
6/Basic Input
and Output
While the Raspberry Pi is, in essence, a very
inexpensive Linux computer, there are a few
things that distinguish it from laptop and
desktop machines that we usually use for
writing email, browsing the Web, or word
processing. One of the main differences
is that the Raspberry Pi can be directly
used in electronics projects, because it has
general-purpose input/output
pins right on
the board, shown in Figure 6-1.
Figure 6-1.
Raspberry Pi’s GPIO pins
Basic Input and Output 89
GSW_RASPI_4ED_FIN.indd 89GSW_RASPI_4ED_FIN.indd 89 10/28/21 10:54 AM10/28/21 10:54 AM

These GPIO pins can be accessed for controlling hardware such as
LEDs, motors, and relays, which are all examples of outputs. As for
inputs, your Raspberry Pi can read the status of buttons, switches,
and dials, or it can read sensors for things like temperature, light,
motion, or proximity (among many others).
With the introduction of Raspberry Pi 1 Model B+, the
number of GPIO pins increased from 26 to 40. If you
have one of the first Pis, you can still carry out the
examples in this chapter as they’ll use only the first 26
pins on the GPIO header.
The best part of having a computer with GPIO pins is that you can
create programs to read the inputs and control the outputs based
on many different conditions, as easily as you’d program your
desktop computer. Unlike a typical microcontroller board, which
also has programmable GPIO pins, the Raspberry Pi has a few
extra inputs and outputs, such as your keyboard, mouse, and
monitor, as well as the Ethernet port, which can act as both an
input and an output. If you have experience creating electronics
projects with microcontroller boards like the Arduino, you have a
few more inputs and outputs at your disposal with the Raspberry
Pi. Best of all, they’re built right in; there’s no need to wire up any
extra circuitry to use them.
Having a keyboard, mouse, and monitor is not the only advantage
that Raspberry Pi has over typical microcontroller boards. There
are a few other key features that will help you in your electronics
projects:
Filesystem
Being able to read and write data in the Linux filesystem will
make many projects much easier. For instance, you can con-
nect a temperature sensor to the Raspberry Pi and have it take
a reading once a second. Each reading can be appended to the
end of a log file, which can be easily downloaded and parsed in a
90 Getting Started with Raspberry Pi
GSW_RASPI_4ED_FIN.indd 90GSW_RASPI_4ED_FIN.indd 90 10/28/21 10:54 AM10/28/21 10:54 AM

graphing program. It can even be graphed right on the Raspberry
Pi itself!
Linux tools
Packaged in the Raspberry Pi’s Linux distribution is a set of core
command-line utilities, which let you work with files, control
processes, and automate many different tasks. These powerful
tools are at your disposal for all of your projects. And because
there is an enormous community of Linux users that depend
on these core utilities, getting help is usually one web search
away. For general Linux help, you can usually find answers at
Stack Overflow (stackoverflow.com). If you have a question
specific to Raspberry Pi, try the Raspberry Pi Forum (www.
raspberrypi.org/phpBB3) or the Raspberry Pi section of Stack
Overflow (raspberrypi.stackexchange.com).
Languages
There are many programming languages out there, and embed-
ded Linux systems like the Raspberry Pi give you the flexibility
to choose whichever language you’re most comfortable with.
The examples in this book use shell scripting and Python, but
they could easily be translated to languages like C, Java, or Perl.
One of the drawbacks to the Raspberry Pi is that there’s
no way to directly connect
analog sensors
, such as light
and temperature sensors. Doing so requires a chip
called an
analog-to-digital converter
or
ADC
. See Chap-
ter 8 for how to read analog sensors using an ADC.
Basic Input and Output 91
GSW_RASPI_4ED_FIN.indd 91GSW_RASPI_4ED_FIN.indd 91 10/28/21 10:54 AM10/28/21 10:54 AM
Using Inputs and Outputs
There are a few supplies that you’ll need in addition to the Raspber-
ry Pi itself to try out these basic input and output tutorials. Many of
these parts you’ll be able to find in hobby electronics component
stores, or they can be ordered online from stores like Maker Shed,
SparkFun, Adafruit, Mouser, or Digi-Key. Here are a few of the basic
parts:
• Solderless breadboard
• LEDs, assorted
• Male-to-male jumper wires
• Female-to-male jumper wires (these are not as common as their
male-to-male counterparts but are needed to connect the Rasp-
berry Pi’s GPIO pins to the breadboard)
• Push button switch
• Resistors, assorted
To make it easier to connect breadboarded components to the
Raspberry Pi’s pins, we also recommend Adafruit’s Pi Cobbler Plus
(adafruit.com/product/2029), which connects all the GPIO pins to
a breadboard with a single ribbon cable. This eliminates the need to
use female-to-male jumper wires.
In Figure 6-2, we’ve labeled each pin according to its default GPIO
signal number, which is how you’ll refer to a particular pin in the
commands you execute and in the code that you write. The unla-
beled pins are assigned to other functions by default.
92 Getting Started with Raspberry Pi
GSW_RASPI_4ED_FIN.indd 92GSW_RASPI_4ED_FIN.indd 92 10/28/21 10:54 AM10/28/21 10:54 AM
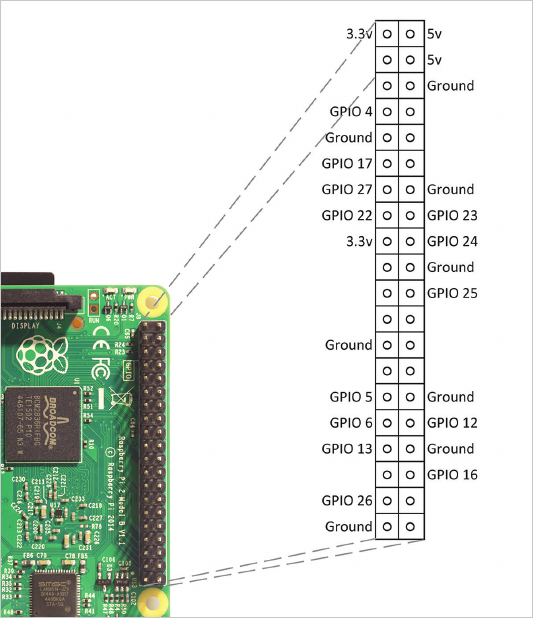
Figure 6-2.
The default GPIO pins on the Raspberry Pi. Some of
the pins left blank could also be used as GPIO, but they have other
possible functions. Unless you need more GPIO pins than are listed
here, steer clear of them for now.
There’s a handy website created by Phil Howard called Raspberry
Pinout (pinout.xyz) which we recommend you bookmark. It’ll show
you the Raspberry Pi’s GPIO pins and has tons of reference infor-
mation about how they can be used.
There are also great products such as RasPiO Portsplus port ID
board (rasp.io), shown in Figure 6-3. It’s a small board that fits
over the GPIO pins for the sole purpose of making the pins easy to
identify.
Basic Input and Output 93
GSW_RASPI_4ED_FIN.indd 93GSW_RASPI_4ED_FIN.indd 93 10/28/21 10:54 AM10/28/21 10:54 AM
..................Content has been hidden....................
You can't read the all page of ebook, please click here login for view all page.