
![]()
exachk
The term “best practice” has long drawn the ire of database professionals. As the saying goes, “They are only best practices until a better one comes along.” The My Oracle Support site contains several exhaustive notes regarding best practices on Exadata. The central “Oracle Exadata Best Practices” support note links to 12 other notes that include best practices for running an Exadata environment. These notes cover many different aspects of managing an Exadata environment: setup, performance, high availability, migration, OLTP, data warehouse, and more. Keeping up with the changes would be a daunting task (MOS note #1274318.1, “Oracle Sun Database Machine Setup/Configuration Best Practices” consumes an astounding 127 pages when printed out). Thankfully, Oracle provides a standard health-check utility, known as exachk, which checks your Exadata system against all of these recommendations.
The exachk script is available from MOS note #1070954.1, and it is generally updated on a quarterly basis. As the checks that it runs are changed with every version, you should always ensure you are on the latest version before running exachk. It initially began as a script specifically written for Exadata environments, but is now the standard script used to validate the configuration of many of Oracle’s other engineered systems. It will perform exhaustive checks against the hardware in the rack, as well as against the Oracle software binaries and databases themselves. exachk is a flexible tool that can be run against a subset of targets, or the system as a whole.
An Introduction to exachk
Once the exachk bundle has been downloaded from My Oracle Support, it is commonly placed in the /opt/oracle.SupportTools/exachk directory on the first compute node in the cluster. This directory should be owned by the operating system account that was used to install the Grid Infrastructure software (typically oracle or grid). This is especially important on Exadata systems that utilize role separation between different databases or pieces of the software stack. On some consolidated environements, administrators may only have access to a single-user account that runs a subset of the databases across the entire cluster. The exachk script utilizes local connections to the database, relying on operating system authentication to run database checks. Imagine that you have two teams of database administrators, each with separate operating system accounts, orahr and oradw. The orahr account is used to run the databases associated with the HR application, and the oradw account is used to run the data warehouse databases. If the administrators only have access to their respective software accounts, they can run a database-level exachk report against the databases that they administer without impacting or accessing any part of the stack that they are restricted from. For a full overview of the system, exachk would either need to be run with root priviliges or the root passwords would need to be entered.
As the check will execute across all of the nodes in the cluster, it is recommended to only install exachk on the first compute node in the cluster. A complete exachk run creates a zip file containing all of the raw data collected across the cluster and an HTML report that can be reviewed for detailed information regarding every check that was run. The reports include a system score, cluster summary, Maximum Availability Architecture scorecard, and full references to all of the checks that were passed or failed during the run.
The bundle available from My Oracle Support includes exachk documentation, sample reports, and a zip file containing the script and the driver files. Unzipping the exachk.zip file will give you everything needed to run exachk against your Exadata cluster. The following example shows how to unzip the archive to the recommended exachk directory:
$ unzip -q exachk.zip -d /opt/oracle.SupportTools/exachk
$ ls -al /opt/oracle.SupportTools/exachk/
total 50036
drwxr-xr-x 3 oracle oinstall      4096 Jul 11 15:31 .
drwxr-xr-x 8 root   root     4096 Jan 26 20:43 ..
drwxrwxrwx 3 oracle oinstall      4096 Jul  2 14:56 .cgrep
-rw-r--r-- 1 oracle oinstall   4114714 Jul  2 14:54 CollectionManager_App.sql
-rw-r--r-- 1 oracle oinstall  39700004 Jul  2 14:56 collections.dat
-rwxr-xr-x 1 oracle oinstall   2209024 Jul  2 14:54 exachk
-rw-r--r-- 1 oracle oinstall      2533 Jul  2 14:56 readme.txt
-rw-r--r-- 1 oracle oinstall   5071756 Jul  2 14:56 rules.dat
-rw-r--r-- 1 oracle oinstall     39612 Jul  2 14:54 sample_user_defined_checks.xml
-rw-r--r-- 1 oracle oinstall      2758 Jul  2 14:54 user_defined_checks.xsd
-rw-r--r-- 1 oracle oinstall       291 Jul  2 14:56 UserGuide.txt
Running exachk
Now that the files have been staged, you are ready to execute your first exachk run. Launch exachk in interactive mode by executing ./exachk as the root user on the first compute node. Upon starting, exachk will first query across the cluster for all running databases. You can choose all of the running databases, none of the running databases, or a subset of the databases. exachk will run configuration and parameter checks against whichever databases you specify when queried. These database checks will be run in parallel across the cluster in order to minimize the time needed to run the script. The following text shows the database selection text from a recent exachk run. As you can see, the default is to check all databases on the cluster:
Searching for running databases . . . . .

. . . . . . . . . . . . . . . . . . . . . . . . . . . . . . . . . . . .
List of running databases registered in OCR
1. ACSTBY
2. BDT
3. BIGDATA
4. dbfs
5. dbm
6. demo
7. All of above
8. None of above

Select databases from list for checking best practices. For multiple databases, select 7 for All or comma separated number like 1,2 etc [1-8][7].
Remember that exachk runs many configuration checks against the hardware and operating system. Because of this, the script requires root privilieges for all of the nodes that will be checked. In fact, Oracle changed its previous recommendation and now asks that exachk be run as root (beginning with version 12.1.0.2.2). Older Exadata systems were automatically configured to allow passwordless access between compute and storage serves as root. That restriction changed in 2014 when Exadata’s configuration scripts were rewritten to remove this functionality. Some customers see this passwordless access as a security risk, so Oracle has removed it from the default configuration. If your system does not have SSH equivalence configured, exachk will need a way to execute with root privileges. When it comes to handling root passwords, there are several options that are provided to users when exachk is run in interactive mode:
- Manually enter the root password for all hosts.
- Utilize sudo privileges if the user account running exachk is not root.
- Skip root checks for the run.
If you choose to enter the root password, it will be saved in memory for the exachk process and not written to disk. The password is only stored in memory during the run—when the script completes, the passwords will no longer be saved. If SSH-user equivalence is already configured between the hosts in the cluster, exachk will not ask for a password at all. When run without SSH-user equivalence, exachk will separately ask for the passwords for the storage cells, compute nodes, and then the InfiniBand switches. If you would prefer to only run the checks against a subset of hosts within the cluster, Table D-1 lists some of the parameters that can be included in the exachk command to customize the run.
Table D-1. exachk Command Parameters
|
Configuration Parameter |
Description |
|---|---|
|
-clusternodes |
Runs checks against the hosts in a comma-separated list. By default, exachk will run checks against all hosts returned by the olsnodes command. |
|
-cells |
Runs checks against the storage servers in a comma-separated list. By default, exachk executes against all hosts listed in the cellip.ora file. |
|
-ibswitches |
Runs checks against the specified InfiniBand switches. By default, exachk executes against the switches listed by the ibswitches command. |
|
-dbnames |
Runs checks against the comma-separated list of databases. |
|
-dball |
Runs checks against all databases running on the cluster. |
|
-dbnone |
Skips all database checks. |
If we wanted to run exachk against none of the database, but execute checks for the first compute node, storage server, and InfiniBand switch, we would start exachk using the following options:
# ./exachk -clusternodes enkx4db01 -cells enkx4cel01 -ibswitches enkx4sw-iba -dbnone
When exachk has completed, it will give the location of the HTML report as well as a compressed archive that contains all of the files generated during the run. Typically, the report file is all that is needed, but the zip file contains other useful information, including patch inventory files for each Oracle software home and the raw data from all of the checks. Figure D-1 shows an example of the summary seen in an exachk report. The exachk HTML report is a comprehensive configuration check of the system. These checks include, but are not limited to the following:
- Operating system kernel versions
- Oracle database homes, patch levels, and databases registered within them
- Exadata software image version
- Maximum Availability Architecture (MAA) comparisons
- Firmware version for all hardware components on each host
- Operating system configuration files
- ASM disk group adherence to best practices
- Oracle clusterware parameters
- Database parameter checks
- Exadata storage server alert checks
- InfiniBand switch configuration
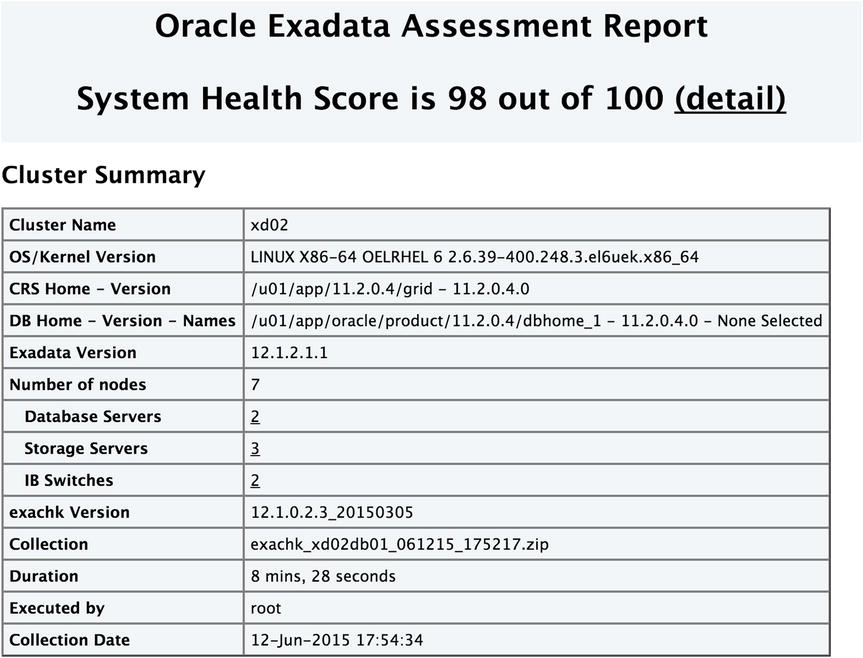
Figure D-1. exachk report summary
The first section includes a system summary and overall score for the Exadata rack. While everyone likes to compare scores, remember that the score itself is not as important as the details surrounding the checks that have failed. Immediately following the system summary is the “Findings Needing Attention” section. This is where you will find any of the important messages in the report. Findings are broken down by host type and include a brief description of the problem, what components failed the check, and a link to further in the report with more details. Clicking that link will take you to a detailed overview of the check: a reference to the My Oracle Support note that describes the finding, what is required to remediate the failure, and, most importantly, the results of that check on each component that was investigated.
After the “Findings Needing Attention” section, you will see the MAA scorecard section. This scorecard validates databases against Oracle’s Maximum Availability Architecture. These checks include looking at each database for Data Guard configurations, whether flashback is enabled, as well as the presence of block corruptions and various database parameters. While many customers will not fully pass the MAA checks, they provide valuable insight into what Oracle recommends from a high availability perspective. Finally, an “Infrastructure and Software Configuration Summary” is provided. This section details the configuration of the hosts, including network settings, ASM storage utilization, and Exadata Storage Server configurations.
Oracle also provides several profiles that can be used with exachk to execute a specific subset of checks. These profiles can be selected by adding the –profile parameter to the command used to launch exachk. Table D-2 defines the profiles available in exachk version 12.1.0.2.4.
Table D-2. exachk Profiles
|
Profile |
Description |
|---|---|
|
asm |
ASM specific checks |
|
clusterware |
Validation checks for Oracle Clusterware |
|
dba |
Database configuration checks |
|
maa |
Maximum Availability Architecture checks and scorecard |
|
storage |
Exadata Storage Server checks |
|
switch |
InfiniBand switch checks |
|
sysadmin |
Checks specific for system administrators |
Saving Passwords for exachk
Many organizations protect the root password for their Exadata racks (as they should). Restrictions on giving out the root password can make running exachk in interactive mode very difficult, as it will request root passwords on every run. Other organizations will not allow DBAs to run commands directly as root. Oracle has resolved these issues by allowing exachk to store the passwords and run in daemon mode. When the host boots up, an administrator must run the exachk script in interactive mode with a specific switch, -d. The prompts will be the same as a normal interactive exachk run, but the checks will not execute. Instead, a process is left running that stores the passwords that were entered. The process does not write any files to disk, so the passwords are only saved in memory. As long as the daemon process is running, administrators can run exachk as many times as they would like without having to enter a single password. If the host reboots, the exachk daemon must be started back up and the passwords entered again. The following shows launching exachk in daemon mode. In this example, only the dbm01 database will be checked by exachk:
# ./exachk -d start

Checking ssh user equivalency settings on all nodes in cluster

Node enkx4db02 is configured for ssh user equivalency for root user
Node enkx4db03 is configured for ssh user equivalency for root user
Node enkx4db04 is configured for ssh user equivalency for root user

Searching for running databases . . . . .
. . . . . . . . . . . . . . . . . . . . . . . . . . . . . . . . . . . . . . . . . .
List of running databases registered in OCR
1. dbm01
2. demo
3. db12c
4. All of above
5. None of above

Select databases from list for checking best practices. For multiple databases, select 4 for All or comma separated number like 1,2 etc [1-5][4].1

Searching out ORACLE_HOME for selected databases.
. . . . . . . . . . . . . . . . . . . . . .

Checking Status of Oracle Software Stack - Clusterware, ASM, RDBMS
. . . . . . . . . . . . . . . . . . . . . . . . . . . . . . . . . . . . . . . . . . . . . . . . . . . . . . . . . . . . . . . . . . . . . . . . . . . .
--------------------------------------------------------------------------------------------
                                                 Oracle Stack Status
--------------------------------------------------------------------------------------------
Host Name  CRS Installed  RDBMS Installed  CRS UP    ASM UP    RDBMS UP  DB Instance Name
--------------------------------------------------------------------------------------------
enkx4db01   Yes             Yes             Yes        Yes      Yes      dbm011
enkx4db02   Yes             Yes             Yes        Yes      Yes      dbm012
enkx4db03   Yes             Yes             Yes        Yes      Yes      dbm013
enkx4db04   Yes             Yes             Yes        Yes      Yes      dbm014
--------------------------------------------------------------------------------------------

Skipping version checks merge as RAT_SKIP_MERGE_INTERNAL is set

Copying plug-ins
. . . . . .
root user equivalence is not setup between enkx4db01 and STORAGE SERVER enkx4cel02 (192.168.12.12).

1. Enter 1 if you will enter root password for each STORAGE SERVER when prompted.
2. Enter 2 to exit and configure root user equivalence manually and re-run exachk.
3. Enter 3 to skip checking best practices on STORAGE SERVER.

Please indicate your selection from one of the above options for STORAGE SERVER[1-3][1]:-1

Is root password same on all STORAGE SERVER[y/n][y]y

Enter root password for STORAGE SERVER :-
Verifying root password.
. . . . . . . . . . . . . . . . . . . . . . . . .

9 of the included audit checks require root privileged data collection on INFINIBAND SWITCH .

1. Enter 1 if you will enter root password for each INFINIBAND SWITCH when prompted
2. Enter 2 to exit and to arrange for root access and run the exachk later.
3. Enter 3 to skip checking best practices on INFINIBAND SWITCH

Please indicate your selection from one of the above options for INFINIBAND SWITCH[1-3][1]:- 1

Is root password same on all INFINIBAND SWITCH ?[y/n][y]n

. Enter root password for INFINIBAND SWITCH enkx4sw-ibb :-
Verifying root password.
. . . . Enter root password for INFINIBAND SWITCH enkx4sw-ibs :-
Verifying root password.
. . . . Enter root password for INFINIBAND SWITCH enkx4sw-iba :-
Verifying root password.
. . .
exachk daemon is started with PID : 53208
exachk was instructed to start daemon mode, as seen by the -d start option. If you would like to run exachk and take advantage of the credentials stored by the exachk daemon, simply add –daemon to your exachk command. Execute exachk with either –d status or –d info if you would like to see information about the running daemon:
# ./exachk -d status
exachk daemon is running. Daemon PID : 53208

# ./exachk -d info

----------------------------------------------------------
exachk daemon information
----------------------------------------------------------

install node = enkx4db01

exachk daemon version = 12.1.0.2.4_20150702

Install location = /tmp/exachk

Started at = Mon Jul 06 21:30:34 CDT 2015
Automating exachk Executions
It is recommended to run exachk monthly in order to assess the overall health of your Exadata system. When using the exachk daemon, it is possible to schedule periodic exachk executions specific to your needs. This auto-run functionality allows for scheduling utility similar to the standard Linux cron utility, with multiple schedules for various needs. Execute exachk and specify the AUTORUN_SCHEDULE parameter to define a schedule. Figure D-2 shows the options that are used to schedule the auto-run functionality.

Figure D-2. AUTORUN_SCHEDULE options
As you can see, the AUTORUN_SCHEDULE is similar to cron, but doesn’t allow you to specify the minute that the exachk script will be executed. When using AUTORUN_SCHEDULE, exachk always executes at the top of the hour. In addition to AUTORUN_SCHEDULE, Oracle recommends to include a NOTIFICATION_EMAIL and PASSWORD_CHECK_INTERVAL. The PASSWORD_CHECK_INTERVAL parameter defines how often the exachk daemon will validate that the passwords stored in memory are still valid. In the event that a password changes, the daemon process will send an e-mail to the address defined by NOTIFICATION_EMAIL. Also, when the scheduled exachk run has completed, the final HTML report will be sent to the address listed in the NOTIFICATION_EMAIL parameter. The following example shows how to create an auto-run schedule that executes every Monday night at 10 p.m.:
# ./exachk -id Monday_Night -set "AUTORUN_SCHEDULE=22 * * 1;
[email protected];
PASSWORD_CHECK_INTERVAL=1"

Created autorun_schedule for ID[Monday_Night]

Created notification_email for ID[Monday_Night]

Created password_check_interval for ID[Monday_Night]
Schedules can be named by using the –id parameter. This allows for multiple schedules with different options or profiles for each schedule. For example, DBAs could get a specific exachk run that runs against a subset of databases, while system administrators could receive an exachk report monthly that outlines the status of the storage cells. Launch exachk with the –get all parameters if you want to see all of the schedules configured with the exachk daemon. In the following example, there are two schedules, Monday_Night and Tuesday_Night. The Tuesday_Night schedule executes the “storage” profile that only checks against the storage servers:
# ./exachk -get all

ID: Monday_Night
----------------------------------
autorun_schedule = 22 * * 1
notification_email = [email protected]
password_check_interval = 1

ID: Tuesday_Night
----------------------------------
autorun_schedule = 22 * * 2
notification_email = [email protected]
password_check_interval = 1
autorun_flags = -profile storage
Finally, you can query the exachk daemon to see when the next automatic run will occur. Querying the exachk daemon and adding the nextautorun argument will declare when the next exachk automatic run will occur, as well as the schedule that will be calling it:
# ./exachk -d nextautorun

ID: Monday_Night

Next auto run starts on Jul 13, 2015 22:00:00
Previous exachk reports will be saved in the directory that the exachk daemon was launched (typically /opt/oracle.SupportTools/exachk). When automatic runs are scheduled, the e-mail notification that is sent will compare the current run to the previous one. The e-mail will give the number of checks passed, failed, and skipped, along with a comparison between the runs. Also, a report detailing the differences between the two runs is created and referenced in the e-mail. If further investigation is needed, this report must be downloaded from the server.
Summary
Best practices are not static recommendations that are set in stone once they are written. Oracle understands that Exadata is a moving target from this perspective. Whether recommendations change due to more powerful hardware and software being developed or due to issues discovered with existing software, the tool that is used to validate the environment must change as well. While certainly not being a tool that will catch every possible issue before it occurs, exachk is able to take advantage of the standardized nature of Exadata to run a host of validation checks that would take months to develop on a build-your-own system.