
![]()
Patching Exadata
One of the biggest drawbacks of running a custom-built Oracle system is that it may be a one-of-a-kind configuration. Even in environments with tight standards, it is very difficult to maintain consistency between hardware, firmware, and operating system configurations. Most organizations do not have the time needed to ensure that every build has the exact same Fibre Channel HBAs, internal RAID controllers, and network cards running the same firmware level, much less go through a testing plan to upgrade each of these components in a single maintenance window. Over the course of a year, it is atypical to find exactly matching components all the way across the stack. With Exadata, Oracle has a standard build that provides the exact same hardware, firmware, and operating system configuration for each release. Every Exadata customer with an X3-2 rack running storage server version 11.2.3.3.0 has an LSI RAID controller running version 12.12.0-178, Sun Flash F40 cards with firmware version UI5P, Oracle Unbreakable Kernel version 2.6.39-400.126.1, and so on. If an update is needed, Oracle releases a single patch that upgrades all of those components in one shot. This standardization allows Exadata administrators to apply bug fixes and firmware updates that most system administrators would not be willing to apply for fear of unexpected changes to their unique configuration. Testing these changes is much easier on Exadata due to the standardized configurations within each generation. This chapter will look at Exadata patching in depth, starting with the various types of patches to be applied on Exadata, the ways each of the patches are applied, and options to make patching as painless as possible.
Before any patches should be applied, check Oracle support note number 888828.1. This note is a living document for Oracle Exadata patching and is known as the patching note or, more formally, Exadata Database Machine and Exadata Storage Server Supported Versions. Covering software versions 11g and 12c, this note encompasses the entire scope of Exadata patching, including references to various kernel and firmware versions for each storage server software release, links to information regarding patches for other Oracle products running on Exadata such as Database Filesystem (DBFS), and a full history of all major patch releases for the product. When looking for important updates, check the “Latest Releases and Patching News” section of the note, as shown in Figure 16-1.

Figure 16-1. Latest releases and patching news*////
Types of Exadata Patches
Exadata patches can be broken down in to two main categories—Exadata storage server patches and Quarterly Database Patches for Exadata. The Exadata storage server patches contain many different components, all bundled in to one single patch. In addition to the version of cellsrv running on the storage servers, Exadata storage server patches contain operating system updates, new versions of the Linux kernel, and firmware updates for many of the hardware components inside the compute and storage servers. The Exadata storage server patch level is commonly referred to as the version of software running on the Exadata. An example version of a storage server patch release is 11.2.3.3.1, as illustrated in Figure 16-2. This version tells the major and minor release versions for both database compatibility and the cellsrv version. Keep in mind that these rules are not hard and fast, as version 11.2.3.3.1 does support 12c databases but does not contain the ability to perform offload processing for 12c—that functionality is introduced in a 12c version of the cellsrv software.

Figure 16-2. Exadata storage server version numbering
Typically, Oracle releases two or three Exadata storage server patches throughout the calendar year. As with most software releases, changes to the final digit are maintenance releases, which may only contain a few bug fixes or firmware updates. Changes to the cell major or minor release traditionally include new features at the storage server level. Examples of Exadata storage server patches including new features are Exadata Smart Flash log (11.2.2.4.0), write-back Flash Cache (11.2.3.2.0), and Flash Cache compression (11.2.3.3.0).
While the name may imply that an Exadata storage server patch is only applied to the storage servers, there are also corresponding patches that are applied to the compute nodes and (in some cases) InfiniBand switches. Because the Exadata storage server patches include operating system and kernel updates, there is an additional component that must be applied to the compute nodes. This ensures that all components in the stack are running the same version of the Linux kernel, which now includes the OpenFabrics Alliance (OFA) drivers for the InfiniBand stack. Starting with Exadata storage server version 11.2.3.3.0, Oracle began to include any firmware updates for the InfiniBand switches as well in the Exadata storage server patch. This helped to streamline the process of applying patches to those components, even though updates are typically few and far between.
In addition to the Exadata storage server patches, Oracle releases a Quarterly Database Patch for Exadata, or QDPE. The QDPE is released in the same time frame as the quarterly PSU (January, April, July, October). Beginning with Oracle Database 12c, a single PSU is issued for both Exadata and non-Exadata platforms. Previously, there was a separate patch release for Exadata. In addition, Oracle releases monthly interim “bundle patches” for the latest database release, allowing customers to have fixes for any critical bugs that may need to be fixed outside of the standard quarterly release cycle. While these patches were applied as standard practice with older versions (Exadata administrators running 11.2.0.1 will remember monthly bundle patches fondly), Oracle recommends customers to stick with the QDPE releases. The monthly bundle patches should only be applied if specific bugs are affecting the system. The term “bundle patch” was used because it is just that—a bundle of patches released together. QDPEs and bundle patches contain two separate patches—one for the database component and one for cluster ready services. Before 11.2.0.4, there was also a diskmon component, but that has since been rolled into the cluster-ready services patch.
Quarterly Database Patch for Exadata
There are several different components of the Exadata “stack” that should be considered when looking at Exadata patching. The first component is what most database administrators are familiar with—the Oracle binaries that comprise the various Oracle homes on each of the compute nodes. In Oracle Database 11g, the Quarterly Database Patch for Exadata (QDPE) is the equivalent to the standard quarterly Patch Set Update (PSU) that is released by Oracle. This patch is applied to both the database and grid infrastructure homes on each compute node.
![]() Note The QDPE has been retired in Oracle Database 12c. Database administrators need only apply the quarterly Grid Infrastructure Patch Set Update (PSU) for Engineered Systems and Database In-Memory. This allows patches for the Oracle stack on Exadata to fall in line with a normal RAC system running Oracle Database 12c.
Note The QDPE has been retired in Oracle Database 12c. Database administrators need only apply the quarterly Grid Infrastructure Patch Set Update (PSU) for Engineered Systems and Database In-Memory. This allows patches for the Oracle stack on Exadata to fall in line with a normal RAC system running Oracle Database 12c.
Because the QDPE is similar to the PSU in structure and contents, patches are applied using the same tools. Oracle’s patching utility, OPatch, does all of the heavy lifting. In order to find out what QDPE is installed on the system, administrators can use OPatch. OPatch has an lspatches command, which easily shares this information:
[oracle@enkx3db01 ~]$ $ORACLE_HOME/OPatch/opatch lspatches
Patch description:  "ACFS Patch Set Update : 11.2.0.4.2 (18031731)"
Patch description:  "CRS PATCH FOR EXADATA (APR2014 - 11.2.0.4.6) : (18497417)"
Patch description:  "DATABASE PATCH FOR EXADATA (APR2014 - 11.2.0.4.6) : (18293775)"
In the above example, this 11.2.0.4 home has the April 2014 QDPE applied. From the version number, you can derive that it is bundle patch 6 for 11.2.0.4. ACFS patch #18031731 is included but has not been updated since bundle patch 2 (there were apparently no necessary bug fixes since then). The patch numbers listed are for each of the components. All that needs to be applied is the single QDPE, which can be found in the Exadata supported versions note.
Applying a QDPE in Place
Applying a QDPE is no different than applying a quarterly PSU on any other Oracle RAC system running version 11.2 or higher. Due to the complexity of patching a Grid Infrastructure home in version 11.2, Oracle introduced the auto functionality to the OPatch utility. Because the Grid Infrastructure home itself is owned by the root account, the software owner cannot create new directories without going through an unlock process. There are also prepatch and postpatch scripts that must be run for each database home. Finally, there are several patches contained within a single bundle patch or PSU that must be applied. Using OPatch’s auto feature, database administrators need only issue a single OPatch command to patch all Oracle homes on a single node. This allows for true rolling patches that are applied to vertical silos rather than horizontally across the cluster. Figure 16-3 shows a list of the commands run by the OPatch utility in auto mode for an 11gR2 cluster.

Figure 16-3. Steps run by OPatch auto
Before applying a QDPE, the OPatch utility should be updated in each Oracle home that will receive the patch. Minimum version requirements can be found in the README for the actual patch, but it is generally a good idea to download the latest version of OPatch (patch 6880880) from My Oracle Support and stage it in each Oracle home directory. When the QDPE is applied, a minimum version check will be performed. You should do this beforehand in order to save time during a maintenance window. It is safe to stage the OPatch binaries and run prerequisite checks while cluster resources are still running on the system.
Because the OPatch auto functionality runs scripts that require root privileges, the opatch command must be invoked with those privileges. This can either be performed directly as the root user or via the sudo command. As the software owner, unzip the patch file. It is recommended to unzip this file as the software owner to ensure that all required access is allowed. In the case of a role separated environment, with separate grid and Oracle users, ensure that the common oinstall group has permissions on all files. Change to the directory where the patches are unzipped and run the command opatch auto. On 12cR1 clusters, the command to issue is opatchauto apply. The command can be run with either the full path or via environment variables if $ORACLE_HOME is set. If multiple Oracle homes are installed, the home to be patched must be specified with the –oh switch. When running in auto mode, the OPatch utility checks with the Oracle Cluster Registry (OCR) to determine which Oracle homes contain cluster-managed resources. OPatch will skip a home if an Oracle home does not have any targets registered to it unless directly specified with the –oh switch. The exercise below breaks down the process of applying a QDPE on an 11gR2 Exadata cluster.
APPLYING A QDPE IN PLACE
This exercise demonstrates the application of the July 2014 QDPE for 11.2.0.4 (patch #18840215) using the in-place method. This example demonstrates installing this patch on an Exadata cluster containing Oracle homes running 11.2.0.3 and 11.2.0.4. Because multiple homes are installed, opatch auto –oh must be used to specify the database homes to be patched.
- Download patch 18840215 and unzip in directory /u01/app/oracle/patches
- As the Oracle user, generate an Oracle Configuration Manager response file. In a role-separated environment, create the file in a directory that both accounts can access.
$ /u01/app/11.2.0.4/grid/OPatch/ocm/bin/emocmrsp
OCM Installation Response Generator 10.3.4.0.0 - Production
Copyright (c) 2005, 2010, Oracle and/or its affiliates. All rights reserved.

Provide your email address to be informed of security issues, install and
initiate Oracle Configuration Manager. Easier for you if you use your My
Oracle Support Email address/User Name.
Visit http://www.oracle.com/support/policies.html for details.
Email address/User Name:

You have not provided an email address for notification of security issues.
Do you wish to remain uninformed of security issues ([Y]es, [N]o) [N]:  y
The OCM configuration response file (ocm.rsp) was successfully created. - Unzip the patch file as the Oracle account.
$ unzip -oq p18840215_112040_Linux-x86-64.zip -d /u01/app/oracle/patches - On the first compute node as the root user, run opatch auto, specifying the Grid Infrastructure home. When asked for the OCM response file, enter the full path to the file created in step 2.
# /u01/app/11.2.0.4/grid/OPatch/opatch auto -oh /u01/app/11.2.0.4/grid
Executing /u01/app/11.2.0.4/grid/perl/bin/perl /u01/app/11.2.0.4/grid/OPatch/crs/patch11203.pl -patchdir /u01/app/oracle/patches -patchn 18840215 -oh /u01/app/11.2.0.4/grid -paramfile /u01/app/11.2.0.4/grid/crs/install/crsconfig_params

This is the main log file: /u01/app/11.2.0.4/grid/cfgtoollogs/opatchauto2014-08-23_15-50-24.log

This file will show your detected configuration and all the steps that opatchauto attempted to do on your system:
/u01/app/11.2.0.4/grid/cfgtoollogs/opatchauto2014-08-23_15-50-24.report.log

2014-08-23 15:50:24: Starting Clusterware Patch Setup
Using configuration parameter file: /u01/app/11.2.0.4/grid/crs/install/crsconfig_params
OPatch  is bundled with OCM, Enter the absolute OCM response file path:
/home/oracle/ocm.rsp

Stopping CRS...
Stopped CRS successfully

patch /u01/app/oracle/patches/18840215/18825509  apply successful for home  /u01/app/11.2.0.4/grid
patch /u01/app/oracle/patches/18840215/18522515  apply successful for home  /u01/app/11.2.0.4/grid
patch /u01/app/oracle/patches/18840215/18522514  apply successful for home  /u01/app/11.2.0.4/grid

Starting CRS...
Using configuration parameter file: /u01/app/11.2.0.4/grid/crs/install/crsconfig_params
Installing Trace File Analyzer
CRS-4123: Oracle High Availability Services has been started.

opatch auto succeeded. - On the first compute node as the root user, run opatch auto, specifying the 11.2.0.4 database homes to be patched. If multiple homes are to be patched, use a comma-separated list.
# /u01/app/11.2.0.4/grid/OPatch/opatch auto -oh /u01/app/oracle/product/11.2.0.4/dbhome_1
Executing /u01/app/11.2.0.4/grid/perl/bin/perl /u01/app/11.2.0.4/grid/OPatch/crs/patch11203.pl -patchdir /u01/app/oracle/patches -patchn 18840215 -oh /u01/app/oracle/product/11.2.0.4/dbhome_1 -paramfile /u01/app/11.2.0.4/grid/crs/install/crsconfig_params

This is the main log file: /u01/app/11.2.0.4/grid/cfgtoollogs/opatchauto2014-09-04_09-01-55.log

This file will show your detected configuration and all the steps that opatchauto attempted to do on your system:
/u01/app/11.2.0.4/grid/cfgtoollogs/opatchauto2014-09-04_09-01-55.report.log

2014-09-04 09:01:55: Starting Clusterware Patch Setup
Using configuration parameter file: /u01/app/11.2.0.4/grid/crs/install/crsconfig_params
OPatch  is bundled with OCM, Enter the absolute OCM response file path:
/home/oracle/ocm.rsp

Stopping RAC /u01/app/oracle/product/11.2.0.4/dbhome_1 ...
Stopped RAC /u01/app/oracle/product/11.2.0.4/dbhome_1 successfully

patch /u01/app/oracle/patches/18840215/18825509  apply successful for home  /u01/app/oracle/product/11.2.0.4/dbhome_1
patch /u01/app/oracle/patches/18840215/18522515/custom/server/18522515  apply successful for home  /u01/app/oracle/product/11.2.0.4/dbhome_1

Starting RAC /u01/app/oracle/product/11.2.0.4/dbhome_1 ...
Started RAC /u01/app/oracle/product/11.2.0.4/dbhome_1 successfully

opatch auto succeeded. - Repeat steps 1-5 on the remaining compute nodes, one at a time.
- Run the catbundle.sql script as the Oracle user on any newly patched database that is not a data guard physical standby. Physical standby databases will receive the catalog update when the script is run on the primary database. Only run the script against one instance in a database. Note that in Oracle database 12c, the catbundle.sql script has been replaced with the datapatch script. For more information, consult the specific patch README.
$ cd $ORACLE_HOME
$ sqplus / as sysdba
SYS@dbm1> @?/rdbms/admin/catbundle.sql exa apply
After all of the nodes have been patched, there is one final step that must be run against all databases with newly patched homes. On any database that is not a data guard physical standby, run the catbundle.sql script from SQL*Plus. The script must be run from the Oracle home due to additional scripts that are called out in $ORACLE_HOME/rdbms/admin. Running from outside of the Oracle home directory will prevent those scripts from being properly called. Databases running 12cR1 will use the datapatch script. For more information on datapatch, consult the specific patch README.
Applying a QDPE by Cloning Homes
In order to save downtime associated with patching, it is possible to clone an Oracle home and apply patches in an out-of-place upgrade. While less commonly used, this method can save time by prebuilding an Oracle home with the new patches applied and then moving the database instances to it. While this process does reduce the amount of time needed to put a patch in place, it requires additional filesystem space and contains more steps than an in-place QDPE application. This process is useful when multiple database instances share a home and only a subset of those databases require a patch upgrade or one off fix. My Oracle Support note #1136544.1 details this process for 11gR2 Oracle homes. The following exercise will detail the process for cloning an 11.2.0.4 database home and applying the July 2014 QDPE.
APPLYING A QDPE OUT OF PLACE
This exercise demonstrates the application of the July 2014 QDPE for 11.2.0.4 (patch #18840215) using the out of place method, with /u01/app/oracle/product/11.2.0.4/dbhome_1 as the original and /u01/app/oracle/product/11.2.0.4/db_july2014 as the new home.
- As the Oracle user, create the new Oracle home and clone the existing home using the tar command. Any errors about the nmb, nmhs, and nmo executables can be ignored.
$ export ORACLE_HOME=/u01/app/oracle/product/11.2.0.4/db_july2014
$ dcli -g ~/dbs_group -l oracle mkdir -p $ORACLE_HOME
$ dcli -g ~/dbs_group -l oracle "cd /u01/app/oracle/product/11.2.0.4/dbhome_1;
ar cf - . | ( cd $ORACLE_HOME ; tar xf - )" - After the home has been cloned, use the clone.pl script to complete the clone and relink the Oracle home.
$ export ORACLE_HOME=/u01/app/oracle/product/11.2.0.4/db_july2014
$ dcli -g ~/dbs_group -l oracle "cd $ORACLE_HOME/clone/bin;
./clone.pl ORACLE_HOME=$ORACLE_HOME
ORACLE_HOME_NAME=OraDB_home_july2014 ORACLE_BASE=/u01/app/oracle" - On each compute node, update the inventory to reflect the new Oracle home.
$ export ORACLE_HOME=/u01/app/oracle/product/11.2.0.4/db_july2014
$ $ORACLE_HOME/oui/bin/runInstaller
-updateNodeList ORACLE_HOME=$ORACLE_HOME "CLUSTER_NODES={db01,db02}" - Relink the database executable for RDS. Note that the Oracle installer will relink a new home for RDS upon installation, but this method does not perform that relink automatically.
$ export ORACLE_HOME=/u01/app/oracle/product/11.2.0.4/db_july2014
$ dcli -g ~/dbs_group -l oracle "cd $ORACLE_HOME/rdbms/lib;
ORACLE_HOME=$ORACLE_HOME make -f ins_rdbms.mk ipc_rds ioracle" - Run the root.sh script to complete the upgrade.
# export ORACLE_HOME=/u01/app/oracle/product/11.2.0.4/db_july2014
# dcli -g ~/dbs_group -l root $ORACLE_HOME/root.sh - Verify that the version of OPatch matches the minimum version required by the QDPE.
$ export ORACLE_HOME=/u01/app/oracle/product/11.2.0.4/db_july2014
$ dcli –l oracle –g ~/dbs_group $ORACLE_HOME/OPatch/opatch version - Apply the patch to the new home. Download patch 18840215 and place in directory /u01/app/oracle/patches.
- As the Oracle user, generate an Oracle Configuration Manager response file. In a role-separated environment, create the file in a directory that both accounts can access.
$ /u01/app/11.2.0.4/grid/OPatch/ocm/bin/emocmrsp
OCM Installation Response Generator 10.3.4.0.0 - Production
Copyright (c) 2005, 2010, Oracle and/or its affiliates.  All rights reserved.

Provide your email address to be informed of security issues, install and
initiate Oracle Configuration Manager. Easier for you if you use your My
Oracle Support Email address/User Name.
Visit http://www.oracle.com/support/policies.html for details.
Email address/User Name:

You have not provided an email address for notification of security issues.
Do you wish to remain uninformed of security issues ([Y]es, [N]o) [N]:  y
The OCM configuration response file (ocm.rsp) was successfully created. - Unzip the patch file as the Oracle account.
$ unzip -oq p18840215_112040_Linux-x86-64.zip -d /u01/app/oracle/patches - On the first compute node as the root user, run opatch auto, specifying the new 11.2.0.4 database home to be patched.
# /u01/app/11.2.0.4/grid/OPatch/opatch auto -oh /u01/app/oracle/product/11.2.0.4/db_july2014
Executing /u01/app/11.2.0.4/grid/perl/bin/perl /u01/app/11.2.0.4/grid/OPatch/crs/patch11203.pl -patchdir /u01/app/oracle/patches -patchn 18840215 -oh /u01/app/oracle/product/11.2.0.4/ db_july2014 -paramfile /u01/app/11.2.0.4/grid/crs/install/crsconfig_params

This is the main log file: /u01/app/11.2.0.4/grid/cfgtoollogs/opatchauto2014-09-04_09-01-55.log

This file will show your detected configuration and all the steps that opatchauto attempted to do on your system:
/u01/app/11.2.0.4/grid/cfgtoollogs/opatchauto2014-09-04_09-01-55.report.log

2014-09-04 09:01:55: Starting Clusterware Patch Setup
Using configuration parameter file: /u01/app/11.2.0.4/grid/crs/install/crsconfig_params
OPatch  is bundled with OCM, Enter the absolute OCM response file path:
/home/oracle/ocm.rsp

Stopping RAC /u01/app/oracle/product/11.2.0.4/ db_july2014 ...
Stopped RAC /u01/app/oracle/product/11.2.0.4/ db_july2014 successfully

patch /u01/app/oracle/patches/18840215/18825509  apply successful for home  /u01/app/oracle/product/11.2.0.4/ db_july2014
patch /u01/app/oracle/patches/18840215/18522515/custom/server/18522515  apply successful for home  /u01/app/oracle/product/11.2.0.4/ db_july2014

Starting RAC /u01/app/oracle/product/11.2.0.4/ db_july2014 ...
Started RAC /u01/app/oracle/product/11.2.0.4/ db_july2014 successfully

opatch auto succeeded. - Repeat steps 7-10 on the remaining compute nodes, one at a time.
- Ensure that the database is using the old Oracle home.
$ srvctl config database -d dbm -a
Database unique name: dbm
Database name: dbm
Oracle home: /u01/app/oracle/product/11.2.0.4/dbhome_1
Oracle user: oracle
Spfile: +DATA/dbm/spfiledbm.ora
Domain:
Start options: open
Stop options: immediate
Database role: PRIMARY
Management policy: AUTOMATIC
Server pools: dbm
Database instances: dbm1,dbm2
Disk Groups: DATA,RECO
Mount point paths:
Services:
Type: RAC
Database is enabled
Database is administrator managed - Relocate the database using the srvctl utility.
$ srvctl modify database -d dbm -o /u01/app/oracle/product/11.2.0.4/db_july2014 - Modify instance and database entries in the /etc/oratab file on each node.
dbm1:/u01/app/oracle/product/11.2.0.4/ db_july2014:N                # line added by Agent
dbm:/u01/app/oracle/product/11.2.0.4/ db_july2014:N # line added by Agent - Perform a rolling restart of the database instances, one at a time.
$ srvctl stop instance -d dbm -i dbm1
$ srvctl start instance -d dbm -i dbm1
$ srvctl stop instance -d dbm -i dbm2
$ srvctl start instance -d dbm -i dbm2 - Run the catbundle.sql script as the Oracle user on any newly patched database that is not a data guard physical standby. Physical standby databases will receive the catalog update when the script is run on the primary database. Only run the script against one instance in a database.
$ cd $ORACLE_HOME
$ sqplus / as sysdba
SYS@dbm1> @?/rdbms/admin/catbundle.sql exa apply
As you can see, the process for applying a QDPE out of place can include many more steps than a traditional in-place patch application. This method is typically reserved for cases where multiple database instances share a home and only a subset of those databases require a patch upgrade or one-off fix.
Exadata Storage Server Patches
The term Exadata storage server patch encompasses a wide breadth of components that reside throughout the stack of an Exadata environment. These patches contain updates for not only the storage servers, but also the compute nodes and InfiniBand switches. In addition to new features and operating system upgrades, updates may include firmware for the RAID controller, flash cards, BIOS, ILOM, and even the disk drives themselves.
Before digging into how the patches are applied, it is good to get an understanding of the architecture of the storage server operating system. Because Exadata storage servers run Oracle Enterprise Linux, Oracle has been able to tailor the operating system layout with patching in mind. On an Exadata storage server, the first two hard disks have a small amount of space carved off to house the operating system. These partitions are then used to build software RAID devices using the standard Linux kernel md RAID driver:
[root@enkx3cel01 ~]# parted /dev/sda print

Model: LSI MR9261-8i (scsi)
Disk /dev/sda: 3000GB
Sector size (logical/physical): 512B/512B
Partition Table: gpt

Number  Start   End     Size    File system  Name     Flags
 1      32.8kB  123MB   123MB   ext3         primary  raid
 2      123MB   132MB   8225kB  ext2         primary
 3      132MB   2964GB  2964GB               primary
 4      2964GB  2964GB  32.8kB               primary
 5      2964GB  2975GB  10.7GB  ext3         primary  raid
 6      2975GB  2985GB  10.7GB  ext3         primary  raid
 7      2985GB  2989GB  3221MB  ext3         primary  raid
 8      2989GB  2992GB  3221MB  ext3         primary  raid
 9      2992GB  2994GB  2147MB  linux-swap   primary  raid
10      2994GB  2995GB  732MB                primary  raid
11      2995GB  3000GB  5369MB  ext3         primary  raid

Information: Don't forget to update /etc/fstab, if necessary.

[root@enkx3cel01 ~]# cat /proc/mdstat
Personalities : [raid1]
md4 : active raid1 sda1[0] sdb1[1]
      120384 blocks [2/2] [UU]

md5 : active raid1 sda5[0] sdb5[1]
      10485696 blocks [2/2] [UU]

md6 : active raid1 sda6[0] sdb6[1]
      10485696 blocks [2/2] [UU]

md7 : active raid1 sda7[0] sdb7[1]
      3145664 blocks [2/2] [UU]

md8 : active raid1 sda8[0] sdb8[1]
      3145664 blocks [2/2] [UU]

md2 : active raid1 sda9[0] sdb9[1]
      2097088 blocks [2/2] [UU]

md11 : active raid1 sda11[0] sdb11[1]
      5242752 blocks [2/2] [UU]

md1 : active raid1 sda10[0] sdb10[1]
      714752 blocks [2/2] [UU]

unused devices: <none>

[root@enkx3cel01 ~]# df -h
Filesystem            Size  Used Avail Use% Mounted on
/dev/md6              9.9G  6.7G  2.8G  72% /
tmpfs                  32G     0   32G   0% /dev/shm
/dev/md8              3.0G  797M  2.1G  28% /opt/oracle
/dev/md4              114M   51M   58M  47% /boot
/dev/md11             5.0G  255M  4.5G   6% /var/log/oracle
Looking at the output of /proc/mdstat, there are a total of eight RAID devices, but only five are mounted by the operating system at a given time. Looking closer at the sizes of each device, /dev/md5 and /dev/md6 have matching sizes, along with /dev/md7 and /dev/md8. This becomes apparent when running the imageinfo command to see what version of the Exadata storage server software is running:
[root@enkx3cel01 ~]# imageinfo

Kernel version: 2.6.39-400.126.1.el5uek #1 SMP Fri Sep 20 10:54:38 PDT 2013 x86_64
Cell version: OSS_11.2.3.3.0_LINUX.X64_131014.1
Cell rpm version: cell-11.2.3.3.0_LINUX.X64_131014.1-1

Active image version: 11.2.3.3.0.131014.1
Active image activated: 2013-12-22 23:48:05 -0600
Active image status: success
Active system partition on device: /dev/md6
Active software partition on device: /dev/md8

In partition rollback: Impossible

Cell boot usb partition: /dev/sdm1
Cell boot usb version: 11.2.3.3.0.131014.1

Inactive image version: 11.2.3.2.1.130109
Inactive image activated: 2013-12-22 22:44:01 -0600
Inactive image status: success
Inactive system partition on device: /dev/md5
Inactive software partition on device: /dev/md7

Boot area has rollback archive for the version: 11.2.3.2.1.130109
Rollback to the inactive partitions: Possible
The imageinfo command gives a wealth of information about the storage server in question. From looking at the “Active image version” line, we can see that it is currently running release 11.2.3.3.0. The / filesystem is listed in the “Active system partition on device” line, and the /opt/oracle partition is defined in the “Active software partition on device” line. The lines that begin with “Inactive” refer to the previous version of the Exadata storage server software that was installed on this cell. As you can see, the system and software partitions are located on /dev/md5 and /dev/md7, respectively. This reflects the out-of-place patching mechanism used by the Exadata storage server process. In the storage server shown above, /dev/md6 and /dev/md8 are used for the operating system. When a new patch is applied, the /dev/md5 and /dev/md7 devices will be wiped out and receive a new image of the operating system. After the image has been deployed and the newly imaged devices will be made active, the storage server will reboot and use the new image, leaving the former image untouched. This allows a rollback of the patch either from the patch administrator or an automatic rollback in the event of a failure during the patching cycle.
Applying an Exadata Storage Server Patch
Exadata storage server patches are applied using the patchmgr utility. Unlike the opatch utility, which is downloaded separately from the actual patch files, patchmgr is included with each release. This utility relies on SSH and the dcli utility to patch all storage servers in a cluster with a single command. Because of this, the user who is running patchmgr must have passwordless access to the root account on all storage servers during the patch. Because of these requirements, storage server patches are typically applied from one of the compute nodes in the cluster, but they can also be applied from any system with SSH keys set up. This could be either a host running Oracle Enterprise Manager or Oracle’s platinum services gateway server. SSH keys can be temporarily configured and removed using the -k and --unkey options in dcli. There are two main modes to the patchmgr utility—a prerequisite check and the actual patch. Even though the patch mode runs the prerequisite check, it is recommended to run the prerequisite check first in a separate run.
Before upgrading a storage server, the patch must be downloaded and unpacked on the host that will be driving the patch session. In addition to the patch itself, it is important to check MOS note #888828.1 for any additional plug-ins that are recommended. Because the patch application involves several reboots, it must be run outside of the hosts that are actually being patched. The patch archive contains several scripts including patchmgr, supporting shell scripts to obtain status updates, and an ISO file that contains the entire Exadata storage server operating system. Releases beyond 11.2.3.3.0 also may contain an update for the InfiniBand switches, which will be discussed later. Before running the patchmgr script, a cell_group file must either be created or copied into the patch directory. This file contains the hostnames of the storage servers that are going to be patched by patchmgr.
Now that the patch contents have been unpacked, it is important to run the prerequisite check to ensure that the system is ready to be patched. The syntax to run patchmgr in prerequisite mode is the following:
patchmgr –cells cell_group –patch_check_prereq
The output below shows the output of a prerequisite check. This check can be run while Clusterware is up and running. It will verify that the current image status of the storage servers reports successful, that there is sufficient disk space for the upgrade, and that there are no open alerts on the storage servers. This is very important to ensure that a failed patch does not leave any of the storage servers in an unbootable state:
[root@enkx3db01 patch_11.2.3.3.1.140708]# ./patchmgr -cells cell_group -patch_check_prereq

2014-10-22 18:37:41 -0500        :Working: DO: Initialize files, check space and state of cell services. Up to 1 minute ...

2014-10-22 18:38:00 -0500        :SUCCESS: DONE: Initialize files, check space and state of cell services.
2014-10-22 18:38:00 -0500        :Working: DO: Copy, extract prerequisite check archive to cells. If required start md11 mismatched partner size correction. Up to 40 minutes ...

2014-10-22 18:38:14 -0500        :SUCCESS: DONE: Copy, extract prerequisite check archive to cells. If required start md11 mismatched partner size correction.
2014-10-22 18:38:14 -0500        :Working: DO: Check prerequisites on all cells. Up to 2 minutes ...
2014-10-22 18:39:17 -0500        :SUCCESS: DONE: Check prerequisites on all cells.
2014-10-22 18:39:17 -0500        :Working: DO: Execute plugin check for Patch Check Prereq ...
2014-10-22 18:39:17 -0500 :INFO: Patchmgr plugin start: Prereq check for exposure to bug 17854520 v1.1. Details in logfile /tmp/patch_11.2.3.3.1.140708/patchmgr.stdout.
2014-10-22 18:39:17 -0500 :INFO: This plugin checks dbhomes across all nodes with oracle-user ssh equivalence, but only for those known to the local system. dbhomes that exist only on remote nodes must be checked manually.
2014-10-22 18:39:17 -0500 :SUCCESS: No exposure to bug 17854520 with non-rolling patching
2014-10-22 18:39:17 -0500        :SUCCESS: DONE: Execute plugin check for Patch Check Prereq.
At this point, Clusterware is either left running (for a rolling patch) or taken down (for an offline patch). Either way, the patchmgr script is called in the same fashion. The syntax to apply the patch is the following:
./patchmgr –cells cell_group –patch [-rolling] [-smtp_from "address"] [-smtp_to "address1 address2"]
Just like with the prerequisite check, the file containing the list of cells to patch is included. The “-patch” switch tells patchmgr to perform a patch operation. Adding “-rolling” to the command will instruct patchmgr to apply the patch to each of the storage servers in a rolling fashion.
The final switches enable e-mail alerting for each portion of the patching process. Enabling the e-mail option will send alerts when patchmgr starts, along with updates when the patch state for a storage server changes. These states can be any of “Started,” “Patching,” “Waiting,” “Succeeded,” or “Failed.” This can be useful during rolling patches, which may run for a long time. Separate multiple e-mail addresses with a space when specifying the smtp_to switch. Figure 16-4 shows a sample email that is sent from patchmgr. You can see that it has completed patching the first storage server, and is beginning to patch host dm01cel02.
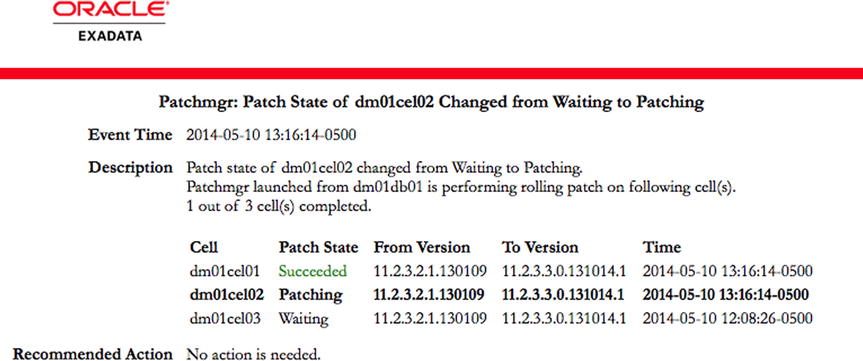
Figure 16-4. Exadata storage server patch alerts
It is important to run patchmgr using a utility such as screen or VNC due to the potential length of a single run. If a patch is applied using the rolling method, patchmgr will not complete until all storage servers have completed the patch process.
After patchmgr has completed successfully and all storage servers are upgraded, it is important to clean up the installation on the storage servers. This is done with the “–cleanup” switch. The full syntax is as follows:
./patchmgr –cells cell_group -cleanup
Storage Server Patching In Depth
There are three distinct phases to a storage server patch: the prerequisite phase, the pre-reboot phase, and the reboot phase. As mentioned previously, the prerequisite phase is executed whenever patchmgr is run, regardless of the mode. During this phase, patchmgr will check for open alerts, available space, and general health of the storage server. The prerequisite phase runs in parallel across all of the storage servers whether the patch is being applied rolling or with a full outage. This is the quickest of all of the phases.
The pre-reboot phase also occurs in parallel, regardless of the patching mode. During the pre-reboot phase, several additional checks are run on the storage servers. First, the file containing the operating system image is copied to all of the storage servers, and the recovery USB media is updated to the latest copy via the make_cellboot_usb.sh script. This step is very important because the USB recovery media may be called upon in the event of a failed patch. After the recovery media is recreated, patchmgr will instruct the cells to destroy the inactive operating system and software partitions and recreate them. The contents of the new operating system image are then copied to the newly created partitions, and the BIOS boot order is validated. Once these steps have completed, the patch will enter a standby state. Once all of the storage servers have completed the pre-reboot phase, patchmgr moves on to the reboot phase. It is at this point where the actions for rolling and non-rolling patches differ.
For non-rolling patches, all storage servers execute the reboot phase in parallel. Because Clusterware must be shut down during a non-rolling patch, there are no negative consequences in applying the patch to all storage servers at once. For a rolling patch, one cell at a time goes through the reboot phase. Before a cell can begin the reboot phase during a rolling patch, the grid disks must be taken offline first. The reboot phase begins with a final validation of all of the components, and critical files that are needed to rebuild the cell are copied to the new partitions. These files include home directories of the root, celladmin, and cellmonitor user accounts, the contents of the /etc directory, and any other necessary files. Finally, the grub bootloader is instructed to boot off of the newly created partitions and ignore the partitions that were previously used to host the operating system and cellsrv application. These now inactive partitions will be left alone in the event that a rollback is needed. Through this method, Oracle ensures that there will always be an installation of the operating system to fall back to, whether that is the previously active partitions or through the bootable USB recovery media. After all of these actions have completed, the storage server will reboot.
During the first reboot of this phase, the storage server will boot up to an incomplete version of the operating system and install a handful of additional RPM packages. These packages reside in a temporary /install/post directory that contains enumerated directories named 10commonos, 30kernel, 40debugos, 50ofed, 60cellrpms, 70sunutils, and 90last. Inside each of these directories is an install.sh script that installs the packages inside of the directory. Upon completion of the installation script in the 90last directory, the /install directory is deleted and the host is rebooted. During the next reboot, firmware components are upgraded. As part of the boot process for each storage server, the /opt/oracle.cellos/CheckHWnFWProfile script is run in upgrade mode. This script will check all of the hardware components in the storage server and validate if their firmware version matches the expected version for the new image. If the current version does not match, it is upgraded to the supported version. This script checks the BIOS, ILOM, RAID controller, InfiniBand HCA, flash cards, and disk drives. Depending on the number of firmware updates that need to be applied, this process can take up to two hours. On older patch releases, the SSHD process was disabled during firmware updates, but this has been removed on some releases. For updates on the status of the firmware upgrade process, log in to the storage server and look at the output of the /var/log/cellos/CheckHWnFWProfile.log file. When all of the hardware components have been upgraded, the storage server will reboot for a final time. If the patch includes a BIOS upgrade, the final reboot could take a significantly longer period of time than what is usually seen. During the final reboot, validation checks will take place to ensure that the new image matches the expected configuration. Results of the validation checks can be found in the /var/log/cellos/validations directory and, specifically, the /var/log/cellos/validations.log file. Upon successful completion of the validation checks, the storage server enters a state of “success,” and patchmgr will either complete or instruct the cell to activate its grid disks (if the patch is being applied rolling). If the patch is being applied rolling, then after the grid disks have been activated, patchmgr will check for the status of the grid disks within ASM. This is checked via the asmmodestatus attribute for each grid disk. During the time that the grid disks are being brought online in ASM, they will show a status of “SYNCING” in V$ASM_DISK (or via the asmmodestatus attribute for the grid disk). This means that the disks are catching up on any writes that they missed while they were offline due to the patch. After the disks have finished the resync process, patchmgr will move on to the next cell, and the reboot phase will begin there. The process repeats until all storage servers have been patched successfully. Recent storage server patches have shown to take slightly over one hour to complete the reboot phase of the patch. Assuming that it takes 30 minutes for each storage server to resync its disks, the reboot phase alone will take approximately 21 hours on a full rack (14 storage servers x 1.5 hour reboot and resync). The amount of time needed for the resync is completely dependent on the activity level of the system. Systems that are not busy during the patch may take between three and five minutes for a resync. In extreme cases where the cluster is very busy, we have seen resync times upward of six hours.
When looking to troubleshoot a storage server patch failure, it helps to know where the log files for the patch reside. When patchmgr is run, it copies the patch contents and runs out of the /root/_patch_hctap_/_p_ directory on each of the storage servers. During a patch session, there are two log files that detail everything that the patchmgr script does: wait_out and wait_out_tmp. The wait_out log file records each time that patchmgr logs in and gives general messages, such as the patch state. For the detail of what exactly patchmgr is doing, look inside the wait_out_tmp file. This log records everything that is going on during the pre-reboot phase. More recent versions of patchmgr also include a log file on the controlling host named for each of the storage servers. These files can be useful to look at, but may not give the full picture that the wait_out and wait_out_tmp files can give.
Much has been said in this section about patchmgr, but not how it works. The patchmgr utility is a bash script that drives the patching process on a set of storage servers designated at runtime. Whether running an upgrade or rollback, rolling or not, the functionality of patchmgr is the same—it pushes scripts and files to the nodes that will be patched and interacts with them via SSH keys and the dcli utility. When patching multiple hosts, patchmgr does not return to a prompt until all of the hosts are patched or there is a failure in the process. Most of the time, the output of patchmgr will look like a pinwheel. During the various phases, patchmgr will report a number of minutes left. This is not an estimate, but a timeout. If the phase does not complete in this amount of time, the patch will be marked as failed. While this is going on in the foreground, patchmgr wakes up every minute and logs in to each cell and runs a patch status script. Based on what the script returns, patchmgr will sleep for another minute, move on to the next phase, or complete the patch. Figure 16-5 shows the output of a patchmgr session.

Figure 16-5. Exadata storage server patch
Rolling vs. Non-rolling Patches
Exadata storage server patches can be installed in parallel during a full cluster outage or sequentially with no downtime. As with any choice involving Oracle, there are benefits and drawbacks to both approaches. While rolling patches do have a certain allure, the extended nature of them tends to dissuade Exadata administrators. Another factor to consider with rolling patches is the ASM redundancy level of your ASM disk groups. If you remember from Chapter 14, disk groups can either have two (Normal Redundancy) or three (High Redundancy) copies of data. When a storage server is being patched, the data that it stores is offline throughout the reboot phase. For an Exadata running high redundancy, this is not an issue because two more copies of data are offline. However, most Exadata customers seem to be running their Exadata racks with normal redundancy for disk groups. This means that throughout the reboot phase of the patch process, a cluster with disk groups configured for normal redundancy has a partial degradation of the ASM disk groups, leaving only one copy of data online throughout. If a partner disk of a currently offline disk was lost during the patching process, there would most likely be a failure of the ASM disk groups, potentially leading to data loss. Due to these factors, patching with a full outage is the method most frequently chosen. While there is an argument to patching the servers sequentially rather than in parallel in order to mitigate risk more effectively, the storage servers are all individual machines. A failure on one cell will not affect the remaining cells. With all of the safeguards put in place through the patch process, a storage server that fails to patch successfully will boot back to the state that it was in before the patch started. If this happens, simply determine the issue that caused the cell to not patch successfully, modify the cell_group file to contain the hostname of the cell that failed the patch, and run the patch process again. It goes without saying—when choosing between rolling patches and taking an outage, consider the redundancy level of the ASM disk groups and the estimated amount of time that a rolling patch will take. In some cases, it’s easier to take the short outage or switch to a disaster recovery system and apply the patch in a non-rolling manner.
Rolling Back Storage Server Patches
The method used for rolling back storage server patches is exactly the same as what was used to apply the patch in the first place. By giving the “–rollback” switch to patchmgr, a rollback process is initiated. When invoked, the rollback process sets the inactive partitions to activate on the next reboot. This will leave the version you are rolling back from as the inactive version. As with an upgrade action, the USB recovery media is recreated in order to ensure that there will be no issues from the rollback operation. Typically, firmware is left at the newer level.
UPGRADING AN EXADATA STORAGE SERVER
This exercise demonstrates upgrading Exadata storage servers to version 12.1.1.1.1 via the full outage patching method.
- Download desired storage server patch file, as found in MOS note #888828.1. In this example, version 12.1.1.1.1 is available as patch number 18084575, and the patch will be run out of the /u01/stage/patches directory. According to the supplemental README note (#1667407.1), additional plug-ins (patch # 19681939) should be downloaded as well. Unzip the patch, followed by the plug-ins. The plug-ins should be copied to the plug-ins directory where the storage server patch is unzipped. Ensure that all plug-in scripts are executable. Patches should be run from the first compute node or a host that is able to access the storage servers via SSH keys.
# cd /u01/stage/patches
# unzip p18084575_121111_Linux-x86-64.zip
# unzip -o -d patch_12.1.1.1.1.140712/plugins p19681939_121111_Linux-x86-64.zip -x Readme.txt
# chmod +x patch_12.1.1.1.1.140712/plugins/* - Create a cell_group file that contains the hostnames of the storage servers to be patched. On older releases, this file will exist within /root. After creating the file, verify the connectivity using dcli.
# cp /root/cell_group /u01/stage/patches/patch_12.1.1.1.1.140712
# cd /u01/stage/patches/patch_12.1.1.1.1.140712
# dcli –l root –g cell_group hostname - Stop Oracle Clusterware across all of the nodes in the cluster.
# $GRID_HOME/bin/crsctl stop cluster -all
# dcli –l root –g <dbs_group> $GRID_HOME/bin/crsctl stop crs - Run the patch prerequisite check.
# cd /u01/stage/patches/patch_12.1.1.1.1.140712
# ./patchmgr –cells cell_group –patch_check_prereq [-rolling] - Check to ensure that there aren’t any processes running.
# dcli -l root -g <dbs_group> "ps -ef | grep grid"
# dcli -g dbs_group -l root "ps -ef | grep grid"
enkdb01: root      11483   9016  0 05:46 pts/0    00:00:00 python /usr/local/bin/dcli -g dbs_group -l root ps -ef | grep grid
enkdb01: root      11500  11495  0 05:46 pts/0    00:00:00 /usr/bin/ssh -l root enkdb02 ( ps -ef | grep grid) 2>&1
enkdb01: root      11501  11496  0 05:46 pts/0    00:00:00 /usr/bin/ssh -l root enkdb01 ( ps -ef | grep grid) 2>&1
enkdb01: root      11513  11502  0 05:46 ?        00:00:00 bash -c ( ps -ef | grep grid) 2>&1
enkdb01: root      11523  11513  0 05:46 ?        00:00:00 bash -c ( ps -ef | grep grid) 2>&1
enkdb01: root      11525  11523  0 05:46 ?        00:00:00 grep grid
enkdb02: root      61071  61069  0 05:46 ?        00:00:00 bash -c ( ps -ef | grep grid) 2>&1
enkdb02: root      61080  61071  0 05:46 ?        00:00:00 bash -c ( ps -ef | grep grid) 2>&1
enkdb02: root 61082 61080 0 05:46 ? 00:00:00 grep grid - Run the patch.
# cd /u01/stage/patches/patch_12.1.1.1.1.140712
# ./patchmgr –cells cell_group –patch [-rolling] - Wait for all of the storage servers to finish patching and run the cleanup phase.
# cd /u01/stage/patches/patch_12.1.1.1.1.140712
# ./patchmgr –cells cell_group –cleanup
Remember to check the README for the patch along with the supplemental note found via MOS note #888828.1 before applying any Exadata storage server patch. These documents will contain known issues and workarounds that could prove valuable during your patching.
Upgrading Compute Nodes
Another component that is included in the Exadata storage server patch is the corresponding patch for the compute nodes. Because the compute and storage servers should both be running the same kernel and operating system versions, Oracle releases a separate patch that includes a yum repository containing all of the Linux packages required to upgrade the host. Because the compute nodes are not a closed system that can easily be reimaged, Oracle provides operating system and firmware updates via the standard Linux method of a yum update. Early patches that utilized the yum updated method offered a plethora of ways to perform the update—over the Internet with Oracle’s Unbreakable Enterprise Linux Network, from a local yum repository, or through the use of an ISO image file provided by Oracle support through a separate patch download. Oracle now has a helper script named dbnodeupdate.sh that makes the upgrade process very straightforward. The most common patch application method used with dbnodeupdate.sh is via an ISO image file containing the yum repository. One of the biggest benefits to using the repository based on the patch file is that it guarantees consistency between updates. If you are like most people, your nonproduction machines are patched before your production systems. This allows time for the patches to “bake in,” and any issues can be discovered through testing. When you are using a public repository for your patches, you cannot control which versions of patches are applied. The repository file created by Oracle support is a static file that is not updated without a change to the patch version number. Also, by using a repository local to the host, there is no need to download patches multiple times or have servers directly connected to the Internet.
Applying Patches with dbnodeupdate.sh
The dbnodeupdate.sh script is available to assist with the process of upgrading the operating system and firmware on a compute node. As mentioned earlier, Oracle support periodically releases a new version of the dbnodeupdate.sh script. This script is available through patch # 16486998. While primarily used to upgrade the operating system, dbnodeupdate.sh performs several additional tasks. Because “best practices” change, as new practices are better than their predecessors, dbnodeupdate.sh will routinely check to make sure that your compute nodes are following along with the guidelines with MOS note # 757552.1. One example of these checks is when Oracle changed the recommendation for the minimum amount of memory to be allocated to the Linux operating system (the kernel parameter vm.min_free_kbytes). In many early deployments, only ~50MB was allocated. After customers began to see node evictions due to the operating system being starved for memory, the recommendation increased to ~512MB. Because many customers may never see the recommendation in the middle of a very long note, the dbnodeupdate.sh script will check this and change the setting during the next run. This is just one example of the fixes that dbnodeupdate.sh can put in place when needed. Other versions will include security fixes for various vulnerabilities that have been discovered after the version was released (in particular, the BASH “Shellshock” exploit).
Another key feature of the dbnodeupdate.sh script is its use of Linux’s native logical volume management (LVM) functionality. Due to the filesystem layout on Exadata — / is a 30GB logical volume, and /u01 is a 100GB logical volume—it is easy to take backups of the root filesystem before making any changes. While this option has been available since the X2-2 was released, many customers did not take snapshot backups before upgrading the operating system. With dbnodeupdate.sh, backups are automatically taken. While different from the methodology used by the Exadata storage servers, the concepts are similar. Exadata storage servers utilize an out-of-place patching mechanism. On Exadata compute nodes, the inactive volume is only used in the event of a rollback—the patches are applied in place unless there is a failure. The default root filesystem resides on the VGExaDb-LVDbSys1 logical volume. When dbnodeupdate.sh is run for the first time, a new logical volume, VGExaDb-LVDbSys2, will be created. If dbnodeupdate.sh has been run before, the volume will be overwritten on the next run. This volume will be used to create a full backup of the original active volume at the time that the script is run. First, a snapshot of the root filesystem is taken, and that snapshot is mounted in /mnt_snap. After the inactive root volume has been created (typically VGExaDb-LVDbSys2), it is mounted to /mnt_spare and the contents of the snapshot are copied to /mnt_spare using the tar utility. After everything has been copied to /mnt_spare, the volume is unmounted and the snapshot volume is removed. Now is probably a good time to note that if you increase the size of the root filesystem, the backups will certainly take longer. Also, additional space will need to be reserved in the volume group to accommodate the larger root volume. Keep in mind that only the root filesystem is backed up by dbnodeupdate.sh because the script does not modify any files on /u01. A copy of the /boot filesystem is created as well, in the event that a backup is needed. Table 16-1 describes the available flags to be used with dbnodeupdate.sh.
Table 16-1. Flags Used with dbnodeupdate.sh
|
Flag |
Description |
|---|---|
|
-u |
Updates a compute node to a new release |
|
-r |
Rolls a compute node back to the previous release |
|
-c |
Performs post-patch or post-rollback operations |
|
-l -s -q -n -p -v -t -V |
URL or location of zip file containing the ISO file Shut down Clusterware stack before running Quiet mode—used with -t Disable filesystem backup Bootstrap phase, used when updating from version 11.2.2.4.2 Dry run—verify prerequisites only Used with –q to specify which release to patch to Print the version number |
Before running dbnodeupdate.sh, download the patch containing the ISO that corresponds to the desired patch level. Place that file and the patch containing the dbnodeupdate.sh script on each compute node. While dbnodeupdate.sh can pull from a yum repository via HTTP, the ISO method has shown to be much more straightforward. There are two stages to every run of dbnodeupdate.sh—the upgrade/rollback stage and the closing stage. Just like the auto functionality of OPatch, dbnodeupdate.sh performs many different tasks that would otherwise have to be executed separately. First, dbnodeupdate.sh will shut down and unlock the grid infrastructure home, followed by a backup of the root filesystem. Next, dbnodeupdate.sh will unpack the zip file containing the patch repository to a temporary location, mount that ISO, and update the /etc/yum.repos.d/Exadata-computenode.repo file to utilize the location of the RPM packages. A yum update is performed, and the system reboots. While the host reboots, firmware components are upgraded. Typically, firmware updates include the InfiniBand HCA, RAID controller, BIOS, and ILOM. The upgrade process is the same methodology used on the storage servers—the /opt/oracle.cellos/CheckHWnFWProfile script is run to compare the firmware versions with the registry of supported versions. If a component does not match, it is flashed to the expected version. After all of the firmware updates have been applied, the host will reboot.
After the host reboots, and the imageinfo command shows a successful upgrade, the dbnodeupdate.sh script must be run again to “close” the upgrade. This mode will validate that the yum update was successful, clean out the yum cache, relink the Oracle homes for the RDS protocol, and start Clusterware and enable it at boot time. When this step has competed, the host is ready to be put back in to service.
UPGRADING AN EXADATA COMPUTE NODE
This exercise demonstrates upgrading an Exadata compute node to version 12.1.1.1.1.
- Download the latest version of the dbnodeupdate.sh utility and desired patch ISO, as found in MOS note #888828.1. In this example, dbnodeupdate.sh is available as patch number 16486998, and the ISO file is in patch number 18889969. In this example, both of the files are downloaded into the /u01/stage/patches directory. Unzip the patch file containing dbnodeupdate.sh.
# cd /u01/stage/patches
# unzip p16486998_121111_Linux-x86-64.zip - Run the dbnodeupdate.sh script, specifying the patch file location.
# ./dbnodeupdate.sh –u –l /u01/stage/patches/p18889969_121111_Linux-x86-64.zip -s - After the compute node has rebooted and imageinfo shows a successful status, close the upgrade using dbnodeupdate.sh.
# imageinfo

Kernel version: 2.6.39-400.128.17.el5uek #1 SMP Tue May 27 13:20:24 PDT 2014 x86_64
Image version: 12.1.1.1.1.140712
Image activated: 2014-12-08 04:42:43 -0500
Image status: success
System partition on device: /dev/mapper/VGExaDb-LVDbSys1

# cd /u01/stage/patches
# ./dbnodeupdate.sh –c
These steps can be executed one node at a time for a rolling patch, or they can be executed on each node in parallel for a full outage.
Rolling Back Patches with dbnodeupdate.sh
The process of rolling back a compute node is very similar to that of an upgrade. Call the dbnodeupdate.sh script with the –r flag to roll back to the previous version of the compute node operating system. Doing this will change the filesystem label of the inactive logical volume (the backup that was created when the update was run) and reconfigure the GRUB bootloader to utilize this volume. The host is rebooted and, when it comes back, it will be running in the state that it was before the patch was issued. Because of this, it is important to not let too many changes occur on the host before you decide to roll back. Any passwords or configuration settings will match the system at the time of the patch.
Upgrading InfiniBand Switches
While updates are seldom released, the InfiniBand switches in an Exadata environment must be updated periodically. These updates have been so infrequent that nearly each release has contained a different installation method. Oracle seems to have standardized on bundling the switch firmware with an Exadata storage server patch release and using the patchmgr utility to apply the update. This makes sense because the InfiniBand switch patches have typically been released in conjunction with a storage server release. By using patchmgr, the syntax will be familiar, and the methods will stabilize.
Just like with a storage server patch, upgrading an InfiniBand switch is a two-step process. First, there is a prerequisite check, followed by the actual upgrade of the switches. While the steps are the same, the syntax is a little bit different. Storage server patches use the –patch_check_prereq flag, whereas InfiniBand patches use the –ibswitch_precheck flag. Patches on the storage servers are applied using the –patch flag, and –upgrade is used for applying updates to the InfiniBand switches. The patchmgr script still uses a file containing the names of the InfiniBand switches, just like when patching a storage server. InfiniBand switch updates are always applied in a rolling fashion, one switch at a time. When applying these patches using patchmgr, verification tests are performed both before and after each switch is patched. These patches can be applied while the Clusterware stack is online and require no systemwide downtime.
UPGRADING EXADATA INFINIBAND SWITCHES
This exercise demonstrates upgrading the Exadata InfiniBand switches to version 2.1.3-4, included in Exadata storage server version 12.1.1.1.1.
- On the same node that was used to apply the Exadata storage server patch, gather the names of the InfiniBand switches. Note that with environments that contain other Oracle-engineered systems, not all InfiniBand switches need to be upgraded. (Exalogic and Big Data Appliance contain “gateway” switches that use different firmware.) Look for switches labeled “SUN DCS 36P” These are the switches that need to be patched.
[root@enkx3db01 ~]# ibswitches
Switch : 0x002128ac ports 36 "SUN DCS 36P QDR enkx3sw-ib3 x.x.x.x" enhanced port 0 lid 1 lmc 0
Switch : 0x002128ab ports 36 "SUN DCS 36P QDR enkx3sw-ib2 x.x.x.x" enhanced port 0 lid 2 lmc 0 - Create a text file named ibswitches.lst that contains the names of the InfiniBand switches that are to be patched.
# cd /u01/stage/patches/patch_12.1.1.1.1.140712
# cat ibswitches.lst
enkx3sw-ib2
enkx3sw-ib3 - Run patchmgr with the –ibswitch_precheck flag to ensure that everything is ready to be patched. The patchmgr script will ask for the root password for all of the switches and verify connectivity, along with other tests (available free space, verify-topology output, and so on). If the script returns successfully, you are ready to apply the patch.
# cd /u01/stage/patches/patch_12.1.1.1.1.140712
# ./patchmgr –ibswitches ibswitches.lst –upgrade –ibswitch_precheck - Apply the patch using the patchmgr script. Each switch will be patched sequentially, as patchmgr would with a rolling Exadata storage server patch. The script will not return to a prompt until all switches have been patched or an error occurs.
# cd /u01/stage/patches/patch_12.1.1.1.1.140712
# ./patchmgr –ibswitches ibswitches.lst –upgrade
Unlike the Exadata storage server patches, there is no cleanup needed on the InfiniBand switches. Once the patch has completed, you are ready to move along to the next piece in the process.
Applying Patches to Standby Systems
Looking at all of the patches described in this chapter, it’s easy to think, “I’ll never get the downtime approved to apply all of these!” One feature that Oracle offers in order to cut actual downtime related to patching is that every Exadata patch since database version 11.2.0.2 supports standby-first patching. Using this method, the only database downtime is the amount of time needed to perform a Data Guard switch to your standby. Simply apply all patches to your standby system ahead of time, switch the databases to the newly patched system, and patch the original primary system. At that point, you can either switch back to the original primary system or continue to run with the roles reversed. Upon the next patch cycle, simply repeat the process. Using this method can show two things that auditors love—successful disaster recovery testing and up-to-date databases. The steps to apply patches in standby-first mode are very simple:
- Apply quarterly patches to the standby system via rolling or full outage method. Patches can include Exadata storage server, compute node, QDPE, and InfiniBand switch upgrades. Grid Infrastructure patch set upgrades can be performed as well, as they do not affect Oracle Data Guard. Do not run post-patch scripts (catbundle.sql or datapatch) on the standby databases, as those scripts need to be run after all Oracle homes have been patched.
- Perform testing against the standby database using Active Data Guard, snapshot standby, or other means.
- Perform Data Guard role switch of all databases on the primary cluster to the secondary cluster.
- Apply quarterly patches to the primary system via rolling or full outage method. These patches should be the same patches applied to the standby system in step 1.
- Perform post-patch steps (catbundle.sql or datapatch) on the primary database instance as instructed in the patch README.
- Switch databases back to the original primary cluster, if desired.
The only patch type that cannot be applied with the standby-first method is a database patchset upgrade. These upgrades involve changing the version number (11.2.0.3 to 11.2.0.4, or from any version to Oracle database 12c). These upgrades cannot be done through the standby-first method because they require an upgrade of the database catalog. This is not a limitation of Exadata, but the Oracle database itself. At a high level, upgrading a database within a Data Guard configuration requires starting the standby database in a home with the new version and running the upgrade scripts from the primary. This would apply for patchset upgrades within a major version (11.2.0.3 to 11.2.0.4 or 12.1.0.1 to 12.1.0.2), or between major versions (for example, 11.2.0.3 to 12.1.0.2). Components within the database are upgraded, and changes propagate via Data Guard. For more details on this process, look in the MOS notes mentioned in Appendix B. They are actually very thorough and methodically walk through the process from end to end.
Summary
Hopefully, this chapter helped to alleviate some of the anxiety many people feel when patching their Exadata for the first time. Like anything else, the process will be more familiar as more patches are applied. Despite being a hit-or-miss proposition in the early stages of Exadata, patch releases have been much more stable over the course of the past few years. This can be attributed to many factors—the maturation of the platform, better testing, and a growing customer base. The best advice to be given when applying Exadata patches is to read the documentation several times and be very patient. Taking a close look at the OPatch logs when applying a QDPE will reveal warnings when the previously installed patches are rolled back. When looking under the covers during an Exadata storage server patch, you may see what look like errors. Trust that the patchmgr script will be able to filter through what can be ignored and what is an actual error. If there is really a failure, patchmgr will give proper warnings that a failure has occurred. As with any other software release, it’s a good idea to wait a little bit before applying the patches after they have been released. The ability for the platform to provide a single set of patches for every component in the stack is something that no other vendor can offer in terms of the Oracle database.