


Provisioning an Oracle environment
|
Attention: The following command conventions are used in this chapter:
•Linux commands that are running as root are prefixed with #
•Linux commands that are running as non-root are prefixed with $
|
This chapter describes the steps to provision an Oracle Linux guest by using Tivoli products.
This chapter includes the following topics:
11.1 Introduction
Many IBM System z customers use Linux on System z in a z/VM hypervisor environment to achieve the benefits of server virtualization. While some of these customers used home-grown tools to install, configure, and manage their Linux servers, there is a need for standardized management tools to automate these system management tasks.
IBM Tivoli Service Automation Manager provides such a set of tools. This solution enables customers to rapidly create, configure, provision, and de-provision Linux on System z servers running in the IBM z/VM host environment. It also provides the tools to help you make a staged entrance into cloud computing. Cloud computing is an IT model that facilitates better use of existing IT resources with fewer provisioning processes, lower capital, and operating expenses.
IBM Tivoli Service Automation Manager provides such a set of tools. This solution enables customers to rapidly create, configure, provision, and de-provision Linux on System z servers running in the IBM z/VM host environment. It also provides the tools to help you make a staged entrance into cloud computing. Cloud computing is an IT model that facilitates better use of existing IT resources with fewer provisioning processes, lower capital, and operating expenses.
Tivoli Service Automation Manager helps the automated provisioning, management, and de-provisioning of cloud resources, consists of hardware servers, networks, operating systems, middleware, and application-level software. Several virtualization environments (hypervisors) are supported while individual virtual server provisioning.
Tivoli Service Automation Manager helps you define and automate services that are lifecycle-oriented; for example, a service to establish and administer an IT server network for a limited period to satisfy increased demand for processing capacity, or to serve as a test environment. Predefined service definitions determine the overall framework for the services. The actual service instances are requested by using these service definitions.
The Self-Service Virtual Server Management environment is used by the cloud users to request provisioning and manage the virtual environments. Tivoli Service Automation Manager provides a Self-Service Virtual Server Management environment, which allows a user to request the provisioning of projects that consists of virtual servers that are based on IBM System x, System p®, or System z and the WebSphere CloudBurst® Appliance product.
Figure 11-1 on page 233 shows the following components of Tivoli Service Automation Manager:
•The Managed From component model refers to resources that are needed for Tivoli Services Automation Manager (Tivoli Service Automation Manager/Tivoli Provisioning Manager).
•The Managed Through component model refers to z/VM, MAPSRV, Linux Master, DIRMAINT, and VSMSERVE.
•The Managed To component model refers to the Linux instances to be provisioned in z/VM.

Figure 11-1 ITSO Tivoli Architecture on Linux System
|
Note: This chapter is not meant to replace the IBM z/VM, Linux, Tivoli Service Automation Manager, or Oracle Databases Enterprise Server products documentation. z/VM, Linux, or Tivoli Service Automation Manager installations are not in the scope of this chapter.
|
For more information about how to deploy a Tivoli provisioning environment on System z, see Tivoli Service Automation Manager Version 7.2.2 - Installation and Administration Guide, SC34-2657.
In this chapter, we focus on Oracle for Linux on System z provisioning automation environment. The following methods can be used to provision an Oracle Linux guest by using Tivoli Service Automation Manager:
•Define a new offering in the Tivoli Service Automation Manager Service’s catalog and expose it through the Web User Interface.
•Use Tivoli Service Automation Manager’s predefined service Project Linux Servers under z/VM and use an Oracle Image for Oracle middleware installation. (We used this deployment option in this chapter.)
The following steps are developed later in this chapter:
•Create a SUSE Linux Enterprise Server 11 SP1 guest.
•Customize the guest for Oracle and Tivoli Service Automation Manager.
•Install a new Oracle Single Instance Database and record the Silent Install file on a test server.
•Customize a shell script (preporacle.sh) to check Linux environment parameters and run the Oracle silent installation.
•Create the Tivoli Service Automation Manager/Tivoli Provisioning Manager objects and Workflows.
•Provision a new Oracle 11gR2 Linux PaaS (Platform as a Service), ready for DB installation.
11.2 Customizing a new Linux reference for Oracle
This section provides information about how to set up a Linux on z/VM environment for Oracle workload (based on general recommendation for Linux on System z) so that Tivoli Service Automation Manager can provision and manage virtual servers with the z/VM hypervisor.
11.2.1 Requirements
The minimum requirement to install Oracle 11gR2 is SUSE Linux Enterprise Server 10 SP3 (or later). Kernel -2.6.16.60-0.54.5 or later is required for an Oracle 11gR2 installation. SUSE Linux Enterprise Server 11 SP1 (2.6.32.12-0.7) + is available and is preferable for Oracle 11gR2 because it incorporates various features of System z hardware.
Verify the release by using the cat /proc/version command.
The initial 11.2.0.2 base release software can be downloaded from E-Delivery and is available at this website:
11.2.0.3 Patchset1 can be downloaded from My Oracle Support (MOS), Patches and Updates Patch:10404530. Check the readme file to determine which .zip files you require.
11.2.2 System environment
In this section, we describe the system environment.
System and operating systems
We used following components of the environment:
•IBM zEnterprise EC12 (zEC12)
•z/VM 6.1
•Linux: SUSE Linux Enterprise Server 11 SP1
The following Oracle Guest definition components were used:
•Four Logical Processors
•6 GB Virtual Memory
•25000 Cylinders Minidisk (approximately 18 GB)
One minidisk is defined and contains two partitions: root (including Oracle binaries) and swap.
We want to deploy Oracle instances that are ready to deploy a database, whatever is the size of the data to deploy. More Linux Logical Volumes or Oracle Automatic Storage Management (ASM) Volumes groups are defined later (which is outside the scope of this chapter).
Figure 11-2 shows the Oracle Reference Disk Layout that is based on our installation.

Figure 11-2 Oracle Reference Disk Layout
Software
The following software was used:
– IBM Tivoli Service Automation Manager 7.2.2
– IBM Tivoli Provisioning Manager 7.0.2
– IBM WebSphere Application Server 6.2
– Oracle 11.2.0.3.
The software stack is shown in Figure 11-3.

Figure 11-3 Software stack for Tivoli on Linux on System z
11.2.3 New reference guest
In this section, we define a new z/VM Linux user. This guest is the reference for provisioned Oracle guests on SUSE Linux Enterprise Server 11 SP1. For more information about installing Linux on System z, see the Linux documentation and IBM Redbooks.
The process includes the following basic steps:
1. Create the Linux guest in z/VM.
2. Install the Linux master (reference) system.
11.3 Optimizing the Linux environment for Oracle workload
In this section, we describe the sets up that are used to perform some of the Oracle configuration for on Linux on System z. However, a script can be developed to run this task and is used to set up the images in a post-provisioning process.
This step is managed by the preporacle shell script. For more information about the sample preporacle.sh file, see Appendix D, “Additional material” on page 357.
11.3.1 rpm checker
For Linux guests on System z, Oracle 11gR2 rpm checker should be used to verify the system configuration before Oracle software is installed.
Procedure
Download the appropriate rpm checker from My Oracle Support (MOS) Note 1306465.1. The rpm checker verifies whether the required rpms for Oracle Grid and database are installed. This prevents problems with the installation of Oracle. You must log on to the Oracle secure website and select one of the rpm checkers. S11 Grid Infrastructure/Database RPM checker 11.2.0.2 (1.38 KB) (SUSE Linux Enterprise Server 11 Checker) was used for this chapter. For more information, see this website:
Extract the download .zip file and then install the extracted rpm to verify your Linux rpm requirements. The rpm checker does not actually install anything. Instead, the checker uses the dependencies of rpm to check your system. Run the RPM checker command as the root user, if possible.
Call the rpm checker by using the following command:
rpm -ivh ora-val-rpm-S11-DB-11.2.0.2-1.s390x.rpm
Figure 11-4 shows the output of the rpm checker script.

Figure 11-4 Example of rpm checker output
Install all missing libraries that are shown in the rpm checker output. Check your installed rpm again, as shown in Figure 11-5.

Figure 11-5 Linux with required rpms rpm checker output
11.3.2 Optional rpm for Oracle Grid: cvudisk-1.0.9-1 rpm
Although we do not set up a grid infrastructure in this chapter, it is worth it to have this rpm installed in an Oracle Linux reference.
This step is managed by the preporacle shell script.
Procedure
For an Oracle Grid install, install the cvudisk-1.0.9-1 rpm package from the Oracle 11gR2 distribution media.
The Cluster Verification Utility (CVU) requires root privilege to gather information about the SCSI disks during discovery. A small binary uses the setuid mechanism to query disk information as root. This process is a read-only process with no adverse effect on the system. To make this secured, this binary is packaged in the cvuqdisk rpm and needs root privilege to install on a machine.
When this package is installed on all the nodes, CVU performs discovery and shared storage accessibility checks for SCSI disks. Otherwise, it complains about the missing package cvuqdisk. You can disable the SCSI device check feature by setting the CV_RAW_CHECK_ENABLED to FALSE in $CV_HOME/cv/admin/cvu_config file. CVU does not complain about the missing rpm if this variable is set to FALSE.
This rpm can be found in the grid installation disk, which can be sent via FTP it to the target server and installed by using the following command:
rpm -iv cvuqdisk-1.0.9-1.rpm
11.3.3 Stopping the useless Linux services
To keep the reference image as clean as possible in terms of processor usage, some of these services can be turned off.
There are several services that are started in a SUSE Linux Enterprise Server 11 SP1 system. They can be viewed by using the following chkconfig command:
chkconfig -l | grep 3:on
Turn off useless services by using the chkconfig command, as shown in the following example:
chkconfig fbset off
chkconfig network-remotefs off
chkconfig postfix off
chkconfig splash off
chkconfig splash_early off
chkconfig smartd off
chkconfig alsasound off
chkconfig kbd off
chkconfig xdm off
11.3.4 Hosts file
In this step, the /etc/host file is customized.
Complete the following steps to customize the file:
1. Comment out any IPV6.
2. Check whether ARP is used by using the following command:
# ifconfig -a
The following result should not appear:
eth0 Link encap:Ethernet HWaddr 02:00:02:00:00:A2
inet addr:130.35.55.234 Bcast:130.35.55.255 Mask:255.255.252.0
inet6 addr: fe80::200:200:100:a2/64 Scope:Link
UP BROADCAST RUNNING NOARP MULTICAST MTU:1492 Metric:1
RX packets:5749678 errors:0 dropped:0 overruns:0 frame:0
TX packets:2799431 errors:0 dropped:0 overruns:0 carrier:0
collisions:0 txqueuelen:1000
RX bytes:1414260847 (1.3 GiB) TX bytes:2735238017 (2.5 GiB)
|
Important: When the two (public and private) network interfaces for Oracle RAC are configured, you must have ARP enabled (that is, NOARP must not be configured). The root.sh script fails on the first node if NOARP is configured.
Oracle requires a host name with a fully qualified domain name and a corresponding entry in the /etc/hosts file. |
11.3.5 Linux Kernel parameters
As the root user, ensure that the required Kernel Parameters are set.
This step is managed by the preporacle shell script.
Procedure
Back up the sysctl.conf file before any modification is done by using the -p option to keep the date, as shown in the following example:
cp -p /etc/sysctl.conf /etc/sysctl.conf.orig
Several parameters should be reviewed concerning the function of the activity (see the comments in this file).
To check the kernel parameters, enter the following commands:
cat /proc/sys/fs/file-max
or
# sysctl -A | grep file-max (file-max parameter for example)
To check all, enter the following command:
# sysctl -A > collect_sysctl
To add or change the kernel parameters, edit the sysctl.conf file. Add or change the following values:
# Oracle Kernel Specific parameters
#
#fs.file-max = 512 x oracle processes (for example 6815744 for 13312 processes)
fs.file-max = 6815744
# fs.aio-max-nr = 3145728 (use for large concurrent I/O databases
fs.aio-max-nr = 1048576
#kernel.shmall = set to (sum of all SGAs on system) / 4096 or a default of 2097152
kernel.shmall = 2097152
#kernel.shmmax=MAX (1/2 the virtual RAM, largest SGA_MAX_SIZE/SGA_TARGET on system)
kernel.shmmax = 4218210304
kernel.shmmni = 4096
kernel.sem = 250 32000 100 128
net.ipv4.ip_local_port_range = 9000 65500
net.core.rmem_default = 262144
net.core.rmem_max = 4194304
net.core.wmem_default = 262144
net.core.wmem_max = 1048576
kernel.spin_retry = 2000
#vm.nr_hugepages = 4000 (Use for large SGAs > 10 GB)
|
Note: The minimum value that is required for shmmax is 0.5 GB. However, Oracle recommends that you set the value of shmmax to 2 GB for optimum performance of the system.
|
By specifying the values in the /etc/sysctl.conf file, they persist when the system restarts. However, on SUSE Linux Enterprise Server systems, enter the following command to ensure that the system reads the /etc/sysctl.conf file when it restarts:
# /sbin/chkconfig boot.sysctl on
Run sysctl -p for the kernel parameter changes to take effect.
11.3.6 Creating and verifying the required UNIX groups and Oracle user accounts
In this section, we describe the process to update the Oracle user file descriptors. This step is managed by the preporacle shell script.
Procedure
When Oracle 11gR2 Database Server single instance is installed, Oracle recommends creating the following groups:
•dba
•oinstall
It is possible to install with one group (for example, only dba). If you are installing only database executable files, often one user account called oracle is created.
To verify that the Linux groups and users were created, you can view the group and password files by using the following commands:
# cat /etc/passwd | grep oracle
# cat /etc/group | grep oinstall
# cat /etc/group | grep dba
# /usr/sbin/groupadd -g 1100 oinstall
# /usr/sbin/groupadd -g 1101 dba
# /usr/sbin/useradd -u 1100 -g oinstall -G dba -s /bin/ksh -m oracle
# passwd oracle
Updates can be verified with the commands that are shown in the previous example.
11.3.7 Pre-creating user directories for product installs
In this section, we show how to create directories that are needed for Oracle. This step is managed by the preporacle shell script.
The Oracle I/O architecture that is defined in this chapter for a Single Instance Database follows the Oracle Flexible Architecture (OFA) requirements, as shown in Figure 11-6 on page 241.

Figure 11-6 Oracle Flexible Architecture
Procedure
Table 11-1 describes the disk space requirements for software files and data files for each installation type on IBM Linux on System z.
Table 11-1 Disk space requirements for software and data files
|
Installation type
|
Requirement for software files
|
Requirement for data files
|
|
Enterprise Edition
|
4.9 GB
|
2 GB
|
|
Standard Edition
|
4.5 GB
|
1.5 GB
|
More disk space on a file system or an Oracle ASM disk group is required for the fast recovery area if you choose to configure automated backups of the following components:
•Oracle executable files
Oracle software is installed under the root file system.
•Oracle data files
These files can be handled by ASM or be placed in a Linux Logical Volume.
•Oracle data directories that have the correct permission bits
Create the ORACLE_BASE directory that is the Oracle directory tree root, /u01/oracle product, as shown in the following example:
# mkdir -p /u01/oracle
# chown -R oracle:oinstall /u01/oracle
Create ORACLE_HOME directory that handle Oracle software executable files, /u01/oracle/11.2.0/db_home1/, as shown in the following example in our case:
# mkdir -p /u01/oracle/11.2.0/db_home1/
# chown -R oracle:oinstall /u01/oracle/11.2.0/
# chown -R oracle:oinstall /u01/oracle/11.2.0/db_home1/
Create /u01/oraInventory directory to handle Oracle referential, as shown in the following example:
# mkdir -p /u01/oraInventory
# chown -R oracle:oinstall /u01/oraInventory
Create /u01/oracle/oradata directory for DB installation, as shown in the following example:
# mkdir -p /u01/ oracle/oradata
# chown -R oracle:oinstall /u01/oracle/oradata
11.3.8 Setting file descriptors limits for Oracle and grid users
A few open file descriptors (sockets) can significantly reduce the performance and load that Oracle can generate. In this section, we describe the process that is used to update the Oracle user file descriptors.
This step is managed by the preparedly shell script.
Procedure
Complete the following steps to set the file descriptors limits for Oracle and grid users:
1. Edit the /etc/security/limits.conf file by adding or modifying the following lines:
# oracle
oracle soft nofile 1024
oracle hard nofile 65536
oracle soft nproc 2047
oracle hard nproc 16384
oracle soft stack 10240
oracle hard stack 32768
# Use memlock for Huge Pages support
#* soft memlock 3145728
#* hard memlock 3145728
# End oracle
To increase the limits at Oracle logon as the oracle user, verify the oracle user’s .profile (for example, /home/oracle/.profile for KSH users) and ensure that the following lines were added:
ulimit -n 65536
ulimit -u 16384
ulimit -s 32768
Another method is to modify the main system profile by adding these lines to the /etc/profile file. Change this if the oracle user is using a separate user shell program, such as, csh or bash.
2. When you log in to the Linux machine, the login program reads the /etc/pam.d/login file. The following line was included in this file, which instructs the login program to load the pam_limits.so module during login.session:
session required pam_limits.so
Browse to the /etc/pam.d directory. The session required pam_limits_.so setting can be added to /etc/pam.d/login, /etc/pam.d/sshd, or /etc/pam.d/su, depending on whether you want to set limits on login, SSH, or su types of log ins. The PAM module (pam_limits.so) is not loaded by default for various applications, such as, login, SSH, or su. By adding it explicitly and loading it, you can limit the login sessions. Ensure that the /etc/pam.d/sshd, login, and su file has an entry for pam_limits.so.
|
Important: After any change, test a new login or sshd session before all opened sessions are closed.
|
11.3.9 Activating the swap in memory (VDisk)
It is recommended that an in-memory swap device is defined. This allows Linux to have a first level of swap on a rapid device. This section shows how to enable several swaps with different levels of priority.
Procedure
Complete the following steps to activate the swap in memory:
1. Ensure that all your Linux production guests define a virtual swap. Check that Linux users are allowed to define VDISKS in the SYSTEM CONFIG file, as shown in the following example:
VDisk, /* Allow VDISKS for Linux swaps */
Syslim infinite,
Userlim infinite
2. Ensure that SWAPGEN EXEC is installed in LNXMAINT, which is the Linux instance that is dedicated to Linux users’ administration.
3. Ensure that SWAPGEN is called by the Linux users' PROFILE EXEC, at Linux IPL. as shown in the following example:
/* PROFILE EXEC for zLinux */
'CP SET RUN ON' /* CP READ will not stop server */
'CP SET PF11 RETRIEVE FORWARD' /* Next command */
'CP SET PF12 RETRIEVE' /* Previous command */
'SWAPGEN 101 250000' /* VDisk swap space; Q VDSK U*/
'CP IPL 100 CLEAR' /* Let's roll */
4. Enable this virtual device as a swap in Linux (as shown in Figure 11-7) by completing the following steps:
a. Set the specified device online, as shown in the following example:
# chccwdev -e 0.0.101
b. Check whether the swap device is available in Linux, as shown in the following example:
# lsdasd
c. Display the swap summary by device, as shown in the following example:
# swapon -s

Figure 11-7 Output of the chccwdev, lsdasd, and swapon commands
5. Edit the /etc/fstab file to add the new swap device, which provides a higher priority to the swap device in memory so that the first amounts of swapped data are done to the memory.
6. Set up a Linux swap area on the swap device, as shown in the following example:
# mkswap /dev/disk/by-path/ccw-0.0.0101-part1
7. Make available all devices that are marked as swap in /etc/fstab, as shown in the following example:
# swapon -a
8. Display again the swap summary by device and verify that the new swap was added, as shown in Figure 11-8:
# swapon -s

Figure 11-8 Output of swapon command
11.4 Linux configuration for Tivoli Service Automation Manager environment
To use this new guest as a reference for Tivoli Service Automation Manager deployments, make the changes to the Linux system that are described in this section.
11.4.1 Python package
Make sure that python and python-XML packages are installed.
With root user, run the following command:
# rpm -qa | grep -i python
11.4.2 Installing rpm for Tivoli Service Automation Manager
Copy IBM-System-z.MASTER-<version number>.s390x.rpm from the Tivoli Service Automation Manager management server to the Linux master ID (the Oracle reference) and install it.
Install the rpm by using the following command:
# rpm -ivh IBM-System-z.MASTER-<version number>.s390x.rpm
In our environment, the rpm name was IBM-System-z.MASTER-7.2.1-1.s390x.
11.4.3 Checking mount definitions in /etc/fstab
Check the mount definitions in /etc/fstab file, as shown in Figure 11-9. Mounts should happen by label, not by device or ID, which can change in the copied image, as shown in Figure 11-9.

Figure 11-9 fstab example displaying mounts by label
11.4.4 Disabling the boot menu at IPL
This optional procedure eliminates the 10-second wait for the boot menu during the IPL.
Edit the :menu section of /etc/zipl.conf and change prompt=1 to prompt=0. Save the change and run the .zipl command.
11.4.5 Disabling parallel boot option on SUSE Linux Enterprise Server 11
On SUSE Linux Enterprise Server 11, ensure that parallel boot option is disabled by editing the /etc/sysconfig/boot file with RUN_PARALLEL="no" parameter. Save the file.
11.4.6 Verifying the configuration
Complete the following steps to verify the configuration:
1. Log in to MAPSRV.
2. Change to the /opt/ibm/ztsam/workflow directory and run the following command with the values corresponding with your environment:
../bin/uhubrpcclient 172.16.0.1 1023 mapauth ntccloud 14091 imagequery L1ORAREF
This command should return the z/VM directory entry of the Linux reference.
11.5 Installing a new Oracle Single Instance database and recording the Silent Install file on a test server
In this section, we describe how to record the Silent Install file, which is used later for the Oracle installation on the new provisioned instances.
11.5.1 Getting the Patchset for Oracle Database Server 11.2.0.3.0
The Oracle Database version 11gR2 (11.2.0.3) was released in December 2011 as a Patch Set. It is a complete replacement for the 11.2.0.2 version, so you do not need to install 11.2.0.2 for a new installation. You can download the six files on My Oracle Support for Patch 10404530.
11.5.2 Starting the Virtual Network Computing server
An X terminal session is required to install the Oracle software on Linux on System z. Vncserver is a wrapper script for Xvnc, the free X server for Virtual Network Computing (VNC). It provides all capabilities of a standard X server, but does not connect to a display. Instead, Xvnc creates a virtual desktop you can view or control remotely by using a VNC viewer.
To start the VNC server, login with oracle user and start a vncserver session with the following command, as shown in Figure 11-10:
$ vncserver
This command starts Xvnc on the next available display with the following suitable defaults:
$ vncserver :1 invokes Xvnc on display :1
Because this is the first time it is started, a password is requested to access your desktops. If needed, the server can be stopped by using the following command:
$ vncserver -kill :1
where :1 is the display number, as shown in the start command.

Figure 11-10 Output of vncserver command
11.5.3 Starting a VNC client
Start a VNC client session by using appropriate client, free TightVNC2 viewer in our case, as shown in Figure 11-11.

Figure 11-11 New TightVNC Connection panel
To get a better display with your VNC client, choose Hextile encoding instead of tight. Go to the VNC Connection Options panel and select Hextile from the Format and Encodings drop-down list, as shown in Figure 11-12.

Figure 11-12 Connection Options panel
11.5.4 Installing Oracle Database
In this section, we describe how to install the Oracle binaries.
In the Oracle 11.2.0.3.0 patchset, the code is provided in six .zip files. Extracting these files on an NFS server creates the directories that are listed in Figure 11-13.
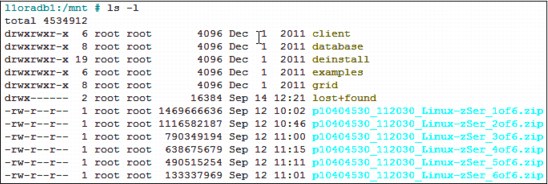
Figure 11-13 Listing Oracle installation directory contents
Complete the following steps to install the Oracle database:
1. Log on with oracle user.
2. Browse to the /mnt/database directory.
3. Run the runInstaller script program to start the installation, as shown in the following example:
$ ./runInstaller
Figure 11-14 on page 249 shows the kind of errors that can be encountered with runInstaller script if the oracle user is not logged on or if the DISPLAY is not set in the Oracle environment. To fix this type of issue, the vncserver can be started by oracle user instead of root.

Figure 11-14 runInstaller error
If no errors were encountered, the output of the runInstaller script looks similar to what is shown in Figure 11-15.

Figure 11-15 Running the runInstaller script
4. Complete the following steps:
a. Start with the Configure Security Updates step as shown in Figure 11-16, which provides the option to download software updates for the installation. Follow the next 10 panels to configure the new Oracle server, and finish with Summary panel, as shown on Figure 11-18 on page 251.

Figure 11-16 First panel of runInstaller
Several components might be missing in the environment to be compliant with Oracle installation. The panel that is shown in Figure 11-17 on page 251 shows a missing rpm. This is a known problem.
You should be aware of the following problems when you are installing upgrades to 11.2.0.3:
– Missing LIBSTDC++-33-3.2.3-47.3, which causes the installer to fail.
– Prerequisite check fails in Grid installation concerning missing rpm compat-libstdc++-33.3.2.3-47.3 (or not installed)
Select Ignore All, click Next, and then click Yes.
|
Prerequisite checks warning: Refer to the following documents to fix the missing rpm issues:
•11.2.0.3 Prereq check warning for missing compatlibstdc++-33.3.2.3-47.3 on IBM: Linux on System z on SLES 11, Doc ID 1383381.1
•Getting Started - 11gR2 Grid Infrastructure, SI (Single Instance), ASM and DB (IBM: Linux on System z), Doc ID 1306465.1
•Ensure that you have prerequisite RPMs to install Oracle Database and AS10g (midtier) on IBM: Linux on System z (s390x), ID 1086769.1
|

Figure 11-17 Known problem during installation: Missing rpm

Figure 11-18 Summary panel
6. Accept the home directory as the target directory for the response file for access authorization reasons. Click Install.
7. Run the orainstRoot shell to change access permissions for the Oracle Referential.
8. Run the root shell script. This script contains all the product installation actions that require root privileges.
9. Return to the Execute Configuration Scripts panel and click OK. The Install Product Status for Execute Root Scripts is now green. Click Next.
The Finish panel displays the message, “The installation of Oracle Database was successful.” Click Close.
The installation log can be found in the following directory: /u01/oraInventory/logs/installActionsInstallDate.log.
11.5.5 Replaying the installation in Silent Mode
Complete the following steps to test the Silent Install response file on the test server:
1. Start the silent mode installation, as shown in the following example:
$ ./runInstaller -ignorePrereq -silent -force (-showProgress) -responseFile /home/oracle/db-install-11.2.0.3-SLES11SP1.rsp
|
Note: This part is included in the preporacle.sh script that is started by the Tivoli Service Automation Manager/Tivoli Provisioning Manager workflow. The showProgress option should not be used in a provisioning workflow.
|
As shown in Figure 11-19, the installation output indicates that the log can be checked in /u01/oraInventory/logs/installActions2012-10-02_05-27-00PM.log.

Figure 11-19 Oracle Silent Installation output
2. Look for a correct installation message in the tail of the log file, as shown in the following example:
$ tail -10 /u01/oraInventory/logs/installActions<timestamp>.log | grep "Successfully executed"
3. As root user during the post-installation process, run the orainstRoot.sh and root.sh scripts, which contain all of the product installation actions that require root privileges, as shown on Figure 11-20.

Figure 11-20 Post installation shell output
11.6 Customizing a script
In this section, we describe the script that is used to set the environment and start the Oracle installation on the new provisioned instances.
11.6.1 Customizing the shell script
This script is used by the Tivoli Service Automation Manager provisioning workflow. A sample is provided in “Sample script for preoracle.sh” on page 379.
|
Warning: The preoracle.sh script must be customized according to each environment and then validated before a provisioning tool is used in a production environment.
|
It implements the following items in the Linux for Oracle environment:
•The first section must be configured with your own environment variables.
•The second section performs the following tasks:
– Creates groups and users
– Updates the Oracle profile
– Copies the silent installation script
– Tests and creates /usr/local/bin, if needed
– Creates directories that are needed to install Oracle
– Updates kernel parameters in /etc/sysctl.conf
– Updates /etc/limits.conf
– Updates /etc/pam.d/sshd
– Installs rpms for Oracle
– Prepares a vncserver to avoid being prompted when starting vncserver before Oracle installs
•The third section starts Silent runInstaller
The mounted NFS server should contain compressed Oracle code packages. Oracle code is in the /mnt/database directory and custom administration scripts are in the /mnt/script directory, including silent installation and rpms.
Make the script executable by root, as shown in the following example:
# chmod u+x preporacle.sh
The script can also be started as a stand-alone script, as shown in the following example:
# ./preporacle.sh
11.6.2 Customizing the Silent Installation file for new server
The previously recorded Silent Installation file contains the host name of the system that is running Oracle, as shown in Example 11-1. This must be updated for each new Oracle instance. The preporacle.sh shell changes the ORACLE_HOSTNAME field inside the Silent Install file
Example 11-1 Response file example with ORACLE_HOSTNAME
#-------------------------------------------------------------------------------
# Specify the hostname of the system as set during the install. It can be used
# to force the installation to use an alternative hostname rather than using the
# first hostname found on the system. (e.g., for systems with multiple hostnames
# and network interfaces)
#-------------------------------------------------------------------------------
ORACLE_HOSTNAME=l1oradb1.mop.ibm.com
|
Note: This part is included in preporacle.sh script that is started by the Tivoli Service Automation Manager/Tivoli Provisioning Manager workflow.
|
11.7 Creating the Tivoli Service Automation Manager and Tivoli Provisioning Manager objects and workflows for PaaS provisioning
This section describes how to implement Tivoli Service Automation Manager objects in a Tivoli environment to deploy a new Oracle Linux instance in z/VM. A custom Oracle Platform as a Service (PaaS) service is available from Tivoli Service Automation Manager Self Service portal.
We also describe the steps that are needed to set up Tivoli Service Automation Manager before it can be used to provision new Linux on System z guests under z/VM. Tivoli Provisioning Manager is the engine that runs workflows on behalf of the Tivoli Service Automation Manager product. The Tivoli Service Automation Manager user interface drives most of its functions through Tivoli Provisioning Manager workflows.
The process includes the following steps:
1. Set up an Oracle Image.
2. Catalog an Oracle Image.
3. Develop the Oracle Installation workflow.
4. Register an Oracle PaaS.
5. Request an Oracle PaaS.
11.7.1 Setting up an Oracle Image
In this section, we describe the steps to set up an Oracle image.
Creating an Oracle Group and users
Create an Oracle Administrator Group and add users to this group.
Cloud and team administrators can create users and add them to the existing teams. Each user is assigned to a customer, security level, one or more security groups, and, optionally, to one or more teams.
In Tivoli Service Automation Manager version 7.2.2, customer objects are introduced as part of the service provider functionality. Because the service provider functionality is not optional and is enabled by default, the existing data must be upgraded to the new model.
Even if you are not planning to use the service provider functionality with Tivoli Service Automation Manager, you must configure at least one customer. For this purpose, Tivoli Service Automation Manager 7.2.2 provides a default customer PMRDPCUST of type SP to represent the service provider.
Complete the following steps to create an Oracle Group and add users:
1. In the Service Automation Manager Home panel, select the customer for which you want to create a user, PMRDPCUST in our case. Click Request a New Service → Virtual Server Management → Manage Users and Teams → Create User.
The Create User wizard opens, as shown on Figure 11-21 on page 256.

Figure 11-21 Create a user in Tivoli Service Automation Manager
2. Users and Team management can be set in this panel. Create an Oracle team, which includes all Oracle Users, as shown in Figure 11-22.

Figure 11-22 Creating a team
3. As shown in Figure 11-23, create other Oracle users that belong to the Oracle Administration team, ORAADM, that was created in Step 2 (you can complete the Oracle instances provisioning later). In the Security Group panel, choose Security Group for Customer Level Policy.

Figure 11-23 Creating users
Configuring resources in Tivoli Service Automation Manager
In this section, we describe the steps to instantiate CPU, Memory, Network, and Disks pools in Tivoli Service Automation Manager. For more information, see Chapter 4 of Tivoli Service Automation Manager Version 7.2.2 - Installation and Administration Guide, SC34-2657-00.
The following methods can be used to create the resource pools:
•Create DCM XML files, load the vrpool.properties file, perform the discovery, and then validate and enable the cloud server pool.
•Perform all the configuration steps manually by using the Cloud Server Pool Administration application.
The configuration steps that are described next are needed to have resources definition available to Tivoli Service Automation Manager.
Configuring cloud server pools
A cloud server pool is the central object that Tivoli Service Automation Manager uses to define cloud environments. It contains references to all data center model (DCM) resources that are needed for the pool (including hypervisor manager, host platform, file repositories, and resource pools). For more information, see the “Configuring cloud server pools for z/VM” section in the Tivoli Service Automation Manager Version 7.2.2 - Installation and Administration Guide, SC34-2657-00.
Configuring cloud networks
Configure your network by completing the following tasks. Create two types of DCM objects, which are necessary for network configuration:
•Sub network: Defines Layer 3 configuration of a network interface within the deployed operating system.
•Switch: Defines Layer 2 connectivity of the network adapter within a virtual machine to the hypervisor virtual switches.
A set of sample DCM import files for hypervisors and resources is provided with Tivoli Service Automation Manager. For more information, see the “Configuring cloud networks” section in the Tivoli Service Automation Manager Administration Guide, SC34-2657.
Configuring cloud storage pools
A Tivoli Service Automation Manager Cloud storage pool is a collection of storage resources for more disks. It is associated with a Tivoli Provisioning Manager storage pool.
When creating a project, you can select a server image and set only the size of the local disk. Cloud storage pools are a flexible solution to add other storage to your provisioned servers.
Click Service Automation → Configuration → Cloud Storage Pool Administration and then complete the following steps:
a. Click the New Cloud Storage Pool toolbar button and complete the following steps:
i. Provide the required parameters for the new cloud storage pool.
ii. Click the Select Value icon to display a list of available storage types and storage extension types.
The default storage type for a logical partition (LPAR) is Mapped Additional Disks. Mounted storage is supported by storage extensions.
b. In the Associated Tivoli Provisioning Manager Storage Pools section, click New Assignment to create a storage pool table entry. Select one Tivoli Provisioning Manager storage allocation pool object.
|
Storage discovery: If there are no storage allocation pools listed in the table, storage discovery likely was not run. To run storage discovery, open the Cloud Server Pool Administration application, select an available System z cloud pool, and run the discovery from the Storage Discovery tab.
|
c. Switch to the Security Settings tab and specify the required information.
d. Click Validate and Enable Cloud Storage Pool.
For more information, the “Configuring cloud storage resources” section in the Tivoli Service Automation Manager Administration Guide.
Configuring the service provider and customer features
Even if you are not planning to use the service provider functionality, you must perform the following basic configuration steps to make the default customer operational.
From the Start Center main page, click Go to → Service Automation → Configuration → Cloud Customer Administration.
To register the default Cloud Service Provider (PMRDPCUST), click the New Customer icon, as shown in Figure 11-24 on page 259.

Figure 11-24 Customer definition
A customer is associated with one or more Cloud Server Pools. Assign Resources Pools that were previously created to the new Cloud Provider.
Tivoli Service Automation Manager maintains a large collection of objects and their attributes, which forms its DCM that is stored in a separate database. Each object in Tivoli Service Automation Manager Data model is assigned a unique identification number. The objects description can be retrieved from the Data Model Object Finder, which is in the main page of the Tivoli Service Automation Manager Start Center.
Objects defined in our testing environment
We defined the following objects in our testing environment:
•Cloud Server Pools
The Cloud Server pool is represented by a DCM object named MAPSRV. It is a logical object that represents the z/VM partition and maintains the status of all its available resources: CPU, memory, and disk. Figure 11-25 shows information about the Cloud Server Pool that is defined in our environment.

Figure 11-25 Cloud Server Pool definition
|
Cloud Storage Pools: The Cloud Storage Pools are not used in our case. Instead, we use the MAPSRV server default pool. A z/VM discovery gathers disk information about the default server pool MAPSRV (no storage pool is required).
|
•Master Images, as shown in Figure 11-26:

Figure 11-26 Master Image Library
•Software Stack, as shown in Figure 11-27:

Figure 11-27 Software Stack
•Cloud Network Configuration, as shown in Figure 11-28:

Figure 11-28 Cloud Network configuration
For more information, see the “Configuring the service provider” section of the Tivoli Service Automation Manager Administration Guide.
Configuring the XML files that are imported into the DCM
This step describes the process that is used to tailor the XML files that are used to import requested objects into Tivoli Service Automation Manager. This process includes the following overall steps:
1. Tivoli Service Automation Manager distributes sample XML files with the product.
2. These files must be tailored to the local Linux and z/VM environment.
3. The resulting XML input files are incorporated into the Tivoli Service Automation Manager database and the DCM.
4. Any text editor (for example, Notepad) can be used to work with .xml files.
5. All objects that are contained in the .xml file are imported into the DCM.
To build an Oracle image and use it with the default Tivoli Service Automation Manager service for Linux that is running as a guest under z/VM, we prepared and built the following elements in a Tivoli Service Automation Manager environment:
•Oracle Master Image
•Software Stack
•Virtual Server Template
We need to register a new image in the Tivoli Service Automation Manager image library for the Linux under z/VM. To instantiate new Oracle environments, we must create a Tivoli Provisioning Manager workflow. This workflow is started after the Linux OS installation in the virtual machine, as described in “Updating the Software Stack” on page 265.
Tivoli Service Automation Manager provides a way to directly define DCM Objects in its interface or to build .xml files and import them by using the administrative interface to import the following components:
– Software Stack
– Master Image
– Virtual Server Template
•Master Image Template: OraclezLinuxImageSLES11SP1_zVMMOP2012.xml
To have a Master Image available, the virtual server template must have some information in it, such as, Linux Prototype, Linux reference name, and the MDisk that is to be cloned, as shown in Figure 11-29.

Figure 11-29 Extract from the XML Master Image, OraclezLinuxImageSLES11SP1_zVMMOP2012.xml
•Virtual Server Template: VirtualServerTemplateSLES11_zVMMOP2012.xml, as shown in Figure 11-30 on page 262.
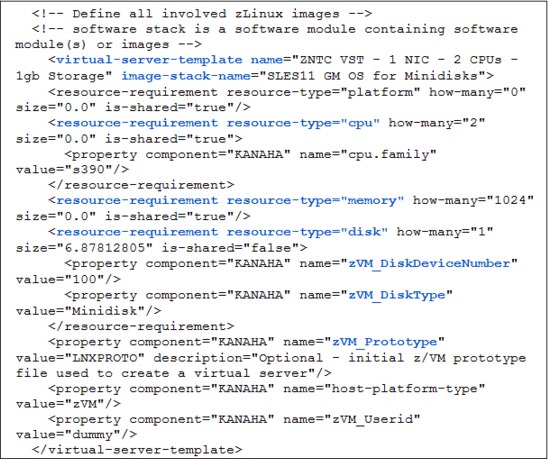
Figure 11-30 Extract from Virtual Server Template XML sample
11.7.2 Cataloging an Oracle Image
By completing this task, the needed definitions in Oracle environment can be defined in Tivoli Service Automation Manager DCM.
Importing resources
This step consists of importing the .xml files that were created in “Configuring the XML files that are imported into the DCM” on page 260 into the DCM. This task is done by the Tivoli Service Automation Manager Administrator.
From the Start Center main page, click: Go To → Service Automation → Configuration → Cloud Server Pool Administration, as shown on Figure 11-31 on page 263.

Figure 11-31 Cloud Server Pool administration access from Go To menu
Click Import DCM Objects. This import creates the DCM objects in the Tivoli Service Automation Manager’s database. We use those objects to register our new Oracle Image. This is the image we select with the default service of Tivoli Service Automation Manager Create Project Linux under z/VM.
Displaying the Oracle Master Image
This step displays the Master Image for Oracle instances.
The Master Image can be created by using the importing an .xml file process or manually through the Tivoli Service Automation Manager administration GUI. The .xml file that is imported into the DCM first must be configured by using a text editor (for example, Notepad).
To display the Master Image for Oracle, from Start Center main page, click: Go To → IT Infrastructure → Image Library → Master Images, then provide Search argument SLES11 SP1 Image for Oracle 11gR2. (The search result is shown on Figure 11-32 on page 264). Click the name of the master image to see its details and note how it is linked to the Virtual Server Template and Software Stack.

Figure 11-32 Searching for Master Images
Displaying the Virtual Server Template
To display the Virtual server Template (VST) content, click: Go To → IT Infrastructure → Provisioning Inventory → Virtual Server Templates, as shown in Figure 11-33.

Figure 11-33 Virtual Templates administration access from GoTo menu
Search for keyword Oracle in the Virtual Server Templates search field. The results are shown in Figure 11-34.

Figure 11-34 Searching for Virtual Server Templates
Click the VST name to display its content.
Updating the Software Stack
This step consists of adding a software module (Oracle11gR2), to the Software Stack SLES11 SP1, which is defined by SLES11 OS Image for Oracle11gR2.
Oracle11gR2 software module was previously modified to call our homemade workflow, which is called Oracle11203_Install.
For more information about designing the workflow, see “Sample workflow for Linux and Oracle installation” on page 268.
To add a software module (Oracle11gR2) to the Software Stack, open the software stack document by clicking Go To → IT Infrastructure → Software Catalog → Software Stacks and search for keyword “Oracle” in the Software Stack field.
Select the software stack, SLES11 OS Image for Oracle 11gR2 in our example, as shown in Figure 11-35.

Figure 11-35 Selecting a Software Stack.
This displays the SLES11 for Oracle Software Stack. In the Select Action box, select Add Stack Entry.
In the Add Stack Entry panel (as shown on Figure 11-36 on page 266), search for Software definitions that contain Oracle, and then select the Oracle definition that contains your workflow. For more information about designing the workflow, see “Sample workflow for Linux and Oracle installation” on page 268.

Figure 11-36 Add Stack Entry panel
Select the Oracle chosen template and click Submit. The Oracle software (workflow) is added to the Software Installable section of the Software stack configuration for Oracle provisioning.
Save the new Software Stack configuration. Click the Save icon. The Oracle 11gR2 Software Installable module is added to the Linux SLES11 OS Image for Oracle 11gR2. This results in a new software module that can install Oracle software immediately after the new Linux Instance is generated in a single project. The oracle11g_SoftwareInstallable_Install workflow is now associated with this Software Stack because you can check in the Software Products window.
Creating a Software Installable Post Install workflow
This step consists of adding a new workflow for Post Installation actions, then assigning it to the SLES11 SP1 Software Stack, which is defined by the SLES11 OS Image for Oracle11gR2 Software Stack object.
First, we need to define a new Post Install workflow. To help in this task, we copy an existing workflow and create one that is dedicated to Oracle post installation.
Complete the following steps:
1. Go to the Start Center portal main page. In Automation Development Applications, click Provisioning Workflow and enter InstallPost in the Workflow Name field, as shown in Figure 11-37 on page 267.

Figure 11-37 Edit a Post Install workflow source code
2. Click the link to edit the code and then copy it into the clipboard.
3. Complete the following steps to create a Post Install workflow for Oracle:
a. Click the New Workflow icon that is the top of the page.
b. Paste the code that was previously inserted in the clipboard, and then save the new workflow with a new name: Oracle_SoftwareInstallable_InstallPost, as shown in Figure 11-38.

Figure 11-38 Create a Post Install workflow for Oracle
c. Add the Post Installation workflow, as described in “Oracle Post Install actions” on page 268. Debug the information to facilitate problem analysis.
d. Click the Save icon at the top of the page. The new code is compiled. Click OK when completed.
4. Add the workflow to the Oracle 11gR2 software stack. Open the software stack as described in “Updating the Software Stack” on page 265, and shown in Figure 11-35 on page 265.
5. From the Software Stack tab, select the Workflows tab in the Installable Files section, and click Assign Provisioning Workflow.
6. In the Assign Workflow list, search for the InstallPost available workflows, as shown in Figure 11-39 on page 268.

Figure 11-39 Assign a Post Install workflow.
7. Select the Oracle post installation workflow and click OK, then agree to save the changes.
The new post installation workflow is added to the Software Installable files.
Oracle Post Install actions
Two Oracle Installation process scripts (orainstRoot.sh and root.sh) must be ran after the Oracle installation process is complete. The scripts contain the product installation actions that require root privileges.
For more information about these scripts, see “Replaying the installation in Silent Mode” on page 252.
11.7.3 Creating a Workflow
Different Tivoli Provisioning Manager workflows can be developed. In our case, we developed one workflow for Oracle Installation.
Sample workflow for Linux and Oracle installation
The Tivoli Provisioning Manager deployment engine is responsible for creating, storing, and running repeatable workflows that automate the configuration and allocation of IT assets. A workflow can represent an entire reconfiguration process that affects multiple computers or a single step in a larger reconfiguration process.
A workflow is represented by a script that uses the following objects:
•Workflow keyword that identifies a file as a workflow
•Variables and assignment
•Calling workflows and device operation, which help to reuse workflows in different contexts
•Calling Java methods
•Scriptlets, which are small scripts included in the workflow
•Jython and operators that use operators to perform simple logic and handle text strings
•Localization and globalization commands
•Conditional statements, Iterations, annotations, and comments
•Data model queries
•Errors and messages
•Special characters and reserved words
An external script is useful when the script is long and easier to maintain separately, or when the script is used by multiple workflows or workflows in different automation packages.
An external script file (called preporacle.sh)is used in this chapter and performs the following tasks:
1. Uses the Device.CopyFile device operation to copy the script to the target computer.
First, the script is manually uploaded to the Tivoli Provisioning Manager server in a repository directory. Then, the Device.CopyFile function copies the script from Tivoli Provisioning Manager repository to the new provisioned guest.
First, the script is manually uploaded to the Tivoli Provisioning Manager server in a repository directory. Then, the Device.CopyFile function copies the script from Tivoli Provisioning Manager repository to the new provisioned guest.
2. Runs the shell script by using the Device.ExecuteCommand operation.
The following functions parameters are available:
•Device.CopyFile, SourceDeviceID, SourcePath, SourceFile, DestinationDeviceID, DestinationPath, DestinationFile, ClientCredentialsKey, HostCredentialsKey, and TimeoutInSeconds
•Device.ExecuteCommand, DeviceId ExecuteCommand, WorkingDirectory, CredentialsKey, TimeoutInSeconds, TreatTimeoutAs, ReturnCode, ReturnErrorString, and ReturnResult
For more information about the Workflow design process, see the Tivoli Information Center at this website:
Starting the workload
In this section, we describe how to install Oracle code with a workflow and an external shell script on a test server. This is needed to deploy and test your code before integrating it into the Oracle Software Stack. Complete the following steps:
1. Upload your customized shell script to the Tivoli Provisioning Manager server in a repository directory (here, it is /opt/ibm/oracle) and then change the permission bits to allow running with chmod u+x preporacle.sh command.
2. Select Provisioning Workflows in the Automation Development Applications section.

Figure 11-40 Adding a new provisioning workflow
4. A new workflow editor is displayed in the browser. Copy and paste your code inside the Workflow editor, as shown on Figure 11-41. Click the Save icon. The new code is compiled.

Figure 11-41 Sample script
Click OK when completed, as shown in Figure 11-42. Return to the workflow list with the List tab and select the new workflow.
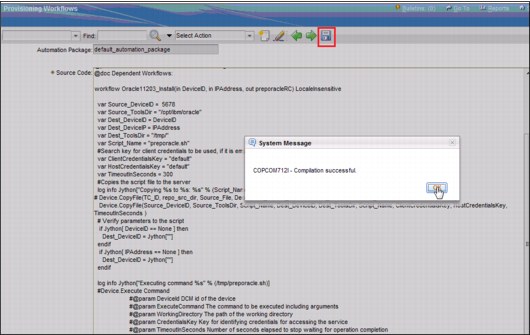
Figure 11-42 New code compilation
5. Click the green arrow to start the workflow, as shown in Figure 11-43.

Figure 11-43 Run the new workflow
6. Enter the requested parameters in the workflow panel, as shown in Figure 11-44. Here, the requested parameter is the ID of a Linux Instance where Oracle code is installed. Click Run and then click Yes to open the Provisioning Task Tracking window.

Figure 11-44 Enter parameters panel
7. Click the Workflow Log ID to show the Provisioning Task Tracking log, as shown in Figure 11-45.

Figure 11-45 Workflow log
The Oracle installation on the new Instance, which is started by the Tivoli Provisioning Manager server, can also be monitored by using the following methods from the new instance environment:
– List the /mnt directory files (mounted by the preporacle script).
– List the temporary files directory /tmp and the created Oracle logs.
– List the Oracle installation process by using the ps -fu oracle command.
– Monitor the system performance that shows Java and I/O activity by using the top or equivalent command.
8. After workflow successful completion, the Status is shown in the Workflow Execution Logs tab, as shown in Figure 11-46.
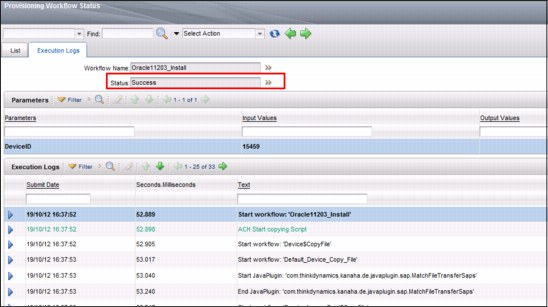
Figure 11-46 Workflow completion status
11.7.4 Registering an Oracle PaaS
In this section, we describe the process that is used to register an Oracle PaaS.
Registering a new z/VM Project in Tivoli Service Automation Manager
This step consists of registering of a new provisioning service, which is done by the Oracle Group Administrator. In a browser, connect to the Tivoli Service Automation Manager Self Service portal main page at this website:
Complete the following steps from the Register z/VM Image window:
1. Provide your User and Password and click Logon.
2. Click Request a New Service.
3. Click Virtual Server Management.
4. On the Virtual Server Management page, click Manage Image Library.
5. On the Manage Image Library page, click Register z/VM Image.
6. On the Register z/VM Image → General panel, complete the fields, as shown in Figure 11-47. The Cloud Server Pool is the resource pool that is used for provisioning. Choose the Master Image for Oracle in the Discovered Image drop-down menu. Click Next.

Figure 11-47 Register z/VM Image
7. Adjust the values in the Resources window (if needed) and then click Next.
8. Make any change (if needed) in Network Configuration window and click Next.
9. A Summary window opens. Click Finish.
Follow the progress in the My Request portlet, as shown in Figure 11-48.

Figure 11-48 Follow the request progress
11.7.5 Requesting a new Oracle Service
In a browser, connect to the Tivoli Service Automation Manager Self Service portal main page and complete the following steps:
1. Click Request a New Service.
2. Click Virtual Server Management.
3. In the Virtual Server Management window, click Create Project with z/VM Linux Servers.
4. Complete the following panels to define the provisioned instances:
– Project Details, as shown in Figure 11-49
– Requested Image
– Servers Details (optional)
– Additional software (optional)
– Network Configuration (optional)
– Other Settings (optional)
– Summary

Figure 11-49 Create project with z/VM Linux Servers
Tivoli Service Automation Manager application workflow sends an email showing the approval of the service to the requester, as shown in Figure 11-50.

Figure 11-50 Service request approval mail
5. Follow the progress in My Request or My Projects portlets.
The progress can be followed at MAPSRV server log level. Open an SSH session on MAPSRV and go to /opt/ibm/ztsam/workflow/tmp. Follow the instantiation progression by looking at the end of the current (most recent) log file in the log directory as shown in Figure 11-51:
$ cd /opt/ibm/ztsam/workflow/tmp
$ tail -f logfile.xxxxx

Figure 11-51 MAPSRV log file extraction
Progress can also be tracked from Start Center Welcome page.
11.7.6 Suppressing a provisioning project
To suppress the provisioned project, click Cancel tin the self-service interface, as shown in Figure 11-52.

Figure 11-52 Cancel a project
You receive an email from Tivoli Service Automation Manager administrator. Follow the progress the same way as described in “Requesting a new Oracle Service” on page 274.
11.7.7 Unregistering a z/VM project
When you want to delete a server image, complete the following steps from the self-service interface:
1. Click the Unregister Image button.
2. Select the image to be unregistered and click OK.
3. Confirm the action by clicking OK again.
4. Follow the progress in My Requests portlet.
11.8 Summary
For more information, see the following resources:
•z/VM and Linux on IBM System z: The Virtualization Cookbook for SLES 11 SP1, SG24-7931-00
•Directory Maintenance Facility Tailoring and Administration Guide; Version 6 Release 1, SC24-6190-00
•Deploying a Cloud on IBM System z, REDP-4711-00
•Provisioning Linux on IBM System z with Tivoli Service Automation Manager, REDP-4663-00
•Installing Oracle 11gR2 RAC on Linux on System z, REDP-4788
•Experiences with a Silent Install of Oracle Database 11gR2 RAC on Linux on System z (11.2.0.3), REDP-9131
•Tivoli Service Automation Manager Version 7.2.2: Installation and Administration Guide, SC34-2657-00
•Tivoli Information Center, which is available at this website:
1 In line with other platforms, it is now a full release that consists of six .zip files
2 Available at this website: http://www.tightvnc.com
..................Content has been hidden....................
You can't read the all page of ebook, please click here login for view all page.