


Automating Oracle on System z
|
Attention: The following command conventions are used in this chapter:
•z/VM commands are prefixed with ==>
•Linux commands that are running as root are prefixed with #
•Linux commands that are running as non-root are prefixed with $
|
The following general approaches can be used to automate the creation of virtual servers:
•Cloning: Copying an image of an existing Linux system
•Building: Installing a new Linux system with all configuration parameters supplied
Cloning is more commonly implemented because the golden image can be customized manually. Building is more systematic and reliable because every step to arrive at a cloned Linux is captured and can be audited. The cloning approach is described in this chapter.
Virtualization, or cloud computing, is often explained as the following three different levels:
•Infrastructure as a Service (IaaS)
•Platform as a Service (PaaS)
•Software as a Service (SaaS)
IaaS can be considered the creation of virtual machines with no operating system installed or running. z/VM is an ideal hypervisor for this. PaaS can be considered adding an operating system to the infrastructure layer. Today, Linux is the most common OS to run under z/VM. SaaS can be considered the installation and configuration of software to the platform layer. This chapter describes adding Oracle software.
This chapter was written by using Red Hat Enterprise Linux (RHEL) 6.2 as the reference distribution. The bash scripts that are associated with this book might work on other versions or RHEL but does not work on any version of SUSE Linux Enterprise Server. Ideally, both scripts should work on SUSE Linux Enterprise Server and Red Hat Enterprise Linux. However, both distributions are not described here.
This chapter includes of the following topics:
•PaaS
10.1 Infrastructure as a Service under z/VM
To get started, the following System z resources must be obtained and configured:
•At least one System z Logical Partition (LPAR)
•z/VM installed on the LPAR and configured
•Processors (CPUs): More commonly IFLs or possibly CPs
•Memory: Defined to the LPAR as central and expanded
•Disk space: ECKD DASD and SCSI/FCP LUNs
•FCP devices: Accesses the SCSI/FCP LUNs
•TCP/IP addresses
•OSA devices to access the network
In the environment that is described in this chapter, z/VM 6.2 at the latest service level (1201) was installed on an LPAR and sufficient processors (four), memory (26 GB central, 2 GB expanded), disk space, and networking resources (OSA devices and TCP/IP addresses) were available.
Complete the tasks that are described in this section to implement IaaS.
10.1.1 Configuring z/VM
The following z/VM configurations are made:
•The SYSTEM CONFIG file is configured.
•TCP/IP is set up and the FTP server is turned on.
•The directory manager DirMaint is configured.
•The Systems Management APIs (SMAPI) are configured.
For the SYSTEM CONFIG file configuration, some details are provided in this section. For more information about TCP/IP and the FTP server, see “Configure TCP/IP” and “Turn on the z/VM FTP server and on DirMaint and SMAPI” in Chapter 18 of The Virtualization Cookbook for z/VM 6.2 RHEL 6.2 and SLES 11 SP2, which is available at this website:
The SYSTEM CONFIG file is the first configuration file that z/VM processes when it loads initially. A layer 3 virtual switch named VSWITCH1 is created for the z/VM TCP/IP stack. A layer 2 virtual switch named VSWITCH2 is created for the Linux systems’ primary network interfaces. Oracle Grid requires a private interconnect among all nodes in a cluster. A third layer 2 virtual switch named VSWITCH3 with no OSA connection is created for this purpose. Layer 2 virtual switches are now recommended over layer 3 because they are required for DHCP and IPv6.
To customize the SYSTEM CONFIG file, complete the following steps:
1. Link and access the PMAINT CF0 disk, as shown in the following example:
==> link pmaint cf0 cf0 mr
==> acc cf0 f
2. Edit the SYSTEM CONFIG file, as shown in the following example:
==> x system config f
3. The following highlighted items are configured in this file. At the top, the many DASD volumes are added as User_Volume_List statements so that z/VM can use them as minidisks:
/**********************************************************************/
/* User volumes for local minidisks */
/**********************************************************************/
User_Volume_List LX7W01 LX7U1R
User_Volume_List LX6601
User_Volume_List LX6602
...
4. Add the Disconnect_Timeout off and Vdisk clauses in the Features statement and configure the system so that disconnected users are not forced off, and Linux virtual machines can create virtual disks for in-memory swap spaces, as shown in the following example:
... # many more volumes
Features ,
Disable , /* Disable the following features */
Set_Privclass , /* Disallow SET PRIVCLASS command */
Auto_Warm_IPL , /* Prompt at IPL always */
Clear_TDisk , /* Don't clear TDisks at IPL time */
Enable,
STP_TZ, /* timezone from STP on CPC */
Retrieve , /* Retrieve options */
Default 99 , /* Default.... default is 20 */
Maximum 255 , /* Maximum.... default is 255 */
MaxUsers noLimit , /* No limit on number of users */
Passwords_on_Cmds , /* What commands allow passwords? */
Autolog yes , /* ... AUTOLOG does */
Link yes , /* ... LINK does */
Logon yes , /* ... and LOGON does, too */
Disconnect_Timeout off , /* Don't force disconnected users */
Vdisk , /* Allow VDISKS for Linux swaps */
Syslim infinite ,
Userlim infinite
...
5. Define virtual switches. In this example, devices 2040-2045 are OSA devices on one CHPID and OSA card, while devices 2060-2065 are on a different CHPID on another OSA card. This architecture prevents VSWITCH1 and VSWITCH2 from having a single point of failure, as shown in the following example:
/**********************************************************************/
/* VSWITCHes */
/* VSWITCH1 - layer 3 - z/VM TCPIP stack */
/* VSWITCH2 - layer 2 - Linux primary interfaces */
/* VSWITCH3 - layer 2 - Linux secondary interconnect - no OSA */
/* */
/**********************************************************************/
DEFINE VSWITCH VSWITCH1 RDEV 2040 2060
MODIFY VSWITCH VSWITCH1 GRANT TCPIP
DEFINE VSWITCH VSWITCH2 ETHERNET RDEV 2043 2063
DEFINE VSWITCH VSWITCH3 ETHERNET
The SHUTDOWN time is set to 10 minutes (600 seconds). With this setting, when z/VM is shut down, it sends a signal to all guests and each Linux system has up to 10 minutes to shut down cleanly, as shown in the following example:
/**********************************************************************/
/* Set signal for shutdown */
/**********************************************************************/
SET SIGNAL SHUTDOWN 600
...
z/VM should now be sufficiently configured to install Oracle.
10.1.2 Defining virtual machines
A profile and virtual machines are defined in z/VM by using the user directory. In the reference environment, DirMaint is configured so the DIRM ADD command is used to create the profile and virtual machines.
Complete the tasks that are described in this section.
Defining a virtual machine for a common 191 disk
Define a virtual machine (named LNXMAINT in this example) to provide for a common read-only 191 disk for all Linux virtual machines. The label JM6289 is shown in bold in the following example (and other examples in this chapter) because that shows values that must be changed for your enterprise:
USER LNXMAINT LNXMAINT 64M 128M BEG
INCLUDE TCPCMSU
LINK TCPMAINT 592 592 RR
MDISK 0191 3390 0001 0020 JM6289 MR READ WRITE MULTIPLE
MDISK 0192 3390 0021 0500 JM6289 MR ALL WRITE MULTIPLE
The 191 disk is only used for this virtual machine’s PROFILE EXEC. The 192 disk, which is read-write, becomes the read-only 191 disk to all other Linux virtual machines. This is where the installation files (kernel and RAMdisk) and the parameter and configuration files are kept.
Defining a profile for all Linux virtual machines
A z/VM user directory profile allows statements that are common to a similar set of virtual machines to be shared. As shown in the following example, the profile named LNXDFLT is common to all Linux systems. The first six command statements allow access to virtual switches VSWITCH2 and VSWITCH3. All Linux virtual machines that use this profile have two network interface controllers (NICs) to the public interface and the primary interconnect:
PROFILE LNXDFLT
COMMAND SET VSWITCH VSWITCH2 GRANT &USERID
COMMAND DEFINE NIC 600 TYPE QDIO
COMMAND COUPLE 600 TO SYSTEM VSWITCH2
COMMAND SET VSWITCH VSWITCH3 GRANT &USERID
COMMAND DEFINE NIC 700 TYPE QDIO
COMMAND COUPLE 700 TO SYSTEM VSWITCH3
CPU 00 BASE
CPU 01
IPL CMS
MACHINE ESA 8
OPTION CHPIDV ONE
CONSOLE 0009 3215 T
SPOOL 000C 2540 READER *
SPOOL 000D 2540 PUNCH A
SPOOL 000E 1403 A
LINK MAINT 0190 0190 RR
LINK MAINT 019D 019D RR
LINK MAINT 019E 019E RR
LINK LNXMAINT 0192 0191 RR
LINK TCPMAINT 0592 0592 RR
LINK ZPRO 0391 0391 RR
The last LINK statement is required if you are using Velocity Software’s zPro.
Defining virtual machines for golden images
The following example shows a virtual machine that is defined for the RHEL 6.2 golden image. The 100 disk is where Linux is installed. The 101 disk becomes a logical volume for the Oracle binaries. After two VDISKs are created at 300 and 301 at virtual machine creation time, the 302 disk becomes the third, slow, swap space:
USER RH62GOLD ORACLE 1G 6G G
INCLUDE LNXDFLT
MDISK 0100 3390 1 10016 LX9A12 MR
MDISK 0101 3390 1 30050 LX6602 MR
MDISK 0302 3390 1 10016 LX9A13 MR
A similar virtual machine, S112GOLD, is created for the SUSE Linux Enterprise Server 11 SP2 golden image.
Defining virtual machines for stand-alone Oracle servers
The following example shows a virtual machine that is defined for a stand-alone of Single Image (SI) Oracle system. The disk device numbers and sizes are identical to the golden images. The two DEDICATE statements of real devices 400 and 500 allows multipathing to FCP/SCSI LUNs:
USER LNXSA1 ORACLE 1G 6G G
INCLUDE LNXDFLT
MDISK 0100 3390 0001 10016 LX9A1A MR
MDISK 0101 3390 0001 30050 LX6605 MR
MDISK 0302 3390 0001 10016 LX9A1B MR
DEDICATE 0400 B800
DEDICATE 0500 B900
The virtual machines LNXSA2 and LNXSA3 are also defined for a reference environment.
Defining virtual machines for Oracle clusters
The following example shows that two virtual machines are defined for a minimal “1.1” Oracle cluster:
•Define the first virtual machine for the cluster with real minidisks for Oracle data disks. Minidisks 200-202 are used for voting disks and 210-213 are used for Oracle data and archives. The MDISK modes of MW for the ASM disks allow multiple-write access. The V mode suffix tells CP to use its virtual reserve/release support, which Oracle ASM uses. The MINIOPT NOMDC statements turn off minidisk cache for the minidisks that precede them.
The DEDCIATE 400 and 500 supply FCP devices for access to the SAN, as shown in the following example:
USER LNXC2N1 ORACLE 4G 6G G
INCLUDE LNXDFLT
MDISK 0100 3390 0001 10016 LX9A1D MR
MDISK 0101 3390 0001 30050 LX6606 MR
MDISK 0200 3390 1 1000 LX9A0E MR
MINIOPT NOMDC
MDISK 0201 3390 1001 1000 LX9A0E MR
MINIOPT NOMDC
MDISK 0202 3390 2001 1000 LX9A0E MR
MINIOPT NOMDC
MDISK 0302 3390 20033 10016 LX6705 MR
MINIOPT NOMDC
DEDICATE 0400 B803
DEDICATE 0500 B903
•Define other virtual machines to be part of the cluster. There are LINK statements to the seven Oracle ASM disks on the first node in the cluster in MW mode. Normally, this link mode is dangerous; however, Oracle CRS is designed to work with multiple systems that are writing to the same disks, as shown in the following example:
USER LNXC2N2 ORACLE 4G 6G G
INCLUDE LNXDFLT
MDISK 0100 3390 0001 10016 LX9A0A MR
MDISK 0101 3390 0001 30050 LX6702 MR
LINK LNXC1N1 0200 0200 MW
LINK LNXC1N1 0201 0201 MW
LINK LNXC1N1 0202 0202 MW
MDISK 0302 3390 0001 10016 LX9A0B MR
DEDICATE 0400 B804
DEDICATE 0500 B904
This completes the profile and virtual machine definitions for a reference environment. This configuration can be considered Iaas.
10.2 PaaS
Now that a virtual machine is defined, an operating system can be added to it. This can be considered PaaS. A Linux distribution must be obtained. This chapter focuses on Red Hat Enterprise Linux (RHEL) 6.2, which is now formally certified by Oracle.
To set up PaaS, complete the tasks that are described in this section.
10.2.1 Preparing to install Red Hat Enterprise Linux 6.2 on the golden image
When RHEL 6.2 Linux is installed, two CMS files are needed: a parameter file and a configuration file. The parameter file has a few common settings and it points to the configuration file. It is common to keep all Linux parameter and configuration files on the same disk, with each Linux virtual machine linking to them read-only. In this example, this is the LNXMAINT 192 disk.
Create the parameter and configuration files on the LNXMAINT 192 disk with the user ID being the file name. This disk is the read-only 191 disk for all Linux virtual machines. Following are the contents of those two files:
==> type rh62gold parm-rh6 d
root=/dev/ram0 ro ip=off ramdisk_size=40000
CMSDASD=191 CMSCONFFILE=RH62GOLD.CONF-RH6
vnc vncpassword=12345678
==> type rh62gold conf-rh6 d
DASD=100-101,300-302
HOSTNAME=rh62gold.itso.ibm.com
NETTYPE=qeth
IPADDR=9.12.7.2
SUBCHANNELS=0.0.0600,0.0.0601,0.0.0602
NETMASK=255.255.240.0
SEARCHDNS=itso.ibm.com
GATEWAY=9.12.4.1
DNS=9.12.6.7
MTU=1500
PORTNAME=DONTCARE
PORTNO=0
LAYER2=1
IPADDR2=10.1.1.2
All variables are recognized by the RHEL installer except for IPADDR2. This variable is used later by the first boot script, boot.onetime, for the private interconnect.
10.2.2 Installing Red Hat Enterprise Linux 6.2 Linux on the golden image
RHEL 6.2 is installed onto the RH62GOLD virtual machine (a detailed description of the installation is outside the scope of this book). For more information, see Chapter 8 of The Virtualization Cookbook for z/VM 6.2 RHEL 6.2 and SLES 11 SP2, which is available at this website:
The virtual machines are given a 3390-9 (approximately 7 GB) for the Linux system, a 3390-27 (approximately 21 GB) for the Oracle binaries, and another 3390-9 for a swap space on disk.
The root file system is not put into a logical volume, but many other file systems are. The rationale for this is that logical volumes allow file system sizes to be easily extended. The root file system is in a single partition because if there is any problem with logical volumes, the Linux system still boots. Because the root file system cannot grow and is relatively small (512 MB), it is important that it is not allowed to fill up. Data of large sizes should be put into logical volumes such as /tmp/ or /opt/.
The FCP/SCSI LUNs for Oracle data are not added during the Linux installation. This is done after cloning is completed.
Table 10-1 shows a summary of the file systems and volumes.
Table 10-1 File system layout for RHEL 6.2
|
Mount point
|
Size
|
Volume group name
|
Logical volume name
|
Minidisk
|
|
/
|
512 MB
|
None
|
None
|
100
|
|
/tmp/
|
1 GB
|
system_vg
|
tmp_lv
|
100
|
|
/usr/
|
3 GB
|
system_vg
|
usr_lv
|
100
|
|
/var/
|
512 MB
|
system_vg
|
var_lv
|
100
|
|
/opt/
|
20 GB
|
opt_vg
|
opt_lv
|
101
|
|
swap
|
7 GB
|
None
|
None
|
302
|
After starting the RHEL 6.2 install, but before starting an SSH session as the user install, there is a possible intermediate step that is necessary. There is an issue in which the Red Hat installer does not recognize disks that were formatted with CPFMTXA. If you used the dasdfmt command to format the minidisks, you can skip this step. If not, start an SSH session and use the dasdfmt command to format the disks. Complete the following steps:
1. Start SSH session to the all system and log in as root. A password is not required.
2. Run the lsdasd command to observe the disks. In the following example, dasdb, dasdc, and dasdf are minidisks that must be formatted:
# lsdasd
Bus-ID Status Name Device Type BlkSz Size Blocks
==============================================================================
0.0.0100 active dasdb 94:4 ECKD ??? 7042MB ???
0.0.0101 active dasdc 94:8 ECKD ??? 21128MB ???
0.0.0300 active dasdd 94:12 FBA ??? 256MB ???
0.0.0301 active dasde 94:16 FBA ??? 512MB ???
0.0.0302 active dasdf 94:20 ECKD ??? 7042MB ???
3. Use a bash for loop and put the dasdfmt commands in the background so the formats can be performed in parallel, as shown in the following example:
# for i in b c f
> do
> dasdfmt -b 4096 -y -f /dev/dasd$i &
> done
[1] 640
[2] 641
[3] 642
4. When you are prompted by the question from the installer: “Which type of installation would you like?”, select Create Custom Layout. Use the GUI tools to create file systems, swap spaces, and logical volumes. As shown in Figure 10-1, the Summary window shows the disk and swap space layout.
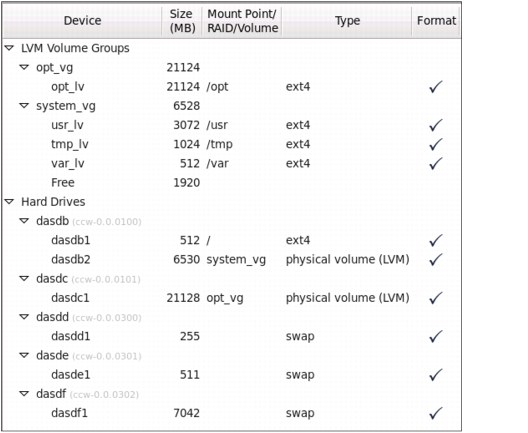
Figure 10-1 File system and swap space layout in RHEL 6.2 golden image
5. Complete the following steps to choose the software during the installation process:
a. Click Customize now at the bottom of the main panel, as shown in the top of Figure 10-2 on page 209.
b. Remove some package groups that were deleted from the Base System group, as shown in Figure 10-2 on page 209.
c. Add two package groups to the Development group. The development tools were added because many software products require access to GNU Collection of Compilers (gcc) and the associated tools and libraries that it pulls in.

Figure 10-2 Software installation choices in Base System and Development groups
After the installation is complete, start an SSH session and observe the file systems and swap spaces with the df -h and swapon -s commands. The reference system is shown in the following example:
# df -h
Filesystem Size Used Avail Use% Mounted on
/dev/dasdd1 504M 162M 317M 34% /
tmpfs 498M 0 498M 0% /dev/shm
/dev/mapper/opt_vg-opt_lv
21G 172M 20G 1% /opt
/dev/mapper/system_vg-tmp_lv
1008M 34M 924M 4% /tmp
/dev/mapper/system_vg-usr_lv
3.0G 1.5G 1.4G 53% /usr
/dev/mapper/system_vg-var_lv
504M 62M 417M 13% /var
# swapon -s
Filename Type Size Used Priority
/dev/dasdc1 partition 259956 0 -1
/dev/dasdb1 partition 519924 0 -2
/dev/dasda1 partition 7211416 0 -3
The RHEL 6.2 golden image should now be installed and is ready to be configured.
10.2.3 Configuring the Red Hat Enterprise Linux 6.2 golden image
The tasks that are described in this section are recommended to configure the golden image. While some of these tasks might seem specific to Oracle servers, often they are helpful for all Linux systems regardless of the running workload.
Adding a network interface to the private interconnect
Linux was installed onto a single network interface by using the NIC starting at virtual device address 600. Oracle Grid requires a private interconnect, but having a second interface for all Linux systems in the LPAR to communicate over can be useful.
To add a second interface for the private interconnect, complete the following steps:
1. Show the NICs that are defined to the virtual machine by using the CP QUERY NIC command that is run with the vmcp module, as shown in the following example:
# modprobe vmcp
# vmcp q nic
Adapter 0600.P00 Type: QDIO Name: DONTCARE Devices: 3
MAC: 02-00-00-00-00-07 VSWITCH: SYSTEM VSWITCH2
Adapter 0700.P00 Type: QDIO Name: UNASSIGNED Devices: 3
MAC: 02-00-00-00-00-08 VSWITCH: SYSTEM VSWITCH3
There is also a second NIC starting at virtual device address 700. This was created in the profile LNXDFLT and it is attached to VSWITCH3.
2. List the configured NIC by using the znetconf -c command, as shown in the following example:
# znetconf -c
Device IDs Type Card Type CHPID Drv. Name State
-------------------------------------------------------------------------------
0.0.0600,0.0.0601,0.0.0602 1731/01 GuestLAN QDIO 00 qeth eth0 online
This shows that the 600 NIC is configured and associated with the eth0 interface.
3. List the unconfigured NIC by using the znetconf -u command, as shown in the following example:
# znetconf -u
Scanning for network devices...
Device IDs Type Card Type CHPID Drv.
------------------------------------------------------------
0.0.0700,0.0.0701,0.0.0702 1731/01 OSA (QDIO) 01 qeth
This shows that the 700 NIC is not yet configured.
4. Configure all NICs by using the znetconf -A command and again view the configured NICs, as shown in the following example:
# znetconf -A
Scanning for network devices...
Successfully configured device 0.0.0700 (eth1)
# znetconf -c
Device IDs Type Card Type CHPID Drv. Name State
--------------------------------------------------------------------------------
0.0.0600,0.0.0601,0.0.0602 1731/01 GuestLAN QDIO 00 qeth eth0 online
0.0.0700,0.0.0701,0.0.0702 1731/01 GuestLAN QDIO 01 qeth eth1 online
This shows that the 700 NIC is now configured and associated with eth1.
5. View the /etc/sysconfig/network-scripts/ifcfg-eth0 file, which is the primary network interface configuration file, as shown in the following example:
# cd /etc/sysconfig/network-scripts/
# cat ifcfg-eth0
DEVICE="eth0"
BOOTPROTO="static"
DNS1="9.12.6.7"
DOMAIN="itso.ibm.com"
GATEWAY="9.12.4.1"
IPADDR="9.12.7.2”
MTU="1500"
NETMASK="255.255.240.0"
NETTYPE="qeth"
NM_CONTROLLED="yes"
ONBOOT="yes"
OPTIONS="layer2=1 portno=0"
PORTNAME="DONTCARE"
SUBCHANNELS="0.0.0600,0.0.0601,0.0.0602"
TYPE="Ethernet"
6. To add another interface, some of the following values must be changed:
– DEVICE : Interface name
– IPADDR : IP address
– SUBCHANNELS : Virtual device addresses of the NIC coupled to the z/VM VSWITCH
Copy the configuration file for eth0 to eth1 and modify the DEVICE, GATEWAY, IPADDR, and NETMASK (optional) variables, depending on your network setup, as shown in the following example:
# cp ifcfg-eth0 ifcfg-eth1
# vi ifcfg-eth1
DEVICE="eth1"
BOOTPROTO="static"
DNS1="9.12.6.7"
DOMAIN="itso.ibm.com"
GATEWAY=""
IPADDR="10.1.1.2"
MTU="1500"
NETMASK="255.255.255.0"
NETTYPE="qeth"
NM_CONTROLLED="yes"
ONBOOT="yes"
OPTIONS="layer2=1 portno=0"
PORTNAME="DONTCARE"
SUBCHANNELS="0.0.0700,0.0.0701,0.0.0702"
TYPE="Ethernet"
Because there is no route off the network, the GATEWAY variable is set to the null string. The Subnetting of the interconnect is set to a class C (or /24), so the subnet mask is changed to 255.255.255.0.
7. Reboot the system, as shown in the following example:
# reboot
Broadcast message from [email protected]
(/dev/pts/0) at 7:58 ...
8. Start a new SSH session as root and run the ifconfig eth1 command. You should see the new network interface, as shown in the following example:
The system is going down for reboot NOW!
...
# ifconfig eth1
eth1 Link encap:Ethernet HWaddr 02:00:00:00:00:08
inet addr:10.1.1.2 Bcast:10.1.1.255 Mask:255.255.255.0
inet6 addr: fe80::ff:fe00:8/64 Scope:Link
UP BROADCAST RUNNING MULTICAST MTU:1500 Metric:1
RX packets:0 errors:0 dropped:0 overruns:0 frame:0
TX packets:13 errors:0 dropped:0 overruns:0 carrier:0
collisions:0 txqueuelen:1000
RX bytes:0 (0.0 b) TX bytes:830 (830.0 b)
If this interface is not present or does not show an IP address, you must remedy the problem.
Configuring the yum command on the RHEL 6.2 golden image
Software packages can always be added by using the rpm command. They also can be added to all co-requisite packages recursively by using the yum command. It must be configured to point to the all source (in this example, the FTP server at IP address 9.12.4.69, user name is totibm, and the password is password).
Complete the following steps:
1. Change directory to /etc/yum.repos.d/, as shown in the following example:
# cd /etc/yum.repos.d/
2. Create the file named rhel62.repo. Include in it the URL from which RHEL 6.2 was installed, as shown in the following example:
# vi rhel62.repo
[RHEL62]
name=Red Hat Enterprise Linux 6.2
baseurl=ftp://totibm:[email protected]//code/rhel62-s390x/dvd1
3. Copy the GPG KEY file for the RHEL 6.2 release, as shown in the following example:
# scp [email protected]:/code/rhel62-s390x/dvd1/RPM-GPG-KEY-redhat-release .
The authenticity of host '9.12.4.69 (9.12.4.69)' can't be established.
RSA key fingerprint is 01:be:16:9d:5d:b6:8a:e0:77:87:ef:a5:f8:37:2b:c3.
Are you sure you want to continue connecting (yes/no)? yes
Warning: Permanently added '9.12.4.69' (RSA) to the list of known hosts.
Password:
RPM-GPG-KEY-redhat-release 100% 3211 3.1KB/s 00:00
4. Install it by using the rpm --import command, as shown in the following example:
# rpm --import RPM-GPG-KEY-redhat-release
5. Test the new configuration by using the yum grouplist command, as shown in the following example:
# yum grouplist
Loaded plugins: product-id, security, subscription-manager
Updating certificate-based repositories.
Setting up Group Process
installed Groups:
Additional Development
Base
You should see a long list of package groups that was obtained from the installation server. If you do not see a long list of commands, you must remedy the problem.
Preparing for multipathing
The device-mapper-multipath RPM package is necessary for setting up multipathing to FCP/SCSI disks. Install it by using the yum -y all command, as shown in the following example:
# yum -y all device-mapper-multipath
...
===============================================================================
Package Arch Version Repository Size
===============================================================================
Installing:
device-mapper-multipath s390x 0.4.9-46.el6 RHEL62 92 k
Installing for dependencies:
device-mapper-multipath-libs s390x 0.4.9-46.el6 RHEL62 142 k
Transaction Summary
===============================================================================
all 2 Package(s)
Total download size: 233 k
Installed size: 746 k
Downloading Packages:
(1/2): device-mapper-multipath-0.4.9-46.el6.s390x.rpm | 92 kB 00:00
(2/2): device-mapper-multipath-libs-0.4.9-46.el6.s390x.r | 142 kB 00:00
-------------------------------------------------------------------------------
Total 172 kB/s | 233 kB 00:01
Running rpm_check_debug
Running Transaction Test
Transaction Test Succeeded
Running Transaction
Installing : device-mapper-multipath-libs-0.4.9-46.el6.s390x 1/2
6. Create the file /etc/multipath.conf. This turns on friendly names (for example, mpatha instead of long names) and adds all ECKD DASD devices to the black list, so they are not considered for multipathing, as shown in the following example:
# cd /etc
# vi multipath.conf
##
## This is a template multipath-tools configuration file
## Uncomment the lines relevent to your environment
##
defaults {
user_friendly_names yes
}
blacklist_exceptions {
devnode "dasd[a-z]*"
}
The basic configuration of multipathing should now be configured.
Installing and configuring the VNC server
A typical Oracle installation requires a graphical environment. Linux graphical environments often are implemented with the X Window System or Virtual Network Computing (VNC), which is described in this section. The tightvnc package is a VNC server and allows for a graphical environment to be set up easily by using the vncserver command.
To set up a graphical environment with VNC, complete the following steps:
1. Install the VNC server and associated packages by using the following yum command:
# yum -y all tigervnc-server openmotif xterm xsetroot xorg-x11-xauth
...
Installed:
openmotif.s390x 0:2.3.3-4.el6
tigervnc-server.s390x 0:1.0.90-0.15.20110314svn4359.el6_1.1
xorg-x11-server-utils.s390x 0:7.5-5.2.el6
xorg-x11-xauth.s390x 1:1.0.2-7.1.el6
xterm.s390x 0:253-1.el6
Dependency installed:
libXaw.s390x 0:1.0.6-4.1.el6 libXdmcp.s390x 0:1.0.3-1.el6
libXmu.s390x 0:1.0.5-1.el6 libXp.s390x 0:1.0.0-15.1.el6
libXpm.s390x 0:3.5.8-2.el6 libXxf86misc.s390x 0:1.0.2-1.el6
libmcpp.s390x 0:2.7.2-4.1.el6 libxkbfile.s390x 0:1.0.6-1.1.el6
mcpp.s390x 0:2.7.2-4.1.el6 xkeyboard-config.noarch 0:2.3-1.el6
xorg-x11-fonts-misc.noarch 0:7.2-9.1.el6 xorg-x11-xkb-utils.s390x 0:7.4-6.el6
Complete!
2. The VNC server configuration file is /etc/sysconfig/vncservers. Edit the file by adding one line at the bottom (another line is commented that can be used after the oracle and grid users are added), as shown in the following example:
# cd /etc/sysconfig
# vi vncservers
...
# VNCSERVERS="2:myusername"
# VNCSERVERARGS[2]="-geometry 800x600 -nolisten tcp -localhost"
# VNCSERVERS="1:root 2:oracle 3:grid"
VNCSERVERS="1:root"
This setting allows root to start VNC session 1 (a comment is added if later the oracle user is to start session 2 and the grid user is to start session 3).
3. Set a VNC password by using the vncpasswd command. This password is needed to connect to the VNC server, as shown in the following example:
# vncpasswd
Password: 123456768
Verify: 12345678
4. Start the VNC server. This creates some initial configuration files under the /root/.vnc/ directory, as shown in the following example:
# service vncserver start
Starting VNC server: 1:root
New 'rh62gold.itso.ibm.com:1 (root)' desktop is rh62gold.itso.ibm.com:1
Starting applications specified in /root/.vnc/xstartup
Log file is /root/.vnc/rh62gold.itso.ibm.com:1.log
[ OK ]
5. The directory /root/.vnc/ is where configuration files are kept. Change to that directory and list the files, as shown in the following example:
# cd /root/.vnc
# ls
passwd rh62gold.itso.ibm.com:1.log rh62gold.itso.ibm.com:1.pid xstartup
6. The file xstartup is the script that is run when the VNC server starts and where the window manager is set. It is recommended that you change from the Tiny window manger, twm, to the more usable Motif window manager, mwm, as shown in the following example
# vi xstartup // change last line
...
xsetroot -solid gray
vncconfig -iconic &
xterm -geometry 80x24+10+10 -ls -title "$VNCDESKTOP Desktop" &
mwm &
7. Verify that the Motif window manager is available by using the which command, as shown in the following example:
# which mwm
/usr/bin/mwm
8. Restart the VNC server by using the service command, as shown in the following example:
# service vncserver restart
Shutting down VNC server: 1:root [ OK ]
Starting VNC server: 1:root
New 'rh62gold.itso.ibm.com:1 (root)' desktop is rh62gold.itso.ibm.com:1
Starting applications specified in /root/.vnc/xstartup
Log file is /root/.vnc/rh62gold.itso.ibm.com:1.log
[ OK ]
You can now use the VNC client to connect to the IP address of the Linux administration system with a :1 appended. Supply the root password to start a session.
Copying files to Linux
Additional files are needed on the golden image to complete all the steps in this chapter. There are two boot scripts that are described in this chapter. The Web material that is associated with this book is available at this website:
Also, there are two RPMs from Oracle that are necessary and one from Velocity Software if you plan to use any Velocity tools.
In this example, the .tar file that is associated with this Redbooks publication is copied to the /tmp/ directory and the tar xzvf command is used to extract the contents, as shown in the following example:
# cd /tmp
# tar xzvf SG248104.tgz
oracleRedbook-SG248104/
oracleRedbook-SG248104/README.txt
oracleRedbook-SG248104/disclaimer.txt
oracleRedbook-SG248104/vm/
oracleRedbook-SG248104/vm/clone.exec
oracleRedbook-SG248104/linux/
oracleRedbook-SG248104/linux/boot.oracle
oracleRedbook-SG248104/linux/boot.onetime
oracleRedbook-SG248104/linux/database.rsp
This creates one directory, oracleRedbook-SG248104/, with subdirectories linux/ for Linux files and vm/ for z/VM files.
Copy the two Linux boot scripts and the two response files to the /etc/init.d/ directory on the RHEL 6.2 golden image. Also, copy the other files that are necessary for Oracle and Velocity Software, if applicable, as shown in Table 10-2.
Table 10-2 Files that are needed on golden image
|
File (RHEL 6.2)
|
Source
|
Description
|
|
/etc/init.d/boot.onetime
|
SG248104.tgz file
|
Configure network
|
|
/etc/init.d/boot.oracle
|
SG248104.tgz file
|
Prepare for Oracle all
|
|
/tmp/database.rsp
|
SG248104.tgz file
|
Database response file
|
|
/tmp/grid.rsp
|
SG248104.tgz file
|
Grid response file
|
|
/tmp/LV11R6.s390x.rpm
|
Velocity Software
|
New snmp MIBs
|
|
/tmp/ora-val-rpm-EL6-DB-11.2.0.3-1.s390x.rpm
|
Oracle
|
Pre-requisite checker
|
|
/tmp/cvuqdisk-1.0.9-1.rpm
|
Oracle
|
For Oracle Grid
|
You should now have all the additional files on the golden image.
Customizing for Velocity Software products
If you plan to use Velocity Software products, this step is necessary. In the reference environment, Velocity Pro was implemented. An RPM was installed to instruct snmp to add the Velocity Software MIB so that detailed Linux performance information can be retrieved by the software.
Complete the following steps:
1. Confirm that the file LV11R6.s390x.rpm was copied to the RHEL 6.2 golden image.
2. Show the file, then install it by using the rpm -ivh command, as shown in the following example:
# cd /tmp
# ls -l LV11R6.s390x.rpm
-rw-r--r--. 1 root root 22092 Oct 10 10:28 LV11R6.s390x.rpm
# rpm -ivh LV11R6.s390x.rpm
Preparing... ########################################### [100%]
1:libvsi ########################################### [100%]
3. Create a backup copy of the snmpd.conf file in the /etc/snmp/ directory, as shown in the following example:
# cd /etc/snmp
# cp snmpd.conf snmpd.conf.orig
4. Rename the two snmp*.conf.vsi configuration files to snmpd*.conf, as shown in the following example:
# mv snmpd.conf.vsi snmpd.conf
# mv snmp.conf.vsi snmp.conf
5. Add the flag -10 to the /etc/init.d/snmpd service script, as shown in the following example:
# cd /etc/init.d
# vi snmpd
...
# diff snmpd /tmp/snmpd.orig
45c45
< daemon -10 --pidfile=$pidfile $binary $OPTIONS
---
> daemon --pidfile=$pidfile $binary $OPTIONS
The system should now be configured for Velocity Software products.
Turning off SE Linux
SE Linux is turned off for now by setting the SELINUX variable in the file /etc/selinux/config from enforcing to permissive. If this service is a requirement of your security policy, it can be turned on later.
To turn off SE Linux, complete the following steps:
1. Change directory to /etc/selinux/ and create a backup copy of the config file, as shown in the following example:
# cd /etc/selinux
# cp config config.orig
2. Edit the config file and set SELINUX to permissive, as shown in the following example:
# vi config
# This file controls the state of SELinux on the system.
# SELINUX= can take one of these three values:
# enforcing - SELinux security policy is enforced.
# permissive - SELinux prints warnings instead of enforcing.
# disabled - No SELinux policy is loaded.
SELINUX=permissive
# SELINUXTYPE= can take one of these two values:
# targeted - Targeted processes are protected,
# mls - Multi Level Security protection.
SELINUXTYPE=targeted
SE Linux is not enforced after the next reboot.
Customizing rc.local
The file /etc/rc.d/rc.local is a boot script that is put in place for local configurations. To customize rc.local, perform the following steps:
1. Create a backup copy, then edit the file /etc/rc.d/rc.local, which is run at boot time, as shown in the following example:
# cd /etc/rc.d
# cp rc.local /tmp/rc.local.orig
2. Edit the file and add the following lines:
# vi rc.local
#!/bin/sh
#
# This script will be executed *after* all the other init scripts.
# You can put your own initialization stuff in here if you don't
# want to do the full Sys V style init stuff.
touch /var/lock/subsys/local
# Set system to logoff on halt and power off
chshut halt vmcmd logoff
chshut poff vmcmd logoff
# detach CMS disks to allow for possible live guest relocation
modprobe vmcp
vmcp det 190
vmcp det 191
vmcp det 19d
vmcp det 19e
# Add the sg module for SCSI support of LUNs
modprobe sg
Be aware of the following points concerning the additional lines:
•The first two lines set the system to log off the z/VM virtual machine at shut down and power off time by using the chshut command. This is useful with the z/VM SIGNAL SHUTDOWN feature, in that all Linux systems shut down and log off cleanly when z/VM is shut down.
•The next five lines install the vmcp module so CP commands can be issued from Linux then use the module to detach four CMS disks. This is so it is possible to use Live Guest Relocation (LGR) with z/VM 6.2 Single System Image (SSI) because virtual machines with links to CMS disks cannot be relocated.
•The last line adds the sg module for SCSI support of LUNs.
Turning on a boot script
There are many ways to clone Linux. One approach is to copy the golden image’s disks to those of a new virtual machine, IPL (boot) the new Linux, and have the new Linux configure itself before networking is started. This is the model that is used in this chapter with the file boot.onetime. For more information about the source code listing for this script, see Appendix D, “Additional material” on page 357. It reads the same CMS configuration file that the RHEL installer uses: userID.CONF on the CMS 191 disk.
To turn on the first boot script, complete the following steps:
1. Set the boot.onetime script to be executable by using the chmod +x command, as shown in the following example:
# cd /etc/init.d
# chmod +x boot.onetime
2. Set the boot.onetime script to start at boot time by using the chkconfig command, as shown in the following example:
# chkconfig boot.onetime on
3. View the link in the following run level 3 startup sequence:
# ls -l /etc/rc.d/rc3.d/S*boot.*
lrwxrwxrwx. 1 root root 22 Nov 6 15:00 /etc/rc.d/rc3.d/S01boot.onetime -> ../init.d/boot.onetime
The boot.onetime script is set to boot early in run level 3 by noting the S01 prefix.
The golden image is now configured to run a new boot script.
Shutting down the RHEL 6.2 golden image
It is not a good practice to clone a running system, so all golden images are normally shut down. Shut down the golden image now by using the following command:
# shutdown -h now
...
The RHEL 6.2 golden image should now be ready to be cloned from.
|
Important: At the time of this writing, an issue was found with RHEL 6 where the system does not shut down. Instead, the shutdown process froze. A Red Hat bugzilla bug, 872702, was opened and is available at this website:
|
10.2.4 Copying a REXX EXEC on z/VM for cloning support
The first half of the cloning process that is described in the previous section is the copying of the disks. This can be done from z/VM or from Linux. The example in this book is a REXX EXEC so it is accomplished from z/VM. The source code listing for this EXEC is in Appendix D, “Additional material” on page 357.
It is recommended that you copy the CLONE EXEC to the MAINT 191 disk. You can choose another virtual machine; however, it must have sufficient privileges. The following example shows the FTP process from a DOS session:
C:> ftp 9.12.4.200
ftp> user MAINT
ftp> put CLONE.EXEC
ftp> quit
You should now be ready to try a clone.
10.2.5 Testing the cloning a virtual machine
In section 10.1.2, “Defining virtual machines” on page 203, three virtual machines were created with identically sized and addressed disks as the RHEL 6.2 golden image. In this example, we test cloning from RH62GOLD to one of the other virtual machines, LNXSA2 , by completing the following steps:
1. Log on to LNXMAINT.
2. Copy the configuration and parameter files from those of the golden image to those with file names of the target user ID, as shown in the following example:
==> copy rh62gold conf-rh6 d lnxsa2 = =
==> copy rh62gold parm-rh6 d lnxsa2 = =
3. Edit the parameter file and modify the CMSCONFFILE variable to point to the new configuration file, as shown in the following example:
==> x lnxsa2 parm-rh6
root=/dev/ram0 ro ip=off ramdisk_size=40000
CMSDASD=191 CMSCONFFILE=LNXSA2.CONF-RH6
vnc vncpassword=12345678
4. Edit the configuration file and modify the HOSTNAME and IPADDR variables for the new host name and primary IP address. Also, modify the IPADDR2 variable, which the Red Hat installer does not reference but the boot.onetime script does, to that of the secondary IP address, as shown in the following example:
==> x lnxsa2 conf-rh6
DASD=100-101,200-202,210-213,300-302
HOSTNAME=lnxsa2.itso.ibm.com
NETTYPE=qeth
IPADDR=9.12.7.4
SUBCHANNELS=0.0.0600,0.0.0601,0.0.0602
NETMASK=255.255.240.0
SEARCHDNS=itso.ibm.com
GATEWAY=9.12.4.1
DNS=9.12.6.7
MTU=1500
PORTNAME=DONTCARE
PORTNO=0
LAYER2=1
IPADDR2=10.1.1.4
5. Log on to MAINT.
6. Start the CLONE EXEC with the source user ID and the target user ID as parameters, as shown in the following example:
==> clone rh62gold lnxsa2
HCPCQU045E RH62GOLD not logged on
Are you sure you want to overwrite disks on lnxsa2 (y/n)?
y
Trying FLASHCOPY of 1100 to 2100 ...
Command complete: FLASHCOPY 1100 0 10015 TO 2100 0 10015
DASD 1100 DETACHED
DASD 2100 DETACHED
Trying FLASHCOPY of 1101 to 2101 ...
Command complete: FLASHCOPY 1101 0 30049 TO 2101 0 30049
DASD 1101 DETACHED
DASD 2101 DETACHED
Trying FLASHCOPY of 1302 to 2302 ...
Command complete: FLASHCOPY 1302 0 10015 TO 2302 0 10015
DASD 1302 DETACHED
DASD 2302 DETACHED
Starting new clone LNXSA2
Command accepted
In this example, FLASHCOPY succeeded so the cloning process took only a few seconds.
7. Quickly log out of MAINT and log on to the new clone. You should see boot messages scrolling on the console. If Linux does not boot, there was a problem copying disks that must be remedied. You should see some from S01boot.onetime similar to those shown in the following example:
AUTO LOGON *** LNXSA2 USERS = 65
HCPCLS6056I XAUTOLOG information for LNXSA2: The IPL command is verified by the
IPL command processor.
...
dasd-eckd 0.0.0191: DASD with 4 KB/block, 360000 KB total size, 48 KB/track, linux disk layout
dasdf:CMS1/ LXM192: dasdf1
S01boot.onetime: source host name = rh62gold
S01boot.onetime: source IP address = 9.12.7.2
S01boot.onetime: source IP address 2 = 10.1.1.2
S01boot.onetime: targetParm = LNXSA2.CONF-RH6
S01boot.onetime: target host name = lnxsa2
S01boot.onetime: target IP address = 9.12.7.4
S01boot.onetime: target IP address 2 = 10.1.1.4
S01boot.onetime: Modifying network values
stop on panic configured.
...
The newly cloned Linux system should come up with its new host name and IP address. Additionally, the second IP address, set in the IPADDR2 variable, is used to set up the private interconnect. If the newly cloned Linux does not come up with the new IP address, try the IP address of the golden image. If you do get to that IP address, verify the virtual machine that Linux system is running on by using the vmcp q userid command. If it is running on the newly cloned virtual machine, this shows that the disk cloning worked, but the setting of the IP address did not work. This issue must be remedied before you proceed.
If you can log in with SSH to the new IP address, run the ifconfig command. You should also see the second IP address on the eth1 interface, as shown in the following example:
# ifconfig
eth0 Link encap:Ethernet HWaddr 02:00:00:00:01:69
inet addr:9.12.7.4 Bcast:9.12.15.255 Mask:255.255.240.0
inet6 addr: fe80::ff:fe00:169/64 Scope:Link
UP BROADCAST RUNNING MULTICAST MTU:1500 Metric:1
RX packets:459 errors:0 dropped:0 overruns:0 frame:0
TX packets:80 errors:0 dropped:0 overruns:0 carrier:0
collisions:0 txqueuelen:1000
RX bytes:40003 (39.0 KiB) TX bytes:12740 (12.4 KiB)
eth1 Link encap:Ethernet HWaddr 02:00:00:00:01:6A
inet addr:10.1.1.4 Bcast:10.1.1.255 Mask:255.255.255.0
inet6 addr: fe80::ff:fe00:16a/64 Scope:Link
UP BROADCAST RUNNING MULTICAST MTU:1500 Metric:1
RX packets:202 errors:0 dropped:0 overruns:0 frame:0
TX packets:13 errors:0 dropped:0 overruns:0 carrier:0
collisions:0 txqueuelen:1000
RX bytes:5656 (5.5 KiB) TX bytes:830 (830.0 b)
...
The next step is SaaS.
10.3 SaaS for Oracle stand-alone
In section 10.2, “PaaS” on page 205, you configured a system and cloned an RHEL 6.2 Linux to it by using the boot.firstone script to modify networking values of the new clone. Similarly, to affect SaaS, the boot.oracle script was also copied. It is set to run late in run level 3 because many other services, such as, the network, are required to be running first.
Up to this point, only traditional ECDK minidisks were used for disk storage. This is a common practice for Linux on System z as minidisks are easy to virtualize. It is also common to use SCSI/FCP disks for Oracle data because the size requirements can be large. SCSI/FCP disk are not as easy to virtualize because of the need to identify the world wide port number (WWPN) and the Logical Unit Number (LUN). As the IPADDR2 variable was added to the RHEL 6 configuration file, additional variables also can be added for identifying target SCSI FCP disks. In this example, two disks are added to the system and a logical volume is created for Oracle data. In addition, there are two paths over two CHPIDs to each disk. This is so that multipathing can be set up so to eliminate a single point of failure. This environment is shown in Figure 10-3.

Figure 10-3 FCP/SCSI disks’ WWPNs and LUNs
At a high level, the SaaS’ first boot script, boot.oracle, performs the following tasks:
•Defines users and groups for Oracle
•Installs all co-requisite RPMs
•Configures the Network Time Protocol (NTP)
•Sets limits for the system and then the oracle and grid users
•Sets kernel parameters per Oracle requirements
•Configures FCP disks for Oracle data storage
•Creates a logical volume from the two FCP disks (for Oracle SI)
•Mounts the logical volume over a new directory (for Oracle SI)
To set up SaaS for Oracle SI by using the methodology described, complete the tasks that are described in this section.
10.3.1 Configuring a Linux system for the Oracle boot script
This section describes the second boot script that reads the same CMS configuration file that the RHEL installer uses: userID.CONF on the Linux system’s read-only 191 disk, which is the LNXMAINT 192 disk.
To configure the golden image for the Oracle boot script, complete the following steps:
1. Log on to LNXMAINT.
2. Add the following variables to the configuration file for the LNXSA2 virtual machine:
– The FCP400WWPN and FCP500WWPN variables set the WWPNs for each channel path (devices 400 and 500).
– The FCPLUN1 and FCPLUN2 variables set the LUNs for each of two disks.
– The SOFTWARE variable is set to prepare for Oracle Stand-alone (SI). One of the following values is used:
• OracleStandalone: For Single instance servers
• OracleGrid: For servers that are part of a cluster
– The PASSWORD variable is used later to set Oracle passwords.
The following values are used in the example environment in this book:
DASD=100-101,200-202,210-213,300-302
HOSTNAME=lnxsa2.itso.ibm.com
NETTYPE=qeth
IPADDR=9.12.7.4
SUBCHANNELS=0.0.0600,0.0.0601,0.0.0602
NETMASK=255.255.240.0
SEARCHDNS=itso.ibm.com
GATEWAY=9.12.4.1
DNS=9.12.6.7
MTU=1500
PORTNAME=DONTCARE
PORTNO=0
LAYER2=1
IPADDR2=10.1.1.4
FCP400WWPN=0x500507630500c74c
FCP500WWPN=0x500507630508c74c
FCPLUN1=0x4010401200000000
FCPLUN2=0x4011401200000000
SOFTWARE=OracleStandalone
PASSWORD=Oracle_01
3. Confirm that the boot.oracle script was copied to the golden image into the /etc/init.d/ directory. If it was not, do so now.
4. Set the script to be executable by using the chmod +x command, as shown in the following example:
# chmod +x boot.oracle
5. Set the script to start at boot time by using the chkconfig command, as shown in the following example:
# chkconfig boot.oracle on
6. Shut down the golden image.
After the golden image is cloned and the clone is booted, the boot.oracle script runs near the end of run level 3 and reads the configuration file on the LNXMAINT 192 disk.
10.3.2 Cloning a virtual server
You should be ready to clone a server that self-customizes for an Oracle stand-alone or grid installation.
The CLONE EXEC that is provided with the code that is associated with this book assumes the minidisk layout of virtual machines that are defined in this chapter. Therefore, it copies minidisks 100, 101, and 302. If you modified this layout, the EXEC must be modified accordingly.
Complete the following steps:
1. Start the CLONE EXEC with the golden image user ID as the source and the target user ID, as shown in the following example:
==> clone rh62gold lnxsa2
HCPCQU045E RH62GOLD not logged on
Are you sure you want to overwrite disks on lnxsa2 (y/n)?
y
Trying FLASHCOPY of 1100 to 2100 ...
Command complete: FLASHCOPY 1100 0 10015 TO 2100 0 10015
DASD 1100 DETACHED
DASD 2100 DETACHED
Trying FLASHCOPY of 1101 to 2101 ...
Command complete: FLASHCOPY 1101 0 30049 TO 2101 0 30049
DASD 1101 DETACHED
DASD 2101 DETACHED
Trying FLASHCOPY of 1302 to 2302 ...
Command complete: FLASHCOPY 1302 0 10015 TO 2302 0 10015
DASD 1302 DETACHED
DASD 2302 DETACHED
Starting new clone LNXSA2
Command accepted
Ready; T=0.01/0.02 17:20:06
AUTO LOGON *** LNXSA2 USERS = 65
HCPCLS6056I XAUTOLOG information for LNXSA2: The IPL command is verified by the
IPL command processor.
|
Attention: If your disk array does not support FLASHCOPY, or if the service is not ready (for example, if you ran two clones in a short period), the code falls back to the z/VM DDR command. The output is different and the process is much slower, as shown in the following example:
==> clonesa2
HCPCQU045E RH62GOLD not logged on
Are you sure you want to overwrite disks on LNXSA2 (y/n)?
y
Trying FLASHCOPY of 1100 to 2100 ...
Command complete: FLASHCOPY 1100 0 10015 TO 2100 0 10015
DASD 1100 DETACHED
DASD 2100 DETACHED
Trying FLASHCOPY of 1101 to 2101 ...
HCPCMM296E Status is not as required - 1101; an unexpected condition
HCPCMM296E occurred while executing a FLASHCOPY command, code = AE.
FLASHCOPY failed, falling back to DDR ...
z/VM DASD DUMP/RESTORE PROGRAM
HCPDDR696I VOLID READ IS 0X0101
HCPDDR696I VOLID READ IS 0X0101
COPYING 0X0101
COPYING DATA 10/21/12 AT 12.15.11 GMT FROM 0X0101 TO 0X0101
INPUT CYLINDER EXTENTS OUTPUT CYLINDER EXTENTS
START STOP START STOP
...
|
2. Log off LNXMAINT.
3. Log on to the target virtual machine. You should see that the network is configured again, as shown in the following example:
...
S01boot.onetime: this userID = LNXSA2
...
Later in the run level, you should see the following output from boot.oracle:
...
S98boot.oracle: Searching for SOFTWARE variable in parameter file LNXSA2.CONF-RH6
S98boot.oracle: SOFTWARE variable = OracleStandalone
S98boot.oracle: Preparing for Oracle standalone installation
S98boot.oracle: Creating Oracle groups and users
S98boot.oracle: cmd: groupadd -g 198 oinstall
S98boot.oracle: cmd: groupadd -g 199 asmadmin
S98boot.oracle: cmd: groupadd -g 201 dba
S98boot.oracle: cmd: groupadd -g 205 asmdba
S98boot.oracle: cmd: groupadd -g 207 asmoper
...
S98boot.oracle: cmd: chown -R oracle.oinstall /opt/oracle
S98boot.oracle: *
S98boot.oracle: ********************************************************
S98boot.oracle: Sucessfully completed!
S98boot.oracle: ********************************************************
dasd-eckd 0.0.0191: No operational channel path is left for the device
...
4. Start an SSH session to the newly cloned Linux system.
5. Change the directory to /tmp/ and review the output file, /tmp/boot.oracle.out.
The system should now be prepared for an Oracle database installation.
10.3.3 Silently installing Oracle Database
Oracle can be installed manually through a graphical interface, or silently with the use of a response file. A silent installation is probably less labor-intensive and more reliable.
In this example, a Linux system was cloned to the virtual machine named LNXSA2. The configuration file includes the variable SOFTWARE=OracleStandalone. When the boot script boot.oracle read this, it prepares the system for an Oracle SI installation.
To perform a silent install of Oracle Database, complete the tasks that are described in the following sections.
Preparing the response file
A database response file named database.rsp is included with the files that are associated with this book. Complete the following steps to view this file:
1. Change to the /tmp/ directory and make oracle the owner of the file and oinstall the group, as shown in the following example:
# cd /tmp
2. View the contents of the file by using the cat command, as shown in the following example:
# cat database.rsp
oracle.all.responseFileVersion=/oracle/all/rspfmt_dball_response_schema_v11_2_0
oracle.all.option=ALL_DB_AND_CONFIG
ORACLE_HOSTNAME=xxxx
UNIX_GROUP_NAME=oinstall
INVENTORY_LOCATION=/opt/oraInventory
SELECTED_LANGUAGES=en
ORACLE_HOME=/opt/oracle/11.2
ORACLE_BASE=/opt/oracle
oracle.all.db.installedition=EE
oracle.all.db.EEOptionsSelection=false
oracle.all.db.optionalComponents=oracle.rdbms.partitioning:11.2.0.3.0,oracle.oraolap:11.2.0.3.0,oracle.rdbms.dm:11.2.0.3.0,oracle.rdbms.dv:11.2.0.3.0,oracle.rdbms.lbac:11.2.0.3.0,oracle.rdbms.rat:11.2.0.3.0
oracle.all.db.DBA_GROUP=dba
oracle.all.db.OPER_GROUP=dba
oracle.all.db.isRACOneall=false
oracle.all.db.config.starterdb.type=GENERAL_PURPOSE
oracle.all.db.config.starterdb.globalDBName=rac.us.oracle.com
oracle.all.db.config.starterdb.SID=rac
oracle.all.db.config.starterdb.characterSet=AL32UTF8
oracle.all.db.config.starterdb.memoryOption=true
oracle.all.db.config.starterdb.memoryLimit=2000
oracle.all.db.config.starterdb.allExampleSchemas=true
oracle.all.db.config.starterdb.enableSecuritySettings=false
oracle.all.db.config.starterdb.password.ALL=xxxx
oracle.all.db.config.starterdb.control=DB_CONTROL
oracle.all.db.config.starterdb.automatedBackup.enable=false
oracle.all.db.config.starterdb.storageType=FILE_SYSTEM_STORAGE
oracle.all.db.config.starterdb.fileSystemStorage.dataLocation=/oradata
oracle.all.db.config.asm.ASMSNMPPassword=xxxx
SECURITY_UPDATES_VIA_MYORACLESUPPORT=false
DECLINE_SECURITY_UPDATES=true
oracle.installer.autoupdates.option=SKIP_UPDATES
3. Use the grep command to view variables that must be set for your enterprise, as shown in the following example:
# grep xxxx database.rsp
ORACLE_HOSTNAME=xxxx
oracle.all.db.config.starterdb.password.ALL=xxxx
oracle.all.db.config.asm.ASMSNMPPassword=xxxx
These are replaced by the boot.onetime and boot.oracle first boot scripts based on variables set in the CMS CONF file. The other values should be correct for the settings that are made by the boot.oracle script. The values for ORACLE_HOME and ORACLE_BASE point to /opt/ over which a large logical volume mounted.
Running the silent installer
To run the silent installer, complete the following steps:
1. Mount the NFS directory with the Oracle binaries. In this example, it is on the NFS server 9.12.5.131 in the /zCode/ directory. It is mounted over the local directory /mnt/, as shown in the following example:
# mount 9.12.5.131:/zCode /mnt -o vers=4
2. Switch the user to Oracle by using the su - command, which runs the user’s profile, as shown in the following example:
# su - oracle
3. Verify that the size of the target directory is sufficient, as shown in the following example:
$ df -h | grep opt
/dev/mapper/opt_vg-opt_lv
21G 172M 20G 1% /opt
In this example, there is 20 GB of free space.
4. Change to the directory with the binaries for Oracle database. In the following example, it is database/:
# cd /mnt/database
5. Run the runInstaller command with the following parameters:
$ ./runInstaller -silent -force -ignorePrereq -responseFile ~/database.rsp
Starting Oracle Universal installer...
Checking Temp space: must be greater than 80 MB. Actual 923 MB Passed
Checking swap space: must be greater than 150 MB. Actual 7803 MB Passed
Preparing to launch Oracle Universal installer from /tmp/Oraall2012-11-10_06-07-16AM. Please wait ...$ You can find the log of this all session at:
/opt/oraInventory/logs/installactions2012-11-10_06-07-16AM.log
6. This process runs for some time. It is possible to use the tail --follow command to monitor the log file as messages are added. Eventually, you should see a success message, as shown in the following example:
The installation of Oracle Database 11g was successful.
Please check '/opt/oraInventory/logs/silentall2012-11-10_06-07-16AM.log' for more details.
As a root user, execute the following script(s):
1. /opt/oraInventory/oraRoot.sh
2. /opt/oracle/product/11.2.0/dbhome_1/root.sh
Successfully Setup Software.
7. Exit from the oracle user to return to the root shell, as shown in the following example:
$ exit
8. Run the first script, as shown in the following example:
# /opt/oraInventory/oraRoot.sh
Changing permissions of /opt/oraInventory.
Adding read,write permissions for group.
Removing read,write,execute permissions for world.
Changing groupname of /opt/oraInventory to oinstall.
The execution of the script is complete.
9. Run the second script, as shown in the following example:
# /opt/oracle/product/11.2.0/dbhome_1/root.sh
Check /opt/oracle/product/11.2.0/dbhome_1/all/root_lnxsa2.itso.ibm.com_2012-11-10_06-52-22.log for the output of root script
10. Check the output of the second script, as shown in the following example:
# cat /opt/oracle/product/11.2.0/dbhome_1/all/root_lnxsa2.itso.ibm.com_2012-11-10_06-52-22.log
Performing root user operation for Oracle 11g
The following environment variables are set as:
ORACLE_OWNER= oracle
ORACLE_HOME= /opt/oracle/product/11.2.0/dbhome_1
Creating /etc/oratab file...
Entries will be added to the /etc/oratab file as needed by
Database Configuration Assistant when a database is created
Finished running generic part of root script.
Now product-specific root actions will be performed.
Finished product-specific root actions.
This output shows that the script was successful.
11. Verify that Oracle is working by using the sqlplus command, as shown in the following example:
$ sqlplus / as sysdba
SQL*Plus: Release 11.2.0.3.0 Production on Mon Nov 12 10:54:05 2012
Copyright (c) 1982, 2011, Oracle. All rights reserved.
Connected to an idle instance.
Note the Oracle release number. In this example, it is 11.2.0.3.0.
12. Quit out of the SQL environment, as shown in the following example:
SQL> quit
Disconnected
This shows that Oracle is installed and working. You should now be ready to start working with Oracle SI.
..................Content has been hidden....................
You can't read the all page of ebook, please click here login for view all page.