


Using the Cloud Control agent to manage Oracle databases
This chapter provides information about how to deploy Oracle Enterprise Manager Cloud Control 12c Release 2 (12.1.0.2) agents on a Linux on System z environment to manage Oracle databases.
To manage Oracle databases, we can use Database Control or Cloud Control. Both are intuitive web-based tools from Oracle. Database Control is installed with every database installation and can be used to monitor a single database instance or a clustered database, whereas the Cloud Control server can monitor many databases that are running on multiple environments from a single console. In addition to databases monitoring, other applications such as Siebel, PeopleSoft, and support for monitoring certain non-Oracle products, IBM WebSphere® Application Server, can also be monitored from a single Cloud Control console. While the Cloud Control Server does not run on Linux on System z, the agents are running on the Linux on System z guests and they communicate with the Cloud Control Server.
In this chapter, we share our experiences with installing a Cloud Control Server on x86 based Linux server and how the agents can be deployed from there to monitor the databases that are running on Linux on System z. Before deploying the agents, the Cloud Control Software Library must be updated with the required levels of agent software and plug-ins. This operation must be performed by connecting to Oracle repository site online. Starting with Oracle Enterprise Manager Cloud Control 12c Release 2 (12.1.0.2), command line utility emcli can also be used to update the Grid Control Software Library in offline mode. Then, the agents can be deployed from the Cloud Control Console and by using silent agent deployment option at the Linux guests (these procedures are provided in this chapter).
This chapter includes the following topics:
5.1 Basic Enterprise Manager Cloud Control Architecture
The Cloud Control Architecture comprises the following components:
•Oracle Management Services (OMS)
The OMS is a web-based application that coordinates with the Management Agents and the plug-ins and stores the collected information in a repository. It also renders the user interface for Enterprise Manager Cloud Control. The OMS is deployed to the Oracle Middleware home (Middleware home) and installs Oracle WebLogic Server if it does not exist in the environment.
•Oracle Management Repository
At the time of Enterprise Manager Cloud Control installation, the Management Repository is configured in the existing database. This is where all the information that is collected by the Management Agent is stored.
•Plug-ins
Plug-ins are deployed to the OMS and the Management Agent. They work in with the OMS and Management Agent to monitor all targets in the environment. By default, the plug-ins that are needed for Oracle Databases are installed automatically at the time of Enterprise Manager Cloud Control installation.
•Oracle Management Agent
The Management Agent is deployed to the hosts, which are monitored by the Enterprise Manager Cloud Control and works with the plug-ins to monitor the targets that are running on that managed host.
•Cloud Console
Cloud Console is the centralized location to monitor and manage the systems and services.
Figure 5-1 shows the Cloud Control Architecture as shown in the Oracle Enterprise Manager Grid Control Basic Installation Guide.

Figure 5-1 Cloud Control Architecture
5.2 Creating Cloud Control infrastructure on x86 Linux
For more information, see the My Oracle support document FAQ: Enterprise Manager Cloud Control 12c Availability / Certification / Install / Upgrade Frequently Asked Questions [ID 1363863.1].
In our environment, we created Oracle Enterprise Manager Cloud Control on a x86-64 Red Hat Enterprise Linux 6 (RHEL 6.2) Linux Server.
For more information about the hardware and software requirements for the server architecture where the Cloud Control is installed, see Oracle Enterprise Manager Cloud Control Basic Installation Guide, 12c Release 2 (12.1.0.2) E22624-15.
We followed the basic processes to install 11.2.0.3 Database Enterprise Edition and created a database. This installation procedure is beyond the scope of this document. For more information, see the Oracle documentation.
In the server, we created the Oracle Enterprise Manager Cloud Control infrastructure by following these steps:
1. Download and extract the installation .zip files.
2. Start the installation in a graphical terminal, such as VNC client.
3. Customize the Enterprise Manager Cloud Control during installation.
4. Customize the Oracle database as per repository configuration requirements.
5. Run the root.sh command.
6. Make sure that Enterprise Manager Cloud Control Console is accessible.
5.2.1 Downloading and extracting the installation files
The following files are downloaded from Oracle OTN network (we confirmed that we were authorized to download the software) for Enterprise Manager Cloud Control 12c Release 2 (12.1.0.2) for Linux x86-64:
•em12cr2_linux64_disk1.zip (1,604,870,804 bytes) (cksum - 1628274676)
•em12cr2_linux64_disk2.zip (1,685,863,807 bytes) (cksum - 1265572904)
•em12cr2_linux64_disk3.zip (2,290,032,132 bytes) (cksum - 2732732695)
We extracted the files and the following directory structure was created:
drwxrwxrwx. 10 oracle oinstall 4096 Oct 11 08:33 ./
drwxrwxrwx. 5 oracle oinstall 4096 Oct 11 08:34 ../
drwxrwxr-x. 8 oracle oinstall 4096 Aug 31 17:02 install/
drwxrwxr-x. 4 oracle oinstall 4096 Aug 31 17:01 jdk/
drwxrwxr-x. 4 oracle oinstall 4096 Aug 31 17:03 libskgxn/
drwxrwxr-x. 4 oracle oinstall 4096 Aug 31 16:52 oms/
drwxrwxr-x. 2 oracle oinstall 4096 Aug 31 17:04 plugins/
-rwxrwxr-x. 1 oracle oinstall 99186 Sep 4 12:49 Release_Notes.pdf*
drwxrwxr-x. 2 oracle oinstall 4096 Aug 31 17:02 response/
-rwxrwxr-x. 1 oracle oinstall 5136 Feb 10 2010 runInstaller*
drwxrwxr-x. 9 oracle oinstall 4096 Aug 31 17:03 stage/
drwxrwxr-x. 2 oracle oinstall 4096 Aug 31 17:02 wls/
-rwxrwxr-x. 1 oracle oinstall 1510253719 Aug 31 16:52 WT.zip*
5.2.2 Installing and configuring the Enterprise Manager Cloud Control 12c
The following tasks are completed by the installation wizard as part of a new Enterprise Manager system:
•Install the Middleware Components in the Middleware home (in our example, /u01/app/mw). The following components are installed in the Middleware home:
– Java Development Kit (JDK) 1.6 v24
– Oracle WebLogic Server 11g Release 1 (10.3.5)
– Oracle Management Service 12c Release 2 (12.1.0.2)
– Oracle JRF 11g Release (11.1.1.6.0), which includes oracle_common directory
– Oracle Web Tier 11g Release (11.1.1.6.0), which includes Oracle_WT directory
– Oracle plug-ins
•Oracle Management Agent 12c Release 2 (12.1.0.2) is installed in the agent base directory that is specified during installation (outside the Middleware home, in our example, /u01/app/oracle/agent).
•An Oracle WebLogic domain called GCDomain and a default user account, weblogic were used as the administrative user and a node manager account also was created.
•Oracle Management Service is configured in the Instance Base location (gc_inst) in the Middleware home for storing all configuration details that are related to Oracle Management Service 12c (in our example, /u01/app/mw/gc_inst).
•Configured Oracle Management Repository in the existing Oracle Database (in our example, Oracle SID: orcl).
•Configured the various installed components.
Start the installation wizard as oracle user from the extracted directory location of the downloaded installation files. As shown in Figure 5-2, the installation starts to specify the Oracle Support Credentials. (The Software Updates option is skipped in Figure 5-2.)

Figure 5-2 My Oracle Support Details window
During prerequisite checks, the installer verifies the requirements for installation. We made sure that all the steps are successful.
However, during software packages checks, we encountered the following software error, as shown in Figure 5-3:
Checking for glibc-devel-2.5-49.i386; Not found. failed <<<<
In SUSE Linux Enterprise Server 11, the following package also failed:
Checking for libstdc++43-4.3; Not found. Failed <<<<

Figure 5-3 Prerequisite checks
However, the warnings that are shown in Figure 5-3 can be ignored for the following packages if you have them already installed in your system as per My Oracle Support documents.
|
Recommended My Oracle Support documents: For more information, see the following documents:
•EM 12c: Installation on OEL6 64-bit Fails At Pre-requisite Check Due To Missing Package 'glibc-devel-2.5-49.i386', ID 1478035.1
•EM 12c: Agent Installation on SLES11 fails at Pre-requisite check “Checking for libstdc++-4.1.0; Not found. Failed,” ID 1471398.1
|
Ignore the warnings and continue the installation.

Figure 5-4 Installation types
As shown in Figure 5-5, we specified the middleware home location, agent base directory location, and the host name where the installation is carried out.

Figure 5-5 Installation Details
As shown in Figure 5-6, the mandatory plug-ins are automatically grayed out and we can select any other plug-ins that are needed. In our example, we left the default selection.

Figure 5-6 Plug-in Deployment window

Figure 5-7 WebLogic Server Configuration Details window
As shown in Figure 5-8, we specified the required information for the installed Database connection in the server. We also choose the deployment size as SMALL.

Figure 5-8 Database Connection Details window
When we clicked Next, we encountered the error that is shown in Figure 5-9. Although we did not configure the database for Enterprise Manager when we created the database, we still received the error.

Figure 5-9 Repository existence error
We dropped the repository by using the following command:
$ emca -deconfig dbcontrol db -repos drop
Figure 5-10 shows that the confirmation that repository was dropped.

Figure 5-10 Repository dropped by using the emca command
The Oracle Cost-Based Optimizer statistics (CBO) gathering job prerequisite appeared, as shown in Figure 5-11 and we choose Yes to fix the issue automatically.

Figure 5-11 CBO statistics gathering error
The Database configuration prerequisite warnings were shown (see Figure 5-12) and we choose to fix the database configurations as recommended by the installation wizard. We used the SQL*PLUS tool to change the parameters and then clicked OK.

Figure 5-12 Database configuration prerequisite warnings
The Repository configuration password details were entered, as shown in Figure 5-13.

Figure 5-13 Repository Configuration Details window
We accepted the default port values, as shown in Figure 5-14.

Figure 5-14 Port Configuration Details
The configuration values were reviewed and we clicked Install, as shown in Figure 5-15.

Figure 5-15 Review window
The installation started and we see the progress of the installation, as shown in Figure 5-16.

Figure 5-16 Installation Progress Details window
When the installation and configuration completed, we ran the allroot.sh command as the root user based on the instructions, as shown in Figure 5-17.

Figure 5-17 Installation Progress Details
The Enterprise Manager Cloud Control configuration and installation took more than 40 minutes to complete and displayed the status. As shown in Figure 5-18, the URL and port number access information for Enterprise Manager Cloud Control and Admin Server was shown.

Figure 5-18 Finish window
When we used the Enterprise Manager Cloud Control URL, we were asked to trust and certify and add the exception. Then, the Enterprise Manager Cloud Control window opened and we logged on as sysman with the assigned password.
We accepted the license requirement and this completed our Enterprise Manager Cloud Control 12c Server installation.
These tasks are for a simple configuration installation process. Enterprise Manager Cloud Control offers multiple configurations. For more information about advanced installation and configuration options, see the Oracle manuals.
5.3 Updating the Cloud Control Software Library in online mode
Enterprise Manager Cloud Control 12c by default has the agent software installed for the operating system where the 12c is installed. In our example, the agent for the Linux x86-64 is available when the Enterprise Manager Cloud Control 12c is installed on the Linux x86-64 Server. But, the agent to monitor the Oracle databases on Linux on System z architecture is not available in the base installation.
Management Agent software for Linux on System z architecture must be downloaded and stored in the Software Library by using the Self Update console. The Self Update feature is a dashboard that is used to obtain information about new updates and a process flow to review, download, and apply those updates. An Oracle Software Library update can be accomplished in online mode or offline mode and the agent can be deployed through the GUI or in silent installation mode.
The Software Library is a repository that stores software entities such as software patches and application software. The Software Library stores its repository on a file system that is accessible by the Oracle Management Services (OMS). Depending on the usage, the size of this file can reach 50 GB. For more information about advanced features and requirements, see the My Oracle Support (MOS) document Understanding and Configuring Software Library In 12C Cloud Control [ID 1368035.1].
5.3.1 Upgrading Software Library by using the Self Update Feature in online
In the following example, we show how the Software Library can be updated in online mode on an Enterprise Manager Cloud Control that is running on x86-64 Linux architecture to get the management agent for Linux on System z.
In general, the process includes the following steps:
1. Set up My Oracle Support Credentials in 12c Cloud Control.
2. Configure the Software Library storage space.
3. Download and apply software updates.
4. Download and apply Management Agent software.
Setting up My Oracle Support Credentials in 12c Cloud Control
Complete the following steps to set up the credentials:
1. Log on to Enterprise Manager Cloud Control 12c
2. Select the Setup menu that is at the upper right of the page. Select My Oracle Support → Set Credentials.
3. In the My Oracle Support window, enter the User Name and Password fields and click Apply.
The My Oracle Support Preferred Credentials are now set up in the 12c Cloud Control.
Configuring the Software Library storage space
The storage location in Software Library represents a repository of files. These files are uploaded by Software Library and we must add at least one upload file storage location. This location can be an OMS Shared location or an OMS Agent location. In our example, we used an OMS shared location and we complete the following steps to set up the location:
1. Identified the /oracle/emlib for the Software Library storage space.
2. Logged on to Enterprise Manager Cloud Control 12c.
3. As shown in Figure 5-19, we selected the Setup menu at the upper right of the page. We then selected Provisioning and Patching → Software Library.

Figure 5-19 Setup option

Figure 5-20 Action options
5. As shown in Fig 5-24, in the Administration page, we choose OMS Shared Filesystem and selected Add to add a new OMS Shared file system.

Figure 5-21 Administration options
6. As shown in Figure 5-22, in the Add OMS Shared File System Location panel, we entered the Name (emlib) and Location (/oracle/emlib) of the OMS host.

Figure 5-22 Shared Filesystems Location panel
7. When we clicked OK, a metadata registration job is submitted (as shown in Figure 5-23) if it is the first time that the process is done. The metadata registration job imports all of the metadata information of all the installed plug-ins from the Oracle home of the OMS.

Figure 5-23 Metadata registration job submission
The progress of the job can be tracked from Enterprise menu by selecting Job, and then clicking Activity.
On the Job Activity page in the Advanced Search region, enter the name of the job, choose Targetless as the Target Type, and then click Search. Typically, the name of the job starts with SWLIBREGISTERMETADATA_*. If this job status shows as succeeded, it implies the software library is configured properly.
Acquiring software updates online
Complete the following steps to acquire software updates online:
1. Ensure that the Cloud Control is set to the online mode, as seen on Figure 5-24 on page 93.
2. Select Setup from the menu at the upper right of the page.
a. Choose Provisioning and Patching → Offline Patching, then change the setting for Connection to Online.
b. Select Software Library.

Figure 5-24 Online settings

Figure 5-25 Self Update Panel
4. Select Extensibility → Self Update, and then select Check Updates to see the complete list of available updates for the Agent software.
A background job is submitted to get the new updates from Oracle. The output log shows the output of the job.
Acquiring Management Agent software in online mode
After the list of available updates are populated in the system, we can download the required Management Agent software and then apply that software to the OMS host.
Complete the following steps to download Management Agent software in online mode:
1. As shown in Figure 5-26, Select the Setup menu at the upper right of the page and then click Extensibility → Self Update.
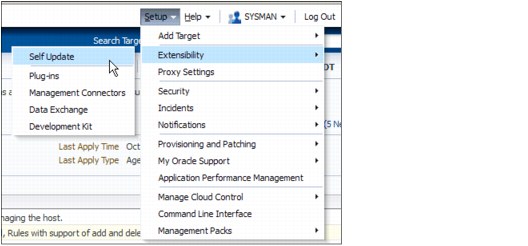
Figure 5-26 Setup menu
2. Select the entity type Agent Software and choose Open from the Action menu. The entity type page shows agent software for different platforms.
a. We selected IBM: Linux on System z OS Platform and 12.1.0.2 version from the list of available updates.
b. We clicked Download and scheduled the download job for an immediate run, as shown in Figure 5-27.

Figure 5-27 Schedule the download
After the successful download, the status is shown as Downloaded.
c. We then selected Apply for the Downloaded Agent.
The next step stages the agent software in the Software Library and makes it available to the Add Targets wizard, which we used to install the agent on System z Linux host machines.
After the job is complete, the new status is shown as Applied.
5.4 Updating the Cloud Control Software Library in offline mode
Previously in this chapter, we showed the steps to update the library in online mode. In this section, we describe the process that is used to update the library in the offline mode.
5.4.1 Upgrading Software Library by using the Self Update Feature in offline mode
In the following example, we describe how the Software Library can be updated in offline mode on an Enterprise Manager Cloud Control that is running on x86-64 Linux architecture to get the management agent for Linux on System z. Oracle requires the use of the Enterprise Manager command-line interface (EMCLI to update the EM Cloud Control Software updates.
In general, the process includes the following tasks:
1. Set up the EMCLI.
2. Configure the Software Library storage space.
3. Download and apply software updates offline.
4. Download and apply Management Agent software offline.
Installing and setting up the EMCLI
In the following example, we describe the process that is used to install and set up the EMCLI. By using the EMCLI, we can update the Software Library in offline mode. The EMCLI client can be installed on any machine in the network. In our example, we installed the client on the Enterprise Manager Cloud Control Server. The only requirement was to have Java version 1.6.0_25 or greater.
We completed the following steps to install and set up the EMCLI client:
1. Connect to the EMCLI download package from the Enterprise Manager Cloud Console by using the following URL:
In the window that opens, click Download the Enterprise Manager CLI kit to your workstation.
2. Download the emclikit.jar file.
3. Ensure that the Java version is 1.6.0_25 and JAVA_HOME and PATH is set up appropriately to use that Java level.
4. Use the following command (as seen in Figure 5-28 on page 96) to install EMCLI:
java -jar emclikit.jar client -install_dir=/zCode/patches
Specify /zCode/patches as the installation directory.

Figure 5-28 Command to install the EMCLI client
5. Set up the EMCLI client by running the following command from where the EMCLI client is installed:
./emcli setup -url="https://9.12.5.131:7802/em" -username=sysman -dir=/zCode/patches -trustall -certans=yes
6. Use the ./emcli setup command to see how the EMCLI client was set up in that environment, as shown in Figure 5-29.

Figure 5-29 Completion of the EMCLI installation
Configuring the Software Library storage space
The storage location in Software Library represents a repository of files. These files are uploaded by Software Library and we must add at least one upload file storage location. This location can be an OMS Shared location or an OMS Agent location. In our case, we decided to use an OMS shared location. We used the process that is described in “Configuring the Software Library storage space” on page 89 to set up the storage space as /zCode/EMGridSWLib, as shown in Figure 5-30.

Figure 5-30 Content of the library
Acquiring software updates offline
Complete the following steps to update the software in Offline mode:
1. Ensure that the Cloud Control Connection setting is set to the offline mode.
2. Select Setup at the upper right of the page. Choose Provisioning and Patching → Offline Patching and change the setting for Connection to Offline.
3. Select Setup at the upper right of the page.
4. Choose Extensibility → Self Update, and then click Check Updates to get the complete list of available updates for the Agent software. It is indicated in the window that the connection status is Offline.
As shown in Figure 5-31, a link is provided in a panel to download the latest Oracle updates catalog. Instructions also are included about how to import the catalog updates into Enterprise Manager.

Figure 5-31 Link to the latest updates
5. By using the provided link (you must provide MOS logon credentials), the .zip file is downloaded, as shown in Figure 5-32.
Figure 5-32 Downloaded compressed file
6. Use the emcli import_update_catalog command to specify the location for the downloaded patch file and omslocal options, as shown in Figure 5-33.

Figure 5-33 Location of the download patches
Acquiring Management Agent software in offline mode
After the list of available updates are populated in the system, we can download the required Management Agent Software and then apply that to the OMS host.
Complete the following steps to download the software and apply it to the OMS host:
1. Select Setup in the upper right of the page and then click Extensibility → Self Update.
2. Select the entity type Agent Software and then choose Open from the Action menu. The entity type page shows agent software for different platforms.
3. Select IBM: Linux on System z as the OS Platform and 12.1.0.2 version from the list of available updates.
A panel shows the link to download the selected agent and instructions about how to import the agent software updates into Enterprise Manager. Use the link to download the .zip file.
4. Use the emcli import_update_catalog command to specify the location for the downloaded patch file and omslocal options, as shown in the Figure 5-34 on page 99.

Figure 5-34 Update is loaded
In the Self Update window, the status is shown as Downloaded for the IBM: Linux on System z agent type.
5. Select Apply for the Downloaded Agent.
The agent software is staged in the Software Library and is available to the Add Targets wizard, which we used to install the agent on System z Linux host machines.
After the job is completed, the status is shown as Applied.
5.5 Deploying the Agents from Cloud Control console
Oracle Management Agent 12c for Linux on System z hosts can be deployed from Enterprise Manager Cloud Control 12c console or by silent installation method. In this section, we describe the processes to deploy from Cloud Control 12c console.
Oracle recommends the use of the Add Host Targets wizard, which converts a host that is not managed to a managed host in the Enterprise Manager system by installing an Oracle Management Agent 12c. For Real Application Cluster (RAC) with multiple nodes, Management Agent must be installed on each of the nodes separately in the Add Host Targets wizard by adding each node explicitly as a destination host.
For more information about hardware and software requirements for installing Cloud Control Agents, see the Oracle documentation.
The following minimum requirements are specified by Oracle for a stand-alone Management Agent:
•2 CPU cores per host
•512 MB of RAM
•1 GB of free hard disk space
•400 MB of /tmp directory space at the destination host
The network between Cloud Control Server where the OMS is running and the destination hosts should be accessible.
We used the ping by host name to make sure that the OMS and hosts can be reached.
We used the following process to install Oracle Management Agent 12c for Linux on System z from Enterprise Manager Cloud Control 12c.
To add or install an Agent on a host, the software distribution of the Agent that corresponds to the host’s platform must be available in the Software Library.
Complete the following steps to verify the availability of Linux on System z agents availability in the EM Cloud Control Server:
1. Log on to Enterprise Manager Cloud Control 12c.

Figure 5-35 Self-update options
3. In the Status section of the Self Update window, select Agent Software as the type, as shown in Figure 5-36

Figure 5-36 Select the agent
4. In the Agent Software Updates section (see Figure 5-37 on page 101), you can see that Agent Software for the Linux on System z shows a status of Applied. When the rows are highlighted, the bottom of the window shows the status, as it did when the agent software was available, downloaded, and applied.

Figure 5-37 Status of the agent

Figure 5-38 Add the target
6. On the Add Targets Manually page, select Add Host Targets and then click the Add Host button.
7. On the Host and Platform page (see Figure 5-39 on page 102), complete the following steps:
a. Accept the default name that is assigned for this session.
b. Click Add and enter the fully qualified name of the host. Select IBM: Linux on System z as the platform of the host on where we want to install the Management Agent. Select Next.

Figure 5-39 Add host
8. On the Installation Details page (see Figure 5-40), complete the following steps:
a. In the Deployment Type section, select Fresh Agent Install.
b. In the Installation Details section, enter the path to the base directory for Installation Base Directory (the software binaries, security files, and inventory files of Management Agent are copied here). In our case, it is /u01/oracle/agentHome.
c. For the Instance Directory, we accept the default instance directory location (all Management Agent-related configuration files can be stored here). In our case, the /u01/oracle/agentHome/agent_inst directory is used.
|
Recommendation: Oracle recommends that the instance directory is maintained inside the installation base directory.
|

Figure 5-40 Installation details
9. From the Named Credential list, add a new profile of which the credentials are used for setting up the SSH connectivity between the OMS and the remote host. They are also used for installing a Management Agent, as shown in Figure 5-41. Click Next.

Figure 5-41 UserName
10. On the Review page (see Figure 5-42), review the details and then click Deploy Agent to install the Management Agent.

Figure 5-42 Review panel
The progress of installation can be monitored in the Add Hosts Status window, as shown in Figure 5-43.

Figure 5-43 Add host status
During the prerequisite check stage, the deployment failed concerning root.sh authorization messages, as shown in Figure 5-44.

Figure 5-44 Prerequisite check
Continue the installation by selecting the Continue all hosts option, as shown in Figure 5-45.

Figure 5-45 Continue the host status option
An Agent Deployment Summary message shows when the process is complete. The Deployment of the agent shows the status that is shown in Figure 5-46.

Figure 5-46 Host status
11. Run root.sh in the host location (as recommended) and, then click Done.
By selecting Targets → Hosts in the Cloud Control (as shown in Figure 5-47), we can see the availability of the hosts in the Hosts window, as shown in Figure 5-48.

Figure 5-47 Host options

Figure 5-48 Availability of hosts
5.6 Deploying Management Agents in silent mode
Oracle Management Agent 12c for Linux on System z hosts can be deployed from Enterprise Manager Cloud Control 12c console or by using the silent installation method. In this section, we describe the processes to deploy it in silent mode. Installing a Management Agent in silent mode is an alternative to installing it by using the Add Host Target wizard. The silent mode requires the use of a response file for providing the installation details and a deployment script (agentDeploy.sh) for silently installing the Management Agent by using the information that is supplied in the response file.
The process that is used to install Oracle Management Agent 12c for Linux on System z in silent mode includes the following steps:
1. At the EM Cloud Control server, download the Agent Software as a .zip file.
2. Customize a response file at the Destination host.
3. Use an AgentDeploy script at the Destination host.
In our example, we used the emcli commands to check the list of supported platforms. After the list of available updates are populated in the system, the required Management Agent software can be downloaded and then applied that to the Destination host by completing the following steps:
1. Check the available Platform Management Agents software by using the following emcli commands, as shown in Figure 5-49:
– $ emcli login
– $ emcli sync
– $ emcli get_supported_platforms
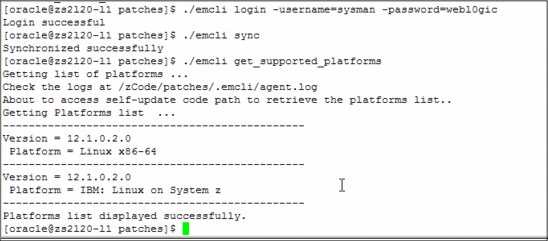
Figure 5-49 Checking supported platforms
From the output, you can see that IBM: Linux on System z, 12.1.0.2.0 is available in the Enterprise Manager Cloud Control Server.
2. Run the $ ./emcli get_agentimage command to download the Agent software, as shown in Figure 5-50.
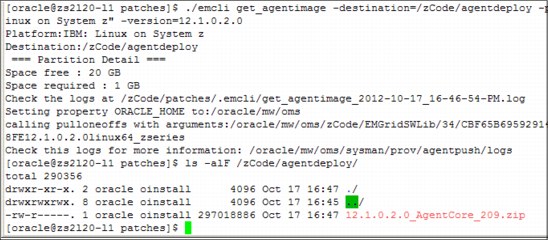
Figure 5-50 Download the file
3. The software needs at least 1 GB of storage. Copy this file into the Destination host and extract the .zip there, as shown in Figure 5-51.

Figure 5-51 Extracted file
At the Destination host, the agent.rsp file was customized, as shown in Figure 5-52.

Figure 5-52 Customized agent
$ agentDeploy.sh AGENT_BASE_DIR=/u01/oracle/agent2 RESPONSE_FILE=/tmp/foragent/agent912710.rsp

Figure 5-53 Running the Deploy script
This completes the Agent Deployment in silent mode process. From the Grid Control Server Console, we can add the databases that are running on the Destination host to be monitored.
5.7 Adding the databases for monitoring
After the agent for Linux on System z is deployed, we can discover the Oracle Databases on that host for monitoring. Complete the following steps:
1. In Cloud Control, select Targets → Databases, and then click Add in the Databases section, as shown in Figure 5-54.

Figure 5-54 Discover the database target
2. In the Host field of the Add Database Instance Target: Specify Host window, specify the fully qualified host name lnxcl2n1.itso.ibm.com and click Continue, as shown in Figure 5-55.

Figure 5-55 Specify the Host name
3. The agent discovers the database (REMOTEDB), ASM instance, and the Listener as shown in Figure 5-56.

Figure 5-56 Showing the listener
4. Configure the database by selecting the Configure at the REMOTEDB line and specify the database- related parameters. Save the configuration.
The database configuration is now saved and the databases that are running on Linux on System z in the Oracle Enterprise Manager Cloud Control can be monitored.
5.8 Summary
In this chapter, we shared our experiences with installing a Cloud Control Server on x86 based Linux server and deployed the agents from there to monitor the databases that are running on Linux on System z.
Before deploying the agents, we also updated the Cloud Control Software Library with the required levels of agent software and plug-ins by connecting to the Oracle repository site online.
Starting with Oracle Enterprise Manager Cloud Control 12c Release 2 (12.1.0.2), we showed how the command line utility emcli can also be used to update the Grid Control Software Library in offline mode. The agents were deployed from the Cloud Control Console and the silent agent deployment option was used at the Linux guests.
We also showed how to enable the cloud control to monitor Oracle databases.
..................Content has been hidden....................
You can't read the all page of ebook, please click here login for view all page.