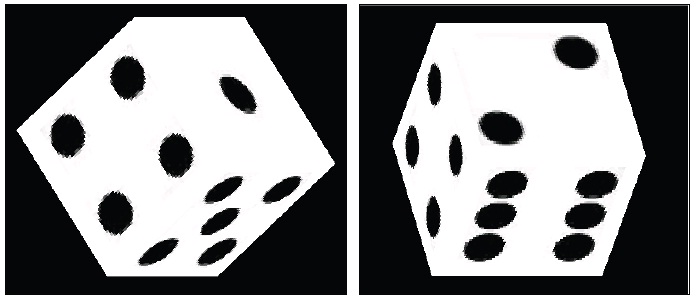
Texture mapping is a technique that overlays an image onto an object's surface to create a more realistic scene. This recipe covers how to add texture in OpenGL ES 1.x.
Readers are recommended to read the Drawing 3D graphics and lighting up the scene with OpenGL ES 1.x API recipe before going through this one.
The following steps create an Android project that demonstrates mapping texture to 3D objects:
- Create an Android application named
DiceG1. Set the package name ascookbook.chapter4.gl1x. Please refer to the Loading native libraries and registering native methods recipe in Chapter 2, Java Native Interface, if you want more detailed instructions. - Right-click on the project
CubeG1, select Android Tools | Add Native Support. - Add three Java files, namely
MyActivity.java,MySurfaceView.java, andMyRenderer.javaunder thecookbook.chapter4.diceg1package.MyActivity.javaandMySurfaceView.javaare similar to the previous recipe. MyRenderer.javais listed as follows:public class MyRenderer implements GLSurfaceView.Renderer{ public float mAngleX; public float mAngleY; private Context mContext; public MyRenderer(Context pContext) { super(); mContext = pContext; } @Override public void onSurfaceCreated(GL10 gl, EGLConfig config) { //call native methods to load the textures LoadTexture(R.drawable.dice41, mContext, 0); LoadTexture(R.drawable.dice42, mContext, 1); LoadTexture(R.drawable.dice43, mContext, 2); LoadTexture(R.drawable.dice44, mContext, 3); LoadTexture(R.drawable.dice45, mContext, 4); LoadTexture(R.drawable.dice46, mContext, 5); naInitGL1x(); } … … private void LoadTexture(int resId, Context context, int texIdx) { //Get the texture from the Android resource directory InputStream is = context.getResources().openRawResource(resId); Bitmap bitmap = null; try { BitmapFactory.Options options = new BitmapFactory.Options(); options.inPreferredConfig = Bitmap.Config.ARGB_8888; bitmap = BitmapFactory.decodeStream(is, null, options); naLoadTexture(bitmap, bitmap.getWidth(), bitmap.getHeight(), texIdx); } finally { try { is.close(); is = null; } catch (IOException e) { } } if (null != bitmap) { bitmap.recycle(); } } }- Add the
DiceG1.cpp,Cube.cpp,Cube.h, andmylog.hfiles under thejnifolder. Please refer to the downloaded project for the complete content. Here, we list out the code thefornaLoadTextureandnaInitGL1xnative methods inDiceG1.cpp, and thedrawmethod inCube.cpp:void naLoadTexture(JNIEnv* env, jclass clazz, jobject pBitmap, int pWidth, int pHeight, int pId) { int lRet; AndroidBitmapInfo lInfo; void* l_Bitmap; GLint format; GLenum type; if ((lRet = AndroidBitmap_getInfo(env, pBitmap, &lInfo)) < 0) { return; } if (lInfo.format == ANDROID_BITMAP_FORMAT_RGB_565) { format = GL_RGB; type = GL_UNSIGNED_SHORT_5_6_5; } else if (lInfo.format == ANDROID_BITMAP_FORMAT_RGBA_8888) { format = GL_RGBA; type = GL_UNSIGNED_BYTE; } else { return; } if ((lRet = AndroidBitmap_lockPixels(env, pBitmap, &l_Bitmap)) < 0) { return; } glGenTextures(1, &texIds[pId]); glBindTexture(GL_TEXTURE_2D, texIds[pId]); glTexParameteri(GL_TEXTURE_2D, GL_TEXTURE_MIN_FILTER, GL_NEAREST); glTexParameteri(GL_TEXTURE_2D, GL_TEXTURE_MAG_FILTER, GL_NEAREST); glTexParameteri(GL_TEXTURE_2D, GL_TEXTURE_WRAP_S, GL_REPEAT); glTexParameteri(GL_TEXTURE_2D, GL_TEXTURE_WRAP_T, GL_REPEAT); glTexImage2D(GL_TEXTURE_2D, 0, format, pWidth, pHeight, 0, format, type, l_Bitmap); AndroidBitmap_unlockPixels(env, pBitmap); } void naInitGL1x(JNIEnv* env, jclass clazz) { glDisable(GL_DITHER); glHint(GL_PERSPECTIVE_CORRECTION_HINT, GL_NICEST); glClearColor(0.0f, 0.0f, 0.0f, 1.0f); glEnable(GL_CULL_FACE); glClearDepthf(1.0f); glEnable(GL_DEPTH_TEST); glDepthFunc(GL_LEQUAL); glShadeModel(GL_SMOOTH); mCube.setTexCoords(texIds); glTexEnvx(GL_TEXTURE_ENV, GL_TEXTURE_ENV_MODE, GL_REPLACE); glEnable(GL_TEXTURE_2D); } Cube.cpp: drawing the cube and mapping texture void Cube::draw() { glEnableClientState(GL_VERTEX_ARRAY); glEnableClientState(GL_TEXTURE_COORD_ARRAY); // Enable texture-coords-array glFrontFace(GL_CW); glBindTexture(GL_TEXTURE_2D, texIds[0]); glTexCoordPointer(2, GL_FLOAT, 0, texCoords); glVertexPointer(3, GL_FLOAT, 0, vertices); glDrawElements(GL_TRIANGLES, 18, GL_UNSIGNED_BYTE, indices); …. glDisableClientState(GL_VERTEX_ARRAY); glDisableClientState(GL_TEXTURE_COORD_ARRAY); } - Add the
Android.mkfile under thejnifolder with the following content:LOCAL_PATH := $(call my-dir) include $(CLEAR_VARS) LOCAL_MODULE := DiceG1 LOCAL_SRC_FILES := Cube.cpp DiceG1.cpp LOCAL_LDLIBS := -lGLESv1_CM -llog -ljnigraphics include $(BUILD_SHARED_LIBRARY)
- Build the Android NDK application and run it on an Android device. The app will display a cube textured as a dice:

This recipe adds a texture to the 3D cube to make it look like a dice.
- Texture coordinates: A texture is typically a 2D image. Texture coordinates
(s, t)are usually normalized to[0.0, 1.0]as shown in the following diagram. Texture image is mapped to[0, 1]in both thesandtaxes:
- Loading textures: The first step of mapping texture in OpenGL ES is to load them. In our example, we used Android SDK to read image files from drawable resources and pass the bitmaps to native code. The native method
naLoadTexturelocks the bitmap image and performs the following OpenGL operations.- Create the glGenTexture texture: This generates texture IDs.
- Bind texture: glBindTexture. This tells OpenGL which texture id we're working with.
- Set the texture filtering:
glTexParameterwithGL_TEXTURE_MIN_FILTERorGL_TEXTURE_MAG_FILTER(this is discussed later). - Set the texture wrapping:
glTexParameterwithGL_TEXTURE_WRAP_SorGL_TEXTURE_WRAP_T(this is discussed later). - Load the images data to OpenGL: (
glTexImage2D) we need to specify image data, width, height, color format, and so on.
- Texture wrapping: texture is mapped to
[0, 1]in both the s and t axes. However, we can specify the texture coordinates beyond the range. Wrapping will be applied once that happens. Typical settings for texture wrapping are as follows:GL_CLAMP: Clamp the texture coordinates to[0.0, 1.0].GL_REPEAT: Repeat the texture. This creates a repeating pattern.
- Texture filtering: It is common that the texture image has a different resolution than the object. If the texture is smaller, magnification is performed; if the texture is larger, minification is performed. The following two methods are used generally:
GL_NEAREST: Use the texture element that is nearest to the center of the pixel being textured.GL_LINEAR: Apply interpolation to calculate the color values based on the four texture elements closest to the pixel being textured.
- Set the texture environment: Before we map textures to objects, we can call
glTexEnvfto control how texture values are interpreted when a fragment is textured. We can configureGL_TEXTURE_ENV_COLORandGL_TEXTURE_ENV_MODE. In our sample project, we used theGL_REPLACEforGL_TEXTURE_ENV_MODE, which simply replaces the cube fragments with texture values. - Mapping the texture: We draw each face of the 3D cube and map the texture by
glDrawElement.GL_TEXTURE_COORD_ARRAYmust be enabled by callingglEnableClientState. Before drawing each interface, we bind to the corresponding texture by callingglBindTexture.
In our native code, we used the Android native bitmap API to receive texture bitmap object from Java code. More details of this API will be covered in Chapter 7, Other Android NDK API.
..................Content has been hidden....................
You can't read the all page of ebook, please click here login for view all page.
