
JNI does little error checking for better performance.
As a result, errors usually lead to a crash. A mode called CheckJNI is offered by Android. In this mode, a set of JNI functions with extended checks are called instead of the normal JNI functions. This recipe discusses how to enable the CheckJNI mode to debug Android NDK applications.
The following steps create a sample Android project and enable the CheckJNI mode:
- Create an Android application named
CheckJNIDemo. Set the package name ascookbook.chapter3. Create an activity namedCheckJNIDemoActivity. Please refer to the Loading native libraries and registering native methods recipe of Chapter 2, Java Native Interface, if you want more detailed instructions. - Right-click on the project
CheckJNIDemo, select Android Tools | Add Native Support. A window appears; click on Finish to dismiss it. - Add the following content to
CheckJNIDemo.cpp. - Change
CheckJNIDemoActivity.javato the following:package cookbook.chapter3; import android.os.Bundle; import android.app.Activity; public class CheckJNIDemoActivity extends Activity { @Override public void onCreate(Bundle savedInstanceState) { super.onCreate(savedInstanceState); setContentView(R.layout.activity_check_jnidemo); CheckJNIDemo(); } public native int[] CheckJNIDemo(); static { System.loadLibrary("CheckJNIDemo"); } } - Right-click on
CheckJNIDemoproject, and select Build Project. - Start the monitor logcat output by entering "
adb logcat -v time" on a command-line console. Then, start the sample Android app on an Android device. The application will crash, and the logcat output will be displayed as follows: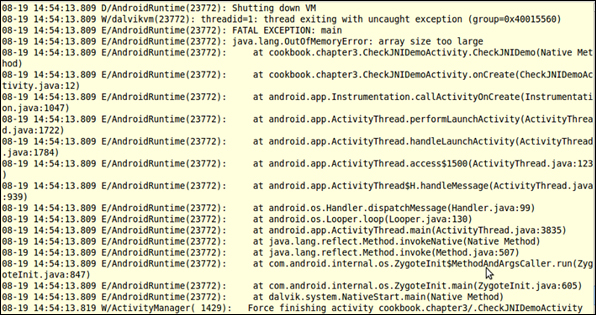
- Enable CheckJNI.
- When the emulator is being used by you, the CheckJNI is on by default.
- If you're using a rooted device, the following sequence of commands can be used to restart the runtime with CheckJNI enabled. The commands stop the running Android instance, change the system properties to enable CheckJNI, and then restart Android.
$ adb shell stop
$ adb shell setprop dalvik.vm.checkjni true
$ adb shell start
- If you have a regular device, you can use the following command:
$ adb shell setprop debug.checkjni 1
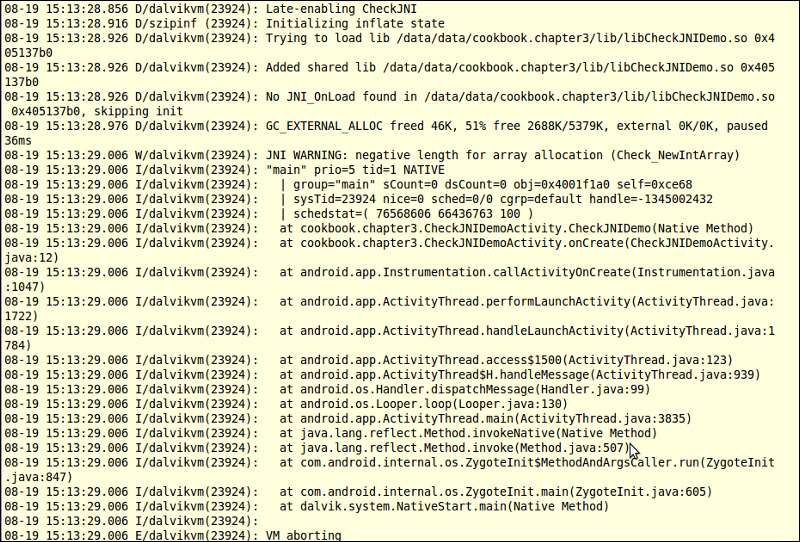
- Run the Android application again. The logcat output will be displayed as follows:
The CheckJNI mode uses a set of JNI functions, which have more error checking than the default one. This makes it easier to find JNI programming bugs. The CheckJNI mode currently checks the following errors:
- Negative-sized array: It attempts to allocate an array of negative size.
- Bad reference: It passes a bad reference
jarray/jclass/jobject/jstringto a JNI function. PassingNULLto JNI function expecting a non-NULL argument. - Class names: It passes the class names of invalid style to the JNI function. Valid class names are separate by "
/" as in "java/lang/String". - Critical calls: It calls a JNI function between a "critical" get function and its corresponding release.
- Exceptions: It calls a JNI function when there's a pending exception.
- jfieldIDs: It invalidates
jfieldIDsor assignsjfieldIDsfrom one type to another. - jmethodIDs: It's similar to jfieldIDs.
- References: It uses
DeleteGlobalRef/DeleteLocalRefon references of wrong types. - Release mode: It passes a release mode other than
0,JNI_ABORT, andJNI_COMMITto a release call. - Type safety: It returns an incompatible type from a native method.
- UTF-8: It passes invalid modified UTF-8 string to JNI functions.
More error checking may be added to CheckJNI as Android evolves. Currently, the following checks are not supported:
- Misuse of local references
..................Content has been hidden....................
You can't read the all page of ebook, please click here login for view all page.