
This recipe covers how to draw 3D objects, handle touch events, and lighten up the objects in OpenGL ES.
Readers are recommended to read the introduction and the Drawing 2D Graphics and Apply Transforms with OpenGL ES 1.x API recipies below before going through this one.
The following steps show how to develop our sample Android project:
- Create an Android application named
CubeG1. Set the package name ascookbook.chapter4.gl1x. Please refer to the Loading native libraries and registering native methods recipe in Chapter 2, Java Native Interface, if you want more detailed instructions. - Right-click on the project CubeG1, select Android Tools | Add Native Support.
- Add three Java files, namely
MyActivity.java,MySurfaceView, andMyRenderer.java, under thecookbook.chapter4.gl1xpackage.MyActivity.javais the same as used in the previous recipe.MySurfaceView.javaextendsGLSurfaceViewwith the code to handle touch events:public class MySurfaceView extends GLSurfaceView { private MyRenderer mRenderer; private float mPreviousX; private float mPreviousY; private final float TOUCH_SCALE_FACTOR = 180.0f / 320; public MySurfaceView(Context context) { super(context); mRenderer = new MyRenderer(); this.setRenderer(mRenderer); //control whether continuously drawing or on-demand this.setRenderMode(GLSurfaceView.RENDERMODE_WHEN_DIRTY); } public boolean onTouchEvent(final MotionEvent event) { float x = event.getX(); float y = event.getY(); switch (event.getAction()) { case MotionEvent.ACTION_MOVE: float dx = x - mPreviousX; float dy = y - mPreviousY; mRenderer.mAngleX += dx * TOUCH_SCALE_FACTOR; mRenderer.mAngleY += dy * TOUCH_SCALE_FACTOR; requestRender(); } mPreviousX = x; mPreviousY = y; return true; } }MyRenderer.javaimplements a render to invoke the native methods to render the graphics:public class MyRenderer implements GLSurfaceView.Renderer{ public float mAngleX; public float mAngleY; @Override public void onSurfaceCreated(GL10 gl, EGLConfig config) { naInitGL1x(); } @Override public void onDrawFrame(GL10 gl) { naDrawGraphics(mAngleX, mAngleY); } @Override public void onSurfaceChanged(GL10 gl, int width, int height) { naSurfaceChanged(width, height); } } - Add the
CubeG1.cpp,Cube.cpp, andCube.hfiles under thejnifolder. Please refer to downloaded project for the complete content. Let's list out the code for thenaInitGL1x,naSurfaceChanged, andnaDrawGraphicsnative methods inCubeG1.cpp, and draw and lighting methods inCube.cpp:CubeG1.cppsets up the OpenGL ES environment and lighting:void naInitGL1x(JNIEnv* env, jclass clazz) { glDisable(GL_DITHER); glHint(GL_PERSPECTIVE_CORRECTION_HINT, GL_NICEST); glClearColor(0.0f, 0.0f, 0.0f, 1.0f); glEnable(GL_CULL_FACE); glClearDepthf(1.0f); glEnable(GL_DEPTH_TEST); glDepthFunc(GL_LEQUAL); //type of depth test glShadeModel(GL_SMOOTH); glLightModelx(GL_LIGHT_MODEL_TWO_SIDE, 0); float globalAmbientLight[4] = {0.5, 0.5, 0.5, 1.0}; glLightModelfv(GL_LIGHT_MODEL_AMBIENT, globalAmbientLight); GLfloat lightOneDiffuseLight[4] = {1.0, 1.0, 1.0, 1.0}; GLfloat lightOneSpecularLight[4] = {1.0, 1.0, 1.0, 1.0}; glLightfv(GL_LIGHT0, GL_DIFFUSE, lightOneDiffuseLight); glLightfv(GL_LIGHT0, GL_SPECULAR, lightOneSpecularLight); glEnable(GL_LIGHTING); glEnable(GL_LIGHT0); } void naSurfaceChanged(JNIEnv* env, jclass clazz, int width, int height) { glViewport(0, 0, width, height); float ratio = (float) width / height; glMatrixMode(GL_PROJECTION); glLoadIdentity(); glOrthof(-ratio, ratio, -1, 1, -10, 10); } void naDrawGraphics(JNIEnv* env, jclass clazz, float pAngleX, float pAngleY) { glClear(GL_COLOR_BUFFER_BIT | GL_DEPTH_BUFFER_BIT); glMatrixMode(GL_MODELVIEW); glLoadIdentity(); glRotatef(pAngleX, 0, 1, 0); //rotate around y-axis glRotatef(pAngleY, 1, 0, 0); //rotate around x-axis glScalef(0.3f, 0.3f, 0.3f); // Scale down mCube.lighting(); mCube.draw(); float lightOnePosition[4] = {0.0, 0.0, 1.0, 0.0}; glLightfv(GL_LIGHT0, GL_POSITION, lightOnePosition); }Cube.cppdraws a 3D cube and lightens it up:void Cube::draw() { glEnableClientState(GL_VERTEX_ARRAY); glVertexPointer(3, GL_FLOAT, 0, vertices); glDrawElements(GL_TRIANGLES, 36, GL_UNSIGNED_BYTE, indices); glDisableClientState(GL_VERTEX_ARRAY); } void Cube::lighting() { GLfloat cubeOneAmbientFraction[4] = {0.0, 0.5, 0.5, 1.0}; GLfloat cubeOneDiffuseFraction[4] = {0.8, 0.0, 0.0, 1.0}; GLfloat cubeSpecularFraction[4] = {0.0, 0.0, 0.0, 1.0}; GLfloat cubeEmissionFraction[4] = {0.0, 0.0, 0.0, 1.0}; glMaterialfv(GL_FRONT_AND_BACK, GL_AMBIENT, cubeOneAmbientFraction); glMaterialfv(GL_FRONT_AND_BACK, GL_DIFFUSE, cubeOneDiffuseFraction); glMaterialfv(GL_FRONT_AND_BACK, GL_SPECULAR, cubeSpecularFraction); glMaterialfv(GL_FRONT_AND_BACK, GL_EMISSION, cubeEmissionFraction); glMaterialf(GL_FRONT_AND_BACK, GL_SHININESS, 60.0); } - Add the
Android.mkfile under thejnifolder with the following content:LOCAL_PATH := $(call my-dir) include $(CLEAR_VARS) LOCAL_MODULE := CubeG1 LOCAL_SRC_FILES := Cube.cpp CubeG1.cpp LOCAL_LDLIBS := -lGLESv1_CM -llog include $(BUILD_SHARED_LIBRARY)
- Build the Android NDK application and run it on an Android device. The app will display a cube, which we can touch to rotate:

This recipe discusses how to use the OpenGL ES 1.x API to draw
3D graphics. Note that we will need to load the OpenGL ES library GLESv1_CM in the Andorid.mk file, and include the header file GLES/gl.h in the native source code.
- Drawing 3D objects in OpenGL ES: Drawing 3D objects is similar to drawing 2D objects. In the
Cube::drawmethod, we first set up the vertex buffer and then calledglDrawElementsto draw the six faces of the cube. We usedGL_TRIANGLESas a primitive. Since each face contains two triangles, there are 12 triangles and 36 vertices. - Touch event handling: In
MySurfaceView.java, we override theonTouchEventmethod to detect the figure movement on screen and change the rotation angle attributes ofMyRenderer. We call therequestRendermethod to request the renderer to redraw the graphics. - Lighting and material in OpenGL ES: There are classes of lighting models, namely local illumination and global illumination. Local illumination only considers direct lighting, and therefore lighting calculation can be performed on individual objects. In contrast to this, global illumination takes indirect lighting reflected from other objects and the environment, and therefore is more computation-expensive. Local illumination is used in OpenGL ES 1.x, while the global illumination can be programmed using the OpenGL Shading Language (GLSL) in OpenGL ES 2.0. Here, we discuss lighting in OpenGL ES 1.x only.
Three parties are involved in OpenGL ES when lighting is considered, including camera position, light sources, and the material of the objects. Camera position is always at a default position (0, 0, 0) and aims into the negative z-axis, as discussed in the previous recipe. Light sources can provide separate ambient, diffuse, and specular lights. Materials can reflect different amounts of ambient, diffuse, and specular lights. In addition, materials may also emit light. Each of the light consists of RGB components:
- Ambient light: It approximates the constant amount of light present everywhere in the scene.
- Diffuse light: It approximates the light from distant directional light source (for example, sunlight). When the reflected light strikes a surface, it is scattered equally in all directions.
- Specular light: It approximates the lights reflected by a smooth surface. Its intensity depends on the angle between the viewer and the direction of the ray reflected from the surface.
- Emission light: Some materials can emit lights.
Note that RGB values in light sources indicate the intensity of the color component, while they refer to the reflected proportions of those colors in the material. To understand how both the light sources and material can affect the viewer perception of the object, think of a white light that strikes on a surface, which only reflects blue component of the light, then the surface will appear as blue for the viewer. If the light is pure red, the surface will be black for the viewer.
The following steps can be performed to set up simple lighting in OpenGL ES:
- Set the lighting model parameters. This is done through
glLightModelfv. Android NDK OpenGL ES supports two parameters, includingGL_LIGHT_MODEL_AMBIENTandGL_LIGHT_MODEL_TWO_SIDE. The first one allows us to specify the global ambient light, and the second one allows us to specify whether we want to calculate lighting at the back of the surface. - Enable, configure, and place one or more light sources. This is done through the
glLightfvmethod. We can configure ambient, diffuse, and specular light separately. The light source position is also configured throughglLightfvwithGL_POSITION. InCubeG1.cpp, we used the following code:float lightOnePosition[4] = {0.0, 0.0, 1.0, 0.0}; glLightfv(GL_LIGHT0, GL_POSITION, lightOnePosition);The fourth value of the position indicates whether the light source is positional or directional. When the value is set to
0, the light is directional, which simulates a light source that is far away (sunlight). The light rays are parallel when hitting the surface, and the (x, y, z) values of the position refer to the direction of the light. If the fourth value is set to1, the light is positional, which is similar to a light bulb. The (x, y, z) values refer to the position of the light source and the light rays hit the surface from different angles. Note that the light source emits light at equal intensities to all directions. The two kinds of lighting sources are illustrated in the following image: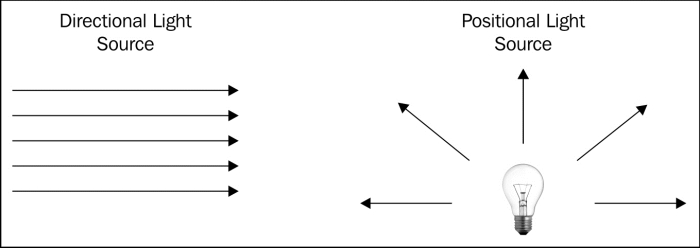
Besides positional and directional light sources, there's also spotlight:
- We shall enable lighting and the light sources also by calling
glEnable(GL_LIGHTING);
and
glEnable(GL_LIGHTx);
- Define the normal vectors for each vertex of all objects. The orientation of the object relative to the light sources is determined by these normals. In our code, we rely on OpenGL ES's default normals.
- Define the material. This is done by the
glMaterialforglMaterialfvmethod. In our sample code, we specify the red component of the diffuse light to be0.8, while keeping the green and blue components 0. Therefore, the final cube appears to be red.