
The Android native application API allows us to create a native activity, which makes writing Android apps in pure native code possible. This recipe introduces how to write a simple Android application with pure C/C++ code.
Readers are expected to have basic understanding of how to invoke JNI functions. Chapter 2, Java Native Interface, covers JNI in detail and readers are recommended to read the chapter or at least the following recipes before going through the current one:
- Manipulating strings in Android NDK
- Calling instance and static methods in NDK
The following steps to create a simple Android NDK application without a single line of Java code:
- Create an Android application named
NativeActivityOne. Set the package name ascookbook.chapter5.nativeactivityone. Please refer to the Loading native libraries and registering native methods recipe of Chapter 2, Java Native Interface, if you want more detailed instructions. - Right-click on the
NativeActivityOneproject, select Android Tools | Add Native Support. - Change the
AndroidManifest.xmlfile as follows:<manifest xmlns:android="http://schemas.android.com/apk/res/android" package="cookbook.chapter5.nativeactivityone" android:versionCode="1" android:versionName="1.0"> <uses-sdk android:minSdkVersion="9"/> <application android:label="@string/app_name" android:icon="@drawable/ic_launcher" android:hasCode="true"> <activity android:name="android.app.NativeActivity" android:label="@string/app_name" android:configChanges="orientation|keyboardHidden"> <meta-data android:name="android.app.lib_name" android:value="NativeActivityOne" /> <intent-filter> <action android:name="android.intent.action.MAIN" /> <category android:name="android.intent.category.LAUNCHER" /> </intent-filter> </activity> </application> </manifest>We should ensure that the following are set correctly in the preceding file:
- The activity name must be set to
android.app.NativeActivity. - The value of the
android.app.lib_namemetadata must be set to the native module name without thelibprefix and.sosuffix. android:hasCodeneeds to be set totrue, which indicates that the application contains code. Note that the documentation in<NDK root>/docs/NATIVE-ACTIVITY.HTMLgives an example of theAndroidManifest.xmlfile withandroid:hasCodeset tofalse, which will not allow the application to start.
- The activity name must be set to
- Add two files named
NativeActivityOne.cppandmylog.hunder thejnifolder. TheANativeActivity_onCreatemethod should be implemented inNativeActivityOne.cpp. The following is an example of the implementation:void ANativeActivity_onCreate(ANativeActivity* activity, void* savedState, size_t savedStateSize) { printInfo(activity); activity->callbacks->onStart = onStart; activity->callbacks->onResume = onResume; activity->callbacks->onSaveInstanceState = onSaveInstanceState; activity->callbacks->onPause = onPause; activity->callbacks->onStop = onStop; activity->callbacks->onDestroy = onDestroy; activity->callbacks->onWindowFocusChanged = onWindowFocusChanged; activity->callbacks->onNativeWindowCreated = onNativeWindowCreated; activity->callbacks->onNativeWindowResized = onNativeWindowResized; activity->callbacks->onNativeWindowRedrawNeeded = onNativeWindowRedrawNeeded; activity->callbacks->onNativeWindowDestroyed = onNativeWindowDestroyed; activity->callbacks->onInputQueueCreated = onInputQueueCreated; activity->callbacks->onInputQueueDestroyed = onInputQueueDestroyed; activity->callbacks->onContentRectChanged = onContentRectChanged; activity->callbacks->onConfigurationChanged = onConfigurationChanged; activity->callbacks->onLowMemory = onLowMemory; activity->instance = NULL; } - Add the
Android.mkfile under thejnifolder:LOCAL_PATH := $(call my-dir) include $(CLEAR_VARS) LOCAL_MODULE := NativeActivityOne LOCAL_SRC_FILES := NativeActivityOne.cpp LOCAL_LDLIBS := -landroid -llog include $(BUILD_SHARED_LIBRARY)
- Build the Android application and run it on an emulator or a device. Start a terminal and display the logcat output using the following:
$ adb logcat -v time NativeActivityOne:I *:S
Alternatively, you can use the logcat view at Eclipse to see the logcat output.
When the application starts, you should be able to see the following logcat output:
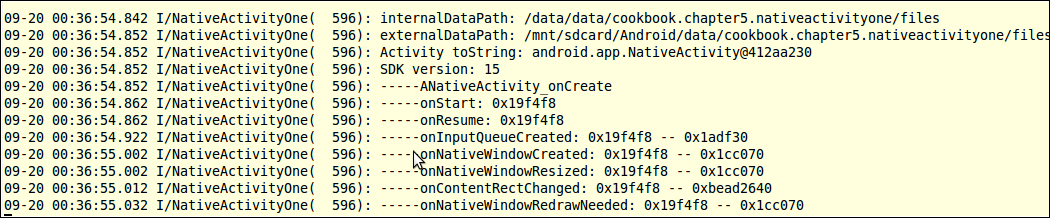
As shown in the screenshot, a few Android activity lifecycle callback functions are executed. We can manipulate the phone to cause other callbacks being executed. For example, long pressing the home button and then pressing the back button will cause the
onWindowFocusChangedcallback to be executed.
In our example, we created a simple, "pure" native application to output logs when the Android framework calls into the callback functions defined by us. The "pure" native application is not really pure native. Although we did not write a single line of Java code, the Android framework still runs some Java code on Dalvik VM.
Android framework provides an android.app.NativeActivity.java class to help us create a "native" activity. In a typical Java activity, we extend android.app.Activity and overwrite the activity lifecycle methods.
NativeActivity is also a subclass of android.app.Activity and does similar things. At the start of a native activity, NativeActivity.java will call ANativeActivity_onCreate, which is declared in native_activity.h and implemented by us. In the ANativeActivity_onCreate method, we can register our callback methods to handle activity lifecycle events and user inputs. At runtime, NativeActivity will invoke these native callback methods when the corresponding events occurred.
In a word, NativeActivity is a wrapper that hides the
managed Android Java world for our native code, and exposes the native interfaces defined in native_activity.h.
The ANativeActivity data structure: Every callback method in the native code accepts an instance of the ANativeActivity structure. Android NDK defines the ANativeActivity data structure in native_acitivity.h as follows:
typedef struct ANativeActivity {
   struct ANativeActivityCallbacks* callbacks;
   JavaVM* vm;
   JNIEnv* env;
   jobject clazz;
   const char* internalDataPath;
   const char* externalDataPath;
   int32_t sdkVersion;
   void* instance;
   AAssetManager* assetManager;
} ANativeActivity;
The various attributes of the preceding code are explained as follows:
callbacks: It is a data structure that defines all the callbacks that the Android framework will invoke with the main UI thread.vm: It is the application process' global Java VM handle. It is used in some JNI functions.env: It is aJNIEnvinterface pointer.JNIEnvis used through local storage data (refer to the Manipulating strings in Android NDK recipe in Chapter 2, Java Native Interface, for more details), so this field is only accessible through the main UI thread.clazz: It is a reference to theandroid.app.NativeActivityobject created by the Android framework. It can be used to access fields and methods in theandroid.app.NativeActivityJava class. In our code, we accessed thetoStringmethod ofandroid.app.NativeActivity.internalDataPath: It is the internal data directory path for the application.externalDataPath: It is the external data directory path for the application.sdkVersion: It is the Android platform's SDK version code. Note that this refers to the version of the device/emulator that runs the app, not the SDK version used in our development.instance: It is not used by the framework. We can use it to store user-defined data and pass it around.assetManager: It is the a pointer to the app's instance of the asset manager. We will need it to accessassetsdata. We will discuss it in more detail in the Managing assets at Android NDK recipe of this chapter.
The native_activity.h interface provides a simple single thread callback mechanism, which allows us to write an activity without Java code. However, this single thread approach infers that we must quickly return from our native callback methods. Otherwise, the application will become unresponsive to user actions (for example, when we touch the screen or press the Menu button, the app does not respond because the GUI thread is busy executing the callback function).
A way to solve this issue is to use multiple threads. For example, many games take a few seconds to load. We will need to offload the loading to a background thread, so that the UI can display the loading progress and be responsive to user inputs. Android NDK comes with a static library named android_native_app_glue to help us in handling such cases. The details of this library are covered in the Creating a native activity with the Android native app glue recipe.
Tip
A similar problem exists at Java activity. For example, if
we write a Java activity that searches the entire device for pictures at onCreate, the application will become unresponsive. We can use AsyncTask to search and load pictures in the background, and let the main UI thread display a progress bar and respond to user inputs.