
Up to this point in this book, the player's point-of-view camera has been stationary. In this chapter, we'll start to move around as we consider various mechanics for locomotion and teleportation. Locomotion in Virtual Reality (VR) generally refers to moving around a virtual scene and, specifically, moving in a continuous way. Teleportation refers to moving to a new location in a single discrete jump. Both of these techniques are compatible with stationary and room-scale tracking. In stationary tracking, locomotion and teleportation are the only means for moving within the scene.
In room-scale tracking, the player can physically walk around the scene within the bounds of the play space, yet can also use locomotion and teleportation to move to a new location. In that case, the play space origin itself (for example, XR Rig) is moved, as we'll see in the various examples in this chapter.
By the end of this chapter, you will know how to implement various techniques for locomotion and teleportation in VR, including the use of components provided with the XR Interaction Toolkit. This chapter will cover the following topics:
- Driving around a scene (glide locomotion) using the hand-controller thumbstick
- Climbing a vertical wall using hand-over-hand grab holds using Extensible Resource Identifier (XRI) interactables
- Using and integrating with the XRI Locomotion System
- Teleporting to areas and anchor points using the XRI Teleportation System
- Managing VR motion sickness
Technical requirements
To implement the projects and exercises in this chapter, you will need the following:
- A PC or Mac with Unity 2019.4 LTS or later, an XR Plugin for your device, and the XR Interaction Toolkit installed
- A VR headset supported by the Unity XR Platform
You can access or clone the GitHub repository for this book (https://github.com/PacktPublishing/Unity-2020-Virtual-Reality-Projects-3rd-Edition-) to optionally use assets and completed projects for this chapter, as follows:
- Asset files for you to use in this chapter are located in UVRP3Files/Chapter-07-Files.zip.
- All completed projects in this book are in a single Unity project atUVRP3Projects.
- The completed assets and scenes for this chapter are in theUVRP3Projects/Assets/_UVRP3Assets/Chapter07/folder.
Implementing basic glide locomotion
Locomotion refers to moving around the scene in a continuous way. In this first example, we'll implement a basic glide locomotion mechanic using the thumbstick on your hand controller to move you in a given direction. We'll start with moving forward (and backward) with a vertical push of the thumbstick. There are several ways you can decide what "forward" means, either based on the direction the player is looking (camera forward direction) or based on the direction the hand controller is pointing, or by using the horizontal press of the thumbstick to rotate. Our script will support all these options: camera forward, hand forward, and thumbstick rotate.
You can start this chapter withany simple scene, such as the02-Dioramascene we created in Chapter 2, Understanding Unity, Content, and Scale, which includes a play space environment, or create a similar new scene to use in this chapter, with the following steps:
- Createa new scene, using File |New Scene.
- Create a ground plane using GameObject | 3D Object | Plane, rename this asGround Plane, reset its transform with Transform | right-click | Reset, and apply a colored material such as theGround Materialcreated in Chapter 2, Understanding Unity, Content, and Scale (such as selecting Mesh Renderer | Materials | Element 0 | doughnut-icon | Ground Material.)
- Create a photo wall using GameObject | 3D Object | Quad, rename this asPhoto, then setTransform | Position(0, 3.75, 5),Transform | Scale(10, 7.5, 10), and apply theGrand Canyonphoto material using Mesh Renderer | Materials | Element 0 | doughnut-icon | GrandCanyon.
- Add anXR Rigusing GameObject | XR | Stationary XR Rig orRoom-Scale XR Rig, andResetitsTransformto the origin.
- Save the scene with the name07-Locomotion-0(File | Save As.)
This starting scene is also available on this book's GitHub repository, with the name07-Locomotion-0. We now have a working scene for this chapter, and we can make a working copy using the following steps:
- Open the07-Locomotion-0 scene using File | Open Scene
- Save into a new scene named07-Locomotion-1 for this topic, with File | Save As
To help visualize these behaviors in the Unity editor, let's add a Capsule object to represent the player rig, as follows:
- With XR Rig selected in the Hierarchy, add a child Capsule (right-click | 3D Object | Capsule)
- Set its Y position to 1 (Transform | Position to (0, 1, 0) and Scale0.5, 1, 0.5 )
- Add another Capsule as its "nose" to show the forward direction (as a child of the first Capsule, right-click | 3D Object | Capsule, set Position (0, 0.75, 0.5), Rotation (90, 0, 0), and Scale (0.1, 0.2, 0.05))
Our capsule body will look like the following screenshot:

Note that in VR, you may see this self-avatar, depending on your position. No worries: it's intended to help demonstrate our development and will not be part of the final scene (later, we'll disable its Mesh Renderer component). Now, we'll write a script to enable us to move around using the thumbstick on the hand controller. After that, we'll see how to change direction and avoid obstacles.
Moving forward with the thumbstick
The glide locomotion behavior will move the player rig—XR Rig—position based on the thumbstick press, and maximum velocity value. To begin, create a new script, GlideLocomotion, on the XR Rig, as follows:
- Select the XR Rig in Hierarchy.
- Create a new C# script by selecting Add Component | New Script (named GlideLocomotion )| Create And Add.
- Open the script for editing, and write it as follows:
public class GlideLocomotion : MonoBehaviour
{
    public Transform rigRoot;
    public float velocity = 2f; // meters per second

    private void Start()
    {
        if (rigRoot == null)
            rigRoot = transform;
    }

    private void Update()
    {
        float forward = Input.GetAxis("
             XRI_Right_Primary2DAxis_Vertical");
        if (forward != 0f)
        {
            Vector3 moveDirection = Vector3.forward;
            moveDirection *= -forward * velocity
                * Time.deltaTime;
            rigRoot.Translate(moveDirection);
        }
    }
}
In this script, we first declare two public variables. TherigRoot variable references the root object that will be moved in the locomotion, andvelocityis the maximum rate of movement, in meters per second. InStart(), we initializerigRootto this game object's transform, if not already set up in theInspector.
In each frameUpdate, we poll the hand controller's right-hand thumbstick (XRI_Right_Primary2DAxis_Vertical) using a call toInput.GetAxis, which returns a value between-1.0and1.0. If the stick is pushed forward any amount (the axis is not zero), we calculate the distance to move as the forward direction (0, 0, 1) multiplied by the velocity and the time frame (Time.deltaTime). Note that theGetAxisvalue returns negative values when pressed forward (that's just the way it works), so we negate the value before using it in the formula. The call to rigRoot.Translate increments the transform's world position by the given amount.
- Save the script and go back to Unity.
- With theGlideLocomotionscript attached toXR Rig, drag theXR Riggame object onto theRig Rootslot.
- PressPlay.
In VR, using the right-hand controller, press the thumbstick forward and you'll glide forward. Pull the thumbstick back, and you'll glide backward. The next thing we'll add is the ability to also rotate your direction by pushing the thumbstick side to side (horizontal axis).
Rotating with the thumbstick
In addition to gliding forward, we can also rotate the entire player rig by pressing the thumbstick from side to side (horizontal axis). Use the following steps to add this to the GlideLocomotion script. First, at the top of the class, add a rotationSpeed variable, as shown in the following code snippet:
public float rotationSpeed = 100f; // degrees per second
Then, in the Update() function, add the following code:
 float sideways = Input.GetAxis("
    XRI_Right_Primary2DAxis_Horizontal");
 if (sideways != 0f)
 {
   float rotation = sideways * rotationSpeed
     * Time.deltaTime;
   rigRoot.Rotate(0, rotation, 0);
 }
Now, when the thumbstick is pressed sideways, the player rig will rotate. You can simultaneously push the stick forward and to the side to drive around the scene. The following screenshot shows a top-down view of the scene after I have moved to a new position and rotated using the right-hand thumbstick:

A modification of this mechanism is to limit the rotation angle to discrete "snaps" in increments such as 45 degrees at a time. We implement such snap turns later in this chapter. Alternatively, instead of rotating the forward direction of the player rig, you can have the player glide in the direction of their gaze (using the Head-Mounted Display (HMD) camera forward direction) or where they are pointing with the hand controller without actually rotating. We'll add this option next.
Moving in the direction you're looking or pointing
A variation of this mechanic is to dynamically change the forward direction using the player's gaze or by pointing in a direction with the hand controller. In order to determine a dynamic forward direction, we will use the transform of a tracked object. For example, this can be the Main Camera (which tracks the player's head pose), or it can be the RightHand Controller (which tracks the player's right hand). In either case, the script only needs its transform. So, to add this feature to our script, first declare a trackedTransform variable at the top of the GlideLocomotion class, as shown in the following code snippet:
public Transform trackedTransform; // camera or controller, null for
                                                           thumbstick
Then, in Update(), we'll use the device's forward direction rather than the fixed Vector3.forward one, as follows:
 float forward = Input.GetAxis("
     XRI_Right_Primary2DAxis_Vertical");
   if (forward != 0f)
   {
     Vector3 moveDirection = Vector3.forward;
     if (trackedTransform != null)
     {
        moveDirection = trackedTransform.forward;
        moveDirection.y = 0f;
     }
     moveDirection *= -forward * velocity
        * Time.deltaTime;
     rigRoot.Translate(moveDirection);
   }
In Update(), we've added a condition that assigns the moveDirection as the forward direction of the tracked device. Also, we zero out the Y coordinate as we only want to move along the X-Z plane, not up or down. The player will glide along the X-Z plane, while the orientation (rotation) of the player XR Rig does not change.
Lastly, we should disable the use of the horizontal thumbstick for rotation, as these modes are mutually exclusive. Wrap that code around another condition, as follows:
 if (trackedTransform == null)
   {
     float sideways = Input.GetAxis("
        XRI_Right_Primary2DAxis_Horizontal");
     if (sideways != 0f)
     {
       float rotation = sideways * rotationSpeed
          * Time.deltaTime;
       rigRoot.Rotate(0, rotation, 0);
     }
  }
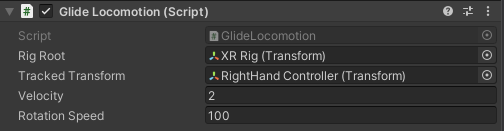
Save the script and go back to Unity and assign the Main Camera to the tracked transform, as follows:
- WithXR Rigselected in theHierarchy, drag the childMain Cameraobject onto theTracked Transformslot. The component looks like the following in theInspector:

- PressPlay.
- In VR, using the right-hand controller, press the thumbstick forward and you'll glide forward. As you move, turn your head to look in a different direction, and you'll move in the direction you are looking for.
If you're using a room-scale tracking rig, you'll notice that the whole play space is moving along with you. That is, your relative location within the tracking space does not change as you travel within the scene. Although you can change the direction you are moving within the scene by turning your head, the forward direction of the tracking space within the scene is not changed.
Alternatively, instead of the gaze direction, we can use the hand controller to point in the direction to move. The change is simple. We just need to change Tracked Transform from Main Camera to the RightHand Controller, as follows:
- With XR Rig selected in the Hierarchy, drag its child RightHand Controller game object onto the Glide Locomotion | Tracked Transform slot. The component now looks like this:
Now, when you press Play, you can point with your hand controller in the direction you want to glide and press the thumbstick forward. Simultaneously, you can push the thumbstick to the side to also twist the rig's orientation and default forward direction. Or, if you prefer the original method, you can use the thumbstick to rotate and remove the Tracked Transform assignment altogether, as follows:

Whichever way you choose to go, we still have another issue. When the scene includes other objects, you'll find that the player can just glide right through them. We'll accommodate that next.
Avoiding obstacles
In VR, you probably want to maintain the illusion that objects are solid. But currently in our scene, as you glide along within the scene, there is nothing to prevent you from passing through walls or other objects. Let's demonstrate this by adding some solid obstacles in the scene, such as a couple of crates. Follow the steps given here:
- Add a Cube object to the scene, using GameObject | 3D Object | Cube, positioned at (-2.5, 0.5, 1.5.)
- Add another cube with right-click, then Cube | Duplicate, positioned at (2.5, 0.5, -1.5.)
- If you'd like, apply the Crate Material we created in Chapter 2, Understanding Unity, Content, and Scale, to both cubes.
If you were to press Play now and move about, you'd find you can pass through the crates as if you're a ghost. To prevent this, we can introduce a Rigidbody to theXR Rig with appropriate constraints to keep it from falling over, as follows:
- Add a Rigidbody to the XR Rig: with XR Rig selected, select Component | Physics | Rigidbody.
- Uncheck the Use Gravity checkbox.
- Check the Freeze Rotation X, Y, Z checkboxes.
Now, when you press Play and move around the scene, if you bump into an object, you'll either get stopped or slide around it as the curved surface of your capsule collider rubs against the surface of the object.
Note that the Rigidbody is using the collider of the object and the Capsule Collider of the player capsule that we added to the XR Rig earlier. If you want to maintain this behavior but hide the capsule, disable its Mesh Renderer component instead of the whole game object.
In summary, we have developed the mechanics for moving around the scene by locomotion—that is, driving or gliding along the ground plane, and using the thumbstick to press forward. We implemented several methods for defining what we mean by "forward," either using the player's gaze direction (camera forward), pointing with a hand controller, or using the side-to-side (horizontal) press of the thumbstick to rotate. We also learned how to avoid passing straight through solid objects using the Rigidbody and Collider components. Next, we'll look at a different mechanic for locomotion, using your hands to grab and pull. In this example, we'll climb up a climbing wall.
Climbing a wall
Many VR games include the ability to climb a wall or ladder; that is, locomotion in a vertical direction. In this section, we will implement a wall-climbing exercise using a hand-over-hand grab-and-pull mechanic. Given a climbing wall, the player can reach up and grab a hold, then pull themself up, reach with the other hand to grab another hold, and so on. But if you let go with both hands, you'll fall! For this, we're going the use the XRI Toolkit's Interactor and Interactable components. We'll build a wall with a series of GrabHold prefabs. Then, we'll write two scripts. A GrabPull script notifies the ClimbController when the player has grabbed or released a hold. The ClimbController moves the XR Rig, and it detects when the player has completely let go, causing them to fall.
Begin with a basic scene such as the one defined at the top of this chapter, as follows:
- Open the scene by clicking File | Open Scene, and select 07-Locomotion-0.
- Save into a new scene named 07-Locomotion-2 for this topic, using File | Save As.
Now, we can start by building a climbing-wall game object.
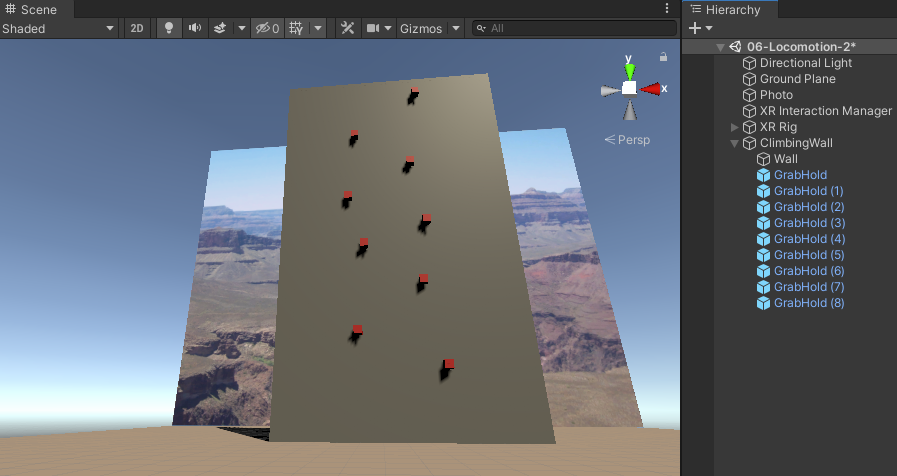
Building a wall with grab holds
In this project, we are going to climb a climbing wall. The wall will be a simple cube slab with grab-holds that the player can use to pull themselves up. To create a wall, follow the steps given next:
- Create an empty game object (GameObject | Create Empty), and name it ClimbingWall.
- Position it a half-meter from the player, at Position (0, 0, 0.5.)
- Create a child Cube for the wall (right-click | ClimbingWall | 3D Object | Cube), and name it Wall.
- Set its Scale (3, 5, 0.1) and Position (0, 2.5, 0.)
Next, we'll add a grab-hold object on the wall, make it a prefab, and copy it to multiple positions up the wall. To do that, follow the steps given next:
- Create a small cube on the wall (right-click ClimbingWall | 3D Object | Cube), and name it GrabHold.
- Set its Scale (0.1, 0.1, 0.1), and position it at an easy reaching distance—for example, (0.5, 0.8, -0.1.)
- Give it a distinct color—for example, using the Red Material created in a prior chapter (Mesh Renderer | Materials | Element 0 | doughnut-icon | Red Material.)
- Make it a prefab by dragging the GrabHold from the Hierarchy window into your Project window's Prefabs/ folder.
Then, duplicate the GrabHold on the Wall, and move each to various locations such as the following X, Y coordinates:
- (0.5, 0.8)
- 1: (-0.5, 1.2)
- 2: (0.3, 1.8)
- 3: (-0.4, 2.3)
- 4: (0.4, 2.6)
- 5: (-0.6, 3.0)
- 6: (0.25, 3.5)
- 7: (-0.5, 4.0)
- 8: (0.4, 4.7)
My climbing wall looks like this:
The next step is to make the grab-holds interactable.
Adding the XRI Interactor and Interactable components
To make the grab-holds grabbable, we'll use the Unity XR Interaction Toolkit components. If you recall from our previous chapters, XRI implements an interactor-interactable pattern, where the hand controllers have an Interactor component, which in turn can select and activate any game objects in the scene with an Interactable component.
The first step is to replace the default hand controllers (that have an XR Ray Interactor) with ones using an XR Direct Interactor. It's easy enough to just disable or delete the default ones and create new ones, as follows:
- In the Hierarchy window, unfold the XR Rig so that you can see the RightHand Controller and LeftHand Controller objects.
- Disable both RightHand Controller and LeftHand Controller objects (uncheck its Enable checkbox.)
- Create a new Direct Interactor named RightHand Direct Interactor (GameObject | Create | XR | Direct Interactor) and rename it RightHand Direct Interactor.
- Drag it as a child of Camera Offset (sibling of the original RightHand Controller.)
- Change its Controller Node to Right Hand.
- Repeat steps 3-5 for the LeftHand Director Interactor.
The XR Rig hierarchy is shown in the following screenshot:

It's important to confirm that you have the Select Usage option set to the Grip button, as we want to be sure that the player will squeeze the grip handle button to grab a handhold.
We should add a hand graphic so that the player will be able to see where their hands are in VR. For simplicity, we'll just use a sphere "fist," as follows (or, instead, you could use a better graphic prefab on the XR Controller | Model Prefab slot):
- Right-click, then go to RightHand Direct Interactor | 3D Object | Sphere.
- Set its Scale (0.1, 0.1, 0.1.)
- Repeat for the LeftHand Direct Interactor.
To make all the GrabHold objects interactable, open the GrabHold prefab for editing and add an XR Simple Interactable component, as follows:
- Double-click the GrabHold to open it for editing
- With its root GrabHold object selected, add a Simple Interactable (Component | XR | XR Simple Interactable.)
(While we're calling these objects "grab holds" that the player will grab to climb the wall, it's not a "grab interactable" such as a gun or a knife that the player can grab and throw.) Note that this also adds a Rigidbody that the Interactable needs. But we do not want the GrabHold to move when it's grabbed, so let's constrain it by following the steps given next:
- Uncheck the Use Gravity checkbox.
- Check the Constraints | Freeze Position | X, Y, Z checkboxes.
- Check the Constraints | Freeze Rotation | X, Y, Z checkboxes.
- Save your changes to the prefab.
We now have interactor hand controllers and a climbing wall with interactable grab holds. We're ready to implement the grab-and-pull mechanic for climbing the wall.
Adding a ClimbController script
The first thing we're going to do to implement the climb mechanic is writing a ClimbController script that will handle the grab/pull/release actions coming from any of the GrabHold objects. Add a new script to the ClimbingWall named ClimbController, as follows:
- With ClimbingWall selected, create a new C# script (Add Component | New Script |ClimbController| Create And Add.)
- Open the script for editing.
- Create a first iteration of the script, as follows:
public class ClimbController : MonoBehaviour
{
    public GameObject xrRig;

    private void Start()
    {
        if (xrRig == null)
            xrRig = GameObject.Find("XR Rig");
    }

    public void Grab()
    {
    }

    public void Pull(Vector3 distance)
    {
        xrRig.transform.Translate(distance);
    }

    public void Release()
    {
    }
}
We declare a variable for the xrRig transform. If you forget to assign it in the Inspector, the Start() function will find the XR Rig in your Hierarchy and assign it for you. The Grab() and Release() functions are placeholders for now; we'll build them out later. The Pull() function is called with a pull distance and moves the player rig (xrRig) the given distance. Save the script. Then, back in Unity, drag the XR Rig onto the ClimbingWall | Climb Controller | XR Rig slot.
Now, we'll write the GrabPull script behavior that the GrabHold objects will use for calculating the pull distance and notify the ClimbController.
Adding the GrabPull script and actions
As an Interactor, each GrabHold object on the wall will know when it's being selected by the user's hand controller. At that time, it should begin tracking how far the player has pulled at the GrabHold in the current frame and pass that distance on to the ClimbController. Create a GrabClimb script on the GrabHold prefab, as follows:
- Double-click the GrabHold prefab to open it for editing.
- With its root GrabHold object selected, create a new C# script by selecting Add Component | New Script |GrabClimb| Create And Add.
- Open the script for editing.
- Start writing the script, as follows:
using System.Collections.Generic;
using UnityEngine;
using UnityEngine.XR.Interaction.Toolkit;

public class GrabClimb : MonoBehaviour
{
    private XRSimpleInteractable interactable;
    private ClimbController climbController;
    private bool isGrabbing;
    private Vector3 handPosition;

    private void Start()
    {
        interactable = GetComponent<XRSimpleInteractable>();
        climbController = GetComponentInParent<ClimbController>();
        isGrabbing = false;
    }
At the top of the file, be sure to declare that we're using UnityEngine.XR.Interaction.Toolkit as we'll be using the XRI toolkit application programming interface (API) functions. At the top of the class, we declare a number of private variables, which get initialized in Start. The interactable variable holds the XRSimpleInteractable component we added to this GrabHold. The climbController contains the ClimbController component we added to the ClimbingWall. And finally, an isGrabbing Boolean variable identifies when this GrabHold is presently being grabbed so that we can continue to update the pull distances. Next, add the following code:
    public void Grab()
    {
        isGrabbing = true;
        handPosition = InteractorPosition();
        climbController.Grab();
    }

    private Vector3 InteractorPosition()
    {
        List<XRBaseInteractor> interactors =
           interactable.hoveringInteractors;
        if (interactors.Count > 0)
            return interactors[0].transform.position;
        else
            return handPosition;
    }
The public Grab function will be called when the user grabs this hold (On Select Enter). It sets the grabbing state to true, registers the current handPosition, and then notifies the ClimbController that a grab has been initiated (climbController.Grab).
We get the current hand controller's position with a private InteractorPosition function, which uses the XRI API to get the list of hoveringInteractors and, for simplicity, returns the position of the first one. If for some reason we thought we're still grabbing but the interactable has no interactors, we return the last known handPosition. Finally, add the final two functions, as follows:
    private void Update()
    {
        if (isGrabbing)
        {
            Vector3 delta = handPosition - InteractorPosition();
            climbController.Pull(delta);
            handPosition = InteractorPosition();
        }
    }

    public void Release()
    {
        isGrabbing = false;
        climbController.Release();
    }
As we know, Update gets called every frame. If we're presently grabbing a grab hold (isGrabbing is true), we calculate the delta distance the hand controller (Interactor) has moved since the previous frame and pass that distance to the climbController.Pull function. Then, we update the current handPosition in preparation for the next Update.
Lastly, the Release function is called when the player lets go of the grab-hold. We reset the isGrabbing state and notify the ClimbController that this hold has been released.
Save the script. Now, back in Unity, let's connect the Grab and Release functions to the interactor Select events, as follows:
- Double-click the GrabHold prefab to open it for editing.
- On its XR Simple Interactable | Interactable Events | On Select Enter, press the + button to add a new event action.
- Drag the same GrabHold game object onto the Runtime Only object slot.
- In its Function dropdown, select GrabClimb | Grab.
- Likewise, on its On Select Exit event, press the + button to add a new action.
- Drag the same GrabHold game object onto the Runtime Only object slot.
- In its Function dropdown, select GrabClimb | Release.
- Save the prefab changes.
The XR Simple Interactable events now look like this:

Wow! That should do it. Let's try it out. Press Play and go into VR. Reach out to one of the grab-holds and squeeze the grip button, then pull yourself up. Repeat with each hand as you climb the wall. The following screenshot shows my view while hanging on and looking down after having climbed to the top of the wall:

That seems to work pretty well. You can now climb the wall using the Interactor hand controller to grab a Simple Interactable grab-hold. While grabbing, the GrabClimb script calculates the distance you have moved the controller and passes that to the ClimbController, which in turn moves the player rig the same distance, resulting in the effect that you've pulled yourself up by the grab-hold. But if you release both hands, you just hover in space as if in zero-gravity. Let's add a consequence to letting go, and fall back to the ground.
Falling
To make you fall down to the ground when you've let go with both hands, we must do several things. First, we need to keep track of how many hands are presently holding onto a grab-hold. When you're not grabbing any, we can implement falling by enabling gravity on a Rigidbody attached to the player rig. The Unity Physics engine will take care of moving the rig in accordance with the laws of gravity, yet we should make sure you don't fall below the ground level and continue descending forever.
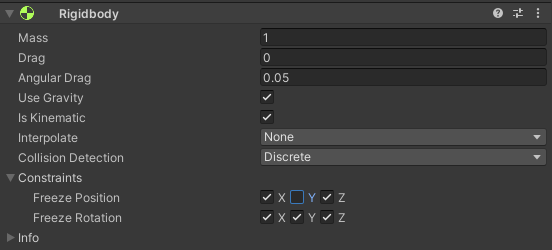
First, we will add a Rigidbody to the rig. Note that there are several ways to disable the effects of falling with a Rigidbody—toggling the Use Gravity value, or toggling the Is Kinematic value, or toggling the Freeze Position Y value. We'll use the Is Kinematic one, as this, when true, tells the Unity Physics engine to ignore this Rigidbody in its calculations altogether. (You might choose a different way to handle this if, for example, you also wanted the player to swing while holding with one hand, or add the ability to jump to a new grab-hold with the other hand.) Let's set up a basic vertical gravity fall now. Follow the steps given next:
- Add a Rigidbody to the XR Rig (with XR Rig selected in Hierarchy, choose Component | Physics | Rigidbody.)
- Ensure the Use Gravity checkbox is checked.
- Check the Is Kinematic checkbox, to temporarily disable the physics.
- Constrain the fall to downward only. Check the Constraints | Freeze Position X, Z and Freeze Rotation X, Y, Z options. Leave the Position Y constraint unchecked.
The Rigidbody settings are shown in the following screenshot:
Now, we should update the ClimbController script in the following ways. First, add new variables for the grabCount, rigidBody, and groundLevel and initialize them in Start, as follows:
public class ClimbController : MonoBehaviour
{
    public GameObject xrRig;

    private int grabCount;
    private Rigidbody rigidbody;
    private float groundLevel;

    private void Start()
    {
        if (xrRig == null)
            xrRig = GameObject.Find("XR Rig");
        grabCount = 0;
        rigidbody = xrRig.GetComponent<Rigidbody>();
        groundLevel = xrRig.transform.position.y;
    }
The Grab function will increment the grabCount, and make the Rigidbody kinematic (thus, disabling any gravity effects), as illustrated in the following code snippet:
    public void Grab()
    {
        grabCount++;
        rigidbody.isKinematic = true;
    }
The Pull function needs no changes. But the Release function now decrements the grabCount, and, if neither hand is grabbing, enables the Rigidbody gravity (by disabling IsKinematic), as illustrated in the following code snippet:
 public void Release()
    {
      grabCount--;
      if (grabCount == 0)
      {
        rigidbody.isKinematic = false;
      }
   }
Finally, we can add an Update function that ensures the rig never goes below ground level, and if so, resets the Y position and Rigidbody kinematics, as illustrated in the following code snippet:
 private void Update()
   {
     if (xrRig.transform.position.y <= groundLevel)
     {
        Vector3 pos = xrRig.transform.position;
        pos.y = groundLevel;
        xrRig.transform.position = pos;
        rigidbody.isKinematic = true;
     }
   }
Save the script. In Unity, press Play. Now, you can climb the wall, but don't let go, or you'll fall down and have to start over. And there it is!
In this section, we've built a little wall-climbing game. First, we built a wall game object from a 3D cube and added a sequence of grab-holds. We made the holds interactable using the XR Simple Interactable component and using an XR Direct Interactor on the left- and right-hand controllers. Each grab-hold detects when it's been selected and calls its own GrabPull script, which begins tracking the pull distance from frame to frame and passes this distance to the ClimbController, which moves the player rig that distance, resulting in a climbing mechanic. When you release the controller grip, the On Select Exit event calls the GrabPull.Release function, resetting the grabbing state, and tells the GrabController you've let go with one hand. If the GrabController sees that no hands are presently grabbing, it enables the Rigidbody physics to let gravity make you fall back down to the ground.
Now, we'll switch our attention from locomotion to teleportation, using the XR Interaction Toolkit's Locomotion System.
Using the XRI Locomotion System
The Unity XR Interaction Toolkit includes what they call the Locomotion System, a framework for managing the relocation of the player rig at runtime. They use the word Locomotion to encompass both teleportation and my narrower definition of locomotion. By my definition, locomotion refers to a smooth movement of the player in the scene, whereas teleportation refers to a discrete jump from one location to another. The XRI Locomotion System has an architecture that can be extended with custom Locomotion Providers, some of which they provide, and others you can write, such as the GlideLocomotion and ClimbController components we developed earlier in this chapter.
In this section, we will introduce the architecture of the XRI Locomotion System, Locomotion Providers, and its control-locking protocol for managing user interactions. We will then install the XRI examples assets, provided separately by Unity, into our project.
Understanding the Locomotion System
The Locomotion System is responsible for changing the location of the player in the scene, handling the XR Rig position and rotation. Also, the Locomotion System can restrict access to the XR Rig transform, preventing other actions from changing it while one Locomotion Provider has control moving it. For example, suppose the user activates a teleport to a new location in the scene; the Locomotion System will lock the XR Rig, ensuring that the user can't do another action, such as snap turning or teleporting again, until the current action is completed. After the teleport is done, the Teleportation Provider releases its exclusive lock, allowing another Locomotion Provider to request changes to the XR Rig in turn.
The overall flow of a Locomotion request is as follows:
- The Locomotion Provider checks whether the Locomotion System is currently busy.
- If not, the Provider requests exclusive access to the Locomotion System.
- If the request is successful, the Provider moves the XR Rig.
- When the Provider has finished modifying the user's transform position and/or rotation, the Provider relinquishes exclusive access.
- If the system is busy, or the Provider is unable to get exclusive access, the Provider will not modify the XR Rig.
This lock allows teleport actions to be animated over multiple frames without interruption. For example, rather than an instantaneous jump to the new location, the Provider could do a fast glide, show a vignette, and/or a blink-effect that helps reduce motion sickness, as explained later in this chapter. Let's jump right in by adding a Snap Turn Provider to the glide locomotion scene we built earlier in this chapter, in the Implementing basic glide locomotion section.
Turning in a snap
The XR Interaction package provides an example implementation of a Locomotion System Snap Turn Provider. Snap Turn is a type of locomotion that rotates the user in place by a fixed angle. In the glide locomotion scene at the top of this chapter, we wrote our own GlideLocomotion script. Let's add to this the ability to turn direction in discrete "snap" angles, using the Snap Turn Provider component.
To do this, first, add a Locomotion System component to the XR Rig, as follows:
- Open the07-Locomotion-1scene (File | Open Scene.)
- Select theXR Riggame object inHierarchy.
- Add aLocomotion Systemcomponent (in Inspector,Add Component, searchlocomotion| Locomotion System.)
- Save it to a new working scene, 07-Locomotion-3 (File | Save As.)
Then, add the Snap Turn component to the XR Rig. Because we set up our scene using the right-hand controller's thumbstick for moving around the scene, we'll connect the snap turn action to the left-hand controller stick only by following the steps given next:
- With XR Rig selected, in Inspector, press Add Component.
- Search snap and select Snap Turn Provider to add the component.
- To add the left-hand controller, grow the Controller list by setting the Snap Turn Provider | Controller | Size to 1.
- Drag the child LeftHand Controller game object from the Hierarchy window onto the Controllers | Element 0 slot.
The component looks like this:

- Also, clear the Glide Locomotion | Tracked Transform slot if you tried experimenting with that mechanic earlier.
Now, when you press Play and press the left-hand controller's thumbstick sideways, you'll snap turn in that direction. In accordance with the parameters we have set, when the thumbstick is pressed to the side, at least 75% off-center (Dead Zone), the player rig will be rotated 45 degrees (Turn Amount) in that direction. When you release the stick, you need to wait at least 0.5 seconds (Activation Timeout) before a new press will register another turn. The System value, which is unassigned, will get filled at runtime by the first Locomotion System found in the hierarchy.
It's currently possible to use both the left and right thumbsticks to move (using our GlideLocomotion script) and snap turn simultaneously. That's not a great idea, according to Unity XRI best practices. If we integrate the GlideLocomotion script with the Locomotion System, however, they'll work in coordination, one at a time.
Integrating scripts with Locomotion System
The XR Interaction package supplies two built-in Locomotion Providers: theTeleportation Provider and theSnap Turn Provider. Both implement theLocomotionProviderabstract class. TheLocomotionProviderclass has a simple interface to request and relinquish exclusive access. TheLocomotionProvider abstract class defines the following methods and events:
- BeginLocomotion—Request exclusive access to the Locomotion System.
- EndLocomotion—Relinquish access to the Locomotion System.
- CanBeginLocomotion—Check if the Locomotion System is currently in exclusive mode before attempting to callBeginLocomotionto acquire it.
- startLocomotion—This event is invoked on a successful call toBeginLocomotion.
- endLocomotion—This event is invoked on a successful call toEndLocomotion.
We can update our GlideLocomotion script developed earlier in this chapter to integrate with the Locomotion System. (In the GitHub files for this book, the script is named GlideLocomotionXRI.) Follow the steps given next:
- Open the GlideLocomotion script file for editing, and update it as follows. First, we'll make it a type of LocomotionProvider (which itself is a type of MonoBehaviour) by changing its declaration, as follows:
using UnityEngine.XR.Interaction.Toolkit;

public class GlideLocomotion : LocomotionProvider
{
- Next, add a private flag to track when we're moving, like this:
private bool isMoving;
- Then, change Update to call the LocomotionProvider functions, as follows:
    private void Update()
    {
        if (!isMoving && !CanBeginLocomotion())
            return;

        float forward = Input.GetAxis("
            XRI_Right_Primary2DAxis_Vertical");
        float sideways = Input.GetAxis("
            XRI_Right_Primary2DAxis_Horizontal");
        if (forward == 0f && sideways == 0f)
        {
            isMoving = false;
            EndLocomotion();
            return;
        }

        if (!isMoving)
        {
            isMoving = true;
            BeginLocomotion();
        }

        if (forward != 0f)
        {
            Vector3 moveDirection = Vector3.forward;
            if (trackedTransform != null)
            {
                moveDirection = trackedTransform.forward;
                moveDirection.y = 0f;
            }

            moveDirection *= -forward * velocity * Time.deltaTime;
            rigRoot.Translate(moveDirection);
        }

        if (trackedTransform == null && sideways != 0f)
        {
            float rotation = sideways * rotationSpeed * Time.deltaTime;
            rigRoot.Rotate(0, rotation, 0);
        }
    }
First, if we're not presently moving (!isMoving), we check whether the Locomotion System is available. If not, then we just return.
Then, we poll the thumbstick input values, and if it's not being pressed at all (zeros), we reset the isMoving flag to false and release the Locomotion System (EndLocomotion).
Otherwise, if we have just started moving, we set isMoving to true and lock the Locomotion System. The rest of the function is largely the same, with minor refactoring changes.
Now, when you press Play and use the right thumbstick to move through the scene, the left thumbstick, Snap Turn, is locked out and will not operate. Once you stop moving, the system is unlocked and you can use the left hand controller to snap turn.
In this section, we learned about the XRI Locomotion System and Provider components for implementing one or more locomotion mechanics in a scene. We learned about the Locomotion System architecture and API, including the abstract LocomotionProvider base class. We learned how to add a Locomotion System component to the XR Rig and use one type of provider, the Snap Turn Provider. Then, we modified our homegrown GlideLocomotion script to also be a type of LocomotionProvider and integrate cleanly with other providers in the same scene.
Next, we'll look at adding teleportation for jumping between locations in the scene.
Teleporting between locations
Teleportation is a type of locomotion that teleports the user from one position to another position, in discrete jumps rather than a continuous gliding motion. Teleportation is generally more user-friendly in VR, reduces the risk of motion sickness, and is often more convenient to use. Normally, as a developer, you designate specific locations or areas where the player is allowed to go. The player then uses the hand controller to point at and select a target location and triggers a jump from here to there. The selection is often indicated with a glowing laser arc ray and a glowing teleportation location disk, showing where the player will end up.
To implement teleportation in our scene, we will use components included with the XRI Toolkit package, but we also need graphics for the arc laser and location anchors effects. For this, it'll be easier to use some of the assets included with the XR Interaction Toolkit Examples project, so let's install that first. Then, we'll add the teleportation components and set up the scene with a Teleportation Area interactable and several Teleportation Anchor points.
Installing the XRI examples
The Unity XR Interaction Toolkit Examples repository on GitHub (https://github.com/Unity-Technologies/XR-Interaction-Toolkit-Examples) includes examples, presets, and assets for using the XR Interaction package, including teleportation. As we've already witnessed, the XRI examples assets are not required in order to use the XRI Toolkit in your own projects, but it will make our demonstration of teleportation a little easier by avoiding our having to duplicate the effort, using assets they've already provided.
Unfortunately (at the time of writing), the assets are not provided directly as a Unity package. They must be cloned from the GitHub repository, opened as a separate Unity project, and exported into a Unity package that you can then import into your own project. To accomplish this, follow these steps using the GitHub Desktop. (Or, if you are already familiar with Git and GitHub, you may choose a different tool.) Note that the repository contains two separate Unity projects, one with VR examples and another with augmented reality (AR) examples. Obviously, for now, we're just interested in the VR one. Follow the steps given next:
- If you do not presently have GitHub Desktop, use your internet browser to go to https://desktop.github.com/ to download and install the tool.
- Then, in your internet browser, go to the XR Interaction Toolkit Examples. repository (https://github.com/Unity-Technologies/XR-Interaction-Toolkit-Examples)
- Click the Clone Or Download button, then Open In Desktop.
- This will open the GitHub Desktop package and you should see the Clone A Repository dialog box. You may choose a Local Path into which you want to place your cloned files. Then, click the Clone button.
Once the repository has been cloned and downloaded, open it in Unity Hub. (You can have more than one copy of Unity open at a time on your desktop, but I recommend that you first save your changes to any open projects before opening an additional Unity instance.) Follow the steps given next:
- Open the Unity Hub desktop application on your PC.
- Navigate to the Projects tab, and select Add.
- Find the repository folder you just downloaded, and navigate to the VR folder (it will contain subfolders named Assets, Packages, and ProjectSettings). Click Select Folder (this will add the project to the Unity Hub Projects list.)
- In the Projects list, if necessary, select a Unity Version from the drop-down list with a version you presently have installed on your machine.
- Then, click the VR project name to open the XRI sample VR project in Unity. If it asks you Do you want to upgrade your Project to a newer version of Unity?, press Confirm.
This will open Unity with the specified project. Now in Unity, we'll export everything from the Unity package to a file named XRI-Examples-VR.unitypackage, using the following steps:
- In the Project window, right-click the root Assets/ folder (we want to export all of the Project folders we just cloned.)
- Choose Export Package..., then Export.
- Choose a filename and location, such as XRI-Examples-VR.unitypackage.
You now have a Unity package with the current assets of the Examples repository that you can use in this and other projects. I recommend you periodically check the GitHub repository for newer updates, and, if necessary, in GitHub Desktop, choose Repository | Pull to get the latest files, then repeat the preceding steps for exporting to a fresh .unitypackage file.
We can now import the examples into our own project. With the current project open (for example, VR_Is_Awesome is the name we used, starting in Chapter 2, Understanding Unity, Content, and Scale), do the following:
- Select Assets | Import Package | Custom Package...
- Navigate to and choose the XRI-Examples-VR package we just created, and choose Open.
- In the Import Unity Package dialog box, click Import.
- Because we're using the Universal Windows Platform (UWP) render pipeline, you might need to convert the imported materials (select Edit | Render Pipeline | Universal Render Pipeline | Upgrade Project Materials to UWP Materials.)
While you're here, you might want to explore some of the example scenes including Locomotion, UI Canvas, and WorldInteractionDemo. Now, we're ready to add teleportation to a scene.
Adding teleportation
As noted previously, the XRI Teleportation Provider supports different types of teleportation interactable objects, including a TeleportationArea and a TeleportationAnchor. Areas let the player choose a location on a surface they wish to teleport to. Anchors teleport the user to a specificpredefined location they choose. Both types of destinations are implemented as a type ofBaseTeleportationInteractableabstract class, as the starting point for shared code. These are intended to be used with an XR Ray Interactor, which uses the intersection point of the ray and the area's collision volume to determine the location where the user wants to teleport.
For our example, let's begin with the first locomotion scene we created earlier in this chapter—that is, 07-Locomotion-1. First, add a Locomotion System and save the scene as a new working scene, as follows:
- Open the07-Locomotion-1scene (File | Open Scene.)
- Select theXR Riggame object inHierarchy.
- Add aLocomotion Systemcomponent (in Inspector,Add Component, searchlocomotion| Locomotion System.)
- Now, we can add a Teleportation Provider to the XR Rig (inInspector,Add Component, searchteleport | Teleportation Provider.)
- Save it to a new working scene,07-Locomotion-4(File | Save As.)
That's the Provider side of the equation. Now, we can add some teleport interactables to the scene. Let's add one area and several anchors. First, we'll add a teleport area by dragging the TeleportArea prefab to the back-left corner of the play area, as follows:
- From the Project window, locate the TeleportArea prefab (this can be found in Assets/Prefabs/.)
- Drag it into the scene
- Set its Scale to (0.5, 1, 0.5) and Position to (-3, 0, 3.)
Notice that this prefab has a number of things already set up. TheSceneview,Hierarchy, andInspectorwith aTeleportAreaare shown in the following screenshot:

As you can see, the game object has children objects that can be used to highlight the area while it's being selected for teleportation, including one namedHighlightFencethat highlights the rectangular perimeter of the area. ItsTeleportation Areacomponent defines two event actions: On Hover Enterwill enable theHighlightFence,andOn Hover Exitwill disable the fence.Also (not shown in the preceding screenshot), theTeleportation Areaspecifies aCustom Reticlethat will be displayed at the actual teleportation location you are pointing at.
When you press Play and point with the hand controller at the TeleportArea, it highlights the HighlightFence around its perimeter, and the TeleportReticle is displayed at the target position. Obviously, you can change each of these graphics to suit your specific game requirements. Squeeze the grip button (or whichever button is configured to activate the teleport), and the XR Rig is moved to the selected location. In the following screenshot, I am pointing at the TeleportArea, and you can see the area perimeter and teleport location reticle are highlighted:

Likewise, we can add individual teleportation anchor points in the scene. Use the following steps to make three separate TeleportAnchor instances in three quadrants of the ground plane:
- From theProjectwindow, locate theTeleportAnchor prefab (this can be found inAssets/Prefabs/.)
- Drag it into the scene and set its Positionto (3, 0, 3) and Rotation (0, -135, 0.)
- Add another at Position (-3, 0, -3) and Rotation (0, 45, 0.)
- And another at Position (3, 0, -3) and Rotation (0, -45, 0.)
Notice that the anchors can be rotated to a specific orientation. When the player teleports to that anchor, they'll end up also facing the forward direction of the anchor. In our example, we have each of the three anchors facing toward the middle of the play area. The following screenshot depicts me standing at one corner and selecting a TeleportAnchor at the opposite corner. If you look closely, you can see that the anchor has a DirectionArrow showing the player which way I'll be facing, if and when I go there. This can be seen here:

As you can see, it is very easy to add teleportation features to your game using the XRI Teleportation System and interactable teleportation platforms' areas and anchors.
Restricting interaction to a specific layer
When your scene contains many interactable objects, you will want to limit the work required to select teleportation interactables by placing them on a specific layer. The default objects we've been using may be on any layer (Everything) or could be already set up to use Layer 31, named Spatial Awareness or Teleport by XRI. If not, you can create a layer now, using the following steps:
- In the Layer dropdown in the top-right of the Inspector, choose Add Layer... or Edit Layers....
- This opens the Tags & Layers window. Unfold the Layers list.
- Choose an undefined layer slot. It can be User Layer 31 or another one. Type the name Teleport.
- Select the TeleportArea GameObject again in Hierarchy to restore its Inspector view.
- Set its Layer value to Teleport and its Teleport Area | Interaction Layer Mask, as shown in the screenshot that follows.
You'll notice that each of the Teleport areas and anchors are assigned to this layer, and their Mesh Collider component is given this layer for its Interaction Layer Mask, as shown in the following screenshot:

And likewise, the Interactors need to know in which layer to find items. On each of the hand controllers' XR Ray Interactor, the Interaction Layer Mask can also be set to this layer and the Raycast Mask.
The XR Interaction system also provides various line-rendering options that we'll explore in more detail next.
Ray interactors for teleportation
We were introduced to the XR Ray Interactor in Chapter 5, Interacting with your Hands, as it is part of the default XR Rig we've been using in our scenes. The ray is rendered as a straight laser-beam ray, using an XR Interactor Line Visual helper and Line Renderer components. Straight lines are good for selecting objects and UI items in a scene, but usually, we use an arcing curve for teleportation. This is because we're usually trying to select a location on a horizontal (or near-horizontal) surface, so you'd want the ray to end in a downward-facing vector. XRI provides two alternatives to the straight line: a Projectile Curve and a Bezier Curve. They are explained as follows:
- A Projectile Curve draws a curve that approximates a projectile being thrown a distance and highlights the landing point. As you lift the hand controller, the landing point goes further away, then comes closer if you keep lifting the controller.
- A Bezier Curve draws a curve between the start point (your controller) and a fixed-distance end selection point. You can control the height of the curve at its peak, and the distance via C#.
For teleportation, I recommend using the Projectile Curve. For example, the following steps will render a projectile curve that drops off near the end instead of a straight-line ray:
- Select the RightHand Controller in Hierarchy.
- In Inspector, set its Line Type to Projectile Curve.
- Set its Velocity to 10.
The curved ray is shown in the following screenshot, interacting with a TeleportArea:

So far, we've only been considering hand controller Interactors that perform a single interaction. In a real game, you're more likely to need multiple interaction modes in a scene. Let's consider this next.
Switching between Interactors
Suppose you have a scene where the player can interact in a variety of ways: teleport with a Projectile Curve ray; grab and use an object by directly touching and picking it up; use a menu user interface (UI) by pointing with a straight-line ray. Each of these may require different controller interactors, configured in their own ways. Unity has thought about this and provides an example scene in the XR Interaction Toolkit Examples project, named WorldInteractionDemo. This scene uses an enhanced XR Rig prefab named XRRig_Demo, with two different hand controllers for each hand (four in total) separating the teleportation one (for example, RightTeleportController) from the direct interaction one (for example, RightBaseController).
The XRRig_Demo object includes a script named ControllerManager that allows the player to switch between hand controllers with the press of a button. Its Inspector is shown in the following screenshot:

As you can see, the four controller game objects are assigned to their respective parameter slots. The Activation Buttons functionality on the controller will trigger a transition to the Teleport Controller, currently set up as either the thumbstick click or the primary button (for example, A or X). The Deactivation Buttons functionality, set as the Grip button, will force deactivation of the teleport mode. When the right or left-hand controller switches between base interaction and teleport interaction, the code will automatically manage this.
You can use this rig directly in your own projects, or modify the ControllerManager script for your own purposes. You could, for example, replace the default XR_Rig with the XRRig_Demo and be well on your way.
In this section, we have learned how to use the XRI Teleportation System for moving to new locations in a scene. The target location can be selected from a Teleport Area or a Teleport Anchor, where the player can choose any location in an Area, or pick a specific anchor location and direction. The teleportation provider interoperates with other locomotion providers in the XRI Locomotion System. We also looked at restricting the teleport interactables to a specific Unity layer for efficiency, how to modify the Ray Interactor to use a Projectile Curve, and ideas for handling multiple kinds of interactor controllers in a scene.
For the final topic in this chapter, we will look into the wide variety of concerns and mechanics related to locomotion, teleportation, VR comfort, and motion sickness.
Locomotion and comfort in VR
Locomotion and teleportation in VR is not a settled science. Many techniques have been tried; some have proven successful and represent best practices. We've demonstrated some of these in this chapter. Others have failed and are discouraged. New advancements in hardware, software, and player mechanics keep the options fresh and open to innovation. In this section, I present a bagful of ideas, in no particular order, for your consideration and amusement, including other locomotion mechanics and techniques for managing VR motion sickness.
Other locomotion mechanics
In the first edition of this book (2015), we implemented a game where you could ride an "elevator" to a high platform, and then jump off onto a trampoline. You'd hit the trampoline, bounce up, and down, bounce up again, and down until you settled. I assumed that would be really fun in VR, but it turned out to be a really bad idea! Unless you want to invoke nausea in your players and make people hate you, I would avoid a mechanic such as this.
If you want to offer your players a VR ride, you candefine a predefinedtrack to glide along, such as a guided tour of a building or art gallery. Tracks can be 3D, moving you up and down too, with gravity, such as VR roller coasters, or without gravity, such as a space tour. We do not recommend this mechanic except for the most hardcore thrill seekers as it also has a good chance of causing motion sickness.
We looked at using a hand-over-hand mechanic for climbing (vertical locomotion). You could also try using your hands not for climbing, but for horizontal locomotion—for example, reaching and pulling like a rope, or swinging your arms like a runner, or even a circular pulling motion as if you're operating a wheelchair.
With room-scale VR tracking, you can walk within a subset of your scene, within the safety boundaries that you have configured for your physical room. There also are hardware devices that implement locomotion mechanisms using your feet to walk or run, such as the following:
- VR treadmills where you walk in place with your feet and legs to walk and run in VR
- Exercisebikes where you can cycle and even hang glide in VR
- Body-trackingsensors can be used not just for playerlocomotion but also motion capture for representing full-body avatars in a social VR room
A technique for comfort during locomotion is to use a vignette. During the movement, the camera is cropped with a circular vignette and simple background, such as a grid being displayed in the player's peripheral vision, so they only see what is directly before them. Eliminating peripheral vision while moving can reduce the chance of motion sickness, as illustrated in the following screenshot (source: https://developers.google.com/vr/elements/tunneling, under the Creative Commons Attribution 4.0 License license):

You can use a similar technique for teleportation. Rather than just start at one location and suddenly appear at the new location, you could animate glide locomotion to the new location, but at a very fast speed. And also, you can use a vignette. This can help preserve the player's orientation of where they've ended up on the scene.
Likewise, blink teleport is a technique that does a fade-out fade-in between the change in player position. It is said to provide an additional degree of comfort.Some have even found fading with a literal blink effect is quite natural, where you rapidly fade out from top to bottom, and fade in the bottom to top, like an eyelid closing and opening.
Another teleportation technique is to provide a third-person view of the scene from above, sometimes called amini-map, god view,or dollhouse view. Fromthis perspective, the player could point to a newlocation to teleport. Thismini version of the scene could be an object the player uses as a tool in the main scene, or you transition to this view mode during the teleportation selection process.
You can also teleport to a different scene. Combined with the fade-out/in, you would callSceneManager.LoadScene("OtherSceneName") rather than simply changing the transform position. You must add the other scene to theBuild Settings Scenesto Buildlist (see https://docs.unity3d.com/ScriptReference/SceneManagement.SceneManager.LoadScene.html). It is recommended you fade to a dark color rather than white, which could be startling in a VR headset.
Clever use of teleportation and the player's direction can lead to efficient use of limited play space and give the perception of the VR space being much larger than it is actually is in real life. For example, in room-scale VR, if you have the player walk toward the edge of the play space and enter an elevator, they could be facing the back of the elevator going in and must turn around when the doors open on the new level, and can now physically walk forward. In fact, infinite corridors and connected rooms could be implemented this way while maintaining player immersion.
I've mentioned motion sickness multiple times here. In the next topic, I discuss the issue in a little more detail.
Managing VR motion sickness
VR motion sickness, or simulator sickness, is a real symptom and a concern for VR. Researchers, psychologists, and technologists with a wide array of specializations and PhDs are studying the problem to better understand the underlying causes and find solutions.
A cause of VR motion sickness is a lag in screen updates—or latency. When you're moving your head, your brain expects the world around you to change exactly in sync. Any perceptible delay can make you feel uncomfortable, to say the least.
Latency can be reduced by faster rendering of each frame, keeping to the recommended frames per second (FPS). Device manufacturers see this as their problem to solve, in both hardware and runtime driver software. Graphics processing unit (GPU) and chip manufacturers see it as a processor performance and throughput problem. We will undoubtedly see leaps and bounds in improvements over the coming years. Likewise, as developers, we also need to take responsibility.
VR developers need to be aware of latency and other causes of VR motion sickness. We need to look at it as though it's our problem too because ultimately, it comes down to performance and ergonomics. With an ongoing dichotomy of mobile VR versus desktop VR, there will always be upper bounds on the performance of devices that our players will be using.
But it's not just technology. I can get nauseous riding a real-world roller coaster. So, why wouldn't a VR one have a similar effect? Things to consider that help improve your players' comfort and safety include game mechanics and a user experience design such as the following:
- Don't move fast: When moving or animating a first-person character, don't move too fast. High-speed first-person shooter games that work on gaming consoles and desktop PCs may not work out so well in VR.
- Look forward: When moving through a scene, if you're looking to the side rather than straight ahead, you're more likely to feel nauseous.
- Don't turn your head too fast: Discourage users from turning their head quickly with the VR headset on. The latency in updating the HMD screen is aggravated by larger changes in the viewport in small time slices.
- Offer comfort mode: When a scene requires you to quickly turn yourself a lot of times, provide a ratcheted (snap turn) rotation mechanism, also known as comfort mode, which lets you change the direction in which you look in larger increments.
- Use fade or blink cuts during teleportation and scene changes. When fading, go to a dark color, as white can be startling.
- Use tunneling or other techniques during locomotion. Reduce what is visible in the peripheral vision by masking the camera, except what is just in front of you.
- Use a third-person camera: If you have high-speed action but you don't necessarily intend to give the user a thrill ride, use a third-person camera view.
- Stay grounded: Provide visual cues that help the user stay grounded, such as horizon lines, nearby objects in your field of view, and relative fixed-position objects, such as dashboards and body parts.
- Provide an option to recenter the view: Mobile VR devices, in particular, are subject to drift and the need to be recentered on occasion. With wired VR devices, this helps you avoid getting tangled in HMD wires. As a safety issue, recentering your view relative to the real world may help you avoid hitting furniture and walls in the physical space.
- Don't use cut scenes: In traditional games (and movies), a technique that can be used to transition between levels is to show a 2D cutscene movie. This does not work well in VR as it breaks the immersion. An alternative is to simply fade to black and then open the new scene.
- Optimize rendering performance: It is important for all VR developers to understand the underlying causes of latency, especially with regard to rendering performance, and what you can do to optimize it, such as lowering the poly count and choosing lighting models carefully. Learn to use performance monitoring tools in order to keep the FPS within the expected and acceptable limits.
- Encourage users to take breaks: Or, alternatively, you can maybe just provide a puke-bag with your game! Just kidding.
We will continue discussing many of these considerations throughout this book. In the next chapter, we examine the rendering pipeline and techniques for optimizing rendering performance while maintaining quality results. In Chapter 11, Using All 360 Degrees, we look at 360-degree media and VR comfort related to that. And in Chapter 13, Optimizing for Performance and Comfort, we dive deeper into performance optimization and Unity profiling tools for detecting and ironing out any performance bottlenecks that can affect latency and comfort.
Summary
In this chapter, we explored a variety of mechanics for moving the player within your virtual environments. We started by implementing a glide locomotion mechanic, using the thumbstick on the hand controller to drive through the scene. This included alternative ways to define what "moving forward" means, using the gaze direction, pointing with a hand controller, or rotating using the horizontal axis of the thumb controller. Then, we built a climbing wall using a hand-over-hand grab-and-pull mechanic. We even made the player fall to the ground if they let go!
We also learned about the XR Interaction Toolkit's Locomotion System that uses Locomotion Providers to implement various features. First, we added a Snap Turn Provider to turn the player in discrete angle increments with the thumbstick, and we learned to use the XRI API to integrate our own GlideLocomotion script with the Locomotion System. Next, we implemented teleportation using a Teleportation Provider along with interactable TeleportArea and TeleportAnchor objects. Using assets from the XR Interaction Toolkit Examples project from Unity, we quickly added effective and high-quality visuals to the teleportation mechanics in our scene.
We also gained a deeper understanding of the use of layers, ray interactor visuals, and managing multiple interactor controllers. Finally, we surveyed a wide variety of locomotion and teleportation techniques and concerns that might affect player comfort and motion sickness.
In the next chapter, we'll step away from the interactivity we've been doing the past few chapters and learn about the Unity rendering pipeline, lighting, and realism.