
OpenStack has been designed for highly scalable environments where it is possible to avoid single point of failures (SPOFs), but sometimes you must build this into your own environment. For example, Keystone is a central service underpinning your entire OpenStack environment, so you would build multiple instances into your environment. Glance is another service that is key to the running of your OpenStack environment. By setting up multiple instances running these services, controlled with Pacemaker and Corosync, we can enjoy an increase in resilience to failure of the nodes running these services. Using Pacemaker and Corosync is one way of providing a highly available solution to OpenStack services. This recipe is designed to give you options for your deployments and allow you to use Pacemaker and Corosync elsewhere in your environment.
For this recipe, we will assume that there are two controller nodes available that are running Glance and Keystone. Installation of Keystone and Glance was covered in the first two chapters of this book.
The first controller1 node will have a host management address of 192.168.100.221. The second controller2 node will have a host management address of 192.168.100.222.
Tip
Visit https://github.com/OpenStackCookbook/Controller-Corosync.git for a two-node OpenStack Controller example that accompanies this section.
To install Pacemaker and Corosync on the two servers that will be running OpenStack services such as Keystone and Glance, carry out the following steps.
- Once Keystone and Glance have been installed with an address in our OpenStack environment that our other OpenStack services can communicate with, we can proceed to install Pacemaker and Corosync as follows:
sudo apt-get update
sudo apt-get install pacemaker corosync
- It's important that our two nodes know each other by address and hostname, so enter their details in
/etc/hoststo avoid DNS lookups:192.168.100.221 controller1.book controller1 192.168.100.222 controller2.book controller2
- Edit the
/etc/corosync/corosync.conffile so that the interface section matches the following code:interface { # The following values need to be set based on your environment ringnumber: 0 bindnetaddr: 192.168.100.0 mcastaddr: 226.94.1.1 mcastport: 5405 } - By default, the
corosyncservice isn't set to start. To ensure that it starts, edit the/etc/default/corosyncservice and setSTART=yes, as follows:sudo sed -i 's/^START=no/START=yes/g' /etc/default/corosync - We now need to generate an authorization key to secure the communication between our two hosts:
sudo corosync-keygen - You will be asked to generate a random entropy by typing using the keyboard. If you are using an SSH session instead of a console connection, you won't be able to generate the entropy using a keyboard. To do this remotely, launch a new SSH session, and in that new session, while the
corosync-keygencommand is waiting for entropy, run the following command:while /bin/true do dd if=/dev/urandom of=/tmp/100 bs=1024 count=100000 for i in {1..10} do cp /tmp/100 /tmp/tmp_$i_$RANDOM done rm -f /tmp/tmp_* /tmp/100 done
- When the
corosync-keygencommand has finished running and anauthkeyfile has been generated, simply press Ctrl + C to cancel this random entropy creation loop.
We now need to install Pacemaker and Corosync on our second host, controller2.
- We install the
pacemakerandcorosyncpackages as follows:sudo apt-get update sudo apt-get install pacemaker corosync
- We also ensure that our
/etc/hostsfile has the same entries for our other host (as before):192.168.100.221 controller1.book controller1 192.168.100.222 controller2.book controller2
- By default, the
corosyncservice isn't set to start. To ensure that it starts, edit the/etc/default/corosyncservice and setSTART=yes:sudo sed -i 's/^START=no/START=yes/g' /etc/default/corosync
With the /etc/corosync/corosync.conf file modified and the /etc/corosync/authkey file generated, we copy this to the other node (or nodes) in our cluster:
scp /etc/corosync/corosync.conf /etc/corosync/authkey
[email protected]:
We can now put the same corosync.conf file as used by our first node and the generated authkey file into /etc/corosync:
sudo mv corosync.conf authkey /etc/corosync
- We are now ready to start the services. On both nodes, issue the following commands:
sudo service pacemaker start
sudo service corosync start
- To check that our services have started fine and our cluster is working, we can use the
crm_moncommand to query the cluster status:sudo crm_mon -1This will return output similar to the following where the important information includes the number of nodes configured, the expected number of nodes, and a list of our two nodes that are online:

- We can validate the configuration using the
crm_verifycommand:sudo crm_verify -L -V - We will get an error mentioning STONITH (short for Shoot The Other Node In The Head). STONITH is used to maintain quorum when there are at least three nodes configured. It isn't required in a two-node cluster. As we are only configuring a two-node cluster, we disable
stonith:sudo crm configure property stonith-enabled=false - Verifying the cluster using
crm_verifyagain will now show errors:sudo crm_verify -L - Again, as this is only a two-node cluster, we disable any notion of
quorumusing the following command:sudo crm configure property no-quorum-policy=ignore - On the first node,
controller1, we can now configure our services and set up a floating address that will be shared between the two servers. In the following command, we've chosen192.168.100.253as theFloatingIPaddress and a monitoring interval of 5 seconds. To do this, we use thecrmcommand again to configure thisFloatingIPaddress, which we will call theFloatingIPcommand. The command is as follows:sudo crm configure primitive FloatingIP ocf:heartbeat:IPaddr2 params ip=192.168.100.253 cidr_netmask=32 op monitor interval=5s
- On viewing the status of our cluster using
crm_mon, we can now see that theFloatingIPaddress has been assigned to ourcontroller1host:sudo crm_mon -1The output is similar to the following example that now says we have one resource configured for this setup (our
FloatingIP):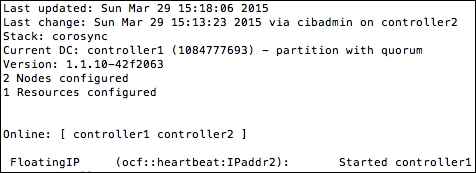
- We can now use this
FloatingIPaddress of192.168.100.253to connect to our first node. When we power that node off, this address will be sent to our second node after 5 seconds of no response from the first node. We can test thisFloatingIPaddress by executing the following commands from either of the controller hosts:export OS_TENANT_NAME=cookbook export OS_USERNAME=admin export OS_PASSWORD=openstack export OS_AUTH_URL=https://192.168.100.253:5000/v2.0/ keystone --insecure endpoint-list
We will get an output similar to this:

Making OpenStack services highly available is a complex subject, and there are a number of ways to achieve this. Using Pacemaker and Corosync is a very good solution to this problem. It allows us to configure a floating IP address assigned to the cluster that will attach itself to the appropriate node (using Corosync), as well as control services using agents, so the cluster manager can start and stop services as required to provide a highly available experience to the end user.
We install both Keystone and Glance onto two nodes (each configured appropriately with a remote database backend such as MySQL and Galera), having the images available using a shared filesystem or cloud storage solution. Doing this provides us with the advantage of configuring these services with Pacemaker, and allowing Pacemaker to monitor these services. If the required services are unavailable on the active node, Pacemaker can start those services on the passive node.