
Heat is the OpenStack Orchestration engine that enables users to quickly spin up whole environments using templates. Heat templates, known as Heat Orchestration Templates (HOT), are Yet Another Markup Language (YAML) based files. The files describe the resources being used, the type and the size of the instances, the network an instance will be attached to, among other pieces of information required to run that environment.
In the previous chapter, we showed you how to use the Heat command line client. In this section, we will show how to use an existing Heat template file in OpenStack Dashboard to spin up two web servers running Apache, connected to a third instance running HA Proxy.
Load a web browser, point it to our OpenStack Dashboard address at http://192.168.100.200/ and log in as an admin user, such as the admin user created in the Adding users to Keystone recipe of Chapter 1, Keystone – OpenStack Identity Service, with the password openstack.
First, we will launch stack within our OpenStack Dashboard.
To launch a Heat stack for a logged in user, carry out the following steps:
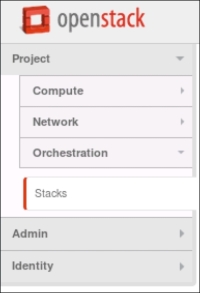
- To view available Heat stacks within our OpenStack Dashboard, select the Stacks tab under the Orchestration menu:
- After clicking on the Stacks tab, you will see all running stacks in your environment. In our case, our list is empty:

- Click on the Launch Stack button to create a new stack. You will see the following window:

- There are several ways to specify what template source to use in a stack: File, Direct Input, or URL. Choose which option is the most convenient for you. For our example, you can either use the URL directly or upload a file. The template file can be downloaded from https://raw.githubusercontent.com/OpenStackCookbook/OpenStackCookbook/master/cookbook.yaml. We will upload files from our system.
- Just like we downloaded the
cookbook.yamlfile, we can also download the Environment Source file. In this case, we do not have to use the environment source, but it makes it convenient. The environment file stores the values we would have to enter into the browser manually, but instead loads the values for us on the Launch Stack screen, as shown in step 8. In our example, we are using the environment file that can be downloaded from https://raw.githubusercontent.com/OpenStackCookbook/OpenStackCookbook/master/cookbook-env.yaml. Update thepublic_net_id,private_net_id, andprivate_subnet_idfields to match your environment. - After selecting the Template Source and Environment Source files, click on Next:

- Our sample environment file contains the following code:
parameters:
  key_name: demokey
  image: trusty-image
  flavor: m1.tiny
  public_net_id: 5e5d24bd-9d1f-4ed1-84b5-0b7e2a9a233b
  private_net_id: 25153759-994f-4835-9b13-bf0ec77fb336
  private_subnet_id: 4cf2c09c-b3d5-40ed-9127-ec40e5e38343
- Clicking on Next will give you a Launch Stack window with all the inputs:

- Note that most of the inputs in our template are now populated. If you did not specify the environment source file in the previous step, you will need to enter the
key_name,image,flavor,public_net_id,private_net_id, andprivate_subnet_idfields. - Enter the stack name and user password for your user. If you are logged in as
adminordemo, the password isopenstack. - Click on the Launch button to start stack creation. If all inputs were correct, you should see your stack being created:

- After the stack creation finishes and if there were no errors during creation, you will see your stack's status updated to Complete:

After launching a stack, there is a lot of information associated with it, including inputs, outputs, and, in the case of errors, information about why stack creation failed.
- To view the details of the stack, click on the stack name from the Stacks list. The first available view is Topology:

Explore the topology by clicking on the nodes. If the graph does not fully fit or you would like a different perspective, you can drag the graph around the window.
- The next tab under Stack Detail will provide all of the information that was used in creating the stack:

Stack information available in the Overview tab is as follows:
- Info
- Status
- Outputs
- Stack parameters
- Launch parameters
- The Resources tab will show all the HEAT resources that were created during stack launch:

If there were any errors during stack launch, check this page to see which component's creation failed.
- The Events tab shows all the events that occurred when the stack was created. This page can also be very helpful in troubleshooting Heat templates:

- While your Heat stack is running, you can also see how many instances it created under the Compute tab's Instance option. The following is what our instances look like on the Instances page:

Stack deletion is simple; however, it will delete all resources that were created during stack launch. Follow these steps:
- To delete a stack, first view the available stacks on the Stacks page:

- Click on the appropriate Delete Stack button to delete a stack. You will be asked to confirm the deletion:

- After confirming deletion, all resources associated with the stack will be deleted.
We have used the OpenStack Dashboard to launch, view, and delete Orchestration stacks. We first needed to download a sample HA Proxy Heat Orchestration Template from GitHub. Since we were using an environment file, we also had to modify the appropriate inputs. Your own templates may have different inputs.
After launching our HA Proxy stack, we explored its topology, resources, and events. Resources created during stack launch will also be reflected in the rest of your environment. If you are launching new instances, all of them will also be available on the Instance page. Delete and modify resources created during the stack launch only through Orchestration section in the OpenStack dashboard or on the command line. Deleting stacks through the dashboard will delete all associated resources.