
In this recipe, we will create a Gray Alien-like skin shader using Cycles procedural textures, as shown here:

Start Blender and open the 1301OS_07_alienskin_start.blend file, where there is an already set scene with an unwrapped Suzanne primitive object. The Suzanne mesh has been "alienizated" by a shape key to morph its monkey-like features into the head of a Gray Alien-like creature (in the Object Data window, under the Shape Keys tab, the alien shape keys with a Value of 1.000, and sliding the slider towards 0.000 gradually restore the original Suzanne shape).
On the second layer, there is a plane tracked (by a Damped Track constraint, in the Object Constraints window) to the Camera to stay perpendicular to the point of view, which we'll use to create a simple star backdrop for our alien Suzanne.
Let's start by setting the background image material first:
- Select the background plane and click on the New button in the Node Editor window's header or in the Material window. Rename the material as
star_backdropand in the Material window switch the Diffuse BSDF shader with an Emission shader. Set the Strength value to0.500. - Add an Image Texture node (press Shift + A and go to Texture | Image Texture) and connect the Color output to the Color input socket of the Emission node. Click on the Open button and browse to the
texturesfolder. Load thegalaxy-constellation-star-background.pngimage (courtesy of nasaimages.org). - Add a RGB Curves node (press Shift + A and go to Color | RGB Curves) and paste it between the Image Texture node and the Emission node. Click on the curve window to add a control point and set these coordinates—X =
0.36667and Y =0.12778. Click again on the curve window to add a second control point and set these coordinates—X =0.65556and Y =0.81111.
Now, let's go ahead with the creation of the alien skin shader (with a different material for the eyes):
- Select the alien Suzanne object. Click on the New button in the Node Editor window's header or in the Material window and rename the material as
alienskin. - Go in the edit mode (press Tab), select the eyes' vertexes, and click on the + icon to the right of the Material window to add a second material. Click on the New button and rename the material as
alieneyes. Then, click on Assign to assign it to the selected vertexes. Come out of the edit mode. - Switch the Diffuse shader with a Mix Shader node. In the first Shader slot, select a Diffuse shader and in the second one, a Glossy Shader. Set the Mix Shader node's Factor value to
0.600, the Diffuse shader's Color value to R 0.010, G 0.006, B 0.010, the Glossy shader's Color value to R 0.345, G 0.731, B 0.800 and the Roughness value to0.100. - Select the alienskin material and in the Material window switch the Diffuse BSDF shader with a Mix Shader node. In the first Shader slot, select a Diffuse BSDF node and in the second one, an Add Shader node. Set the Diffuse shader's Roughness value to
0.800. - Add a Layer Weight node (press Shift + A and go to Input | Layer Weight) and connect its Facing output to the Fac input socket of the Mix Shader node. Set the Blend node's Factor value to
0.400. - In both the Shader slots of the Add Shader node, select a Glossy BSDF shader node. Rename the first one as
Glossy BSDF 1and the second one asGlossy BSDF 2. Set the Roughness value of the first one to0.450and the Roughness value of the second one to0.225.
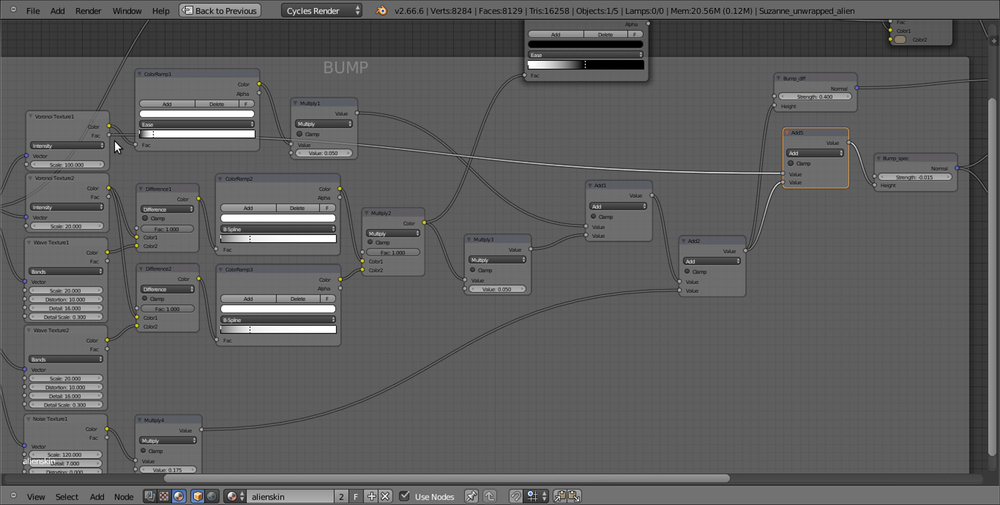
Now that we have set the basic shader for the alien skin, let's go ahead with the main component of the material, that is the bump:
- Add a Texture Coordinate node (press Shift + A and go to Input | Texture Coordinate) and two Mapping nodes (press Shift + A and go to Vector | Mapping). Connect the UV output of the Texture Coordinate node to the Vector input sockets of both the Mapping nodes.
- Add two Voronoi Texture nodes (press Shift + A and go to Texture | Voronoi Texture,) rename them as
Voronoi Texture1andVoronoi Texture2, and connect the first Mapping node's output to their Vector input sockets. Set the Scale value of the Voronoi Texture1 to100.000and the Scale value of the Voronoi Texture2 to20.000. - Set the Rotation Y value of the first Mapping node to 60°.
- Add two Wave Texture nodes (press Shift + A and go to Texture | Wave Texture) and rename them as
Wave Texture1andWave Texture2. Connect the first Mapping node's output to the Vector input socket of the Wave Texture1 node, set the Scale value of the texture to20.000, Distortion value to10.000, Detail to16.000, and Detail Scale to0.300. - Connect the second Mapping node output to the Wave Texture2 node's Vector input socket and set the values of the texture exactly as the former one. Set the Rotation Y value of the second Mapping node to 20°.
- Add a Noise Texture node (press Shift + A and go to Texture | Noise Texture), rename it as
Noise Texture1, and connect the second Mapping node's output to its Vector input socket and set the texture's Scale value to120.000and the Detail value to7.000. - Add a ColorRamp node (press Shift + A and go to Convertor | ColorRamp), rename it as
ColorRamp1, and connect the Voronoi Texture1 node's Color output to its Fac input socket. Set the interpolation to Ease and move the white colored marker to the left, very close to the black colored one (to be more exact, under the end of the last e of the word Ease). - Add a Math node (press Shift + A and go to Convertor | Math), change the operation to Multiply, and rename it as
Multiply1. Connect the Color output of the ColorRamp1 node to the first Value input socket of the Multiply1 node and set the second Value to0.050. - Add a Mix node (press Shift + A and go to Color | Mix) and connect the Color output of the Voronoi Texture2 to the Color1 input socket and the Color output of the Wave Texture1 node to the Color2 input socket. Set the Blend Type to Difference and the Fac value to
1.000. Rename it asDifference1. - Add a second Mix node (press Shift + A and go to Color | Mix) and connect the Color output of the Voronoi Texture2 to the Color1 input socket and the Color output of the Wave Texture2 node to the Color2 input socket. Set the Blend Type to Difference and the Fac value to
1.000. Rename it asDifference2. - Add two ColorRamp nodes (press Shift + A and go to Convertor | ColorRamp), rename them as
ColorRamp2andColorRamp3. Connect the Difference1 node's Color output to the Fac input socket of the ColorRamp2 node and the output of the Difference2 node to the Fac input socket of the ColorRamp3 node. - Set the interpolation to B-Spline for both of them. And, move the white colored marker three-fourths of the slider length to the left for both of them.
- Add a Mix node (press Shift + A and go to Color | Mix) and connect the Color output of the ColorRamp2 node to the Color1 input socket and the Color output of the ColorRamp3 node to the Color2 input socket. Set the Blend Type to Multiply and the Fac value to
1.000. Rename it asMultiply2. - Add a Math node (press Shift + A and go to Convertor | Math), change the operation to Multiply, and rename it as
Multiply3. Connect the output of the Multiply2 node to the first Value input socket of the Multiply3 node and set the second Value to0.050. - Add a Bump node (press Shift + A and go to Vector | Bump) and connect the output of the Multiply3 node to the Height input socket. Set the Strength value to
0.400and connect the Bump node's Normal output to the Normal input sockets of the Diffuse BSDF node. Rename the node asBump_diff. - Press Shift + D to duplicate the Bump node, rename it as
Bump_spec, and connect its output to the Normal input sockets of the Glossy BSDF 1 and Glossy BSDF 2 nodes. Connect the Fac output of the Voronoi Texture1 node to the Height input socket. Set the Strength to-0.015. - Press Shift + D to duplicate the Add2 node, rename it as
Add5, and paste it in between the Voronoi Texture1 node and the Bump_spec node. - Add a Math node (press Shift + A and go to Convertor | Math) and paste it to the immediate left of the Bump node. Rename it as
Add1and connect the output of the Multiply1 node to the first Value input socket, so as to automatically switch the former connection to the second Value input socket. - Add a new Math node (press Shift + A and go to Convertor | Math) and paste it in between the Add1 node and the Bump node. Rename it as
Add2. Connect the Noise Texture1 node's Color output to the second Value input socket. - Add a Math node again (press Shift + A and go to Convertor | Math) and paste it between the Noise Texture1 node and the Add2 node. Set the operation to Multiply and the second Value to
0.175. Rename it asMultiply4. - Connect the output of the Add2 node to the second Value input socket of the Add5 node.
We are done with the bump part, so now let's go with the color pattern:
- Add a ColorRamp node (press Shift + A and go to Convertor | ColorRamp), rename it as
ColorRamp4, and connect the Color output of the Multiply2 node to its Fac input socket. Set the interpolation to Ease, move the black colored marker to the middle of the slider, and the white colored marker to the extreme left. - Add a Mix node (press Shift + A and go to Color | Mix), set the Blend Type to Add, and rename it as
Add3. Connect the Color output of the ColorRamp4 node to the Fac input socket and set the Color2 value to R 0.553, G 0.599, B 0.473. Connect its output to the Color input socket of the Diffuse shader node. - Add a Noise Texture node (press Shift + A and go to Texture | Noise Texture) and rename it as
Noise Texture2. Connect the first Mapping node's output to its Vector input socket and set the texture's Scale value to60.000and the Detail value to7.000. - Add a ColorRamp node (press Shift + A and go to Convertor | ColorRamp), rename it as
ColorRamp5, and connect the Noise Texture2 node's Color output to its Fac input socket. Set the interpolation to B-Spline, move the black colored marker to the middle of the slider, and the white colored marker one-fourth the slider length to the left. - Add a Mix node (press Shift + A and go to Color | Mix), set the Blend Type to Add, and rename it as
Add4. Paste it between the Add3 node and the Diffuse shader. Set the Color2 value to R 0.235, G 0.198, B 0.132. Connect the Color output of the ColorRamp5 node to the Fac input socket of the Add4 node.
This is how the preceding steps work to create a Gray Alien skin material:
- From step 1 to step 3, we built a simple and quick shader for the starry background. Note that the background is actually emitting light (off course, according to the black and white values of the image mapped on the plane), so affecting the Suzanne alien mesh. But in this case, this doesn't matter because it's not visible from the Camera point of view. To see how to set a bright, but not a light-emitting background, that is a shader behaving as a shadeless material you have in the Blender Internal engine, go to Chapter 9, Special Materials, of this cookbook.
- From step 6 to step 9, we built the basic shader for the alien Suzanne skin. The diffuse component is mixed, on the ground of the Facing output of a Layer Weight node, with a specular component made up of two summed Glossy nodes with different Roughness values, so as to have a crisper specular effect on a more diffuse one.
- From step 10 to step 30, we built the quite complex bump pattern for the skin. Note that there are two separate bump effects, one for the diffuse component and the same one, summed with the bare Voronoi texture, connected to the specular component nodes.
- Finally, from step 31 to step 35, we built a very simple color pattern.
The reality of this material would benefit a lot from at least a little Sub Surface Scattering effect. In the 2.66a official Blender version, there is no SSS shader in Cycles yet (even if not totally developed, it will be present in the official 2.67 release coming out soon), but we'll see different ways to "fake" it in Chapter 8, Human Skin Materials and Faking Sub Surface Scattering in Cycles, of this cookbook.