
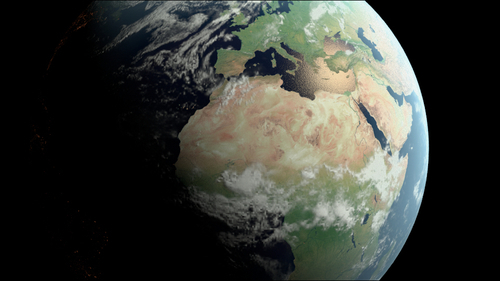
In this recipe, we will create a realistic planet Earth using image textures available on the Web:
The image textures provided with this book have generally been heavily down-scaled and are good only for demonstration purposes (or, in this case, for a very distant Earth render). For better results with this recipe, just replace these low resolution images with hi-res versions that you can download, for example, from these addresses:
Before you download anything, always have a look at the license of the images provided by any site you can find, to be sure they are released as freely usable, especially if you are going to use them for commercial works. The preceding links should be good enough, but on the Internet things can change quite quickly, so double-check!
The image maps you need are, at least, five:
- Earth-color: The color of the land/sea surfaces in daylight
- Earth-night: The color of the land/sea surfaces at night (usually provided with superimposed city lights)
- Earth-bump: A gray-scale high map of the continents
- Earth-spec: A black and white outline with the continents filled with black and the water masses perfectly white
- Clouds: A gray-scale map of the clouds

Note that, even if gray-scale, in Cycles all the image textures must be in RGB color space.
Actually, Cycles can also pretty well handle very big textures, reaching a size of 16 K (that is, 16.000 pixels for the longest side of the image), so you can use them at the best resolution you can find. In any case, be aware that the bigger the resolution of the textures, the longer the Cycles' rendering times.
However, besides the texture images, we also have to follow these steps:
- Start Blender and switch to the Cycles Render engine.
- Delete the default cube and add a UV Sphere (with the mouse cursor in the 3D view, press Shift + A and go to Mesh | UV Sphere). Rename it as
Earth_Surface. - With the mouse cursor in the Camera view, press 1 from the numpad to go in orthogonal front view. Now, go in edit mode, select all the vertexes, and press U. In the UV Mapping pop-up menu, select Sphere Projection. Go out of edit mode and press 0 from the numpad to go back again to the Camera view.
- Press Shift + D and hit Enter to duplicate the sphere. In the Transform panel to the right (press N if not already activated), set the Scale value for X, Y, and Z to
1.001. Rename it asEarth_Clouds. - Duplicate it again, set the scale to
1.002, and rename it asEarth_Atmosphere. - Add an Empty (press Shift + A and go to Empty | Plain Axes) and rename it as Empty_Earth. In the Object Data window, set its size to
2.00. Select the three UV spheres and then the Empty and press Crtl + P to parent them to the Empty. - Select Empty_Earth, and in the Transform panel set the Rotation value to: X= 18.387°, Y = 0.925°, and Z = -4.122° (this is just to have a nice specular effect showing on the oceans at rendering time).
- Select the camera and in the Transform panel set these values: Location X = -0.64000, Y = - 4.70000, and Z = 0.12000; Rotation X = 89°, Y = 0°, and Z = -9°. Go to the Object Data window and change the Focal Length value to
60.000(Millimeters). - Go to the World window. Click on New and change the background color to pure black and set the Strength value to
0.000. - Select the lamp and set it to Sun. Set the Size value to
0.100and the Strength value to8.000. Set the color to R 1.000, G 0.902, B 0.679. In the Transform panel, set these values: Location X = 145.00000, Y = -65.00000, and Z = 110.00000; Rotation X = 30.579°, Y = 48.615°, and Z = 14.078°. - Go to the Render window, and under the Sampling sub-panel set the Clamp value to
1.00, the Preview samples to20, and the Render samples to50.
In the Outliner hide, for the moment, the Earth_Clouds and Earth_Atmosphere spheres by clicking on the little eye icons to see only the Earth_Surface sphere in the viewport rendered and updated in real time as we work on the material.
- Select the Earth_Surface sphere and click on New in the Material window under the Properties panel or in the Node Editor window's header. Rename the material as Surface.
- In the Material window on the right, under the Properties panel, switch the Diffuse BSDF shader with an Add Shader node. In the first Shader slot, load a Diffuse BSDF shader. In the second Shader slot, load a Glossy BSDF node and set its Roughness value to
0.700. - Add an Image Texture node (press Shift + A and go to Texture | Image Texture) and connect its Color output to both the Color input sockets of the Diffuse and Glossy shaders. Click on the Open button on the Image Texture node and browse to your
texturesdirectory and load theEarth-col_low.pngimage (or a hi-res version if you have it). - Press N in the Node Editor window to bring up the Active Node panel. In the Label slot, rename the Image Texture node as Color_Day.
- Add a new Image Texture node (press Shift + A and go to Texture | Image Texture) and a Bump node (press Shift + A and go to Vector | Bump). Connect the color output of this second Image Texture node to the Height input socket of the Bump node, and then connect the Normal output of the Bump node to the Normal input sockets of both the Diffuse and the Glossy shaders.
- Rename the second Image Texture node as Bump, and then click on its Open button and load the Earth-bump_low.png image. Set Color Space to Non-Color Data. Select the Bump vector node, rename it as
Bump_Lands, and set its Strength value to0.002. - Add a Frame (press Shift + A and go to Layout | Frame), select the two image texture nodes, the Bump_Lands node, the Diffuse and Glossy shaders, and then the frame. Press Crtl + P to parent them and rename the frame as LANDS:

- Now add a Noise texture (press Shift + A and go to Texture | Noise Texture), a Bump node (press Shift + A and go to Vector | Bump), a Diffuse shader (press Shift + A and go to Shader | Diffuse BSDF), and a Glossy shader (press Shift + A and go to Shader | Glossy BSDF).
- Set the Noise texture's Scale value to
1000.000and connect the Color output to the Height input socket of the Bump node. Rename the latter asBump_Oceans, set the Strength value to0.001, and connect the Normal output to the Normal input sockets of the new Diffuse and Glossy shaders. Set the Glossy shader's Roughness value to0.100. - Add a Frame (press Shift + A and go to Layout | Frame), select the new nodes and the frame and press Crtl + P to parent them; rename the frame as
SEAS. - Add a Mix Shader node (press Shift + A and go to Shader | Mix Shader) and place it just under the Add Shader node. Set the Fac value to
0.100and connect the output of the SEAS frame's Diffuse to the first Shader input and the output of the SEAS frame's Glossy to the second Shader input socket. - Press Shift + D to duplicate the Mix Shader node and paste it between the Add Shader node and the Material Output node. Connect the output of the first Mix Shader node to the second Shader input.
- Add a new Image Texture node (press Shift + A and go to Texture | Image Texture) and rename it as
Spec/Mask. Connect the Color output to the Fac input socket of the last Mix Shader node. Click on the Open button to load theEarth-spec_low.pngimage and set Color Space to Non-Color Data. - Add a Frame (press Shift + A and go to Layout | Frame), select the Spec/Mask node and the frame, and press Crtl + P to parent them; rename the frame as
SEPARATOR LANDS/SEAS. - Now click on the Color output of the Color_Day image texture inside the LANDS frame and connect it to the color input of the Diffuse shader inside the SEAS frame.
- Add a Mix node (press Shift + A and go to Color | Mix) and paste it just before the SEAS frame's Diffuse shader. Switch the Color1 connection to the Color2 input socket and then set Color1 to R 0.0065, G 0.0065, B 0.024.
- Add a ColorRamp node (press Shift+ A and go to Convertor | ColorRamp) to the SEAS frame (just add it and parent it to the frame). Connect the Color output to the Color input of the Glossy shader. Set the interpolation to B-Spline and change the black color to pure white and the white color to R 0.209, G 0.117, B 0.117. Click on the Add button and change the new marker color to R 0.965, G 0.462, B 0.223.
- Add a Layer Weight node (press Shift + A and go to Input | Layer Weight) to the SEAS frame, connect the Facing output to the Fac input socket of the ColorRamp node and to the Fac input socket of the Mix node.
- Add an Image Texture node (press Shift + A and go to Texture | Image Texture), a ColorRamp node (press Shift + A and go to Convertor | ColorRamp), a Mix node (press Shift + A and go to Color | Mix), and an Emission shader (press Shift + A and go to Shader | Emission).
- Rename the Image Texture node as
Color_Nightand connect its color output to the Fac input socket of the ColorRamp node and the color output of the latter to the Color1 input socket of the Mix node. Connect the Mix node output to the color input of the Emission node. - In the Color_Night image texture node, load the
Earth-night_low.pngimage. Set the ColorRamp node's interpolation to B-Spline and move the white color marker to the middle of the slider, then move the black color marker one-fourth to the right. Set the Mix node's Blend Type to Multiply, the Fac value to1.000, and change the Color2 value to R 1.000, G 0.257, B 0.090. Set the Emission node's Strength value to0.400. - Add a Frame (press Shift + A and go to Layout | Frame), select the new nodes and the frame, and press Crtl + P to parent them; rename the frame as
NIGHT. - Add a Mix Shader node (press Shift + A and go to Shader | Mix Shader) and paste it just before the Material Output node. Connect the Emission node output to the second Shader input socket of the last Mix Shader node.

- In the Outliner, unhide the Earth_Clouds sphere and select it. Click on New in the Material window under the Properties panel or in the Node Editor window's header. Rename the material as Clouds.
- In the Material window on the right, under the Properties panel, switch the Diffuse BSDF shader with a Mix Shader node. In the first Shader slot, load a Transparent BSDF shader and in the second Shader slot load a new Mix Shader node. In its first Shader slot, load a Diffuse BSDF shader and in the second a Glossy BSDF shader. Set the Glossy shader's Roughness value to
0.800and the colors of both the shader nodes to pure white. - Add an Image Texture node (press Shift + A and go to Texture | Image Texture), a ColorRamp node (press Shift + A and go to Convertor | ColorRamp) and a Bump node (press Shift + A and go to Vector | Bump).
- Rename the Image Texture node as Clouds and connect its Color output to the Fac input of the ColorRamp and to the Height input socket of the Bump node.
- Set the ColorRamp interpolation to Ease and connect its color output to the Factor input socket of the first Mix Shader node. Connect the Bump node output to the Normal inputs of both the Diffuse and Glossy shaders and set the Strength value to
0.002. - Click on the Open button of the Clouds image texture node and load the
Clouds.pngimage. Set Color Space to Non-Color Data.
- In the Outliner, unhide the Earth_Atmosphere sphere and select it. Click on New in the Material window under the Properties panel or in the Node Editor header. Rename the material as
Atmosphere. - In the Material window on the right, under the Properties panel, switch the Diffuse BSDF shader with a Mix Shader node. In the first Shader slot, load a Transparent BSDF shader and in the second Shader slot load a new Mix Shader node. In its first Shader slot, load a Diffuse BSDF shader and in the second a Glossy BSDF shader. Set the Glossy shader's Roughness value to
0.800. Set the Transparent shader color to R 0.640, G 0.692, B 0.753. - Add a Layer Weight node (press Shift + A and go to Input | Layer Weight) and a ColorRamp node (press Shift + A and go to Convertor | ColorRamp) and connect the Facing output of the Layer Weight node to the Fac input of the ColorRamp node. Set the ColorRamp node's interpolation to B-Spline and move the black color marker one-fourth to the right of the slider.
- Move them close to the first Mix Shader node and connect the Color output of the ColorRamp node to the Fac input of the first Mix Shader node. Set the Layer Weight node's blend factor to
0.200. - Select and press Shift + D to duplicate the Layer Weight and the ColorRamp nodes and move them close to the Diffuse and Glossy shaders. Connect the ColorRamp color output to the color inputs of the two shaders and set the blend factor of the Layer Weight node to
0.700. - Set the ColorRamp node's interpolation to Ease and move the white color marker to the middle of the slider. Set its color to R 0.266, G 0.491, B 0.753. Change the black color marker to R 0.500, G 0.000, B 0.139. Click on the Add button and change the new marker color to pure black.

The three overlapping spheres technique dates back almost to 2004 (at least for what relates to Blender), more precisely to the How to make a realistic planet in Blender tutorial that I wrote at that time for Blender Version 2.23/2.30. This tutorial is now outdated as far as materials are concerned, but the technique's basic concepts are still working even in Cycles, that is, the Earth surface on the smaller of the spheres, a clouds layer on a slightly bigger one, and the atmospheric Fresnel effect of the bigger one, thereby enclosing the other two.
At first, we built the more complex of all the three shaders—the Surface material— on the smallest of the three spheres:
- From step 1 to step 7, we built the shader for the continents, simply image textures connected as color factor to a Diffuse shader and a Glossy shader. And from step 8 to step 12, we built the basic shader for the oceans.
- At steps 13 and 14, we "split" the continent's component from the oceans by using the Earth-spec map, a black and white image working as a stencil for the factor input of the Mix Shader node. We also connected the Earth-color map to the SEAS frame's Diffuse shader, to bring back color to the oceans.
- From step 15 to step 18, we added to the SEAS frame, driven by a Facing Fresnel node, a ColorRamp node to enhance the coloration of the water's specularity (according to what often NASA satellite's photos show) and a deep blue color mixed to the color image map by a Mix node. Thanks to the Facing Fresnel, the blue color is mapped on the mesh faces perpendicular to the point of view, thereby resulting in darker water masses towards the center of the Earth sphere.
- From step 19 to step 23, we built the night shader. The Earth-night image has been clamped (contrasted) by the ColorRamp node and the resulting brighter values multiplied by a reddish color in the Mix node. All this is then assigned to an emission shader mixed at 50 percent with the rest of the components of the surface shader. Because the emission value is quite low, the "night surface" shows only in the shadow side of the Earth.
- Then, from step 24 to step 29, we built the Clouds layer on the second sphere.
- From step 30 to step 35, we built the atmosphere layer on the third sphere.
As you have probably noticed, we didn't use any Texture Coordinate or Mapping node to map the image maps. This is so because the spheres have been unwrapped and with Image Textures nodes the existing UV coordinate layer is taken automatically in account by Cycles for the mapping. For the ocean bump, instead, obtained by the Noise procedural, the Generated mapping option is automatically used (if you remember the section about the mapping of the textures in Cycles from Chapter 1, Overview of Materials in Cycles).