
Before starting with the actual organization, it's a good idea to prepare a material creation screen to be saved in your Blender preferences.
It is possible, in fact, to prepare a basic scene setup including the elements and the settings we need to do the job in the best way.
In any case, just take this paragraph with a pinch of salt; that is, more as a suggestion or as a starting point that you can eventually modify to better agree with your needs.
- Start Blender and in the upper menu (Engine to use for rendering button) switch to Cycles Render.
- Split the 3D view into two horizontal rows: move the mouse cursor onto the edge of the window; the cursor changes to a double arrow icon, right-click, and from the context menu select Split Area.
- Change the upper window into a Node Editor by selecting the item from the Editor type button in the left-hand corner of the bottom bar.
- Select the default cube in the scene and press Tab to go in edit mode.
- Press W on the keyboard; in the Specials pop-up menu select Subdivide Smooth. Do it three times; the cube is now a Spheroid made by 386 vertexes.
- Go out of edit mode and set the cube's Shading mode to Smooth using the Object Tools panel on the left.
- Move the cube two units upward on the Z axis (G | Z | 2 | Enter).
- Being careful that the cursor is still at the center of the scene (if not, press Shift + C to center it), press Shift + A | Mesh | Plane to add a plane.
- Still with the plane in edit mode, scale it four times bigger.
- Split the bottom row into two parts, put the mouse cursor in the 3D window on the right and press 0 in the numpad of the keyboard to go in Camera view; then press T to close the Object Tools panel on the left.
The following screenshot shows where we are so far:

- In the Editor type button in the left-hand corner of the bottom bar, of the left 3D window, select UV/Image Editor.
- Put the mouse in the Camera view and press Shift + F to enter fly mode (a viewfinder appears to show the center of the camera field); by slightly moving the mouse upward (scroll wheel to go forward or backward) adjust the Camera view to better fit the cube, then hit Enter or left-click to confirm:

- Select the plane and press New in the Node Editor header to assign a new material, rename it Plane, and let all the settings be as they are.
- Select the cube and press Use Nodes in the Material window under the Properties panel or in the Node Editor header.
- Under the Surface tab in the Material window, switch the Diffuse BSDF shader with a Mix Shader, then click in the first slot to select a Diffuse BSDF, and in the second slot for a Glossy BSDF shader.
- In the Node Editor adjust the position of the nodes to make them more easily readable:

- Set the Camera view to Rendered mode by clicking on the Viewport Shading button on the window header and selecting the upper item. Then go in the Render window under the Properties panel on the right, and under the Sampling tab, set Clamp to 1.00, and both Render and Preview to 50 samples:

- Set the Percentage scale for render resolution under Dimensions to 25%.
- Under the Performance tab, set the Acceleration structure to Static BVH and check both Use Spatial Splits and Cache BVH (this is probably not really useful for a simple Spheroid but just in case you want to render a more complex object).
- Now select the lamp and delete it (press X on the keyboard); go to the World window and click on Use Nodes for the material.
- Click on Color and set the RGB values to 0.100 and the Strength to 0.100; set the Ambient Occlusion (AO) to 0.30 but let it be unchecked (it's a low value ready in case we want to use the AO, but it's usually better not to have it activated by default).
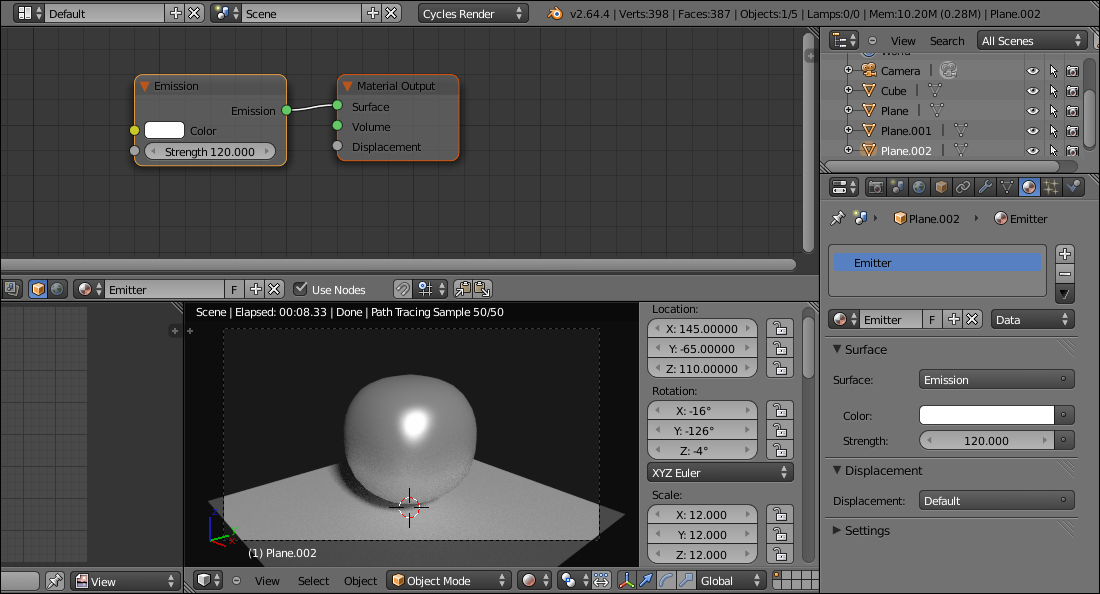
- Now press Shift + A and add a new plane; out of edit mode, press N in the Camera view and in the Transform tab on the right of the 3D window set these values: Location X as 145.00, Y as -65.00, and Z as 110.00; Rotation X as -16°, Y as -126°, and Z as -4°; Scale X, Y, and Z as 12.
- Go into the Material window and assign a new material; switch the Diffuse BSDF shader with an Emission one, set the Color to pure white, and the Strength to 120.000; change the material's name in Emitter:
- Press N to close the Camera view Properties panel.
Note
Optionally, other things that you can do: increase the scale of the floor plane, in the Outliner set the mode to Visible Layers, and click on the arrows of the two planes (floor and emitter) to make them non-selectable; select the cube and in the Object Modifiers window assign a Subdivision Surface modifier to make it look more smoothed.
- Go back to the Material window. Press Ctrl + U to save the setting as user default (Save Startup File). Done.

We set a very low World global illumination, keeping it gray so as not to affect the color of the material. For the same reason we added a quite powerful mesh-light emitting pure white light, scaling it big and moving it quite distant from the center of the scene to obtain clear shadows. The floor plane is to have bouncing light on the shadowed parts of the object.
We prepared the Rendered viewport as a Camera view to have a better feedback for the final rendered image, which will show at 25 percent of the established size in the UV/Image Editor window on the bottom left-hand side of the screen.
By setting the Clamp value to 1.00 we reduced the fireflies produced by the Glossy shader and by increasing the Render and Preview samples to 50 we reduced the noise, keeping at the same time the rendering times reasonable even with a not very powerful workstation.
The Acceleration structure set to Static BVH and the Use Spatial Splits and Cache BVH options are useful to reduce the calculation time for the bounding volume hierarchy of the mesh that Cycles has to calculate every time it starts a rendering. Anyway, this is useful only if the mesh doesn't get any modification between renderings.
The layout and the settings we just saved as default are what we are going to see at first from now on every time we start Blender.
But maybe we don't want to have a Cycles material interface every time to start with, and we prefer to have it as an option to be used only if there is the need.
Here is a simple way to do this:
- Start Blender with the factory settings (File | Load Factory Setting) and look at the top of the screen, in the main header on the side of the Blender Render button: there are two more buttons labeled Default and Scene.
- By clicking on the Default button we can set a different interface layout (there are already nine, each one studied for a different task, and their names are perfectly explicative); clicking on Scene shows just the current scene.
- By clicking on the + icon on the side of the Default button, add a new screen layout, and rename it Materials.
- Then click on the + icon on the side of the Scene button and, by choosing Full Copy, add a new scene to the file and rename it something like Cycles_Materials. This new scene is a full copy of the default one, coexisting but independent.
At this point we can start with all the instructions already seen in the How to do it... section of this recipe, that is switching to Cycles Render, splitting the 3D window, subdividing the cube, and so on.
When done, just click on the screens button and switch back to Default, then save the user preferences (Ctrl + U). Now our material creation interface is saved as a screen option in a different scene; every time we need to access it, we simply select the layout Materials from the screens button.