
Chapter 5. Native Video
Introduction
HTML5’s new embedded content elements offer designers and developers more options for including media in our sites.
Similar in nature to audio, the
video element shares many of the same
attributes, has a similar syntax, and can be styled and manipulated with
CSS and JavaScript. And just like audio, video
has some implementation challenges.
5.1. Adding HTML5 Video
Solution
Use the video element
with the addition of a src attribute that references the location of
your video file:
<video src="video.ogv"></video>To display default video player controls (see Figure 5-1), add the
Boolean controls
attribute:
<video src="video.ogv" controls></video>
Note
Native player controls look different in different browsers. Style your own controls with JavaScript and CSS (see Recipe 5.6).
Preloading
The preload attribute allows
you to suggest to the browser
whether and how it should download the video:
<video src="video.ogv" controls preload></controls>You can skip the attribute and let the browser decide, or give browsers a “hint” with specific values (refer back to Recipe 4.1, for details):
preload="auto"or, simply,preloadpreload="metadata"preload="none"
Fallback content
You should also make it standard practice to include fallback
content with video:
<video src="video.ogv" controls>
    Your device does not support HTML5 video. <a href="video.ogg">Download the
    Learning to Love HTML5 introductory video</a>.
</video>
Note
Note that providing fallback content is not the same as ensuring accessibility or providing accessible content.
Fallback content is content that displays on browsers that
don’t support video. It does two
things: informs the user that her browser doesn’t support HTML5
video and provides a link to download the video.
For a good overview of the state of HTML5 video accessibility, see http://john.foliot.ca/accessibility-and-html5-today/.
Along with different video formats, Flash video can be inserted as a fallback alternative.
In fact, you can nest fallback content for lack of support for
both the object and video elements:
<video src="video.ogv" controls>
    <object type="application/x-shockwave-flash"
            data="player.swf?file="video.mp4">
        <param name="movie" value="player.swf?file="video.mp4">
        <a href="video.mp4">Download the Learning to Love HTML5
            introductory video</a>
    </object>
</video>
Discussion
Unfortunately, video is not as
straightforward to implement as it might seem, because not all browsers
support the same set of video file formats.
Multiple video codecs
As with audio (see Recipe 4.1), the HTML5 specification doesn’t specify which video codecs should be supported.
Instead, the browser makers decide which format to support (see Table 5-1). This is fine, but getting browser vendors to agree on any one thing is nearly impossible. Getting them to agree on which video formats—much less a single video format—to support is going to be next to impossible. To work around this situation, video needs to be encoded and published in multiple formats in order to display across the broadest range of browsers.
Note
While the blink element is
almost universally disliked, it’s still supported in browsers. Go
figure.
Browser | H.264 (.mp4) | Ogg Theora (.ogv) | VP8 (.webm) |
Chrome 6+ | R | Y | Y |
Firefox 3.6+ | Y | Y | |
IE9+ | Y | D | |
Opera 10.5+ | Y | Y | |
Safari 5+ | Y |
Note
In Table 5-1, R indicates “removed,” D indicates “download required,” and Y indicates “yes (supported).” Note that Google removed support for H.264 from the Chrome browser with version 11. IE9 supports VP8, but only if the user installs the codec on Windows.
As you can see from Table 5-1, if you want to reach all of the latest browsers you need to include at least the .mp4 and .ogv formats. Briefly, the supported formats are:
- .mp4
The container format for the proprietary H.264 codec that encodes video for a full range of devices, including high definition.
- .ogv
The free, open source container format for the open source Theora codec. Results in lower quality than H.264.
- .webm
Another open source container format, which is used by the new, royalty-free VP8 codec from Google.
Note
Google pulled support for H.264 in Chrome (see http://blog.chromium.org/2011/01/html-video-codec-support-in-chrome.html), while VP8 is supported by Microsoft’s IE9 with the installation of a decoder (see http://windowsteamblog.com/windows/b/bloggingwindows/archive/2010/05/19/another-follow-up-on-html5-video-in-ie9.aspx).
Why is there such a messy situation with video codecs? Intellectual property and licensing fees are a large factor. Browser makers who want to use certain formats (and therefore codecs) natively are subject to the intellectual property rights of the codecs and formats.
Apple and Microsoft have paid the licensing fees to allow the H.264 video codec to play natively in their respective browsers. The vendors that produce the Firefox and Opera browsers, meanwhile, opt to support free, open source formats.
Note
For a more in-depth explanation of why there are so many codecs and formats for video, check out this great introductory video from Stephanie Sullivan Rewis on HTML5 video: http://tv.adobe.com/watch/adc-presents/videoandhtml5part2gettingstarted/. You will need Flash installed on your Internet-enabled device in order to see it, though.
See Also
For some open source videos on developing and experimenting with HTML5 video support, search the Internet
Archive (see http://www.archive.org/details/movies).
5.2. Ensuring Multi-Browser Video Support
Solution
Use the source child element of video to
specify each of your video formats:
<video controls>
    <source src="video.mp4" />
    <source src="video.ogv" />
    Your device does not support HTML5 video.
</video>
Note
Note that you must remove the src attribute and value from the video element, as seen in Recipe 5.1.
As we saw in Table 5-1, using .mp4 and .ogv covers all browsers that support HTML5. But order matters, too. List your source formats from most to least desirable, as browsers will play the first format they recognize.
Note
The Video for Everybody site provides comprehensive details about bugs and device nuances with HTML5 video: http://camendesign.com/code/video_for_everybody/.
Discussion
Beyond specifying the video files themselves, it is good practice to also specify the MIME type for your video files:
<source src="video.mp4"type="video/mp4"/> <source src="video.ogv"type="video/ogg"/>
Warning
Firefox does not play Ogg video if the MIME type is wrong.
Since file formats are simply containers for different codecs, you should also specify the compression used:
<source src="video.ogv" type="video/ogg; codecs='theora'">Including this information speeds up rendering of the video since it indicates what kind of content the browser is utilizing without the browser having to download a portion of the file to make its own determination.
Here are some examples of MIME types with codecs:
type="video/ogg; codecs='theora, vorbis'" type="video/mp4; codecs='avc1.42E01E'" type="video/webm; codecs='vp8, vorbis'"
Unfortunately, even if you declare your MIME types with the proper codec in your HTML, there can also be challenges related to the MIME types supported by your server. If your server isn’t configured to support the MIME types your video uses, there will be playback issues.
You can, however, configure your server to support video MIME types. Information about Ogg media from the Mozilla Developer Center (https://developer.mozilla.org/en/Configuring_servers_for_Ogg_media) can equally be applied to .webm and .mp4.
See Also
If you have your own video but want to convert it to other formats, check out these tools:
Miro VideoConverter: http://www.mirovideoconverter.com/
WebM Tools: http://www.webmproject.org/tools/
MPEG StreamClip: http://www.squared5.com/
TinyOgg: http://tinyogg.com/
OggConvert: http://oggconvert.tristanb.net/
5.3. Setting Video Dimensions
Solution
Add the width and height attributes, and their corresponding values, to video:
<video controls width="640" height="360">
<source src="video.mp4" type="video/mp4" />
<source src="video.ogv" type="video/ogg" />
Your device does not support HTML5 video.
</video>Discussion
Browsers render the video player according to the dimensions you assign, not the resolution of your actual video. Using different dimensions might lead to a loss in quality by expanding a video beyond its native resolution; the same goes for scaling down a large video simply to fit into a small space.
So, when possible, use the same dimension
values for the video element as for
the video file itself, and don’t resize your video with width and height.
Technically speaking, the width and height of a video element do not need to be set as
browsers default to inheriting the dimensions of the video file itself.
The drawback to this approach is that if the dimensions are not set,
browsers won’t know what space to reserve for your video and may have to
redraw your page after downloading the video data.
The width and height values need to be set in CSS pixels as
integers and not as percentages or
other values. Adding dimension values helps browsers more efficiently
render your pages, which usually results in a better user
experience.
Since you probably don’t want to use width and height to resize your video to something other
than its native dimensions, you can instead use encoding software to
specify the resolution.
See Also
Mark Pilgrim’s “Dive Into HTML5” (see http://diveintohtml5.info/video.html), which provides very detailed instructions about using many of the encoding tools available, and CSS Pixel at http://www.emdpi.com/csspixel.html.
5.4. Displaying a Placeholder Image Before Video Plays
Solution
Add the poster attribute
with the placeholder image file path as the value:
<video controls width="640" height="360" poster="video_still.png">
    <source src="video.mp4" type="video/mp4" />
    <source src="video.ogv" type="video/ogg" />
    Your device does not support HTML5 video.
</video>
Discussion
Poster images can be a nice user enhancement, especially when the video doesn’t load or can’t be displayed.
Consider a single-source .mp4 video viewed in Firefox, as shown in Figure 5-2.

Unfortunately, different browsers handle poster images differently:
Firefox stretches the image to fill the dimensions of the player (see Recipe 5.3).
Chrome keeps the image at its original size.
Safari displays the poster image until the video data is loaded, at which point it displays the first frame from the video. If the poster image is a different size from the video, the video is resized to match the aspect ratio of the poster image (see Figure 5-3).

See Also
John Foliot points out the lack of accessibility of the poster attribute in a blog post at http://john.foliot.ca/the-current-problem-with-the-poster-attribute-of-the-video-element/.
Keep this limitation in mind when
using poster.
5.5. Making Video Loop
Solution
Add the loop Boolean attribute to video:
<video controls width="640" height="360" loop>
    <source src="video.mp4" type="video/mp4" />
    <source src="video.ogv" type="video/ogg" />
    Your device does not support HTML5 video.
</video>
Discussion
As of this writing, Firefox does not support loop unless the user has the Media Loop
add-on (https://addons.mozilla.org/en-US/firefox/addon/media-loop-45730/)
installed. All other browsers will loop
natively.
That said, use loop
thoughtfully. Consider how your users will
experience a video that loops and whether that experience will be
appropriate for your particular video and pleasant for your
audience.
autoplay
Another video attribute
you should judiciously consider before implementing is
the Boolean autoplay. Just as when
it is used with audio (see Recipe 4.2), autoplay starts playing the video as soon as
the page loads. This can make for an extremely unpleasant user
experience.
See Also
Not all Firefox users will know about the Media Loop add-on, much less have it installed. If you desperately need looping to work across all browsers, you can consider a JavaScript-based solution: http://forestmist.org/2010/04/html5-audio-loops/.
5.6. Sample Design: Manipulating Video with <canvas>
Problem
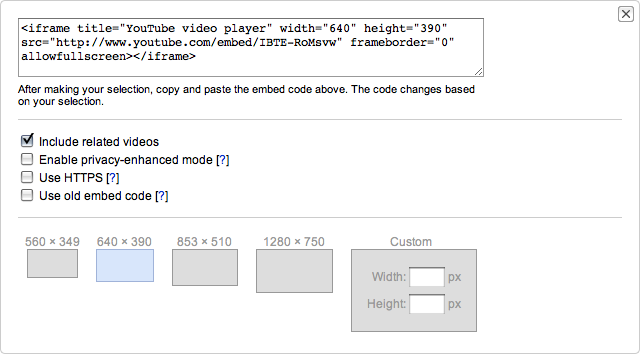
You want to embed a video from YouTube, but you want a better preview of how the video might appear than the default selection key (see Figure 5-4).
Solution
In this Sample Design, we use canvas (see Chapter 9) to
create a better and more contextual preview of what video may look
like at different sizes (see Figure 5-5).

Add <video> and <canvas>
To start, reuse the markup used in this chapter for video, and add a button to trigger the drawing, as well as two canvas elements: one for a medium preview
and one for a small one.
To each element, assign a unique id:
<videoid="origVideo"width="640" height="360"> <source src="video.mp4" type="video/mp4" /> <source src="video.ogv" type="video/ogg" /> Your device does not support HTML5 video. </video> <button title="Generate Preview" onclick="generatePreview();">Generate Preview</button> <canvasid="previewMed"></canvas> <canvasid="previewSm"></canvas>
Generate preview
Next, create a function to generate the preview and set the
JavaScript variables for the video and canvas elements:
<script>
function generatePreview(){
var video = document.getElementById('origVideo'),
var canvas1 = document.getElementById('previewMed'),
var context1 = canvas1.getContext('2d'),
var canvas2 = document.getElementById('previewsSm'),
var context2 = canvas2.getContext('2d'),Note that the variables to specify the 2D context for each
canvas drawing state are also
declared.
Set preview dimensions
Next, define the dimensions for each of the canvas drawings in the function:
canvas1.width = 320;
canvas1.height = 180;
canvas2.width = 160;
canvas2.height = 90;Add an event listener
Then add an event listener to trigger the canvas drawing upon video play:
video.addEventListener('play', function(){
drawVideo(this,context1,context2);
},false);and close out the function:
video.play();
}Draw previews
Lastly, add the function that draws each of the canvas previews:
function drawVideo(video,canvas1,canvas2) {
if(video.paused || video.ended) return false;
canvas1.drawImage(video,0,0,320,180);
canvas2.drawImage(video,0,0,160,90);
setTimeout(drawVideos,25,video,canvas1,canvas2);
}
</script>This function first checks to see if the video is playing:
if(video.paused || video.ended) return false;
If so, we use drawImage with
scaling to draw a canvas image that
is half the size of the original video:
canvas1.drawImage(video,0,0,320,180);
and a second canvas that is
half the size of previewMed:
canvas2.drawImage(video,0,0,160,90);
The scaling parameters in these examples are:
object.drawImage(source,x,y,width,height);
where x and
y represent the top-left corner of the
image on the target canvas, and
width and height
are the image’s size on the target canvas.
Finally, tell drawPreviews to
call itself every 25 milliseconds, which roughly equals 40 frames per
second (1000ms / 40fps = 25):
setTimeout(drawVideos,25,video,canvas1,canvas2);
Discussion
Here’s the complete markup and script for this example:
<video id="origVideo" width="640" height="360">
    <source src="video.mp4" type="video/mp4" />
    <source src="video.ogv" type="video/ogg" />
    Your device does not support HTML5 video.
</video>

<button title="Generate Preview" onclick="generatePreview();">Generate
    Preview</button>

<canvas id="previewMed"></canvas>
<canvas id="previewSm"></canvas>
<script>
    function generatePreview(){
        var video = document.getElementById('origVideo'),
        var canvas1 = document.getElementById('previewMed'),
        var context1 = canvas1.getContext('2d'),
        var canvas2 = document.getElementById('previewsSm'),
        var context2 = canvas2.getContext('2d'),
        canvas1.width = 320;
        canvas1.height = 180;
        canvas2.width = 160;
        canvas2.height = 90;
        video.addEventListener('play', function(){
            drawVideo(this,context1,context2);
        },false);
        video.play();
    }
    function drawVideo(video,canvas1,canvas2) {
        if(video.paused || video.ended) return false;
        canvas1.drawImage(video,0,0,320,180);
        canvas2.drawImage(video,0,0,160,90);
        setTimeout(drawVideos,25,video,canvas1,canvas2);
    }
</script>With native video offered through HTML5, web developers now have the ability to dive deep into a video file and make enhancements to the user experience that were once the domain of proprietary technologies.
See Also
HTML5 Doctor offers demos and detailed descriptions of other ways to use canvas and video together at http://html5doctor.com/video-canvas-magic/.