
Chapter 6. Microdata and Custom Data
Introduction
One of the primary benefits of web standards, promoted for over 10 years by standards evangelists, was that more semantic markup would provide greater context and meaning to content.
By the mid 2000s, web standards were catching on, but the “standardistas” recognized that semantic markup alone was not enough to convey all meaning related to content—for example, that some content is personal data or that links may represent relationships.
To solve this problem, first came XFN (XHTML Friends
Network, see http://gmpg.org/xfn/), and then
microformats (see http://microformats.org). Both
of these solutions relied on the
class and rel attributes—both valid (X)HTML—but, because
those attributes had more
appropriate uses, some web professionals felt that using them to convey
additional semantics was somewhat of a hack.
At about the same time, the W3C XHTML 2 Working Group created the RDFa specification, based on the Resource Description Framework, to enable reuse of existing XHTML attributes—and the addition of some new ones—to support structured machine-readable data.
Microformats, in particular, caught on quickly with web professionals. Web builders started using them to mark up personal information, resumes, event data, and even cooking recipes. Search engines picked up on this and began parsing the additional data found in microformats and RDFa to improve search results.
With HTML5, the web community has a renewed focus on strictly
adhering to the specification. Rather than continuing to extend—some would
say abuse—the class and rel attributes, HTML5 (at least via the WHATWG
spec) introduces microdata, which gives us a new syntax
for marking up these additional structured semantics.
In addition, HTML5 allows for custom data attributes, which further give web professionals a standards-compliant way for embedding additional data in their markup.
The markup aspects of these features work in browsers today, but the associated DOM APIs to interact with them are not yet (microdata) or widely (custom data) supported by user agents. Still, given that it is possible to write JavaScript to interact with the additional data, there’s little reason not to use them.
When to Use Microdata Versus Custom Data
Similar to microformats and RDFa, microdata is used to mark up structured data. It introduces new attributes that can be applied to any element in order to identify scoped name/value pairs. As with microformats, shared vocabularies are emerging to standardize how data is marked up, so microdata can be used to share data across websites and applications.
Custom data attributes are just that: custom.
You, the programmer, create attributes using the data- prefix and
assign them values. The name/value pairs are related to the displayed
content, but are not themselves displayed. Because you define the
attributes according to the needs of your website or application, these
are not to be used to exchange
data with another site, nor do public search engines consume them.
Note
Should you use microdata or RDFa for your structured data? Ongoing W3C discussions about whether or not two overlapping standards should exist have some concerned about the future of these specifications. Google, Microsoft, and Yahoo!, meanwhile, are promoting microdata and have teamed up to create Schema.org, a shared vocabulary of data structures that allows their search engines to extract more meaning from your data.
For an excellent comparison of microdata, RDFa, and microformats, read Manu Sporny’s detailed analysis at http://manu.sporny.org/2011/uber-comparison-rdfa-md-uf/.
6.1. Adding Microdata to Markup
Problem
You want to add microdata to convey additional meaning or semantics about your content so that machine-parsing tools can access this information.
Solution
Use the itemscope and itemprop attributes, along with descriptive property names, to
label your content:
<pitemscope> <spanitemprop="inventor">Tim Berners-Lee</span> created the <spanitemprop="invention">World Wide Web</span>. </p>
Discussion
The itemscope attribute is used
to identify the scope of the microdata item—an item
being a set of name/value pairs. The itemprop attribute values define the property
names and their associated values—in this case, the contents of the
span tags. Thus, this example yields the following name/value
pairs:
Inventor: Tim Berners-Lee
Invention: World Wide Web
This is a very basic example. In the next recipe, we’ll look at an example that implements a standardized vocabulary.
See Also
The itemprop attribute
in the HTML5 specification at http://www.w3.org/TR/html5/microdata.html#names:-the-itemprop-attribute.
6.2. Using Microdata and Schema.org
Problem
You want to convey additional meaning about your content—for example, that the content identifies a person—so that popular search engines can extrapolate this data.
Solution
In addition to using the itemscope and itemprop attributes, specify an itemtype and apply the appropriate property names from the Schema.org vocabulary:
<section itemscope itemtype="http://schema.org/Person">
    <h1 itemprop="name">Tim Berners-Lee</h1>
    <img itemprop="image"
       src="http://www.w3.org/Press/Stock/Berners-Lee/2001-europaeum-eighth.jpg">
    <p>
        <span itemprop="jobTitle">Director</span>,
        <span itemprop="affiliation" itemscope
              itemtype="http://schema.org/Organization" itemprop="name">World Wide
              Web Consortium</span>
    </p>
    <p itemprop="address" itemscope itemtype="http://schema.org/PostalAddress">
        <span itemprop="addressLocality">Cambridge</span>,
        <span itemprop="addressRegion">MA</span>
    </p>
    <a itemprop="url" href="http://www.w3.org/People/Berners-Lee/">Website at
       W3C</a>
</section>
Discussion
The start of this microdata item is again indicated by the use of
itemscope on the section element, but also added to this
element is the itemtype attribute.
Use itemtype with a URL in order to
identify the item data type. In this case, we’re using the Schema.org
structure to identify a person.
As in the previous recipe, the itemprop attribute is applied with property
names to give meaning to the content in the markup. By looking at the
properties and pairing them with the content, we can tell that “Tim
Berners-Lee” is a person’s name and that this person’s job title is
“Director.”
The use of itemprop for both
the image and URL properties works a bit differently: the corresponding
values in these cases are the src and
href attribute values, respectively.
If you’ve worked with microformats in the past, this concept won’t be
new to you.
A final special case in this example can be seen with the
affiliation and address itemprop
attributes. Here, new items are nested inside of the main item. In both
cases, the itemprop not only
identifies the property that is directly related to the person item but,
within the same tag, also establishes the property as an item itself
with the itemscope attribute.
Going one step further, itemtype is
also applied to indicate the URL that describes the item data
type.
While this might seem a bit complicated at first, it’s not much different from combining multiple microformats (like hCard and hCalendar on a resume) or creating an XML object to represent nested data.
Whether you’ve worked on projects like this before or not, there is an easy way to check to see that you’re making progress in applying the Schema.org vocabularies: you can use the Google Rich Snippets Testing Tool (available at http://www.google.com/webmasters/tools/richsnippets) to validate that your structured data markup can be parsed, as shown in Figure 6-1.
Note
Before Google, Microsoft, and Yahoo! created Schema.org, Google was promoting Rich Snippets based on its own vocabulary at http://data-vocabulary.org. Google’s documentation for Rich Snippets is still live, but every page features a link to Schema.org.

See Also
For additional data types that are recognized by search engines, along with sample code, see http://schema.org. To learn more about microdata, see HTML5 Doctor’s Microdata article (http://html5doctor.com/microdata/) and Mark Pilgrim’s chapter from “Dive Into HTML5” (see http://diveintohtml5.info/extensibility.html), which also details Google Rich Snippets.
6.3. Adding Custom Data to Markup
Solution
Define your own data- attributes to
name and store the information:
<h1>My Volkswagens</h1>
<ul>
    <li data-year="1996" data-color="white" data-engine="VR6">Cabrio</li>
    <li data-year="1993" data-color="purple" data-engine="VR6">Corrado</li>
    <li data-year="2008" data-color="red" data-engine="2.0T">Eos</li>
    <li data-year="2003" data-color="blue" data-engine="W8">Passat</li>
</ul>
Discussion
Since not everyone cares about VWs or cars, there’s a lot of detail we need not provide—like the year, color, and engine type of each VW. With custom data attributes, we can include such extraneous data in the markup without requiring readers to look at it.
Note
The data is now stored in the HTML; read the subsequent recipes in this chapter to learn what else you can do with this data.
In order to store the year, color, and engine type of each car, in
this example we created three custom data attributes: data-year, data-color, and data-engine.
As you can see, they all start with data- followed by at least one character. The
name you define may not include uppercase letters, but it can include
hyphens. You could, for example, define a data-model-year attribute, but data-modelYear would not be allowed.
Warning
If your custom data attributes have additional hyphens in the
name, you need to convert them to camel case names when using the
dataset API—for example,
data-foo-bar would be referred to
as dataset.fooBar. But if you’re
using getAttribute() or setAttribute(), you will still reference it as data-foo-bar.
Even though we use the three custom attributes consistently in
this example, we haven’t created any special relationships by using them
together—for example, we could list another car and apply only a
data-color attribute, or we could go
on to list airplanes that we’ve flown and reuse the data-engine attribute. It’s up to you, the
programmer, to maintain structure or define the namespace you need for
your website or application.
See Also
HTML5 Doctor’s discussion about custom data attributes at http://html5doctor.com/html5-custom-data-attributes/.
6.4. Accessing Custom Data with JavaScript
Solution
Start with the same markup as that in Recipe 6.3, but add a paragraph for JavaScript output:
<h1>My Volkswagens</h1>
<ul>
    <li data-year="1996" data-color="white" data-engine="VR6">Cabrio</li>
    <li data-year="1993" data-color="purple" data-engine="VR6">Corrado</li>
    <li data-year="2008" data-color="red" data-engine="2.0T">Eos</li>
    <li data-year="2003" data-color="blue" data-engine="W8">Passat</li>
</ul>
<p></p>
Access the custom data using the dataset
API:
<script>
    var cars = document.getElementsByTagName("li");
    var output = "What color are Kimberly's cars? ";

    for (var i=0; i < cars.length; i++) {
        output += cars[i].dataset.color;
        if (i != (cars.length-1)) {
            output += ", "
        }
    }

    document.getElementsByTagName("p")[0].innerHTML = output;
</script>
Discussion
With the introduction of custom data attributes, HTML5 also defines the dataset DOM API. This is a simple and easy way of accessing any custom data associated with any element.
The JavaScript is straightforward: we create an array of all list
items (cars), and we create a string
that is inserted into the paragraph (output). As we iterate over the cars array, we use dataset.color to
access the value of each data-color
attribute and append it to the output
variable. The end result is the phrase “What color are Kimberly’s cars?
White, purple, red, blue” being added to the paragraph at the end of the
list.
Not all browsers yet support the dataset API (see Table 6-1),
but accessing custom data
attributes in all browsers is easy. Where dataset is not
supported, simply use getAttribute(). Here’s the for loop using fallback logic and getAttribute() when
necessary:
    for (i=0; i < cars.length; i++) {
        if (cars[i].dataset) {
            output += cars[i].dataset.color;
        } else {
            output += cars[i].getAttribute("data-color");
        }
        if (i != (cars.length-1)) {
            output += ", "
        }
}Note
To keep up with dataset API support, check http://caniuse.com/dataset regularly.
See Also
The itemprop attribute in
the HTML5 specification at http://www.w3.org/TR/html5/microdata.html#names:-the-itemprop-attribute.
6.5. Manipulating Custom Data
Solution
Let’s build on the code from Recipe 6.4. We’ll use the same markup to start:
<h1>My Volkswagens</h1>
<ul>
    <li data-year="1996" data-color="white" data-engine="VR6">Cabrio</li>
    <li data-year="1993" data-color="purple" data-engine="VR6">Corrado</li>
    <li data-year="2008" data-color="red" data-engine="2.0T">Eos</li>
    <li data-year="2003" data-color="blue" data-engine="W8">Passat</li>
</ul>
<p></p>
and use the dataset API to modify and create our custom data, along
with setAttribute() for fallback support:
<script>
    var cars = document.getElementsByTagName("li");
    for (var i=0; i < cars.length; i++) {
        if (cars[i].dataset) {
            cars[i].dataset.color = "yellow";
            cars[i].dataset.rating = "awesome";
        } else {
            cars[i].setAttribute("data-color", "yellow");
            cars[i].setAttribute("data-rating", "awesome");
        }
    }

    var output = "What color are Kimberly's cars? ";

    for (var i=0; i < cars.length; i++) {
        if (cars[i].dataset) {
            output += cars[i].dataset.color;
        } else {
            output += cars[i].getAttribute("data-color");
        }
        if (i != (cars.length-1)) {
            output += ", "
        }
    }

    document.getElementsByTagName("p")[0].innerHTML = output;
</script>
Discussion
Once you know how to access custom data, manipulating it is pretty
easy. If you can use the dataset API, just assign the new value to the
desired attribute; otherwise, fall back to using setAttribute(). This same method allows you to
add new custom data attributes, as well.
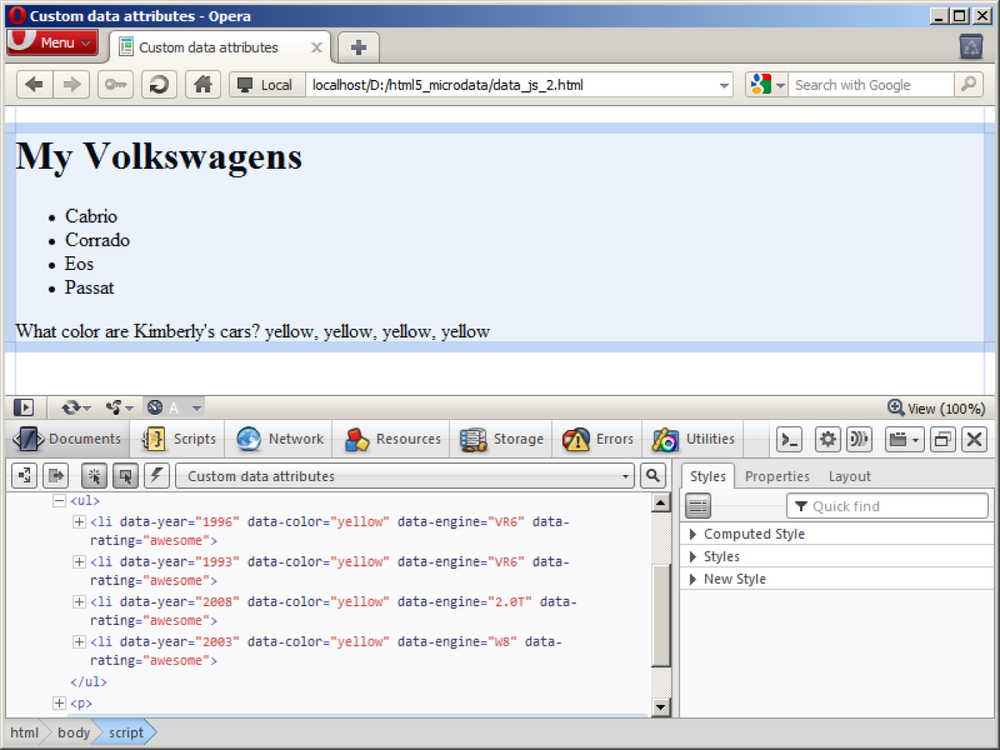
In this example, we’ve decided to repaint all of the cars yellow
using JavaScript. Looping through the list items, we access dataset.color (or use setAttribute() to
access data-color) and assign a new
value of "yellow".
We also use JavaScript to add a rating for each of the cars. In
that same loop, we create data-rating
by applying a value of "awesome" to
dataset.rating (or use setAttribute() to do the same).
If you need to remove a custom data attribute, you can do so by
setting its value to null. You can
verify that the DOM is being manipulated by using a tool such as Opera
Dragonfly, as shown in Figure 6-2.
See Also
The dataset specification
at http://dev.w3.org/html5/spec/Overview.html#dom-dataset.
6.6. Example: Creating a Map Application Using Custom Data
Solution
Store the latitudes and longitudes of the locations you wish to show on the map in separate custom data attributes. Then write JavaScript to access those datasets and render markers on the map:
<!DOCTYPE html>
<html>
<head>
    <title>Map example</title>
    <script type="text/javascript"
            src="http://maps.google.com/maps/api/js?sensor=false"></script>
    <style type="text/css">
        #map { height:500px; width:500px; border:1px solid #000; }
    </style>
</head>
<body>
<h1>Ice Cream in Philadelphia</h1>
<ul>
    <li><a data-lat="39.9530255" data-long="-75.1596066"
           href="http://www.bassettsicecream.com/">Bassetts Ice Cream</a></li>
    <li><a data-lat="39.949888" data-long="-75.161717"
           href="http://www.capogirogelato.com/">Capogiro Gelateria</a></li>
    <li><a data-lat="39.949556" data-long="-75.1428795"
           href="http://www.franklinfountain.com/">Franklin Fountain</a></li>
</ul>

<div id="map"></div>

<script>
    var map_options = {
        zoom: 15,
        center: new google.maps.LatLng(39.95, −75.152),
        mapTypeId: google.maps.MapTypeId.HYBRID
    };

    var map = new google.maps.Map(document.getElementById("map"), map_options);

    var locations = document.getElementsByTagName("a");
    for (var i=0; i < locations.length; i++) {
        var latitude, longitude;
        if (locations[i].dataset) {
            latitude = locations[i].dataset.lat;
            longitude = locations[i].dataset.long;
        } else {
            latitude = locations[i].getAttribute("data-lat");
            longitude = locations[i].getAttribute("data-long");
        }
        locations[i][i] = new google.maps.Marker({
            position: new google.maps.LatLng(latitude, longitude),
            title: locations[i].innerHTML,
            map: map
        });
    }
</script>
</body>
</html>
Discussion
You already know how to define custom data, so the list of anchors
containing data-latitude and data-longitude attributes should be old hat by
now.
Creating a Google Map using the Google APIs is very easy—just call
the API in the document head, create
an element to house the map in the body, then call a script that defines
your map options and triggers its rendering.
After the script triggers the drawing of the map, it then accesses the latitude-longitude positions and uses them to render markers on the map.
Example: The jQuery data() method
The jQuery library has provided support for accessing and manipulating custom data since version 1.4.3. This support was updated in jQuery 1.6 to conform to changes in the HTML5 specification; use this version of jQuery if possible (see http://www.webmonkey.com/2011/05/jquery-update-improves-html5-data-tools/).
Using the jQuery data()
method is straightforward. Let’s return to an earlier example to see
how it works:
<ul>
    <li data-year="1996" data-color="white" data-engine="VR6">Cabrio</li>
</ul>

<script>
    alert($("li").data("year"));   // alerts "1996"
    alert($("li").data("engine")); // alerts "VR6"

    // let's repaint the car again
    $("li").data("color", "yellow");

    // and add the rating data
    $("li").data("rating", "awesome");
</script>
The jQuery data() method
successfully reads the data-year
and data-engine attributes defined
in the markup, but if you access data-color via the dataset API or examine
the DOM object, you neither see its value turn yellow nor find a
data-rating attribute, as you did
in Recipe 6.5:
<script>
    alert($("li").data("color")); // alerts "yellow"
    alert(document.getElementsByTagName("li")[0].dataset.color); // alerts "white"
</script>
While jQuery reads in the data from the custom data attributes, it does not write this data back to the DOM; instead, it stores the data in a JavaScript object. This speeds up applications where a lot of data access or manipulation is performed. However, if you forget this difference and try to also use the dataset API in your application, you will encounter some unexpected results.
See Also
A small sampling of applications utilizing microdata:
PaintbrushJS by Dave Shea: http://mezzoblue.github.com/PaintbrushJS/demo/inde7.html
Dynamic Google Analytics Tagging by Jason Karns: http://jasonkarns.com/blog/2010/03/10/google-analytics-tagging/
SXSW 2010 Parties site by Christopher Schmitt, Kyle Simpson, Stephanie Sullivan, and Zoe Gillenwater: http://www.sxswcss3.com