
AndroidGraphics and AndroidPixmap: Double Rainbow
It's time to get back to our most beloved topic, graphics programming. In Chapter 3, we defined two interfaces called Graphics and Pixmap. Now, we're going to implement them based on what you learned in Chapter 4. However, there's one thing we have yet to consider: how to handle different screen sizes and resolutions.
Handling Different Screen Sizes and Resolutions
Android has supported different screen resolutions since version 1.6. It can handle resolutions ranging from 240×320 pixels to a full HDTV resolution of 1920×1080. In the last chapter, we discussed the effect of different screen resolutions and physical screen sizes. For instance, drawing with absolute coordinates and sizes given in pixels will produce unexpected results. On again, Figure 5–1 shows you what happens when we render a 100×100-pixel rectangle with the upper-left corner at (219,379) on 480×800 and 320×480 screens.
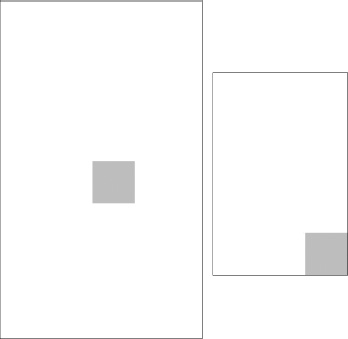
Figure 5–1. A 100×100-pixel rectangle drawn at (219,379) on a 480×800 screen (left) and a 320×480 screen (right).
This difference is problematic for two reasons. First, we can't draw our game and assume a fixed resolution. The second reason is more subtle: in Figure 5–1, we assumed that both screens have the same density (that is, each pixel has the same physical size on both devices), but this is rarely the case in reality.
Density
Density is usually specified in pixels per inch or pixels per centimeter (sometimes you'll hear about dots per inch, which is not technically correct). The Nexus One has a 480×800-pixel screen with a physical size of 8×4.8 centimeters. The older HTC Hero has a 320×480-pixel screen with a physical size of 6.5×4.5 centimeters. That's 100 pixels per centimeter on both axes on the Nexus One, and roughly 71 pixels per centimeter on both axes on the Hero. We can easily calculate the pixels per centimeter using the following equation.
pixels per centimeter (on x-axis) = width in pixels / width in centimeters
Or:
pixels per centimeter (on y-axis) = height in pixels / height in centimeters
Usually, we only need to calculate this on a single axis since the physical pixels are square (they're actually three pixels, but we'll ignore that here).
How big would a 100×100-pixel rectangle be in centimeters? On the Nexus One, we have a 1×1-centimeter rectangle; while the Hero has a 1.4×1.4-centimeter rectangle. This is something we need to account for if, for example, we are trying to provide buttons that are big enough for the average thumb on all screen sizes. This example implies that this is a major issue that could present huge problems; however, it usually doesn't. We need to make sure that our buttons are a decent size on high-density screens (for example, the Nexus One) since they will automatically be big enough on low-density screens.
Aspect Ratio
Aspect ratio is another problem to consider. The aspect ratio of a screen is the ratio between the width and height, either in pixels or centimeters. We can calculate aspect ratio using the following equation.
pixel aspect ratio = width in pixels / height in pixels
Or:
physical aspect ratio = width in centimeters / height in centimeters
Here width and height usually means the width and height in landscape mode. The Nexus One has a pixel and physical aspect ratio of ~1.66. The Hero has a pixel and physical aspect ratio of 1.5. What does this mean? On the Nexus One, we have more pixels available on the x-axis in landscape mode relative to height, than we have on the Hero. Figure 5–2 illustrates this with screenshots from Replica Island on both devices.
NOTE: This book uses the metric system. We know this might be an inconvenience if you are familiar with inches and pounds. However, as we will be considering some physics problems in the following chapters, it's best get used to it now since physics problems are usually defined in the metric system. Remember that 1 inch is roughly 2.54 centimeters.
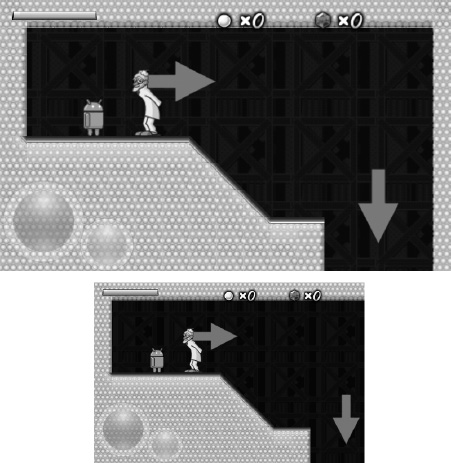
Figure 5–2. Replica Island on the Nexus One (top) and the HTC Hero (bottom).
The Nexus One displays a bit more on the x-axis. However, everything is identical on the y-axis. What did the creator of Replica Island do in this case?
Coping with Different Aspect Ratios
Replica Island serves as a very useful example of the aspect ratio problem. The game was originally designed to fit on a 480×320-pixel screen, including all “the sprites,” such as the robot and the doctor, the tiles of “the world,” and the UI elements (the buttons at the bottom left and the status info at the top of the screen). When the game is rendered on a Hero, each pixel in the sprite bitmaps, map to exactly one pixel on the screen. On a Nexus One, everything is scaled up while rendering, so one pixel of a sprite actually takes up 1.5 pixels on the screen. In other words, a 32×32-pixel sprite will be 48×48 pixels on the screen. This scaling factor is easily calculated using the following equation.
scaling factor (on x-axis) = screen width in pixels / target width in pixels
And:
scaling factor (on y-axis) = screen height in pixels / target height in pixels
The target width and height are equal to the screen resolution for which the graphical assets were designed; in Replica Island, the dimensions are 480×320 pixels. For the Nexus One, there is a scaling factor of 1.66 on the x-axis and a scaling factor of 1.5 on the y-axis. Why are the scaling factors on the two axes different?
This is due to the fact that two screen resolutions have different aspect ratios. If we simply stretch a 480×320-pixel image to an 800×480-pixel image, the original image is stretched on the x-axis. For most games, this will be insignificant so we can simply draw our graphical assets for a specific target resolution and stretch them to the actual screen resolution while rendering (remember the Bitmap.drawBitmap() method).
However, for some games, you might want to use a more complicated method. Figure 5–3 shows Replica Island scaled up from 480×320 to 800×480 pixels and overlaid with a faint image of how it actually looks.

Figure 5–3. Replica Island stretched from 480×320 to 800×480 pixels, overlaid with a faint image of how it is rendered on an 800×480-pixel display.
Replica Island performs normal stretching on the y-axis using the scaling factor we just calculated (1.5), but instead of using the x-axis scaling factor (1.66), which would squish the image, it uses the y-axis scaling factor. This trick allows all objects on the screen to keep their aspect ratio. A 32×32-pixel sprite becomes 48×48 pixels instead of 53×48 pixels. However, this also means that our coordinate system is no longer bounded between (0,0) and (479,319); instead, it ranges from (0,0) to (533,319). This is why we see more of Replica Island on a Nexus One than on an HTC Hero.
Note, however, that using this fancy method might be inappropriate for some games. For example, if the world size depends on the screen aspect ratio, players with wider screens could have an unfair advantage. This would be the case for a game like StarCraft 2.I Finally, if you want the entire game to fit onto a single screen, like in Mr. Nom, it is better to use the simpler stretching method; if we use the second version, there will be blank space left over on wider screens.
A Simpler Solution
One advantage of Replica Island is that it does all this stretching and scaling via OpenGL ES, which is hardware accelerated. So far, we've only discussed how to draw to a Bitmap and a View via the Canvas class, which involves slow number-crunching on the CPU and doesn't involve hardware acceleration on the GPU.
With this in mind, we perform a simple trick by creating a framebuffer in the form of a Bitmap instance with our target resolution. This way, we don't have to worry about the actual screen resolution when we design our graphical assets or render them via code. Instead, we pretend that the screen resolution is the same on all devices, and all our draw calls target this “virtual” framebuffer Bitmap via a Canvas instance. When we're done rendering a frame, we simply draw this framebuffer Bitmap to our SurfaceView via a call to the Canvas.drawBitmap() method, which allows us to draw a stretched Bitmap.
If we want to use the same technique as Replica Island, we need to adjust the size of our framebuffer on the bigger axis (that is, on the x-axis in landscape mode and on the y-axis in portrait mode). We also have to make sure to fill the extra pixels to avoid blank space.
The Implementation
Let's summarize everything in a work plan.
- We design all our graphic assets for a fixed target resolution (320×480 in the case of Mr. Nom).
- We create a
Bitmap that isthe same size as our target resolution and direct all our drawing calls to it, effectively working in a fixed-coordinate system. - When we are done drawing a frame, we draw our framebuffer
Bitmapthat is stretched to theSurfaceView. On devices with a lower screen resolution, the image is scaled down; on devices with a higher resolution, it is scaled up. - When we do our scaling trick, we make sure that all the UI elements with which the user interacts are big enough for all screen densities. We can do this in the graphic asset–design phase using the sizes of actual devices in combination with the previously mentioned formulas.
Now that we know how to handle different screen resolutions and densities, we can explain the scaleX and scaleY variables we encountered when we implemented the SingleTouchHandler and MultiTouchHandler in the previous sections.
All of our game code will work with our fixed target resolution (320×480 pixels). If we receive touch events on a device that has a higher or lower resolution, the x- and y-coordinates of those events will be defined in the View's coordinate system, but not in our target resolution coordinate system. Therefore, it is necessary to transform the coordinates from their original system to our system, which is based on the scaling factors. To do this, we use the following equations.
transformed touch x = real touch x * (target pixels on x axis / real pixels on x axis)

transformed touch y = real touch y * (target pixels on y axis / real pixels on y axis)
Let's calculate a simple example for a target resolution of 320×480 pixels and a device with a resolution of 480×800 pixels. If we touch the middle of the screen, we receive an event with the coordinates (240,400). Using the two preceding formulas, we arrive at the following equations, which are exactly in the middle of our target coordinate system.
transformed touch x = 240 * (320 / 480) = 160

transformed touch y = 400 * (480 / 800) = 240
Let's do another one, assuming a real resolution of 240×320, again touching the middle of the screen, at (120,160).
transformed touch x = 120 * (320 / 240) = 160

transformed touch y = 160 * (480 / 320) = 240
This works in both directions. If we multiply the real touch event coordinates by the target factor divided by the real factor, we don't have to worry about transforming our actual game code. All the touch coordinates will be expressed in our fixed–target coordinate system.
With that issue out of our way, we can implement the last few classes of our game framework.
AndroidPixmap: Pixels for the People
According to the design of our Pixmap interface from Chapter 3, there's not much to implement. Listing 5–13 presents the code.
Listing 5–13. AndroidPixmap.java, a Pixmap Implementation Wrapping a Bitmap
package com.badlogic.androidgames.framework.impl;


import android.graphics.Bitmap;


import com.badlogic.androidgames.framework.Graphics.PixmapFormat;

import com.badlogic.androidgames.framework.Pixmap;


public class AndroidPixmap implements Pixmap {

    Bitmap bitmap;

    PixmapFormat format;
    public AndroidPixmap(Bitmap bitmap, PixmapFormat format) {

        this.bitmap = bitmap;

        this.format = format;

    }


    @Override

    public int getWidth() {

        return bitmap.getWidth();

    }


    @Override

    public int getHeight() {

        return bitmap.getHeight();

    }


    @Override

    public PixmapFormat getFormat() {

        return format;

    }


    @Override

    public void dispose() {

        bitmap.recycle();

    }

}
All we need to do is store the Bitmap instance that we wrap, along with its format, which is stored as a PixmapFormat enumeration value, as defined in Chapter 3. Additionally, we implement the required methods of the Pixmap interface so that we can query the width and height of the Pixmap, as well as its format, and ensure that the pixels can be dumped from RAM. Note that the bitmap member is package private, so we can access it in AndroidGraphics, which we'll implement now.
AndroidGraphics: Serving Our Drawing Needs
The Graphics interface we designed in Chapter 3 is also lean and mean. It will draw pixels, lines, rectangles, and Pixmaps to the framebuffer. As discussed, we'll use a Bitmap as our framebuffer and direct all drawing calls to it via a Canvas. It is also responsible for creating Pixmap instances from asset files. Therefore, we'll also need another AssetManager. Listing 5–14 shows the code for our implementation of the interface, AndroidGraphics.
Listing 5–14. AndroidGraphics.java; Implementing the Graphics Interface
package com.badlogic.androidgames.framework.impl;


import java.io.IOException;

import java.io.InputStream;


import android.content.res.AssetManager;

import android.graphics.Bitmap;

import android.graphics.Bitmap.Config;

import android.graphics.BitmapFactory;
import android.graphics.BitmapFactory.Options;

import android.graphics.Canvas;

import android.graphics.Paint;

import android.graphics.Paint.Style;

import android.graphics.Rect;


import com.badlogic.androidgames.framework.Graphics;

import com.badlogic.androidgames.framework.Pixmap;


public class AndroidGraphics implements Graphics {

    AssetManager assets;

    Bitmap frameBuffer;

    Canvas canvas;

    Paint paint;

    Rect srcRect = new Rect();

    Rect dstRect = new Rect();
The class implements the Graphics interface. It contains an AssetManager member that we use to load Bitmap instances, a Bitmap member that represents our artificial framebuffer, a Canvas member that we use to draw to the artificial framebuffer, a Paint we need for drawing, and two Rect members we need for implementing the AndroidGraphics.drawPixmap() methods. These last three members are there so we don't have to create new instances of these classes on every draw call. That would create a number of problems for the garbage collector.
    public AndroidGraphics(AssetManager assets, Bitmap frameBuffer) {

        this.assets = assets;

        this.frameBuffer = frameBuffer;

        this.canvas = new Canvas(frameBuffer);

        this.paint = new Paint();

    }
In the constructor, we get an AssetManager and Bitmap that represent our artificial framebuffer from the outside. We store these in the respective members and create the Canvas instance that will draw the artificial framebuffer, as well as the Paint, which we use for some of the drawing methods.
    @Override

    public Pixmap newPixmap(String fileName, PixmapFormat format) {

        Config config = null;

        if (format == PixmapFormat.RGB565)

            config = Config.RGB_565;

        else if (format == PixmapFormat.ARGB4444)

            config = Config.ARGB_4444;

        else

            config = Config.ARGB_8888;


        Options options = new Options();

        options.inPreferredConfig = config;


        InputStream in = null;

        Bitmap bitmap = null;

        try {

            in = assets.open(fileName);

            bitmap = BitmapFactory.decodeStream(in);
            if (bitmap == null)

                throw new RuntimeException("Couldn't load bitmap from asset '"

                        + fileName + "'");

        } catch (IOException e) {

            throw new RuntimeException("Couldn't load bitmap from asset '"

                    + fileName + "'");

        } finally {

            if (in != null) {

                try {

                    in.close();

                } catch (IOException e) {

                }

            }

        }


        if (bitmap.getConfig() == Config.RGB_565)

            format = PixmapFormat.RGB565;

        else if (bitmap.getConfig() == Config.ARGB_4444)

            format = PixmapFormat.ARGB4444;

        else

            format = PixmapFormat.ARGB8888;


        return new AndroidPixmap(bitmap, format);

    }
The newPixmap() method tries to load a Bitmap from an asset file, using the specified PixmapFormat. We start by translating the PixmapFormat into one of the constants of the Android Config class used in Chapter 4. Next, we create a new Options instance and set our preferred color format. Then, we try to load the Bitmap from the asset via the BitmapFactory, and throw a RuntimeException if something goes wrong. Otherwise, we check what format the BitmapFactory used to load the Bitmap and translate it into a PixmapFormat enumeration value. Remember that the BitmapFactory might decide to ignore our desired color format, so we have to check to determine what it used to decode the image. Finally, we construct a new AndroidBitmap instance based on the Bitmap we loaded, as well as its PixmapFormat, and return it to the caller.
    @Override

    public void clear(int color) {

        canvas.drawRGB((color & 0xff0000) >> 16, (color & 0xff00) >> 8,

                (color & 0xff));

    }
The clear() method extracts the red, green, and blue components of the specified 32-bit ARGB color parameter and calls the Canvas.drawRGB() method, which clears our artificial framebuffer with that color. This method ignores any alpha value of the specified color, so we don't have to extract it.
    @Override

    public void drawPixel(int x, int y, int color) {

        paint.setColor(color);

        canvas.drawPoint(x, y, paint);

    }
The drawPixel() method draws a pixel of our artificial framebuffer via the Canvas.drawPoint() method. First, we set the color of our paint member variable and pass it to the drawing method in addition to the x- and y-coordinates of the pixel.
    @Override

    public void drawLine(int x, int y, int x2, int y2, int color) {

        paint.setColor(color);

        canvas.drawLine(x, y, x2, y2, paint);

    }
The drawLine() method draws the given line of the artificial framebuffer, using the paint member to specify the color when calling the Canvas.drawLine() method.
    @Override

    public void drawRect(int x, int y, int width, int height, int color) {

        paint.setColor(color);

        paint.setStyle(Style.FILL);

        canvas.drawRect(x, y, x + width - 1, y + width - 1, paint);

    }
The drawRect() method sets the Paint member's color and style attributes so that we can draw a filled, colored rectangle. In the actual Canvas.drawRect() call, we have to transform the x, y, width, and height parameters of the coordinates in the top-left and bottom-right corners of the rectangle. For the top-left corner, we simply use the x and y parameters. For the bottom-right corner, we add the width and height to x and y and subtract 1. For example, if we render a rectangle with an x and y of (10,10) and a width and height of 2 and 2 and we don't subtract 1, the resulting rectangle on the screen will be 3×3 pixels in size.
    @Override

    public void drawPixmap(Pixmap pixmap, int x, int y, int srcX, int srcY,

            int srcWidth, int srcHeight) {

        srcRect.left = srcX;

        srcRect.top = srcY;

        srcRect.right = srcX + srcWidth - 1;

        srcRect.bottom = srcY + srcHeight - 1;


        dstRect.left = x;

        dstRect.top = y;

        dstRect.right = x + srcWidth - 1;

        dstRect.bottom = y + srcHeight - 1;


        canvas.drawBitmap(((AndroidPixmap) pixmap).bitmap, srcRect, dstRect,

                null);

    }
The drawPixmap() method, which allows us to draw a portion of a Pixmap, sets up the source and destination of the Rect members that are used in the actual drawing call. As with drawing a rectangle, we have to translate the x- and y-coordinates together with the width and height to the top-left and bottom-right corners. Again, we have to subtract 1, or else we will overshoot by 1 pixel. Next, we perform the actual drawing via the Canvas.drawBitmap() method, which will automatically do the blending if the Pixmap we draw has a PixmapFormat.ARGB4444 or a PixmapFormat.ARGB8888 color depth. Note that we have to cast the Pixmap parameter to an AndroidPixmap in order to fetch the bitmap member for drawing with the Canvas. That's a bit complicated, but we can be sure that the Pixmap instance that is passed in will be an AndroidPixmap.
    @Override

    public void drawPixmap(Pixmap pixmap, int x, int y) {

        canvas.drawBitmap(((AndroidPixmap)pixmap).bitmap, x, y, null);

    }
The second drawPixmap() method draws the complete Pixmap to the artificial framebuffer at the given coordinates. Again, we must do some casting to get to the Bitmap member of the AndroidPixmap.
    @Override

    public int getWidth() {

        return frameBuffer.getWidth();

    }


    @Override

    public int getHeight() {

        return frameBuffer.getHeight();

    }

}
Finally, we have the methods getWidth() and getHeight(), which simply return the size of the artificial framebuffer stored by the AndroidGraphics to which it renders internally.
AndroidFastRenderView is the last class we need in order to implement.
AndroidFastRenderView: Loop, Stretch, Loop, Stretch
The name of this class should give away what lies ahead. In the last chapter, we discussed using a SurfaceView to perform continuous rendering in a separate thread that could also house our game's main loop. We developed a very simple class called FastRenderView, which was derived from the SurfaceView class, we made sure we play nice with the activity life cycle, and we set up a thread in order to constantly render the SurfaceView via a Canvas. Here, we'll reuse this FastRenderView class and augment it to do a few more things.
- It keeps a reference to a
Gameinstance from which it can get the activeScreen. We constantly call theScreen.update()andScreen.present()methods from within theFastRenderViewthread. - It keeps track of the delta time between frames that is passed to the active
Screen.
It takes the artificial framebuffer to which the AndroidGraphics instance draws, and draws it to the SurfaceView, which is scaled if necessary.
Listing 5–15 shows the implementation of the AndroidFastRenderView class.
Listing 5–15. AndroidFastRenderView.java, a Threaded SurfaceView Executing Our Game Code
package com.badlogic.androidgames.framework.impl;


import android.graphics.Bitmap;

import android.graphics.Canvas;

import android.graphics.Rect;

import android.view.SurfaceHolder;

import android.view.SurfaceView;


public class AndroidFastRenderView extends SurfaceView implements Runnable {

    AndroidGame game;

    Bitmap framebuffer;

    Thread renderThread = null;

    SurfaceHolder holder;

    volatile boolean running = false;
This should look familiar. We just need to add two more members—an AndroidGame instance and a Bitmap instance that represent our artificial framebuffer. The other members are the same as in our FastRenderView from Chapter 3.
    public AndroidFastRenderView(AndroidGame game, Bitmap framebuffer) {

        super(game);

        this.game = game;

        this.framebuffer = framebuffer;

        this.holder = getHolder();

    }
In the constructor, we simply call the base class's constructor with the AndroidGame parameter (which is an Activity; this will be discussed in the following sections) and store the parameters in the respective members. Once again, we get a SurfaceHolder, as in previous sections.
    public void resume() {

        running = true;

        renderThread = new Thread(this);

        renderThread.start();

    }
The resume() method is an exact copy of the FastRenderView.resume() method, so we won't discuss it again. In short, the method makes sure that our thread interacts nicely with the activity life cycle.
    public void run() {

        Rect dstRect = new Rect();

        long startTime = System.nanoTime();

        while(running) {

            if(!holder.getSurface().isValid())

                continue;


            float deltaTime = (System.nanoTime()-startTime) / 1000000000.0f;
            startTime = System.nanoTime();


            game.getCurrentScreen().update(deltaTime);

            game.getCurrentScreen().present(deltaTime);


            Canvas canvas = holder.lockCanvas();

            canvas.getClipBounds(dstRect);

            canvas.drawBitmap(framebuffer, null, dstRect, null);

            holder.unlockCanvasAndPost(canvas);

        }

    }
The run() method has a few more features. The first addition is its ability to track delta time between each frame. For this, we use System.nanoTime(), which returns the current time in nanoseconds as a long.
NOTE: A nanosecond is one-billionth of a second.
In each loop iteration, we start by taking the difference between the last loop iteration's start time and the current time. To make it easier to work with that delta, we convert it into seconds. Next, we save the current time stamp, which we'll use in the next loop iteration, to calculate the next delta time. With the delta time at hand, we call the current Screen's update() and present() methods, which will update the game logic and render things to the artificial framebuffer. Finally, we get a hold of the Canvas for the SurfaceView and draw the artificial framebuffer. The scaling is performed automatically in case the destination rectangle we pass to the Canvas.drawBitmap() method is smaller or bigger than the framebuffer.
Note that we've used a shortcut here to get a destination rectangle that stretches over the whole SurfaceView via the Canvas.getClipBounds() method. It will set the top and left members of dstRect to 0 and 0, respectively, and the bottom and right members to the actual screen dimensions (480×800 in portrait mode on a Nexus One). The rest of the method is exactly the same as what in our FastRenderView test. The method simply makes sure that the thread stops when the activity is paused or destroyed.
public void pause() {

        running = false;

        while(true) {

            try {

                renderThread.join();

                break;

            } catch (InterruptedException e) {

                // retry

            }

        }

    }

}
The last method of this class, pause(), is also the same as in the FastRenderView.pause() method – it simply terminates the rendering/main loop thread and waits for it to die completely before returning.
We are nearly done with our framework. The last piece of the puzzle is the implementation of the Game interface.