
The HelpScreenClass(es)
Next, let's implement the HelpScreen, HighscoreScreen, and GameScreen classes we used previously in the update() method.
We defined three help screens in Chapter 3, each more or less explaining one aspect of the game play. We now directly translate those to Screen implementations called HelpScreen, HelpScreen2, and HelpScreen3. They all have a single button that will initiate a screen transition. The HelpScreen3 screen will transition back to the MainMenuScreen. Figure 6–3 shows the three help screens with the drawing coordinates and touch areas.
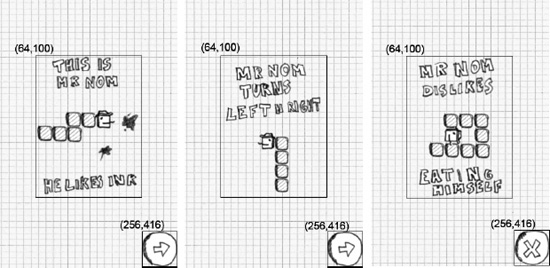
Figure 6–3. The three help screens, drawing coordinates, and touch areas.
Now that seems simple enough to implement. Let's start with the HelpScreen class shown in Listing 6–6.
Listing 6–6. HelpScreen.java; the First Help Screen
package com.badlogic.androidgames.mrnom;


import java.util.List;


import com.badlogic.androidgames.framework.Game;

import com.badlogic.androidgames.framework.Graphics;

import com.badlogic.androidgames.framework.Input.TouchEvent;

import com.badlogic.androidgames.framework.Screen;


public class HelpScreen extends Screen {

    public HelpScreen(Game game) {

        super(game);

    }

    @Override

    public void update(floatdeltaTime) {

        List<TouchEvent> touchEvents = game.getInput().getTouchEvents();

        game.getInput().getKeyEvents();


        int len = touchEvents.size();

        for(int i = 0; i < len; i++) {

            TouchEvent event = touchEvents.get(i);

            if(event.type == TouchEvent.TOUCH_UP) {

                if(event.x > 256 && event.y > 416 ) {

                    game.setScreen(new HelpScreen2(game));

                    if(Settings.soundEnabled)

                        Assets.click.play(1);

                    return;

                }

            }

        }

    }


    @Override

    public void present(float deltaTime) {

        Graphics g = game.getGraphics();

        g.drawPixmap(Assets.background, 0, 0);

        g.drawPixmap(Assets.help1, 64, 100);

        g.drawPixmap(Assets.buttons, 256, 416, 0, 64, 64, 64);

    }


    @Override

    public void pause() {


    }


    @Override

    public void resume() {


    }


    @Override

    public void dispose() {


    }

}
Again, very simple. We derive from Screen, and implement a proper constructor. Next, we have our familiar update() method, which simply checks if the button at the bottom was pressed. If that's the case, we play the click sound and transition to HelpScreen2.
The present() method just renders the background again, followed by the help image and the button.
The HelpScreen2 and HelpScreen3 classes look the same; the only difference is the help image they draw and the screen to which they transition. We can agree that we don't have to look at their code. On to the high-scores screen!