
Sprite Animation
If you've ever played a 2D video game, you know that you are still missing a vital component: sprite animation. The animation consists of so-called keyframes, which produce the illusion of movement. Figure 8–25 shows a nice animated sprite by Ari Feldmann (part of his royalty-free SpriteLib).
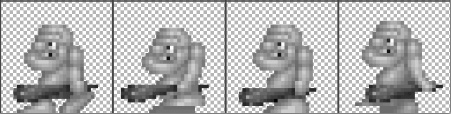
Figure 8–25. A walking caveman, by Ari Feldmann (grid not in original)
The image is 256×64 pixels in size, and each keyframe is 64×64 pixels. To produce animation, you just draw a sprite using the first keyframe for an amount of time—say, 0.25 s—and then you switch to the next keyframe, and so on. When you reach the last frame you have two options: you can stay at the last keyframe or start at the beginning again (and perform what is called a looping animation).
You can easily do this with your TextureRegion and SpriteBatcher classes. Usually, you'd not only have a single animation, like the one in Figure 8–25, but many more in a single atlas. Besides the walk animation, you could have a jump animation, an attack animation, and so on. For each animation, you need to know the frame duration, which tells you how long to keep using a single keyframe of the animation before switching to the next frame.
The Animation Class
From this, you can define the requirements for an Animation class, which stores the data for a single animation, such as the walk animation in Figure 8–25:
- An
Animationholds a number ofTextureRegions, which store where each keyframe is located in the texture atlas. The order of theTextureRegions is the same as that used for playing back the animation. - The
Animationalso stores the frame duration, which has to pass before you switch to the next frame. - The
Animationshould provide you with a method to which you pass the time you've been in the state that theAnimationrepresents (for example, walking left), and that will return the appropriateTextureRegion. The method should take into consideration whether you want theAnimationto loop or to stay at the last frame when the end is reached.
This last bullet point is important because it allows you to store a single Animation instance to be used by multiple objects in your world. An object just keeps track of its current state (that is, whether it is walking, shooting, or jumping, and how long it has been in that state). When you render this object, use the state to select the animation you want to play back and the state time to get the correct TextureRegion from the Animation. Listing 8–19 shows the code of your new Animation class.
Listing 8–19. Animation.java, a Simple Animation Class
package com.badlogic.androidgames.framework.gl;


public class Animation {

    public static final int ANIMATION_LOOPING = 0;

    public static final int ANIMATION_NONLOOPING = 1;


    final TextureRegion[] keyFrames;

    final float frameDuration;


    public Animation(float frameDuration, TextureRegion … keyFrames) {

        this.frameDuration = frameDuration;

        this.keyFrames = keyFrames;

    }


    public TextureRegion getKeyFrame(float stateTime, int mode) {

        int frameNumber = (int)(stateTime / frameDuration);


        if(mode == ANIMATION_NONLOOPING) {

            frameNumber = Math.min(keyFrames.length-1, frameNumber);

        } else {

            frameNumber = frameNumber % keyFrames.length;

        }

        return keyFrames[frameNumber];

    }

}
First, define two constants to be used with the getKeyFrame() method. The first one says the animation should be looping, and the second one says that it should stop at the last frame.
Next, define two members: an array holding the TextureRegions and a float storing the frame duration.
You pass the frame duration and the TextureRegions that hold the keyframes to the constructor, which simply stores them. You can make a defensive copy of the keyFrames array, but that would allocate a new object, which would make the garbage collector a little mad.
The interesting piece is the getKeyFrame() method. You pass in the time that the object has been in the state that the animation represents, as well as the mode, either Animation.ANIMATION_LOOPING or Animation.NON_LOOPING. Calculate how many frames have already been played for the given state, based on the stateTime. If the animation shouldn't be looping, simply clamp the frameNumber to the last element in the TextureRegion array. Otherwise, take the modulus, which will automatically create the looping effect you desire (for example, 4 % 3 = 1). All that's left is returning the proper TextureRegion.
An Example
Let's create an example called AnimationTest, with a corresponding screen called AnimationScreen. As always, only the screen itself will be discussed.
You want to render a number of cavemen, all walking to the left. Your world will be the same size as your view frustum, which has the size 4.8×3.2 m. (This is arbitrary; you could use any size.) A caveman is a DynamicGameObject with a size of 1×1 m. You will derive from DynamicGameObject and create a new class called Caveman, which will store an additional member that keeps track of how long the caveman has been walking. Each caveman will move 0.5 m/s, either to the left or to the right. Add an update() method to the Caveman class to update the caveman's position, based on the delta time and his velocity. If a caveman reaches the left or right edge of the world, set him to the other side of the world. Use the image in Figure 8–25 and create TextureRegions and an Animation instance, accordingly. For rendering, use a Camera2D instance and a SpriteBatcher because they are fancy. Listing 8–20 shows the code of the Caveman class.
Listing 8–20. Excerpt from AnimationTest, Showing the Inner Caveman Class.
static final float WORLD_WIDTH = 4.8f;

static final float WORLD_HEIGHT = 3.2f;


static class Caveman extends DynamicGameObject {

    public float walkingTime = 0;


    public Caveman(float x, float y, float width, float height) {

        super(x, y, width, height);

        this.position.set((float)Math.random() * WORLD_WIDTH,

                          (float)Math.random() * WORLD_HEIGHT);

        this.velocity.set(Math.random() > 0.5f?-0.5f:0.5f, 0);

        this.walkingTime = (float)Math.random() * 10;

    }


    public void update(float deltaTime) {

        position.add(velocity.x * deltaTime, velocity.y * deltaTime);

        if(position.x < 0) position.x = WORLD_WIDTH;

        if(position.x > WORLD_WIDTH) position.x = 0;

        walkingTime += deltaTime;

    }

}
The two constants WORLD_WIDTH and WORLD_HEIGHT are part of the enclosing AnimationTest class, and are used by the inner classes. Your world is 4.8×3.2 m in size.
Next up is the inner Caveman class, which extends DynamicGameObject, since you will move cavemen based on velocity. You define an additional member that keeps track of how long the caveman has been walking. In the constructor, place the caveman at a random position and let him walk to the left or the right. Initialize the walkingTime member to a number between 0 and 10; this way your cavemen won't walk in sync.
The update() method advances the caveman based on his velocity and the delta time. If he leaves the world, reset him to either the left or right edge. Add the delta time to the walkingTime to keep track of how long he's been walking.
Listing 8–21 shows the AnimationScreen class.
Listing 8–21. Excerpt from AnimationTest.java: The AnimationScreen Class
class AnimationScreen extends Screen {

    static final int NUM_CAVEMEN = 10;

    GLGraphics glGraphics;

    Caveman[] cavemen;

    SpriteBatcher batcher;

    Camera2D camera;

    Texture texture;

    Animation walkAnim;
Your screen class has the usual suspects as members. You have a GLGraphics instance, a Caveman array, a SpriteBatcher, a Camera2D, the Texture containing the walking keyframes, and an Animation instance.
    public AnimationScreen(Game game) {

        super(game);

        glGraphics = ((GLGame)game).getGLGraphics();

        cavemen = new Caveman[NUM_CAVEMEN];

        for(int i = 0; i < NUM_CAVEMEN; i++) {

            cavemen[i] = new Caveman((float)Math.random(), (float)Math.random(), 1, 1);

        }

        batcher = new SpriteBatcher(glGraphics, NUM_CAVEMEN);

        camera = new Camera2D(glGraphics, WORLD_WIDTH, WORLD_HEIGHT);

    }
In the constructor, you create the Caveman instances, as well as the SpriteBatcher and Camera2D.
@Override
    public void resume() {

        texture = new Texture(((GLGame)game), "walkanim.png");

        walkAnim = new Animation( 0.2f,

                                  new TextureRegion(texture, 0, 0, 64, 64),

                                  new TextureRegion(texture, 64, 0, 64, 64),

                                  new TextureRegion(texture, 128, 0, 64, 64),

                                  new TextureRegion(texture, 192, 0, 64, 64));

    }
In the resume() method, you load the texture atlas containing the animation keyframes from the asset file walkanim.png, which is the same as seen in Figure 8–25. Afterward, you create the Animation instance, setting the frame duration to 0.2 s and passing in a TextureRegion for each of the keyframes in the texture atlas.
    @Override

    public void update(float deltaTime) {

        int len = cavemen.length;

        for(int i = 0; i < len; i++) {

            cavemen[i].update(deltaTime);

        }

    }
The update() method just loops over all Caveman instances and calls their Caveman.update() method with the current delta time. This will make the cavemen move and update their walking times.
    @Override

    public void present(float deltaTime) {

        GL10 gl = glGraphics.getGL();

        gl.glClear(GL10.GL_COLOR_BUFFER_BIT);

        camera.setViewportAndMatrices();


        gl.glEnable(GL10.GL_BLEND);

        gl.glBlendFunc(GL10.GL_SRC_ALPHA, GL10.GL_ONE_MINUS_SRC_ALPHA);

        gl.glEnable(GL10.GL_TEXTURE_2D);


        batcher.beginBatch(texture);

        int len = cavemen.length;

        for(int i = 0; i < len; i++) {

            Caveman caveman = cavemen[i];

            TextureRegion keyFrame = walkAnim.getKeyFrame(caveman.walkingTime, Animation.ANIMATION_LOOPING);

            batcher.drawSprite(caveman.position.x, caveman.position.y,

caveman.velocity.x < 0?1:-1, 1, keyFrame);

        }

        batcher.endBatch();

    }


    @Override

    public void pause() {

    }


    @Override

    public void dispose() {

    }

}
Finally, you have the present() method. Start off by clearing the screen and setting the viewport and projection matrix via your camera. Next, enable blending and texture mapping, and set the blend function. Start rendering by telling the sprite batcher that you want to start a new batch using the animation texture atlas. Next, loop through all the cavemen and render them. For each caveman, you first fetch the correct keyframe from the Animation instance based on the caveman's walking time. You specify that the animation should be looping. Then you draw the caveman with the correct texture region at his position.
But what do you do with the width parameter here? Remember that your animation texture only contains keyframes for the “walk left” animation. You want to flip the texture horizontally in case the caveman is walking to the right, which you can do by specifying a negative width. If you don't trust us, go back to the SpriteBatcher code and check whether this works. You essentially flip the rectangle of the sprite by specifying a negative width. You could do the same vertically, as well, by specifying a negative height.
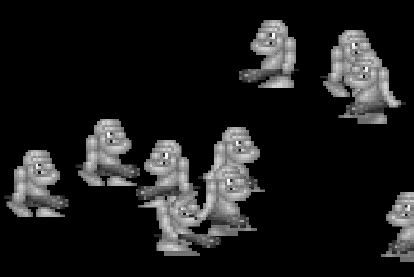
Figure 8–26 shows your walking cavemen.
And that is all you need to know to produce a nice 2D game with OpenGL ES. Note how you still separate the game logic and the presentation from each other. A caveman does not need to know that he is being rendered. He therefore doesn't keep any rendering-related members, such as an Animation instance or a Texture. All you need to do is keep track of the state of the caveman, and how long he's been in that state. Together with his position and size, you can then easily render him by using your little helper classes.