
Lighting in OpenGL ES
Lighting in OpenGL ES is a useful feature that can give our 3D games a nice touch. To use this functionality, we have to have an idea of the OpenGL ES lighting model.
How Lighting Works
Let's think about how lighting works for a moment. The first thing we need is a light source to emit light. We also need an object that can be lit. Finally, we need a sensor, like our eyes or a camera, which will catch the photons that are sent out by the light source and reflected back by the object. Lighting changes the perceived color of an object depending on the following:
- The light source's type
- The light source's color or intensity
- The light source's position and direction relative to the lit object
- The object's material and texture
The intensity with which light is reflected by an object can depend on various factors. We are mostly concerned with the angle at which a light ray hits a surface. The more perpendicular a light ray is to a surface it hits, the greater the intensity of the light reflected by the surface. Figure 11–1 illustrates this point.

Figure 11–1. The more perpendicular a light ray is to a surface, the greater the intensity of the reflected light.
Once a light ray hits a surface, it is reflected in two different ways. Most of the light is reflected diffusely, which means that the reflected light rays are scattered randomly by irregularities of the object's surface. Some reflections are specular, which means that the light rays bounce back as if they had hit a perfect mirror. Figure 11–2 shows the difference between diffuse and specular reflection.

Figure 11–2. Diffuse and specular reflection
Specular reflection will manifest itself as highlights on objects. Whether an object will cast specular reflections depends on its material. Objects with rough or uneven surfaces, like skin or fabric, are unlikely to have specular highlights. Objects that have a smooth surface, like glass or a marble, do exhibit these lighting artifacts. Of course, glass or marble surfaces aren't really smooth in an absolute sense either. Relative to materials like wood or human skin, though, they are very smooth.
When light hits a surface, its reflection also changes color depending on the chemical constitution of the object it hits. The objects we see as red, for example, are those that reflect only the red portions of light. The object “swallows” all other wavelengths. A black object is one that swallows almost all of the light that is shone on it.
OpenGL ES allows us to simulate this real-world behavior by specifying light sources and materials of objects.
Light Sources
We are surrounded by all kind of light sources. The sun constantly throws photons at us. Our monitors emit light, surrounding us with that nice blue glow at night. Light bulbs and headlights keep us from bumping or driving into things in the dark. OpenGL ES allows you to create four types of light sources:
- Ambient light: Ambient light is not a light source per se but rather the result of photons coming from other light sources and bouncing around in our world. All of these stray photons combined make for a certain default level of illumination that is directionless and illuminates all objects equally.
- Point lights: These have a position in space and emit light in all directions. A light bulb is a point light, for example.
- Directional lights: These are expressed as directions in OpenGL ES and are assumed to be infinitely far away. The sun can be idealized as a directional light source. We can assume that the light rays coming from the sun all hit the earth at the same angle because of the distance between the earth and the sun.
- Spotlights: These are similar to point lights in that they have an explicit position in space. Additionally, they have a direction in which they shine and create a light cone that is limited to some radius. A street lamp is a spotlight.
We'll only look into ambient, point, and directional lights. Spotlights are often hard to get right with limited GPUs like those found on Android devices because of the way OpenGL ES calculates the lighting. You'll see why that is in a minute.
Besides a light source's position and direction, OpenGL ES lets us also specify the color or intensity of a light. This is expressed as an RGBA color. However, OpenGL ES requires us to specify four different colors per light source instead of just one.
- Ambient: This is the intensity/color that contributes to the overall shading of an object. An object will be uniformly lit with this color, no matter its position or orientation relative to the light source.
- Diffuse: This is the intensity/color with which an object will be lit when calculating the diffuse reflection. Sides of an object that do not face the light source won't be lit, just as in real life.
- Specular: This intensity/color is similar to the diffuse color. However, it will only affect spots on the object that have a certain orientation toward the viewer and the light source.
- Emissive: This is totally confusing and has very little use in real-word applications, so we won't go into it.
Usually, we'll only set the diffuse and specular intensities of a light source and leave the other two at their defaults. We'll also use the same RGBA color for both the diffuse and specular intensity most of the time.
Materials
Every object in our world has a material covering. The material defines how the light that is hitting an object will be reflected and it modifies the color of the reflected light. OpenGL ES lets us specify the same four RGBA colors for a material as we can for a light source:
- Ambient: This is the color that's combined with the ambient color of any light source in the scene.
- Diffuse: This is the color that's combined with the diffuse color of any light source.
- Specular: This is the color that's combined with the specular color of any light source for specular highlight points on an object's surface.
- Emissive: We again ignore this as it has little use in our context.
Figure 11–3 illustrates the first three types of material/light source properties: ambient, diffuse, and specular.

Figure 11–3. Different material/light types. Left: ambient only. Center: Diffuse only. Right: Ambient and diffuse with specular highlight.
In Figure 11–3, we can see the contributions of the different material and light properties. Ambient light illuminates the object uniformly. Diffuse light will be reflected depending on the angle that the light rays hit the object; areas that directly face the light source will be brighter, and areas that can't be reached by light rays are dark. In the right-most image we see the combination of ambient, diffuse, and specular light. The specular light manifests itself as a white highlight on the sphere.
How OpenGL ES Calculates Lighting: Vertex Normals
You know that the intensity of the reflected light bouncing back from an object depends on the angle it hits the surface of the object. OpenGL ES uses this fact to calculate lighting. It does so by using vertex normals, which we have to define in our code, just as we define texture coordinates or vertex colors. Figure 11–4 shows a sphere with its vertex normals.

Figure 11–4. A sphere and its vertex normals
Normals are simply unit-length vectors that point in the direction a surface is facing. In our case, a surface is a triangle. Instead of specifying a surface normal, though, we have to specify a vertex normal. The difference between a surface normal and a vertex normal is that the vertex normal might not have to point in the same direction as the surface normal. We can clearly see this in Figure 11–4, where each vertex normal is actually the average of the normals of the triangles to which that vertex belongs. This averaging makes for a smooth shading of the object.
When we render an object with vertex normals and lighting enabled, OpenGL ES will determine the angle between each vertex and light source. With this angle, it can calculate the vertex's color based on the ambient, diffuse, and specular properties of the material of the object and the light source. The end result is a color for each vertex of an object that is then interpolated over each triangle in combination with the calculated colors of the other vertices. This interpolated color will then be combined with any texture maps we apply to the object.
This sounds scary, but it really isn't that bad. All we need to do is enable lighting and specify the light sources, the material for the object we want to render, and the vertex normals, in addition to the other vertex attributes we usually specify, like position or texture coordinates. Let's have a look at how to implement all of this with OpenGL ES.
In Practice
We'll now go through all of the necessary steps to get lighting to work with OpenGL ES. Along the way, we'll create a few little helper classes that make working with light sources a bit easier. We'll put those in the com.badlogic.androidgames.framework.gl package.
Enabling and Disabling Lighting
As with all OpenGL ES states, we first have to enable the functionality in question. We do that with this:
gl.glEnable(GL10.GL_LIGHTING);
Once enabled, lighting will be applied to all of the objects that we render. Of course, we'll have to specify the light sources and materials as well as the vertex normals to achieve meaningful results. Once we are done with rendering all of the objects that should be illuminated, we can disable lighting again:
gl.glDisable(GL10.GL_LIGHTING);
Specifying Light Sources
OpenGL ES offers us four types of light sources: ambient lights, point lights, directional lights, and spot lights. We'll take a look at how to define the first three. In order for spot lights to be effective and to look good, we'd need to have a very high triangle count for each of our objects' models. This is prohibitive on most current mobile devices.
OpenGL ES limits us to having a maximum of eight light sources in a scene, plus a global ambient light. Each of the eight light sources has an identifier, from GL10.GL_LIGHT0 up to GL10.GL_LIGHT7. If we want to manipulate the properties of one of these light sources, we do so by specifying the respective ID of that light source.
Light sources have to be enabled with this syntax:
gl.glEnable(GL10.GL_LIGHT0);
In this case, OpenGL ES will then take the properties of the light source with ID zero and apply it to all rendered objects accordingly. If we want to disable a light source, we can do it with a statement like this:
gl.glDisable(GL10.GL_LIGHT0);
Ambient light is a special case as it does not have an identifier. There is only one ambient light ever in an OpenGL ES scene. Let's have a look at that.
Ambient Light
Ambient light is a special type of light, as explained already. It has no position or direction, but only a color by which all objects in the scene will be uniformly lit. OpenGL ES lets us specify the global ambient light as follows:
float[] ambientColor = { 0.2f, 0.2f, 0.2f, 1.0f };

gl.glLightModelfv(GL10.GL_LIGHT_MODEL_AMBIENT, color, 0);
The ambientColor array holds the RGBA values of the ambient light's color encoded as floats in the range 0 to 1. The glLightModelfv() method takes a constant as the first parameter specifying that we want to set the ambient light's color, the float array holding the color and an offset into the float array from which the method should start reading the RGBA values. Let's put this into a lovely little class. Listing 11–2 shows the code.
Listing 11–2. AmbientLight.java, a Simple Abstraction of OpenGL ES Global Ambient Light
package com.badlogic.androidgames.framework.gl;


import javax.microedition.khronos.opengles.GL10;


public class AmbientLight {

    float[] color = {0.2f, 0.2f, 0.2f, 1};


    public void setColor(float r, float g, float b, float a) {

        color[0] = r;

        color[1] = g;

        color[2] = b;

        color[3] = a;

    }


    public void enable(GL10 gl) {

        gl.glLightModelfv(GL10.GL_LIGHT_MODEL_AMBIENT, color, 0);

    }

}
All we do is store the ambient light's color in a float array and then provide two methods: one to set the color and the other to make OpenGL ES use the ambient light color that we define. By default, we use a gray ambient light color.
Point Lights
Point lights have a position as well as an ambient, diffuse, and specular color/intensity (we leave out the emissive color/intensity). To specify the different colors, we can do the following:
gl.glLightfv(GL10.GL_LIGHT3, GL10.GL_AMBIENT, ambientColor, 0);

gl.glLightfv(GL10.GL_LIGHT3, GL10.GL_DIFFUSE, diffuseColor, 0);

gl.glLightfv(GL10.GL_LIGHT3, GL10.GL_SPECULAR, specularColor, 0);
The first parameter is the light identifier; in this case we use the fourth light. The next parameter specifies the attribute of the light we want to modify. The third parameter is again a float array that holds the RGBA values, and the final parameter is an offset into that array. Specifying the position is easy:
float[] position = {x, y, z, 1};

gl.glLightfv(GL10.GL_LIGHT3, GL10.GL_POSITION, position, 0);
We again specify the attribute we want to modify (in this case the position), along with a four-element array that stores the x-, y-, and z-coordinates of the light in our world. Note that the fourth element of the array must be set to 1 for a positional light source! Let's put this into a helper class. Listing 11–3 shows you the code.
Listing 11–3. PointLight.java, a Simple Abstraction of OpenGL ES Point Lights
package com.badlogic.androidgames.framework.gl;


import javax.microedition.khronos.opengles.GL10;


public class PointLight {

    float[] ambient = { 0.2f, 0.2f, 0.2f, 1.0f };

    float[] diffuse = { 1.0f, 1.0f, 1.0f, 1.0f };

    float[] specular = { 0.0f, 0.0f, 0.0f, 1.0f };

    float[] position = { 0, 0, 0, 1 };

    int lastLightId = 0;


    public void setAmbient(float r, float g, float b, float a) {

        ambient[0] = r;

        ambient[1] = g;

        ambient[2] = b;

        ambient[3] = a;

    }


    public void setDiffuse(float r, float g, float b, float a) {

        diffuse[0] = r;

        diffuse[1] = g;

        diffuse[2] = b;

        diffuse[3] = a;

    }


    public void setSpecular(float r, float g, float b, float a) {

        specular[0] = r;

        specular[1] = g;

        specular[2] = b;

        specular[3] = a;

    }


    public void setPosition(float x, float y, float z) {

        position[0] = x;

        position[1] = y;

        position[2] = z;

    }


    public void enable(GL10 gl, int lightId) {

        gl.glEnable(lightId);

        gl.glLightfv(lightId, GL10.GL_AMBIENT, ambient, 0);

        gl.glLightfv(lightId, GL10.GL_DIFFUSE, diffuse, 0);

        gl.glLightfv(lightId, GL10.GL_SPECULAR, specular, 0);

        gl.glLightfv(lightId, GL10.GL_POSITION, position, 0);

        lastLightId = lightId;

    }


    public void disable(GL10 gl) {

        gl.glDisable(lastLightId);

    }

}
Our helper class stores the ambient, diffuse, and specular color components of the light as well as the position (with the fourth element set to 1). In addition, we store the last light identifier used for this light so that we can offer a disable() method that will turn off the light if necessary. For each light attribute, we have a nice setter method. We also have an enable() method, which takes a GL10 instance and a light identifier (like GL10.GL_LIGHT6). It enables the light, sets its attributes, and stores the light identifier used. The disable() method just disables the light using the lastLightId member set in enable().
We use sensible defaults for the ambient, diffuse, and specular colors in the initializers of the member arrays. The light will be white, and it will not produce any specular highlights because the specular color is black.
Directional Lights
A directional light is nearly identical to a point light. The only difference is that it has a direction instead of a position. The way the direction is expressed is somewhat confusing. Instead of using a direction vector, OpenGL ES expects us to define a point in the world. The direction is then calculated by taking the direction vector from that point to the origin of the world. The following snippet would produce a directional light that comes from the right side of the world:
float[] dirPos = {1, 0, 0, 0};

gl.glLightfv(GL10.GL_LIGHT0, GL10.GL_POSITION, dirPos, 0);
We can translate that to a direction vector:
dir = -dirPos = {-1, 0, 0, 0}
The rest of the attributes, like the ambient or diffuse color, are identical to those of a point light. Listing 11–4 shows you the code of a little helper class for diffuse lights.
Listing 11–4. DirectionLight.java, a Simple Abstraction of OpenGL ES Directional Lights
package com.badlogic.androidgames.framework.gl;


import javax.microedition.khronos.opengles.GL10;


public class DirectionalLight {

    float[] ambient = { 0.2f, 0.2f, 0.2f, 1.0f };

    float[] diffuse = { 1.0f, 1.0f, 1.0f, 1.0f };

    float[] specular = { 0.0f, 0.0f, 0.0f, 1.0f };

    float[] direction = { 0, 0, -1, 0 };

    int lastLightId = 0;


    public void setAmbient(float r, float g, float b, float a) {

        ambient[0] = r;

        ambient[1] = g;

        ambient[2] = b;

        ambient[3] = a;

    }


    public void setDiffuse(float r, float g, float b, float a) {

        diffuse[0] = r;

        diffuse[1] = g;

        diffuse[2] = b;
        diffuse[3] = a;

    }


    public void setSpecular(float r, float g, float b, float a) {

        specular[0] = r;

        specular[1] = g;

        specular[2] = b;

        specular[3] = a;

    }


    public void setDirection(float x, float y, float z) {

        direction[0] = -x;

        direction[1] = -y;

        direction[2] = -z;

    }


    public void enable(GL10 gl, int lightId) {

        gl.glEnable(lightId);

        gl.glLightfv(lightId, GL10.GL_AMBIENT, ambient, 0);

        gl.glLightfv(lightId, GL10.GL_DIFFUSE, diffuse, 0);

        gl.glLightfv(lightId, GL10.GL_SPECULAR, specular, 0);

        gl.glLightfv(lightId, GL10.GL_POSITION, direction, 0);

        lastLightId = lightId;

    }


    public void disable(GL10 gl) {

        gl.glDisable(lastLightId);

    }

}
Our helper class is nearly identical to the PointLight class. The only difference is that the direction array has its fourth element set to 1. We also have a setDirection() method instead of a setPosition() method. The setDirection() method allows us to specify a direction, like (–1, 0, 0) so that the light comes from the right side. Inside the method, we just negate all of the vector components so that we transform the direction to the format that OpenGL ES expects from us.
Specifying Materials
A material is defined by a couple of attributes. As with anything in OpenGL ES, a material is a state and will be active until we change it again or the OpenGL ES context is lost. To set the currently active material attributes, we can do the following:
gl.glMaterialfv(GL10.GL_FRONT_AND_BACK, GL10.GL_AMBIENT, ambientColor, 0);

gl.glMaterialfv(GL10.GL_FRONT_AND_BACK, GL10.GL_DIFFUSE, diffuseColor, 0);

gl.glMaterialfv(GL10.GL_FRONT_AND_BACK, GL10.GL_SPECULAR, specularColor, 0);
As usual, we have an ambient, a diffuse, and a specular RGBA color to specify. This is again done via four-element float arrays, just as we did with the light source attributes. Putting this together into a little helper class is again very easy. Listing 11–5 shows you the code.
Listing 11–5. Material.java, a Simple Abstraction of OpenGL ES Materials
package com.badlogic.androidgames.framework.gl;


import javax.microedition.khronos.opengles.GL10;


public class Material {

    float[] ambient = { 0.2f, 0.2f, 0.2f, 1.0f };

    float[] diffuse = { 1.0f, 1.0f, 1.0f, 1.0f };

    float[] specular = { 0.0f, 0.0f, 0.0f, 1.0f };


    public void setAmbient(float r, float g, float b, float a) {

        ambient[0] = r;

        ambient[1] = g;

        ambient[2] = b;

        ambient[3] = a;

    }


    public void setDiffuse(float r, float g, float b, float a) {

        diffuse[0] = r;

        diffuse[1] = g;

        diffuse[2] = b;

        diffuse[3] = a;

    }


    public void setSpecular(float r, float g, float b, float a) {

        specular[0] = r;

        specular[1] = g;

        specular[2] = b;

        specular[3] = a;

    }


    public void enable(GL10 gl) {

        gl.glMaterialfv(GL10.GL_FRONT_AND_BACK, GL10.GL_AMBIENT, ambient, 0);

        gl.glMaterialfv(GL10.GL_FRONT_AND_BACK, GL10.GL_DIFFUSE, diffuse, 0);

        gl.glMaterialfv(GL10.GL_FRONT_AND_BACK, GL10.GL_SPECULAR, specular, 0);

    }

}
There are no big surprises here, either. We just store the three components of the material and provide setters and an enable() method, which sets the material.
OpenGL ES has one more trick up its sleeve when it comes to materials. Usually one wouldn't use glMaterialfv(), but would instead choose something called color material. This means that instead of the ambient and diffuse color specified via glMaterialfv(), OpenGL ES will take the vertex color of our models as the ambient and diffuse material color. To enable this nice feature, we just have to call it:
gl.glEnable(GL10.GL_COLOR_MATERIAL);
We usually use this instead of a full-blown material class, as shown earlier, because ambient and diffuse colors are often the same. Since we also don't use specular highlights in most of our demos and games, we can get away with just enabling color materials and not using any glMaterialfv() calls at all. The choice of using the Material class or color materials is totally up to you.
Specifying Normals
For lighting to work in OpenGL ES, we have to specify vertex normals for each vertex of a model. A vertex normal must be a unit length vector that points in the (average) facing direction of the surface(s) to which a vertex belongs. Figure 11–5 illustrates vertex normals for our cube.

Figure 11–5. Vertex normals for each vertex of our cube
A vertex normal is just another vertex attribute, like position or color. In order to upload vertex normals, we have to modify our Vertices3 class one more time. To tell OpenGL ES where it can find the normals for each vertex, we use the glNormalPointer() method, just like we used the glVertexPointer() or glColorPointer() methods previously. Listing 11–6 shows our final revised Vertices3 class.
Listing 11–6. Vertices3.java, the Final Version with Support for Normals
package com.badlogic.androidgames.framework.gl;


import java.nio.ByteBuffer;

import java.nio.ByteOrder;

import java.nio.IntBuffer;

import java.nio.ShortBuffer;


import javax.microedition.khronos.opengles.GL10;


import com.badlogic.androidgames.framework.impl.GLGraphics;


public class Vertices3 {

    final GLGraphics glGraphics;

    final boolean hasColor;

    final boolean hasTexCoords;

    final boolean hasNormals;

    final int vertexSize;
    final IntBuffer vertices;

    final int[] tmpBuffer;

    final ShortBuffer indices;
Among the members, the only new addition is the hasNormals Boolean, which keeps track of whether the vertices have normals or not.
    public Vertices3(GLGraphics glGraphics, int maxVertices, int maxIndices,

            boolean hasColor, boolean hasTexCoords, boolean hasNormals) {

        this.glGraphics = glGraphics;

        this.hasColor = hasColor;

        this.hasTexCoords = hasTexCoords;

        this.hasNormals = hasNormals;

        this.vertexSize = (3 + (hasColor ? 4 : 0) + (hasTexCoords ? 2 : 0) + (hasNormals

? 3    : 0)) * 4;

        this.tmpBuffer = new int[maxVertices * vertexSize / 4];


        ByteBuffer buffer = ByteBuffer.allocateDirect(maxVertices * vertexSize);

        buffer.order(ByteOrder.nativeOrder());

        vertices = buffer.asIntBuffer();


        if (maxIndices > 0) {

            buffer = ByteBuffer.allocateDirect(maxIndices * Short.SIZE / 8);

            buffer.order(ByteOrder.nativeOrder());

            indices = buffer.asShortBuffer();

        } else {

            indices = null;

        }

    }
In the constructor, we now also take a hasNormals parameter. We have to modify the calculation of the vertexSize member as well, adding three floats per vertex if normals are available.
    public void setVertices(float[] vertices, int offset, int length) {

        this.vertices.clear();

        int len = offset + length;

        for (int i = offset, j = 0; i < len; i++, j++)

            tmpBuffer[j] = Float.floatToRawIntBits(vertices[i]);

        this.vertices.put(tmpBuffer, 0, length);

        this.vertices.flip();

    }


    public void setIndices(short[] indices, int offset, int length) {

        this.indices.clear();

        this.indices.put(indices, offset, length);

        this.indices.flip();

    }
As you can see, the methods setVertices() and setIndices() stay the same.
    public void bind() {

        GL10 gl = glGraphics.getGL();


        gl.glEnableClientState(GL10.GL_VERTEX_ARRAY);

        vertices.position(0);

        gl.glVertexPointer(3, GL10.GL_FLOAT, vertexSize, vertices);
        if (hasColor) {

            gl.glEnableClientState(GL10.GL_COLOR_ARRAY);

            vertices.position(3);

            gl.glColorPointer(4, GL10.GL_FLOAT, vertexSize, vertices);

        }


        if (hasTexCoords) {

            gl.glEnableClientState(GL10.GL_TEXTURE_COORD_ARRAY);

            vertices.position(hasColor ? 7 : 3);

            gl.glTexCoordPointer(2, GL10.GL_FLOAT, vertexSize, vertices);

        }


        if (hasNormals) {

            gl.glEnableClientState(GL10.GL_NORMAL_ARRAY);

            int offset = 3;

            if (hasColor)

                offset += 4;

            if (hasTexCoords)

                offset += 2;

            vertices.position(offset);

            gl.glNormalPointer(GL10.GL_FLOAT, vertexSize, vertices);

        }

    }
In the bind() method just shown, we do the usual ByteBuffer tricks, this time also incorporating normals via the glNormalPointer() method. To calculate the offset for the normal pointer, we have to take into account whether colors and texture coordinates are given.
    public void draw(int primitiveType, int offset, int numVertices) {

        GL10 gl = glGraphics.getGL();


        if (indices != null) {

            indices.position(offset);

            gl.glDrawElements(primitiveType, numVertices,

                    GL10.GL_UNSIGNED_SHORT, indices);

        } else {

            gl.glDrawArrays(primitiveType, offset, numVertices);

        }

    }
You can see that the draw() method is again unmodified; all of the magic happens in the bind() method.
    public void unbind() {

        GL10 gl = glGraphics.getGL();

        if (hasTexCoords)

            gl.glDisableClientState(GL10.GL_TEXTURE_COORD_ARRAY);


        if (hasColor)

            gl.glDisableClientState(GL10.GL_COLOR_ARRAY);


        if (hasNormals)

            gl.glDisableClientState(GL10.GL_NORMAL_ARRAY);

    }

}
Finally, we also modify the unbind() method slightly. We disable the normal pointer if normals were used, to clean up the OpenGL ES state properly.
Using this modified Vertices3 version is as easy as before. Here's a small example:
float[] vertices = { -0.5f, -0.5f, 0, 0, 0, 1,

                      0.5f, -0.5f, 0, 0, 0, 1,

                      0.0f, 0.5f, 0, 0, 0, 1 };

Vertices3 vertices = new Vertices3(glGraphics, 3, 0, false, false, true);

vertices.setVertices(vertices);
We create a float array to hold three vertices, each having a position (the first three floats on each line) and a normal (the last three floats on each line). In this case, we have a triangle in the x/y plane, with its normals pointing in the direction of the positive z-axis. All that's left to do is to create the Vertices3 instance and set the vertices. Easy, right? Binding, drawing, and unbinding work is exactly the same as with the old version. We can, of course, also add vertex colors and texture coordinates, as done previously.
Putting it All Together
Let's put all this together. We want to draw a scene with a global ambient light, a point light, and a directional light that all illuminate a cube centered at the origin. For good measure, we'll also throw in a call to gluLookAt() to position our camera in the world. Figure 11–6 shows the setup of our world.
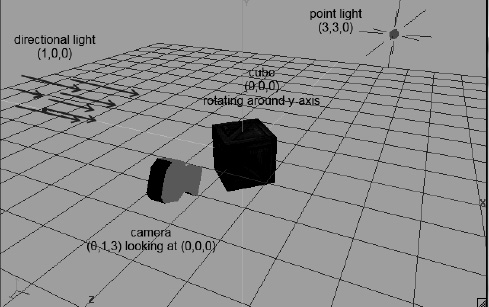
Figure 11–6. Our first lit scene
As with all of our examples, we create a class called LightTest, which extends GLGame as usual. It returns a new LightScreen instance from its getStartScreen() method. The LightScreen class extends GLScreen, and this is shown in Listing 11–7.
Listing 11–7. Excerpt from LightTest.java, Lighting with OpenGL ES
class LightScreen extends GLScreen {

    float angle;

    Vertices3 cube;

    Texture texture;

    AmbientLight ambientLight;

    PointLight pointLight;

    DirectionalLight directionalLight;

    Material material;
We start off with a couple of members. The angle member stores the current rotation of the cube around the y-axis. The Vertices3 member stores the vertices of the cube model, which we are going to define in a bit. In addition, we store an AmbientLight, PointLight, and DirectionalLight instance, as well as a Material.
    public LightScreen(Game game) {

        super(game);


        cube = createCube();

        texture = new Texture(glGame, "crate.png");

        ambientLight = new AmbientLight();

        ambientLight.setColor(0, 0.2f, 0, 1);

        pointLight = new PointLight();

        pointLight.setDiffuse(1, 0, 0, 1);

        pointLight.setPosition(3, 3, 0);

        directionalLight = new DirectionalLight();

        directionalLight.setDiffuse(0, 0, 1, 1);

        directionalLight.setDirection(1, 0, 0);

        material = new Material();

    }
Next is the constructor. Here we create the cube model's vertices and load the crate texture, just as we did in the previous chapter. We also instantiate all of the lights and the material and set their attributes. The ambient light color is a light green, and the point light is red and sits at (3,3,0) in our world. The directional light has a blue diffuse color and comes from the left. For the material, we use the default values (a little ambient, white for diffuse, and black for specular).
    @Override

    public void resume() {

        texture.reload();

    }
In the resume() method, we make sure that our texture is (re)loaded in case of a context loss.
    private Vertices3 createCube() {

        float[] vertices = { -0.5f, -0.5f, 0.5f, 0, 1, 0, 0, 1,

                              0.5f, -0.5f, 0.5f, 1, 1, 0, 0, 1,

                              0.5f, 0.5f, 0.5f, 1, 0, 0, 0, 1,

                             -0.5f, 0.5f, 0.5f, 0, 0, 0, 0, 1,


                              0.5f, -0.5f, 0.5f, 0, 1, 1, 0, 0,

                              0.5f, -0.5f, -0.5f, 1, 1, 1, 0, 0,

                              0.5f, 0.5f, -0.5f, 1, 0, 1, 0, 0,

                              0.5f, 0.5f, 0.5f, 0, 0, 1, 0, 0,
                              0.5f, -0.5f, -0.5f, 0, 1, 0, 0, -1,

                             -0.5f, -0.5f, -0.5f, 1, 1, 0, 0, -1,

                             -0.5f, 0.5f, -0.5f, 1, 0, 0, 0, -1,

                              0.5f, 0.5f, -0.5f, 0, 0, 0, 0, -1,


                             -0.5f, -0.5f, -0.5f, 0, 1, -1, 0, 0,

                             -0.5f, -0.5f, 0.5f, 1, 1, -1, 0, 0,

                             -0.5f, 0.5f, 0.5f, 1, 0, -1, 0, 0,

                             -0.5f, 0.5f, -0.5f, 0, 0, -1, 0, 0,


                             -0.5f, 0.5f, 0.5f, 0, 1, 0, 1, 0,

                              0.5f, 0.5f, 0.5f, 1, 1, 0, 1, 0,

                              0.5f, 0.5f, -0.5f, 1, 0, 0, 1, 0,

                             -0.5f, 0.5f, -0.5f, 0, 0, 0, 1, 0,


                             -0.5f, -0.5f, -0.5f, 0, 1, 0, -1, 0,

                              0.5f, -0.5f, -0.5f, 1, 1, 0, -1, 0,

                              0.5f, -0.5f, 0.5f, 1, 0, 0, -1, 0,

                             -0.5f, -0.5f, 0.5f, 0, 0, 0, -1, 0 };

        short[] indices = { 0, 1, 2, 2, 3, 0,

                            4, 5, 6, 6, 7, 4,

                            8, 9, 10, 10, 11, 8,

                            12, 13, 14, 14, 15, 12,

                            16, 17, 18, 18, 19, 16,

                            20, 21, 22, 22, 23, 20,

                            24, 25, 26, 26, 27, 24 };

        Vertices3 cube = new Vertices3(glGraphics, vertices.length / 8, indices.length,

false, true, true);

        cube.setVertices(vertices, 0, vertices.length);

        cube.setIndices(indices, 0, indices.length);

        return cube;

    }
The createCube() method is mostly the same as the one we used in previous examples. This time, however, we add normals to each vertex, as shown in Figure 11–4. Apart from that, nothing has really changed.
    @Override

    public void update(float deltaTime) {

        angle += deltaTime * 20;

    }
In the update() method, we simply increase the rotation angle of the cube.
    @Override

    public void present(float deltaTime) {

        GL10 gl = glGraphics.getGL();

        gl.glClearColor(0.2f, 0.2f, 0.2f, 1.0f);

        gl.glClear(GL10.GL_COLOR_BUFFER_BIT | GL10.GL_DEPTH_BUFFER_BIT);

        gl.glEnable(GL10.GL_DEPTH_TEST);

        gl.glViewport(0, 0, glGraphics.getWidth(), glGraphics.getHeight());


        gl.glMatrixMode(GL10.GL_PROJECTION);

        gl.glLoadIdentity();

        GLU.gluPerspective(gl, 67, glGraphics.getWidth()
                / (float) glGraphics.getHeight(), 0.1f, 10f);

        gl.glMatrixMode(GL10.GL_MODELVIEW);

        gl.glLoadIdentity();

        GLU.gluLookAt(gl, 0, 1, 3, 0, 0, 0, 0, 1, 0);


        gl.glEnable(GL10.GL_LIGHTING);


        ambientLight.enable(gl);

        pointLight.enable(gl, GL10.GL_LIGHT0);

        directionalLight.enable(gl, GL10.GL_LIGHT1);

        material.enable(gl);


        gl.glEnable(GL10.GL_TEXTURE_2D);

        texture.bind();


        gl.glRotatef(angle, 0, 1, 0);

        cube.bind();

        cube.draw(GL10.GL_TRIANGLES, 0, 6 * 2 * 3);

        cube.unbind();


        pointLight.disable(gl);

        directionalLight.disable(gl);


        gl.glDisable(GL10.GL_TEXTURE_2D);

        gl.glDisable(GL10.GL_DEPTH_TEST);

    }
Here it gets interesting. The first couple of lines are our boilerplate code for clearing the color and depth buffer—enabling depth testing and setting the viewport.
Next, we set the projection matrix to a perspective projection matrix via gluPerspective() and also use gluLookAt() for the model-view matrix, so that we have a camera setup as shown in Figure 11–6.
Next we enable lighting itself. At this point, no lights have yet been defined, so we do that in the next couple of lines by calling the enable() methods of the lights as well as the material.
As usual, we also enable texturing and bind our crate texture. Finally, we call glRotatef() to rotate our cube and then render its vertices with well-placed calls to the Vertices3 instance.
To round off the method, we disable the point and directional lights (remember, the ambient light is a global state) as well as texturing and depth testing. And that's all there is to lighting in OpenGL ES!
    @Override

    public void pause() {

    }


    @Override

    public void dispose() {

    }

}
The rest of the class is just empty; we don't have to do anything special in case of a pause.
Figure 11–7 shows you the output of our example.
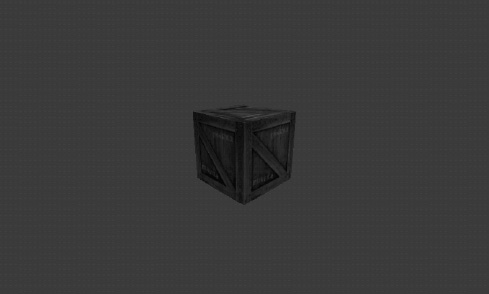
Figure 11–7. Our scene from Figure 11–6, rendered with OpenGL ES
Some Notes on Lighting in OpenGL ES
While lighting can add some nice eye candy, it has its limits and pitfalls. Here are a few things you should take to heart.
- Lighting is expensive, especially on low-end devices. Use it with care. The more light sources you enable, the more computational power is required to render the scene.
- When specifying the position/direction of point/directional lights, you must do it after you have loaded the camera matrices and before you multiply the model-view matrix with any matrices to move and rotate objects around! This is crucial. If you don't follow this method, you will have some inexplicable lighting artifacts.
- When you use
glScalef()to change the size of a model, its normals will also be scaled. This is bad because OpenGL ES expects unit-length normals. To work around this issue you can use the commandglEnable(GL10.GL_NORMALIZE)or, in some circumstances,glEnable(GL10.GL_RESCALE_NORMAL). We'd suggest sticking to the former, as the latter has some restrictions and caveats. The problem is that normalizing or rescaling normals is computationally heavy. For optimum performance, it's best not to scale your lit objects.