Chapter 20: Understanding Drives, Folders, and Files
IN THIS CHAPTER
Disk drives, disks, and memory cards
Navigating through folders with File Explorer
Clicking, viewing, and arranging icons your way
Stop losing saved files
Beginners and casual users are often thrown by terms like drive, folder, file, icon, kilobyte, megabyte, gigabyte, terabyte, and so forth. Virtually every resource you turn to assumes that you already know what these things mean. Nobody ever bothers to explain them. That's because these terms and concepts have remained unchanged for the past 25 years or so.
Of course, just because those terms have been around for a long time doesn't mean everyone understands them. In fact, for every person who knows what those terms mean, you can be sure many thousands don't. So in this chapter, we're going to break from tradition and explain those terms.
Understanding Disks and Drives
Computers work with information. That information has to be stored on some type of medium. These days, that medium is most likely to be in the form of a disk or a card. You can also store information on tape, but tape is used primarily for backup.
Your computer's hard disk
All the programs and information that are in your computer are actually stored on a disk. In most cases, you will never see that disk because it's inside a sealed case. That disk goes by many names including hard disk, hard drive, and fixed disk. You may even hear it referred to as a solid-state drive.
Essentially, all the data you work with, with the exception of information you browse to on the Internet, is stored on one or more hard disks in your computer. This includes Windows itself, your programs, and all your documents, photos, videos, music, and other data.
You can also add extra hard drives to your system, either internally or externally. Each shows up as an icon in your Computer folder, as discussed later in this chapter.
Your main hard disk, drive C:, is called a non-removable disk because you can't just pop it out of the computer by pressing some button. Other types of disks are called removable media because you can pop them in and out of the computer quite easily. Flash drives, CDs, and DVDs are examples of removable media.
Hard drives come in two primary types for the PC. The standard hard drive comprises multiple platters of disks that rotate around a spindle. Data is written and read on the platters by way of a magnetic head. These types of drives are available in large sizes and are relatively cheap when compared to the second type of drives, solid-state drives. Solid-state drives use integrated circuits to create memory to store data. You can find solid-state drives on many of the newer slim and lightweight laptops and netbooks. Solid-state drives are not as vulnerable to mechanical or physical errors (such as physical damage to the drive) but are more expensive than standard hard drives. Solid-state drives also provide greater speeds than traditional hard drives, providing users with improved access speeds to data, files, and other disk-related functions.
Removable media
Removable media are disks and devices you can pop into and out of the computer at will. Most removable media require a specific disk drive, or drive for short. The drive is a device into which you can place the disk. The drive then spins the disk. A drive head can then read data from, or write data to, the disk as it is spinning. The following sections are about removable media.
CDs and DVDs
CDs and DVDs are very popular storage media. The record companies use CDs to sell albums. The movie industry sells movies on DVDs. The computer industry uses both CDs and DVDs to distribute software. Figure 20.1 shows a DVD, but it could just as easily be a CD. The two look exactly alike.
When putting a CD or DVD disk into its drive, push the eject button to open the drive or to eject the disk from the system. Make sure to insert the disk in the tray or disk slot with the label facing up. For systems with disk trays, you then need to push the eject button on the drive to close the drive.
Figure 20.1
CD or DVD.

To listen to music on a CD, you usually just stick the CD into your CD drive, wait a few seconds, and the CD starts playing in your default music program, usually Windows Media Player. The same is true for most movie DVDs, but only if your computer has the appropriate hardware and software.
For more information on listening to, copying from, or creating your own music CDs, turn to Chapter 18. For more on watching DVD movies, turn to Chapter 19.
The most common mistake people make with CDs and DVDs is assuming they're the same. After all, they look the same. But they're not the same at all. Nor do you treat them like other kinds of disks. That's why we've dedicated an entire chapter (Chapter 19) just to CDs and DVDs.
Portable devices
Technically, portable devices aren't disks or disk drives. But some can store files. For example, digital cameras store pictures. Portable MP3 players store songs. When you connect such a device to your computer, Windows 8.1 provides access to the device as if it's a disk drive. The contents of the device, such as photos or videos, show up in your Computer folder.
You can copy things to and from portable devices using many different techniques. For example, you can use Windows Photo Gallery (see Chapter 17) to get pictures from a digital camera. Windows Photo Gallery is included with the Live Essentials programs, both of which are available for free from Microsoft. Use Windows Media Player to copy songs to and from a portable MP3 player. You can also use more general techniques, described in Chapter 21, to copy files to and from some portable devices.
Flash cards and memory sticks
Flash cards (also called memory cards and memory sticks) are a solid-state medium, which just means there's no spinning disk or drive head involved in getting information to and from the card. Memory cards come in many shapes and sizes. Figure 20.2 shows some examples.
Most digital cameras and portable MP3 players use memory cards to store songs and pictures. When you connect the device to the computer, you get access to that memory card so you can copy files from it or to it.
Figure 20.2
Memory cards.

If your computer has memory card slots, you also have the option of putting the card right into a slot. Each slot into which you can insert a card shows up as an icon in your Computer folder. When you insert a card into a slot, you can copy files from it (or to it) using techniques described in Chapter 22.
Flash drives
A flash drive (or thumb drive) isn't a disk at all. It's more like a little gizmo you hang from a keychain, although you can also hide them in pens and pocket knives. Furthermore, you don't need any special kind of drive for this storage medium because it is a drive. You just plug it into a USB port on your computer. Figure 20.3 shows examples of flash drives.
Once the flash drive is plugged in, it looks and acts just like a disk drive to Windows. You can move or copy files to it and from it using any technique described in Chapter 21. Flash drives come in all shapes and sizes. To see examples, go to any online retailer that sells computer accessories (www.newegg.com, www.cdw.com, www.amazon.com, or wherever) and search for “thumb drive” or “flash drive.”
Figure 20.3
Flash drives.

Viewing your computer's drives
Every disk drive in your computer is represented by an icon in your Computer folder. To open that folder, use whichever of the following techniques works for you:
- Click the Desktop icon on the Windows 8.1 interface and click the File Explorer button. On the left pane choose Computer.
- Click the File Explorer icon on the Windows 8.1 interface and click Computer on the left pane of File Explorer.
- Show the Charms Bar and choose Search. Type computer and choose the Computer option that displays.
- From the Windows desktop, click File Explorer and choose Computer from the left pane of File Explorer.
- Press Windows+X, click File Explorer, and choose This PC from the left pane of File Explorer.
Exactly what you see depends on what's available in your PC. Figure 20.4 shows an example of a PC with a single hard drive.
Figure 20.4
File Explorer open over a single drive.

Don't expect your Computer folder to look like the one in Figure 20.4. All computers are different and have different drives, slots, and portable devices that can connect. But you should see at least two categories of drives.
The first category is Hard Disk Drives. Your computer will have at least one of these traditionally named C:. That's the drive where everything in your computer is stored. One hard drive is sufficient for most users.
Under Devices with Removable Storage, you'll see icons for other media. For computers that are older than five years old, you may have a floppy disk drive (A:). You probably have a CD or DVD drive. Its letter could be D: or something else. In the figure, the DVD drive is D:. The computer in that picture also has a removable disk connected to it (E:).
Another category you might see, Portable Devices, shows icons only for devices that are currently connected to your computer. If you don't have a camera or similar device connected when you open your Computer folder, you might not see a Portable Devices category. In the figure, a digital camera is connected to the computer and turned on, so it shows up under Portable Devices.
Finally, your Computer folder might also list other computers in your homegroup or local area network. This category is called Network Location. These devices are computers and shared drives that appear on networked computers.
You can leave your Computer folder open as you insert and remove disks. The names of icons that represent removable drives change to reflect the content of the disk that's currently in the drive. When you remove the disk, the name reverts to the generic name for the drive. That's a good thing to know if you're new to all this and don't know what the icons in your own computer represent on your system.
Sizes and capacities
Every disk is like a container in which you store things. There's a limit to how much data you can put on a disk. This is no different from any other container. For example, you can store water in a drinking glass, bucket, bathtub, or swimming pool. They're all containers for water. They just vary greatly in their capacity (how much water each can hold).
If you liken different computer media to water containers, a floppy disk or Zip disk is like a drinking glass. A CD is like a bucket, a DVD like a bathtub, and your hard disk like a swimming pool. Memory cards and flash drives vary in capacity, so it's tough to liken any one to a water container, but they're basically in the bucket-to-bathtub range.
With water, you measure things in ounces, liters, gallons, and such. In the computer world, the basic unit of measure is the byte. One byte equals roughly the amount of space required to store one character, like the letter a. For example, the word cat requires 3 bytes.
Most disks can hold thousands, millions, billions, even trillions of bytes. Most often the capacities are rounded to the nearest thousand, million, or billion bytes. That's because disk storage is cheap and plentiful and there's no point in fussing over a few thousand bytes here or there. Also, computer folks don't even use the words thousand, million, or billion. They have shorter terms as follows:
- Kilo: Thousand
- Mega: Million
- Giga: Billion
- Tera: Trillion
That's all you really need to know about those terms. For those who like their numbers more exact, Table 20.1 shows the facts in detail.

Let's return to our analogy of water containers. Here are approximate capacities of common disk types:
- Floppy: 1.44MB
- CD: 650–700MB
- DVD: 4.7GB
- Flash drive: 4GB or more
- Hard disk: 230GB or more
Note that hard disks are available in many different capacities from about 230GB to 2TB or more. (Some computer systems still come with smaller hard drives, as little as 120GB.) Zip disks, memory cards, flash drives, and portable devices also vary greatly in capacity. The hard disk reigns supreme in its ability to store large amounts of information.
How much room is there?
Everything you store on a disk takes up some space. So, once you start putting things on a disk, you have some used space and some free space. It's easy to see how much space you have on a disk.
When you open your Computer folder, each hard disk has a little meter beside it (in Tile view) that shows how much space is used (blue) and how much free space is still available for storing data (white). For example, in Figure 20.4, Removable Disk E: has 790MB of free space left. Its total capacity is 995MB (or about 1GB). Disk F:, on the other hand, has 2.28GB free of a total of 3.80GB.
To see how much space is left on a flash drive, memory card, or other device, first insert the disk or card. Right-click the icon for that drive and choose Properties. You see a dialog box like the example shown in Figure 20.5. There you can see how much space is used, how much is still available, and the total capacity of the disk or card.
If you see 0 bytes capacity, that means you right-clicked the icon for a drive or slot that's empty. An empty drive has no capacity because there's no disk in it. The drive or slot doesn't have a capacity. The disk or card in it has a capacity. No disk or card in a drive means no capacity (0 bytes).
If you check the capacity of a CD-ROM or DVD-ROM that's already been burned, you might see 0 bytes free, even if the used space doesn't match the total capacity of that drive. That's because optical media (CDs and DVDs) don't work quite like other types.
If you right-click the icon for a portable device, you might not see used space, free space, or capacity. Again, that's just because the properties sheet for a portable device tends to show information about the device as a whole, not just its storage. It's no big deal, however, because typically you copy files from portable devices, not to them. Also, you tend to use programs such as Photo Gallery and Windows Media Player to work with portable devices, not your Computer folder.
Figure 20.5
Used space, free space, and capacity.

Viewing disk contents
Disks exist for one reason only — to store information. That information is stored in files, often organized into folders. To view the contents of a disk or memory card, insert it into its drive or slot and then open (double-click) its icon in your Computer folder. Make sure you insert the disk or card first because it makes no sense to open the icon for an empty drive.
For example, if there is no DVD in your DVD drive, it makes no sense to open that icon. There has to be a disk in the drive whose contents you want to view.
Like your hard disk, external disks store data in folders and files. Each folder and file on the disk is represented by an icon. Double-click a folder's icon to view its contents. Double-click a file's icon to open the file and see its contents. Use the Back button to back out of a folder to wherever you were before.
Formatting disks
Just about everyone has heard about formatting a disk. But not many people really understand what that's about. So, let's start with some basic rules of thumb:
- Not all disks need to be formatted. Only blank, unformatted disks and a few other types need to be formatted. But only once, not each time you use the disk.
- Never presume that you have to format a disk. If a disk needs to be formatted, you'll see a message telling you so and an option to format it right on the spot. If you don't see such a message, don't format the disk or even think about formatting the disk.
- Formatting a disk permanently erases the contents of that disk. Never format a disk unless you're 100 percent certain you'll never need anything on that disk again for the rest of your life.
Don't even think about formatting your computer's primary hard disk. You won't be able to anyway. But formatting your hard disk would erase Windows 8.1, all your installed programs, contacts, saved e-mails, and saved files — everything. You don't want to do that unless you really know what you're doing and you're certain that you can easily get back everything you lost in the process.
About Folders
Information stored on a disk is organized into files. For example, a photograph is stored as a file. A song is stored as a file. The files may be organized into folders. Folders on a disk play exactly the same role as folders in a filing cabinet — to organize things so they're easier to find when you need them.
If you're confused as to why folders exist at all, look at it this way: Suppose you went to your filing cabinet (the real one with paper in it) and dumped the contents of every single folder onto your desk. You end up with a big messy pile of paper on your desk. Finding anything in that pile would not be easy. That's why you put things into folders in filing cabinets in the first place — to make it easy to find things when you need them.
Disks can store millions of files. If every time you opened a disk's icon you were faced with millions of filenames, you'd have the same basic problem as the mountain of papers on your desk. You'd spend all your time looking through icons and filenames rather than getting stuff done.
In short, folders on disks exist for exactly the same reason manila file folders in filing cabinets exist — to organize information. When you're looking at a disk's contents, it's fairly easy to tell which icons represent folders:
- The icon for a folder usually looks like a manila file folder.
- Folders are usually listed first.
Figure 20.6 shows some examples of icons that represent folders.
Figure 20.6
Icons that represent folders.

Viewing the contents of a folder
To open a folder and see what's inside, you just double-click the folder's icon. The name of the folder whose contents you're currently viewing always appears at the end of the file path near the top of the window. The contents of the folder appear in the main pane at the center of the window. Figure 20.7 shows an example where we're viewing the contents of a library named Music.
It might seem odd that the folder named Music contains icons for still more folders (in the case of Figure 20.7, the Music folder contains folders named Sample Music and Syriana). But that's the way it often works. Any folder can contain still more folders, files, or both. That's different from the way folders in a filing cabinet work, so let's take a look at that.
Figure 20.7
Viewing the contents of a folder.

Folders within folders (subfolders)
In a filing cabinet, a folder usually contains documents, not other folders. But any computer folder can contain still more folders. We call the folders within a folder subfolders, but they're still just folders. For example, Figure 20.7 shows the contents of a folder named Music. All the folder icons that appear in the main pane are subfolders of that Music folder (but they're still just folders).
Subfolders allow you to organize information hierarchically so things are easier to find when you need them. For example, let's say you copy thousands of songs from your audio CDs into your Music folder with Windows Media Player or a music app. If you opened your Music folder and saw an icon for every single song, that could be a pain if you were looking for a specific song. You'd have to read through lots of filenames until you found the one you wanted.
To better organize things, Media Player organizes your songs by artist and album. So when you open your Music folder, you see a folder icon for each artist. When you open an artist's folder, you see an icon for each album by that artist. And when you open the folder for an album, you see all the songs by that artist.
So, once again, the important thing to remember about folders and subfolders is that they're really just a means of organizing files into groups — the same as folders in a filing cabinet. Of course, you need to know how to navigate through folders for any of this to be useful, because all your files are stored in folders.
Parent folders
The folder in which a subfolder is contained is called the parent to that folder. For example, if you open File Explorer and then click the Documents folder, the main document folder for your user account opens. That folder you opened is the parent to all the subfolders you see in the main pane.
About Files
Every file has a filename and an icon. A file can be just about anything — a photograph, a song, a video clip, a typed report, a spreadsheet, a contact, whatever. In the preceding section, we likened a computer folder to a manila file folder in a filing cabinet. If we use the same analogy here, a file is roughly equivalent to one thing you'd put inside a manila file folder. In fact, that's the whole idea. You organize your computer files into folders just as you organize your paper files into manila file folders.
In the preceding section, you also saw how the icon that represents a folder often looks like a manila file folder. Icons that represent files don't have a manila file folder in their icon because that would just confuse things. Icons that represent files tend to look more like little dog-eared sheets of paper. On top of that sheet of paper, you might see the logo of the program that opens or plays the file. More on that topic in a moment.
Figure 20.8 shows examples of some icons that represent files. But you have to bear in mind that there are thousands of different kinds of files and thousands of different programs. So, don't expect to find those exact examples anywhere on your system. The key is that the icons for files don't look like manila file folders.
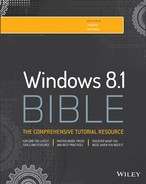
Pictures and videos are also files. But their icons don't always sport the dog-eared sheet of paper look. Instead, their icons usually look like the actual picture that's in the file, or a frame from the video in the file. Windows 8.1 shows them that way so that you don't have to open the file to see what picture it contains (see Figure 20.9).
Figure 20.8
Sample icons that represent files.

Figure 20.9
Sample icons for pictures.
Opening and closing files
To see, change, or print what's in a file, you open that file. You do that in the same way that you open a folder or the icon that represents a disk drive: by double-clicking the file's icon.
Document files never open by themselves. A file has to open within some program. There are thousands of different kinds of files and thousands of different programs so we can't tell you offhand what program that will be. But if you can open the file at all, it will open and appear within a program.
Showing/hiding filename extensions
Windows uses a file's extension to determine what program to use to open a file. The extension is a short abbreviation, preceded by a period, at the end of the filename, as in the example shown in Figure 20.10.
If you want to see the filename extension for a single file, right-click the file's icon and choose Properties. In the Properties dialog box that opens, you'll see the file's type (in words) followed by the extension in parentheses. For example, if you right-click the icon for a video file, you might see something like the following (the .wmv in parentheses is the filename extension that's hidden in Explorer's main contents pane):
Type of file: WMV File (.wmv)
To see filename extensions for all files in Explorer, select the View tab in File Explorer and choose Options. In the dialog box that opens, select the View tab and clear the check mark next to Hide Extensions for Known File Types. Then click OK.
If you opt to make filename extensions visible in Explorer, you have to be careful not to change the extension when renaming a file. Changing a file's extension doesn't change the file's type. It just assigns the wrong type to the file, which could make it impossible to open the file. You'll need to rename the file back to its original extension before you can open the file again.
Figure 20.10
Filename and extension.

Choosing a program or app to open a file
The program or app that opens automatically when you open a file icon is called the default program for that file type. But you're not stuck with that. If you have two or more programs capable of opening a file type, you can right-click the file's icon, choose Open With, and then click the name of the program you want to open the file with (see Figure 20.11). The file will open in the specified program this one time.
Figure 20.11
Choosing Open With.

Changing the default program or app
If you want to permanently change the default program or app that opens when you open a particular type of file, right-click the file's icon and choose Open With as just described. But don't click a program name. Instead, click Choose Default Program. A list appears like the one shown in Figure 20.12. This shows programs and apps that Windows 8.1 recognizes that will support the file type you want to open. The programs and apps that appear in your dialog box depend on the type of file you right-clicked and the programs or apps installed on your computer.
Figure 20.12
The Open With list.

You can click any program or app name to make it the default for opening files of the same type as the one you right-clicked. If the program or app you want to use doesn't show in the Open With list, you can use the More Options link at the bottom of the list to see additional programs Windows 8.1 finds on your computer.
Windows 8.1 also includes the following links to help you find a program or app to open your selected file:
- Look for an App in the Store connects you to the Windows Store online where you can search for an app that supports your selected file type.
- Look for an App on This PC displays the Open With dialog box, which you can use to navigate your computer to locate a program that will open the selected file type.
When choosing a program or app to open the file, make sure you choose a program that can open that file type. Otherwise, you'll end up with an error message or gobbledygook when the file tries to open in that program.
To make the change permanent, select (check) the Use This App for All <file type> Files check box. By default, Windows 8.1 selects this option.
Upon selection of the program, Windows opens the program or app you specified with the selected file open. If you chose a program or app that cannot open that file type, you'll end up with an error message or a bunch of meaningless gobbledygook. If that happens, you need to get back to the Open With list and choose a recommended program or app, or any program or app that you know for sure can handle that type of file.
Windows cannot open this file
It's possible that Windows won't be able to open a file at all. For example, suppose someone sends you an Adobe Photoshop file (.psd) attached to an e-mail message. If you don't have Adobe Photoshop installed on your computer, Windows won't be able to open the file. Instead, it will display the Open With list, as in the example in Figure 20.13.
Figure 20.13
When Windows can't open a file.

If you're new to all of this, there's no easy way to guess what program might work to open the file. As we said, there are thousands of file types and thousands of programs out there. Your best bet might be to ask the person who sent you the file what program you need to open the file. Or ask the sender to send you the file in some other format that you can open.
File paths
Every file on your system is in a specific location defined as the path to the file. The path starts with the drive letter (for example, C: for your primary hard disk), then the folder in which the file is stored, and then all the higher-level folders leading up to that folder. Each part of the path is separated by a backslash ().
For example, let's say you're in your user account (Tech_Sup) and you save a file named MyMovie.wmv to your Videos folder. The path to that folder would be:
C:UsersTech_SupVideosMyMovie.wmv
Figure 20.14 shows why this is so. Your hard disk has, at its highest level, at least three folders. One is named Program Files, and it contains subfolders and files for all the programs that are installed on your system. A second folder named Users contains a subfolder for each user account. A third folder, named Windows, contains all the folders and files that make up the Windows 8.1 operating system.
Figure 20.14
C:UsersAkivaVideos.

Each user account folder in the Users folder contains the built-in folders people can use to store their documents. These include the Music, Pictures, and Videos folders, among others.
The path C:UsersTech_SupVideosMyMovie.wmv tells Windows exactly how to get to the file. It has to start by going to the hard drive (C:), drilling down through the folders named Users and Tech_Sup until it gets to the folder named Videos. There it will find the file named MyMovie.wmv. Figure 20.14 shows the basic idea, using a few sample folders from the folder hierarchy.
It isn't often that you need to know or type the path to a file. We mention it only because you'll see paths like that from time to time. The program you'll use to navigate through folders, File Explorer, makes it very easy for you to get around without worrying about paths.
Using File Explorer
Knowing about drives, folders, and files is certainly important. In fact, you really can't do much with a computer until you've mastered those concepts. To review:
- All computer information is stored on some medium, usually disks.
- All the stuff that's in your computer right now is stored on a hard disk that you never see or remove from the computer.
- Information is stored in files.
- Files are organized into folders just like files in a filing cabinet are organized into folders.
Once you understand the concepts, the next step is to learn how to use the tool that gives you access to drives, folders, and files. That tool is a program named File Explorer (or just Explorer for short).
File Explorer is the main program for getting around your computer to access all the disks, folders, and files available to you. Notice that we didn't say Internet Explorer. Despite the name similarity, the two programs serve two entirely different purposes:
- File Explorer (or Explorer): Enables you to explore and access stuff that's inside your computer or on your local area network (LAN)
- Internet Explorer: Enables you to explore and access stuff that's outside your computer on the Internet
That's a huge difference. For one thing, you have to be online (connected to the Internet) to use Internet Explorer to access resources currently online because the Internet exists outside your personal computer. You don't have to be online to use File Explorer because all the stuff you're exploring is inside your computer.
There's also a big size difference. The Internet consists of billions of computers all over the world. A lifetime isn't nearly enough time to explore the entire Internet. Your own computer is just one computer. It doesn't take anywhere near a lifetime to explore your own computer! But you do have to invest some time in learning how to use Explorer if you want to be able to use everything your computer has to offer.
Opening File Explorer
You start most programs on your computer by going through the Windows 8.1 interface or from pinned items on the taskbar of the desktop. You can start File Explorer that way if you want to. Show the Charms Bar, choose Start, navigate to and click File Explorer. You also can show the desktop and click the File Explorer icon on the Windows taskbar. Finally, you can press Windows+X and click File Explorer.
File Explorer components
File Explorer has many optional panes and other gizmos. Figure 20.15 points out the names of the main ones. Some may not be visible when you first open a folder, but they're easy to show or hide, so don't worry about that.
Figure 20.15
Explorer panes and tools showing tooltip.

Here's a quick overview of the main components:
- Quick Access toolbar: Provides commonly used tools while you're in File Explorer. For example, the Properties button and New Folder buttons are available on the Quick Access toolbar by default. You can add other tools, including Undo, Redo, Delete, and Rename by clicking the down arrow to the right of the New Folder button.
- Title bar: Use this to move the whole window. Use the Minimize, Maximize, and Close buttons to size the window as you would in any other program.
- Ribbon bar: Displays the File Explorer ribbon bar. The ribbon bar includes tabs that provide quick access to toolbar options you can perform with files and folders. Buttons in the toolbar enable you to do things with files and folders in the contents pane. Ribbon bars change depending on the types of icons you select in the folder.
- Address bar: Displays a breadcrumb trail (also called an eyebrow menu) of drives and folders leading up to the folder you're viewing. The name of the folder you're currently viewing appears at the end.
- Search box: Enables you to search by name for an item within the current folder.
- Search pane: Enables you to conduct a more thorough and exact search than the Search box. This topic is covered in Chapter 22.
- Navigation pane: Makes it easy to get to any drive or folder in your computer.
- Contents: The contents of the folder you're currently viewing.
- Preview pane: When you select an icon, this pane provides a sneak peek into the file's contents, when possible. Otherwise it just shows an enlarged version of the icon.
- Details pane: Shows some detailed information about the icon(s) currently selected in the contents pane.
Show or hide ribbon bar
New to Windows 8.1 is the ribbon bar on File Explorer. To show or hide the ribbon bar, click the Minimize the Ribbon or Expand the Ribbon arrow on the top right of the File Explorer window. It appears directly below the Close button (X) and to the left of the Help question mark (?). To quickly show or hide the ribbon bar, press Ctrl+F1 on the keyboard. Figure 20.16 shows a tooltip displayed when you hover over the ribbon bar on/off arrow.
Figure 20.16
Show or hide the ribbon bar.

Navigating with the Address bar
No matter how you open File Explorer, it's easy to get just about anywhere from the Address bar. Don't assume that only the names in the Address bar matter. You can click the left or right triangle symbols (if any) or any triangle between names to see nearby places to which you can navigate just by clicking the item's name.
If you see the name of the folder you want to open, click that name. Otherwise, click the triangle to the left of any name to see its subfolders, as in Figure 20.17, and then click the folder you want to open. Or click the up arrow at the left side of the trail to get to higher-level places. Or click the Previous Locations button (the down triangle at the right side of the Address bar) or the Recent Pages button (the triangle to the right of the Forward button) to return to any recently visited folder.
Figure 20.17
Show or hide Explorer components.

You can also type the name of the folder that you want to navigate to right into the Address bar. But that works only with certain built-in folders. First, click the icon that appears at the left side of the Address bar. Then, type the first few letters of the place you want to go. A drop-down menu will display matching locations as you type. When you see the name of the folder to which you want to navigate, click that name. Or type the entire name and press Enter.
Of course, you can also use the Back and Forward buttons to the left of the Address bar to navigate. At first, both buttons may be disabled (dimmed) because there's no place to go back or forward to. But when you go from one folder to another, the Back button is enabled, so you can click that to return to the place you just left. After you click the Back button, the Forward button is enabled. Click the Forward button to return to the folder you just backed out of.
Navigating with the Navigation pane
You can get anywhere from the Address bar. But at times, you may find it more convenient to use the Navigation pane. When open, the Navigation pane offers two ways to get around:
- You can use the Favorites group at the top of the pane, which shows links for commonly used folders, or any locations you want. Click any link to open it in the current window.
- You can right-click a link and choose Open In New Window to open it in a new window. This is handy when you want to move or copy files to the new location by dragging.
In the middle of the Navigation pane is the Libraries group, which gives you quick access to your user libraries. By default, these include Documents, Music, Pictures, and Video.
Below this group is the Homegroup group, which shows shared files, printers, devices, and other resources available on your home network. If you don't have any homegroups established, see Chapter 39 for more information on setting up home networks.
Below this group in the Navigation pane, you'll find the Computer group, which includes items for your local and removable disks. You can expand each of these to access the folders they contain. Under the Computer group is the Network group, which gives you quick access to devices and shared resources on your local network.
To widen or narrow the Navigation pane, get the tip of the mouse pointer on its right border so the mouse pointer turns to a two-headed arrow. Then drag left or right.
You can expand and collapse libraries, drives, and folders in the Folders list to see more, or fewer, details. Click the white triangle next to any name to expand. Click the black triangle next to any name to collapse. Figure 20.18 shows where all these things are located.
Figure 20.18
Working with the Navigation pane.

When you click a folder name or drive in the Navigation pane, it opens in the current window. If you want to open the folder or drive in a separate window, right-click and choose Open in New Window.
Adding places to Favorites
The Favorites group can provide easy one-click access to any drive or folder on your system. Initially, you'll see a few shortcuts in it. But you can replace those with any you like. Just drag the icon for any item to which you want easy access into the Favorites group. Figure 20.19 shows an example where we're in the process of dragging the Contacts icon from the user account folder into the Favorite Links pane. Release the mouse button to create the link.
Figure 20.19
Create your own favorite link.

Managing favorites
Managing favorites is easy, too. Here are the basics of managing shortcuts in your Favorites:
- To rename a shortcut, right-click the shortcut, choose Rename, type the new name or edit the existing name, and press Enter.
- To alphabetize shortcuts, right-click Favorites and choose Sort by Name.
- To remove a shortcut you don't use, right-click it and choose Remove. Then choose Yes when asked for confirmation.
Navigating from the contents pane
The main contents pane at the center of Explorer's program window shows you the contents of whatever folder you're viewing at the moment. If the folder you've opened contains subfolders, you can open a subfolder by double-clicking its icon, or by single-clicking, if you've configured Folder Options for single clicking. After you've opened a subfolder, you can click the Back button to return to the parent folder.
If you want to open a subfolder in a separate window, right-click the folder's icon and choose Open in New Window. You can size and position the two open folder windows so you can see the contents of both. Then you can move files from one folder to the other just by dragging their icons.
Regardless of how you navigate, you can get to any folder on any drive on your system. Some people want to use buttons in the Address bar. Others want to use the more traditional Folders list in the Navigation pane. It doesn't matter which you use or how you get to the folder you need. All that matters is that you're able to get there when you need to go.
Navigating to a disk drive
You can open any disk drive right from the Navigation pane. If you see a white triangle next to This PC in the Folders list, click the triangle to see all your available drives. Click the name of the drive you want to open. Or right-click the drive and choose Open in New Window to open it in a new window. If the drive name shows a white triangle in the Folders list, you can click that triangle to see folders and files on the disk in the drive without opening the drive.
Choosing an icon view
Once you've opened a folder, you can view its contents in several different ways. As usual, there's no right or wrong way, or good or bad way. There are just different ways, and you should use whichever one is most convenient at the moment. To choose how you want to view icons, select the View tab on the File Explorer ribbon bar to see the Layout options shown in Figure 20.20.
Figure 20.20
Choosing a view.

To choose how you want to view icons, hover over any option in the Layout box on the View tab. As you move from one view to the next, such as Extra Large Icons to Details, views of your folders and files change to match the layout.
Most of the options show each item as an icon and filename. The Tiles view shows the type and size of each file. For folders, it just shows File Folder.
Using columns in the Details view
The Details view of a folder shows icons for folders and files in a tabular view like the example in Figure 20.21. You can use this view to show a lot of information about each folder and file. The column headings you see across the top of the display (Name, Date Modified, Type, and so forth) don't tell the whole story. You can choose columns to view as you see fit. Just right-click any column heading to reveal more column names, as in Figure 20.22.
Figure 20.21
Showing drive contents in Details view.

Figure 20.22
Right-click any column heading.

To add a column to the display, click its name on the menu. To remove a column, click its name on the menu to clear its check mark. To see other columns to display, click More at the bottom of the menu. Then select (check) the columns you want to see. Clear the check marks of columns you don't want to see. Then click OK.
If you choose more columns than can fit within the window, you'll see a horizontal scroll bar at the bottom of the contents pane. Use that to scroll left and right through the columns you've selected.
To size a column, put the tip of the mouse pointer on the right border of the column heading so the mouse pointer turns into a two-headed arrow. Then drag left or right. To move a column left or right, put the tip of the mouse pointer right on the column name, and then drag left or right.
Sorting icons
The View tab lets you choose different ways of viewing icons. The column headings under the toolbar enable you to choose different ways of arranging the icons in a folder. Those column headings aren't only visible in the Details view. They're visible in all views. It might seem weird to have column headings showing when the icons aren't arranged into columns. But they're there for a good reason — you can click any one of them to sort and alphabetize icons on an as-needed basis.
To sort icons, you just click the column heading that you want to sort by. The first click usually puts the headings in ascending order (A to Z, smallest to largest, or oldest to newest). When icons are sorted into ascending order, the column heading shows an up triangle.
For example, when you click the Name column heading and see an up triangle in that column heading, you know the icons are in ascending alphanumeric order. Folders are typically listed before files. So, the folders will be listed first in alphanumeric order, followed by files in alphanumeric order.
When you click the Date Modified column heading, you sort icons by the date they were last modified. The first click puts them in ascending order (newest to oldest). The second click puts them in descending order (oldest to newest).
You can sort icons by any column heading, in any view. Click the Choose Columns item from the Sort By drop-down menu to sort by some other column. If the column on which you want to base the sort isn't available, you can add that column heading as described in the previous section.
Filtering a folder
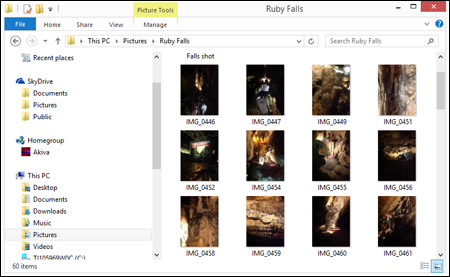
When you point to a column heading in Details view, a triangle appears to the right of the column name. Clicking that triangle displays options for filtering icons in the folder. These options work best in folders or search results that contain lots of icons. The exact options you see vary from one column heading to the next because different columns offer different ways of arranging things. Depending on the age of the files you are viewing, Figure 20.23 shows options that can appear when you click the arrow next to Date Modified.
Figure 20.23
Click the arrow next to Date Modified.

Depending on the selection you make in a column's header, you can end up with a filtered view of the folder's contents. For example, if you click the arrow beside Name and place a check in the A–H box, you see only folders or files whose names begin with any letter from A through H. The column header then shows a check mark at the right edge of the column to indicate that a filter is applied. Click the check mark and clear the check box for any selection to clear the filter view and show all items. The following section offers more detail.
Filtering is a means of temporarily hiding things when they're just in the way. For example, let's say you're viewing a folder that contains dozens, or even hundreds, of icons. You want to focus on just the files and folders you modified today or yesterday. You don't want to delete the other icons. You just want to put them into hiding temporarily so you can focus on the more recently edited icons.
To view just the icons of files you modified today, you would select (check) the Today check box shown previously in Figure 20.23. Then click outside the menu. Icons for files that were modified today remain visible while all other icons disappear. The Date Modified column heading shows a check mark to serve as a visual reminder that you're not viewing all icons — only icons that meet certain Date Modified criteria, as in Figure 20.24.
Figure 20.24
The check mark next to Date Modified tells you some icons are hidden.

The Search box in the upper-right corner of a folder also plays a filtering role (see Figure 20.25). As you type in the Search box, only files from the current folder and its subfolders that match those characters remain visible. Icons that don't match what you've typed are temporarily hidden from view. This makes it easy to quickly locate icons in a large folder based on their names. When you search from the Search box, the Address bar shows the words “Search Results” rather than the folder name. To undo the search and bring all icons from the folder back into view, click the X button beside the Search box.
Figure 20.25
Filter a view with the Search box.
Chapters 21 and 22 discuss searching in detail.
Using the Preview pane
The optional Preview pane at the right side of Explorer tries to show the contents of whatever icon is selected in Explorer. If no icon is selected, the Preview pane shows only the words “Select a file to preview.” If the Preview pane isn't open, select the View tab and choose Preview Pane in the Panes area (at the far left).
The window has to be wide enough to accommodate the contents of the pane and whatever else is showing. If the window is too narrow, the Preview pane disappears. You have to widen the window or close the Navigation pane to make room for the Preview pane.
See Chapter 21 for the many different ways you can select icons.
What shows in the Preview pane depends on the type of icon you select, as follows:
- If you select a picture's icon, the pane shows that picture.
- If you select a music or video file, the pane shows options for playing that file.
- If you select an icon whose contents can be read directly by Windows 8.1, you see a portion of the file's contents in the pane.
- If you select a folder icon or any file that can't be previewed, the pane just shows No Preview Available.
As with any pane, you can widen and narrow the Preview pane by dragging its inner border. Just make sure you get the tip of the mouse pointer right on the bar, so you see the two-headed arrow before you hold down the left mouse button and start dragging. The wider you make the Preview pane, the larger the preview image.
Figure 20.26 shows an example of a video file icon selected in a folder. Note the two-headed mouse pointer you need to see in order to widen or narrow the pane.
Figure 20.26
The Preview pane, a selected icon, and the sizing mouse pointer.

Using the Details pane
The optional Details pane at the right of Explorer's window also shows information about the currently selected icon(s). To show or hide that pane, click Details Pane on the View toolbar. The icon(s) you select and how tall you make the pane determine how much information is displayed. Drag the left border of the pane to make it shorter or taller.
In Figure 20.27, we've selected three icons that represent files containing pictures. Depending on the type of file(s) selected, you might be able to change the Authors, Tags, Comments, Categories, Status, Content Type, or Subject of the selected items right in the Details pane. That information becomes metadata used by the search index to quickly find and arrange icons in a way that transcends their physical locations in folders. Chapter 23 describes metadata and searching in detail.
Figure 20.27
The Details pane and three icons selected.

To Click or Double-Click?
As mentioned throughout this book, you may have to double-click icons to open them. Or you may have to click only once on an icon to open it. Whether you have to double-click or single-click is entirely up to you. The default is usually to double-click because that method allows you to select icons by clicking, which is easier for people who haven't fully mastered the mouse.
You use the Folder Options dialog box to choose between the double-click and single-click methods. Here's how:
- Open any folder so you're in File Explorer.
- Click the Options button on the View tab. The Folder Options dialog box opens, as in Figure 20.28.
Figure 20.28
The General tab of Folder Options.

- Under Click Items as Follows, choose how you want to handle icons:
- Single-Click to Open an Item (Point to Select): Choose this option if you want to be able to open icons by clicking once. If you choose this option, also choose one of the following:
- Underline Icon Titles Consistent with My Browser: Choosing this option will usually make all icon names look like hyperlinks (blue and underlined).
- Underline Icon Titles Only When I Point At Them: Choosing this option leaves icon names alone so they look normal. The name only looks like a hyperlink when you touch it with your mouse pointer.
- Double-Click to Open an Item (Single-Click to Select): This is the more classical approach where you have to double-click icons to open them. If you're new to computers or have difficulty using a mouse, this might be your best bet.
- Single-Click to Open an Item (Point to Select): Choose this option if you want to be able to open icons by clicking once. If you choose this option, also choose one of the following:
- Click OK.
Personalizing folder behavior
The Folder Options dialog box offers many options in addition to double-click and single-click preferences. On the General tab, you can choose from the following options:
- Open Each Folder in the Same Window: This is the default behavior; each time you open a folder, the current instance of Explorer shows the contents of that folder.
- Open Each Folder in Its Own Window: Choosing this option causes each folder to open in a separate instance of Explorer so you end up with an instance of Explorer for each open folder.
- Show Favorites: This option turns on or off the Favorites folder in the File Explorer Navigation pane. By default, it's turned on.
- Show All Folders: This option in the Navigation pane group, when enabled, causes File Explorer to show additional icons in the Navigation pane, such as Control Panel and the Recycle Bin.
- Automatically Expand to Current Folder: This option, if enabled, causes File Explorer to automatically expand the Navigation pane to show the currently opened folder.
When two or more folders are open, you can right-click the clock and choose the options Cascade Windows, Show Windows Stacked, or Show Windows Side by Side to arrange them in different ways on the desktop. Use taskbar buttons or Alt+Tab to switch among them.
By default, the taskbar buttons for folder windows will collapse into a single taskbar File Explorer button. You can close them all in one fell swoop by right-clicking that taskbar button and choosing Close All Windows. You can also hover the mouse over the icon to see a preview of all windows in the group.
Options on the View tab
Selecting the View tab in the Folder Options dialog box takes you to a whole bunch of options for controlling folder behavior (see Figure 20.29). Most of the options are self-explanatory. If you open a folder that shows icons for pictures and a Navigation pane, you'll be able to try out many on the fly. Just fill or clear a check box and click Apply to see how it affects that open folder.
Figure 20.29
The View tab of Folder Options.

Some options aren't quite so obvious. In the interest of being complete, we'll run through them all in the following list:
- Always Show Icons, Never Thumbnails: If you choose this option, icons for pictures and videos will be generic icons rather than mini-pictures of the file's contents. It might help speed things along on an extremely slow computer. But to see the picture in a file, you'll need to open that picture. You won't be able to see the picture in Explorer.
- Always Show Menus: Choose this option if you want the classic menu bar to open automatically with Explorer. If you don't choose this option, the menu bar is hidden when you first open Explorer.
- Display File Icon on Thumbnails: If you choose this option, thumbnails will show the logo of the default program for opening the file. If you clear the option, thumbnails show without the logo.
- Display File Size Information in Folder Tips: This option is about the size of files and folders in terms of how much disk space they use, not the visual size of the icon on the screen. When you choose this option, you're telling Explorer to show a folder's size when you point to (rest the mouse pointer on) a folder's icon. That size is the sum of the sizes of all the files in the folder. For example, all the songs in the Music folder shown in Figure 20.30 are taking up 84.2MB of disk space. You can see that in the tooltip that appears under the mouse pointer.
If you clear this option, the tooltip shows only the Date Created for the folder.
Figure 20.30
Size of folder (84.2MB) in the folder's tooltip.

- Display the Full Path in the Title Bar: The title bar normally displays only the name of the folder you're currently viewing, such as
Music. If you choose this option, the title bar shows the complete path to the file, such asC:UsersYourUserAccountNameMy Music. - Show Hidden Files and Folders: Hidden files are those that have the Hidden attribute checked on the properties sheet. If you choose Don't Show Hidden Files, Folders, and Drives, then files and folders that have the Hidden attribute checked won't appear at all in Explorer. If you choose Show Hidden Files, Folders, and Drives, you'll see those folders and files. But their icons are dimmed to distinguish them from items that aren't marked as hidden.
- Hide Empty Drives: Choose this option to have Windows 8.1 hide drives that don't contain media. For example, if the CD drive is empty, that drive will not appear under the This PC branch of the File Explorer Navigation pane.
- Hide Extensions for Known File Types: As mentioned earlier in this chapter, most files have a filename extension that indicates the file type. That extension also determines which program will open when you open the file. A known file is one for which you already have a default program installed and defined.
Choosing Hide Extensions for Known File Types hides filename extensions for known file types so you see only the filename without the extension for those kinds of files. Clearing that option displays filename extensions for all files.
As always, choosing one option or the other is strictly a matter of personal preference. Sometimes it's convenient to see filename extensions. Other times they might just seem to be adding unnecessary clutter. Of course, it only takes a few mouse clicks to turn them on or off, so you can easily change from one setting to the other just as conveniently.
There's a slight security risk to hiding filename extensions. Malware files delivered by e-mail sometimes have a dot in the filename, as in
MyDocument.txt.exe. If filename extensions are hidden, you see onlyMyDocument.txtbecause the extension is the part that comes after the last dot in the name. Text (.txt) files are harmless, so you might open the file. Executable (.exe) files can contain malware. Of course, millions of.exefiles are perfectly safe, but one where someone is trying to hide the.exeextension is certainly suspicious, and probably not safe. Then again, opening e-mail attachments from people you don't know, in general, isn't safe either! - Hide Protected Operating System Files (Recommended): Protected operating system files are files that Windows 8.1 needs to do its job. These files are for the computer's use. Choosing this option keeps those files hidden so you don't see their icons. This is the recommended choice based on the “out of sight, out of mind” theory. If you can't see files you shouldn't be concerned with, you don't have to wonder what they are. Nor can you do bad things, like delete or rename them, which could cause a lot of problems with your computer.
If you clear this option, those protected operating system files will be visible in Explorer. Do this at your own risk. If you mess with one of those files, you could render your computer inoperable.
- Launch Folder Windows in a Separate Process: This oddly named option really has nothing to do with processes listed in Task Manager. Typically, File Explorer sets aside a little bit of memory to store the contents of the currently selected folder. As you go from one folder to the next, it overwrites that portion of memory with the current folder's contents.
If you choose this option, each folder's contents are stored in a separate area in memory. This won't change how things look on your screen. But if your computer crashes frequently while exploring folders, this setting might solve the problem.
- Restore Previous Folder Windows at Logon: This option launches File Explorer and opens the last folder that was open.
- Show Drive Letters: By default, whenever you open your Computer folder, each drive's icon displays both a friendly name and a drive letter (such as
C:). Choose this option if you want to hide the drive letters and see only the friendly name. - Show Encrypted or Compressed NTFS Files in Color: The NTFS file system used in Windows 8.1 lets you encrypt and/or compress folders. Choose this option if you want the names of those folders to appear in color, to distinguish them from regular unencrypted, uncompressed folders. Names of encrypted folders will be green. Names of compressed folders will be blue.
- Show Pop-up Description for Folder and Desktop Items: Selecting this option ensures that when you point to a file, folder, or desktop icon you see a tooltip. If you clear this option, you won't see a tooltip when pointing to such an icon (or anything else).
- Show Preview Handlers in Preview Pane: When you select a file icon in Explorer, the Preview pane (if open) will attempt to show some content from that file. It doesn't work with all file types, so often you'll just see “No preview available.”
If you clear this option, the Preview pane will never attempt to show the contents of any file icon you select. If it takes too long to show the contents of a file, and that's slowing you down, clearing this option will help speed things along. But you won't see the contents of any file you select.
- Use Check Boxes to Select Items: Chapter 21 describes different ways you can select icons in a folder. If you find it difficult to use those techniques, choose this option to have each icon show a check box. Then you can select multiple icons by clicking their check boxes. You'll also see a check box next to the Name column heading. Select (check) that one if you want to select all icons in the folder.
- Use Sharing Wizard (Recommended): To share a folder or file with other users, you typically right-click the icon and choose Share, or select icons and click Share in Explorer's toolbar. When you choose this option, the Sharing Wizard opens to help you through the sharing process.
If you clear this option, the Sharing Wizard won't open when you click the Share button. Instead you're taken to the folder's Properties dialog box. There, you share the folder by choosing specific options rather than using the simpler wizard.
- When Typing into List View: The options in this group determine what happens when you start typing in a list view. The default behavior is to select the item that matches what you're typing. You can choose to have the text you type appear in the Search box instead.
- Restore Defaults: Click this button if you've experimented with settings and you want to get things back the way they were originally set in Windows 8.1.
As always, be sure to click OK after changing options in the Folder Options dialog box.
Saving Things in Folders
The most common complaint among casual computer users is the inability to find things they're certain they've saved. This occurs because users don't choose where they want to save an item, or what they want to name it. They just click the Save button. This is roughly the same as handing an important paper document to a colleague and saying, “Stick this in the filing cabinet somewhere, but don't tell me where you put it.” Finding that document later isn't going to be easy.
Another common mistake is to save things on external media such as flash drives, DVDs, CDs, and such. That's a bad idea. You only use external media to save copies of files that you've previously saved on your hard disk. The copy might be for backup or to give to a friend. But either way, it should be a copy of the file, not the one and only original file.
What folder should I use?
Windows 8.1 comes with several folders already created for you to store your files in. When you're saving a file, first ask yourself, “What is this thing I'm saving?” Then based on your answer, use the folder whose name matches the type of thing you're saving:
- If it's a picture or photograph, save it in your Pictures folder.
- If it's a video, save it in your Videos folder.
- If it's a song or sound clip, save it in your Music folder.
- If it's any other kind of typed document or worksheet, save it in your Documents folder.
There's no rule that states you must save a file in a specific folder. Remember, folders exist mainly to help you organize files so they're easy to find later when you need them. Also, saving to a folder is no big commitment. You can easily move any file from any folder to another folder whenever you want.
How to save in folders
There are basically two times when you have to choose where to save a folder:
- After you've created a new document from scratch in some program and chosen File ⇒ Save from that program's menu, or closed the program and answered Yes when asked if you want to save it
- When you've opted to download a file from the Internet and chosen Save
In either case, a dialog box titled Save (perhaps Save As, Save Picture, or Save Webpage, or something like that) appears. It's in that dialog box where most people make their mistake. They click the Save button without first thinking about and specifying where to put the file and what to name it.
Saving in Windows 8.1–style dialog boxes
The name at the end of the Address bar is the name of the folder where the file will be saved unless you specify otherwise. The file will be saved in the Documents folder for the current user. At the very least, you should look at that name so you know where the file is going, and where you can find it in the future.
If you don't want to save the file to the folder that's suggested in the Address bar, navigate to the folder in which you want to save the file. A simple way to do this is to navigate folders and drives in the Navigation pane (left-side pane). Then click the folder into which you want to save the document.
Depending on the type of document you're saving, you may be given an option to enter metadata, such as an author's name, tags, or other information. Metadata is information about the file that is stored in the file's properties or Windows 8.1's search index. At first, you might see only a couple of metadata options. If you enlarge the Save As dialog box by dragging any corner or edge, you might see many more. Figure 20.31 shows an example from Microsoft Word, which lets you add tags to the file.
Figure 20.31
Sample metadata tags entered.

Fill in whatever metadata seems appropriate for your way of organizing and searching for things. If you're not up on Windows 8.1–style searching yet, don't worry about it. You can still add any information that seems reasonable. But the main thing to keep in mind when filling in the blanks is the question “If I lost this thing, what word(s) might I type into the Search box to find it?” Whatever words come to mind are the words you should put into metadata. Also keep in mind that Windows 8.1 can search within documents to find words or phrases in the document.
After you've chosen where you want to save the file (and filled in some metadata, if available), you can name the file.
Naming the file
After you've chosen where you want to save the file, the next step is to choose what to name it. Again, think to yourself “If I were to look for this thing six months from now, what name would I look for?” Then name the file accordingly. Keep the name short and specific. You can use spaces and some basic punctuation such as apostrophes. The characters , /, ?, :, *, ”, ”, >, <, and | are not allowed in a filename because they have special meanings and will be rejected.
Choosing a Save As type
It's usually best to ignore the Save As Type drop-down at the bottom of a Save dialog box. The suggested type is the “normal” type for the type of file you're saving. If you have a good and specific reason for choosing a different type, then go ahead and choose it. But otherwise you might just create unnecessary headaches for yourself!
Click Save
The last step in the process of saving a file is to click the Save button in the dialog box. Before you do, you might want to take a quick look at the last folder name in the Address bar again or the name in the Save In box so you know where you're about to save the file. Take another quick look at the name in the File Name box so you know its name. Then click Save. The file is saved to the folder you specified with the name you specified.
Opening the saved file
To open the file in the future, use File Explorer to navigate to the folder in which you placed the file, as described earlier in this chapter. Then double-click the file's icon.
If the file you saved is a document, you may be able to re-open it by opening the program you used to create the document, and then opening its File menu and clicking the filename on the recently used list (this name varies according to the program or app). But keep in mind that those places only include recently used files. Your file won't stay in either list forever!
After you open the file, keep in mind that changes you make are not saved automatically by most programs. Changes you make to an open file are stored in RAM, not on the hard disk. If you want to save changes you've made, you must choose Save from the File menu while the document is open. Or remember to choose Yes when asked about saving your changes when you close the document.
Creating Your Own Folders
You can create your own folders at any time. For example, if you have many files in your Documents folder or some other folder, you might want to start organizing into subfolders within your Documents folder. You can create as many folders as you wish and name them anything you wish. You can move or save any files you wish into any folder you create.
The main trick when creating your own folders is to put them where they make the most sense. Any folder you create will be a subfolder of some other folder. So, the first thing you want to do is get to that parent folder — the folder in which your own custom folder will be stored. If you're new to all this and you aren't sure what we're talking about, here are some suggestions:
- If you're creating a subfolder to organize pictures, use your Pictures folder as the parent folder.
- If you're creating a subfolder to organize songs, use your Music folder as the parent folder.
- If you're creating a subfolder to organize videos, use your Videos folder as the parent folder.
- If you're creating a subfolder to organize some other type of files, use your Documents folder as the parent folder.
You can create a folder anywhere you like. The preceding items are just suggestions. For example, you can create a folder on a flash drive, memory card, or external hard drive. In those cases, whichever disk is currently in the drive would be like the parent folder. Make sure you put a disk in the drive before you perform the following steps:
- In File Explorer, open the parent folder for the folder you're about to create. Or open your This PC folder and then open the icon for the disk drive on which you want to create a folder.
- Do whichever of the following is easiest for you:
- Select the Home tab and click New Folder.
- Right-click some empty space below or to the right of icons in the current folder and choose New ⇒ Folder.
- Type in a name of your own choosing and press Enter.
The new folder appears with the name you specified. When you double-click its icon to open it, you'll find it's empty. That's because it's brand new and you haven't put anything in it yet. (Click the Back button or press Backspace to leave the folder.)
You can move existing files into the folder using techniques described in Chapter 21. You can save new files to the folder just by opening the folder from the Save dialog box.
Creating folders on the fly while saving
There may be times when you're in the middle of saving a file and suddenly think, “I should have created a new folder for this file and others like it.” You don't have to cancel out of the current save operation to create a folder. Instead, navigate to the folder that will act as the parent to the new folder you want to create.
If you're using a Windows 8.1–style Save dialog box, right-click in the file list area of the dialog box and choose New ⇒ Folder. Or click the New Folder button on the Save As dialog box. If you're using an older-style Save dialog box, point to each toolbar button until you find the one that lets you create a new folder at the bottom of that same figure, and click it. A new empty folder appears in the main pane at the center of the dialog box. Type in a new name of your own choosing and press Enter.
Double-click the new folder's icon in the main pane of the Save As dialog box so that the name appears at the end of the Address bar or in the Save In box. Then click the Save button in the dialog box. Your file is saved in that new folder.
Personalizing your folder
You can customize a folder in several ways. Unlike the Folder Options described earlier, which apply to all folders, these settings apply to only one folder — the one whose icon you right-click to specify your settings. To get started on customization, first right-click the icon you want to customize and choose Properties. In the Properties dialog box that opens, select the Customize tab to see the options shown in Figure 20.32.
Figure 20.32
The Customize tab for a folder's properties.

Specify a folder type
All folders have a default view that defines what tools appear in the toolbar and how icons look when you first open the folder. To define a default view, click the button under “What kind of folder do you want?” and choose from the menu. There isn't any rule that says you must choose a specific kind. But in general, you want to choose an option that reflects the type of items that the folder contains, or will contain:
- General Items: Use this option if the folder will contain multiple file types and subfolders.
- Documents: Use this type if the folder will contain mostly non-media document files (text, spreadsheets, database data, and such).
- Pictures: Use this if the folder will contain pictures.
- Music: Use this if the folder will contain mostly albums or other subfolders that contain songs.
- Videos: Use this if the folder will contain mostly video files.
If you want your selection to be applied to subfolders within the folder, choose Also Apply This Template to All Subfolders.
Folder pictures
Folder icons always look like partially opened manila file folders because, like real-world manila file folders, computer folders are containers in which you store files (written documents, pictures, songs, videos, and such). Items listed in the folder represent files that are actually in the folder. For example, folders that contain albums show the covers of albums that are in the folder, as in Figure 20.33.
Figure 20.33
Folder icons showing album covers.

If you don't like the file that a folder icon shows, you can change it to a picture. Just click the Choose File button on the Customize tab and click the file you want the folder icon to show.
If you ever change your mind and want to go back to the original, click the Restore Default button in the properties sheet.
Changing a folder's icon
You can choose an entirely different icon for a folder. You'll likely lose the open folder effect you normally see in folder icons, so you might consider changing the folder's picture rather than its icon. But if you really want to change the folder's icon to something else, just click the Change Icon button. Click the icon you want to use, or use the Browse button to browse to any location that contains icon (.ico) files, and choose an icon there.
If you change the icon and then change your mind, click the Change Icon button again and click Restore Default. Don't forget to click OK or Apply after changing any settings in any dialog boxes. Your changes won't take effect until you do.
If your changes don't take effect immediately, refresh the folder. (Right-click some empty space in the folder and choose Refresh or press F5.)
Read-Only, Hidden, and Advanced attributes
When you right-click a folder icon (or file icon) and choose Properties, the General tab of the Properties dialog box shows the options shown in Figure 20.34. The Read-Only and Hidden options often confuse folks, so let's take a moment to discuss what those are about.
Figure 20.34
The General tab of a folder's Properties.

The Read-Only attribute can be
- Empty: The contents of the folder can be read (viewed and opened) by everyone who has access to the folder.
- Black Square: The contents can be read and written to (changed) by the owner of the folder (the person who created the folder). Other users with whom the folder is shared can view the contents of the folder but not change its contents.
- Checked: Everyone can view the contents of the folder, but nobody (not even the owner) can change the folder's contents.
The Hidden attribute, if checked, makes the folder's icon invisible in the folder if the Do Not Show Hidden Files and Folders option in Folder Options is selected. The folder's icon is dimmed if Show Hidden Files and Folders is selected in Folder Options.
Clicking the Advanced button on the General tab reveals the options shown in Figure 20.35.
Figure 20.35
Advanced folder or file attributes.

The Folder Is Ready for Archiving check box is handled automatically by Windows File History (the backup feature of Windows 8.1), so it's unlikely you'd ever need to change that yourself. The check box is selected if you've never backed up the folder (or file) or if its contents have changed since the last backup; that tells Windows File History to back it up again the next time you do a backup. The check box is empty if its contents haven't changed since the last backup; that tells Windows File History that there's no need to back it up again.
The Allow Files in This Folder to Have Contents Indexed in Addition to File Properties check box, if selected, allows Windows to index the contents of files in the folder, as well as the file properties. For example, if the folder contains Microsoft Word documents, Windows will index the contents of those documents, enabling you to search for and locate files based on words or phrases inside the documents.
The other two options in the dialog box deserve some special attention and are described next.
Compress Contents to Save Disk Space
Choosing this option tells Windows to compress everything in the folder to reduce its disk space consumption. (This works only on hard disks that use the NTFS file system.) When you open a file from the folder, it's automatically decompressed for you. So, the compression is transparent, in the sense that you don't have to constantly compress and decompress files yourself.
Folder and file compression is a good way to conserve disk space. But before you jump in and start compressing all your folders, there are some costs to consider. For one, there is a time cost. It takes a little time to automatically compress every file you save and automatically decompress every file you open. Furthermore, many file types already have a degree of compression built into them. Putting such files into a compressed folder may have little or no effect on the amount of disk space they consume.
With today's computers, the amount of time it takes to compress and decompress a file on the fly is negligible. So, you can generally compress folders without worrying about a performance impact. However, you should generally not compress all of drive C:. Instead, just compress those folders where you store lots of documents that are taking up a lot of space. If you want to turn off compression for a folder, just clear the check box beside the Compress Contents to Save Disk Space option.
Encrypt Contents to Secure Data
This check box enables you to apply Encrypting File System (EFS) to the folder. EFS encrypts the contents of the folder (or a single file) to make it almost impossible to open without logging in to the computer using the account that encrypted it. EFS is not the most complete form of encryption available for PCs, but it is nevertheless a very effective tool for securing data.
First, understand that anyone who has access to your user account also has access to files in your encrypted folders. Therefore, there is no point in using EFS if your user account isn't password protected.
If you forget the password to your user account, you'll lose access to all files in the encrypted folders. To play it safe, you must make a backup copy of your encryption key, preferably on a CD-R or other disk where it can't be erased. You need to store that disk in a safe place, preferably in a fireproof safe.
The act of encrypting a folder is easy. Just select (check) the Encrypt Contents to Secure Data check box. Then follow the steps in the wizard that appears to make a backup copy of your encryption key (see Figure 20.36). If you save that file to your hard disk, copy it to a CD-R or other medium, and delete the copy that's on your hard disk.
Once you've encrypted a folder, you really don't have to do anything else to secure its contents. When you save a file to that folder, or move a file into that folder, its contents are encrypted automatically. When you open a file, the contents are decrypted. So, working with the files in the encrypted folder is like working with any other files in any other folder.
If someone tries to open a file in the encrypted folder from another user account, he'll be denied access to the file. There is no way he can access anything in the folder unless he can get a copy of your encryption key.
After all this talk of creating folders, you may be wondering how to get some of your existing files into one. That's a topic for the next chapter.
Figure 20.36
Make a backup copy of your encryption key.

Wrap-Up
This chapter covered some basic facts about how computers store information. It also covered some basic (and some not-so-basic) skills for navigating through your system to find things. Here's a quick review:
- Everything that's in your computer is stored on your hard disk, typically drive
C:. - The This PC folder shows icons for all the disk drives in your system. To open that folder, click the Quick Access and choose This PC.
- A folder is a container in which files (and perhaps subfolders) are stored.
- Icons that represent folders usually look like little manila file folders. Double-click a folder's icon to open the folder and see what's inside.
- File Explorer (also called Explorer) is the program you use to navigate through and explore the contents of all the drives and folders in your system.
- Explorer's ribbon bar, Address bar, Navigation pane, and main contents window are all tools for navigating through drives and folders in your system.
- When saving a file, always navigate to an appropriate folder and provide a meaningful filename before you click Save. Otherwise, it may be difficult to find the file later when you need it.
- You can create your own folders from the Organize button in Explorer or from the Save dialog box.
- To customize a folder, right-click its icon and choose Properties.