Chapter 21: Managing Files and Folders
IN THIS CHAPTER
Selecting items to move, copy, rename, or delete
Moving and copying files and folders
Renaming files and folders
Creating shortcuts to favorite places
Deleting and un-deleting files and folders
Your computer's hard disk has enough space on it to store thousands of pictures, songs, and other files. Having lots of stuff on your computer can be a good thing, but only if you can find what you're looking for when you need it. Therefore, keeping things organized so they're easy to find is an important basic skill that every computer user needs to learn.
Chapter 20 discusses drives, folders, and files in terms of what they are and why you need them. It also tells you how to use Explorer to navigate your system and get to things you need. The chapter covers strategies for saving things in such a way that prevents you from losing them.
This chapter picks up where that one left off. Here, we assume you've read and understood most of that chapter. Now you're ready to start reorganizing what you already have. That requires that you know how to select, move, and copy files. You'll also discover other important techniques in this chapter, such as how to rename, delete, and un-delete files. These basic skills are important to acquire if you ever intend to use your computer for anything beyond basic e-mail and web browsing.
Selecting Icons
You'll often find that you want to perform some operation on many files. For example, let's say you want to copy a couple dozen files to an external disk. You could do them one at a time, but that would take a lot of time and effort. It would be better and easier to select all the icons you want to copy, and copy them all in one fell swoop.
As you'll see, you can select icons in many ways. As always, there is no right way or wrong way, no good way or bad way. It's usually a matter of choosing the method that is easiest for you, or is best for whatever you're trying to accomplish.
![]() How you select icons depends largely on whether you're using the double-click or single-click method to open icons. If you don't know what that's about, see Chapter 20.
How you select icons depends largely on whether you're using the double-click or single-click method to open icons. If you don't know what that's about, see Chapter 20.
Thumbnails for pictures and videos are icons, too. So all the techniques described in this chapter apply to thumbnails.
Selecting one icon
Selecting a single icon is easy. If you're using the double-click method to open documents or programs, you click (once) on the icon you want to select. If you're using the single-click method to open icons, you just point to the icon (rest the tip of the mouse pointer right on the icon you want to select). The selected icon will be highlighted to stand out from the others. The toolbar will likely change to reflect things you can do with that selected icon. If the Details pane is open, it will show information about the selected icon, as illustrated in Figure 21.1.
Figure 21.1
A selected icon.

If you turned on the option to select icons using check boxes in Folder Options, you have to point to the icon first and then click its check box. The only thing that's unique about this method is that the selected icon's check box has a check mark, as in Figure 21.2.
Figure 21.2
A selected icon shows a check mark.

To turn on the option to use check boxes, select the View tab and choose Options. Select the View tab in the dialog box that opens. Then scroll down to and check Use Check Boxes to Select Items. Click OK. The check box won't show on an icon until you point to or click the icon.
![]() See Chapter 20 for more information on folder options.
See Chapter 20 for more information on folder options.
Selecting all icons
If you want to select all the icons in a folder, use whichever of the following techniques is easiest for you:
- Select the Home tab and click Select All.
- Press Ctrl+A.
All the icons are selected.
Selecting a range of icons
You can easily select a range of icons using the mouse and keyboard. If there are many icons in the folder, you might consider using the Layout buttons on the View tab (or the Ctrl key and your mouse wheel) to make the icons small enough so you can see all the icons you want to select. If the items you want to select have something in common, consider sorting the icons so the ones you want to select are adjacent to one another.
To select multiple icons:
- Select the first one by pointing or clicking.
- Hold down the Shift key and click the last one.
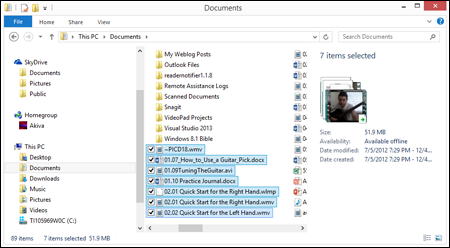
Both icons and all the icons in between are selected. The toolbar changes to show things you can do with all those icons. If the Details pane is open, it shows some information about the selected icons. The Size detail tells the combined size of all the selected icons. Figure 21.3 shows an example when you don't have any folders selected.
Figure 21.3
A range of icons selected.
Selecting and unselecting one at a time
To select a single icon without unselecting others, Ctrl+click the icons you want to select (or unselect). Ctrl+click means hold down the Ctrl key as you click. For example, if you wanted to unselect only the highlighted icon in Figure 21.3, you'd Ctrl+click its icon. All the other icons would remain selected.
If you're using the single-click method to open icons, you can Ctrl+click or Ctrl+point to select or unselect a single icon. It doesn't matter which — the result is the same.
Here's another way to look at it. When you select an icon by pointing or clicking, only that one icon is selected. Any other selected icons are instantly deselected. But if you hold down the Ctrl key as you go, other selected icons remain unchanged, as shown in Figure 21.4. So, you can hold down the Ctrl key to select or unselect without disturbing other selected icons.
Figure 21.4
Select multiple icons.

Of course, you can use the Ctrl key to select multiple non-adjacent icons.
Selecting with a touchscreen
Windows 8.1 is designed for mobile devices such as mobile phones and tablets. Another way to select onscreen files is to touch the files using your finger (as long as your screen is a touchscreen). To select multiple files with touch, touch each file you want to select. To unselect a file in a group of selected ones, simply re-touch that file.
There are a handful of touch-based gestures you'll use with Windows 8.1, along with mouse-based alternatives for use on non-touch devices (or for when you have a mouse connected to a touch device). Chapter 2 discusses these gestures in more detail. In addition, see Appendix D for a list of common touch gestures.
Selecting with the keyboard
You can select icons without using the mouse at all. First, you have to make sure the keyboard focus is in Explorer's main contents pane. If you're not sure, press the arrow keys on the keyboard until you notice the selection box moving from icon to icon within the main content pane. Then move the focus to the first icon you want to select using the navigation keys (←, →, ↑, ↓, Home, End, PgUp, and PgDn).
To select multiple adjacent icons, hold down the Shift key as you move through icons using the navigation keys. All icons through which you pass are selected. To select multiple non-adjacent icons, hold down the Ctrl key as you move from icon to icon with the navigation keys. When you get to an icon you want to select, tap the Spacebar (but don't let go of the Ctrl key). To unselect all selected icons with the keyboard, press any navigation key alone, without holding down Shift or Ctrl.
Selecting by filtering
Yet another way to select icons that have something in common is to filter out (hide) the icons you don't want to select. For example, let's say you want to select only files that were created or edited today. On the View tab, choose the Details Layout option. Click the arrow next to the Date Modified column heading and choose the Today option. Or, perhaps you want to select only TIFF files, as in Figure 21.5. In that case, use the Type column to filter the view.
Figure 21.5
Hide all except TIFF files.

You also can filter by using the Search box at the top of the folder. Just be aware that the search results might include files from subfolders. It all depends on your selection choice in Folder and Search Options, as discussed in Chapter 20. But for the sake of example, let's say you want to select all PNG and GIF images in a folder. You could type the following into the Search box for the folder:
- type:gif OR type:png
Or the following:
- *.gif OR *.png
Just make sure you use an uppercase OR to separate the two types. The search results include only files with .gif and .png extensions.
When only the icons you want to select remain visible, select them all using any technique described earlier (for example, press Ctrl+A). None of the hidden icons will be selected, so you can move, copy, delete, or rename the selected icons without affecting anything else.
Selecting by lassoing
You can also select multiple icons by dragging the mouse pointer or your finger (on a touchscreen device) through them. But this is more difficult to do in Windows 8.1 than in older versions of Windows. The problem is that if you want to select by lassoing, you have to get the mouse pointer to some empty spot near the first icon you want to select, without selecting any icons. That's difficult in Windows 8.1 because there is little or no empty space between icons. What appears to be empty space isn't empty at all.
You can see this if you use the single-click method to open icons. Once you get the mouse pointer anywhere near an icon, you select the icon. Once you've selected an icon, if you start dragging, you only move the icon; you don't select multiple icons. The mouse pointer has to be in neutral territory (not on an icon) before you start dragging.
To see where the empty space is in the current view, press Ctrl+A to select icons. If there's any empty space at all, it will be white. To select by dragging, you have to get the tip of the mouse pointer into a white area near the first icon you want to select. Then hold down the left mouse button and drag through all the icons you want to select.
Selecting most icons in a folder
The old “invert selection” technique from previous versions of Windows still works, too. But the option is available only from the Home tab. As the name implies, the Invert Selection option unselects all selected icons and selects the ones that weren't selected. Say, for example, you want to select most, but not all, of the icons in a folder. You could start by selecting the few icons you don't want to select. Then choose the Home tab and click the Invert Selection option.
Selecting from multiple folders
To select icons from multiple folders, perform a search that finds all the icons you want to select. In the search results, you can select all icons, or just specific icons using any of the preceding methods.
![]() For more information on performing searches, see Chapters 23 and 24.
For more information on performing searches, see Chapters 23 and 24.
Unselecting all icons
If you have one or more icons selected and want to unselect them all, click some neutral area to the right of, below, or between icons (if you can find such an area). Or click the Refresh button (the two arrows to the right of the Address bar).
Moving and Copying Files
Many reasons exist for moving and copying files. If you've been saving files in a willy-nilly manner, you may want to move them around into folders that make more sense so they're easier to find. Or, if you end up with hundreds or thousands of files in a folder and you get sick of looking through all their names, you might want to create some subfolders and then move some of those files into subfolders.
If you have a bunch of files on external disks, you may want to copy them to your hard disk where they're easier to get to and work with. Or, if you need to send files to someone whose e-mail account has file-size limits, you might want to copy some files to an external disk to put in the mail. Then again, you may want to copy some files to an external disk as a backup, just in case some mishap damages the copy on your hard disk.
Whatever your reason for moving or copying files, the techniques are the same. First, understand that there is a difference between moving and copying. The words mean the same things they do in English. When you move a file from one place to another, you still have only one instance of the file. It's just in the new location rather than the old location. When you copy a file, you end up with two instances: the original in the original location and an exact copy in the new location.
Moving and copying usually involves two locations. These locations may be two different folders in the same drive, or two entirely different drives. But that doesn't really matter because one location is always the source. The other location is the target or destination. Here's the difference:
- Source: The drive and/or folder that contains the files you want to move or copy (the “from” drive and/or folder).
- Destination or target: The drive and/or folder to which you want to move or copy files (the “to” drive and/or folder).
The source can be any folder on your network, hard disk, a flash drive, a memory card, an external device (such as a digital video camera), or a DVD. The same is true for the destination in most cases, although copying files to CDs and DVDs requires methods that are different from those described in this chapter.
Moving files to a subfolder
One of the most common reasons to move files is that you've created a new, empty subfolder within some existing folder and want to move some files into that new subfolder. To do so, do one of the following:
- Drag any item onto the subfolder's icon, and release the mouse button.
- Select the items you want to move and drag any one of the selected items to the subfolder's icon; then release the mouse button.
- For touchscreens, press and hold down on the file's icon and drag the file to its new location. Lift your finger off the screen when the file reaches the new destination.
The main trick is to make sure that you get the mouse pointer or your finger on the subfolder's icon. When the mouse pointer is right on the subfolder's icon, you'll see the words Move to foldername at the mouse pointer (where foldername is the name of the folder into which you're moving the file). For example, in Figure 21.6 we're about to drop a selected icon into a subfolder named Tomorrow. To drop the files into the folder, release the mouse button without moving the mouse pointer away from that folder.
Figure 21.6
About to drop selected icons onto a subfolder's icon.

If you change your mind partway through the drag-and-drop operation, just tap the Esc key and then release the mouse button. If it's too late for that because you've already dropped the items, press Ctrl+Z to undo the move.
If you want to copy, rather than move, the files to a subfolder, drag with the right mouse button. After you drop the file, click Copy Here on the menu that appears. Optionally, you can drag with the left mouse button, but you have to press and hold down the Ctrl key before you release the mouse button.
Copying to/from external disks
You can copy things to external disks in many ways. But don't forget that size is limited on those. And the rules for copying to CDs and DVDs are different from those described here. You'll want to refer to Windows Help if you plan on copying files to a CD or DVD.
Anyway, you first have to know how much space you have on the external disk, which means you have to put the disc into its drive and open your This PC folder. When you view icons in the This PC folder as Tiles, each drive's available space shows with its icon. Or if you can see the drive's icon in the Folders list, right-click that and choose Properties. In the properties sheet that opens, the Free Space number tells you how much room you have.
Then you need to know how much space the file(s) you're about to copy will require. For that, you can select the icons you intend to copy. If the Details pane is open, you'll see their combined size next to the Size option. But that size isn't entirely accurate because it doesn't take into account the small amount of additional overhead involved in storing files on disk. For a more accurate size, right-click any selected icon and choose Properties. The Size On Disk number in the properties sheet more accurately describes how much disk space you'll need to store all the selected files. If there isn't enough space on the external disk, you'll need to select and copy fewer files.
Once you know the files will fit, you can use any of the techniques in the sections that follow to copy files to the external disk, or for that matter, to copy files from an external disk or portable device (camera or music player) to your hard disk.
Moving and copying by dragging
You can move or copy any file (or selected files) to any location whose name you can see in the Navigation pane. You can also create a shortcut to the file. As usual, if you want to move or copy multiple items, first select their icons. Then just drag any one of them to the appropriate location in the Navigation pane, as illustrated in Figure 21.7. That location can be any folder or any drive.
Figure 21.7
Drag icons to any drive or folder in the Navigation pane.

When dragging, make sure you get the tip of the mouse pointer right on the name of the drive or folder to which you want to copy. If you drag with the left mouse button, you'll see Move To or Copy To when the mouse pointer is in position. The rules are
- If you drag to a different drive, including an external drive or a network drive, Windows assumes you want to copy.
- If you drag to another folder on the same drive, Windows assumes you want to move.
There's rarely any need to move a file to an external disk. External disks are mainly used for copies of files on your hard disk. Likewise, there's rarely any need to have two copies of the same file on your hard drive. But you're not stuck letting Windows 8.1 decide whether to move or copy. Just press and hold down Alt, Shift, or Ctrl before you release the mouse button to drop the files. When you press
- Ctrl: Files will be copied to the location.
- Shift: Files will be moved to the location.
- Alt: A shortcut to the file will be created.
As an alternative to relying on the keys, you can drag with the right mouse button instead of the left. When you release the mouse button to drop, you'll see a menu like the one in Figure 21.8. Click Move or Copy depending on what you want to do. Click Cancel if you change your mind and decide to do neither.
Figure 21.8
The menu when you right-drag and then drop.

Moving or copying by using two open folders
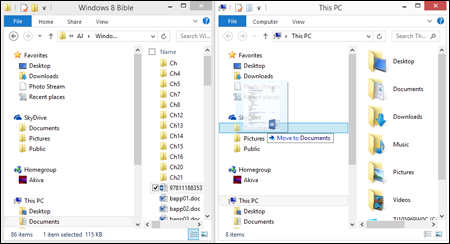
It's not always easy getting the tip of the mouse pointer right on the destination drive or folder in the Navigation pane. You might find it easier to open both the source and destination locations at the same time. Then just drag from one open window to the other.
The trick here is to open two instances of Explorer: one for the source and one for the destination. Then size and position so you can see at least some portion of both. For example, in Figure 21.9, the left window is a folder on the hard drive. The right window is a jump drive.
Figure 21.9
Drag icons from one folder to the other.
- Open the source folder or drive (from which you want to move/copy files).
- Right-click the File Explorer icon on the taskbar and choose File Explorer. This starts a second instance of a File Explorer window.
- In the second Explorer window, navigate to the destination drive or folder.
- Right-click the clock in the lower-right corner of the screen and choose Show Windows Side by Side, or simply size and position the windows to suit your needs, as shown in Figure 21.9.
That gets you to the point where you can see both open folders. Now you just have to select the items you want to move or copy. Then drag them into the main center pane of the destination folder and drop them there. Or, right-drag the items so you can choose Move or Copy after you release the mouse button.
Using cut-and-paste to move or copy files
You can also copy and paste files to copy them, or cut and paste to move files. The procedure goes like this:
- Navigate to the drive or folder that contains the items you want to move or copy.
- To move or copy multiple items, select their icons. Then:
- To move the items, right-click its icon or any selected item and choose Cut or press Ctrl+X.
- To copy the items, right-click its icon or any selected icon and choose Copy or press Ctrl+C.
- Navigate to the destination drive or folder.
- Paste using any of the following methods:
- Click the Home button and choose Paste.
- Press Ctrl+V.
- Right-click some empty space in the main, center pane of the destination window and choose Paste.
Making a copy in the same folder
You may want to make a copy of a file within the same folder. For example, maybe you have a large photo from your digital camera. You want to make a smaller version for e-mail or for use in documents. Of course, you don't want to shrink down your original because that's the best one to use for editing and printing. Here's the quick and easy way to make copies:
- Select the icon (or icons) you want to copy.
- Press Ctrl+C and then press Ctrl+V (to copy, then paste).
The copied files have the same name as the originals followed by – Copy, as in Figure 21.10. You can rename the copies if you like, but that isn't necessary. You can make any changes you want to the copies. Those changes will have no effect on the originals.
Figure 21.10
Original files and copies.

Undoing a move or copy
If you complete a move or copy operation and then change your mind, you can undo the action. But you have to do it soon because you can only undo your most recent action. For example, you can't move or copy, then do a bunch of other things, and then come back and undo the move or copy. Use whichever technique is easiest for you to undo a move/copy:
- Press Ctrl+Z.
- Click the down arrow on the Quick Access toolbar (which is on the File Explorer title bar) and choose Undo.
- Right-click some empty white space in the main pane of either folder and choose Undo Move or Undo Copy.
This location already contains …
A folder cannot contain two files that have the same name. If you move or copy a file into a folder (or onto a drive) and that destination already has a file with the same name as the one you're bringing in, you'll see a message similar to the one in Figure 21.11. In this example, we're copying a file. Notice that the message simply explains what's going on and gives you some choices as to what you can do about it.
Figure 21.11
The destination already has a file with that name.

Before you make a decision, take a look at the source you're copying from and the destination to which you're copying. That information appears at the top of the Replace or Skip Files dialog. If that isn't where you intended to copy from and to, click the Close button to cancel the whole operation. Then rethink where you want to move/copy from and to, and start over. But this time, make sure you get both locations right.
If the source and destination are correct, then think what you want to do about the copy that's already in the destination. The following options are available in the Windows 8.1 Replace or Skip Files dialog box:
- If you want to replace the file at the destination with the one you're moving or copying, click the first option, Replace the File in the Destination Folder.
- If you want to keep the file that's already at the destination and leave well enough alone, click Skip This File. The move/copy operation will be canceled and it will be just as though you never even tried to move or copy.
- If you want to compare file information for both files, click the third option — Choose Compare Info for Both Files. This displays the File Conflicts dialog box, which is shown in Figure 21.12. This dialog box is new to Windows 8 and 8.1. You select one or both of the files. If you select both, the file will be moved or copied. Its name will be the same as the original name followed by a number, like
Landscape-EastWing–(2), for example.Figure 21.12
The File Conflicts dialog box displays when a folder already includes the same file as the one you want to copy or move there.

Click Continue when you're ready to complete the copy procedure.
The bottom line here is that you can move or copy any file anywhere at any time. There are no restrictions. It's simply a matter of first knowing why you want to move or copy, because there is no point in doing such things purely for the heck of it. Then you need to know where the item is now and where you want to move or copy it to. Once all that is squared away, use either a dragging method or a copy-and-paste method described earlier to do the move or copy.
In addition to the techniques already described, you can get stuff into your computer using methods listed here:
- To get pictures from a digital camera into your computer, use the Photos app (see Chapter 17).
- To get music from a CD or portable music player into your computer, use Windows Media Player (see Chapter 18).
Renaming Files
Renaming a file or folder is simple. Just right-click the item you want to rename and choose Rename. The existing name will become highlighted in a new color (the default is blue). You can type a new name, or edit the current name, and then press Enter.
If you've taken filename extensions out of hiding, that part of the name won't be highlighted. For example, the .jpg extension on the highlighted photo shown in Figure 21.13 isn't highlighted. That's because you don't want to change the extension unless you really know what you're doing. Guessing is unlikely to work. At the very least, make sure you know the extension you're about to change. That way, if you ruin the file, you can rename the file back to the original extension (in case you miss the opportunity to undo the rename).
Figure 21.13
The filename extension is not highlighted.

Undoing a rename
You can undo a rename as you can undo just about anything else. But as always, you have to do so fairly soon after the rename. Just press Ctrl+Z. If it's too late for that, you have to manually rename the file back to its original name and extension.
Renaming multiple files
To rename multiple files, select all their icons using any methods described near the start of the chapter. Then right-click any one of them and choose Rename. Type the new name (again, don't change the extension if it shows up) and press Enter. The files will all be given the name you specified. All but the first will have numbers. For example, if you renamed to River, the files will be named River, River (2), River (3), River (4), and so forth.
If you have a relatively large number of files and want to rename just a part of the filename for each one, you can turn to the Command Prompt to rename the files. For example, assume that you have a set of files named img-old-01.jpg, img-old-02.jpg, img-old-03.jpg, and so on in sequence. You want to replace the word old with the word new. Here's how to do it:
- Press Windows+X and choose Command Prompt to open a command console.
- Type CD (path) where (path) is the path to the folder where the files reside that you want to rename. For example, assuming the files are located in your Documents folder and your username is rtidrow, type CD Users tidrowMy Documents.
- Type the command rename img-old-??.jpg img-new-??.jpg and press Enter.
The question marks in the command essentially tell Windows to leave those characters alone. In this example, the sequential image numbers remain the same and only the word in the middle of the filename is changed.
Before you try renaming multiple files using the command console in this way, we suggest you make a backup copy of the files in a different folder. That way, if you really mess up the filenames by typing an incorrect command, you can simply copy the files back to the original folder to restore the old filenames.
Deleting Files
In computers, the term delete is synonymous with “throw in the trash.” That's important to know because you wouldn't want to throw important paper documents from your filing cabinet into the trash. Likewise, you don't want to delete anything important that's on your computer.
It's easy to delete files and folders. Perhaps it's too easy, because it's a leading cause of headaches and disasters, especially among beginners and casual computer users who try to learn by guessing and figuring things out. Deleting and “moving to the Recycle Bin” are basically the same thing. So, let's start with a couple of good rules of thumb. Before you delete an item or move it to the Recycle Bin, ask yourself two questions:
- Do I know exactly what this file (or folder) is?
- Am I 100 percent certain that neither I nor my computer will need it in the future, ever?
If the answer to both questions is “Yes,” go ahead and delete the file. If the answer to either question is “No,” don't delete the file or move it to the Recycle Bin.
Deleting is a simple process. If you want to delete a single file or folder, first select its icon. Optionally, if you want to delete multiple items in one fell swoop, select their icons. Then do whichever of the following is most convenient for you:
- Right-click the icon (or any selected icon) and choose Delete.
- Press the Delete (Del) key.
- Select the Home tab and click Delete.
- Drag the selected item(s) to the Recycle Bin.
By default, with Windows 8.1, you aren't prompted to confirm before the item(s) are deleted. In previous Windows versions, a confirmation appeared as a question asking if you were sure, and gave you a choice as to whether you wanted to proceed. This is no longer the default behavior option. Once you delete the file, it's sent to the Recycle Bin.
However, you can set up Windows 8.1 to display the confirmation if you want. To do so, right-click the Recycle Bin and choose Properties. In the Recycle Bin Properties dialog box, choose Display Delete Confirmation Dialog, and then click OK.
Now when you delete a file using the preceding methods, the Delete File dialog box appears. Figure 21.14 shows an example of the confirmation message.
Figure 21.14
Asking for confirmation before deleting.

The idea is to read the message, and then click Yes only if you're sure. If you're not so sure, you should click No. Clicking Yes deletes the files. Clicking No keeps the files right where they are.
When you send something to the Recycle Bin, you still get one last chance to change your mind. It's kind of like fishing something out of the wastepaper basket before you empty it for good. That doesn't mean you should put things you intend to keep in the Recycle Bin. You wouldn't put important papers in your trash can. Never put important files or folders in your Recycle Bin.
When you permanently delete a file or folder, there's no turning back. Whatever you permanently deleted is gone for good and there's no changing your mind and getting it back. Permanently deleting a file is akin to putting something down the garbage disposal. Or dousing the thing with gasoline and burning it to ashes. There is no “undo” for such actions.
Using the Recycle Bin
The Recycle Bin stores copies of files you've deleted from your hard disk. You can quickly see if one or more files are in the Recycle Bin by looking at its icon on the desktop. If the icon shows that the trash can is empty, then no files or folders are currently in the Recycle Bin. If the icon appears to have “trash” in it, then you know that one or more files or folders have been sent to the Recycle Bin and it has not been emptied since the last file was sent there.
To open your Recycle Bin, use whichever method is easiest for you:
- Open the Recycle Bin on the desktop.
- Click Recycle Bin in the Folder list in Explorer's Navigation pane.
- Click the leftmost arrow in Explorer's Address bar and choose Recycle Bin.
- Type Recycle Bin in Explorer's Address bar and press Enter.
When the Recycle Bin opens, it looks like any other folder. Figure 21.15 shows an example.
Figure 21.15
An open Recycle Bin.

Each icon in the Recycle Bin represents an item that's in your computer trash can, so to speak. You have basically two ways to use the Recycle Bin:
- Restore files that you've accidentally deleted, so they go back to their original folders. (Same as fishing something out of your real trash can.)
- Empty the Recycle Bin, thereby permanently deleting the files within it to reclaim the disk space they were using. (Same as emptying your real trash can into a dumpster or incinerator.)
The sections that follow look at each option.
Recovering accidentally deleted files
If you accidentally deleted some files or folders from your hard disk, and if they were sent to the Recycle Bin, you can get them back, provided that you don't empty the Recycle Bin first. You have three ways to do that:
- To put all items back where they were, click Restore All Items on the Manage tab.
- To put a single item back where it was, right-click its icon and choose Restore. You can also click the Manage menu to access the Restore option.
- Select multiple icons, right-click any selected icon, and choose Restore to put all those selected items back where they were.
Each file and folder you restore will be returned to its original location.
Permanently deleting Recycle Bin files
When you feel confident that the Recycle Bin contains only folders and files that you'll never need again, click Empty the Recycle Bin in the toolbar. The icons in the Recycle Bin disappear. The files and folders that those icons represented are permanently deleted from your hard disk. The space they occupied is freed up for anything you might want to save in the future.
If you want to remove only one or a selection of files from the Recycle Bin, select those files, right-click, and choose Delete. Windows asks if you want to permanently delete the files, removing them from the Recycle Bin. Click Yes to delete them, or No to leave them in the Recycle Bin.
When you've finished with the Recycle Bin, you can close it as you would any other window — by clicking the Close (X) button in its upper-right corner.
For all intents and purposes, you should consider the files that were in the Recycle Bin as permanently gone. But if you messed up and emptied too early, you might be able to get some of the files that were in there back using the Previous Versions feature discussed in Chapter 24.
Creating and Deleting Shortcuts
Shortcuts provide an easy way to get to a file or folder without having to navigate through a bunch of folders. For example, let's say you have an external disk drive X. On that drive, you have a folder named My Big Project inside another folder named Xternal Docs. To view the contents of your My Big Project folder, you have to open your Computer folder, open the icon for drive X, open the Xternal Docs folder, and then open the My Big Project folder. Doing that repeatedly gets tiresome.
If you create a shortcut to My Big Project, you won't have to go through all those steps. You just have to open the My Big Project shortcut icon. That shortcut icon can be anywhere you like — on the desktop, in your Documents folder, in the Favorites pane — or any combination thereof.
You can create a desktop shortcut to virtually any program, folder or file just by right-clicking that item's icon and choosing Send To ⇒ Desktop (create shortcut). You can also use any of the following methods to create a shortcut to a file or folder:
- Hold down the Alt key as you drag an icon to the folder in which you want to place the shortcut.
- Drag, using the right mouse button, the selected icon(s) to where you want to put the shortcuts. After you release the right mouse button, click Create Shortcuts Here.
- Copy the selected icon(s) to the Clipboard (press Ctrl+C or right-click and choose Copy). Then right-click some empty space at the location where you want to place the shortcuts and choose Paste Shortcut.
Once you have a shortcut, you can double-click (or click) its icon to open the item to which the shortcut refers.
It's important to understand that when you delete a shortcut to a resource, you delete only the shortcut. You don't delete the folder or file to which the shortcut refers. That means you can easily create a bunch of shortcuts to a folder you're working with right now.
Later, when you move on to another project in another folder, you can delete all those shortcuts and replace them with new shortcuts to whatever folder you're working in currently. But you have to make sure you delete the shortcuts only, not the real folder because when you delete the real folder, you also delete everything that's in that folder. You also render the shortcuts useless because the location to which they refer no longer exists. When you try to open a shortcut that points to a nonexistent file or folder, you see a message like the one in Figure 21.16.
Figure 21.16
Opening a shortcut that leads nowhere.

If you deleted the item recently and it's still in the Recycle Bin, click the Restore button. The original item will be taken out of the trash and put back where it belongs, and the shortcut will work. Otherwise, if there's no way to recover the item to which the shortcut refers, all you can do is delete the now-useless shortcut by clicking the Yes button.
If you're thinking about deleting an icon, but you aren't sure if it's a shortcut or the real thing, there are ways to find out. For one thing, all links in the Favorites portion of Explorer's Navigation bar are shortcuts. Desktop icons you control from the Desktop Icon Settings dialog box are also shortcuts. We're not suggesting you delete any of those unless you have a very good reason, but if you do delete one, be aware that you're deleting only the shortcut and not the actual item.
![]() Chapters 10 and 20 provide more detailed information about the items described in the preceding paragraph.
Chapters 10 and 20 provide more detailed information about the items described in the preceding paragraph.
Shortcut icons of your own making have many characteristics that make it easy to distinguish them from the items to which they refer. The most obvious is the curved arrow that appears right on the icon. The name of the icon usually has - shortcut at the end (if you don't rename the shortcut). The filename extension for a shortcut icon is always .lnk (for link). The size of a shortcut will always be tiny (1KB or less). When you right-click the icon and choose Properties, the General tab shows the Type of File as Shortcut (.lnk). The Shortcut tab shows information about the icon and its target, as in Figure 21.17.
When you delete a shortcut, you delete only the shortcut, not the item to which it refers. So, you can create and delete shortcuts on-the-fly without losing any important files or folders. But the number-one rule of deleting still applies: Know exactly what you're deleting and why you're deleting it before you delete. It's as simple as that.
Figure 21.17
Anatomy of a custom shortcut icon.

Managing Files with DOS Commands
This section is for people who were around in the DOS days and remember commands such as CD (change directory), Copy (to copy files), and so forth. All those old DOS commands still work. Using DOS commands is useful in some instances, such as when you want to print a list of filenames or paste them into a file. So, in this section, we'll look at how all that works.
Getting to a command prompt
The first step to using DOS commands is to get to the Command Prompt window (also called a console window). To do so, press Windows+X and then choose Command Prompt. A window reminiscent of ye olde DOS days opens, complete with the standard prompt that displays the folder (directory in DOS terms) that you're currently in. Figure 21.18 shows an example. Note that we've changed the size of the default window from 80 x 25 pixels to 120 x 60. Also we've changed colors for the console to be black text on a white background. The default is white text on a black background.
Figure 21.18
The Command Prompt window.

The Command Prompt window has a title bar and taskbar button. You can drag the window around by its title bar. To a limited extent, you can size the Command Prompt window by dragging any corner or edge, but the height is limited to the number of lines currently displayed within the window.
To get full control over the size of the Command Prompt window, you need to use its Properties dialog box. That Properties dialog box also lets you choose a cursor size, a Full Screen View, a font, text and background colors, and so forth.
You can get to the Command Prompt window's Properties dialog box in two ways: If you want to change properties for the current session only, right-click the Command Prompt title bar and choose Properties. If you want to change the defaults for future sessions as well, right-click the title bar and choose Defaults. The dialog box that opens is self-explanatory and is a normal Windows dialog box.
You can scroll up and down through the Command Prompt window using the vertical scroll bar at its right. The navigation keys don't work unless you right-click within the window and choose Scroll. You can't type normal characters in the scroll mode; you can just navigate up and down. To get out of scroll mode and back to normal typing, press Enter.
To exit a command prompt session, type exit and press Enter. Or close the Command Prompt program window by clicking its Close (X) button or by right-clicking its taskbar button and choosing Close.
Using the command prompt
The Command Prompt window works just like the screen did in DOS. You type a command and press Enter (assuming that you're not in the aforementioned “scroll mode,” wherein typing normal characters just triggers a beep). After you press Enter, you see the results of the command and another command prompt appears. For example, if you enter Help (that is, type the word Help and press Enter), you see a list of all the supported DOS commands.
To get help with a command, type its name followed by a forward slash and question mark. For example, entering the command dir /? shows help for the Dir command. The Doskey feature is enabled automatically (again assuming that you're not in the bizarre scroll mode). So, you can use the up and down arrow keys (↑ and ↓) to retrieve previous commands from the current session. Press the left and right arrow keys (← and →) to bring back and remove the previous command one character at a time.
The mouse doesn't do much in the Command Prompt window. As mentioned, you can right-click the title bar (or its taskbar button) to get to the properties sheet. You can right-click and choose Scroll to enter the (disturbing) scroll mode where navigation keys move through the window and normal characters do nothing but beep at you (although pressing Enter terminates the scroll mode).
Copy and paste in the Command Prompt window
Right-clicking in the Command Prompt window provides some options that allow you to use copy-and-paste. It's a bit tricky, but handy when you want to copy a lengthy list of filenames into a Word, WordPad, or Notepad document. If you'll be using the keyboard to select only a portion of the text, you first want to use the scroll bar to navigate to the text that you want to select. If you'll be using the mouse to select a portion of text, or you'll be selecting all the text in the window, it's not so important where you start.
To select the entire window, right-click within the window and choose Select All. To select only a portion of the window's contents, right-click within the Command Prompt window and choose Mark. You'll see a square cursor. To select with the keyboard, hold down the Shift key and use the arrow keys, PgUp, and PgDn keys to extend the selection through the text you want to select. With the mouse, move the mouse pointer to the far-right edge of the window, hold down the left mouse button, and then drag diagonally through the text you want to select.
Once you've selected some text, press Enter to copy the selected text and also clear the selection. From there, you can paste the copied text into any document that accepts pasted text.
You can paste a command into the window, but it has to be a valid DOS command. Just right-click near the command prompt and choose Paste.
Navigating from the command prompt
Navigating to a particular drive at the command prompt is easy. Type the drive letter followed by a colon and press Enter. For example, entering d: takes you to drive D:. Entering c: takes you to drive C:.
Use the cd (Change Directory) command, just as you did in DOS, to go to a folder on the current drive. You can use the following three cd commands:
cdtakes you to the root folder of the current drive.cd..takes you to the parent of the current folder.cd foldertakes you to the subfolder specified byfolder.
Using wildcards
When specifying filenames in most DOS commands, you can use wildcard characters to represent characters in the filename. Use the ? character to represent a single character and the * character to represent multiple characters. For example, a?c.txt would match abc.txt, a2c.txt, aqc.txt, and so on. By comparison, a*c.txt would match abc.txt, a12345c.txt, anotherc.txt, and so on.
A common use for the wildcard is to find all files of the same type, such as *.jpg, which would match all JPG files. So, the following command would list all JPG files in the current folder:
dir *.jpg
The following section explains how to use the dir command.
Printing a list of filenames
Perhaps the one thing that the DOS command offers that Explorer doesn't is the ability to easily print a list of filenames from any folder, or even a parent folder and all its subfolders. Although you can print directly by following any command with >prn, we're sure most people would prefer to get that list into a Word or WordPad document. From there, you can edit and sort the filename list to your liking, and then print it.
You use the dir command to list the filenames. You may find some of the following optional switches useful for controlling how dir displays its output:
/s: Include filenames from subfolders./b: Display filenames in bare format (no headings or summary)./w: Show in wide format./d: Same as wide, but sorted by columns./n: Use long list format with filenames to the far right./l: Use lowercase letters./o: Sort output by column as follows:n(by name),s(by size),e(by extension),d(by date),-(prefix for descending sort),g(group folder names first).
As an example of using the /o switch, the command dir /on lists filenames in ascending alphabetical order. The command dir /o-s lists filenames by size, in descending order.
Let's look at a practical example. Suppose that you've downloaded music to your Music folder. The songs are organized into folders by artist and album. But you want a list of all song filenames, from all the subfolders.
Step 1 is to get to the parent folder of all the files you want to list. The DOS command would be cd followed by the full path to that folder: for example, cd C:UsersyourUserNameMusic where yourUserName is the name of your user account.
Next, you need to enter a dir command with the /s switch to list the filenames from all the subfolders. You can use any other switches in combination with /s. For example, here's a dir command that lists all the filenames in bare format:
dir /b /s
Here's one that lists files in the columnar wide format with filenames listed alphabetically by name:
dir /d /on /s
You can try out various DOS commands to see which presents the most reasonable list of filenames. Then, when you get a decent list, enter that command again, but follow it with >filename.txt where filename is any name of your choosing. The file will be stored in whatever folder you're currently in. For this example, we'll use SongList.txt as the filename. So, you might enter a command like this at the command prompt:
dir /d /on /s >SongList.txt
You won't get any feedback on the screen after you redirect the output to a file. You can just exit the Command Prompt window. Then use File Explorer to navigate to the folder from which you ran the dir command. You'll find your SongList.txt file there. Right-click it and choose Open With ⇒ Microsoft Word (or whatever program you want to use to edit the file).
The list will look exactly like DOS output, which might not be ideal. But if you know how to use the program, it shouldn't be too tough to select and delete anything you don't want in the document. Then, save it, print it, and keep it for future reference.
Whether this example of exporting filenames is of any value to you, we can't say. But it's just an example. If you know DOS, you may be able to come up with more useful applications of your own. You can do anything at the Command Prompt window that you could do in DOS — even copy and delete files. Remember that for a quick overview of all the DOS commands available in the Command Prompt window, just type help at the command prompt and press Enter.
Wrap-Up
Managing files and folders in Windows 8.1 is a lot like it was in earlier versions of Windows. You just have more ways of doing things. Here's a quick wrap-up of the main topics covered in this chapter:
- To select a single icon to work with, click it (if you're using double-click to open files) or point to it (if you're using single-click to open files).
- To select multiple icons, use Ctrl+click or Shift+click, or select it with your finger (if you have a touchscreen device) or the drag-through method, whichever is appropriate to your goal and easiest for you to use.
- To move or copy selected files and folders, drag them to some new location, or use copy-and-paste, or use the Copy or Move options under File and Folder Tasks in the Explorer bar.
- To rename a file or selected files, right-click and choose Rename.
- To delete a file or selected files, right-click and choose Delete.
- Small items you delete from your hard drive are just moved to the Recycle Bin.
- Large files, and files you delete from removable media, are not sent to the Recycle Bin.
- To recover a file from the Recycle Bin, right-click its icon and choose Restore.
- To permanently delete all the files in the Recycle Bin and reclaim the disk space they're using, empty the Recycle Bin.
- When you delete a shortcut to a resource, you delete only the shortcut — not the resource itself.
- If you're a DOS guru, you can still use DOS commands to manage files. Press Windows+X and choose Command Prompt to get to the Command Prompt window.