Chapter 11: Customizing Startup Options
IN THIS CHAPTER
Understanding applications and services
Starting programs automatically
Preventing programs from auto starting
Managing services
Bypassing the login page
Your computer already has many programs and apps installed on it, and many thousands more that you can add to it. Many are programs that you can start at will from icons on the Start screen or desktop. Some programs start automatically when you log in. Often, these programs run in a window, as an icon on the taskbar, or both.
Another type of program starts automatically as soon as you start your computer. These are referred to as services, and services are most often part of the Windows operating system itself or programs that control hardware or other underlying functions. Services generally don't have program windows or have taskbar buttons on your desktop. In fact, you would likely never know that services existed unless you went looking for them.
This chapter is about controlling exactly which programs and services do, and don't, start automatically when you first start your computer and Windows. By controlling these programs, you can streamline the Windows startup and fix problems with performance or function. We don't cover new Windows 8 apps too much in this chapter because they're covered in more detail in other chapters. Instead, this chapter focuses primarily on legacy Windows programs that run in the desktop environment.
First Things First
First, we need to make a distinction between application programs and services. For the purposes of this chapter, an application program (or application) are programs that, when open, usually have a program window on your desktop and a rectangular button in the taskbar. Typically, you open and use such a program to perform some specific task, such as browse the web or perform spreadsheet tasks. Then you close the program when you've finished that task. To close such a program, you can typically click the Close (X) button in the program's upper-right corner or right-click the program's taskbar button and choose Close. You can reopen the program at any time by clicking its icon on the Start screen. Windows 8 apps can be closed by grabbing the top edge of their window and dragging down until the app resizes to a small rectangle. Release the mouse button and the app closes.
Even though most application programs run in a window and live on the taskbar, not all do. Windows 8 apps run as standalone programs that do not show up on the Windows taskbar. They are accessible as tiles from the Windows 8.1 Start screen. Many utility applications appear as icons on the notification area (tray). The Ultramon program, for example, runs as an icon on the tray and provides special features for using multiple displays. Typically, when you rest the mouse pointer on a tray icon such as Ultramon's, a tooltip appears, showing the name of the program that the icon represents. Clicking or double-clicking such an icon often opens a dialog box or similar window. Right-clicking such an icon often displays a list of things you can do with the program.
![]() In many cases, you can control whether a program's icon appears in the tray. You can also control which of the Windows 8 tray icons appear in the tray. See Chapter 10 to learn how to customize the taskbar and tray.
In many cases, you can control whether a program's icon appears in the tray. You can also control which of the Windows 8 tray icons appear in the tray. See Chapter 10 to learn how to customize the taskbar and tray.
Services are also application programs, but services generally don't provide any means for the user to interact with them. Many services are actually included as part of the operating system. For example, the Windows Time service provides time synchronization functions for Windows, enabling it, for example, to set the computer's time from a remote time server. The DHCP Client service is another example of a service. It is responsible for (among other things) obtaining an IP address for your computer when the computer starts up, enabling your computer to participate on the network.
Neither the Windows Time service nor the DHCP Client service provides any means for you to interact with them; they do their thing in the background with no input from you. In contrast, the Windows Firewall service does provide a means for you to interact with it. Even so, Windows Firewall is still a service, and most of the time, you don't interact with it. Services such as this that provide a means for user interaction are by far the exception rather than the rule.
Why are we telling you about services and how they differ from other programs? In most cases, you won't need to manage services or control their startup, but in some situations, doing so is necessary. Most of the time, you'll be more concerned with which application programs start automatically. But it's important for you to understand the difference so that you can make an educated decision as to how to handle services. One of the main focuses of this chapter is to help you understand how to make programs start automatically that normally don't do so, how to stop certain programs from starting automatically, and why you would want to do either. Let's start with how you make programs start automatically.
Starting Programs Automatically
If you always use a certain program when you start your computer, you can configure Windows to start that program automatically. For example, maybe you use Microsoft Outlook 2013 all the time for your e-mail and want it to open as soon as you log in to the computer so that you don't have to start it yourself.
Using the Startup folder
You have a couple of ways to make programs start automatically when you log in. In previous versions of Windows (for example in Windows 7), you could access the Start menu from the Start button and All Programs menu. Windows 8.1 does not provide this type of access to it. Similarly, you cannot use Search to directly find the Startup folder.
Fortunately, you can pin the Startup folder to the Start screen so you can quickly add or remove programs from it. To do that, use these steps:
- Press Windows+X and then click Run.
- Type shell:startup and click OK. File Explorer opens so you can see the contents of the Startup folder. Click the Programs folder in the Address bar to go back one subfolder so you can see the Startup subfolder listed in the main Explorer window. Figure 11.1 shows an example Startup folder. You also can enter the following path, using your user profile name in place of
<username>:Figure 11.1
The Startup folder.

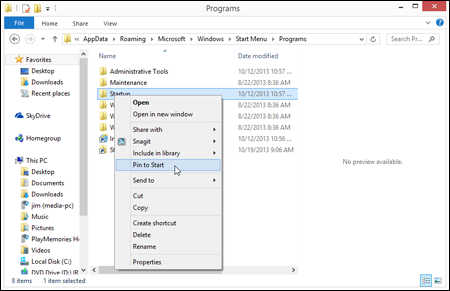
C:Users<username>AppDataRoamingMicrosoftWindowsStart MenuPrograms - Right-click the Startup folder and choose Pin to Start on the context menu, as shown in Figure 11.2. A shortcut of the folder appears in the current folder view.
Figure 11.2
Pin the Startup folder to the Start screen.
- Display the Start screen by pressing the Windows Key or showing the Charms Bar and clicking Start.
- Scroll to the far right to see the Startup folder pinned to the Start screen, as shown in Figure 11.3.
You can now open the Startup folder to view and manage programs that start when you boot up Windows. If you want a program to start automatically for you, put a shortcut for the program in your Startup folder. If you want a program to start automatically for everyone, you can instead put it in the Startup folder for all users.
Figure 11.3
The Startup folder pinned to the Start screen.

If you're already logged in to your user account, the steps to open your own Startup folder are easy:
- Display the Start screen.
- Scroll over until you see the Startup folder tile on the screen.
- Click that Startup folder tile. The folder opens as a folder on the desktop.
To make an application program auto start, right-drag (drag with the right mouse button) an icon for that program into Startup folder and drop it there; then choose Create Shortcuts Here.
When you've finished, close the Startup folder. Windows Defender may show a message alerting you to the fact that your startup options have changed. No cause for alarm. In this case, the message is superfluous because you intentionally changed your startup programs. Defender doesn't know that, however. It's just doing one of its many jobs, which in this situation is to keep you informed of changes to your startup options.
Using the Task Manager Startup tab
You can use the Windows 8.1 Task Manager to help you manage and monitor running programs and services. Chapter 32 discusses Task Manager in detail, but it's worthwhile to mention now that you can view and disable properties of programs in your Startup folder with the Startup tab.
Figure 11.4 shows an example of a Startup tab (click More Details to view this tab). Notice the Status column. It tells you if a program is enabled or disabled. To disable a program, right-click the row on which it appears and click Disable. You also can click a program and click the Disable button at the bottom of the Task Manager window.
Figure 11.4
The Startup tab of Task Manager.

An interesting part of the Startup tab is the Startup Impact column. That column shows you the relative impact on your system when Windows starts a program automatically.
Stopping auto start applications
Should you ever change your mind about auto start applications, you just need to reopen that Startup folder for your user account. Then delete the shortcut icon for any program you don't want to auto start. Or, if you moved it from another location, move it back (out of the Startup folder). However, not all programs that auto start will be in the Startup folder for your user account. Some may be in the Startup folder for all users. (Still others will be in other locations.)
To view, and optionally remove, programs that start automatically in all user accounts, you need to get to the all users Startup folder, found at the following hidden location:
C:ProgramDataMicrosoftWindowsStart MenuPrograms
You may need administrative privileges to make changes to that folder, so be prepared to enter an administrative password if you're working from a standard account. Figure 11.5 shows an example of the Startup folder for all users. You can open the Startup folder from within this folder view.
Figure 11.5
Open the Startup folder for all user accounts.

The Startup folder for all users works just like the Startup folder for a single user account. If you want a program to auto start in all user accounts, drag that program's icon into the folder. If you want to stop a program from auto starting in all user accounts, delete its icon from that Startup folder. But again, stick with programs you know. Removing programs from the Startup folder for all users at random could have unpleasant consequences that you weren't expecting.
Using the System Configuration Tool to Control Startup
One tool that has existed in multiple versions of Windows that lets you control program startup is the System Configuration program. That program is also available in Windows 8.1. To open System Configuration, open the Control Panel, click Large Icons or Small Icons from the View By drop-down list, and click Administrative Tools. Double-click the System Configuration shortcut.
If you're at the Windows Start screen, type MSCONFIG. Click the Msconfig icon in the Apps window.
Figure 11.6 shows the System Configuration program window.
Figure 11.6
The System Configuration program window.

The General tab, shown in Figure 11.6, offers three options for controlling startup:
- Normal Startup: Start Windows normally. All items that normally start automatically are started.
- Diagnostic Startup: Load only basic device drivers and operating system services but not other services or programs. Use this option to troubleshoot problems with Windows startup that might be caused by a third-party service, device driver, or program.
- Selective Startup: Choose which types of items to start automatically. Start Windows with basic devices and services, and optionally other system services and startup programs.
The Boot tab, shown in Figure 11.7, lets you control how Windows boots. The large list box lists all the operating system boot selections. If Windows 8.1 is the only operating system on the computer, it will be the only one listed in the text box. If you have a dual-boot system (for example, with Windows 7 and Windows 8.1 on the same computer in different partitions), those additional operating system instances will also be listed. Click an instance and then click Set as Default to make that operating system boot by default when the computer starts.
Figure 11.7
The Boot tab.

The other options under the Boot Options group enable you to configure options for a safe boot so that the next time you start Windows, it boots with the specified safe boot option. You can also set other boot options. Because you likely will use these options rarely, if ever, we point you to the Help content rather than cover them here. Just click the Help button on the Boot tab to view an explanation of these options.
The Services tab (shown in Figure 11.8) gives you a means to disable services so that they don't start when Windows boots. This tab also shows the current state of the services on the computer. Selecting the check box beside a service indicates that the service is enabled. You can disable a service by clearing its check box. If you want to view only third-party services, select the Hide All Microsoft Services check box. This helps you identify services that are not part of the Windows 8 operating system.
Figure 11.8
The Services tab.

In general, you should avoid disabling services unless you know exactly what the service does and what the consequences of disabling it will be. Usually, you want to disable a service only if a tech support engineer or some troubleshooting documentation has directed you to do so.
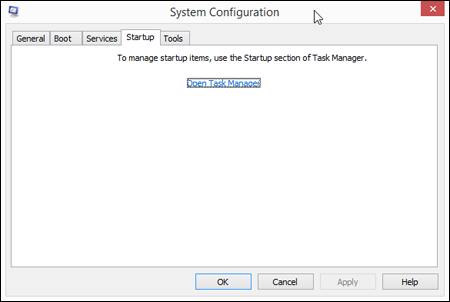
The Startup tab is pretty useless in Window 8.1. It simply has a link (see Figure 11.9) to the new and improved Task Manager's Startup tab, which was discussed earlier in the chapter (refer to Figure 11.5).
Figure 11.9
The Startup tab.
Often, program developers design their programs to start from the registry instead of the Startup folder when they don't want the user to be able to turn off the program without uninstalling it. This is typical for antivirus programs and other utility programs. If you're trying to turn off a program and you don't find it in one of the Startup folders, there is probably an entry for the program in the registry that causes it to start automatically.
The Tools tab (see Figure 11.10) gathers a selection of useful tools for troubleshooting problems with your computer and compiling more information about programs. Just click a tool and click Launch to open the tool.
Figure 11.10
The Tools tab.

After you make changes to configuration settings in the System Configuration tool, you need to click OK and then restart the computer to make the changes take effect.
Services Snap-In
Windows 8.1 includes a system management framework tool called the Microsoft Management Console (MMC). The MMC provides access to various snap-ins, with each snap-in providing options for different configurations or an interface to manage items such as policies, accounts, and so on. One of these snap-ins is named Services.msc. It's not a user-friendly program; instead, it's designed for professionals. Beginners and casual users are better off sticking with the Startup folders to work with auto start programs. Even so, beginners can start to understand how some of the underlying pieces of Windows work by looking through the Services console and checking out what some of the services do.
To start the Services snap-in, press Windows+X on the desktop, click Run, and type SERVICES.MSC. Click OK. When the Services snap-in is open, use the View menu options to choose how you want to view icons. Figure 11.11 shows how things are displayed in the Detail view. The toolbar contains a couple of buttons for showing and hiding optional Console Tree and Action panes. (Both are shown in Figure 11.11.) Extended and Standard tabs are near the bottom of the window. Both tabs show the same information, but the Extended tab shows additional information about the selected service, with links for starting and stopping the service. The figure shows how things look in the Extended tab.
Figure 11.11
The Services snap-in.

Selecting the Extended tab opens a new pane at the left side of the program window that shows detailed information about any service name you click. It also provides options to start a service that's not running, or to stop or restart the service if it's not running correctly.
If you scroll through the list of services, you'll probably see quite a few. Exactly which services are listed will vary from one computer to the next. Few, if any, of the services will have any meaning to the average computer user. These things are really only of use to professional programmers, network administrators, support technicians, or other experienced professionals. What follows is mainly for those folks. We don't summarize what each service does because doing so would eat up several pages and only repeat the information that's already in the Description column.
The Status column shows Running for those services that are currently running. It shows nothing for services that aren't running. The Startup Type column shows whether the service is configured to run automatically, if at all. Common settings are as follows:
- Automatic (Delayed Start): The service starts automatically, but only after a delay in time to enable other dependent services to start.
- Automatic: The service starts automatically when the computer starts or when a user logs in.
- Manual: The service doesn't start automatically. You can start the service, however, by right-clicking the service name and choosing Start or by choosing Start from the Action menu.
- Disabled: The service is disabled and must be enabled from the Properties dialog box before it can be started.
To get more information about a service or change its Startup type, right-click the service name and choose Properties. You see a dialog box like the one in Figure 11.12.
Figure 11.12
Properties for the DNS client service.

The options you see in Figure 11.12 are typical of the items listed in the Services snap-in. The Description text box provides a description of the services and tells what will happen if you disable or stop the service. The Path to Executable text box shows the location and name of the program that provides the service. The Startup Type option provides the Automatic, Manual, and Disabled options.
The buttons let you stop, pause, resume, or start the service. Some programs accept parameters, which you can add to the Start Parameters text box.
The Log On tab provides options for granting rights to services that need permissions to run. The Recovery tab provides options for dealing with problems when a service fails to start.
The Dependencies tab (see Figure 11.13) is one of the most important of the bunch because it specifies which services the current service depends on (if any) and which services depend on the current service. For example, DNS is a TCP/IP thing (which is the protocol used by the Internet and most modern local networks). If a service isn't starting and you can't figure out why, seeing what services the current one depends on might provide a clue. If the dependent service isn't running, the original one you're looking at can't start, so you need to go to its dependent service and make sure it's starting.
Figure 11.13
The DNS Client service Dependencies tab.

If you're interested in learning more about TCP/IP and how the Internet works, any book on TCP/IP or networking, or any book or course that prepares you for Microsoft Certified Systems Administrator (MCSA) or Microsoft Certified Systems Engineer (MCSE) certification, would explain all that in depth. For broader technical coverage of services, consult a technical reference such as Microsoft TechNet at http://technet.microsoft.com.
For more information on Microsoft certifications, see www.microsoft.com/learning/en-us/default.aspx.
Bypassing the Login Page
This is one of those little Windows secrets everyone likes to know about but should be cautious about using. It lets you bypass the login screen and start up Windows 8.1 in a specific user account automatically. Although it does save you one click at startup, it means anyone who sits at your computer can just turn on the power switch and have full access to everything in your user account. So don't do this if you want to keep other people out of your user account.
This trick requires administrative privileges. So, you need to know the password or you need to log in to an administrative account first. Here are the steps:
- Press Windows+X, click Run, and enter netplwiz. Or you can open the Charms Bar, click Search, and enter netplwiz. Click the Netplwiz application on the Apps screen. The User Accounts dialog box appears, as shown in Figure 11.14.
Figure 11.14
The User Accounts dialog box.

- Grant permission or enter an administrative password if prompted.
- Clear the Users Must Enter a User Name and Password to Use This Computer check box.
- Click Apply.
- In the dialog box that opens, type the name of the non-administrative user account to which you want to log in automatically.
- If that user account requires a password, type the password once in the Password box and then again in the second box for confirmation. If the user account isn't password protected, leave both boxes empty.
- Click OK in each open dialog box.
That's it. The next time you restart your computer, there will be no login page. You're taken directly to your user account. If there are other user accounts on the computer, and you want to let another user log in, log out of your account (click the Start button, the arrow next to the lock symbol, and choose Log Off). You're taken to the login page, which works normally. For example, if you want to get into a password-protected administrative account, you'll still click that account's icon and you'll have to enter the correct password.
If you ever change your mind about doing this, just repeat Steps 1 and 2 in the preceding list. This time, however, select the Users Must Enter a Username and Password to Use This Computer check box and click OK.
Troubleshooting Startup
Many things can prevent Windows from starting properly. There is no simple solution to the problem because too many things might be wrong. Typically, you need a professional to fix such problems. But we can tell you a few things that even the average user might try to get things going again.
Get rid of disabled devices
If your computer contains a hardware device that Windows 8.1 can't use, you should still be able to get to the desktop. But each time you do, you'll see a notification message about a device being disabled. That can get tiresome. If you manually disable the device through Device Manager, you won't see that message anymore. Also, it should take a little less time for Windows 8 to start.
To disable a device, you need to first log in to a user account that has administrative privileges. Then press Windows+X and click Device Manager on the Power menu. Expand the category to which the device belongs. If you're not sure which category to look in, try the Other Devices category. You'll be looking for a device whose icon shows an exclamation point in a tiny yellow triangle. After you find the device, right-click its name and choose Disable.
When you've disabled the device, the yellow icon changes to a white downward-pointing arrow. That means the device is disabled and Windows 8 won't try to reinstall it on future boot-ups, which should mean a slightly quicker boot-up time and no irritating message about the disabled device.
When Windows won't start at all
If Windows won't start at all, try to start Windows 8 in Safe Mode. This is a special mode in which Windows 8 loads only the minimum services, drivers, and programs it needs to get going. Getting to Safe Mode isn't always easy. Read Chapter 6 on how to enable Safe Mode in Windows 8 and how to boot into it once it's enabled.
Start Screen versus the Desktop
Most of the negative press about Windows 8 and Windows 8.1 has little or nothing to do with the technical features in Windows, but rather focuses on the design shift from the desktop to the Start screen. Rather than focus on the capabilities and improved performance of the operating system, many so-called Windows “pundits” decry the fact that Windows 8 boots to a Start screen rather than the desktop. Most of them ignore the fact that the Windows desktop is just a click away. All a user has to do is click the Desktop tile to switch to the familiar desktop.
To address these complaints, Microsoft has introduced some additional features in Windows 8.1 to enable you to control whether Windows 8.1 opens the Start screen or the desktop when you log on. You can also configure additional settings that control how Windows 8.1's Start screen and desktop work together.
To access these settings, open the desktop, right-click the Taskbar, and choose Properties. Then select the Navigation tab (see Figure 11.15).
Figure 11.15
The Taskbar and Navigation Properties dialog box.
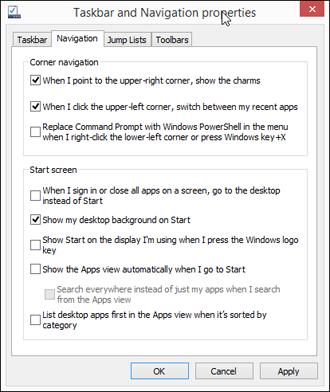
The first three options on the Navigation tab let you control what happens when you move the pointer to or click in the upper-left, upper-right, and lower-left corners of the desktop:
- When I Point to the Upper-Right Corner, Show the Charms: When this option is enabled, Windows 8.1 displays the Charms Bar when you move the pointer to the upper-right corner of the display.
- When I Click the Upper-Left Corner, Switch between My Recent Apps: When this option is enabled, Windows 8.1 cycles through the currently running apps when you click in the upper-left corner of the display.
- Replace Command Prompt with Windows PowerShell in the Menu When I Right-Click the Lower-Left Corner or Press Windows+X: Enable this option if you want Windows 8.1 to show a link for Windows PowerShell in the desktop's Start menu rather than the Command Prompt.
The options in the Start Screen control group let you control how and when Windows displays the Start screen:
- When I Sign In or Close All Apps on a Screen, Go to the Desktop instead of Start: Enable this option if you want Windows 8.1 to start on the desktop rather than the Start screen when you log in. This option, when enabled, also causes Windows 8.1 to display the desktop after you close a Windows 8 app.
- Show My Desktop Background on Start: Enable this option if you want Windows 8.1 to display the same background on the Start screen as you have on your desktop.
- Show Start on the Display I'm Using When I Press the Windows Logo Key: If your computer has multiple displays attached, enabling this option causes Windows 8.1 to display the Start screen on the currently active display when you press the Windows logo key. When this option is disabled, Windows 8.1 shows the Start screen on the primary display.
- Show the Apps View Automatically When I Go to Start: Enable this option if you want Windows 8.1 to shows the Apps view of the Start screen (see Figure 11.16), rather than the default Start screen view.
- Search Everywhere instead of Just My Apps When I Search from the Apps View: Enable this option to have Windows 8.1 search everywhere (for example, including the Internet) instead of just your installed apps when you search from the Apps view.
- List Desktop Apps First in the Apps View When It's Sorted by Category: Enable this option if you want Windows 8.1 to show your installed desktop apps first in the Apps view of the Start screen (when shown by category). Enabling this option helps you locate your desktop apps more quickly when using the Start screen.
Figure 11.16
The Apps view of the Start screen.

Wrap-Up
This chapter has covered all the different ways you can control which programs do, and don't, automatically start when Windows first starts up or when you first log in to your Windows user account.
- Some programs have their own built-in options for choosing whether the program starts automatically and appears in the notification area.
- You can start any application program automatically, or even open a folder automatically, by adding a shortcut for the program to the Startup folder.
- The full set of services that can be started and stopped automatically is listed in the
Services.mscsnap-in. - The
Services.mscsnap-in is an advanced tool designed for professional Information Technology workers and network engineers. As such, it contains very little information that would be useful to the average computer user. - You can use
netplwizto bypass the login page and go straight to any user account you wish. - Safe Mode provides a means of starting Windows 8 with the fewest drivers and services. It helps you get the system started so that you can diagnose and repair the problem that is preventing normal startup.
- Use the Navigation tab of the Taskbar and Navigation Properties dialog box to control how and when Windows 8.1 displays the Start screen and desktop.