Chapter 25: Installing and Managing Printers
IN THIS CHAPTER
Using the new Windows 8.1 Devices tool
Using your Devices and Printers folder
Choosing a default printer
Installing a new printer
Managing printer drivers
Setting default printer properties
Installing a printer is usually an easy job. There's one rule that applies to installing any hardware, and it certainly applies to printers: Read the instructions that came with the printer first. Trying to save time by ignoring the instructions and winging it is likely to cost you more time in getting the thing to work.
In many cases, you'll have the option to connect the printer to a USB port or a printer port. If your computer is a member of a network, you might want to install a shared printer that's physically connected to some other computer or a printer that is directly connected to the network. This chapter looks at different ways of installing printers, including using the new Windows 8.1 Devices tool, as well as techniques for managing installed printers.
Windows 8.1 also packs new support for wireless printing (WI-FI Direct) and far easier and more efficient support for ad-hoc connection to printers. Windows 8.1 also supports NFC (Near Field Communications) tap-to-pair technology.
There is nothing special you have to do to connect to printers using these technologies. Both WI-FI Direct and NFC tap-to-pair implementation depends on the printers. Newer printers support WI-FI Direct, while older printers can use NFC tap-to-pair if you attach NFC tags to them. On the client side, you don't have to do anything extra to connect to printers using this technology with Windows 8.1. NFC tap-to-pair is a boon for users on tablets, phones, and other handheld devices. (Tap-to-pair is not practical from your desktop computer.)
Printer Properties Versus Printing Properties
Two types of properties are covered in this chapter: printer properties and printing preferences. The distinction isn't obvious from the terminology, so here's a general description to help you understand the difference:
- Printer properties: These properties apply to the printer itself, such as the way it's connected to the computer, whether and how it's shared on the network, the way the computer sends information to the printer, when the printer is available, and more.
- Printing preferences: These properties apply to how the printer creates a printed document, including such features as paper source, paper size, duplex printing, paper quality settings, print scaling, watermarks, and other document output properties.
In a way, you can think of printer properties as related to how the printer prints all documents, and printing preferences as related to how the printer prints specific documents. That's not 100 percent accurate, but it should begin to help you understand the distinction between the two.
If you're a typical Windows user, you'll be more likely to spend time configuring printing properties than printer properties. If you're a power user or administrator, however, you'll no doubt spend some time configuring printer properties to control how the printer operates.
Before diving into printer and printing preferences, you need to get your printer installed. That's covered in the following section.
Add a Printer with the Devices Tool
Windows 8.1 includes a new Devices tool in the PC Settings area. The Devices tool provides a way to add, remove, and view your hardware devices, such as a printer. What we have found is that once Windows 8.1 recognizes a new printer connected to your computer, regardless of whether you're actively using the Devices tool, Windows 8.1 automatically installs device drivers for it (as long as those device drivers are part of the Windows 8.1 installation).
To get to the Devices tool, do the following:
- Show the Charms Bar.
- Choose Settings.
- Click Change PC Settings.
- Click PC and devices on the PC Settings list. An example of the Devices tool is shown in Figure 25.1.
In this example, a printer named MFC-J835DW has been added to the Devices list. If your printer is not showing up in this list, make sure the printer is connected to an active USB port (or other printer port) and ensure the printer is turned on. If, after doing these checks, the printer does not start installing, click the Add a Device button on the Devices page. Windows 8.1 will look for the new device (your printer in this case) and upon locating it will install the necessary drivers or prompt you for a location to find the drivers. In some cases, those drivers can be located online from the printer manufacturer's website. In other cases, the drivers are located on a distribution disk that was bundled with your printer.
Figure 25.1
The new Windows 8.1 Devices tool.

You can learn more about installing printers in the “Installing a New Printer” section, later in this chapter.
Once you have a printer installed, you really can do only two other things in the Devices tool. You can view the name of the printer, such as HP DeskJet 970Cse, and you can remove a device from your computer. To remove a device, select it and click the Remove Device button that appears to the right of the device name (see Figure 25.2). A message pops up asking if you're sure you want to uninstall the device. Click Yes. (If you aren't sure and you want to keep the device installed as is, press Esc on your computer's keyboard.)
Figure 25.2
Removing a printer using the new Windows 8.1 Devices tool.

Opening the Devices and Printers Folder
Another tool to use for setting up and managing printers is the Devices and Printers folder. This folder includes the same features of the new Windows 8.1 Devices tool (see the preceding section), but it also adds management of properties and printer options to the list of tasks available to you.
In the past, aside from actually printing documents, just about everything you did with printers took place in the Devices and Printers folder. As you read already, some tasks can be done using the new Devices tool.
As with everything else in Windows 8.1, you can get to the Devices and Printers folder in several ways. Use whichever works for you and is most convenient at the moment:
- Show the Charms Bar, choose Search, and type dev and click the Settings link. On the Settings Results page, click the Devices and Printers item.
- On the Windows desktop, press Windows+X, choose Control Panel ⇒ View Devices and Printers under Hardware and Sound.
When you're in your Devices and Printers folder, you'll see an icon for each printer (or similar device) that you can print to. Figure 25.3 shows an example; your folder will, of course, look different.
Setting the default printer
If your Devices and Printers folder contains more than one printer icon, only one of them will be the default device for printing. By “default,” we mean the printer that's used automatically if you don't specify something else. For example, many programs allow you to print a document to the default printer by pressing Ctrl+P. The program may not ask what printer you want to use. Instead, it just sends the document to the default printer.
Figure 25.3
A sample Devices and Printers folder.

In the Devices and Printers folder, the default printer is indicated by a check mark. If you want to change the default printer, right-click the printer's icon and choose Set As Default Printer. The printer or device you specified will now sport the green check mark, and will be used for printing when you don't specify some other printer or device.
Testing a printer
If you've just installed a printer and you want to test it out, follow these steps (here, we're assuming that you're already in the Devices and Printers folder):
- Right-click the printer's icon and choose Printer Properties. (Be careful not to click Printing Preferences or the Printer Properties items.)
- Select the General tab.
- At the bottom of the Properties dialog box that opens, click the Print Test Page button.
- Wait a few seconds (few printers start immediately). The printer should print a sample page.
- If the page prints and doesn't look garbled, click OK in each open box.
- If nothing prints within 15 or 30 seconds, click Get Help with Printing for some tips on solving the problem.
If you had to click Get Help with Printing, follow the advice in the Help documentation first to resolve the problem. You can click the Click to Open the Print Troubleshooter link to launch the printing troubleshooter from the Control Panel. Also, keep in mind that hundreds of different makes and models of printers are on the market, and no single rule applies to all. So, don't overlook the documentation that came with your printer or the printer manufacturer's website, which may provide troubleshooting advice.
Installing a New Printer
Before you can use a new printer, you need to connect it to the computer and install it. Earlier in this chapter, you learned how to set up a printer using the new Windows 8.1 Devices tool. Let's look at adding a printer using the Devices and Printers folder. Many printers give you the choice of using the USB port to connect the printer or a parallel printer port. In most cases, USB will work just fine for printing. In fact, most of today's standard computer configurations don't even have a parallel printer port, so USB might be your only option. Likewise, most new printers don't have parallel or serial port connections.
As mentioned at the beginning of this chapter, the main rule on installing a printer is to follow the instructions that came with it. Sometimes you need to install drivers first; sometimes you don't. There is no “one rule fits all” when it comes to installing printers, or any other hardware device for that matter. But in a pinch, when there are no instructions, the techniques in the following sections will be your best first guess.
Installing printers with USB and infrared connections
If you have the option to connect the printer through a USB port, or by infrared, the installation procedure should go like this:
- Close all open programs on your Windows desktop so that you're at the Windows desktop with nothing else showing.
- Check the documentation that came with the printer, and if directed to install the drivers before connecting the printer to the computer, do so.
- Plug the printer into the power outlet; connect the printer to the computer with its USB connection, or configure the infrared connection as instructed by the printer manufacturer.
- Turn on the printer, and wait a few seconds.
You should see a message in the notification area that tells you the device is connected and ready to use. You're done. The printer is installed and ready to go.
Regardless of which of these methods you use, you'll want to test the printer, and perhaps make it the default printer, as discussed later in this chapter.
Installing printers with parallel and serial port connections
If your printer is an older model (for example, an older HP LaserJet that you refuse to get rid of) that is not a typical plug-and-play USB printer, it probably connects to the computer via an LPT port or COM port. The following is the best approach to installing it on Windows 8.1:
- Save any unsaved work, close all open programs, shut down Windows, and shut down your computer.
- Plug the printer into the power outlet, connect the printer to the computer's LPT or serial port, turn on the printer, and turn on the computer.
- When Windows restarts, look for the
Found New Hardwarenotification message to appear.
It's tough to say what will happen next. You might be prompted for a disk if Windows can't find the driver for the printer. If you see a notification message indicating that the printer is installed and ready to use, you're probably done.
If your printer is not located automatically, you might want to use Google or Bing to locate instructions on the web for setting up your printer in Windows 8.1. Because so many different printers are available, this book cannot even begin to show how to install your particular printer. Often, the manufacturer's website includes updated device drivers and/or updated instructions on how to get legacy printers (those that are several years old) working with the latest operating systems such as Windows 8.1.
You might also try installing the printer using the Program Compatibility feature of Windows 8.1.
Installing a network, wireless, or Bluetooth printer
If your computer is a member of a home or small business network, and you know of a shared printer on another computer in that network, you can use the technique described here to install that printer on your own computer. The same is true of many wireless and Bluetooth printers. But again, this procedure may not be necessary because Windows 8.1 often detects network printers and makes them available automatically. Be sure to check the manual that came with a wireless or Bluetooth printer for an alternative procedure before trying the method described here. Also, be sure to turn on the printer before you try to install it.
If you're trying to install a printer that's attached to another computer in your private network, make sure that both the printer and the computer to which the printer is physically connected are turned on. Make sure your network is set up and you've enabled discovery and sharing as discussed in Part IX of this book. Then go to the computer that needs to access the network printer and perform the steps to follow on that computer. You install a network, wireless, or Bluetooth printer in much the same way you install a local printer. First, open the Devices and Printers folder using any technique described at the start of this chapter.
If the printer's name appears in the new Devices tool of the Settings area or in the Devices and Printers folder, you don't need to install it. If you want to make it the default printer, right-click its icon and choose Set As Default Printer (only available while in the Devices and Printers folder). Then close the Devices and Printers folder and Control Panel. You'll be able to use the printer as described in Chapter 26.
If there's no sign of the printer in the Devices tool or in your Devices and Printers folder, open the Devices and Printers folder and follow these steps to install it:
- Click Add a Printer in the toolbar. The Add Printer Wizard opens.
- If the printer is located automatically, select it and click Next to work through the wizard to install it. If the printer is not located, click The Printer That I Want Isn't Listed. The Find a Printer by Other Options window opens, as shown Figure 25.4.
Figure 25.4
Setting up a network shared printer.

- If you know the UNC name or IP address of the printer to which you want to connect, fill in the appropriate information. Otherwise, click Browse, and navigate to the computer and printer to which you want to connect. Click the printer's name and click Select. Then click Next.
- After the printer is successfully installed, click Next. On the next wizard page, you can opt to print a test page and make the shared printer your default printer. Make your choices and click Finish.
An icon for the shared printer will appear in your Devices and Printers folder. If you made it the default printer, it will also show a check mark.
Managing Printer Drivers
Virtually all hardware devices, including printers, come with a special program called a device driver, or just driver for short. The driver provides the interface between the device and a specific operating system, such as Windows 8 and Windows 8.1, Windows 7, Windows Vista, or Windows XP. You need to have the correct and current printer driver installed on your computer to get your printer to work correctly.
Many printers come with the drivers on a CD. How you install a driver from the disk depends on the printer you're using, but an older printer may not even have a Windows 8.1 driver to offer. In that case, you'll need to look for a current driver online. Try Windows Update first by following these steps:
- Display the Charms Bar and choose Settings.
- Click Change PC Settings.
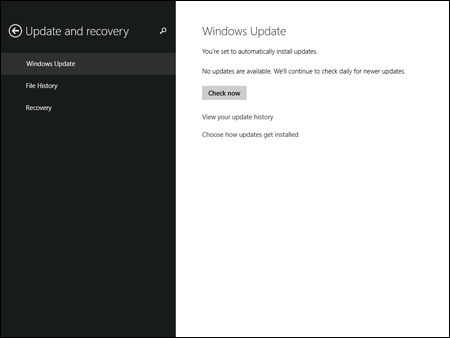
- Click the Update and Recover link in the PC Settings list. You may have to scroll down to view the Windows Update item.
- Click Check for Updates, which you can see in Figure 25.5.
Figure 25.5
Checking Windows Update for updated printer device drivers.
- When the update search is complete, click the link for available updates (if any).
- If the driver for your printer appears, go ahead and install it per the onscreen instructions.
If Windows Update doesn't find an updated driver, it might mean your printer manufacturer hasn't posted the driver on their site yet. Browse to the printer manufacturer's website and look around for a Drivers link or Support page with downloads. Or go to the Support page and send an e-mail asking if there's an updated driver for your printer model.
Setting Default Printing Preferences
Remember the discussion early in this chapter about printing preferences versus printer properties? This section explains how to configure the default printing properties that a printer will use to print documents.
Like objects on your screen, many devices have properties that you can customize. Most printers have such properties. You can make selections from those properties to define defaults for the printer. Those default settings for properties won't be set in stone. You can override the defaults any time you print a document.
As with other objects, a printer's properties are accessible from its icons. To view the properties for an installed printer, first open the Devices and Printers folder if you haven't already done so. Then right-click the printer's icon and choose Printing Preferences. The options available to you depend on your printer. The options shown in Figure 25.6 are for an MFC-J835DW printer.
The Printing Preferences dialog box varies from one printer to the next and often offers multiple tabs, each with several options. The following sections cover some of the more common settings that you might want to set for your printer.
Portrait versus landscape printing
Unless your printing needs are very unusual, you'll probably want to print most of your documents in a portrait orientation. That's the orientation that normal letters and other documents use, so you'll almost always want to choose Portrait as your default orientation, as in Figure 25.6.
You can always override that default and print the occasional document in Landscape orientation (sideways, so the page is wider than it is tall).
Figure 25.6
Sample printing preferences.

Printing on both sides
On some printers, you have the option of printing a multi-page document on both sides of a piece of paper. For our example, this option is located in the Print on Both Sides drop-down list. You can choose None, which prints on a single side of a piece of paper. The Flip on Long Edge option results in a multi-page document being printed front to back, also called duplexing. The Flip on Short Edge option prints on both sides, but is usually used for documents printed in landscape mode.
Making pages print in the correct order
When you print a multi-page document, you don't want to have to shuffle the pages around to get them in the correct order. You want the pages to come out of the printer in the correct order. The Page Order property is the option that determines whether the pages are printed in the correct order. The rules are as follows:
- If the pages come out of the printer face down, use Front to Back order.
- If the pages come out of the printer face up, use Back to Front order.
Said another way, if you have to reshuffle printed pages, choose whichever of those options currently isn't selected.
Saving time and money
Printers, as a rule, are just plain slow. That's because they're clunky mechanical devices, and it takes time to move a page through a printer and get the ink or toner onto the paper. Faster printers are typically more expensive than slower ones. But no matter what the cost or general speed of your printer, one general rule will apply: The higher the print quality of the document you're printing at the moment, the longer it will take to print.
Here's another fact about printers in general. Many printers are cheap, but ink cartridges typically are not. In some cases, buying a new printer is actually cheaper than buying replacement cartridges for your printer. Also, some manufacturers ship new printers with starter cartridges, which typically contain less than a full-size replacement cartridge.
The printer property that most determines how quickly your documents print and how much ink or laser toner you use per document is called print quality. The higher the print quality, the longer it takes to print a document, and the more ink or laser toner you use in the process. You can save time and money by doing all your day-to-day printing in Draft quality, perhaps even without color if you want to conserve color ink or laser toner.
On the Brother printer shown in Figure 25.7, quality settings are on the Paper/Quality tab. The Draft quality setting for the Brother, for example, causes the printer to use less ink when it prints, but the quality of the finished document is naturally lower. Your printer might have similar options.
As with other printer properties, setting the printer defaults to low-quality and black-and-white settings won't prevent you from printing the occasional color document. You can override those defaults any time you print a document. When you want to print a professional-looking report or a fine photo, just increase the print quality and activate color for that one print job.
Beyond these features, the properties vary greatly from one printer to the next. The only resource for learning all the details of your particular make and model of printer is the documentation that came with that printer, or the printer manufacturer's website.
Figure 25.7
Paper/Quality settings.

Setting Printer Properties
If you're an average Windows user, you might never need to configure printer properties for a printer. In most cases, you'll be more concerned with printing preferences that control how the printed documents look. If you're an advanced user or administrator, however, you'll likely need to understand how to configure printer properties.
To configure properties for a printer, start by opening the Devices and Printers folder, as described earlier in this chapter (you should find it on the Control Panel). Then right-click the printer and choose Printing Properties to open a Properties dialog box similar to the one shown in Figure 25.8.
The tabs shown in the Properties dialog box for a printer can vary from one type of printer to another, but you'll see some common settings between them. The following sections use the HP DeskJet 970Cse as an example to illustrate common concepts such as port configuration, printer pooling, spooling options, and more.
Figure 25.8
A sample Properties dialog box.

Configuring shared printers
The Sharing tab (see Figure 25.9) enables you to set up your printer so that you can share it with others on your home or work network. By clicking the Share This Printer option, you enable sharing and then must provide a share name for the printer. You can use the default, which is the name of the printer, or name it something more descriptive. For example, you might name it something like “Rob's Printer” or “Laser Printer in Room 100” so others in your network know which printer it is by looking at the name.
Figure 25.9
The Sharing tab.

The Additional Drivers button contains a way for you to install additional drivers to support multiple versions of Windows. For example, you might be running Windows 8.1 on your computer, but the person down the hallway or in another part of the house may be on Windows Vista or Windows XP still. By installing those drivers now, you can be assured that users of those other versions of Windows will have an easier time setting up to use your shared printer.
After you set up these options, click Apply. You may be prompted to shut down and restart Windows before your sharing takes effect.
Configuring printer ports
The Ports tab (see Figure 25.10) lets you view and configure the printer's ports, which define the way the printer is connected to the computer. Typically, a printer will have only one port, but it's possible to have multiple ports.
Figure 25.10
The Ports tab.

Users visit the Ports tab for two primary reasons: to configure a printer for a different network port, or to switch from one LPT port to another. You can also configure the printer to print by default to a file by selecting the File port.
Some port types offer settings that you can configure. LPT ports, for example, enable you to specify the Transmission Retry setting, which determines how long the computer will wait for a response from the printer before timing out. For serial printers on a COM port, you can specify several settings that control the speed of the port and how data flows from the computer to the printer. To configure a port, select the port from the list and click Configure Port. Use the settings in the resulting dialog box to specify settings for the port.
If you need to add a new port for a printer, click the Add Port button. Windows displays the Printer Ports dialog box shown in Figure 25.11. Select the type of port you want to create and click New Port. If the selected port type supports creating new ports, Windows displays a dialog box or a wizard (depending on the port type) that you use to specify the settings for the new port.
Figure 25.11
Printer Ports dialog box.

Setting up printer pooling
A printer pool is a group of identical printers that Windows treats as a single printer instance. You can then print to the printer pool as if it were a single printer, and Windows handles sending the document to an appropriate printer in the pool. Before we explain pooling in more detail, take a look at how a printer driver instance differs from a printer.
A printer that you see listed in the Devices and Printers folder is really not a printer per se. Instead, it's an instance of a printer driver. The printer driver is the middleware between Windows and the printer hardware (the real printer in this discussion) that enables Windows to communicate with the printer. The phrase instance of a printer driver refers to a named copy of the printer driver that has its own set of properties. You can have two instances of the same printer driver with different settings, both of which control the same printer. Or you can have one instance of a printer driver that controls more than one printer, and that's a printer pool.
For example, assume your office has three identical network printers. You can create a printer pool using those three printers, assigning three ports to the single instance of the printer driver in your Devices and Printers folder. So, you might have one HP LaserJet 1250N network printer in your Devices and Printers folder, for example, but that instance of the driver could actually print to any of the three printers.
Why would you want to do that? First, you need to manage only one instance of the printer driver in your computer, which can simplify printer and document management, particularly if you typically use the same settings for each one. Second, you don't have to worry about selecting a printer when you print. Instead, assuming you've assigned the printer driver instance for the pool as your default printer, you just click Print and send the document on its way. Windows decides which printer to send the document to.
To set up a printer pool, first install the printer driver for the printers in the pool. Then open the properties for the printer from the Devices and Printers folder and select the Enable Printer Pooling option on the Ports tab. When that option is selected, you can select multiple ports from the ports list. Add ports as needed (such as additional TCP/IP ports for network printers), and select the ports for all the printers in the pool. Then click OK.
Configuring printer availability
You can specify when a printer is available. For example, you might want to restrict access to a printer to business hours to keep people from using it when no one is around. Whatever the reason, you configure printer availability from the Advanced tab of the Printer Properties dialog box (see Figure 25.12).
Figure 25.12
The Advanced tab.

By default, a printer is configured to be always available. To limit its availability, click the Available From option; then use the spin controls to set the start and end times for the time range when the printer will be available. If you or a network user of a shared printer sends a document to a printer when it isn't available, the document is held in the printer queue on the sending computer until the printer becomes available.
Setting other advanced options
As Figure 25.12 illustrates, Windows offers several other advanced options for configuring a printer. For example, the spooling options determine how the printer driver sends data to the printer. The option Spool Print Documents So Program Finishes Printing Faster causes documents to be spooled to an on-disk queue, where it waits until the printer driver can send it to the printer. To the printing application, printing is complete as soon as the last page of the document is sent to the queue and you can then continue using the program.
Alternatively, you can configure the printer driver to print directly to the printer, bypassing the on-disk document queue. The downside to this option is that you can't use the program until it finishes printing, which can potentially take much longer than sending the document to a queue if the document is complex or very large.
In most cases, today's computers are fast enough and have enough disk capacity that you will never need to print directly to the printer. If you're trying to print a huge document and you have very little free space on your disk, however, sending the document directly to the printer could enable the document to print when it might not otherwise.
Following are some additional settings on the Advanced tab:
- Hold Mismatched Documents: The spooler checks the configuration of the printer against the document setup before sending the document to the printer. If the document setup doesn't match the printer, the document is held in the queue and not sent to the printer. You can then address the configuration mismatch, and restart the document from the queue to send it to the printer.
- Print Spooled Documents First: Documents that have completed spooling to the queue are printed before documents that are still spooling, even if they have a lower priority.
- Keep Printed Documents: Documents remain in the queue even after they're printed, enabling you to restart the document from the queue if needed to reprint them.
These aren't the only properties available for a printer. We cover other properties, such as the sharing properties, in other chapters.
Wrap-Up
That about wraps it up for installing and managing printers. In the next chapter, you learn how to print documents, choose color and quality settings on the fly, and so forth. The main points from this chapter are as follows:
- Many makes and models of printers exist. Your best resource for your specific printer is the documentation that came with that printer.
- Installed printers, and options for installing printers, are in the new Windows 8.1 Devices tool, or in your Devices and Printers folder.
- If you have access to multiple printers, right-click the icon for the printer you want to use on a day-to-day basis and choose Set As Default Printer.
- To test a printer, right-click its icon and choose Printer Properties. Then click the Print Test Page button.
- To connect a printer by USB, don't shut down the computer. Instead, leave the computer on, connect the printer to the computer, and then turn on the printer. Check the printer documentation to see whether you need to install the drivers before connecting the printer.
- The typical scenario for installing a printer that connects to a printer port (LPT port) is to shut down the computer, connect the printer and turn it on, and then restart the computer.
- To ensure that your printer driver is appropriate for your operating system, check the Windows Update site and the printer manufacturer's website.
- To set default properties for day-to-day printing, right-click the printer's icon and choose Printing Preferences.