Chapter 9: Personalizing the Windows 8.1 Interface
IN THIS CHAPTER
The Windows 8.1 interface
Working with tiles
Working with tile groups
Customizing the contents of the Start screen
Clearing tile data
The Windows 8.1 interface presents a clean, streamlined way to interact with your apps, data, and documents, but like the traditional Windows desktop interface, the new interface is just a starting point. You can customize the organization of tiles and tile groups on the Start screen, change the picture on the Lock screen, and much more.
This chapter explores how you can change all these elements of the Windows 8.1 interface and customize it to suit the way you work and play.
Customizing the Start Screen
Although the Lock screen might be the first thing you see when you start Windows 8.1, you'll certainly spend a lot more time working on the Start screen, so that's where we'll start our tour of the tools and settings you can use to customize the interface.
Rearranging tiles
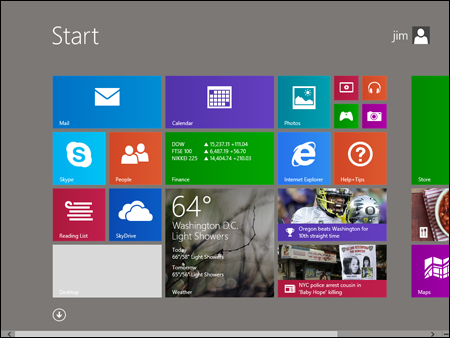
Figure 9.1 shows a portion of a typical Windows 8.1 Start screen. As the figure shows, the tiles on the Start screen are grouped. You can rearrange the tiles on the Start screen, moving them within a group, moving them to other groups, or even creating new groups.
Figure 9.1
Tiles on the Windows 8.1 Start screen.
Moving tiles within a group is easy. If you're using a touch device, tap and hold the icon until a check mark appears near the upper-right corner of the tile; then simply drag it into its new position. If you're using a mouse, right-click the tile to make the check mark appear, and then left-click and drag the tile to its new position.
Adding and removing tiles
You can customize the tiles that appear on the Start screen, adding and removing tiles as desired. For example, you might add the documents or websites you use most often, and remove the apps you seldom or never use. The following sections explain how to add and remove tiles from the Start screen, as well as the Windows taskbar.
Adding tiles
Apps that you add from the Windows Store are automatically pinned to the Start screen. When you install other apps, Setup generally adds one or more tiles to the Start screen for those, as well.
If you've removed a tile and you want to add it back, or you need to add a tile for an app that wasn't added automatically, you can easily do so. To add an app using the mouse, right-click the Start screen to show the App Bar, and then click All Apps. With a touch device, slide up from the bottom of the display and then tap All Apps.
Locate the app that you want to add to the Start screen, and then either right-click or swipe down on the icon. When the App Bar appears (see Figure 9.2), click or tap Pin to Start. If you also want to add the app to the Windows taskbar, open the App Bar again for the app and click or tap Pin to Taskbar. Note that you can pin only legacy Windows apps to the Taskbar.
Figure 9.2
Pin items to the Start screen using the App Bar.

Removing tiles
As mentioned earlier, Setup typically adds tiles to the Start screen when you install an app. Over time, the Start screen gets cluttered with apps you probably use seldom, if at all. You can certainly uninstall apps you don't need, but in some cases you might prefer to simply remove the app's tile(s) from the Start screen. For example, maybe it's a utility app that runs in the background that you never need to open.
Removing a tile is easy. If using a mouse, right-click the tile and then, in the App Bar, click Unpin from Start. If using a touch device, swipe down on the tile to open the App Bar, and then tap Unpin from Start.
Resizing tiles
Although some tiles have a fixed size, you can change others from small to large, or vice versa. This is particularly handy for live tiles for which you want to provide more space to display their live data. To change the size of a tile, right-click or swipe down on the tile to open the App Bar. Click Resize, then click Small, Medium, Large, or Wide, as appropriate.
Working with live tiles
In the Windows 8.1 interface, live tiles are ones that display data dynamically. Examples include the Weather, Mail, and Finance tiles. For example, Finance shows stock price information for stocks that you've added to your watch list.
You can control whether a live tile–capable app shows data on the Start screen. For example, if you don't use the Weather app much, you might not want it showing data. To turn live tiles on or off, right-click or swipe down on the tile to open the App Bar. Then click or tap either Turn Live Tile Off or Turn Live Tile On (see Figure 9.3), depending on the current state of the tile.
Working with groups
You've already seen that the Start screen groups tiles and that you can move tiles from one group to another. Groups enable you to group together tiles on the Start screen in whatever way makes sense to you. For example, you might group your Office apps together in one group, and other items that you use less often into another group.
Figure 9.3
Use the App Bar to turn live tiles on or off.

The “Rearranging tiles” section, earlier in this chapter, explained how to move tiles from one group to another, or within the same group. But there are other actions you can take in regards to groups, including creating new groups and naming them.
Creating groups
To create a new group, simply drag a tile to the vertical space between two groups, or to the left or right edge of the Start screen. Windows displays a translucent vertical bar to indicate that it's going to create a new group when you release the tile. Release the tile, and then drag other tiles as desired into the group.
Rearranging groups
You can also change the order of groups on the Start screen. To work with a group as a whole, you first need to zoom out to see the entire Start screen. To do so with a mouse, click the Summary View icon at the bottom right of the display. On a touch device, simply pinch the Start screen to zoom out and view the Summary view (see Figure 9.4). With the Start screen at the Summary view, click or tap on a group and then drag it to the desired location.
Figure 9.4
Use the Summary view to manage tile groups.

Clearing live data
Over time, as you use live tiles to display data, you might want to clear the data the tiles show. For example, if you're working in a public place such as on an airplane, you might not want your data displayed on the Start screen. Windows 8.1 makes it easy to clear that data.
Display the Start screen, and then open the Charms Bar and click or tap Settings. Click Tiles in the resulting Settings menu, and then click or tap Clear (see Figure 9.5).
Allocating storage for Tile updates
Live tiles display data, and as you might expect, that data needs to be stored somewhere. The more live tiles you use, the more data is created. By default, Windows 8.1 will store up to 50MB of live tile data, and when that storage is used, your live tiles will let you know there are updates available but won't display them. To increase the amount of storage allocated for live tile data, open the Charms Bar, click or tap Settings, and then click or tap Tiles on the Settings menu. Use the Data Used for Tile Updates drop-down to specify the amount of storage allocated for live tile data.
Figure 9.5
The Tiles menu.

Adding administrative tools to the Start screen
One final change you might want to make to the Start screen is to add the Windows 8.1 administrative tools to it. These tools include Performance Monitor, Task Manager, Optimize Drives, and other tools for managing your device. If you use these tools often, or simply want quick access to them, you can add them to the Start screen. To do so, open the Charms Bar, click or tap Settings, click or tap Tiles in the Settings menu, and set the Show Administrative Tools option to Yes.
Changing the Start Screen Background and Color
Another change you can make to the Start screen is to change the background color and/or choose a background for the Start screen. To change either of these properties, open the Charms Bar, click or tap Settings, and then click or tap Personalize.
In the Personalize menu, choose a background from the options provided, or choose the solid color if you prefer no background image. Use the color selector to choose a color for the Start screen (see Figure 9.6).
Figure 9.6
Use the Personalize menu to choose a color and background image.

Customizing the Lock Screen
Although you probably don't spend a lot of time on the Lock screen, you might still want to customize the way the Lock screen looks and functions. For example, maybe you want to change the picture displayed on the Lock screen. Or maybe you want to choose the apps that run in the background and display information on the Lock screen (such as the Mail app, showing how many unread e-mails you have). Only apps written to do so can display status on the Lock screen. Depending on their design, some apps can display basic information, while others can display detailed status. The Calendar app is an example of an app that can display detailed status.
To customize the Lock screen, open the Charms Bar, click or tap Settings, and then click or tap Change PC Settings. In the PC Settings app, click or tap PC and Devices and then click or tap Lock Screen to display the options shown in Figure 9.7.
Windows 8.1 provides a small number of stock images from which you can choose for the Lock screen. Just click an image to set it as the background for the Lock screen, or click Browse to choose a photo or other image stored on your device.
Figure 9.7
Use the Personalize item to set Lock screen options.

The Lock Screen Apps section of the Lock Screen page lets you choose which apps display status updates on the Lock screen. By default, the Skype, Mail, Calendar, and Alarms apps are selected to display their status, with the Calendar app set to display detailed status. To add an app, click or tap one of the available boxes (with the plus sign in the middle) and choose an app from the resulting pop-up menu. To change which app displays detailed status, click or tap the detailed status icon and choose the desired app. If you prefer not to have detailed status on the Lock screen, click or tap Don't Show Detailed Status on the Lock Screen.
Changing Your Account Picture
One final change you'll probably want to make that affects both the Lock screen and the Start screen is your account picture. For example, maybe you want to use your Xbox avatar as your account picture.
After you have the image you want to use as your account picture, open the Charms Bar, click or tap Settings, and click or tap Change PC Settings to open the PC Settings app. Click or tap Accounts. The Account Picture page shows your currently assigned picture, if any. To choose a different one, click or tap Browse, choose an image, and click or tap Choose Image to apply the new image.
Wrap-Up
In previous versions of Windows, you had a considerable amount of control over what the Windows interface looked like, and to a lesser degree, over how it functioned. With the introduction of the Windows 8.1 interface, you have fewer options for customizing the interface because of the nature of that interface — it's more streamlined, so there is less to customize. Even so, Windows 8.1 gives you a fair amount of flexibility over the position and grouping of tiles on the Start screen, its background and color, and other properties. You learned how to change those properties in this chapter.
The Windows desktop hasn't gone away, however, and you'll no doubt want to do at least a little customization of the desktop interface. To learn more about the available customization options, check out Chapter 10.