Chapter 18: Making Music with Media Player
IN THIS CHAPTER
Playing music with Media Player
Copying CDs to your PC
Using your Media Library
Creating your own music CDs
Copying songs to portable players
Using your computer to collect, manage, and play music is a lot of fun. You can build up a collection of all your favorite songs, make custom CDs from those songs, or copy them to a portable MP3 player. You can use your computer as a stereo to play any songs you like in any order you like. If your computer is part of a network, you can share songs and play them on any computer that's in the network.
Windows 8.1 comes with two programs and one Windows 8.1 app for collecting and playing music. One program is Windows Media Player, which we discuss in this chapter. The other program is Media Center (not included with all editions of Windows 8.1), which may not work with all editions. The app is simply called Music and it can be found on the Apps screen. Music is more suited to Windows tablets and other devices, like Xbox, and its raison d'etre is more for playing music and creating playlists. It also has an online radio component.
Controlling Sound Volume
Before we get into Windows Media Player, you need to know a few things upfront about music and video. In particular, you want to get your sound working and under control, so you can listen to whatever you like, without blasting your eardrums out!
Before you get started, make sure that you can control the volume of your speakers. At any given time, you're likely to have at least three volume controls available to you. Whichever control is set the lowest wins, in the sense that it puts an upper limit on the other volume controls.
If you have powered speakers, you need to make sure that the speakers are plugged in and turned on and connected to the Speaker output jack on your computer. If the speakers have a Mute button, make sure that it's turned off. If the speakers have a volume control button, that needs to be turned up.
You can control the volume of sound coming from your computer's speakers using the Volume Control icon in the notification area. It looks like a little speaker with sound waves coming out. Pointing to that icon shows the current volume setting as in the left side of Figure 18.1. Clicking that icon displays a volume control slider and a Mute button, as in the right side of Figure 18.1.
Figure 18.1
Volume control icon and slider.

To adjust the volume, just drag the slider handle up or down the bar. To mute the sound, click the Mute button at the bottom of the slider. When the sound is muted, the icon shows a little red international No symbol (circle and slash) and no sound comes from your computer. To get the sound back, click the Mute button a second time.
With your speakers and volume control slider under control, you're ready to start using Media Player for Music.
Starting Windows Media Player
To start Windows Media Player, use whichever method is easiest for you:
- Display the Charms Bar, click Search, type med, and choose Windows Media Player.
- Open any music file for which Windows Media Player is the default program.
The first time you open Windows Media Player, it takes you through a series of steps asking for your preferences. Don't worry if you don't know how to answer some questions. You can change your answer at any time. So, if you see a window titled “Welcome to Windows Media Player” and don't know what to do, just click Recommended Settings and then click Finish. You can change settings at any time, so you're not making any settings permanent by accepting the suggested defaults.
Media Player program window
Like most programs, Windows Media Player opens in its own program window and has a taskbar button. The player can have many different appearances. Exactly how it looks at any time is up to you. You'll see different ways to display things in a moment. For now, we need to cover the names of things so you know what we're talking about in the sections that follow.
Figure 18.2 points out the major components of Media Player's Player Library program window.
Figure 18.2
Major Media Player components.

The Features taskbar across the top of the program window represents different areas of Media Player, each of which helps you perform a specific task. In Figure 18.2, the Play tab is selected. Here's a quick summary of the program components and what each tab offers:
- Navigation pane: Takes you to your collection of songs and other media files.
- Details pane: Shows details for the currently selected library, album, genre, video, and so on.
- List pane: Shows information about the current playlist and item.
- Playback controls: Provides controls for playing the currently selected media, and for switching to Now Playing mode.
- Play: Shows the movie or video you're currently watching or song that is currently playing (if any). You can also rip (copy) CDs to your computer.
- Burn: Lets you create custom CDs from songs in your media library.
- Sync: Allows you to copy songs and other media files to a portable media player.
The toolbar
The Media Player toolbar gives you quick access to frequently used commands and options. The buttons in the toolbar change depending on what you have selected at the moment. The following list summarizes the available buttons:
- Organize: Manage your media libraries, sort media, customize the Navigation pane, change the Player Library layout, and access Media Player options.
- Stream: Enable Internet access to your home media and turn on media streaming, which allows you to send your media to other computers on the local network or the Internet.
- Create Playlist: Create a playback list (playlist) of media so you can play the selected items as a group. For example, you might create a playlist called My Top 100 that contains 100 of your favorite songs.
- Rip CD: Copy music from a CD to your media library on your computer so you can play it from your computer and optionally share it.
- Rip Settings: Specify settings to control the way Media Player rips music from CDs to your computer.
- View Options: Choose between Icon, title, and Details views for the List pane.
- Search: Search for media in your library.
- Help: Open Media Player's Help content.
Media Player menus
Media Player has lots of menus. They're hidden from view most of the time, but they're also easy to get to. Many of the toolbar buttons have their own menus. You'll see a little down-pointing triangle at the right of the button if it offers commands. Get the tip of the mouse pointer right on that little triangle and click the left mouse button to see the menu for that taskbar button. In Figure 18.3, for example, you can see the menu for the Organize button.
Figure 18.3
Organize menu.

To see the main menu, right-click an empty area near the play controls, as at the bottom of Figure 18.4. Optionally, you can right-click an empty spot on the left or right side of the features taskbar to get to the same menu. To make those same options visible in a menu bar, choose Show Menu Bar from the bottom of that main menu.
Figure 18.4
Media Player play controls.

Play controls
The play controls (also called the playback controls) are at the bottom of Media Player's program window (refer to Figure 18.4). They work only when you're playing a song or video or you've selected something to play. They work much like the controls on a stereo or DVD player. The exact role of each button varies slightly with the type of content you're viewing. Here's what each of the play controls offers:
- Seek bar: When content is playing, a green indicator moves along the seek bar. You can click anywhere along the seek bar to jump forward or backward in the playing item. When you point to the end of the green indicator, a button appears. You can drag that button left or right to move back or forward within the item that's playing.
- Shuffle: When selected, multiple songs from the current playlist are played in random order. When turned off, songs from the playlist are played in the same order as in the playlist.
- Repeat: When turned on, the same song or playlist plays repeatedly. When turned off, the song or playlist plays only once.
- Stop: Stops whatever is playing and rewinds to the beginning.
- Previous: Skips back to the previous song in the playlist or DVD chapter. Or if you point to the button and hold down the left mouse button, plays the current item backward in fast motion.
- Play/Pause: When content is playing, you can click this button to pause playback. Click again to resume playback.
- Next: Skips to the next song in the playlist or next chapter on a DVD. Point to this button and hold down the left mouse button to fast-forward through the content that's playing.
- Mute: Click to mute the playback sound. Click a second time to hear the sound again.
- Volume: Drag the handle left or right to increase or decrease the volume.
- Now Playing: Switches to Now Playing mode, a simplified version of the Media Player window. Also useful when you want to see a video or DVD played at full-screen size. Once in the full-screen mode, right-click anywhere on the screen and choose Exit Full Screen to return to the Player Library window. Or click Switch To Library to return to the Player Library window.
Other items in the Features taskbar are discussed later in this chapter. For now, let's stick with some of the basics of using Media Player's program window.
Closing/minimizing Windows Media Player
You can close Windows Media Player as you would any other program:
- Click the Close (X) button in the upper-right corner of Media Player's program window.
- Right-click the toolbar at the top of the window, choose File ⇒ Exit from Media Player's menu.
- Right-click Media Player's taskbar button and choose Close.
- If Media Player is in the active window, press Alt+F4.
When you close Media Player, it stops playing.
If you want to continue to listen to music, but you want Media Player off the screen, minimize Media Player's program window. Use any of the following techniques to minimize Media Player's program window:
- Click the Minimize button in Media Player's title bar.
- Right-click Media Player's title bar and choose Minimize.
- Right-click Media Player's taskbar button and choose Minimize.
In Windows 7, the Media Player icon appeared on the Windows taskbar by default, even if the program was not running. For Windows 8.1, however, you have to launch the program from the Search tool or by finding it on the Apps window, in the Windows Accessories group. To do this, show the Charms Bar, click Search, and type Media. Click Windows Media Player to launch it.
If Media Player is running, pointing to it on the taskbar displays a preview window as shown in Figure 18.5. You can click the controls at the bottom of the preview to play, stop, or skip forward or back in the playlist. Click the small preview window or the taskbar icon to open Media Player.
Figure 18.5
Media Player on the Windows taskbar.

That should be enough to get you started using Media Player. Next, we look at various ways in which you can use Media Player to listen to music or watch videos.
Listening to a CD
A music CD (also called an audio CD) is the kind of CD you normally play in a stereo or CD player. Typically, you buy these at a music store. As you learn later in this chapter, you can also create your own custom music CDs.
To listen to a music CD, just put it in your CD drive, label side up, and close the drive door. Then wait a few seconds. Windows Media Player might open and start playing the CD automatically. However, other things could happen:
- A Windows message asks what you want to do. If you see a dialog box like the example in Figure 18.6, click Play Audio CD Windows Media Player. You also have the option of clicking Take No Action if you don't want Windows Media Player to play your CD.
Figure 18.6
A dialog box asking about a music CD.

- Nothing happens. If absolutely nothing happens after you insert an audio CD, or if some other program opened and you closed it, start Windows Media Player. From Windows Media Player's Play menu (right-click the Media Player toolbar), choose Play VCD or CD Audio.
- Windows Media Player opens: If Windows Media Player opens and starts playing the song, you don't have to do anything else.
After the CD starts playing, you should be able to hear it (assuming your speakers are properly connected and not turned down too far). Use the volume slider in the play controls to adjust the volume of the music.
Now Playing, Visualizations, and Enhancements
When music is playing, Media Player by default shows the album art, if available, in the Now Playing window. However, you can instead watch a visualization of the music. The visualization is a pattern of colors and shapes that change in rhythm to the music. Media Player offers many visualizations from which to choose.
To try a different visualization, first make sure that you're viewing the Now Playing window (press Alt and choose View ⇒ Now Playing). Then right-click in the Now Playing window, choose Visualizations, and then choose an option from the resulting cascading menu (see Figure 18.7).
Figure 18.7
Choosing a visualization.

Regardless of which method you use, you'll see a menu of visualization names. Clicking a name displays a submenu of still more visualizations. Just pick any one to see how it looks. Go ahead and try a bunch while a song is playing to find one you like.
Using the playlist in Now Playing view
When you're playing a music CD in Now Playing view, the Playlist pane to the right of the visualization (see Figure 18.8) shows songs from the CD. That pane is optional. To show or hide that pane, right-click in the Now Playing window and choose Show List.
Figure 18.8
The Playlist pane on the right side of the window.

In the Playlist pane, you might see the song titles, as in Figure 18.8. Or you might just see more generic names such as Track1, Track2, and so forth. Many CDs don't have song titles stored on CD, so the song titles have to be downloaded from the Internet. You'll see song titles only if they're available on the CD or they've been downloaded from the Internet.
If you want to listen to a specific song on the CD, just double-click its title in the Playlist pane, or use the Previous and Next buttons in the play controls to highlight the song you want to listen to.
To change the width of the Playlist pane, get the tip of the mouse pointer right on the left border of the pane, so the mouse pointer turns to a two-headed arrow. Then drag left or right.
Using Enhancements
While you're listening to music and you're in the Now Playing area, you can also use Enhancements to adjust the sound and perform other tasks. The many Enhancements windows are invisible until you open them.
To show or hide Enhancements, right-click in the Now Playing window and choose Enhancements. Or press Alt to open the menu bar, and then choose View ⇒ Enhancements from Media Player's menu. When the Enhancements menu is open, you can choose which type of enhancement you want to see. Your options are summarized here:
- Crossfading and Auto Volume Leveling: When Crossfading is turned on, one song gradually fades out while the next song fades in. Auto Volume Leveling keeps songs at roughly equal volumes.
- Graphic Equalizer: Adjust the relative strengths of low, middle, and high tones. Optionally, click Default and choose a music type such as Rock or Classical. Click Reset to return to the default settings.
- Play Speed Settings: Use this to adjust the play speed of content. This option only works when playing
.wma,.wmv,.wm,.mpe, and.asffiles. Careful with this one. You don't want all your albums sounding like The Chipmunks! - Quiet Mode: Adjusts the audio dynamic range of music (the difference between the loudest and softest sounds). You'd most likely use this option when listening to headphones or watching a movie in Media Player.
- SRS WOW Effects: When activated, SRS WOW effects add depth to your music. This one is definitely worth turning on and trying out if you have good speakers attached to your system.
- Video Settings: Adjust the brightness, contrast, hue, saturation, and size of video when viewing a movie or video in Media Player.
The selected Enhancements appear in a separate window. You can cycle through the various Enhancements options by clicking the Next or Previous buttons in the upper-left corner of the Enhancements window.
Stopping a CD
When you've finished listening to a CD, click the Stop button in the play controls. To eject the CD, choose Play ⇒ Eject from Media Player's menu, press Ctrl+J, or push the Eject button on your CD drive.
Play CDs automatically with Media Player
If you want to ensure that Media Player opens and plays music CDs automatically, you need to make Media Player the default player for CDs. Here's how:
- Press Windows+X and choose the Control Panel.
- Click Hardware and Sound.
- Click AutoPlay.
- Next to Audio CD, choose Play Audio CD (Windows Media Player).
- Click the Save button.
- Close the Control Panel.
From that point on, whenever you put a music CD in your CD drive, Windows Media Player should open and play the CD automatically.
Ripping (Copying) Music CDs
Media Player isn't just about playing CDs. The real idea is to build up a library of digital media on your hard drive, from which you can create custom playlists and music CDs. If you already own some music CDs, ripping a few CDs will be a great way to start creating your personal media library. Though the term rip might sound like something bad, it's not. It simply means to “copy,” and no harm will come to the CD when you rip songs from it to your media library.
When you rip a CD, you store a copy of each song from the CD on your hard drive. That song is in a format that's more suitable for computers than the song that's on the CD. You can put the original CD back in its case, and leave it there so it doesn't get scratched up. Play the songs straight from your PC, or make your own CDs to play the songs in a stereo. Keep the original CD as a backup in case you accidentally delete some songs you've copied.
Ripping CDs is easy, as you'll see. But you need to make a few decisions upfront, such as where you want to put the songs, how you want them titled, what format you want them stored in, and so forth. The sections that follow look at all your options.
Options for ripping CDs
To choose options for how you want to copy CDs to your hard disk, use the Rip Music tab in Media Player's Options dialog box. To get to those options:
- Open Windows Media Player (if it isn't already open).
- Insert an audio CD in the drive and click the drive in the Library pane so that the Rip and Rip Settings buttons are available in the toolbar. Then choose More Options to open the Rip Music tab of Media Player's Options dialog box.
You're taken to the Rip Music tab in Media Player's Options dialog box, as shown in Figure 18.9.
Figure 18.9
The Rip Music tab in Media Player's Options dialog box.

The following sections describe what each option offers. Note that you don't need to make selections from the dialog box for every CD you copy. Instead, you choose your options once. All CDs that you copy from that point forward will use whatever settings you chose.
Choosing where to put songs
By default, all songs you copy from a CD are placed in your Music folder. That's a perfectly fine place to put them, but there's no rule that says you have to put them there. You can store them in any folder you want. For example, you might put them in the Public Music folder if you want everyone who uses the PC to access the songs. Or, if you have multiple hard drives, you can put them in a folder on some drive other than C:.
To choose a drive and folder for storing CDs, click the Change button in the dialog box. Then navigate to the drive and folder in which you want to store the songs. For example, if you want to put the songs in your Public Music folder, expand the This PC, Local Disk (C:), Users, and Public folders, and click Public Music. Then click OK.
The path in the dialog box shows where the songs will be stored. For example, in Figure 18.9 the path C:UsersRobMusic tells you that the songs will be stored in the personal Music folder for the user account named Rob. (C: is the hard disk and Users is the name of the folder in which all user accounts are stored.)
Choosing how to name files
Each song you copy from a CD is stored as a file. Like all files, each song will have a filename. Windows Media Player names the files automatically, based on the track number, song title, and other media information.
How you name the songs is entirely up to you and won't affect how they play. The default filename is the CD track number followed by the song name. You might prefer to have the song name first. To make your selections, click the File Name button on the Rip Music tab of the dialog box. The File Name Options dialog box, shown in Figure 18.10, opens.
Figure 18.10
The File Name Options dialog box.

Choose the elements you want to use in each song's filename. At the very least, you should choose Song Title, because that's certainly a key piece of information. Use the Separator drop-down list to choose which character will separate each portion of the name.
To change the order of items in the filename, click any selected item and use the Move Up or Move Down button to change its position in the filename. As you choose components and change their order, the generic filename under Preview gives you a sense of how each song title will look with your current settings.
Click OK after you decide how you want your filenames to look.
Choosing a file format and quality
Under Rip Settings on the Rip Music tab, the Format drop-down list lets you choose a format and quality in which to store songs you copy. Basically, this all boils down to a trade-off between file size and music quality. File size has to do with how much hard disk space each song consumes. Quality has to do with the depth, clarity, and richness of the music when you listen to it. Music quality is measured in kilobits per second, abbreviated Kbps. The higher the Kbps number, the better the music quality, but the more disk space each song consumes.
Options for choosing are under the Rip Settings heading in the Options dialog box. First, use the Format drop-down list to choose one of the following formats:
- Windows Media Audio: Songs are copied to Windows Media Audio (
.wma) format files and compressed to conserve disk space. You can choose the amount of compression using the Audio Quality slider in the same dialog box. This is a good general-purpose format that plays on all Windows computers and many portable media devices. - Windows Media Audio Pro: Similar to the preceding format, but includes features that make the music sound better on high-end multi-channel sound systems.
- Windows Media Audio (Variable Bit Rate): Same as the preceding format, but the amount of compression varies with the complexity of the information being stored. As a rule, you get better quality with smaller file sizes using a variable bit rate. This format is not compatible with all portable music players.
- Windows Media Audio Lossless: Same as the preceding format, but files are not compressed at all. (Lossless means that no data is lost when the audio file is being made.) The sound quality is excellent, but the files are huge. Still, if you're a true audiophile, or you're interested in creating HighMAT (High-Performance Media Access Technology) CDs, this is an excellent choice.
- MP3: MP3 is the most widely used format for digital music. It's been around the longest. You can play MP3 songs on any MP3-compatible player.
- WAV (Lossless): Stores each song as a WAV file, which offers high quality but creates enormous files. So, you probably want to stay away from this format unless you have some good reason to use it.
If you're new to all this, and at a complete loss as to what to choose, go with WMA or MP3. Those are common formats that almost any device can play.
If you choose anything but a lossless format, you can then use the Audio Quality slider to choose a quality setting. Again, the basic rule of better quality creating larger files applies. Hard disk space is cheap and plentiful, so there's no need to settle for the lowest-quality setting. If in doubt, don't go below 128 Kbps or your music may all end up sounding shallow or kind of “tinny.”
As you move the Audio Quality slider to different settings, text beneath the slider tells you roughly how much disk space an entire CD will consume at that setting. To better illustrate how format and audio quality relate to disk space consumption, we ripped a three-minute song at various sound qualities and put their sizes in Table 18.1. The last column, “Songs per GB,” gives you a sense of how many songs you can get into a single gigabyte of hard disk space at various quality settings.

![]() See Chapter 20 for more information on disk drives, capacities, and discovering how much space you have. You might want to take a peek at your available space each time you copy a CD, so you can get a sense of how much free space each copied CD consumes.
See Chapter 20 for more information on disk drives, capacities, and discovering how much space you have. You might want to take a peek at your available space each time you copy a CD, so you can get a sense of how much free space each copied CD consumes.
After you've chosen a format and audio quality, you have a few more options on the Rip Music tab to choose from.
Copy Protect Music
The Copy Protect Music option on the Rip Music tab lets you decide whether to put copyright protection on the songs you copy. We suspect that a lot of people choose that option thinking it will somehow protect them from messing up the songs. But that's not how it works. The protection that the option offers is for the copyright holder, not for you.
If you choose the Copy Protect option, the songs you copy play only on the computer you're using. This option also puts other restrictions on the songs. For example, you won't be able to import them into Movie Maker or other programs that normally let you edit music. If you want to keep things simple and make sure you can use your copied songs freely, we suggest you leave the Copy Protect Music check box empty.
Rip CD Automatically
If selected, this option tells Windows Media Player to copy all the songs from a CD as soon as you insert the audio CD. Choosing this option, along with the Eject CD option described next, makes it easy to rip a whole collection of CDs in assembly-line fashion. For example, if you have a few dozen CDs you want to rip, you can just insert a CD, wait for it to be copied and ejected, and then insert the next CD.
When you've finished ripping your CD collection, you can then clear this option so that you have more flexibility in deciding what you want to do with each CD you insert into your hard drive.
Eject CD after Ripping
If selected, this option just tells Media Player to eject the CD from the drive when it's finished copying the CD. As mentioned, choosing this option along with the Rip CD Automatically option is a great way to copy multiple CDs in a quick, assembly-line manner.
Still more rip options
Media Player's Options dialog box contains some additional options that affect what happens when you rip CDs. While you still have the Options dialog box open, select the Privacy tab. Then choose among the options summarized next. But remember that not all CDs have media information posted on the Internet. Therefore, even if you do select options as indicated, you may need to manually update media information for a song or album.
- Display Media Information from the Internet: Choose (check) this option to have media information, such as song titles, appear automatically when you play or copy a CD.
- Update Music Files by Retrieving Media Info from the Internet: Choose this option to have Media Player automatically fill in information from songs you've already copied to your computer.
When you've finished making all your selections, click OK in the Options dialog box. Now you're ready to start ripping CDs. Remember that you don't need to change the preceding settings every time you copy a CD. The settings you choose apply to all CDs that you copy.
Copying songs
With all the details of choosing how you want to copy CDs out of the way, you're ready to start copying. Follow these steps:
- If your Internet account requires logging in, get online so that you're connected to the Internet and Media Player can download media information (song titles).
- Insert the music CD you want to rip (copy) into your CD drive and close the drive door.
- If Windows Media Player doesn't open automatically, open it yourself. (If some other program opened when you inserted the CD, close that program, and then open Media Player.)
- If you chose the Rip CD Automatically option described earlier in this chapter, skip to Step 10.
- If the CD starts playing, click the Stop button down in the play controls.
- Wait for song titles to appear. If song titles don't appear within 30 seconds or so, the CD might not be in the Compact Disk Database (CDDB), an online database that contains song titles for most (but not all) commercially sold CDs. In that case, you can go ahead and rip the CD and then fill in the details later in your media library.
- Optionally, clear the check box to the left of any songs that you don't want to copy. Media Player will only copy songs that have a check mark.
- Click the Rip CD button in the toolbar. Figure 18.11 shows Media Player ripping a Sting CD to disk.
Figure 18.11
Media Player ripping a CD to disk.

- Wait until the Rip Status column shows Ripped To Library for all songs you've opted to copy. If the CD doesn't eject automatically, go ahead and eject it.
- Put the CD back to wherever you normally keep your CDs. You won't need it any more to play songs from your computer or to copy files to custom audio CDs or an MP3 player.
That's it for ripping one CD. To rip more CDs, just repeat Steps 4 through 10 for each CD. If, at any time, you want to check your available hard disk space, open your Computer folder. If you don't see any indication of available disk space for your hard disk (typically Local Disk C:), choose Tiles from the Views menu in that folder.
Copying songs from CDs you already own is one way to build up your Media Player music library. Any songs you don't already own, but would like to, you can purchase online and download to your Media Player library. We discuss how that works in the next section.
Getting Music Online
In addition to ripping CDs you already own, you can download music from online stores. The exact procedure varies from one online store to the next. Some are membership sites. Some let you purchase and download songs without joining or paying a membership fee. New stores and services come online all the time, so there's little that we can tell you specifically that applies to all the available vendors, other than that you should shop around and not necessarily sign up with the first vendor to pop up on your screen. In the bottom left of the Navigation pane, click the arrow beside the Media Guide button and choose Browse All Online Stores to see other options. The button changes to Online Stores. Click the arrow and choose Media Guide if you want to view the Media Guide.
Using the Media Player Library
The whole point of a program like Windows Media Player is to build and manage a library of digital media. That includes music, pictures, video, and recorded TV (even though we're focusing on music in this chapter).
To see and manage your Media Player library, open Media Player in Library mode. If Media Player is currently running in Now Playing mode, click the Switch to Library button.
Navigating the library
There is almost no limit to the ways in which you can view, organize, and change things in the library. You can view media by artist, album, genre, playlist, and other ways. If you want to add other properties to your Navigation pane, choose Organize ⇒ Customize Navigation Pane to show the Customize Navigation Pane dialog box shown in Figure 18.12.
If your Media Player library doesn't show songs, but instead shows pictures or other kinds of media, click an option under Music in the Navigation pane.
Figure 18.12
The Customize Navigation Pane dialog box.

In the Navigation pane, you can click the triangle button (if any) next to an item to view different categories such as Artist, Album, Genre, and so on. The following list covers the views you can add to the Navigation pane for music:
- Artist: Shows artist names in alphabetical order.
- Album: Shows album titles in alphabetical order.
- Genre: Shows names of music genres (such as Classical, Rock, Jazz).
- Year: Shows albums organized by publication year.
- Rating: Shows songs organized by rating (one to five stars). The songs are separated into those you've rated and those that are rated automatically based on your listening habits. Songs that are unrated appear under the Unrated category.
- Contributing Artist: Shows songs organized by contributing artists, if any.
- Composer: Shows songs organized by composer.
- Parental Rating: Shows songs organized by parental rating.
- Online Stores: Shows songs based on the store from which it was obtained.
- Folder: Shows songs organized by the folder in which they're stored.
You'll be better able to appreciate the library if you have at least 30 or 40 songs — or better yet, several hundred songs — in your library before reading this section. As you explore your library, keep in mind that you can right-click any icon, stack, category name, or whatever to view, edit, or play items.
Use the View Options button to choose how you want to view things. Depending on where you are at the moment, some View options will be disabled (dimmed) because they're not applicable to the current way of looking at things.
Of course, there's no right way or wrong way to view icons. Just choose whichever view works best for you. Feel free to try things out. You can't do any harm by checking out different ways to view things. And nothing you choose is set in stone. You can change your view at any time.
How you use a view depends on what you're viewing. For example, if you're viewing genres, you'll see an icon or stack for each genre in your library. Double-clicking an icon or stack shows you all the songs in that genre. Double-clicking an icon that represents a single album displays songs on that album. To play all the items that an icon represents, right-click the icon and choose Play. Again, doing some exploring on your own is your best bet. You're not permanently changing anything as you explore, so there's no need to be worried.
Choosing columns for Media Library
In addition to choosing how you want media information to look, you can choose exactly which information you do and don't want to see. The exact options available to you depend on what you're viewing and how you're viewing it at the moment. To see the full set of options, click Music in the Navigation pane, and then choose Details from the View Options menu. You'll see detailed information about each song organized into rows and columns.
To choose which columns you want to view, right-click a column heading, such as Title or Length, and click Choose Columns on the menu. The Choose Columns dialog box shown in Figure 18.13 opens. The number of columns depends on what you have open in the navigation tree.
In the Choose Columns dialog box, select (check) the columns you want to see. Clear (uncheck) columns you don't want to see. You can also control the order of columns, either in the dialog box, or after you exit the dialog box. To control the order of columns while you're in the dialog box, click any selected column name, and then click the Move Up or Move Down button to move it up or down. The higher a column name is in the dialog box, the farther to the left it is in the Details view.
After you've chosen the columns you want to view, click OK. Most likely you won't be able to see all the columns at the same time. But you can use the horizontal scroll bar under the columns to scroll left and right through columns.
Figure 18.13
The Choose Columns dialog box.

Sizing columns
To adjust the width of any column, get the mouse pointer to the right side of the column heading. You'll know the mouse pointer is in the right place when it turns to a two-headed arrow. Then just drag the column to the width you want.
Moving columns
To move a column left or right, first put the mouse pointer right on the column heading — for example, the heading Title, Length, Album, or Album Artist. Then hold down the left mouse button and drag the column left or right. Release the mouse pointer when the column is where you want it to be.
Sorting songs
When you're in a Details view, you can also sort items by any column. For example, you can sort them by Title, Length, Album, Album Artist, or any other column heading. The first time you click, items will be sorted into ascending order (alphabetically, or smallest to largest). The second time you click, items will be sorted into descending order (reverse alphabetical, or largest to smallest).
Getting missing media information automatically
Recall that media information refers to things such as song titles, artist name, and so forth. That information might be missing from some of your songs for a couple of reasons. One reason might be that the information isn't available from the Internet. In that case, you may have to fill in the missing information manually, using techniques described later in this chapter.
A second reason why you might be missing media information is that you weren't online when you copied some CDs. If that's the case, it's not too late to retrieve that information. It's quicker and easier to retrieve the information automatically. So, before you start manually changing media information, use the technique described in this section to see how much of that information you can get automatically.
First, you need to check your options for updating media information automatically. Click the Organize button and choose Options. The Library tab in Media Player's Options dialog box appears, as shown in Figure 18.14.
Figure 18.14
The Library tab in the Options dialog box.

Under the Automatic Media Information Updates for Files heading, choose (check) Retrieve Additional Information from the Internet.
- If you've already added some media information manually and you don't want the new information to replace that, choose Only Add Missing Information.
- Otherwise, choose Overwrite All Media Information if you want information you've added yourself to be replaced with information from the Internet.
When you've finished making your selection, click OK in the dialog box. Then click the Organize button and choose Apply Media Information Changes. After the changes are applied, click the Close button to exit the Apply Changes dialog box.
There's no guarantee that all missing information will be filled in. You may have songs for which there is no online media information. You'll still have to edit those manually. To change the title of a single song, right-click the current title (Track1, Track2, or whatever), choose Edit, and type the correct song title.
Information other than the title is likely to be the same for all the songs on a given album. It's not necessary to change that information one song at a time. You can select multiple songs to which you want to make a change. The change you make is then applied to all the selected songs. We'll get to that in a moment. First, let's look at how you can add songs that you have elsewhere on your computer to your Media Player library.
Choosing what files to include in your library
If you set up multiple user accounts on your computer, each user gets to have his or her own media library. Parents don't have to dig through the kids’ songs, and vice versa. But you're not stuck with only those songs. Each user also has the option to share songs, and each user has the option to choose or reject songs shared by others. To choose which songs display in your own media library:
- Click Organize in the taskbar and choose Manage Libraries ⇒ Music to open the Music Library Locations dialog box (see Figure 18.15).
- Click the Add button. The Include Folder in Music dialog box opens.
- Browse to the drive and folder that you want to include and click Include Folder. You can repeat this step to monitor as many folders as you wish.
- To prevent songs from a folder from being added to your library, click the folder (while in the Music Library Locations dialog box) you want to exclude and click the Remove button.
- Click OK after making your selections to have Media Player search any newly added folders.
Media Player updated your library according to the selections you made.
Figure 18.15
The Music Library Locations dialog box.

Sharing (streaming) your media library
Each user can opt to share all songs or some songs with other user accounts on the same computer. Likewise, if your computer is part of a private network, each user can choose to share songs with other Windows Vista, Windows 7, Windows 8, and Windows 8.1 computers. In addition, you can share with Windows 8.1–compatible devices, such as the Microsoft Xbox 360 gaming device. A great feature in Windows Media Player 12 is the capability to share and stream music to the Internet. So, you can enjoy the music library stored on your home computer when you're at work.
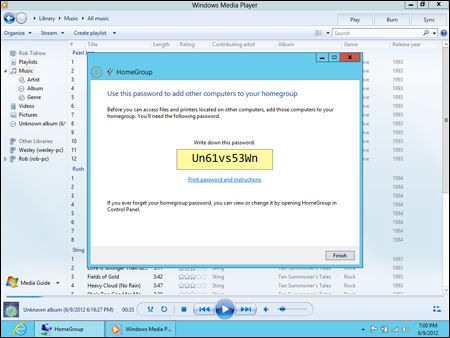
The first step in sharing your music is to enable streaming. To do so, click the Stream button in the toolbar and choose the More Streaming Options menu. Choose the media streaming options (see Figure 18.16) you want for this device and click Next to see the HomeGroup dialog box. Make sure the Shared option next to Music is selected and click Next. A dialog box (see Figure 18.17) with a password displays; it will enable you to add other computers to the homegroup to access your music. Write down this password. Click Finish.
Figure 18.16
Media streaming options.

Figure 18.17
The password option to add other computers to access your music.
Allowing Internet streaming
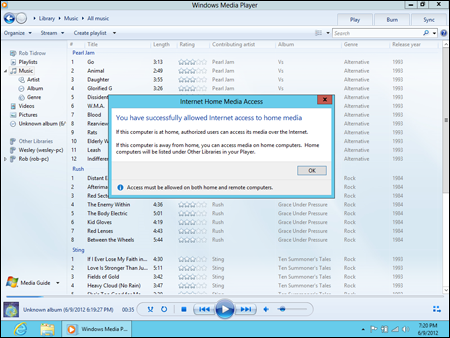
As mentioned previously in this chapter, you can use Media Player to stream media to other devices on the Internet. For example, you might listen to your home music library while you're at work. Whatever the case, you must first set up that capability because it is not enabled by default.
Open Media Player and click Stream ⇒ Allow Internet Access to Home Media. In the resulting Internet Home Media Access dialog box, click Allow Internet Access to Home Media. If prompted for an administrative password, enter it, or if prompted with a User Account Control dialog box, click Yes. Click OK when Windows 8.1 indicates it has successfully enabled sharing (see Figure 18.18).
Figure 18.18
Remote libraries are set up for Internet access.
Using a remote stream
After you configure streaming on a computer, you can then access that stream from another computer, whether on the local network or on the Internet. To play a stream from another computer, first open Media Player. Then, in the Library view, look under the Other Libraries branch in the Navigation pane. You should see the other computer(s) listed there. Click the server from which you want to play, and then play items from the List pane just as you would for a local library.
Allow Remote Control
If you want to let other computers and devices push music, video, and photos to Media Player on your computer, you need to enable remote control of Media Player on your computer. To do so, open Media Player and choose Stream ⇒ Allow Remote Control of My Player. In the resulting Allow Remote Control dialog box, click Allow Remote Control on This Network.
Pushing media to another computer
If you have a media player at home, such as an Xbox 360, Roku SoundBridge, D-Link MediaLounge, or other device, you can stream music from your computer to that device using Media Player. For example, let's say you have a MediaLounge in your living room hooked up to your entertainment center. Your music collection is on your home PC. No problem, just push the music from your PC to the MediaLounge. Open Media Player, and then create the playlist that you want to stream to the remote device. At the top of the List pane, click the Play To button and choose the device from the list.
![]() See Part IX for more information on private networks and sharing.
See Part IX for more information on private networks and sharing.
Automatically renaming songs
Earlier in this chapter, you learned how you could control filenames of songs you rip (copy) from CDs. Those filenames don't have a big impact on how information shows up in your library. The media information from each song actually comes from properties in the file rather than the filename. Nonetheless, it never hurts to have some consistency in your filenames.
For example, suppose you ripped a bunch of CDs before you realized you could control how the filenames of those songs are formatted. You change the rip settings to something you like better. That change won't affect songs you've already ripped; it will only affect songs that you rip after changing the setting. You can, however, get Media Player to rename previously named songs according to your new settings. Here's how:
- Click Organize and choose Options.
- On the Library tab, choose Rename Music Files Using Rip Music Settings.
- Optionally, if you also want to have the songs rearranged in your rip music folder (typically the Music folder in your user account), choose Rearrange Music in Rip Music Folder Using Rip Music Settings.
- Click OK after making your selections.
- To apply changes, click Organize and choose Apply Media Information Changes.
It may take a while to update and rearrange all the songs in your rip music folder. When the change is complete, click the Close button that appears in the progress indicator. You may not notice any changes in Media Player's library, but you likely will notice changes when you open your rip music folder outside of Media Player.
Most of the options and settings discussed so far have to do with groups of songs and things the Media Player does on its own. No matter what settings you choose, there may be times when you need to manually edit (or remove) items in your library.
In some cases, you may need to change a single song title. For example, suppose you have songs named Track1, Track2, Track3, and so forth. You've already tried updating that information through techniques described earlier, but the song titles still don't appear because the song titles aren't available online. When that happens, you'll need to manually change the media information.
When changing a song title, you'll want to work with one song at a time. In other cases, such as when changing a genre or artist name, you may want to make the same change to several songs at once. To make the same change to multiple songs in your library, you first have to select the songs you want to change. So, before talking about manually editing songs, let's look at techniques for selecting the songs you want to change.
Selecting in Media Library
Your media library isn't set in stone. You can change the information you see at any time. Typically, you just right-click the thing you want to change and choose Edit to change it or Delete to remove it. We'll get to the specifics in a moment, but first, let's talk about selecting items in the library. Selecting two or more items allows you to make the same change to all those selected items in one fell swoop.
Selecting items in media library is much like selecting icons in folders, so if you already know how to do that, you're ahead of the game. You can select items in any view, but you might find it easiest to work in the Details view. For example, click Music in the Navigation pane at the left side of the window. Then choose Details from the View Options drop-down list. Finally, click whatever column heading arranges the songs in a way that groups them in whatever way is easiest for you to work with at the moment.
One way to select all the items in a group is to click the heading that precedes the group. For example, in Figure 18.19, we clicked the artist name Yes to select all the songs under that category. The selected songs are highlighted. Any change you make to one of the selected songs is applied to all the selected songs.
Another way to select multiple adjacent songs is to click the first one you want to select. Then hold down the Shift key and click the last one you want to select. The two songs you clicked and all the songs in between are selected.
To select multiple songs that aren't adjacent to one another, click the first one that you want to select. Then hold down the Ctrl key while clicking other songs you want to select. That same technique lets you deselect one selected song without deselecting any other songs.
You can also use the keyboard to select songs, as follows:
- To select every song in the library, click Songs in the Navigation pane, click a song title, and press Ctrl+A.
- To select all the songs from the current song to the bottom of the list, click the first song you want to select and press Shift+End.
- To select all the songs to the top of the list, click the first song and press Shift+Home.
Figure 18.19
Selected songs under the Yes heading.

To deselect songs, click a neutral area in the program window, such as the empty space to the left of the play controls.
Selecting songs doesn't have any effect on them, other than to highlight them. However, any action you take while the songs are selected is applied to all the selected songs. The following sections look at things you can do with any one song or any number of selected songs.
Changing a song title
Every song on a CD is likely to have its own unique title, so you generally have to change titles one at a time. To change just one song title, first make sure you don't have multiple songs selected. (Click the song you want to change so that only that song is selected.) Then right-click the title you want to change and choose Edit. Type the new title and press Enter.
Changing genre, artist, and so on
You can change the genre, artist, album title, or any other media information for a song by right-clicking in a specific column and choosing Edit. But because all the songs on a CD may have that same artist, or belong to the same genre, you might want to make the change to several songs. First, select all the songs to which you want to apply the change. Then click the word or name you want to change in any one of the selected songs and choose Edit. Type in the new name or word and press Enter. The change will occur in all the selected songs.
Changing incorrect media information
Sometimes Media Player will get media information from the Internet, but it's the wrong information. This is especially true when working with multiple CD sets. Instead of manually typing all the information for the CD, you can take a shot at finding the correct information online. To do so, click Album in the Navigation pane. Then scroll to the album that has the incorrect icon, right-click its icon, and choose Update Album Info. Then double-click the album's icon to see whether the situation has improved at all.
If updating the album info didn't help, you can try right-clicking the album title just above its song titles and choosing Find Album Info. Most likely, you'll get the same faulty information you got the first time. But you can click the Search button in the lower-left corner of the Album Info window that opens and try searching by the artist's name or album title. You may get lucky and find the exact album you're looking for. The Album Info window acts like a wizard, so you can just follow the instructions on the screen and use the buttons along the bottom of the window to aid in your search.
If you do find the exact album you're looking for, click the Finish button in the Album Info window and Media Player copies the media information to the album in your media library. If you don't have any such luck, you can still manually enter the correct information for each song on the album using the techniques described in the previous sections.
Rating songs
You've probably noticed the star ratings that Media Player adds to each song. By default, the ratings are all the same (three stars) because the idea is for you to rate each song according to your own likes and dislikes. Give five stars to your favorite songs, one star to songs you don't like, and something in between for all the rest.
To change the rating of a single song, right-click the title of the song you want to rate, choose Rate, and enter the number of stars you want to give it. To rate multiple songs, first decide what rating you want to apply (such as five stars). Then select all the songs to which you want to apply that rating. (You can use the Ctrl+click method to select multiple nonadjacent songs.) After you've selected all the songs to which you want to apply a rating, right-click any selected song, choose Rate, and choose the desired rating.
Any time you want to view all the songs to which you've applied a rating, choose Organize ⇒ Sort By ⇒ Rating. The Contents pane in the center of the program window will show rating categories: one category for ratings you've applied and another for songs you haven't rated yet but were given ratings automatically, like the example in Figure 18.20.
To play all the songs to which you've given a certain rating, right-click the rating icon and choose Play. To see all the songs to which you've applied a given rating, double-click the rating icon.
Figure 18.20
Stars representing ratings.

Making Custom Playlists
A playlist is a group of songs, photos, video, or other Media Player items. In Media Player's library, every icon, stack, and Navigation pane category is a playlist in its own right, which you can play by right-clicking and choosing Play. So, every time you open Windows Media Player and click the Library button in the features taskbar, you have many playlists from which to choose.
A custom playlist is one you create yourself. A custom playlist can contain any songs you like, in any order you like. For example, you can create a Party playlist of songs to play during a party. You can create a Favorites playlist of just your favorite songs. You can also create custom playlists of songs you want to copy to your own custom CDs, DVDs, or portable music player.
To get started on creating a custom playlist, follow these steps:
- If you haven't already done so, open Windows Media Player.
- Open the Library view if currently in Now Playing view.
- If you don't see the Playlist pane at the right side of the program window, do either of the following to make it visible:
- Select the Play tab.
- Click the Organize button and choose Layout ⇒ Show List.
To create your own custom playlist, you'll need to start with an empty one, like the example at the right side of Figure 18.21. If your List pane isn't empty, click the Clear List button at the top of the Playlist pane.
Figure 18.21
The Empty List pane.
To create your custom playlist, drag any song titles you want from the Contents pane to the left of the playlist into the playlist. As an alternative to dragging one song title at a time, you can select multiple songs and drag them all at once. As an alternative to dragging, you can right-click any song title and choose Add to Playlist. Or select multiple songs, right-click any selected song, and choose Add to Playlist.
To add all the songs from an album to the playlist, right-click the album's icon and choose Add to Playlist. Likewise, you can right-click any icon or stack that represents a category of songs — such as a genre, artist name, or rating — and choose Add to Playlist. All the songs within that category are added to the playlist.
Don't worry about adding too much stuff to the playlist. There's almost no limit to how large a playlist can be. And you can also remove any song from the playlist at any time.
Managing songs in a playlist
After you have some songs in a playlist, you can arrange them as you see fit. Use any of the following techniques to do so:
- Drag any song title up or down to change its position in the list.
- Right-click any song title and choose Move Up or Move Down.
- Click the List Options button above the list, and choose whichever option best describes how you want them sorted (see Figure 18.22).
- To put the songs in random order, choose Shuffle List from the List Options menu.
Figure 18.22
Sorting songs in a playlist.
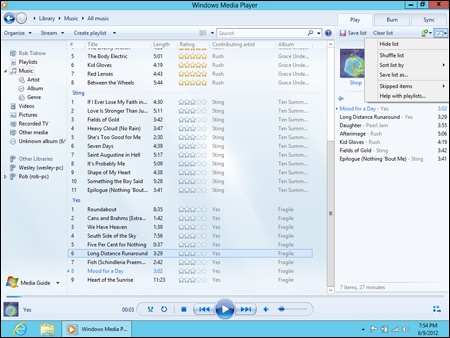
Figure 18.23 shows a completed playlist.
Figure 18.23
A playlist.

To remove a song from the playlist, right-click the song title and choose Remove from List. Optionally, you can select multiple songs using the Ctrl+click or Shift+click method. Then press Delete (Del) or right-click any selected item and choose Remove from List.
Saving a playlist
To save a playlist, name the list by clicking Unsaved List and entering a name. To rename a list, simply click the name and type a new one; then press Enter.
Viewing, playing, and changing playlists
To play all the songs in a playlist, or change a playlist, first select the Play tab. If the Navigation pane isn't open, use the Layout Options button to open it. The playlists appear under the Playlists branch in the Navigation pane. If you click Playlists in the Navigation pane, you'll see all your saved playlists in the Contents pane as icons. Recent playlists will be listed first, followed by all playlists, as in Figure 18.27. In the example, we chose Tile from the View Options to show the playlists.
To use a playlist, right-click its icon or name and choose an option, depending on what you want to do:
- Open: Shows the contents of the playlist in the Contents pane
- Play: Plays all the songs in the playlist
- Add To: Adds the songs from the playlist to whatever playlist is currently in the List pane
- Rename: Enables you to change the name of the playlist
- Delete: Deletes the playlist
- Open File Location: Opens the folder in which the playlist is stored
Using and creating Auto Playlists
An Auto Playlist is one that gets its content automatically. You can also create your own Auto Playlists based on any criteria you like. To create an Auto Playlist, click the arrow beside the Create Playlist button in the toolbar and choose Create Auto Playlist. The New Auto Playlist dialog box opens, as shown in Figure 18.24.
To specify a criterion for the Auto Playlist, click the plus sign under Music in My Library and choose an option from the resulting drop-down list. Then specify criteria by clicking options that appear next to the funnel icon. For example, if you wanted to create an Auto Playlist for songs in which Carlos Santana is a contributing artist, choose Contributing Artist from the list, and then click the Click to Set link and either choose an artist's name or type the artist's name.
You could create an Auto Playlist, perhaps named “Today's Tunes,” by choosing Date Added from the drop-down list and then choosing a date specification (such as Last 7 Days) from the links that appear beside the new criteria item.
Suppose you have many different types of files in your library and you want to be able to quickly view just the MP3 files. You could create an Auto Playlist named “MP3s” (or whatever) and use the criteria File Type and MP3.
You can specify multiple criteria if you like. Multiple criteria are always treated as “and” logic, which means each new criterion narrows, rather than expands, the Auto Playlist's contents. For example, if you specify the criteria Contributing Artist Contains Santana and Date Added to Library Is After Last 30 Days, you'll see all songs added to the library in the last 30 days where a contributing artist is Santana.
Figure 18.24
The New Auto Playlist dialog box.

To include pictures, video, or TV shows in the Auto Playlist, choose an option under the And Also Include heading. Or to place additional restrictions on the content, choose options under And Apply the Following Restrictions to the Auto Playlist.
When you've finished specifying criteria for your Auto Playlist, click OK. The Auto Playlist will be listed in the Navigation pane along with all others. To play the Auto Playlist and see its current contents, double-click its name or icon. To change the criteria that define the Auto Playlist's contents, right-click its icon, and choose Edit.
Creating Your Own Music CDs
Although CD players are becoming less and less popular (because of smartphones, MP3 players, iPhones, and the like), many people still have CD players in their vehicles. For that reason, you may want to opt for a custom CD of your favorite music. Creating your own custom music CDs is a lot of fun. It's also a great way to protect any new CDs you purchase from getting scratched and ruined. When you buy a new CD, rip it to your Media Library, and then put it back in its case for safekeeping. Burn a copy of the CD (or just your favorite songs from the CD along with some other favorite songs), and use the copy in your home or car stereo. In some cases, you can also copy songs you purchased online to CDs.
If you buy blank CDs in spindles of 50 or more, they're typically very inexpensive. You won't get the little plastic jewel case, but you can buy paper sleeves or jewel cases separately. Or you can keep all the CDs in a CD binder.
Types of music CDs
Before we get into the specifics of burning CDs, it's important to understand that you can create two different types of music CDs:
- Audio CD: This type of CD plays in any home stereo, car stereo, portable CD player, or computer. You must burn songs to a CD-R disk (preferably an Audio CD-R) to create this type of CD because most non-computer players can't play CD-RW disks or DVD disks.
- Data CD: This type of music CD plays in computers, or in any stereo that's capable of playing this type of CD. You can use CD-R or CD-RW disks. However, you must choose a disk type that is compatible with both your computer's CD/DVD burner and the device on which you want to play the disk.
If you don't know what type of disks your stereo can play, refer to the instructions that came with that device. Optionally, create an RW (Read/Write) disk and try it out. There's no loss if the disk doesn't play because you can always erase the disk and use it for something else. Once burned, R (Recordable) disks cannot be erased or changed.
Choosing music disk options
The first step in creating a music CD is to specify which type of disk you want to create, and perhaps some other options. In Media Player, select the Burn tab, and then click Burn Options to see the menu shown in Figure 18.25. Choose options as summarized in the following list:
- Hide List: Hide the burn list.
- Eject Disc after Burning: Have the CD ejected automatically when it's ready for use. This is especially useful when burning multiple CDs from a single Burn list.
- Data CD or DVD: Choose this option if you want to create a music CD or DVD that plays only on computers and devices that are capable of playing nontraditional music CDs.
- Audio CD: Create the type of CD that all stereos and players can play. For best results, use an 80-minute Audio CD-R disk.
- Name Disc: Specify a name for the disk.
- More Burn Options: Choosing More Burn Options takes you to the Burn tab of Media Player's Options dialog box, shown in Figure 18.26. Most of the options duplicate options on the menu. Here are the ones that are unique:
- Burn Speed: The default setting is Fastest. But if you have problems burning disks, or the sound quality isn't up to par on the disks you burn, consider reducing this to a slower speed.
- Automatically Eject the Disc after Burning: Instruct Windows to open the disk tray after the CD burning completes.
- Apply Volume Leveling across Tracks: Ensure that the volume of each song is the same when listening to the finished CD.
- Burn CD without Gaps: Omit the two-second gap normally inserted between audio tracks.
- Add a List of All Burned Files to the Disc in This Format: Choose WPL if your player can read Windows playlists. Choose M3U if your player can only read MP3-style playlists.
- Use Media Information to Arrange Files in Folders on the Disc: If selected, items on the CD will be organized into folders. If you're unsure about whether your player can handle folders, clear the check box for this option.
Figure 18.25
Burn options.

- Help with Burning: Choose this option for help with burning music CDs.
Figure 18.26
The Burn tab of the Options dialog box.

Click OK in the Options dialog box to save any settings you changed. With your options selected and squared away, you're ready to choose which songs you want to copy to your custom CD.
Choosing songs to put on the CD
The skills needed to choose songs to put on a CD are the same as those for creating a custom playlist. You can drag songs individually, or you can drag an entire album or other category. But you have to make sure you're dragging to the Burn list, not just any playlist. Here's the basic process:
- Select the Burn tab to make sure you're viewing the Burn list.
- If your Burn list contains songs from a previously burned CD and you want to create a new one, click Clear List at the top of the Burn list. Click the Burn Options button and choose Audio CD if you're burning a music CD for stereos. Otherwise, you can choose Data CD or DVD if you're creating a music disk for computers and appropriate players.
- Use a felt-tip pen or disk labeler to write the name of your custom CD on a blank CD. Then put that CD in your CD drive.
Your Media Player window should look something like Figure 18.27. The songs that appear in the center Contents pane will, of course, be songs you have in your own library. How your icons look depends on what category you're viewing and what option you've selected from the View Options drop-down list.
Figure 18.27
Ready to copy songs to a Burn list.

At this point, just drag the songs you want to burn to your custom CD to the Burn list, or right-click any song title and choose Add to Burn List. As you add songs, the indicator at the top of the Burn list keeps you informed of how much space will be used on the CD. You can keep adding songs until the disk capacity is exhausted. Any additional songs you add at that point are added to a new disk. Media Player numbers the disk sequentially in the list.
Options that apply to custom playlists also apply to the Burn list. For example, to remove a song from the Burn list, right-click its title and choose Remove from List. To change the order of songs, click Burn Options, choose Sort List By, and choose a sort option. Or drag any song title up or down within the list.
When you're happy with the songs you've selected and their order, you're ready to burn the CD.
Creating the disk
When the Burn list contains all the songs you want to copy to the CD, click the Start Burn button at the top of the Burn list. Then wait. How long it takes depends on the type of CD you're creating, the speed of your drive, and other factors. The status column in the Contents pane and an indicator below the Burn list keep you apprised of the progress.
When the CD is finished, remove it from the CD drive. If you created a standard audio disk, you can insert and play it in a stereo as you would any other disk. If you created a data disk, you can play it in any device that supports the type of disk you created.
Saving a Burn list
It's a good idea to save each Burn list you create. That way, if you ever want to create another copy of the same CD, you can just open the saved Burn list. To save a Burn list, click the Burn Options button and choose Save List As. Change the name to something that describes the Burn list and click Save. Then, to create a new Burn list, click the Clear List Pane button.
Copying Music to Portable Devices
A portable device is an MP3 player or similar device that lets you take your music with you. To put songs (or other media) on your portable device, you sync songs from Media Player's library to the device. You can put any songs you wish onto your player. The only limit is the storage capacity of the device.
Windows Media Player works with many MP3 players. However, it does not work with the Apple iPhone, iPod, or iPad (you use iTunes to sync to those). Nor does it work with some older devices.
If you don't already have a portable device but you're thinking of getting one, visit http://windows.microsoft.com/en-US/windows/products/windows-media-player.
Different devices work a little differently. So, if you already have a device, the first step is to learn the basics of using it and connecting it to your computer. That information you can get only from the instructions that came with the device. Despite the differences among devices, we can tell you generally how synchronization works with Media Player.
The first step is to open Windows Media Player and select the Sync tab. Then connect your device to the computer and turn it on. If a dialog box opens asking you to name the device, type in a name of your own choosing and click Finish. What happens next depends on the storage capacity of the device:
- If the device capacity is 4GB or greater, and your media library can fit within that capacity, Media Player automatically copies your entire library to the device. Each time you connect the device in the future, Media Player copies any new songs you've acquired since the last connection so that the device stays in sync with your library.
- If the device capacity is less than 4GB, or your library is too large to fit in the device, nothing is copied automatically. But you can manually copy any songs you like to the device.
You can change what happens when you connect your device. We'll get to that in a moment. First, let's look at how you manually choose songs to put on your device.
Manual syncing
When your device is connected to your computer and you want to choose songs to copy to the device, select the Sync tab. The List pane at the right side of the program window shows the storage capacity of the device, and the amount of space that's currently on the device. Beneath that is an empty playlist, called the Sync list.
To add songs to the device, you need to drag them from the contents pane to the Sync list, just as you would when burning a CD or creating a custom playlist. As always, you can select multiple songs and drag them all at once. You can also right-click any song, album, icon, or category name and choose Add to Sync List.
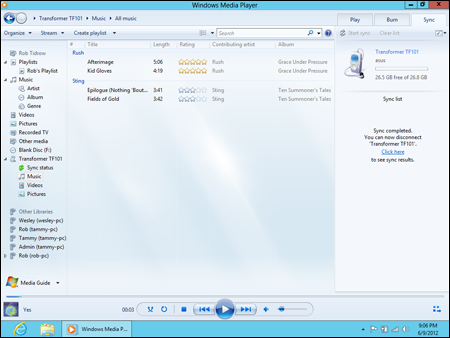
As you add songs, an indicator near the top of the Sync list shows you how much space you have remaining. If the indicator turns red and shows “Filled,” you've gone over the limit. To remove a song from the Sync list, right-click its title and choose Remove from List. Do so until the indicator turns green again. Figure 18.28 shows an example with many songs already chosen and about 26.5GB of space left on a portable player.
As always, you can arrange songs in the Sync list by dragging them up or down. Optionally, click Sync List, choose Sort, and choose a sort order. When you're happy with the songs you've selected and their order, click the Start Sync button at the bottom of the Sync list.
The Contents pane of Media Player shows the synchronization progress as songs are copied to the device. When the Status column shows “Synchronized to Device” for every song, you're done. You can disconnect the device from the computer, plug in your headphones, and take your music with you.
Figure 18.28
Songs added to the Sync list.

Managing songs on a device
Portable media players are much more flexible than CDs. For example, you can delete individual songs from a portable device and replace them with other songs. When your device is connected, it shows up as its own set of categories in the Navigation pane. When you click a category name under the device name, the Contents pane to the right shows the contents of the device only, not the contents of your entire library.
Figure 18.29 shows an example. In the Navigation pane at left, we've clicked the Transformer TF101 device and clicked the All Music category name. The Contents pane to the right is showing songs that are currently on the synced device. When viewing songs in that manner with your own device, you can right-click any song title and choose Delete to remove it from the device.
Manual syncing is easy (once you've played around with it a bit). Most people like to choose exactly what's on their portable player so manual syncing is also the most commonly used method. To use auto syncing, you need to enable automatic syncing and specify what syncs automatically. Let's look at that next.
Figure 18.29
Music on an MP3 player.
Auto syncing devices
Auto sync is a method of keeping a portable player up to date with whatever content is currently available in your Media Player library. If your device doesn't have enough capacity to store your entire library, exactly what you end up with can be somewhat arbitrary. The first step is to connect the device to the computer and make sure it's turned on.
Next, select the Sync tab and then click Sync Options, point to your device name, and choose Set Up Sync. If you have not set up the device previously, you'll see the Windows Media Player – Device Setup dialog box, which asks if you want to sync temporarily (this session only) or permanently. If you choose the latter, you'll have additional options available for syncing, including the capability to specify which playlists are synced.
The Device Setup dialog box opens. The left column shows available playlists. The right column shows playlists that are currently used to sync songs to the device. To remove a playlist from the right column, click its name and choose Remove.
To add a playlist to the right column, click its name in the left column and click Add. To see Auto Playlists specifically designed for syncing, click the My Playlists button under Available Playlists and choose Sync Playlists.
If no playlist defines the kinds of songs you want to sync automatically, you can create your own. Click New Auto Playlist and give your playlist a name. For example, to make an Auto Playlist that copies new songs added to your library in the last week, create a criterion that specifies Date Added to Library Is after Last 7 Days.
Give the new playlist a name, perhaps New This Week, and save it. Then click the Add button to copy it from Available Playlists to Playlists To Sync. If that's the only playlist you put in the right column, then each time you connect your device, Media Player copies only songs that you've added to your library within the last week.
Optionally, choose Shuffle What Syncs. If you do, each time you connect the device, files that are currently on the device are removed automatically and replaced with songs that match the criteria of your selected Auto Playlists. So, each time you connect the device, you automatically get however many songs your playlist provides added to the device.
Click Finish when you're done, and Media Player syncs based on your selections. Remove the device when the syncing is finished. Any time you want to change the contents of your player, just connect it to the PC and click the Finish button.
Choosing between manual and auto sync
You can choose whether you want to use manual sync or auto sync at any time. Just connect your device, click the arrow under Sync, click the device name, and choose Set Up Sync. To use manual syncing, clear the check mark next to Sync This Device Automatically. To enable auto syncing, select (check) that same check box. Then click Finish.
Setting player options
To see other options that your player supports, connect the player, right-click its name in the Navigation pane, and choose Properties. A Properties dialog box for the device opens. The options available to you will depend on the capabilities of your player. If you're not sure what an option in the dialog box means, check the manual that came with your device or click the Help button in the dialog box for more information.
Fun with Skins
Whenever you're using a program, the part that you see on the screen is just one snowflake on the tip of the proverbial iceberg. The real “guts” are in memory and invisible. The part you see on the screen is called the user interface, abbreviated UI, and often referred to as simply the interface or skin. Some programs, including Windows Media Player, allow you to change the interface without changing the functionality of the program.
Windows Media Player comes with several skins for you to try out. These skins are for Now Playing mode, not for Library mode. To see them if Media Player is in Now Playing mode, press Alt to open the menu, and choose View ⇒ Skin Chooser. If Media Player is in Library mode, right-click the area to the right of the breadcrumb trail, and then choose View ⇒ Skin Chooser.
Click each skin name in the left pane to get a preview of how Media Player will look if you apply the skin. To download additional free skins, click the More Skins button above the left column. When you find a skin you like, click the Apply Skin button.
Figure 18.30 shows an example using the Blue Crush skin. Once you're in a skin, point to various symbols and buttons on it to figure out what's up. You'll see the name of the control in a tooltip.
Figure 18.30
Media Player in the Blue Crush skin.

When you're in the normal Full mode, you can click the Switch to Skin Mode button in the lower-left corner of Media Player's program window to switch to a skin. From the keyboard, press Ctrl+2 to switch to Skin mode. Press Ctrl+1 to switch back to Full mode. To get out of the Skin Chooser in Full mode, click the Back button.
Extending Media Player with Plug-ins
Plug-ins are optional add-on capabilities that you can purchase or, in some cases, download for free. A plug-in might be as simple as a new visualization or skin. Or it could be an audio or DVD driver or enhancer that extends the capabilities of Media Player. Some plug-ins add capabilities to Media Player. It all depends on what you download and install. To see your options, press Alt and then choose Tools ⇒ Download Plug-Ins.
Some plug-ins are free; others aren't. Once you're at the site for downloading plug-ins, you'll need to review what's available and decide for yourself what's of value to you.
To manage any plug-ins you acquire, choose Tools ⇒ Plug-ins and then choose Options.
Converting File Types
Suppose you've ripped a bunch of CDs to WMA format and then acquire a portable media device that only plays MP3s. Do you need to rip all those same CDs again? The answer is no. Media Player 12 can automatically convert files as it syncs them to your portable device. For example, it can convert WMA files to MP3 format. It can also convert video files.
To configure file conversion options, press Alt and then click Tools ⇒ Options and select the Devices tab. Then click the Advanced button to open the File Conversion Options dialog box (see Figure 18.31).
In the File Conversion Options dialog box, you can specify whether video or audio file conversion happens in the background. Conversion in the background can speed up syncing. By default, background conversion is on for video and off for audio. You can also specify a better quality for video by choosing the Choose Quality over Speed When Converting Video option. If you need more space for temporary files created during conversion, click the Change button and choose a different location. You can also specify the amount of disk space to allocate for the temporary files and delete any temporary files currently in the temporary location. For other types of conversion options, consider searching any download site for the type of conversion you need to perform. For example, you might go to www.tucows.com or http://download.cnet.com. Or you could use a more generic search engine such as Bing or Google. Type in the words that best define the type of conversion you need to perform, such as Convert WMA MP4. We're also partial to Pocket DVD Studio at www.pqdvd.com. It has versions to convert DVDs for various devices, including PSP, iPad, iPod, and others.
Figure 18.31
The File Conversion Options dialog box.

Music, Metadata, and Searches
Earlier in this chapter you discovered how you can store media information such as artist, album title, genre, and so forth with songs. That media information is a form of metadata. Metadata, in turn, is information about a file, and it doesn't apply only to music. Pictures, videos, Microsoft Office documents, and many other file types support metadata.
You don't have to be in Windows Media Player to take advantage of metadata. The Search features in Windows 8.1 allow you to search and group things based on metadata in any file. For example, if you select Search from the Charms Bar and type an artist's name into the Search box, songs by that artist show up in the Files window (click Files under the search box).
You're also not limited to searching for one thing. You can specify multiple criteria separated by the words AND or OR (uppercase letters). For example, here's a search that finds all tracks in which the composer is either Beethoven or Mozart: composer:beethoven OR composer:mozart.
If you want to locate all MP3 songs that have Nickelback as an artist and a year greater than 2010, the following search would do the trick: type:mp3 AND artist:nickelback AND year:>2010.
![]() For experienced users, this is a far cry from the old days of searching for filenames. But it's not the kind of thing you master in a minute. Searches are successful only when you know how to construct them correctly. See Chapter 22 and Chapter 23 for the full story.
For experienced users, this is a far cry from the old days of searching for filenames. But it's not the kind of thing you master in a minute. Searches are successful only when you know how to construct them correctly. See Chapter 22 and Chapter 23 for the full story.
Wrap-Up
This chapter looked at the Windows Media Player main music capabilities, but all its capabilities haven't been covered yet. In the next chapter, you learn about using Windows 8.1 with DVDs and videos. If you have an edition of Windows 8.1 that includes Media Center, you can also use Media Center to play songs from your media library. The following points were covered in this chapter:
- Controlling sound volume on your computer is a necessary first step to playing music.
- The Features taskbar along the top of Media Player's program window provides easy access to all of Media Player's main components.
- The Now Playing mode can show a visualization of music that's playing or the visual content of the playing video or DVD.
- The Navigation pane gives you access to all songs and other media you've downloaded or copied from CDs.
- You can rip (copy) songs from music CDs to your media library.
- You can burn your own custom music CDs.
- You can sync (copy) music to portable media devices.