Chapter 19: Working with Videos and Photos
IN THIS CHAPTER
Watching video files with the Video app
Watching video files with Media Player
Managing photos with Media Player
Windows 8.1 provides two tools to help you play back video files stored on your computer: the Windows 8.1 Video app and Windows Media Player. The Video app provides basic playback features, while Windows Media Player includes ways to create playlists and more. You can even use Media Player to manage photos and copy them to portable devices.
If you have Media Center working on your version of Windows 8.1, you can use Media Center or Media Player to manage and watch recorded TV.
Watching Video Files
A video file is a file on a hard disk that contains video and audio. These files include videos you capture from video cameras, smartphones, digital cameras, recorded TV shows, and videos you download from the web. Video files come in many formats, and thanks to the Windows 8.1 Video app and Media Player 12's support for additional formats, Windows can now play almost any type of video. The following sections will help you understand how to manage and play videos in the Video app and Media Player.
Using your Videos library
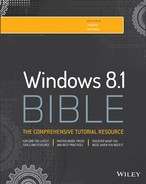
To open your Videos folder, start File Explorer. Then click Videos in the Navigation pane. Figure 19.1 shows an example where there are already some videos and other items in the Videos folder. Only the icons that look like thumbnails are actual videos. When you click one of those, it shows in the Preview pane (if the Preview pane is open).
Figure 19.1
Videos folder example.
If you want to see filename extensions of video files but they're not currently visible, select the View tab and then click Options. In the Folder Options dialog box, select the View tab, clear the check mark next to Hide Extensions for Known File Types, and click OK.
Recorded TV
Recorded TV shows are video files stored in the .dvr-ms (Digital Video Recording — Microsoft) format. You use Media Center (which you may have to install) to define times and channels to record, as on a VCR or DVD recorder. You can also decide where you want to store recorded TV shows in Media Center. And of course, you can watch recorded TV shows in Media Center.
You can also watch recorded TV shows in Windows Media Player. To view your recorded TV shows in Media Player, click the Recorded TV branch in the Navigation pane.
If some of your recorded TV shows don't show up, Media Player may not be monitoring their folders. Launch Media Player while on the Windows Start screen by typing media. Click Windows Media Player on the results. In Media Player, choose Organize ⇒ Manage Libraries ⇒ Recorded TV. In the resulting Recorded TV Library Locations dialog box, click the Add button to add folders that contain recorded TV to the list of the monitored folders.
Playing videos using the Video App
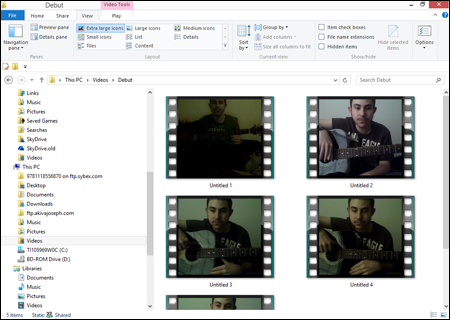
To watch a video using the Windows 8.1 Video app, open File Explorer and right-click a video you want to play. Choose Open With and select Video. Or, if Video is the default video player, you simply have to double-click that video from File Explorer, and Windows automatically launches the Video app with your video playing. Figure 19.2 shows the Video app playing back a selected video.
Notice in Figure 19.2 that the video controls display to help you control the video playback. These controls include the following:
- Rewind: Enables you to skip back to a previously played section of the video.
- Pause/Play: During playback, the Pause button appears so you can halt the playback. While paused, the Play button appears so you can restart the playback of the video.
- Fast Forward: Enables you to skip forward in the video.
- Now Playing Bar: Shows a progress timeline of the video. Slide the Now Playing controller (usually a green circle) forward and backward to move the video to a specific place on the timeline.
If you don't click on any of these playback controls, after a few moments they'll disappear from view. Bring them back into view by moving the mouse or tapping the screen on a touchscreen monitor.
While playing a video, you can display additional tools by right-clicking. Figure 19.2 also shows playback and Video app tools at the bottom of the screen. You can click the Open File button to display the Files app to see a list of videos you can play. You also have buttons to repeat, rewind, play, and fast forward.
Figure 19.2
The Video app playing a video.
Playing videos using Media Player
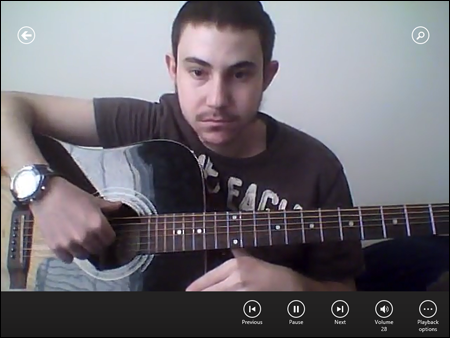
To watch a video file in the Media Player, open Media Player (show the Charms Bar, click Search, type media, and click Windows Media Player on the Start screen). If the video is stored in a format supported by Media Player, it should open in Media Player (see Figure 19.3). If it opens in some other program, close that program. Then follow these steps to watch it in Media Player:
- Right-click the video icon in File Explorer and choose Open With ⇒ Choose Default Program.
- To ensure that files of that type open in Media Player by default, choose Use This App for All of the Chosen File Types (such as
.mp4,.avi, and so on). - Click Windows Media Player (or whatever program you want to set as the default).
Figure 19.3
Using Media Player to play a video.
Adding videos to your Media Library
You can store information about your video files in Media Player's library. Depending on how Media Player is configured, video files from your Videos folder, and perhaps Public Videos folders, should already appear in Media Player. To find out, click Videos in the Navigation pane.
To add video files to your media library, monitor the folders in which they're stored by following these steps:
- If you're not already in Windows Media Player, open it now.
- Choose Organize ⇒ Manage Libraries ⇒ Videos. Videos appear in the Video Library Locations dialog box by default (shown in Figure 19.4).
Figure 19.4
Using the Video Library Locations dialog box.

- Click the Add button and navigate to the drive and folder that contains other videos you want to include. Then click Include Folder. Repeat this step for each folder you want to add.
- Click OK in each open dialog box to save all your changes.
Media files from the folders you specified are added to your library. You can use the View Options button on the toolbar to display icons in Icon, Tile, or Details view. You also can add your own media information to better organize your videos by genre, director, actor, or whatever. To add a genre to a video, choose the Details view, and then click in the Genre column and type a tag, such as SciFi, Sports, Nature, and so on.
By default, the Navigation pane doesn't show Genre as an option under the Videos branch. To add Genre, choose Organize ⇒ Customize Navigation Pane to open the Customize Navigation Pane dialog box. Under the Videos branch, place a check beside Genre and any other items you want to show, and click OK.
Figure 19.5 shows an example where we've already categorized video files by Genre. We clicked the Genre icon in the Navigation pane at the left to see video files stacked by categories.
Figure 19.5
Video files organized by genre.

Playing videos from your library
Playing videos in Media Player is no different from playing songs. In the library, just double-click the video's title or icon. Or right-click an icon, stack, or category name, and choose Play.
Managing Photos with Media Player
In Chapter 17, you discovered ways to acquire and manage photos with Photo Gallery. There's no need to bring that information into Media Player, but you can if you want to. For example, if you have a portable media device that displays pictures, you might want to bring the photos into Media Player so you can sync music and video files.
To view photos in Media Player, the photos need to be in a folder that's monitored by Media Player. Or you'll need to add that folder to your list of monitored folders. By default, the Pictures library appears in Media Player's Navigation pane but without any options such as Tags or Date Taken. You can add those options by clicking the Organize button in Windows Media Player and choosing Customize Navigation Pane. Scroll down to find Pictures in the list and select the desired options.
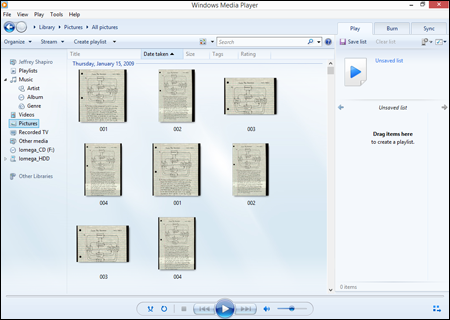
To view photos in Media Player, click Pictures in the Navigation pane. Figure 19.6 shows an example where we're viewing photos by date taken. Each stack represents a group of photos.
Figure 19.6
Viewing photos by date taken in Media Player.
More on Playlists
In Media Player, you can include videos and photos in any music playlists you create. This is mostly useful for creating Auto Playlists for syncing to devices that support music, photos, and video. (When you play the playlist in Media Player, the videos and photos play in sequence, not simultaneously, so you'll still see only a visualization or album art when music is playing.)
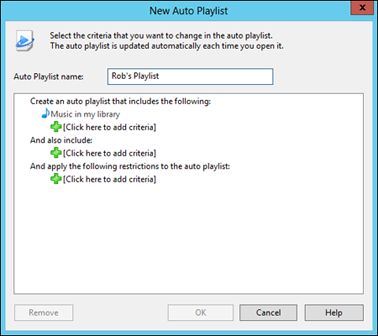
To create an Auto Playlist that includes music, photos, and/or videos, click the arrow beside the Create Playlist button in the toolbar and choose Create Auto Playlist. Or right-click the name of an existing Auto Playlist and choose Edit. In the New Auto Playlist dialog box (shown in Figure 19.7), name the playlist however you like. Under Music in My Library, add your criteria for music. Then, under And Also Include, set criteria for Pictures, TV, and Video as you see fit.
Figure 19.7
Creating an Auto Playlist in Windows Media Player.
You can use that Auto Playlist to keep your portable media player up to date with media content on your computer on a daily basis. To update manually, connect your device and select the Sync tab. Drag the playlist name from the Navigation pane into the List pane. Then click the Start Sync button.
To use the daily Auto Playlist for automatic syncing, first connect your device. Then right-click the device in the Navigation pane and choose Set Up Sync. Choose Sync This Device Automatically. Then add the Auto Playlist to the Playlists to Sync column. Remove any other playlists that are in that Playlists to Sync column.
Limiting playlist size
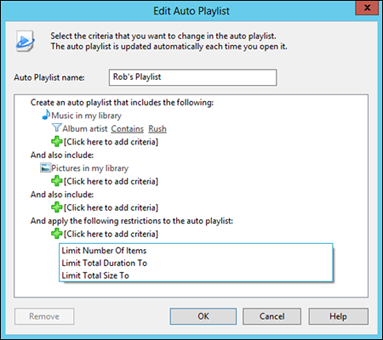
If you discover that your Auto Playlists are too large, containing more content than you can fit on your portable player, you can limit the amount of content the playlist contains. Open the playlist for editing, and at the bottom of the Auto Playlist, click the + sign under And Apply the Following Restrictions to the Auto Playlist. You'll see the options shown in Figure 19.8 and described here:
- Limit Number of Items: Choose this option to limit the number of items the playlist may contain. For example, if you choose 10, the Auto Playlist will list only the first ten items that meet the criterion.
- Limit Total Duration To: Choose this option to set a maximum time limit to match the time duration of the disk to which you'll be copying items. For example, if you'll be copying playlist items to an Audio CD, the time limit is 80 minutes.
- Limit Total Size To: When syncing to portable devices, choose this option to limit the playlist items to the storage capacity of your device in kilobytes (KB), megabytes (MB), or gigabytes (GB).
Click OK when you've finished setting criteria. To see which items the Auto Playlist includes, click its name under Playlists in the Navigation pane. Or click Playlists in the Navigation pane, and then double-click the playlist name in the Details pane. To use your new playlist for auto syncing, connect your portable device to the computer. Then right-click the device in the Navigation pane and click Set Up Sync. Choose the Sync This Device Automatically check box and remove any items listed in the Playlists To Sync column. Then add your new playlist to that same column.
Figure 19.8
Options for restricting an Auto Playlist.
Limiting playlists to favorite items
When you manually create playlists by dragging items to the List pane, criteria you set in an Auto Playlist have no effect. But you can limit manual playlists to favorite items, providing you rate your items before dragging them over.
First, before you drag an album or category to the List pane, open the album or group and rate the songs. To rate a song, right-click its title in the contents pane and choose Rate. Or select several songs to which you want to apply the same rating, right-click any one selected song, and choose Rate. Give a four- or five-star rating to any songs you do want copied to playlists. Give a three-star or lower rating to songs you don't want copied.
To copy only favorites from the category to the playlist, right-click the album's icon or category name and choose “<playlist name> (Favorites Only).” Only the four- and five-star rated items appear in the List pane.
Skipping playlist items
When you're playing items in a playlist, you can skip over any item by clicking the Next button in the play controls. Media Player can remember which items you skipped and then skip them automatically the next time you play the list. It can also automatically omit skipped items when you save the playlist.
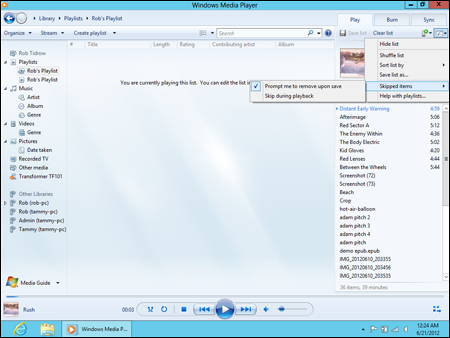
To choose how Media Player treats skipped items, click the List Options button above the list (shows an icon with a check mark on it) and choose Skipped Items, as in Figure 19.9. A selected option is active; an unselected option is inactive. You can click the option to activate or deactivate it. The following section describes how those options work.
Figure 19.9
Options for skipping items.
Prompt Me to Remove Upon Save
Activating the Prompt Me to Remove Upon Save option causes a message to appear whenever you save a playlist that contains skipped items. You can choose whether you want to leave the skipped items in the saved playlist or omit them. If you choose to keep the items in the playlist, you can choose Skip During Playback to have the songs skipped over the next time you play the playlist.
If you choose the Don't Show This Message Again option, Media Player automatically saves the playlist, and skipped songs will be skipped over on playback. Clear this option if you want to be prompted about these skipped items again.
Wrap-Up
Windows 8.1 includes two tools to play back videos — the Video app and Windows Media Player 12. Here's a quick summary of key points made in this chapter about using the Video app and Media Player to watch videos and view photos:
- To view a video using the new Windows 8.1 Videos app, open File Explorer and double-click a video file or right-click the video and choose Open With ⇒ Video.
- To open your Videos folder, open File Explorer and open the Videos folder.
- To view video files you've imported to Media Player, click Videos in the Navigation pane.
- For help, troubleshooting, and more information, click the Help button on the toolbar.