
Chapter 3. Entering Text
To start building a document, begin by entering your text. Word is set up so you can start typing right away in a fresh, new document file. A blinking cursor marks your current location in a document. You can click anywhere in a document and start typing from that point onward. As you type, the cursor marks your spot on the page. In this chapter, you’ll learn the basics for adding text, including how to insert special symbols, select text, move and copy text, and use pre-built text elements.

Typing and Editing Text
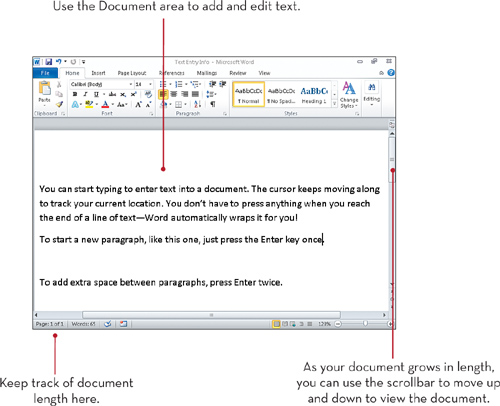
To add text to a document, just start typing. If you want to add text in a certain spot on the page, click the area to move the cursor and type in your text. The cursor, the blinking line on your document page, marks your current location in the document. This blinking cursor is also called the insertion point. When you reach the end of a line, Word automatically wraps the text to the next line for you. Default margins are already in place and Word makes sure your lines of text fit within those margins.
![]()

![]() Start typing your text.
Start typing your text.
![]() To start a new paragraph, press Enter.
To start a new paragraph, press Enter.
![]() To add extra space between paragraphs, press Enter twice.
To add extra space between paragraphs, press Enter twice.
![]() To move the cursor in a document, click where you want to insert it or use the keyboard arrow keys to move it.
To move the cursor in a document, click where you want to insert it or use the keyboard arrow keys to move it.
Tip: Red and Green Lines!
![]()
If you see red wavy lines under a word you typed, Word’s Spell checker tool is trying to tell you the word may be misspelled. If you see a green wavy line, that’s the Grammar checker alerting you to a grammar issue. To learn more about Word’s proofing tools, see Chapter 9, “Reviewing Documents.”

![]() To edit text, click in the word you want to change. Word moves the cursor to the new spot.
To edit text, click in the word you want to change. Word moves the cursor to the new spot.
![]() You can press Delete to delete a character to the right of the cursor.
You can press Delete to delete a character to the right of the cursor.
![]() You can press the Backspace key to delete a character to the left of the cursor.
You can press the Backspace key to delete a character to the left of the cursor.
![]()
Tip: Insert and Overtype
![]()
You can switch between two modes of text entry when working on a document: Insert and Overtype. Insert mode is the default mode, and anywhere you click the cursor you can start typing and any existing text moves over to make room for new text. When Overtype mode is turned on, existing text is replaced by whatever you type. In Word 2010, you can turn the Insert key on your keyboard into a toggle to switch between the two modes. To do so, click the File tab and click Options. Under Advanced options, click the Use the Insert Key to Control Overtype Mode check box.
Selecting Text
To edit your text and assign various formatting, you must first learn how to select the text you want to modify. Selecting text is as easy as clicking or dragging, or a combination of both. There are a variety of text selection techniques you can apply, whether you’re selecting a single character, a word, a sentence, a paragraph, or even an entire document.
![]()

![]() To select by dragging, click and drag across the character, word, or paragraph you want to select.
To select by dragging, click and drag across the character, word, or paragraph you want to select.
![]() Selected text appears highlighted in the document.
Selected text appears highlighted in the document.
![]() You can double-click within a word to select a single word in the document.
You can double-click within a word to select a single word in the document.
![]() To select a paragraph, triple-click anywhere in the paragraph.
To select a paragraph, triple-click anywhere in the paragraph.


![]() You can also select text by clicking in the margin. To select a line of text, click in the margin directly left of the line.
You can also select text by clicking in the margin. To select a line of text, click in the margin directly left of the line.
![]() To select a paragraph, double-click in the margin.
To select a paragraph, double-click in the margin.
![]() To select the entire document, triple-click in the margin.
To select the entire document, triple-click in the margin.
![]()
Tip: Mini Toolbar
![]()
When you select text, you may notice a ghostly toolbar popping up next to the selection. This is the mini toolbar offering you quick shortcuts to related commands, such as formatting. You can move the mouse pointer over the toolbar and use the tools, or you can ignore it and it goes away.
Moving and Copying Text
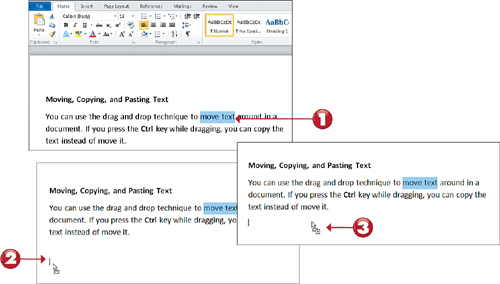
You can easily move and copy text in a document, and paste it wherever you want it to go, including into other documents. Using the Cut, Copy, and Paste commands, you can edit and rearrange text and other elements you insert into a document. You can drag and drop text to move it, or use the Cut and Paste technique. When copying text, you’re making a duplicate of the original.
![]()
![]() Select the text or other item you want to move or copy.
Select the text or other item you want to move or copy.
![]() Drag the selected text and drop it where you want it to appear.
Drag the selected text and drop it where you want it to appear.
![]() To copy the selection, press and hold the Ctrl key while dragging.
To copy the selection, press and hold the Ctrl key while dragging.
Tip: Keyboard Shortcuts
![]()
If you’re used to working with keyboard shortcuts for cutting, copying, and pasting, you’ll be happy to know they work the same way in Word 2010. Press Ctrl+x to cut, press Ctrl+c to copy, and press Ctrl+v to paste.


![]() To move selected text with the Cut command, click the Cut button on the Home tab of the Ribbon.
To move selected text with the Cut command, click the Cut button on the Home tab of the Ribbon.
![]() To copy selected text with the Copy command, click the Copy button.
To copy selected text with the Copy command, click the Copy button.
![]() To paste the cut or copied text, click where you want it to go and click the Paste button.
To paste the cut or copied text, click where you want it to go and click the Paste button.
![]() To control paste options, click the Paste menu button and choose an option.
To control paste options, click the Paste menu button and choose an option.
![]()
Tip: Paste Options
![]()
New to Word 2010, you can right-click after cutting or copying an item and choose from several paste options. You can choose to keep the original formatting of the item you’re pasting, merge the formatting, or paste only the text without the formatting. You can also find these three options through the Paste menu on the Home tab.
Inserting Quick Parts
Word’s Quick Parts offers you dozens of pre-made content elements, called building blocks, you can insert into your documents. Building blocks include headers that appear at the top of each page, salutations to end letters, and page numbers. Word’s Building Blocks Organizer holds a vast array of reusable Quick Parts elements you can choose from, and you can add your own to the mix. You can turn any text into a building block that appears in the Quick Part Gallery to reuse over and over again.
![]()

![]() Click the Insert tab on the Ribbon.
Click the Insert tab on the Ribbon.
![]() Click Quick Parts.
Click Quick Parts.
![]() To view all the building blocks available, click Building Blocks Organizer to open a full list of reusable elements.
To view all the building blocks available, click Building Blocks Organizer to open a full list of reusable elements.
![]() Click a building block element to see a preview.
Click a building block element to see a preview.
![]() Click Insert to add it to your document.
Click Insert to add it to your document.


![]() To turn text into a building block, first select the text in the document.
To turn text into a building block, first select the text in the document.
![]() Click Quick Parts.
Click Quick Parts.
![]() Click Save Selection to Quick Part Gallery.
Click Save Selection to Quick Part Gallery.
![]() Fill out any details you want to save along with the text element and click OK.
Fill out any details you want to save along with the text element and click OK.
![]() Word displays the text in the gallery the next time you click Quick Parts.
Word displays the text in the gallery the next time you click Quick Parts.
![]()
Tip: Remove a Quick Part
![]()
To remove an item from the Quick Part Gallery, open the Building Blocks Organizer window, select the element you want to remove, and click the Delete button. Word takes it out of the Building Blocks Organizer list and out of the Gallery that appears when you click the Quick Parts menu.
Inserting Symbols
If you ever need to insert a special symbol or character into your document, such as a copyright symbol or a paragraph mark, you can open the Symbol dialog box. This dialog box offers a library of special symbols and characters ranging from mathematical symbols to special quote marks.
![]()

![]() Click the Insert tab on the Ribbon.
Click the Insert tab on the Ribbon.
![]() Click Symbol.
Click Symbol.
![]() You can click a symbol to insert from the list.
You can click a symbol to insert from the list.
![]() Click More Symbols to open the Symbol dialog box.
Click More Symbols to open the Symbol dialog box.
![]() Click the Symbols tab to view available symbols.
Click the Symbols tab to view available symbols.


![]() Click the Special Characters tab to view characters.
Click the Special Characters tab to view characters.
![]() Click the symbol or character you want to insert.
Click the symbol or character you want to insert.
![]() Click Insert to insert the symbol into the document. The dialog box remains open in case you want to insert more symbols. Click Close to exit.
Click Insert to insert the symbol into the document. The dialog box remains open in case you want to insert more symbols. Click Close to exit.
![]()
Tip: Even More Symbols
![]()
If you don’t see the symbol you’re looking for in the Symbols tab of the Symbols dialog box, try switching to another font or symbol subset using the drop-down arrows.