
Chapter 1. Getting Started with Word
Before you jump in and start clicking buttons and scrolling willy-nilly around the screen, take a few moments to orient yourself to the Word program window. Much like learning your way around a new town or city, learning your way around Word takes a little navigating. You need to figure out where to find the commands you need and which direction will get you where you want to be.
Starting Word
If you’re ready to start using Word, the first thing you have to do is open its program window. Any time Word is open, you’ll see a document button for the program on the Windows taskbar at the bottom of your computer screen. If you’re using Windows 7, you can hover the mouse over the Word icon to view multiple documents. If you’re using Windows Vista or earlier and have more than one document open at a time, you’ll see buttons for each document. You can easily switch between open documents by clicking their respective buttons or thumbnails on the taskbar.
![]()

![]() Click the Start button.
Click the Start button.
![]() Click All Programs.
Click All Programs.
![]() Click Microsoft Office, then click Microsoft Word 2010.
Click Microsoft Office, then click Microsoft Word 2010.
![]() The Word program window opens.
The Word program window opens.
![]()
Tip: Other Start Methods
![]()
If you click the Start button and see a listing for Word 2010, you can click it instead of going through the All Programs submenu to open Word. Depending on how you installed Word, you might also see a shortcut icon on the desktop you can double-click or an icon on the taskbar you can click to open the program.
Tip: Taskbar Button
![]()
When you open Word, a Word document button also appears on the Windows taskbar. If you have more than one application open at a time, you can click the Word document button anytime you want to return to the Word window.
Exiting Word
After you finish using Word, you can close the program window. If you have unsaved work in the document, Word might ask you to save your document before exiting. As soon as you exit, the Word document button disappears from the Windows taskbar, too.
![]()

![]() Click the program window’s Close button.
Click the program window’s Close button.
![]() If you haven’t saved your work yet, Word prompts you to do so. Click Save to save your document, click Don’t Save to exit without saving your changes, or click Cancel to keep Word open.
If you haven’t saved your work yet, Word prompts you to do so. Click Save to save your document, click Don’t Save to exit without saving your changes, or click Cancel to keep Word open.
![]() You can also exit Word by clicking the File tab and clicking the Exit option in the Backstage view menu.
You can also exit Word by clicking the File tab and clicking the Exit option in the Backstage view menu.
![]()
Tip: Exit the Document but Not the Program Window
![]()
To close a document but leave Word open, click the File tab and then click the Close option.

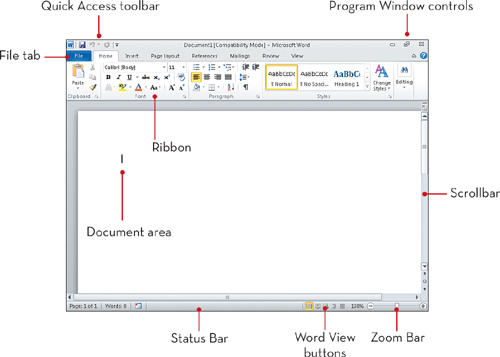
Navigating the Program Window
The Word program window features several key elements you need to know about. First and foremost, you need to know where to find all the commands you’ll use to build and format your documents. The File tab, Quick Access toolbar, and Ribbon contain all the commands you’ll use the most. The middle of the window is where you’ll create and edit your document, and you’ll use the scrollbars to move your view of the document. The Status bar at the bottom keeps you apprised of page numbers, word count, and zoom settings.
![]()

![]() Use the Quick Access toolbar to save a document or to undo and redo actions.
Use the Quick Access toolbar to save a document or to undo and redo actions.
![]() The File tab, when clicked, lets you open Backstage view with all kinds of options and features for working with the document file.
The File tab, when clicked, lets you open Backstage view with all kinds of options and features for working with the document file.
![]() The Ribbon groups Word’s commands into tabs. Click a tab to view the associated commands.
The Ribbon groups Word’s commands into tabs. Click a tab to view the associated commands.
![]() Use the program window controls to minimize, maximize (also called restore down in this case), or close the Word program window.
Use the program window controls to minimize, maximize (also called restore down in this case), or close the Word program window.


![]() The document work area is where you type and edit text and other document elements, with scrollbars on the right and bottom for moving around the screen. Click the scroll arrow buttons to move your view of the document page or drag the bar.
The document work area is where you type and edit text and other document elements, with scrollbars on the right and bottom for moving around the screen. Click the scroll arrow buttons to move your view of the document page or drag the bar.
![]() The Status bar displays status items, such as the current page you’re viewing and word count.
The Status bar displays status items, such as the current page you’re viewing and word count.
![]() The five View buttons let you choose a layout view for the document.
The five View buttons let you choose a layout view for the document.
![]() Use the Zoom bar to change the magnification level for viewing your document.
Use the Zoom bar to change the magnification level for viewing your document.
![]()
Tip: Turn on Rulers
![]()
You can click the View Ruler button located at the top of the vertical scrollbar to turn on the horizontal and vertical rulers to help you with spacing actions.
Tip: How Do I Find Help?
![]()
You can click the Help button located in the far right corner of the program window to open Word’s help files. Learn more about finding help in the task “Finding Help with Word 2010” later in this chapter.
Minimizing and Maximizing the Program Window
You can control the program window by minimizing or maximizing the window. When a window is minimized, it appears as a button on the Windows taskbar. When a window is maximized, it fills the whole computer screen.
![]()

![]() To minimize the program window, click the Minimize button.
To minimize the program window, click the Minimize button.
![]() Word minimizes the window to a button on the Windows taskbar. You can click the button to restore it again.
Word minimizes the window to a button on the Windows taskbar. You can click the button to restore it again.
![]() To maximize a window, click the Maximize button.
To maximize a window, click the Maximize button.
![]() The program window fills the computer screen.
The program window fills the computer screen.
![]()
Tip: Program Window Shortcuts
![]()
You can also click the Word icon located in the top left corner of the program window or right-click a blank area at the top of the program window to display a pop-up menu of program window controls.
Working with the File Tab
The File tab, when activated, is actually a combination dialog box and menu system that acts as a repository for various document-related tasks, such as saving files, opening new and existing files, printing files, controlling permissions and sharing, and accessing program customization options. Microsoft calls this special full-screen menu the Backstage view, because it offers you options for controlling things that happen to a document rather than in a document.
![]()

![]() Click the File tab.
Click the File tab.
![]() Word displays the Backstage view menu with document tasks organized into groups that are listed in the left pane.
Word displays the Backstage view menu with document tasks organized into groups that are listed in the left pane.
![]() Click a command to view associated options or open another dialog box. In this example, the New options are displayed, and you can open a new document based on a template.
Click a command to view associated options or open another dialog box. In this example, the New options are displayed, and you can open a new document based on a template.
![]() Click the Home tab or any other tab on the Ribbon to return to Word without selecting anything in Backstage view, or just press the Esc key.
Click the Home tab or any other tab on the Ribbon to return to Word without selecting anything in Backstage view, or just press the Esc key.
![]()

Customizing the Quick Access Toolbar
The Quick Access toolbar is located at the very top left corner of the program window. It contains just a few shortcut keys commonly used by every Word user: Save, Undo, and Redo. You can edit the toolbar to include other commands you use the most. When you display the customize menu, you can check or uncheck the commands you want to display on the toolbar. To find more commands, you can open Word’s Options dialog box to further customize the toolbar.
![]()
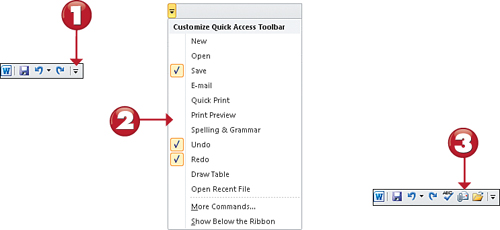
![]() Click the Customize Quick Access Toolbar arrow button.
Click the Customize Quick Access Toolbar arrow button.
![]() Click the buttons you want to turn on or off in the toolbar display.
Click the buttons you want to turn on or off in the toolbar display.
![]() Word displays your changes in the toolbar.
Word displays your changes in the toolbar.
Tip: Removing Buttons
![]()
To remove a button from the Quick Access toolbar, reopen the Word Options view, select the command from the list on the right, and then click the Remove button. Click OK to save your changes and exit the dialog box.


![]() Click the Customize Quick Access Toolbar arrow button and then click More Commands.
Click the Customize Quick Access Toolbar arrow button and then click More Commands.
![]() In the Word Options dialog box, click the command you want to add and then click the Add button.
In the Word Options dialog box, click the command you want to add and then click the Add button.
![]() The command is added to the list of toolbar buttons.
The command is added to the list of toolbar buttons.
![]() When you finish adding all the commands you want, click OK.
When you finish adding all the commands you want, click OK.
![]()
Tip: Move the Toolbar
![]()
If you prefer, you can orient the Quick Access toolbar to appear beneath the Ribbon. Click the Customize Quick Access Toolbar arrow button and then click Show Below the Ribbon.
Tip: Finding More Commands
![]()
You can click the Choose Commands From drop-down list in the Word Options dialog box to view other command groups.
Working with the Ribbon
The Ribbon displays the commands you need to accomplish various Word tasks and presents them as intuitive tools you can activate with ease at the top of the Word window. Related commands are displayed in groups represented by tabs along the top of the Ribbon. To view a group, click its tab.
![]()

![]() Click a Ribbon tab name.
Click a Ribbon tab name.
![]() The Ribbon displays all the associated commands and features for that group.
The Ribbon displays all the associated commands and features for that group.
![]() To activate a feature or command, click the one you want to use. Some commands activate immediately, while others require additional input through a menu or dialog box that opens.
To activate a feature or command, click the one you want to use. Some commands activate immediately, while others require additional input through a menu or dialog box that opens.
Tip: Customize the Ribbon
![]()
Like the Quick Access toolbar, you can customize the Ribbon. Right-click an empty area on the Ribbon and click Customize the Ribbon. This opens the Word Options dialog box to the Ribbon settings. You can add new commands to the Ribbon or remove commands you never use. You can also add a new tab to the Ribbon and fill it with custom tools.

![]() Anytime you see this icon near a group of commands, you can click it to open a dialog box with additional controls you can set.
Anytime you see this icon near a group of commands, you can click it to open a dialog box with additional controls you can set.
![]() When you finish fine-tuning the settings in the dialog box, you can click OK to apply the changes.
When you finish fine-tuning the settings in the dialog box, you can click OK to apply the changes.
![]() Click the Minimize the Ribbon button to reduce the Ribbon to show only the tab names.
Click the Minimize the Ribbon button to reduce the Ribbon to show only the tab names.
![]() Click the button again to view the full Ribbon.
Click the button again to view the full Ribbon.
![]()
Tip: Quick Minimize
![]()
You can also minimize the Ribbon by double-clicking on a tab name. Click a tab name again to bring back the full Ribbon display.

Finding More Customizing Options
Word 2010 offers you all kinds of ways you can customize how the program works and what features appear on screen. You can find settings for proofing, saving, language, and display, as well as advanced options and settings for customizing the Quick Access toolbar and the Ribbon. All of the options are controlled through the Word Options dialog box.
![]()

![]() Click the File tab.
Click the File tab.
![]() Click Options.
Click Options.
![]() The Word Options dialog box opens.
The Word Options dialog box opens.
![]() Click a section name to view the options.
Click a section name to view the options.


![]() Many of the options can be turned on or off with a check box.
Many of the options can be turned on or off with a check box.
![]() Other options include selections from a drop-down menu.
Other options include selections from a drop-down menu.
![]() After making any changes, click OK to apply the new settings.
After making any changes, click OK to apply the new settings.
![]()
Tip: Help with Options
![]()
To find out what a group of options in the Word Options dialog box does, simply click the tab name and a description appears at the top of the dialog box. Also, look for option names that have a circle icon with an i inside next to them—this is Word’s helpful information icon. Hover your mouse pointer over the icon to reveal a ScreenTip that tells what the feature does.
Working with View Modes
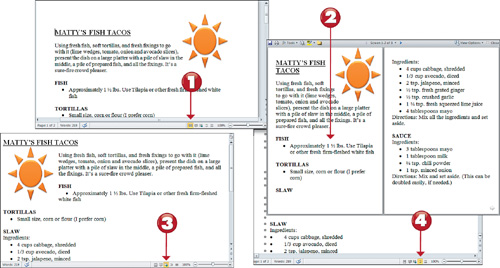
You can use Word’s view modes to change the way in which you look at a document. Print Layout view, which is the default view, shows you what your document looks like when printed. You can use Outline view to see your document in an outline format, or view your document as it looks in a Web browser window using Web Layout view. Full Screen Reading view optimizes your document for easy reading onscreen. Lastly, Draft view displays a draft version of the document, without text or graphics. You can access view modes on the Status bar or in the Ribbon’s View tab.
![]()
![]() Click Print Layout view to see how your document will appear when printed.
Click Print Layout view to see how your document will appear when printed.
![]() Click Full Screen Reading to see your document much like a book.
Click Full Screen Reading to see your document much like a book.
![]() Click Web Layout to see your document as a Web page.
Click Web Layout to see your document as a Web page.
![]() Click Outline to see your document in outline format.
Click Outline to see your document in outline format.

![]() Click Draft to see your document without graphics or other added elements.
Click Draft to see your document without graphics or other added elements.
![]() Another way to switch views is by clicking the View tab on the Ribbon.
Another way to switch views is by clicking the View tab on the Ribbon.
![]() Click the document view you want to apply.
Click the document view you want to apply.
![]()
Tip: Outlining Tools
![]()
When you switch to Outline view, Word displays an Outlining tab in the Ribbon with tools for changing heading levels, viewing different levels of the outline, and moving different outline headings around in the document. When you click another view mode, the Outlining tab is hidden again.
Magnifying Your View with Zoom Tools
You can magnify your view of a document using the Zoom tools. You can zoom in to see the document up close or zoom out for a bird’s eye view. The Zoom tool is based on percentages, with 100% being the normal document view just as it appears when printed. If your font size is small, you can zoom in to better view your text; or if you want to see how the document’s margins appear, you can zoom out to see the entire page. The Status bar features a Zoom bar you can use to zoom in or out, or you can use the Zoom tools featured on the View tab on the Ribbon. The Zoom percentage always appears on the Status bar to let you know the current magnification setting.
![]()

![]() On the Status bar, click the Zoom Out button to zoom out in increments of 10%.
On the Status bar, click the Zoom Out button to zoom out in increments of 10%.
![]() Click the Zoom In button to zoom in.
Click the Zoom In button to zoom in.
![]() You can also drag the Zoom box right or left to quickly zoom in or out.
You can also drag the Zoom box right or left to quickly zoom in or out.
![]() To return the view to 100%, click the middle of the Zoom bar.
To return the view to 100%, click the middle of the Zoom bar.


![]() Click the View tab on the Ribbon.
Click the View tab on the Ribbon.
![]() Click the Zoom button.
Click the Zoom button.
![]() From the Zoom dialog box, click a new zoom option or use the spinner arrows to set a unique zoom percentage.
From the Zoom dialog box, click a new zoom option or use the spinner arrows to set a unique zoom percentage.
![]() Click OK to apply the new setting.
Click OK to apply the new setting.
![]()
Tip: Page Views
![]()
Among the Zoom options on the Ribbon’s View tab are buttons for viewing a document’s pages by choosing a singular page, two pages, or full page width. For even more page views, open the Zoom dialog box.
Finding Help with Word 2010
Anytime you run into difficulty using Word, you can find assistance through the program’s help files. With an online connection, you can access the Microsoft Office Online center directly and look up topics you want to learn more about. You can view a table of contents for all the available topics and click the one you want to read more about. The Word Help window works much like a browser window, letting you navigate from topic to topic.
![]()

![]() Click the Help button to open the Word Help window.
Click the Help button to open the Word Help window.
![]() Click the Show Table of Contents button to open the Table of Contents pane.
Click the Show Table of Contents button to open the Table of Contents pane.
![]() Click a category and topic you want to view.
Click a category and topic you want to view.
![]() Word displays a page detailing more about the topic. You can click any links in the article to read related topics.
Word displays a page detailing more about the topic. You can click any links in the article to read related topics.
Tip: Table of Contents
![]()
The Table of Contents pane toggles on or off. You can click the Show Table of Contents button anytime you want to display the pane of help topics on the left side of the Help window. Click the button again to toggle the pane display off. You can also click the pane’s Close button to turn it off.

![]() You can use the Help window’s tool buttons to navigate the Help pages just as if they were Web pages.
You can use the Help window’s tool buttons to navigate the Help pages just as if they were Web pages.
![]() You can type in a keyword and click Search or press Enter to look up a specific topic.
You can type in a keyword and click Search or press Enter to look up a specific topic.
![]() To return to the main Help screen again, click the Home button.
To return to the main Help screen again, click the Home button.
![]() Click the window’s Close button to exit the Help window.
Click the window’s Close button to exit the Help window.
![]()
Tip: Larger Print
![]()
You can adjust the size of the font found in the Help window by clicking the Change Font Size button and selecting another setting.
