
Chapter 2. Working with Word Documents
Files you create in Word are called documents. You can create, edit, and save your documents, reuse them again as new documents, turn them into templates to build more documents, and print them out. You can also tap into Word’s security settings to assign permissions to control who edits your documents or use passwords to control who can view your documents. The tasks in this section focus entirely on working with document files. You’ll learn how to save Word documents in different file formats, how to view multiple documents, and how to move or copy data between documents. All of the commands and features you use to work with documents are found in the Backstage view through the File tab.

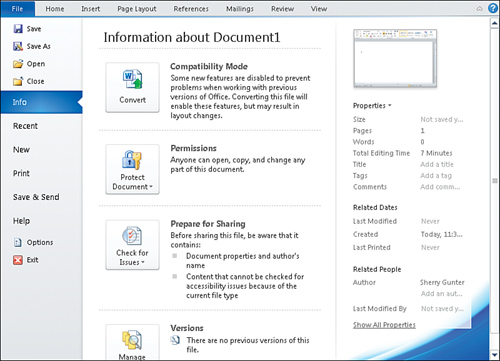
The Backstage view lets you control your Word documents in various ways all in one convenient spot.
Starting a New Document
Whenever you open the Word program window, there’s a brand new document waiting for you to begin working with. After you start adding content to the document, you can save it as a file and revisit it again. You can also start new documents at any time. To start a new document, use the File tab to open the Backstage view. The Backstage view is your one-stop spot for all things related to documents. To start a new blank document, choose the Blank Document template. To learn more about using templates, see the task “Applying a Template” later in this chapter.
![]()

![]() Click the File tab to open the Backstage view menu.
Click the File tab to open the Backstage view menu.
![]() Click New.
Click New.
![]() Click Blank Document. You can also choose a document type from the list of available templates; click the one you want to use as a base for the new document to see a sample of the document in the right pane.
Click Blank Document. You can also choose a document type from the list of available templates; click the one you want to use as a base for the new document to see a sample of the document in the right pane.
![]() Click Create.
Click Create.
![]()
Tip: Quick Start
![]()
You can also double-click the template you want to create in the Backstage view to open the document immediately.

Closing a Document
You can close documents you no longer want to edit to free up some processing power on your computer. Closing a document does not close the program window, just the file you were working on. If you haven’t saved your work before exiting, Word prompts you to do so before exiting the file.
![]()

![]() Click the File tab.
Click the File tab.
![]() Click Close.
Click Close.
![]() If no other documents are open, Word simply displays an empty space in the document area.
If no other documents are open, Word simply displays an empty space in the document area.
![]()

Saving a Document
After you start adding content to a document, you can save the file to reuse it again later. Word document files are saved in the .docx file format unless you specify otherwise. For most users, the file format designation works behind the scenes and you never see the .docx file extension as part of the filename unless you have the feature turned on. You can save your Word documents as other file formats, if needed. For example, you can save a document as a PDF file or a Web page to share with someone who doesn’t have Word.
![]()

![]() Click the Save button on the Quick Access toolbar to open the Save As dialog box.
Click the Save button on the Quick Access toolbar to open the Save As dialog box.
![]() Click in the File name box and type a name for the file.
Click in the File name box and type a name for the file.
![]() To save the file in a different file format, click the Save as Type drop-down arrow and choose another format.
To save the file in a different file format, click the Save as Type drop-down arrow and choose another format.
Tip: File Naming Rules
![]()
When it comes to naming your documents, avoid using the following illegal characters: / : < > | * ? or “ in your filenames. You can use a period as part of your filename, such as memo1.sherry.docx.
Tip: Quick Save
![]()
If you’ve already saved a file, you don’t have to name it again. You can just save it to its existing name by clicking the Save button in the Quick Access toolbar.
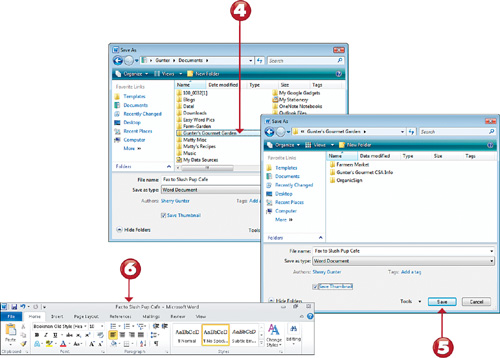
![]() To save a document to a specific folder, navigate to the folder and double-click it.
To save a document to a specific folder, navigate to the folder and double-click it.
![]() Click Save.
Click Save.
![]() The new document name appears on the Title bar.
The new document name appears on the Title bar.
![]()
Tip: Save an Existing File with a New Filename
![]()
To duplicate a file and give it a new name, click the File tab and then click Save As. This opens the Save As dialog box, and you can type a new name for the document and save it.
Tip: The File Tab
![]()
You can also access the Save As dialog box through Backstage view. Click the File tab and then click Save As.
Opening a Document
You can open documents you previously saved to work on them again. You can use the Backstage view to open files through the Open options or you can view a list of recent documents and choose one from the list. You can even keep your favorite documents listed on the Recent Documents list so you can always access them quickly.
![]()

![]() Click the File tab.
Click the File tab.
![]() Click Open to display the Open dialog box.
Click Open to display the Open dialog box.
![]() In the Folders pane, navigate to the folder containing the document you want to open.
In the Folders pane, navigate to the folder containing the document you want to open.
![]() Click the filename and click Open.
Click the filename and click Open.
Tip: Pin a File
![]()
You can keep your favorite documents listed in the Recent Files list by pinning them there with the pushpin icon located to the right of the filename. You can un-pin a document again when you no longer want it pinned to the list.

![]() Click the File tab.
Click the File tab.
![]() Click Recent.
Click Recent.
![]() Click the document you want to open.
Click the document you want to open.
![]()
Tip: Shortcut Idea
![]()
If you get tired of opening the File tab to the Backstage view every time you want to open a file, you can add the Open command to your Quick Access toolbar to save yourself a step. See the task “Customizing the Quick Access Toolbar” in Chapter 1, “Getting Started with Word,” to learn more.

Printing a Document
When you’re ready to print a document, you can choose from a range of printing options through the Backstage view as well as preview the document page by page. You can control the number of copies you print, the page orientation, and the printer you use.
![]()

![]() Click the File tab.
Click the File tab.
![]() Click Print to display the print options and view a preview of the document.
Click Print to display the print options and view a preview of the document.
![]() Specify the number of copies you want to print.
Specify the number of copies you want to print.
![]() To change the printer, click the Printer menu and select another from the list.
To change the printer, click the Printer menu and select another from the list.
Tip: Quick Print
![]()
To print the document using the default settings, just click the Print button. For even faster printing, add the Print button to your Quick Access toolbar.
See the task “Customizing the Quick Access Toolbar” in Chapter 1 to learn more.


![]() Click here to specify whether you want to print the whole document, selected text, the current page, or a custom range. You can also specify a range of pages to print.
Click here to specify whether you want to print the whole document, selected text, the current page, or a custom range. You can also specify a range of pages to print.
![]() Scroll down to view settings for choosing paper orientation, paper size, margins, and collating documents. Simply click the menu item you want to change and make your selections.
Scroll down to view settings for choosing paper orientation, paper size, margins, and collating documents. Simply click the menu item you want to change and make your selections.
![]() If your document has more than one page, you can click the page buttons to view each page before printing.
If your document has more than one page, you can click the page buttons to view each page before printing.
![]() Click the Print button to print the document.
Click the Print button to print the document.
![]()
Tip: Zoom Your Preview
![]()
Click the Zoom bar buttons to zoom the print preview in or out to see more or less of your document’s contents.
Tip: More Print Options
![]()
Use the Printer Properties link in the print settings to open the Properties dialog box, which gives you additional layout and paper/quality settings.
Viewing Multiple Documents
You can open and work with multiple documents in Word. For example, you might want to open two documents and compare them side by side. When you open two or more documents, you can use the View tools to control how you view them.
![]()

![]() With two or more documents open, click the View tab on the Ribbon.
With two or more documents open, click the View tab on the Ribbon.
![]() Click the Switch Windows button and click the document you want to view.
Click the Switch Windows button and click the document you want to view.
![]() To view two document windows at the same time, click the View Side by Side button.
To view two document windows at the same time, click the View Side by Side button.
![]() Word displays both documents side by side onscreen.
Word displays both documents side by side onscreen.
Tip: Side by Side Options
![]()
When you activate the View Side by Side feature, two additional options become available: Synchronous Scrolling and Reset Window Position. Synchronous Scrolling is activated by default and allows you to scroll through both document windows simultaneously. The Reset Window Position button lets you return both windows to the same position.

![]() To make a document active for edits, click the document’s title bar.
To make a document active for edits, click the document’s title bar.
![]() To turn off side by side viewing, click the View Side by Side button located under the Window options on the shortened Ribbon.
To turn off side by side viewing, click the View Side by Side button located under the Window options on the shortened Ribbon.
![]() To view multiple documents tiled horizontally instead of vertically, click the Arrange All button.
To view multiple documents tiled horizontally instead of vertically, click the Arrange All button.
![]() Click the Close button to close a document at any time, or click the Maximize button to return a document to its full window again.
Click the Close button to close a document at any time, or click the Maximize button to return a document to its full window again.
![]()
Tip: Split a Window
![]()
You can split the current document window into two scrollable parts. For example, if you’re making a long table, you might want the top of the table with all the headings to stay in view while adding additional content at the bottom of the table. Click the Split button on the View tab to keep the top portion onscreen and then click on the document where you want the split to occur. Click the Remove Split button to toggle the feature off.
Assigning Document Passwords
You can assign a password to a document to prevent unauthorized access to the file. It’s crucial when creating a password to make sure you keep it in a safe place. If you forget it, you will not be able to recover the document. Word passwords are case-sensitive, and, as with any passwords you assign, stronger passwords include both numbers and letters.
![]()
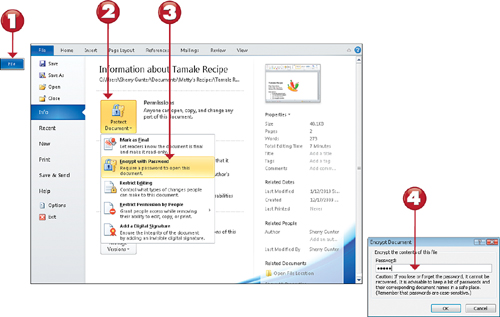
![]() Click the File tab.
Click the File tab.
![]() Under the Info category, click the Protect Document button.
Under the Info category, click the Protect Document button.
![]() Click Encrypt with Password to open the Encrypt Document dialog box.
Click Encrypt with Password to open the Encrypt Document dialog box.
![]() Type a password.
Type a password.
Tip: Remove a Password
![]()
To remove a password, click the Change Password button located under the Permissions settings. Delete the current password from the Encrypt Document dialog box and click OK. When you save the file, the password is permanently removed.

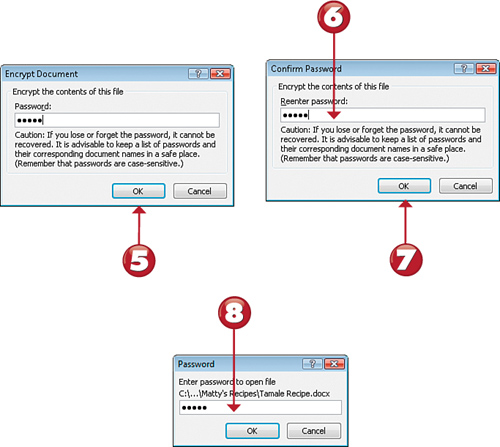
![]() Click OK and the Confirm Password dialog box opens.
Click OK and the Confirm Password dialog box opens.
![]() Retype the password.
Retype the password.
![]() Click OK. Be sure to save your file before closing it or the password will not be saved as part of the document.
Click OK. Be sure to save your file before closing it or the password will not be saved as part of the document.
![]() The next time you open the file, a Password prompt box appears. Type the password you assigned and click OK.
The next time you open the file, a Password prompt box appears. Type the password you assigned and click OK.
![]()
Tip: Add a Digital Signature
![]()
You can add a digital signature to a Word document to ascertain its authenticity. Click the Protect Document button and click Add a Digital Signature. Click OK in the prompt box that appears and follow the instructions for adding or creating a digital signature.

Applying a Template
Word installs with a variety of ready-made, pre-formatted templates you can use to create all kinds of documents, from brochures and business cards to calendars and budgets. With an online connection, you can find even more on the Office.com website. By default, Backstage view displays both installed templates and online templates. Most templates include placeholder text and graphical elements that can be replaced by your own text. Depending on the template you select in Backstage view, you might first need to download it from the Office website in order to apply it to a document.
![]()

![]() Click the File tab.
Click the File tab.
![]() Click New to display the available templates, including installed templates and templates available through the Office Online site.
Click New to display the available templates, including installed templates and templates available through the Office Online site.
![]() Scroll through the list pane to view the available templates. Some templates are stored in folders; click a folder to display its related templates.
Scroll through the list pane to view the available templates. Some templates are stored in folders; click a folder to display its related templates.
![]() Click a template to preview it in the preview pane, if available.
Click a template to preview it in the preview pane, if available.
Tip: Navigating the New Options
![]()
You can use the navigation bar at the top of the New options to move back and forth between lists of templates. Click the Home button to return to the original listing.
Tip: Finding More Templates
![]()
You can conduct a search for more templates on the Office website. Click in the Search Microsoft box in Backstage view and type a keyword or phrase, then click the Search arrow or press Enter.

![]() When you find a template you like, click the Create button to apply it to the document.
When you find a template you like, click the Create button to apply it to the document.
![]() Some templates may need to be downloaded first; click the Download button to add it to your computer.
Some templates may need to be downloaded first; click the Download button to add it to your computer.
![]() After you’ve applied a template, you can replace the placeholder text or graphics with your own.
After you’ve applied a template, you can replace the placeholder text or graphics with your own.
![]()
Tip: Create Your Own Template
![]()
You can save an existing document as a template file to reuse to build other documents. Click the File tab and then click Save As. In the Save As dialog box, assign a unique name to the file, then click the Save as Type menu and choose Word Template as the file type. Click Save and the new template is created. By default, Word saves templates in the Templates folder for easy access unless directed otherwise.