
Chapter 6. Adding Advanced Formatting
The number of formatting features available in Word seem endless. You can apply formatting features to text, paragraphs, and entire pages. You can change the appearance of text, change the positioning of text and paragraphs, add page elements, and much more. In this chapter, you’ll learn about a few of Word’s more advanced formatting features. Some of these features can be real timesavers. For example, you can save yourself some effort in formatting your documents by applying a preset style or theme. You can also dress up your text further by using features like drop caps or Word’s text effects.


Applying Styles
Styles are a great way to apply a collection of formatting attributes to a document and create a uniform look and feel. Word has a wide variety of preset styles you can use, or you can create your own. For example, rather than reapplying formatting each time a heading appears in your document, you can assign a heading style to apply with a simple click. You can use styles to quickly format body text, captions, and more. You can use the Quick Styles gallery to quickly insert a style, or you can change the style set shown in the gallery.
![]()

![]() Select the text to which you want to apply a style.
Select the text to which you want to apply a style.
![]() Click the Home tab on the Ribbon.
Click the Home tab on the Ribbon.
![]() Use the scroll arrows to scroll through the list of available styles.
Use the scroll arrows to scroll through the list of available styles.
![]() Click a style from the Styles group.
Click a style from the Styles group.
![]() Word immediately applies the style to the text.
Word immediately applies the style to the text.
Tip: Quick View
![]()
To see all of the styles in the gallery at once, click the More button directly below the Styles group scroll arrow buttons.
Tip: Remove It
![]()
To remove a style, select the text and click the More button and then click Clear Formatting or click the Clear Formatting button in the Font group on the Home tab.

![]() To change the style set, click the Change Styles button.
To change the style set, click the Change Styles button.
![]() Click Style Set.
Click Style Set.
![]() Click another style set from the list.
Click another style set from the list.
![]() Word applies the style set to the Quick Styles gallery and to any styles you have already assigned in the document.
Word applies the style set to the Quick Styles gallery and to any styles you have already assigned in the document.
![]()
Tip: Make Your Own Style
![]()
Format the text just the way you want it, then select it. Next, click the More button and click Save Selection as a New Quick Style. This opens the Create New Style from Formatting dialog box where you can name the style.
Tip: Open the Style Pane
![]()
You can also open Word’s Style pane to view and select styles. Click the Styles icon in the lower-right corner of the Styles group on the Home tab.
Applying Themes
Themes are another way you can apply a common look and feel to your Word documents along with styles. Themes include a set of coordinating colors, fonts, and effects you can apply to make sure your documents share a professional appearance. You can choose from a variety of preset themes or browse for more themes from Office.com. Themes work best with styles you have already assigned to the document.
![]()

![]() Click the Page Layout tab on the Ribbon.
Click the Page Layout tab on the Ribbon.
![]() Click Themes.
Click Themes.
![]() Click the theme you want to apply.
Click the theme you want to apply.
![]() Word applies the new theme to the document.
Word applies the new theme to the document.


![]() Click the Theme Colors drop-down arrow to change the color scheme associated with the theme.
Click the Theme Colors drop-down arrow to change the color scheme associated with the theme.
![]() Click the Theme Fonts drop-down arrow to change the fonts associated with the theme.
Click the Theme Fonts drop-down arrow to change the fonts associated with the theme.
![]() Click the Theme Effects drop-down arrow to change the effects.
Click the Theme Effects drop-down arrow to change the effects.
![]()
Tip: What’s in a Theme?
![]()
When you assign a theme, Word looks for and replaces the formats of each of the styles to the document elements. A theme includes fonts for any headings and body text assigned, including color, type style, and spacing. Themes also include 3D effects, shadows, and lighting effects.
Tip: Looking for More Themes
![]()
You can browse your computer or network for more themes. To browse for more themes, click the Themes button and click Browse for Themes.
Adding Borders
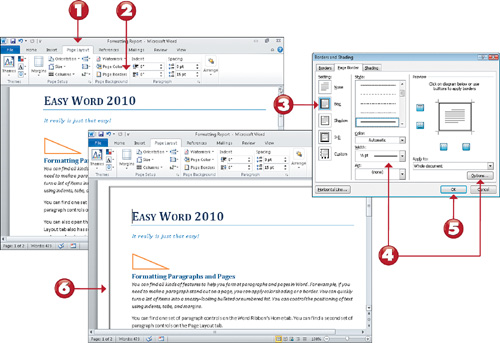
You learned how to add borders to paragraphs in Chapter 5, “Formatting Paragraphs and Pages.” You can also add borders to entire pages in your Word document. You can choose from several border styles, including a shadow or 3D border.
![]()
![]() Click the Page Layout tab.
Click the Page Layout tab.
![]() Click Page Borders to open the Borders and Shading dialog box to the Page Border tab.
Click Page Borders to open the Borders and Shading dialog box to the Page Border tab.
![]() Click the type of page border you want to add.
Click the type of page border you want to add.
![]() You can use the remaining formatting tools to set a style, color, and line thickness for the border, if desired. Click the Options button to set custom borger margins.
You can use the remaining formatting tools to set a style, color, and line thickness for the border, if desired. Click the Options button to set custom borger margins.
![]() Click OK.
Click OK.
![]() Word applies the new border.
Word applies the new border.
![]()
Tip: Apply To
![]()
If you click the Apply to drop-down arrow you can choose to apply the border to sections, or the entire document.
Adding Drop Caps
You can apply drop caps to add visual interest to a paragraph, creating a rather dramatic effect. A drop cap is a large initial or capital letter that appears at the start of the paragraph and seems to drop below the baseline into the rest of the paragraph. Drop caps can also appear offset in the margin.
![]()
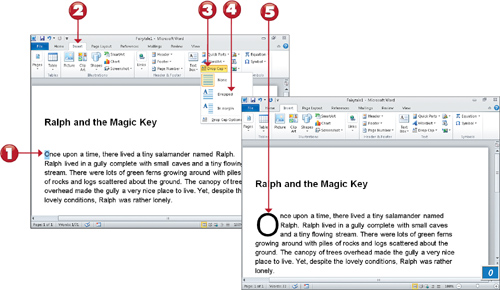
![]() Select the character you want to turn into a drop cap.
Select the character you want to turn into a drop cap.
![]() Click the Insert tab on the Ribbon.
Click the Insert tab on the Ribbon.
![]() Click Drop Cap.
Click Drop Cap.
![]() Click Dropped.
Click Dropped.
![]() Word creates the drop cap.
Word creates the drop cap.
![]()
Tip: Customize It
![]()
You can customize your drop cap by clicking the Drop Cap Options command at the bottom of the Drop Cap menu. This opens the Drop Cap dialog box where you can set a different font for the character, specify how many lines to drop down, and adjust the distance between the drop cap and the rest of the paragraph.
Applying Text Effects
Word offers a gallery of decorative text effects you can apply to give your document more impact. Text effects include outlines, shadows, glows, and reflections.
![]()

![]() Select the text you want to format.
Select the text you want to format.
![]() Click the Home tab.
Click the Home tab.
![]() Click the Text Effects button.
Click the Text Effects button.
![]() Click the effect you want to apply.
Click the effect you want to apply.
![]() Word adds the effect to the selected text.
Word adds the effect to the selected text.


![]() To view additional choices for any text effect, click the name to view a submenu of effects.
To view additional choices for any text effect, click the name to view a submenu of effects.
![]() Click an effect.
Click an effect.
![]() Word applies the effect to your text.
Word applies the effect to your text.
![]()
Tip: Remove It
![]()
To remove a text effect, select the text and revisit the Text Effects menu, this time clicking the Clear Text Effects command at the bottom of the menu. This returns your text to its original setting.
Tip: Customizing
![]()
For some of Word’s text effects, you can set additional options for customizing the effect. For example, with the Reflection effect, you can control the position of the reflection, or with the Glow effect, you can change the glow color and edges. Look for additional options within the effect’s submenu.