
Chapter 12. Using Word’s Graphic Tools
Graphic elements are an important part of creating documents that make an impact and convey your message. Graphic elements are also an important part of giving your documents visual interest and extra polish. Graphic elements can include clip art, digital pictures, drawn shapes and charts, text effects, text boxes, and more. For terminology’s sake, we’ll just categorize these elements as graphic objects since they can be inserted, moved around, and resized on the document page.


Drawing with AutoShapes
Word 2010 installs with a large set of pre-drawn shapes, called AutoShapes. For example, you can use AutoShapes to create logos and simple drawings. You can draw basic shapes, such as circles and squares, or more elaborate shapes, such as a starburst or callout balloon. You can also use AutoShapes to draw lines and arrows. Once you draw a shape, you can add a fill color, change the border, and apply special styles, shadow, and 3D effects. The Format tab appears offering all kinds of formatting tools for the shape.
![]()

![]() Click Insert.
Click Insert.
![]() Click Shapes.
Click Shapes.
![]() Click the shape you want to draw.
Click the shape you want to draw.
![]() The mouse pointer changes to a crosshair icon.
The mouse pointer changes to a crosshair icon.
![]() Click and drag on the document to determine the size of the shape.
Click and drag on the document to determine the size of the shape.
Tip: Save a Logo
![]()
Although you cannot save a logo you create out of AutoShapes and other graphic elements in Word, you can group the items together and copy them to another program, such as Windows Paint, and save the graphic as a logo there instead. To learn more about grouping items in Word, see the task “Grouping Objects” later in this chapter.

![]() Release the mouse button and the shape is completed and surrounded by a border with selection handles.
Release the mouse button and the shape is completed and surrounded by a border with selection handles.
![]() To add a fill color to the shape, click here and choose a color.
To add a fill color to the shape, click here and choose a color.
![]() To change the border, click here and choose a color or line weight.
To change the border, click here and choose a color or line weight.
![]() To add an instant style including a fill color and border, click a shape style.
To add an instant style including a fill color and border, click a shape style.
![]()
Tip: Building Logos
![]()
You can build your own logo by layering shapes, WordArt objects, or text boxes. To learn more about WordArt, see the task “Inserting a WordArt Object” later in this chapter. To learn more about text boxes, see “Inserting a Text Box Object.” To learn about ordering graphic objects, see the task “Layering Objects.”
Tip: Formatting Options
![]()
You can also find formatting for your shapes in the Format Shape dialog box. Right-click the shape on the document, then click Format Shape to open the dialog box.
Inserting Clip Art
If drawing your own artwork doesn’t sound appealing, then add some clip art instead. Clip art is pre-drawn artwork you can insert into your documents and manipulate or format as you like. Clip art comes in a variety of categories and styles, and includes drawings, photos, and even sound or animation clips. You can sort through the available artwork using the Clip Art task pane. You can also include the Office.com website as part of your search for clip art that meets your document needs.
![]()

![]() Click Insert.
Click Insert.
![]() Click Clip Art.
Click Clip Art.
![]() Word opens the Clip Art pane.
Word opens the Clip Art pane.
![]() Type a word or phrase related to the type of clip art you want to use.
Type a word or phrase related to the type of clip art you want to use.
![]() Click Go or press Enter.
Click Go or press Enter.
Tip: Resizing Clip Art
![]()
To resize clip art, select the art and then move the mouse pointer over a corner or side selection handle. You can then drag the border to a new size. To keep the clip art proportional, drag a corner selection handle. To rotate the artwork, click and drag the green selection handle/circle at the top of the clip art.

![]() The Clip Art pane displays any matching results. You can scroll through the list to view the clip art.
The Clip Art pane displays any matching results. You can scroll through the list to view the clip art.
![]() To learn more about a particular piece of clip art, simply move the mouse pointer over the artwork to reveal a brief description about the dimensions and file type.
To learn more about a particular piece of clip art, simply move the mouse pointer over the artwork to reveal a brief description about the dimensions and file type.
![]() When you find clip art you want to use, click it.
When you find clip art you want to use, click it.
![]() Word immediately inserts it into the document. You can move or resize the clip art to suit your document needs.
Word immediately inserts it into the document. You can move or resize the clip art to suit your document needs.
![]()
Tip: Moving Clip Art
![]()
To move clip art, click it to select it, then move the mouse pointer over the clip art until it takes the shape of a four-sided arrow pointer. Drag the clip art object and drop it where you want it to go.
Organizing Clip Art with the Clip Organizer
You can access clip art libraries stored on your computer in addition to the clip art that comes with Word 2010. The Microsoft Clip Organizer is the place to go to organize and view clip art on your computer. You can use the feature to search for clip art, add and organize clip art, and remove clip art you no longer want.
![]()

![]() Click the Start menu.
Click the Start menu.
![]() Click All Programs.
Click All Programs.
![]() Click Microsoft Office.
Click Microsoft Office.
![]() Click Microsoft Office 2010 Tools.
Click Microsoft Office 2010 Tools.
![]() Click Microsoft Clip Organizer.
Click Microsoft Clip Organizer.
![]() The Microsoft Clip Organizer window opens.
The Microsoft Clip Organizer window opens.
Tip: View Properties
![]()
To view a clip’s properties, click the clip’s drop-down arrow and click Preview/Properties. This opens the Preview/Properties dialog box where you can find all kinds of information about the clip, such as dimensions, location path, assigned keywords, resolution, and more.

![]() The Clip Organizer lists your clip art collections here. You can click a collection folder to expand or collapse the folder view.
The Clip Organizer lists your clip art collections here. You can click a collection folder to expand or collapse the folder view.
![]() You can use the toolbar to perform a search; view the collection as a list; copy, paste, and delete clip art; and search for clip art online.
You can use the toolbar to perform a search; view the collection as a list; copy, paste, and delete clip art; and search for clip art online.
![]() To perform an action on a piece of clip art, move the mouse pointer over the artwork and click the drop-down arrow that appears.
To perform an action on a piece of clip art, move the mouse pointer over the artwork and click the drop-down arrow that appears.
![]() Choose an action.
Choose an action.
![]() To close the window, click here.
To close the window, click here.
![]()
Tip: Searching for Clips
![]()
To search for a particular piece of artwork, click the Search button in the Organizer window’s toolbar to open the Search pane. Next, type the keyword you want to search for and press Enter or click the Go button. Microsoft Clip Organizer lists any matches.
Finding Clip Art Online
You can also visit the Microsoft Office website and look for more clip art to add to your clip art collections. When you find clip art online, you can download it into the Clip Organizer and use it in your Word documents as well as other Office 2010 programs.
![]()

![]() Click Insert.
Click Insert.
![]() Click Clip Art.
Click Clip Art.
![]() At the bottom of the Clip Art pane, click Find more at Office.com.
At the bottom of the Clip Art pane, click Find more at Office.com.
![]() Your default Web browser opens to the Office.com site’s Images page.
Your default Web browser opens to the Office.com site’s Images page.
![]() Type a keyword or phrase describing the type of clip art you want to view.
Type a keyword or phrase describing the type of clip art you want to view.
![]() Press Enter or click the Search button.
Press Enter or click the Search button.


![]() The Search Results page displays any matches.
The Search Results page displays any matches.
![]() Move the mouse pointer over the clip art you want to download and click Download.
Move the mouse pointer over the clip art you want to download and click Download.
![]() The artwork is downloaded and added to the Microsoft Clip Organizer window’s Downloaded Clips folder.
The artwork is downloaded and added to the Microsoft Clip Organizer window’s Downloaded Clips folder.
![]()
Tip: Office.com
![]()
Anytime you want to visit the Office website and view clip art, simply type in www.office.com to open the Microsoft Office Online site and click the Clip Art link.
Tip: License Agreement
![]()
If this is your first time downloading clip art, you may need to agree to the Microsoft License Agreement before downloading. Just follow the onscreen prompts as needed.
Inserting a Picture
You can insert digital photographs, or pictures, into your document to illustrate and add visual appeal. You can insert JPEG, GIF, PNG, and other popular image file types. Once you insert a picture, you can apply formatting, move or resize the image, or control how text wraps around the picture.
![]()

![]() Click Insert.
Click Insert.
![]() Click Picture.
Click Picture.
![]() The Insert Picture dialog box opens.
The Insert Picture dialog box opens.
Tip: Formatting Pictures
![]()
You can use the tools on the Format tab under Picture Tools to format your picture in a variety of ways. You can make color corrections, apply artistic effects to make a picture look like a painting, add a border, control text wrapping, and crop the picture.


![]() Navigate to the file you want to insert and select the file.
Navigate to the file you want to insert and select the file.
![]() Click Insert.
Click Insert.
![]() Word inserts the image and displays the Picture Tools on the Ribbon. You can resize or move the image as needed.
Word inserts the image and displays the Picture Tools on the Ribbon. You can resize or move the image as needed.
![]()
Tip: Quick Styles
![]()
You can apply a variety of Quick Styles to your picture to add a border or change the picture shape. Simply click the Quick Styles button on the Format tab and choose a style from the gallery that appears.
Removing an Image Background
New to Word 2010, you can remove the background from a picture using the Background Removal tool. This unique tool acts much like similar tools found in photo-editing programs, allowing you to cut out parts of the background and focus just on the subject of the picture. Depending on the image, you may have to fine-tune the selection process to determine just what parts of the image stay in or are cut out.
![]()

![]() Click the image you want to edit.
Click the image you want to edit.
![]() Click the Format tab under Picture Tools on the Ribbon.
Click the Format tab under Picture Tools on the Ribbon.
![]() Click Remove Background.
Click Remove Background.
![]() Word opens the Background Removal tab and the tool attempts to place a selection marquee around the subject of the picture.
Word opens the Background Removal tab and the tool attempts to place a selection marquee around the subject of the picture.
![]() Click and drag the marquee selection handles to make sure the subject you want to keep is within the marquee borders.
Click and drag the marquee selection handles to make sure the subject you want to keep is within the marquee borders.
Tip: More Edits
![]()
To retouch the image some more, you can revisit the Background Removal tab. Just click the Remove Background tool again to view the tab.

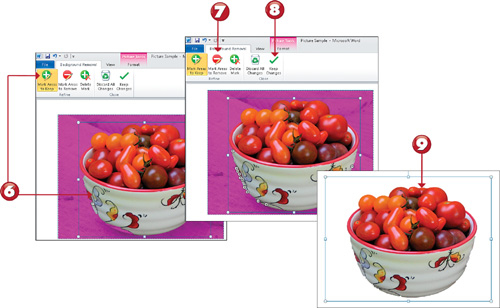
![]() If the Background Removal tool is leaving out an important area, click the Mark Areas to Keep button and click the area to keep in the subject.
If the Background Removal tool is leaving out an important area, click the Mark Areas to Keep button and click the area to keep in the subject.
![]() Click additional areas to keep, as needed. To remove an area instead, click the Mark Areas to Remove button and click the area.
Click additional areas to keep, as needed. To remove an area instead, click the Mark Areas to Remove button and click the area.
![]() Click the Keep Changes button or click anywhere outside the image to view the removal.
Click the Keep Changes button or click anywhere outside the image to view the removal.
![]() Word removes the background.
Word removes the background.
![]()
Tip: Discard Edits
![]()
To return your picture to the way you found it, display the Background Removal tab and click the Discard All Changes button.

Adding a Picture Border
You can add all kinds of borders to pictures you insert into Word. You can choose a border color, line weight, or even use specialty borders with dashes or dots.
![]()

![]() Click the picture you want to edit.
Click the picture you want to edit.
![]() Click the Format tab.
Click the Format tab.
![]() Click the Picture Border drop-down arrow.
Click the Picture Border drop-down arrow.
![]() To assign a color, click a color from the palette.
To assign a color, click a color from the palette.
![]() Word assigns the color to the picture border, which is difficult to see unless you increase the line weight of the border.
Word assigns the color to the picture border, which is difficult to see unless you increase the line weight of the border.
Tip: Quick Styles, Too
![]()
Don’t forget to look among Word’s Quick Styles for easy borders you can assign to your images. Click the Quick Styles button on the Format tab and choose a style from the gallery.
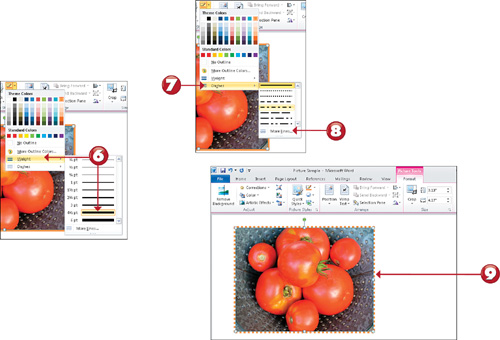
![]() To assign a different line thickness, or weight, click Weight and click a style.
To assign a different line thickness, or weight, click Weight and click a style.
![]() To assign a dash style to the border, click Dashes and choose a style.
To assign a dash style to the border, click Dashes and choose a style.
![]() To view additional line options, click the More Lines command to open the Format Picture dialog box to the Line Style settings.
To view additional line options, click the More Lines command to open the Format Picture dialog box to the Line Style settings.
![]() Word immediately applies any border styles you selected to the picture.
Word immediately applies any border styles you selected to the picture.
![]()
Tip: Adding Borders to Other Elements
![]()
You can also add borders to other selected graphic objects in Word, including text boxes, WordArt objects, shapes, and clip art. You can find tools for adding borders, or outlines, to graphic elements on the Format tab. Click the Shape Outline drop-down arrow and choose a border color or line weight.
Adding a Picture Effect
You can use Word’s Picture Effects feature to quickly turn any image into stylized artwork. Picture Effects include shadow effects, 3D effects, bevels, glows, and more. As you view the effects listed in the gallery menu, you can see what each one looks like on your selected image simply by passing the mouse over the listed effect.
![]()

![]() Click the picture you want to edit.
Click the picture you want to edit.
![]() Click the Format tab.
Click the Format tab.
![]() Click the Picture Effects button.
Click the Picture Effects button.
![]() Word displays several categories of effects.
Word displays several categories of effects.
![]() To view preset effects, click Preset and browse through the selections.
To view preset effects, click Preset and browse through the selections.
![]() As you move the mouse pointer over an effect, a preview of the effect is applied to the selected picture in the document.
As you move the mouse pointer over an effect, a preview of the effect is applied to the selected picture in the document.

![]() To view another category, click the category name to open a submenu of effects. In this example, the Soft Edges effects are listed.
To view another category, click the category name to open a submenu of effects. In this example, the Soft Edges effects are listed.
![]() To assign an effect, click the picture effect.
To assign an effect, click the picture effect.
![]() Word applies the effect to the picture. In this example, a 25 Point Soft Edge effect is applied.
Word applies the effect to the picture. In this example, a 25 Point Soft Edge effect is applied.
![]()
Tip: More Options
![]()
At the bottom of each Picture Effect category, you’ll notice an options command, such as Shadow Options or Reflection Options. You can click this command to open the Format Picture dialog box to the effect’s settings. Here you can tweak the effect by making changes to the settings, thus creating new effects tailored to your own making.
Tip: No Effect
![]()
To remove any picture effect you’ve applied, select the image, click the Picture Effects button, click the Presets category, then click the No Presets effect.
Capturing a Picture of Your Screen
Another new feature in Word 2010 is the ability to capture a screenshot, or picture, of your program screen. You can then insert the image into a document, a PowerPoint slide, an Excel spreadsheet, and so on. The screen clipping feature takes a picture of the currently opened program window. If you have several open at the same time, you can choose which one to use. You can also choose to select the portion of the window you want to capture.
![]()

![]() Click where you want to insert a screen clipping.
Click where you want to insert a screen clipping.
![]() Click the Insert tab.
Click the Insert tab.
![]() Click Screenshot.
Click Screenshot.
![]() Click a screenshot from among the existing open applications.
Click a screenshot from among the existing open applications.
![]() Word adds the screen clipping to your document.
Word adds the screen clipping to your document.
Tip: Moving and Resizing
![]()
Once you’ve added a screen clipping to your document, you can move and resize it just like any other graphic object. The Format tab is available with all the formatting commands you can apply to the image.

![]() To control exactly what part of the screen is captured, click Screen Clipping in the Screenshot menu.
To control exactly what part of the screen is captured, click Screen Clipping in the Screenshot menu.
![]() Drag across the portion of the window you want to capture.
Drag across the portion of the window you want to capture.
![]() Release the mouse button and Word adds the clipping to the document.
Release the mouse button and Word adds the clipping to the document.
Tip: Clip the Right Window
![]()
When drawing your own screen clipping, Word automatically displays the program window immediately next to the current program window. For example, if you have three documents open on the Taskbar, named File 1, File 2, and File 3, and File 3 is where you’re inserting the clipping, the Screenshot tool assumes you want File 2 as your source. If this is not the case and you want File 1 instead, you’ll need to close File 2 so that File 1 is adjacent to File 3 in the Taskbar.
Inserting a WordArt Object
The Office WordArt feature has been around a long time, and in Word 2010, it’s better than ever. WordArt lets you turn text into graphic elements in your documents. For example, you can create curved text or shadowed text, or choose from a variety of gradient fill effects.
![]()

![]() Click where you want to insert a WordArt object.
Click where you want to insert a WordArt object.
![]() Click the Insert tab.
Click the Insert tab.
![]() Click WordArt.
Click WordArt.
![]() Click a style.
Click a style.
![]() Word creates the WordArt object and displays the Drawing Tools on the Ribbon.
Word creates the WordArt object and displays the Drawing Tools on the Ribbon.
![]() Replace the placeholder text with your own word or words.
Replace the placeholder text with your own word or words.
Tip: Formatting Options
![]()
You can format your WordArt text using the formatting tools on the Format tab, including changing text direction, alignment, and colors.


![]() To change the WordArt object’s effect, click the Text Effects button.
To change the WordArt object’s effect, click the Text Effects button.
![]() Click an effect category.
Click an effect category.
![]() Click an effect.
Click an effect.
![]() Word applies it to the WordArt. In this example, an Arch Up effect is applied to the text.
Word applies it to the WordArt. In this example, an Arch Up effect is applied to the text.
![]()
Tip: Format Text Effects Dialog Box
![]()
You can change how your WordArt text is aligned in its text box by opening the Format Text Effects dialog box to the Text Box tab. Simply click the Format Text Effects icon in the corner of the WordArt Styles group on the Format tab. This opens the dialog box where you can change alignment, text direction, and set internal margins inside the text box.
Inserting a Text Box Object
You can insert text boxes into your documents any time you want to set aside text in its own box, such as a quote or sidebar text. Text boxes act like other graphic objects, and can be moved around the document, resized, and formatted with borders, fill colors, and more. You can choose from a gallery of preset text boxes or you can draw your own.
![]()

![]() Click the Insert tab.
Click the Insert tab.
![]() Click Text Box.
Click Text Box.
![]() To use a preset text box, click a box from the gallery.
To use a preset text box, click a box from the gallery.
![]() Word immediately adds it to the document and you can replace the placeholder text with your own.
Word immediately adds it to the document and you can replace the placeholder text with your own.
Tip: Format It
![]()
You can format the text inside a text box just like you format document text. Additionally, you can also apply formatting as you would to a graphic object, such as adding a color border, fill color, or applying shape styles.

![]() To draw your own custom text box, click the Draw Text Box command on the Text Box vmenu.
To draw your own custom text box, click the Draw Text Box command on the Text Box vmenu.
![]() Click and drag in the document where you want the text box to go.
Click and drag in the document where you want the text box to go.
![]() Release the mouse button and the box is created.
Release the mouse button and the box is created.
![]() Type your text inside the box.
Type your text inside the box.
![]() Click outside the box to unselect it.
Click outside the box to unselect it.
![]()
Tip: Text Wrap
![]()
Use Word’s text wrapping feature to wrap text around a text box object. Select the text box, then click the Arrange button and click Wrap Text and choose a text wrapping option, such as Tight or Square.
Moving and Resizing Objects
You can quickly move and resize graphic objects you place in your Word documents. When you select an object, such as clip art or a picture, it’s surrounded by selection handles, tiny squares at each corner and sometimes along the sides of the object. You can use the selection handles to resize an object.
![]()
![]() Click the object you want to edit to select it.
Click the object you want to edit to select it.
![]() To move an object, move the mouse pointer over the object until the pointer becomes a four-sided arrow icon.
To move an object, move the mouse pointer over the object until the pointer becomes a four-sided arrow icon.
![]() Click and drag the object to a new location in the document.
Click and drag the object to a new location in the document.
![]() As soon as you stop dragging, the object is moved.
As soon as you stop dragging, the object is moved.
Tip: Keeping Proportions
![]()
To keep the original proportions, drag a corner selection handle instead of a edge handle.


![]() To resize an object, move the mouse pointer over a selection handle until the pointer becomes a two-sided arrow icon.
To resize an object, move the mouse pointer over a selection handle until the pointer becomes a two-sided arrow icon.
![]() Click and drag the handle to resize the object.
Click and drag the handle to resize the object.
![]() As soon as you release the mouse button, the object is resized.
As soon as you release the mouse button, the object is resized.
![]()
Tip: Exact Sizing
![]()
If your picture or graphic object needs to be a precise size, you can use the Size boxes on the Format tab to set measurements. Simply click in the Shape Width and Shape Height boxes and type new measurements, or click the spinner arrows to adjust the measurements.
Rotating and Flipping Objects
You can rotate or flip objects to change their appearance or position in the document. You can use the selection handles to flip an object vertically or horizontally, and you can use the rotation handle to rotate an object.
![]()

![]() Click the object you want to edit to display selection handles.
Click the object you want to edit to display selection handles.
![]() To flip an object, move the mouse pointer over a side selection handle until the pointer becomes a two-sided arrow icon.
To flip an object, move the mouse pointer over a side selection handle until the pointer becomes a two-sided arrow icon.
![]() Click and drag the handle beyond the opposite side of the object.
Click and drag the handle beyond the opposite side of the object.
![]() As soon as you stop dragging, the object is flipped.
As soon as you stop dragging, the object is flipped.
Tip: Button Method
![]()
You can also click the Rotate button in the Arrange group of tools on the Format tab and choose to rotate or flip an object. You can use the menu that appears to rotate an object right or left by 90°, or flip the object vertically or horizontally.


![]() To rotate an object, move the mouse pointer over the rotation handle until you see a circular arrow icon.
To rotate an object, move the mouse pointer over the rotation handle until you see a circular arrow icon.
![]() Click and drag the handle to rotate the object.
Click and drag the handle to rotate the object.
![]() As soon as you release the mouse button, the object is rotated.
As soon as you release the mouse button, the object is rotated.
![]()
Tip: More Options
![]()
For more rotation options, open the Layout dialog box to the Size tab and specify a specific rotation degree. To view the dialog box, click the Rotate button on the Format tab and click More Rotation Options.
Tip: Undo
![]()
Anytime you want to undo your change, whether you flipped or rotated an object, just click the Undo button on the Quick Access toolbar.
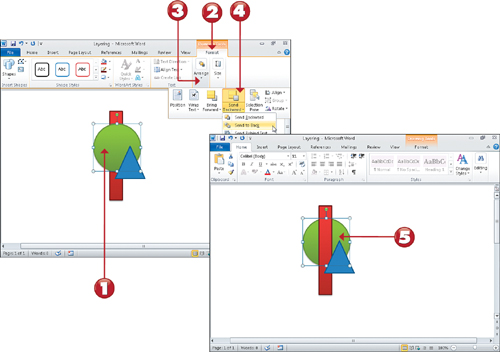
Layering Objects
You can layer objects in a document to create logos and complex drawings. When layering objects, you can move a selected object forward or backward in a stack of other objects.
![]()
![]() Click the object you want to layer.
Click the object you want to layer.
![]() Click the Format tab.
Click the Format tab.
![]() Click the Arrange button.
Click the Arrange button.
![]() To send the object backward in the stack, click the Send Backward button and choose an option.
To send the object backward in the stack, click the Send Backward button and choose an option.
![]() Word moves the object back in the stack. In this example, the circle moves to the back layer.
Word moves the object back in the stack. In this example, the circle moves to the back layer.

![]() To bring the object forward in the stack, click the Bring Forward button and choose an option.
To bring the object forward in the stack, click the Bring Forward button and choose an option.
![]() Word moves the object forward in the stack. In this example, the circle moves to the top layer.
Word moves the object forward in the stack. In this example, the circle moves to the top layer.
![]()
Tip: Alignment Options
![]()
The Drawing Tools or Picture Tools tab has tools for aligning shapes and other graphic objects. Like text alignment controls the positioning of text, graphic alignment tools control the positioning of graphic objects. Using the Align button, you can align selected objects to the left, right, or center, or you can align them vertically to the top, middle, or bottom of the page, or even distribute the objects evenly across or up and down the page.
Grouping Objects
You can use grouping controls to group together objects into one. For example, you might group together all the elements that make up a logo you’ve created and create a single object, or group several shapes to apply the same formatting all at once or move all the items at the same time. You can leave the group together, or you can ungroup the group and return all the individual elements to their own selectable objects again.
![]()

![]() While pressing the Ctrl key, click each object you want to include in a group. Each object is surrounded by its own selection box and handles.
While pressing the Ctrl key, click each object you want to include in a group. Each object is surrounded by its own selection box and handles.
![]() Right-click over the selected objects.
Right-click over the selected objects.
![]() Click Group.
Click Group.
![]() Click Group.
Click Group.
![]() Word surrounds the objects with a single border and selection handles. You can now move or format the entire set of objects.
Word surrounds the objects with a single border and selection handles. You can now move or format the entire set of objects.
Tip: More Options
You can also find the grouping commands on the Format tab. If the Drawing Tools Format tab is displayed, you can click the Arrange button, click Group, and click Group in the menu that appears. If the Picture Tools Format tab is displayed, click the Group button and then click Group.

![]() To ungroup a set of grouped objects, first select the object.
To ungroup a set of grouped objects, first select the object.
![]() Right-click the selected object.
Right-click the selected object.
![]() Click Group.
Click Group.
![]() Click Ungroup.
Click Ungroup.
![]() The objects revert to their individual parts.
The objects revert to their individual parts.
![]()
Tip: Selection Troubles?
![]()
If you’re having a difficult time selecting individual items to include in a group, try using Word’s Selection Pane. If the Drawing Tools Format tab is displayed, you can click the Arrange button and then click Selection Pane. If the Picture Tools Format tab is displayed, click the Selection Pane button. Either route opens the Selection Pane and you can then click items to select for your grouping task.
Cropping a Picture
You can use Word’s cropping feature to crop out unwanted parts of your pictures. When activated, you can crop out different sides or corners of an image.
![]()

![]() Click the picture you want to edit.
Click the picture you want to edit.
![]() Click the Format tab.
Click the Format tab.
![]() Click Crop.
Click Crop.
![]() Click Crop.
Click Crop.
![]() Word surrounds the picture with cropping handles.
Word surrounds the picture with cropping handles.
Tip: More Options
![]()
The Crop button also displays several additional tools to help you maintain image ratio after cropping. Click the Crop button to reveal the Aspect Ratio, Fill, and Fit commands to help you adjust picture ratios.

![]() Click and drag a cropping handle to crop the picture.
Click and drag a cropping handle to crop the picture.
![]() When finished cropping, click the Crop button on the Format tab again to toggle cropping off.
When finished cropping, click the Crop button on the Format tab again to toggle cropping off.
![]() The picture is cropped.
The picture is cropped.
![]()
Tip: Shape Cropping
![]()
You can also crop a picture to a particular shape, such as a diamond or a triangle. Pairing with Word’s AutoShapes, the cropping feature crops out everything but what’s inside the shape pattern you choose. To use this feature, click the Crop button on the Format tab and click Crop to Shape. A gallery of AutoShapes appears and you can click the one you want to apply to your picture.
Adding Artistic Effects
You can add painterly effects and other stylizations to your pictures using Word’s Artistic Effects feature. You can choose from a variety of effects ranging from pencil sketch to watercolor sponge.
![]()

![]() Click the picture you want to edit.
Click the picture you want to edit.
![]() Click the Picture Tools Format tab.
Click the Picture Tools Format tab.
![]() Click Artistic Effects.
Click Artistic Effects.
![]() A gallery of effects appears.
A gallery of effects appears.
Tip: Turn It Off
![]()
To return your picture to its normal state, click the Artistic Effect button and click None, the top left effect listed in the gallery.


![]() To preview an effect, move the mouse pointer over the effect.
To preview an effect, move the mouse pointer over the effect.
![]() Click the effect you want to assign.
Click the effect you want to assign.
![]() Word applies the effect to the picture. In this example, the Light Screen effect is applied.
Word applies the effect to the picture. In this example, the Light Screen effect is applied.
![]()
Tip: Reset Picture
![]()
If, after making all kinds of formatting changes to a picture, you want to return the picture to its original appearance, you can activate the Reset Picture command. Click the Format tab and click the Reset Picture button in the Adjust group of tools, then click Reset Picture.
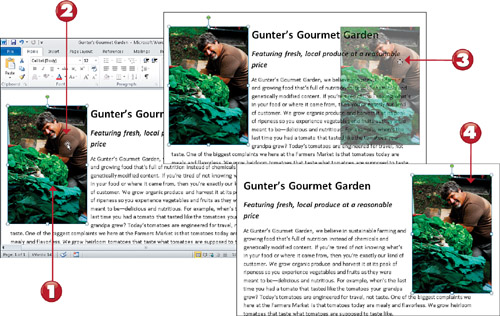
Controlling Text Wrapping
Text wrapping refers to how document text flows around graphic elements you add, such as pictures or clip art. By default, Word places graphic elements inline with text, which means the graphic object sits on the same baseline as the text. To make the text wrap around the object, assign another wrapping control instead.
![]()

![]() Click the object you want to edit.
Click the object you want to edit.
![]() If the object is a picture or clip art, click the Picture Tools Format tab.
If the object is a picture or clip art, click the Picture Tools Format tab.
![]() Click the Wrap Text button.
Click the Wrap Text button.
![]() Click a wrap option.
Click a wrap option.
![]() Word wraps the text as specified. In this example, the Tight wrapping control is assigned.
Word wraps the text as specified. In this example, the Tight wrapping control is assigned.
Tip: More Options
![]()
You can find more text wrapping controls in the Layout dialog box. After clicking the Wrap Text button, click the More Layout Options command. This opens the Layout dialog box to the Text Wrapping tab. You can set a wrap option, specify which sides of the object to wrap around, and even control the distance of the object from the text.

![]() If the object is a text box or shape, click the Drawing Tools Format tab.
If the object is a text box or shape, click the Drawing Tools Format tab.
![]() Click the Arrange button.
Click the Arrange button.
![]() Click the Wrap Text button.
Click the Wrap Text button.
![]() Click a wrap option.
Click a wrap option.
![]() Word wraps the text as specified. In this example, the Square wrapping control is assigned.
Word wraps the text as specified. In this example, the Square wrapping control is assigned.
![]()
Tip: Precise Wrapping
![]()
You can apply wrapping points and move them to control the text wrap by clicking the Edit Wrap Points command on the Wrap Text menu. You can then click to add a wrap point handle to the object and drag it to change the wrapping about the object at that point. You may need to add several wrap points to achieve the desired result.
Correcting and Coloring a Picture
Word offers two handy photo-editing tools you can use to change a picture’s quality: Corrections and Color. You can use the Corrections tool to make improvements to a picture’s brightness, contrast, and sharpness. You can use the Color tool to make improvements to the picture’s color settings, such as color saturation, tone, and recoloring options.
![]()

![]() Click the picture you want to edit to display the Picture Tools Format tab.
Click the picture you want to edit to display the Picture Tools Format tab.
![]() To make corrections to sharpen or change brightness or contrast, click the Corrections button.
To make corrections to sharpen or change brightness or contrast, click the Corrections button.
![]() Word displays a gallery of settings. To preview a setting, move the mouse pointer over the setting and Word immediately previews the effect on the selected picture.
Word displays a gallery of settings. To preview a setting, move the mouse pointer over the setting and Word immediately previews the effect on the selected picture.
![]() Click the correction option you want to assign.
Click the correction option you want to assign.
![]() Word applies the setting to the picture. In this example, the picture is sharpened.
Word applies the setting to the picture. In this example, the picture is sharpened.
Tip: Swap Pictures
![]()
You can use the Change Picture button on the Format tab to swap out the currently selected picture with a new one from your computer. Click the button to open the Insert Picture dialog box, navigate to the picture you want to insert instead, and Word replaces the picture with the new selection.

![]() To make color changes to a picture, click the Color button.
To make color changes to a picture, click the Color button.
![]() Word displays a gallery of color settings. To preview a setting, move the mouse pointer over the setting and Word immediately previews the color on the selected picture.
Word displays a gallery of color settings. To preview a setting, move the mouse pointer over the setting and Word immediately previews the color on the selected picture.
![]() Click the color option you want to assign.
Click the color option you want to assign.
![]() Word applies the change to the picture. In this example, the color saturation is adjusted.
Word applies the change to the picture. In this example, the color saturation is adjusted.
![]()
Tip: Compress Pictures
![]()
You can compress your pictures to dramatically reduce the overall file size of your document. Pictures are notorious space consumers, so reducing their file size can help speed up downloading or save room on the drive in which you store the document. To compress your pictures, click the Compress Pictures button in the Adjust group on the Format tab. This opens the Compress Pictures dialog box where you can adjust the output target and then apply compression.
Adding SmartArt
If you need to insert a diagram of some sort, make things easy for yourself and take advantage of Word’s SmartArt graphics. You can use SmartArt to create diagrams for graphical lists, processes, procedures, hierarchies, organization charts, and more. When you add a SmartArt diagram, Word adds two SmartArt Tools tabs to the Ribbon which you can use to format and design the diagram.
![]()

![]() Click the Insert tab.
Click the Insert tab.
![]() Click SmartArt.
Click SmartArt.
![]() The Choose a SmartArt Graphic dialog box appears.
The Choose a SmartArt Graphic dialog box appears.
![]() Click a category.
Click a category.
![]() Click a diagram style.
Click a diagram style.
![]() Click OK.
Click OK.
![]()
Tip: Format SmartArt
![]()
To format SmartArt, click the Format tab and use the formatting twos on one of two special tabs that appear on the Ribbon when you select an object. You can change shape styles, shape sizes, fill colors, borders, and more.

![]() Word opens a default SmartArt diagram with placeholder text.
Word opens a default SmartArt diagram with placeholder text.
![]() Click a diagram element and type your own text.
Click a diagram element and type your own text.
![]() Continue adding text to each part of the diagram.
Continue adding text to each part of the diagram.
![]() When finished, click outside the diagram to unselect the graphic object.
When finished, click outside the diagram to unselect the graphic object.
![]()
Tip: Add a Shape
![]()
To add a shape to the diagram, click where you want to add a new shape in the chart, then click the Design tab and click the Add Shape button and choose whether you want to add the shape before or after the current selection.