
Chapter 9. Reviewing Documents
Proofreading your documents is always an important step in any situation, especially when you’re sharing the documents with others. Since we’re not all trained editors, Word offers some handy tools to help us check over our documents for errors and tools to help us locate text and look out for hidden data. You may have already noticed Word’s AutoCorrect feature kicking in whenever you misspell a common word, such as teh instead of the. AutoCorrect is turned on by default, but you can add more misspellings to its list for words you personally struggle to spell correctly.
Speaking of spelling, Word also automatically checks your document’s spelling and grammar as you type. You can turn this feature off and choose to activate it only when you have a final document ready to proof. If you need to quickly replace a word with another word throughout your document, you can employ Word’s Find and Replace tools. You can also check over your document for hidden personal data and remove it before sending the document off. Lastly, you can use Word’s Track Changes feature to review changes from multiple authors to a single document.


Finding and Replacing Text
Sometimes you not only need to find text in a long document, but also replace it with something else. Word’s Find and Replace tools take the tedium out of making the same change in several places. Whenever you find yourself about to change something by hand throughout your entire document, stop and see whether Word’s Find and Replace feature could do the work for you.
![]()

![]() Click the Home tab on the Ribbon.
Click the Home tab on the Ribbon.
![]() Click Editing.
Click Editing.
![]() Click Replace to open the Find and Replace dialog box.
Click Replace to open the Find and Replace dialog box.
![]() In the Replace tab, click the Find what text box and type the word or phrase you want to search for in the document.
In the Replace tab, click the Find what text box and type the word or phrase you want to search for in the document.
![]() Click the Replace with text box and type the word or phrase you want to replace the text.
Click the Replace with text box and type the word or phrase you want to replace the text.
![]() Click Find Next.
Click Find Next.
Tip: Where to Start?
![]()
By default, Word starts the search wherever the cursor is currently located in the document. To start the search from the very top, click at the top of the document.

![]() Word highlights the first occurrence of the text. To replace it, click the Replace button.
Word highlights the first occurrence of the text. To replace it, click the Replace button.
![]() To look for more instances of the text, click Find Next again.
To look for more instances of the text, click Find Next again.
![]() To replace all the occurrences with the new text, click Replace All.
To replace all the occurrences with the new text, click Replace All.
![]() When you finish searching and replacing, a prompt box appears; click OK.
When you finish searching and replacing, a prompt box appears; click OK.
![]() Click Close to close the dialog box.
Click Close to close the dialog box.
![]()
Tip: Find Only
![]()
If you just want to find a word without replacing it, click the Editing button and click Find to open the Navigation Pane to the Search tab. Type in what you want to locate and press Enter to search for the text.
Tip: More Options
![]()
To be more specific about what text you are looking for, click the More button at the bottom of the Find and Replace dialog box to reveal a variety of options to narrow the search.
Checking Spelling and Grammar
You can use Word’s Spelling and Grammar Checker to help you correct proofreading issues in your document. By default, the Spell Checker is turned on when you start Word, underlining any problems it encounters with a red, wavy line. If the Grammar Checker is on, grammar issues are identified with green, wavy lines. You can also choose to run the Spell Checker anytime you need to review the document. The feature takes you through each problem, one at a time, until the check is complete.
![]()

![]() Click the Review tab on the Ribbon.
Click the Review tab on the Ribbon.
![]() Click Spelling & Grammar located in the Proofing tools.
Click Spelling & Grammar located in the Proofing tools.
![]() Word displays the Spelling and Grammar dialog box and highlights the first misspelling or grammar error in the document, along with correction suggestions; click the suggestion you want to apply.
Word displays the Spelling and Grammar dialog box and highlights the first misspelling or grammar error in the document, along with correction suggestions; click the suggestion you want to apply.
![]() Click Change to change the spelling.
Click Change to change the spelling.
![]() To change all occurrences of the same word, click Change All.
To change all occurrences of the same word, click Change All.
![]() If the misspelling is a proper name or is spelled correctly, click Ignore Once or Ignore All.
If the misspelling is a proper name or is spelled correctly, click Ignore Once or Ignore All.

![]() If the Check grammar check box is selected, grammar issues are checked along with spelling and any problems are highlighted and marked with green, wavy lines. Click Change to change the grammar error.
If the Check grammar check box is selected, grammar issues are checked along with spelling and any problems are highlighted and marked with green, wavy lines. Click Change to change the grammar error.
![]() To ignore the grammar rule, click Ignore Once or Ignore Rule.
To ignore the grammar rule, click Ignore Once or Ignore Rule.
![]() When the check is complete, click OK.
When the check is complete, click OK.
![]()
Tip: Turning It Off
![]()
To turn off the Spell Checker, click the File tab and click Options to open the Word Options dialog box. Click Proofing, and then deselect the check box for the Check spelling as you type option. To turn off the Grammar Checker, deselect the Check grammar with spelling check box. You can also open the Word Options dialog box by clicking the Options button at the bottom of the Spelling and Grammar dialog box.
Using AutoCorrect
Word’s AutoCorrect feature fixes spelling errors for you automatically as you type. The feature is turned on by default when you first open Word. AutoCorrect makes corrections based on suggestions from the Spell Checker. It also has its own list of many commonly misspelled words, and you can add your own favorite typos to the list. In addition, you can use AutoCorrect to automatically enter special symbols, long names, or phrases you have to type frequently.
![]()

![]() Click the File tab.
Click the File tab.
![]() Click Options to open the Word Options dialog box.
Click Options to open the Word Options dialog box.
![]() Click Proofing.
Click Proofing.
![]() Click AutoCorrect Options to open the AutoCorrect dialog box.
Click AutoCorrect Options to open the AutoCorrect dialog box.
![]() Scroll through the list to see the types of corrections AutoCorrect makes.
Scroll through the list to see the types of corrections AutoCorrect makes.
Tip: Common Phrases
![]()
If you want to use AutoCorrect to insert a long name or phrase, type an abbreviation for the phrase in the Replace box, then type the whole phrase in the With box. The next time you type the abbreviation, AutoCorrect inserts the full phrase.


![]() Click in the Replace text box and type a word you commonly misspell.
Click in the Replace text box and type a word you commonly misspell.
![]() Click in the With text box and type the correct spelling for the word.
Click in the With text box and type the correct spelling for the word.
![]() Click the Add button.
Click the Add button.
![]() AutoCorrect adds the word to the list.
AutoCorrect adds the word to the list.
![]() Click OK to exit the dialog box.
Click OK to exit the dialog box.
![]() Click OK to exit the Word Option dialog box.
Click OK to exit the Word Option dialog box.
![]()
Tip: Remove It
![]()
To remove a word from the AutoCorrect list, select it in the AutoCorrect dialog box and click the Delete button.
Checking a Document for Hidden Data
You can use Word’s Document Inspector tool to check your document for sensitive information or hidden data. For example, if you plan on sharing the document with other users, you may want to remove any personal information concerning the file. Hidden data, also called metadata, includes elements such as comments, tracked changes, and information about who created the document. With the Document Inspector, you can control what type of content is inspected and if any issues need to be addressed.
![]()

![]() Click the File tab.
Click the File tab.
![]() Click Info.
Click Info.
![]() Click Check for Issues.
Click Check for Issues.
![]() Click Inspect Document to open the Document Inspector dialog box.
Click Inspect Document to open the Document Inspector dialog box.
![]() Click which types of information you want inspected.
Click which types of information you want inspected.
![]() Click Inspect.
Click Inspect.


![]() Word inspects the document and any issues appear listed for you to check.
Word inspects the document and any issues appear listed for you to check.
![]() Click Remove All to fix an issue.
Click Remove All to fix an issue.
![]() Click Close.
Click Close.
![]()
Tip: Caution
![]()
You cannot undo the effects of removing information with Document Inspector. You can, however, restore the removed information by closing the document without saving the changes made by the inspection process.
Tracking and Reviewing Documents
If you share your documents with other Word users in an editorial environment, you can turn on Word’s Track Changes feature and keep track of who makes what changes to the text. For example, if your department is working on a project that involves everyone’s input on the team, you can pass the document around and collect everyone’s changes, then review the changes, accepting or discarding each one as needed. Track Changes allows you to track comments, insertions, deletions, formatting changes, and more.
![]()

![]() Click the Review tab.
Click the Review tab.
![]() Click Track Changes.
Click Track Changes.
![]() Click Track Changes to turn the tracking feature on. You can now share the document with other users to make edits to the text.
Click Track Changes to turn the tracking feature on. You can now share the document with other users to make edits to the text.
![]() Edits you make appear in a comment balloon off to the right of the document page.
Edits you make appear in a comment balloon off to the right of the document page.
Tip: Comments
![]()
To add a comment, click where you want it to go or select the text it refers to, then click the New Comment button on the Review tab. Type your comment text. To remove a comment, click it and click the Delete Comment button.
Tip: Reviewing Pane
![]()
You can click the Reviewing Pane button on the Review tab to open a Reviewing Pane on the left side of the document. This pane lists all the changes, revisions, and comments. You can click an item in the list to quickly move to its location in the document.
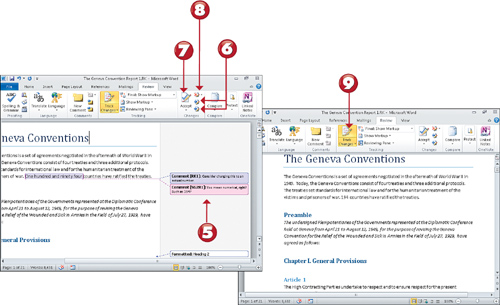
![]() Once the document is edited, you can review the changes. Open the document and view the changes. In this example, two users have reviewed the document.
Once the document is edited, you can review the changes. Open the document and view the changes. In this example, two users have reviewed the document.
![]() Click the Next Change and Previous Change buttons to navigate between the edits.
Click the Next Change and Previous Change buttons to navigate between the edits.
![]() Click the Accept button to okay the change and move to the next change in the document.
Click the Accept button to okay the change and move to the next change in the document.
![]() Click the Reject button to forego the change and move to the next edit.
Click the Reject button to forego the change and move to the next edit.
![]() When you complete the review, you can turn off the tracking feature; click Track Changes.
When you complete the review, you can turn off the tracking feature; click Track Changes.
![]()
Tip: Reviewing Two or More Documents
![]()
If reviewers have made changes to two of the same file, click the Review tab and click Compare, then click Compare to compare two documents, or Combine to combine two documents into one. See the next task to learn more.
Comparing Documents
You can compare two documents to see what changes were made in each. You compare an original document with an updated version by creating a third file that has all the differences between the two documents marked. Changes are marked in the same way tracked changes are marked in documents with multiple authors, and you use the same reviewing principles to check each change in the comparison document.
![]()
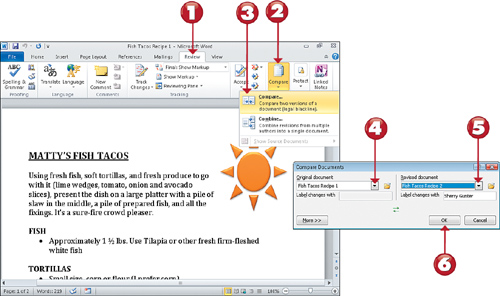
![]() With the original version of the document open, click the Review tab.
With the original version of the document open, click the Review tab.
![]() Click Compare.
Click Compare.
![]() Click Compare.
Click Compare.
![]() The Compare Documents dialog box appears. Click here and choose the original version of the document you want to compare.
The Compare Documents dialog box appears. Click here and choose the original version of the document you want to compare.
![]() Click here and choose the revised version of the document.
Click here and choose the revised version of the document.
![]() Click OK.
Click OK.

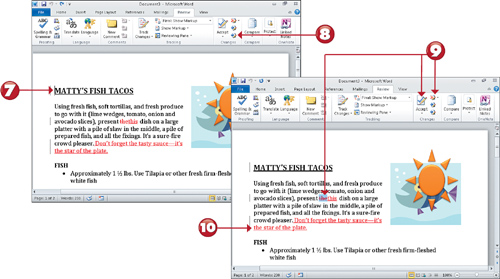
![]() Word creates a new document with comparisons from both files noted. Click at the beginning of the document to begin reviewing.
Word creates a new document with comparisons from both files noted. Click at the beginning of the document to begin reviewing.
![]() Click Next on the Review tab.
Click Next on the Review tab.
![]() Word highlights the first issue. Click Accept to accept the change or click Reject to reject the change.
Word highlights the first issue. Click Accept to accept the change or click Reject to reject the change.
![]() You can continue editing the document as needed.
You can continue editing the document as needed.
![]()
Tip: Accepting All Changes
![]()
To accept all changes in the document, click the down arrow under Accept and click Accept All Changes in Document.