If you’ve never seen a PowerPoint presentation, you’re in a pretty select group. With legions of folks all over the world pounding out an estimated 30 million PowerPoint slides every day, PowerPoint’s the runaway leader in the field of presentation programs, leaving competitors like Corel Presentations and Apple’s Keynote in the dust. PowerPoint has become so ubiquitous that it’s even managed to work its way into the English language: powerpointless, as many audience members can attest, describes a PowerPoint presentation that has bulleted text, graphics, animated slide transitions—everything except a good reason for existing.
So how do you improve a program that’s so wildly successful? If you’re Microsoft, you completely redesign it. As described in the introduction, PowerPoint 2007 looks completely different from its previous incarnation, PowerPoint 2003. The menus, wizards, and most of the toolbars and panes that a generation of PowerPointilists grew up with have been replaced by the ribbon (Figure 17-1). And that’s just the tip of the redesign iceberg.
This chapter will familiarize you with the major changes by walking you through the creation of a basic bullets-and-background slideshow presentation. You’ll learn how to create a new slideshow, choose a look and feel, add text and slides, print speaker notes and handouts, and finally, how to unveil your masterpiece.
The good news is you can still do the same things in PowerPoint 2007 that you could do in earlier versions—and a few more, besides. You can still design beautiful slideshows that contain bulleted lists, pictures, and sound clips. You can still deliver your slideshows in person, on CD, or on an unattended kiosk.
What’s new in PowerPoint 2007 is how you do all of these things.
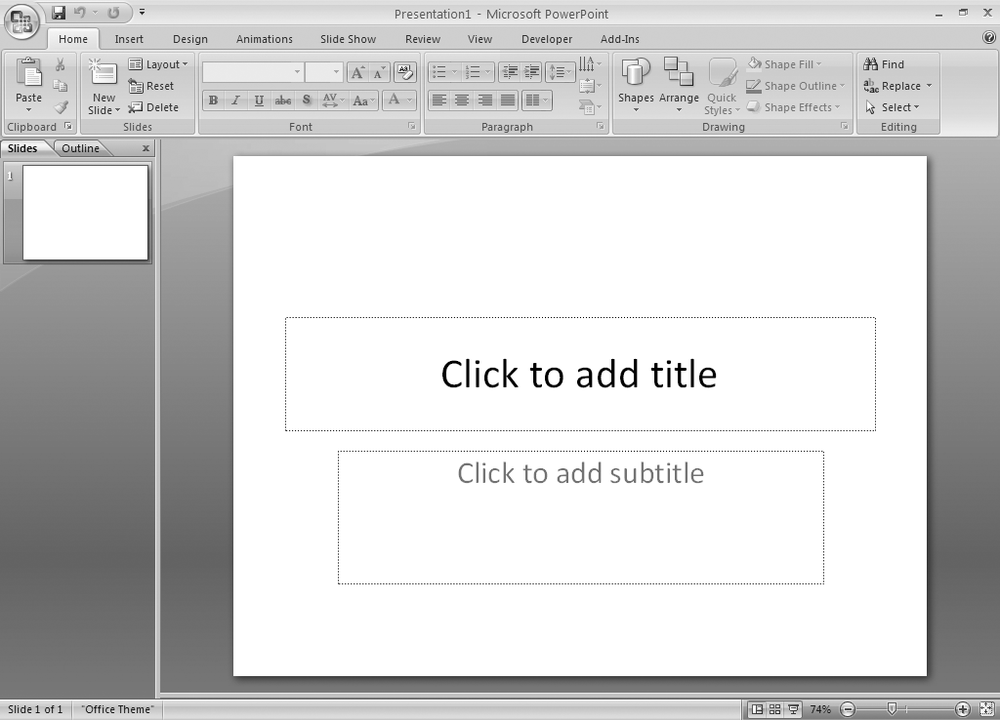
Figure 17-1. If you’re a PowerPoint 2003 aficionado, expect to be a little shocked when you fire up PowerPoint 2007 for the first time. This version’s the biggest wholesale change to the PowerPoint look in nearly a decade, and there’s no fallback “classic” mode, either.
If you’re familiar with PowerPoint 2003 or an earlier version of the program, this book will help you make the transition from the old, familiar way of doing things to the new, improved way. (You’ll even see tips and tricks that were buried so deep inside menus and toolbars in PowerPoint 2003 that you probably didn’t know they were there.)
On the other hand, if you’re brand new to PowerPoint—or even to presentation programs in general—then you’re in luck, because this book shows you how to build basic to bowl-'em-over presentations for work, school, or whatever you’re involved in.
PowerPoint was originally designed to help business professionals create and deliver electronic slideshows (sales presentations, mostly). But over the years, as Microsoft piled on the options, folks began discovering new ways to use the program.
Here’s a short list of what you can create using PowerPoint 2007:
Multimedia presentations. Use PowerPoint to create slideshows that you—the presenter—can run in front of an audience on a computer screen (for small groups) or a digital projector (for a packed conference hall). The kinds of presentations that fit into this group include business and sales presentations, workshop and conference sessions, academic lectures, in-class reports, courtroom summations, and church choir programs. The sky’s the limit. Anytime you need to stand in front of a group and present information, you can use a PowerPoint slideshow to get your point across.
Kiosk presentations. Presentations that run unattended, are perfect for trade shows, department store product demonstrations—even (believe it or not) weddings and funerals.
Printed documents. It’s not a full-fledged page-layout program like Quark XPress, but PowerPoint 2007 comes with templates for popular printables (like certificates of achievement and calendars). It also gives you more control over layout than earlier versions of the program.
Nearly all the changes Microsoft made to PowerPoint 2007 affect the way the program looks and behaves; in other words, the changes affect how you do things in PowerPoint 2007. The most sweeping of these include:
A completely redesigned interface. The difference you notice right away is the tabbed ribbon (Figure 17-2), which replaces all of the old, pre–PowerPoint 2007 menus and toolbars. Instead of wasting time trying to remember if the option you want is hiding on a toolbar or a menu or a pane or a dialog box or somewhere else entirely, in PowerPoint 2007, you reach all options from the ribbon.
New file formats. The files you’ll create in PowerPoint 2007 bear a different file extension than the ones you created in earlier versions of the program. The good news is that the new XML-based file formats tend to be smaller and more recoverable than the old ones. The bad news is that you can’t edit PowerPoint 2007 files in an earlier version of the program unless you download and install a special converter program (Special Formats for Special Numbers has details).
Tighter integration among Office programs. Microsoft gave all of the Office programs a face lift, not just PowerPoint. The result is that all Office programs share similar elements. For example, the Office button (the old File menu) appears in the same spot in all Office programs, and certain options—like the ones you use to create charts and diagrams—look and behave pretty much the same way in PowerPoint as they do in Word and Excel.
Figure 17-2. You can’t make the ribbon larger, nor can you move it around or hide its tabs (although PowerPoint does let you hide the ribbon itself; see The Ribbon). If you’re wondering why there’s no File tab, it’s because the Office button replace the File menu in all Microsoft Office 2007 programs.
Improved graphics. All Office programs share a single, new-and-improved graphics engine that not only makes the charts, diagrams, and other visuals you create in PowerPoint look better (much better), but makes them easier to create, too (Figure 17-3).
More look-and-feel options. PowerPoint 2007 comes with more and better-looking templates and slide layouts than earlier versions of the program.


Figure 17-3. Top: The charts and other graphics you could create using PowerPoint 2003 got the point across, but they weren’t exactly what you’d call inspiring. Bottom: Not only do graphics look great out of the box in PowerPoint 2007, you can change the way they look with the click of a button by applying professionally designed Quick Styles.
The files you create using PowerPoint 2007 bear different file extensions than the files you created using PowerPoint 2003 or an earlier version of the program. The “x” in the new PowerPoint 2007 file names reflects the new, XML-based file format. Table 17-1 shows you the differences.
Table 17-1. Old and New File Extensions for the Files You Create in PowerPoint
|
PowerPoint 2007 File Extension |
Description |
Old (pre-2007) File Extension |
|---|---|---|
|
.pptx |
Presentation |
.ppt |
|
.potx |
Template |
.pot |
|
.ppsx |
Show |
.pps |
|
.ppam |
Add-in |
.ppa |
|
.pptm |
Macro-enabled presentation |
.ppt |
Note
The PowerPoint portion of this book is based on PowerPoint 2007: The Missing Manual (O’Reilly). That book is a comprehensive reference covering every program feature, including geeky pursuits like adding video and animations to your slides and writing macros (mini-programs that automate your slideshows). Although you’ll probably never need to do these things—and never want to—PowerPoint 2007: The Missing Manual has everything you need to know.
The implications of the new file formats are twofold:
Because the new file formats are based on XML, they tend to be more compact than PowerPoint 2003. A smaller file is good news if you intend to deliver your presentation by email or on CD. Also, these new files are easier to recreate in the event of a computer crash.
The files you create with PowerPoint 2007 can’t automatically be edited in earlier versions of the program. Fortunately, Microsoft offers a compatibility pack that lets folks running Office 2003 open PowerPoint 2007 files; to download and install it, visit www.microsoft.com/office/preview/beta/converter.mspx. PowerPoint 2007 also gives you the option to save files compatible with PowerPoint 2003 and earlier versions of the program (see the box on Running a Presentation).
Microsoft overhauled the part of Microsoft Office that lets you create charts, diagrams, and pictures in PowerPoint, Word, and other Office programs. Not only is creating graphics easier in PowerPoint, the results, as you saw in Figure 17-3, are much more impressive.
Like harvest-gold stoves and avocado shag carpeting, the design templates that came with PowerPoint 2003 were beginning to show their age. So Microsoft created a bunch of new design templates (they’re called Office themes now) that look a little more up-to-date. Unlike the old PowerPoint-only design templates, you can apply the Office themes to any file you create using an Office program, from a PowerPoint slideshow to a Word document or Excel spreadsheet. (That’s good news for folks who want to create matching backup reports in Word and matching spreadsheets in Excel to hand out at the end of their PowerPoint presentations.) Also new in PowerPoint 2007 is the ability to create multiple slides with the same layout faster with reusable slide masters (Chapter 21).
You’ve got two basic choices when it comes to creating a new presentation:
You can start from scratch, using a blank canvas. If you’re familiar with earlier incarnations of the PowerPoint program, or if you’re interested in learning the ins and outs of PowerPoint quickly, then you’ll probably want to choose this option. (As daunting as “from scratch” sounds, you don’t have to do all the work yourself; From an existing (built-in) theme shows you how to apply a canned look and feel—or theme—to your new presentation.)
You can create a new presentation based on an existing template, theme, or presentation. A template is a generic presentation file designed for you to reuse. Complete with themes (see the box on From an existing (built-in) theme), background images, and even generic content (such as page numbers and placeholder text), templates let you jump-start your presentation by giving you everything you need except your specific content. If you’re creating a presentation for your local school board, for example, then you’ll need to add the content that describes your findings, conclusions, and suggestions.
Templates are the better option when you need to crank out a presentation in a jiffy. PowerPoint comes with a handful of professionally designed templates and themes, but you can also create presentations based on a template, theme, or presentation that you’ve previously created, or one that you’ve found online and downloaded onto your computer.
When you launch PowerPoint, the program starts you off with a brand-new presentation cleverly named Presentation1 (Figure 17-4).
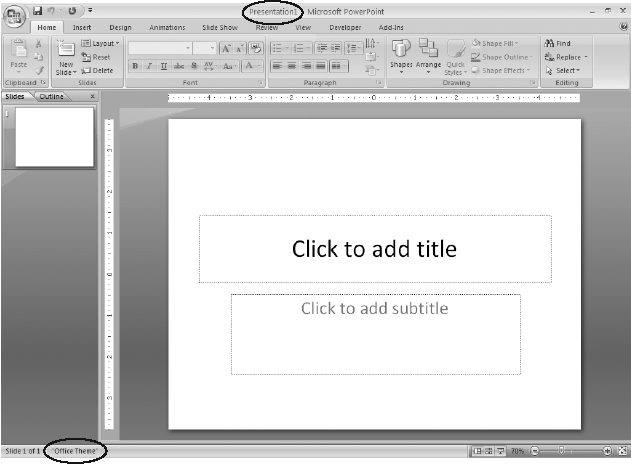
Figure 17-4. PowerPoint calls this a “blank” presentation even though technically it’s not blank at all: It contains placeholders for the first slide’s title and subtitle. Choosing a Theme for Your Presentation shows you how to change the Office theme that PowerPoint hands you to something more colorful and more artfully laid out.
Typically, you dive right in, adding a look and feel, text, pictures, and so on to the blank presentation PowerPoint hands you. But if you’ve closed or saved your freebie, here’s how you create an additional blank presentation:
Select Office button → New.
The New Presentation window (Figure 17-5) appears.
Figure 17-5. Because folks typically want to create a new presentation either from scratch or based on a favorite (and, therefore, recently used) template, the “Blank and recent” option is automatically selected. But you can choose instead to create a presentation based on an existing presentation, or on a theme or template you’ve created or downloaded from the Web.
On the left side of the New Presentation window, make sure the “Blank and recent” option is selected.
If it’s not, click it to select it.
In the New Presentation window, double-click Blank Presentation (Figure 17-5). Or you can click Blank Presentation and then click Create.
Either way, a new blank presentation named Presentation2 (or Presentation3, or Presentation4 depending on how many new presentations you’ve created since you launched the program) appears in your PowerPoint workspace.

Tip
To create a new blank presentation without going through the New Presentation window, press Ctrl+N.
To find out how to add content and design elements to your newly created presentation, zip down to Adding Text. Saving and Closing a Presentation shows you how to save your new presentation.
PowerPoint lets you get a jump on your new presentation by starting with an existing template, theme, or presentation and then filling in your content. You can choose from the many templates and themes that come with PowerPoint, or you can go online and search for a specific template or theme that matches your needs. You can also reuse any of the templates, themes, or presentations that you (or your co-workers) have previously created. The following sections describe each of your options.
A template is a generic presentation designed (by Microsoft, by a third-party vendor, by you, or by whoever created the template) to be used again and again. Templates help you crank out presentations quickly, because all the design work has been done for you. All you have to do is add your content: the text, charts, graphics, and other elements that convey your particular message.
Templates vary widely, but all contain predefined themes (color schemes, background images, title and bullet point layouts, and text fonts). Some templates contain additional format and design elements and even some generic or placeholder content. Some templates are businesslike, with sober colors and artwork; some are whimsical, with wacky fonts and brightly colored balloons all over the place. The template motifs you can find are nearly endless, which makes it relatively easy to choose a template that fits the mood and structure you want to create for your presentation.
PowerPoint gives you four different options for creating a new presentation using an existing template: Recently used templates, Installed Templates, “My templates” (templates you’ve saved yourself), and Microsoft Office Online. The option you choose depends on where you want PowerPoint to hunt for the template, as described in the following sections.
Recently used templates. PowerPoint keeps track of the templates you apply to your presentations and displays the last few in a list. So if you tend to use the same two or three templates to create all your presentations, chances are you’ll find this option the easiest.
Here’s how to create a new presentation using a template you recently applied to another presentation:
Select Office button → New.
The New Presentation window appears.
In the left side of the New Presentation window, make sure the “Blank and recent” option is selected. (If it’s not, click to select it.)
In the middle of the New Presentation window, scroll through the template thumbnails.
Tip
Mousing over a template briefly displays the location of the template (for example, C:Program FilesMicrosoft OfficeTemplatesQuizShow.potx for a built-in template stored on your computer, or Office Website for a template located on Microsoft’s Web server). You might find this information useful if, for example, you’re hunting for a template you remember finding online.
Click to select the template you want to base your new presentation on.
In the right side of the New Presentation window, a preview appears (see Figure 17-6). Depending on whether the selected template is stored on your computer or on Microsoft’s Web server, PowerPoint displays a Create or Download button, respectively, at the bottom of the New Presentation window.
Click Create (or Download).
The New Presentation window disappears. (If you clicked Download, then a Downloading Template message flashes briefly on the screen.) PowerPoint then loads the selected template into a new presentation it names Presentation1 (or Presentation2, or Presentation3, depending on how many presentations you’ve created since you launched PowerPoint).

Figure 17-6. To see a larger version of a tiny template thumbnail—as well as to display any available identifying information, such as the template’s file size and popularity rating—simply click to select the template.
Installed templates. When you installed PowerPoint, you automatically installed a handful of professionally designed templates, including templates that let you set up photo albums (Classic Photo Album and Contemporary Photo Album), corporate-style slideshows (Corporate Presentation), layouts for print publications (Pitchbook), animated question-and-answer tutorials (Quiz Show), and big-screen slideshows (Wide Screen Presentation 16 x 9).
To use one of these built-in templates to create a new presentation, follow these steps:
Select Office button —New.
The New Presentation window appears.
In the left side of the New Presentation window, click Installed Templates.
Several template thumbnails appear in the middle of the New Presentation window.
Click a template to select it.
A larger version of the template appears in the preview area (the right side) of the New Presentation window.
Click Create.
The New Presentation window disappears, and you see a new presentation file based on the template you selected. Figure 17-7 shows you an example.
Tip
Instead of clicking a template and then clicking Create, you can save a step by simply double-clicking the template.

Figure 17-7. Templates are nothing more than presentations for which someone (the template author) has defined Slide and Title masters. Masters, which you’ll learn all about in Chapter 21, define the way your slides look overall (like this crisp, clean background) as well as the way your text looks (the color and font). Templates also typically include helpful slide layouts and content, like the attractive section headings and replaceable text shown here.
My templates. Each time you create your own template or download a template from Microsoft’s Web site (below), PowerPoint automatically stores the template in a special directory on your computer similar to this one: C:Documents and Settings[Your Name]Application DateMicrosoftTemplates.
To use one of these templates to create a new presentation, follow these steps:
Select Office button → New.
The New Presentation window appears.
On the left side of the New Presentation window, click “My templates.”
The New Presentation window vanishes, and the New Presentation dialog box shown in Figure 17-8 appears.
In the New Presentation dialog box, select the template you want to use and click OK.
The New Presentation dialog box disappears, and PowerPoint displays a new presentation file based on the template you selected.
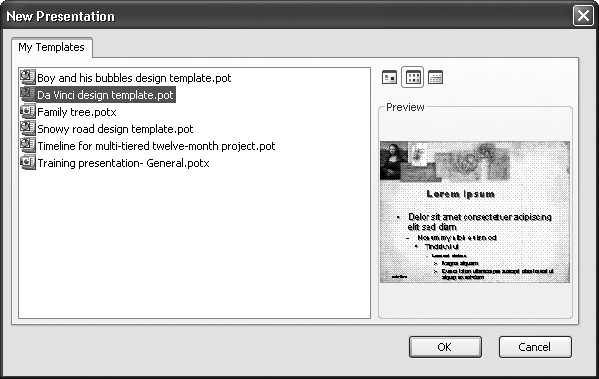
Figure 17-8. PowerPoint stores the templates you create—or that you download from Microsoft’s Office Online Web site—in a special folder so that you won’t confuse them with PowerPoint’s built-in templates. To change how the template icons appear, choose from Large Icons (which makes the template names easier to read), List (shown here), and Details (which displays the date the template was created).
Online. Although lots of Web sites offer PowerPoint templates for download, you should check Microsoft’s Office Online Web site first for a couple of reasons. One, Microsoft’s templates are free; and two, checking Microsoft’s site is one-click easy, as described next.
Tip
Because Microsoft lets its customers upload templates willy-nilly, the quantity and quality of the templates you find on its site can vary widely. Figure 17-9 shows how to weed out customer-submitted templates, leaving only those designed by official Microsofties.
Select Office button → New.
The New Presentation window appears.
On the left side of the New Presentation window, under Microsoft Office Online, choose the type of template you’re looking for, such as Brochures or Content Slides.
Template thumbnails appear in the center of the New Presentation window (Figure 17-9).
Click a template thumbnail to select it; then click Download.
A validation message box appears, letting you know that Microsoft is gearing up to check your copy of PowerPoint to make sure it’s not bootlegged. (If Microsoft doesn’t find a legitimately purchased copy of PowerPoint on your computer, then you won’t be able to download templates.)
In the validation message box, click Continue.
Microsoft checks out your copy of PowerPoint. If it passes muster, a Downloading Template message appears briefly, after which PowerPoint displays a new presentation file based on the template you selected.
The rest of this chapter shows you how to add text and change the look of your newly created presentation.

Figure 17-9. For finer control over the templates you see, select Rating Sort (which displays the most popular templates first, as determined by other PowerPoint fans), Name Sort (which displays named templates in alphabetical order), Show Customer Submitted (which displays all templates, including the ones other PowerPoint folks have uploaded), or Hide Customer Submitted (which shows only those templates created by Microsoft).
If you know which theme you want to apply to the new presentation you’re creating, then you can save a click or two by applying it when you create the presentation file. (The alternative is to create the presentation file and then apply the theme, as described on Choosing a Theme for Your Presentation.)
To create a new presentation based on one of the themes that comes with PowerPoint:
Select Office button → New.
The New Presentation window appears.
On the left side of the New Presentation window, click Installed Themes.
Several theme thumbnails appear in the middle of the New Presentation window.
Click a theme to select it.
A larger version of the theme appears in the preview area (the right side) of the New Presentation window.
Click Create.
The New Presentation window disappears and you see a new presentation based on the theme you selected. Figure 17-10 shows you an example.
Tip
Instead of clicking a theme and then clicking Create, you can save a step by simply double-clicking the theme.
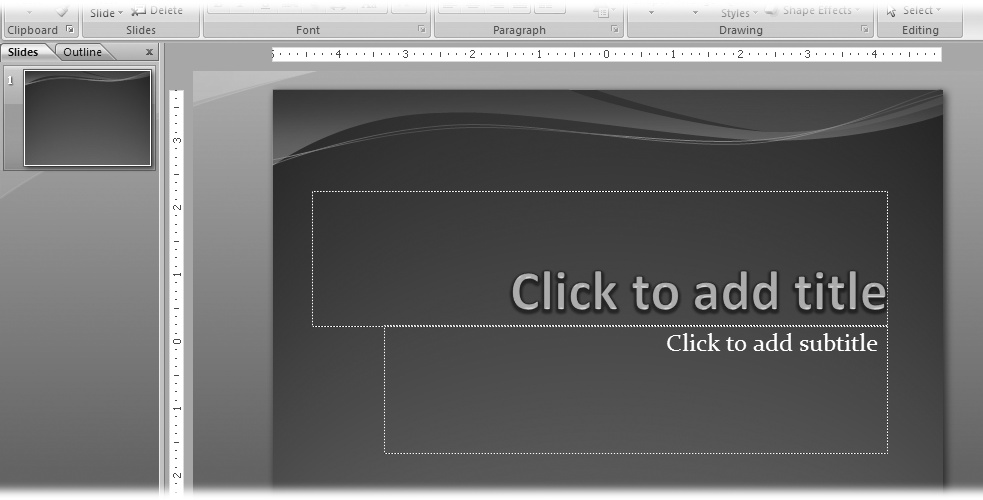
Figure 17-10. Unlike applying a template to a newly created presentation, applying a theme doesn’t start you out with custom slide layouts or content. Instead—as you can see by the single slide shown here—themes give you coordinated color, font, and background effects. PowerPoint automatically applies these effects to each new slide you create.
If you’ve already got a presentation on your computer—created in any version of PowerPoint—then you can load that presentation into PowerPoint 2007 and use it as the basis of a new presentation.
You’ve got two options for loading an existing presentation: the New From Existing Presentation window, which is a good choice if you’ve never used PowerPoint before; and the Open window, which is handy if you’re familiar with PowerPoint.
Note
A third, quickie alternative exists for creating a new presentation from an existing one—but this alternative works only if you’ve recently edited the existing presentation. To try it out, click the Office button and then, from the list of Recent Documents that appears, choose an existing document. After PowerPoint opens the document, immediately save it (Office button → Save As) with a different name.
If you’re new to PowerPoint, then you’ll appreciate the New from Existing Presentation window, which simplifies the process of opening an existing presentation. And unlike using the Open window, using the New from Existing Presentation window automatically generates a new file name, so you don’t have to worry about accidentally overwriting your original presentation.
To create a presentation using the New from Existing Presentation window:
Select Office button → New.
The New Presentation window appears.
Click “New from existing.”
The New from Existing Presentation window appears.
Select the file you want to open, as described in Figure 17-11, and then click Create New.
The New from Existing Presentation window disappears, and the presentation you selected appears in your PowerPoint workspace. PowerPoint gives the presentation a new, generic name (PowerPoint2, PowerPoint3, and so on) to remind you to rename the file before you save it. (Custom AutoFill lists shows you how to rename files.)
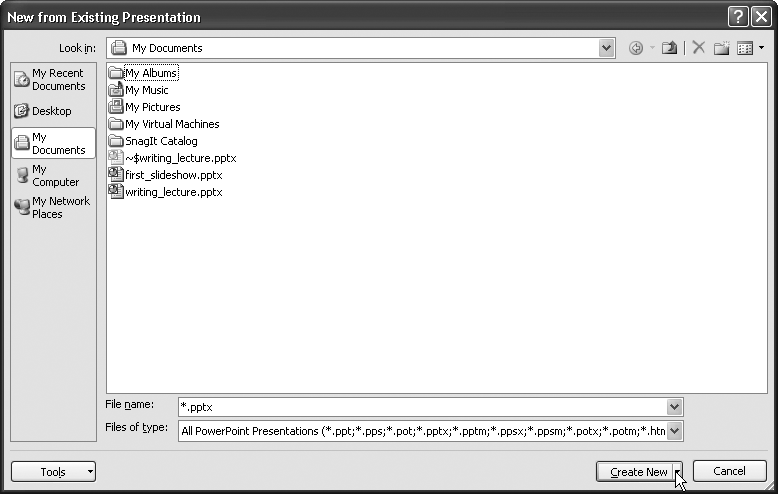
Figure 17-11. To browse your computer for an existing PowerPoint file, either click the folder icons you see on the left side of the window, or click the “Look in” drop-down menu. When you see the PowerPoint file you’re looking for, click it to select it. Them click Create New to load it into PowerPoint under a new name.
The Open window gives you more options for opening an existing presentation than the New from Existing window does. You’ll find these options useful in certain situations, such as when you want to protect an existing presentation by opening it in read-only mode, read through all the slides to make sure it’s the one you want, and then save a copy.
To open an existing presentation using the Open window:
Choose Office button → Open (or press Ctrl+O).
The Open window shown in Figure 17-12 appears.
Select the file you want to open, either by clicking the folder icons you see on the left side of the window, or by clicking the “Look in” drop-down menu. When the PowerPoint file you’re looking for appears in the list, click it to select it.
Tip
To see a preview of each file on the right side of the Open window as you select it, click the Open window’s Views icon (Figure 17-12) and select Preview.
Choose one of the following options:
Open. Opens the selected file.
Open → Open Read-Only. Opens a protected version of the file that lets you make changes to the presentation, but doesn’t let you save them unless you specify a new filename.
Open → Open as Copy. Opens the presentation file, but renames it Copy(1)filename.pptx.
Open → Open in Browser. Opens the selected HTML file in Internet Explorer (or your default browser).
Open → Open and Repair. Tells PowerPoint to fix a corrupted file before it tries to open it.

The file you selected appears in your PowerPoint workspace.
No matter which approach you use to create a presentation—from scratch, from an existing presentation, from a template, or from a built-in theme—once you have a presentation, you can change how it looks in one fell swoop by changing its theme.
A theme is a collection of characteristics including colors, fonts, and graphic effects (such as whether the shapes you add to your slides have drop shadows). For example, applying the built-in Deluxe theme turns your background a tasteful shade of blue and displays your title text (which appears in the Corbel font) in an attractively contrasting, gently shadowed shade of yellow—all thanks to the theme. You can change all of these characteristics individually, of course, as you’ll see in Chapter 20. But applying themes gives you more bang for your buck in several important ways:
Using themes is quicker than changing individual settings one at a time. Applying a theme is a two-click proposition. Changing the dozen-plus settings controlled by a theme would exercise your click finger a lot more than that. And themes save you time you’d otherwise spend figuring out which colors look good together.
Using themes helps ensure a decent-looking, readable slide. Consistency is an important design principle: it sets the tone for your presentation and lets your audience focus on your message. When you change settings manually, you can end up with a distracting mishmash of colors and fonts on a single slide or across slides. Not so with themes. Once you apply a theme, the theme takes control of your settings. If you change the background color of your slides, then the theme automatically changes the title and subtitle fonts to compatible colors—colors that aren’t just readable against your new background, but attractive, too.
Using themes lets you create a consistent look and feel across Microsoft Office-produced materials. You can use the same themes you use in PowerPoint in Word and Excel, too. When you apply the same theme to your Word documents, Excel spreadsheets, and PowerPoint slides, you end up with a consistently presented, harmonious whole.
Here’s how to apply a theme to a PowerPoint presentation:
Click the Design tab.
The design tools appear, complete with a Theme gallery (Figure 17-13). (For more on PowerPoint 2007’s new ribbon, check out The Ribbon.)
Click the More icon at the bottom-right corner of the Themes section (Figure 17-13).
Additional themes appear in the gallery, as shown in Figure 17-14.
Mouse over the themes in the gallery one by one.
PowerPoint previews each theme as you mouse over it (Figure 17-15) so you can get an idea of how each will look applied to your presentation’s content and layout.
Figure 17-15. No more clicking Preview or Apply and waiting around: simply mousing over a theme temporarily applies it to your presentation. To apply the theme for good, click the theme to select it. If you change your mind, you can revert back to your presentation’s original theme by applying the Office Theme theme.
Click a theme to select it.
PowerPoint applies the selected theme to all of the existing slides in your presentation, as well as all the new slides you create.
Tip
PowerPoint lets you apply a theme to only selected slides. Applying more than one theme to a slideshow is useful when you’re creating a distinct before-and-after presentation or other multi-section slideshow and want each section to look distinct. For details, check out Chapter 20.


You’ll want to add at least some text to most, if not all, PowerPoint presentations you create. (See the box on Adding a New Text Box for advice on how much prose to add to your presentation.) Knowing that, the PowerPoint designers made it easy for you to add text to your slides. The following sections show you how.
When you start to work with a new presentation, the ribbon displays the Home tab (Figure 17-16).
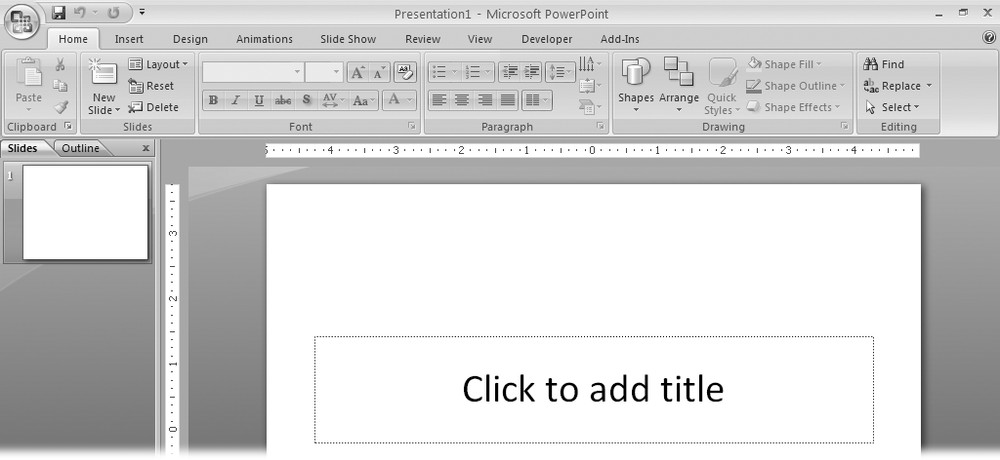
Figure 17-16. Until you click a text box, most of the options appear grayed out, meaning you can’t use them. See Figure 17-17 for a glimpse of the subtitle box.
Blank presentations come complete with title and subtitle placeholder text boxes. To replace the placeholder text in either of these two text boxes with your own text, simply click inside the placeholder and begin typing. When you do, two things happen:
PowerPoint displays the Drawing Tools | Format tab and, on the Home ribbon, activates many of the text formatting options (Figure 17-17). You can use these options to change the font, size, and color of your text, turn your text into a right-justified paragraph or a bullet point, and much more. (Chapter 19 describes your options in detail.)
Resize and transform handles appear at the corners and edges of the text box (Figure 17-17). Tiny white resize handles, which are square on the edges of the text box and circular on the corners, let you stretch or shrink your text box by dragging them. The circular green transform handle appears above the top of your text box and lets you tilt it. Drag the handles to tilt or resize your text box.
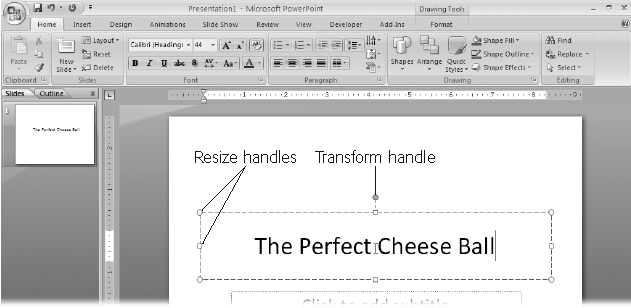
Figure 17-17. As soon as you click a text box, PowerPoint activates the text formatting and drawing tools and reveals the Drawing Tools | Format tab. Now, in addition to typing your text, you can format it, change its color, or add an effect (such as a glow or bevel). Drag any of the eight white resize handles to resize your text box; drag the circular green transform handle to rotate the text box. Chapter 19 covers text manipulation in more detail.
You’re not limited to the placeholder text boxes PowerPoint starts you off with: you can add as many additional text boxes to your slides as you like.
To add a new text box to a slide:
Click the Insert tab.
The Insert tab (Figure 17-18) appears.
On the Insert tab, click Text Box.
In the status bar at the bottom of the screen, PowerPoint displays a helpful hint (“Click and drag to insert a text box”). When you mouse over your slide, you notice that your cursor looks like a tiny down arrow.
On the slide, click where you want your new text box to appear.
A text box appears with the cursor handily positioned inside (Figure 17-19). The Drawing Tools | Format tab pops up, and on the Home tab, PowerPoint activates most of the formatting options, ready for you to format your text.
Figure 17-19. Choosing one or more formatting options (such as Bold, Italics, or Font) before you begin typing tells PowerPoint to apply those options to your text automatically as you type. (You’ll find more on formatting in Chapter 19.)
Type your text.
The text box expands automatically to accommodate your text.


When you create a new blank presentation, PowerPoint spots you one slide. But in most cases, you’ll want your presentation to contain a lot more slides than that. Fortunately, adding a new slide is easy, as you’ll see in the following sections.
PowerPoint gives you two options: adding a slide with layout identical to the current slide, and specifying a different slide layout. A slide layout is a description of what content appears where on a slide. For example, applying a Title Slide layout to a slide positions title and subtitle text placeholders near the middle of your slide, and nothing else. Applying a Title and Content layout positions a title text placeholder near the top of a slide, and an object placeholder beneath that.
To add a slide with a layout identical to the current slide:
Select any non-title slide.
PowerPoint doesn’t automatically duplicate title slides for a pretty obvious reason: 99 percent of the time, you don’t want two title slides in a single presentation. For the one percent of the time when that’s exactly what you want, add a slide, and then change the slide’s layout to Title Slide as shown on Applying a Layout.
Click the Home tab.
The ribbon you see in Figure 17-20 appears.
Figure 17-20. Clicking the New Slide button is the quickest way to add a slide to your presentation. You can always change the layout, of course, but when you want to add a different kind of slide—say, one with a subtitle or columns—you can save yourself some time by choosing a new slide layout right off the bat, as shown below.
PowerPoint inserts a new slide after the current slide. If that’s not what you want (for example, if you want to add a slide to the beginning of your presentation), then you can easily change the order of your slides. Moving Slides shows you how.

Tip
PowerPoint gives you another way to add a new slide with a layout similar to the current slide. In the Slides pane (at the left side of your workspace, as shown in Figure 17-19), you can right-click the page after which you want to create a new slide. Then, from the menu that appears, select Duplicate.
To add a slide with a different layout:
On the Home tab, click the down-arrow next to New Slide.
A menu similar to the one you see in Figure 17-21 appears.
Click to select the slide layout you want. Your choices include Title Slide, Title and Content, Section Header, Two Content, Comparison, Title Only, Blank, Content with Caption, and Picture with Caption.
PowerPoint adds your new slide after the current slide.

Moving around your presentation when you only have one slide isn’t much of an issue. But once you start adding slides, you’ll want a way to hop quickly from your first slide to your last. You’ll also want to jump to specific slides in the middle of your presentation; for example, to tweak a particular slide’s layout, to add content, or to delete it.
PowerPoint gives you several ways to flip through your presentation. This section acquaints you with the easiest and most useful options: using your workspace scroll bar, using the View pane on the left side of the screen, and using the Home tab’s Find function.
In PowerPoint, you see a scroll bar on the right side of your workspace similar to the one in Figure 17-22.
To scroll through your presentation, all you need to do is click the scroll bar and drag up (to scroll toward the beginning of your presentation) or down (to scroll toward the end). As you go, PowerPoint displays each slide in turn.
Tip
To flip forward (or back) through your presentation one slide at a time, click the Next Slide (or Previous Slide) arrow shown in Figure 17-22.

Figure 17-22. If you’ve got more than one slide, the vertical scroll bars always appear in PowerPoint, no matter which tab you select or which tab appears at the top of your workspace. Scrolling tells PowerPoint to display slides not just in the main workspace, but also to display thumbnail versions in the Slides pane.
Slides and Outline tabs are not views (they both appear in Normal view) but are tabs that let you see slide thumbnails or an outline of your slideshow, respectively, in the Slides (Figure 17-23) or Outline (Figure 17-24) pane.

Figure 17-23. Here, the Slides tab is selected. You’re viewing the contents of the first (selected) slide.
PowerPoint assumes you want to use Slides view until you tell it otherwise. To change views, click the Outline tab shown in Figure 17-24. To switch back to Slides view, click the Slides tab.

Figure 17-24. Here’s the same presentation in outline form. To banish the View pane altogether, click the X in the upper-right corner. To resize it, simply drag the resize handle on the right side of the pane. (In keeping with its new-and-improved design philosophy, PowerPoint doesn’t let you make the View pane larger than one-quarter of the total interface.)
Note
If you don’t see the View pane at all, select View → Normal (or click the Normal icon shown in Figure 17-23) to display it.
When you’ve got a lot of slides and you’re looking for one containing a specific word or phrase, you’ll want to bypass Views in favor of the Find function. Similar to the Find feature in other Windows programs, PowerPoint’s Find function lets you search for specific words quickly and easily. Here’s how to use it.
Press Ctrl+F.
The Find dialog box appears (Figure 17-25).
Figure 17-25. Another way to display this Find box is to head to the Editing section of the Home tab and then click the Find button. Chapter 18 shows you how to use the more advanced Find functions, including Replace, which lets you automatically replace the text you find with different text.
In the “Find what” box, type in the text you want to find (in Figure 17-25, the text is marshmallow).
If you like, you can click to turn on the “Match case” checkbox (which tells PowerPoint to look for marshmallow but not Marshmallow, MARSHMALLOW, or MaRsHmAlLoW) or the “Find whole words only” checkbox (which tells PowerPoint to look for marshmallow but not chocolatemarshmallowgraham). When you finish, click Find Next.
PowerPoint displays the slide containing your text. If it doesn’t find a match, it shows this message: “PowerPoint has finished searching the presentation. The search item wasn’t found.”

Speaker notes are optional text notes you can type into PowerPoint. You can associate a separate speaker note with each slide of your presentation. Your audience can’t see speaker notes, but you can. You may find speaker notes useful:
While you’re putting your presentation together. If you know you need to add a graphic to slide six and a couple of bullet points to slide 33, then you can jot down reminders to yourself in the Speaker Notes pane (Figure 17-26). Then, before you put your presentation to bed, you can view your speaker notes and double-check that you’ve caught everything.
While you’re delivering your presentation. You can set up your presentation so that your audience sees your slideshow on the screen while you see your notes (on your own computer monitor). Or, if you’re the tactile type, you may prefer to print out your speaker notes and keep them with your during your presentation.
To add speaker notes for a particular slide, click in the Speaker Notes pane (Figure 17-26) and type away.

Figure 17-26. Speaker notes are specific to individual slides, so when you select a new slide, PowerPoint displays a fresh, clean Speaker Notes pane. You can make the pane bigger by dragging the resize handle.
Note
If you don’t see the Speaker Notes pane, then click the Speaker Notes pane’s resize bar at the bottom of the workspace and drag upward, as shown in Figure 17-27.
Figure 17-27. Depending on the view you choose, the Speaker Notes pane doesn’t always appear automatically—and it’s not obvious that you can drag the resize bar at the bottom of the workspace to display it. Fortunately, you can. The farther you drag, the larger the notes display (and the smaller the slide display).
You don’t have to do anything special to create handouts in PowerPoint. That’s because handouts in PowerPoint are nothing more than slides printed one or more to a page.
To print handouts:
Select Office button → Print → Print Preview.
The Print Preview tab appears, and PowerPoint’s best guess at how you want your handouts printed appears in the workspace.
Click the “Print what” drop-down box and then, from the menu that appears, choose how you want PowerPoint to print your handouts (Figure 17-28).
PowerPoint redisplays the handouts preview based on your selection.
Click Print.
The familiar Print dialog box appears.
Note
Chapter 24, which shows you how to print your presentation, walks you through the Print dialog box step by step.
Click OK.
PowerPoint prints your handouts.
Click Close Print Preview (Figure 17-28) to dismiss the Print Preview tab and return to your workspace.

Lightning storms hit, coffee cups spill, and power cords work themselves out of walls (especially if you have a dog who likes to chase squeaky toys). After you’ve created a new presentation file and spent some time working on it, you’ll want to save it every so often so that when your system crashes, you can recover your work. And if you’re like most folks, you’ll also want to save and close your presentation each time you wrap up a work session.
Saving and closing a PowerPoint presentation are both straightforward tasks. If you’re familiar with any other Windows programs, then you’ll recognize most of the steps.
To save a newly created presentation:
Select Office button → Save.
The Save As dialog box appears (Figure 17-29).
Click the “Save in” drop-down box to choose a directory to store your file in. In the File name field, type a new name for your file.
Shoot for short, unique, and memorable; you don’t want to have to spend a lot of time hunting for your file a week from now.
Click the “Save as Type” drop-down box to select a file format. Most of the time, you’ll choose the .pptx format.
The box below explains your options. For example, to save your presentation as a template that you can use over and over, choose .potx.
Click Save.
The Save As dialog box disappears and PowerPoint saves the file in the format you specified.

To close a presentation, simply select Office → Close. When you do, PowerPoint closes your presentation with no fanfare. If you’ve never saved this particular file, however, a dialog box pops up asking you if you want to save the changes you made. Click Yes to display the Save As dialog box shown in Figure 17-29 and proceed as described above.
Chapter 23 shows you everything you need to know about setting up and running special types of presentations: for example, recording narration, hiding certain slides, and creating stand-alone presentations that run on kiosks. But for running through a basic presentation on your very own computer, the process is simple:
Press F5 or click the Slideshow icon you see at the bottom of the screen, as shown in Figure 17-30.
PowerPoint replaces your workspace with a full-screen version of your slideshow, beginning with the currently selected slide.
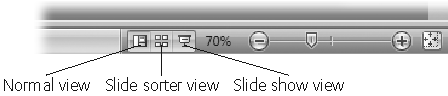
Figure 17-30. Clicking the Slideshow icon at the bottom of your workspace is one of the easiest ways to run your presentation.
Tip
Pressing Shift+F5 and clicking the Slideshow icon both tell PowerPoint to run your slideshow beginning at the current slide (not necessarily the first slide). To run your slideshow from the beginning, you have three choices: press F5, click the Slideshow icon, or select Slide Show → Start Slide Show → From Beginning.
Click the forward and backward arrows that appear at the bottom of the screen (Figure 17-31) to step through your presentation. (Figure 17-31 describes how to end the presentation before the last slide.)
After the last slide, PowerPoint displays a black screen containing the words “End of slide show, click to exit.”
Figure 17-31. PowerPoint displays ghosted controls (Back, Ink, Slide, and Next) when you run a presentation. Mousing over these controls highlights them so you can see where to click. To end your slideshow immediately without having to flip through every last slide, you have two choices: either hit Esc or click the Slide icon and then, from the menu that appears, choose End Show.
Click anywhere on the screen (or press the Space bar or Enter).