Most of the time, you’ll deliver your PowerPoint presentations electronically, on a computer or digital projector. So with all these high-tech bits-and-bytes options, why on earth would you print your slides?
Here are three cool things you can do with printed slides:
Create a foolproof, fail-safe backup. Printouts may not look as glamorous as full-color, widescreen slideshows, but they’re invaluable when you have a technology meltdown. So when you reach your client’s office with three minutes to spare and discover that your preschooler poured maple syrup into your laptop when you weren’t looking, you at least have hard copies to work from.
Run off quick-and-dirty handouts. For really useful audience handouts, you’ll probably want to create separate supporting materials, as described on Handouts (Multiple Slides per Page). But to give your boss a quick outline of your presentation, printouts are the way to go.
Deliver your presentation in low-tech but effective ways like overhead transparencies. You can’t always control your presentation environment. For example, if you’re in a location where an old overhead projector is all that’s available, you can turn your presentation into overheads.
In addition to printing your slides, for some presentations you may want to print related materials like speaker notes for moral support behind the podium; a presentation outline, for double-checking that you’ve included all your important points; and even tent cards, for making your audience feel welcome. Another reason you might want to print a slide is because you’ve created a layout meant to be printed, such as an award certificate or a calendar. (See Editing Slide and Layout Masters for the scoop on using Microsoft’s own slide designs to create these and more printable layouts.)
The most straightforward to way to print your presentation is to print each individual slide on a separate piece of paper. You can keep paper printouts in a file, bring them with you to the presentation as a failsafe, or use them to practice your spiel or proof your slides (some errors are easier to spot in plain black and white).
When you commit your slides to paper, you have a few extra decisions to make. For example, onscreen slides don’t usually have a footer with a page number and date, but that kind of information is mighty handy on a hard copy. You can also choose exactly which slides to print, whether to print in black and white or color, and more. The following tutorial walks you through all your options.
Tip
A super-fast way to print one slide per page is to select Office button → Print → Quick Print. But because choosing this option tells PowerPoint to begin printing immediately—without giving you a chance to inspect or change your print settings—you probably don’t want to use it unless you’ve printed your presentation at least once following the steps in this section.
To print your slides:
Choose Office button → Print → Print Preview.
The Print Preview tab (Figure 24-1) appears, along with a preview of your first slide. As you mouse over the preview, your cursor turns into a magnifying glass bearing either a plus sign (+), which tells PowerPoint to zoom in when you click, or a minus sign (−), which tells PowerPoint to zoom out when you click.
Figure 24-1. Out of the box, PowerPoint assumes you want to print your presentation one slide per page, so that’s what you get if you click the printer icon. But because printing a presentation is a time-consuming proposition, you’ll want to set a few options before you actually tell PowerPoint to start printing.
Make sure the word Slides appears in the Print What box.
If it doesn’t, click the drop-down arrow next to Print What and, from the list of options that appears, choose Slides.
Click Options → Header and Footer.
The Header and Footer dialog box (Figure 24-2) appears.
Figure 24-2. As you turn on the checkboxes next to Date and Time, Slide Number, or Footer, PowerPoint adjusts the thumbnail in the Preview section to let you know where it intends to put each footer element: left, center, or right. Here, the checkboxes next to all three elements are turned on, so all three footer elements in the Preview area appear black. Turning off an element grays out its position in the Preview.
Check to make sure the Slide tab is selected; if it isn’t, click to select it.
This tab lets you set a host of printing options:
If you want to add a date, timestamp, or both to your footer, then turn on the checkbox next to Date and Time. Then choose either Update automatically (to tell PowerPoint to adjust the date or time so that it always matches today’s, in which case you need to choose a date-and-time format from the drop-down list shown in Figure 24-2) or Fixed (in which case you need to type the fixed text you want PowerPoint to add to your footer).
If you want to add a consecutively numbered page number (beginning with 1) to the footer that appears on each page of your printout, then turn on the checkbox next to Slide number.
Tip
If you want to number your slides starting not from 1 but from, say, 21 (perhaps you’re responsible for the second half of a 40-page presentation), click Close Print Preview to return to your presentation, and then choose Design → Page Setup → Page Setup. When the Page Setup dialog box opens, enter 21 in the “Number slides from” box.
If you want to add text to your footer, turn on the Footer checkbox and then, in the text box, type in the text you want to appear at the bottom of each page of your printout.
If you don’t want your footer to appear on the first page of your presentation (most folks don’t, because the first page usually contains the title of their presentation and nothing more), then turn on the checkbox next to “Don’t show on title slide.”
After you’ve chosen your settings, click Apply to All to tell PowerPoint to add your footer to each page of your document.
Tip
You can reformat your header and footer text by changing the font of the page number, say, or the color of the date. To do so, you need to edit your presentation’s Slide master, which you learn all about in Chapter 21.
To choose whether to print in color, grayscale (like the illustrations in this book), or plain black and white, click Options → Color/Grayscale.
From the list that appears, choose one of the following: Color, Grayscale, or Pure Black and White. As you click, you can see each option in the Preview pane. Choose Color when you need color printouts to show in public (this option uses a lot of ink). Choose Grayscale if you don’t have a color printer, but want your printed slides to look as much as possible like they do in PowerPoint. Choose Pure Black and White only if your presentation doesn’t contain a lot of graphics and you want to print it out as quickly as possible. (See the box on Printing Slides (One Slide per Page) for more on the differences between Grayscale and Pure Black and White.)
Choose one or more of the following options, which determine how the slide appears on the page:
Options → Scale to Fit Paper. Tells PowerPoint to stretch the content of your slide, leaving the tiniest of margins on all sides.
Options → Frame Slides. Tells PowerPoint to draw a thin black line around the content of each slide.
Options → Print Hidden Slides. Tells PowerPoint to print any slides you’ve previously earmarked as hidden (Hiding Individual Slides). PowerPoint doesn’t activate this option if your slideshow doesn’t contain any hidden slides.
Click Next Page and Previous Page to scroll through the preview of your presentation and make sure everything looks good.
Alternatively, you can use the scroll bars that appear in the Preview area to scroll through each slide. You want to make sure your slideshow looks good— right down to the headers, footers, and margins—before you’ve spent half an hour (and half an ink cartridge) printing it.
If you spot a problem, then click Close Print Preview.
The Print Preview tab disappears, and you return to the main ribbon. Make any changes you want, and then choose Office button → Print → Print Preview. Repeat steps 2 through 8 until you’re satisfied with how your presentation looks in preview mode.
When you’re ready to print, click the Print icon.
The Print dialog box you see in Figure 24-3 appears.
Figure 24-3. Most of the options you see here are options you’ve already set in the Print Preview ribbon. (When you set them in the Print Preview ribbon, PowerPoint carries them over to this dialog box.) Two options that you do want to set (or double-check) here: which pages you want to print, and how many copies you want to print.
Tell PowerPoint which pages you want to print by choosing one of the following options:
All. Prints every page of your presentation. PowerPoint assumes you want this option, unless you tell it differently.
Current slide. Prints only the currently selected slide.
Selection. Prints a range of selected slides. PowerPoint doesn’t activate this option until you select multiple slides in the Slides pane (see Slides Pane).
Custom show. Prints a named subset of your slideshow called a custom show. To see how to create a custom show, flip back to Slideshows for Multiple Audiences.
Slides. Lets you specify a print range, which may be contiguous (1–12) or noncontiguous (1, 2, 5, 6).
Tell PowerPoint how many copies of your presentation you want to print in the “Number of copies” box.
If you want just one copy, then you can skip this step: PowerPoint assumes you want to print one copy unless you tell it differently.
Click OK to print your presentation.
The Print dialog box disappears, and PowerPoint sends your presentation to the printer. At the bottom of the PowerPoint interface you see the print status (Figure 24-4). If you notice that your presentation isn’t printing the way you want, click the X icon to cancel printing.


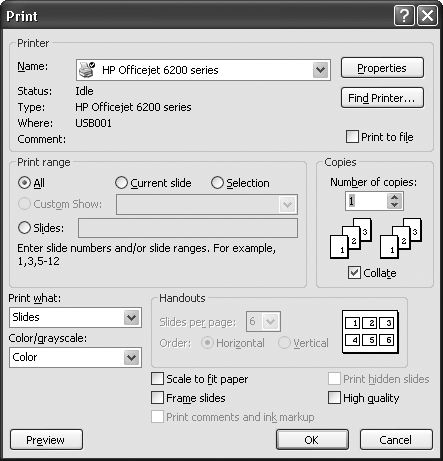

Figure 24-4. After you click Print, a status bar appears to let you know PowerPoint’s busy gearing up to print—which is a really a good thing, because printing a PowerPoint presentation of any length typically takes so long that, without feedback from the status bar, you might wonder if something was wrong.
In PowerPoint-ese, a handout is a printout designed to accompany your presentation. There are two major differences between printing handouts and printing slides: You can only print slides one per page, but you can print handouts anywhere from one to nine slides per page. Also, when you print handouts (even one slide per page), PowerPoint automatically adds a basic header and footer and leaves good-sized margins for note taking.
Theoretically, your audience can jot down notes on their handouts during your presentation and be left with useful information they can refer to days or weeks afterward. The problem with this theory is that most slides make terrible handouts—for two reasons:
Good slides are brief; good handouts aren’t. To be effective, the text on your slides needs to be brief, concise, and compelling. For example, short sentences that either ask questions or make controversial statements (which you, of course, answer or explain during your presentation). The same text on a handout, on the other hand, is only going to confuse the audience a week later.
Good slides are colorful; good handouts aren’t Light-colored text on a nice dark background with a couple of tasteful graphics thrown in for good measure looks great onscreen. The same slide printed in black and white isn’t going to look good at all—in fact, the background won’t even print. And it goes without saying that any animated effects, sound clips, and interactive links that you’ve added to your slides aren’t going to translate to printed form.
The best handouts provide detailed, lengthy, or dense background information that supports your slides—testimonials, reports, charts, graphics, and so on. Thus, creating really useful handouts is a lot harder than simply selecting a print option and then clicking Print. You have to double your efforts by creating handout material from scratch, most likely in another program like Microsoft Word. PowerPoint lets you jump-start this process by selecting Office button → Publish → Create Handouts in Microsoft Office Word. Whether the results are worth the extra effort, only you—the presenter—can say.
On the other hand, when you’re in a hurry, PowerPoint’s quick-and-dirty version of handouts may be better than none at all.
Tip
One use for PowerPoint handouts that’s often overlooked is as a practice aid. With multiple-slides-to-a-page handouts in front of you, you can easily practice your presentation on an airplane, on a bus, or even in a staff meeting—no laptop necessary.
To print handouts:
Choose Office button → Print → Print Preview.
The Print Preview ribbon appears.
In the “Print what” box, choose one of the following: Handouts (1 slide per page), Handouts (2 slides per page), and so on, all the way up to Handouts (9 slides per page).
A preview of your handout’s configuration appears in the Preview area. Figure 24-5 shows an example.
You can switch the orientation of your handout pages from Landscape to Portrait (or vice versa) by heading to the Print Preview tab and clicking Options → Portrait or Options → Landscape.
If you’ve chosen to print six slides per page or more, then you can tell PowerPoint whether you want it to arrange the slides in horizontal rows or vertical columns. To do so, click Options → Printing Order and then choose either Horizontal or Vertical.
You can change any of several other print settings explained beginning on Printing Slides (One Slide per Page). When you’re ready to print, click the Print icon.
The Print dialog box appears.
Tell PowerPoint how many copies of your handout you want to print, and then click OK.
The Print dialog box disappears, and PowerPoint sends your presentation to the printer.

Figure 24-5. The good thing about choosing to print three pages per slide is that PowerPoint gives you lines for note taking. (You get extra room on the page with other options, but no lines.) Notice that PowerPoint assumes you want your handouts to include page numbers. You can delete the page numbers by selecting Options → Header and Footer, clicking the Slide tab, and turning off the radio button next to Slide number.
Overhead transparencies, also known as foils or just plain overheads, are see-through sheets of plastic you slap onto an overhead projector. In the old, pre-PowerPoint days, overheads (and chalkboards) were the only means folks had to deliver presentations. But even today, with PowerPoint 2007 at your disposal, you may have occasion to print your presentation onto overheads.
For example, imagine you’re on a plane, headed for the most important presentation of your entire career. You’re settling into a taxi when you discover you left your laptop in the airport terminal. When you get to the conference center, there’s not enough time to get your office to email a copy of the presentation and then wrestle it onto an unfamiliar computer. If the conference center has an overhead projector (most do) and you’ve got a stack of overheads in your briefcase, you’re golden.
Printing out overheads isn’t a lot of extra work. It involves the same steps you take to create a regular printout, with the following exceptions:
Replace the paper in your printer with a stack of overhead transparencies, available at any office supply store. (You don’t need a special printer or special ink.)
Consider printing your presentation on paper first to make sure it looks exactly the way you want it to. It’s often easier to spot goofs on paper printouts than onscreen.
If your slides have colored backgrounds, consider printing grayscale or black-and-white ( Printing Slides (One Slide per Page)) versions. Doing so leaves white space you’ll appreciate if you tend to draw or jot notes on your transparencies while you’re presenting.
If you’re the one feeding the printer, watch it like a hawk. Transparencies tend to shift, slide, and stick together. Printing your presentation in two or three batches makes it easier for you to catch missing and misprinted overheads.
Speaker notes, as you may recall from Adding Speaker Notes, are notes you can attach to any slide of your presentation to remind yourself of things you want to say but don’t want your audience to read, like “Remember to tell the joke about the priest, the rabbi, and the lawyer before you start this slide” or “Haul out the flip chart when you get to bullet #2.”
Chapter 23 shows how you can set up an extra computer screen to display your speaker notes while you’re running your presentation from your main computer (Setting Up a Speaker Notes Screen). But in most cases, simply printing your speaker notes and keeping them with you while you give your presentation is sufficient.
To print speaker notes:
Choose Office button → Print → Print Preview.
The Print Preview ribbon appears.
From the Print What drop-down menu, choose Notes Pages.
The Notes pages you’ve attached to your slides appear in the Preview area (Figure 24-6).
Tip
If you’d like to add a header or footer before you print, check out Applying Multiple Slide Masters.
To double-check your speaker notes, click Next Page and Previous Page (or use the scroll bars that appear next to the Preview area to flip through your notes pages).
When you’re satisfied, click Print.
The Print dialog box appears. For help in setting Print options, such as choosing which pages to print or how many copies to print, head to Printing Slides (One Slide per Page).
Click OK.
PowerPoint prints your speaker notes.

Figure 24-6. PowerPoint won’t automatically print speaker notes attached to hidden slides, so if you’ve hidden any slides (Hiding Individual Slides) but still want to see all of your speaker notes, make sure you turn on the radio box next to Print Hidden Slides in the Print dialog box shown in Figure 24-3.
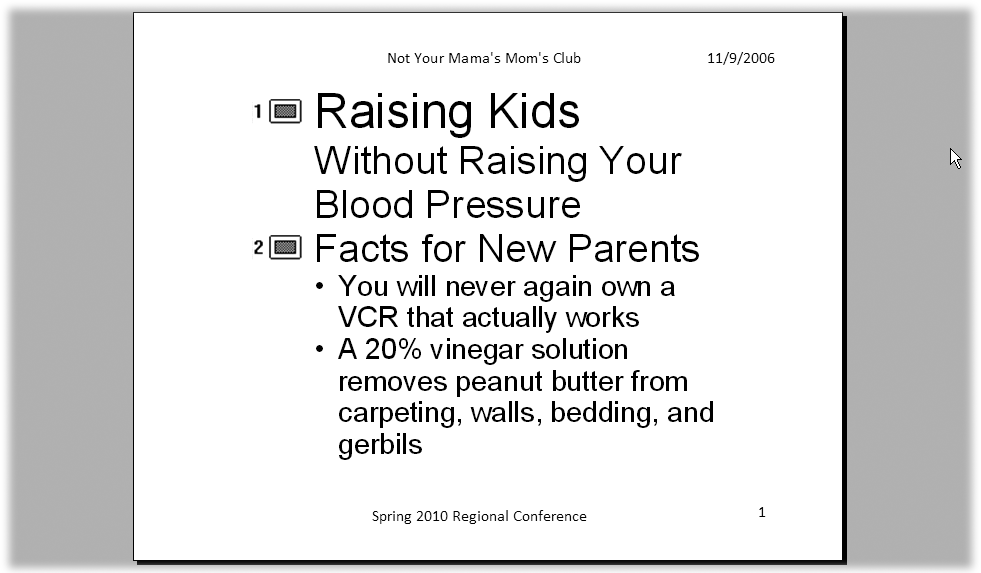
Printing an outline version of your presentation is useful for the same reason as examining your presentation in Outline view (Figure 24-7) is: It pares away all the formatting and lets you focus on the organization of your content, which is the heart of any good presentation. You might want to print an outline as a proofing tool, to help you double-check that you’ve included all the material you wanted to include. But you can also use a printed outline as a hard-copy backup of your presentation and even (in a pinch) as an audience handout.
To print an outline of your presentation, choose Office button → Print → Print Preview. From the “Print what” drop-down menu, choose Outline View (see Figure 24-7), and then follow the steps on Printing Slides (One Slide per Page) to send your outline to the printer.