The tables you’ve seen so far lead lonely, independent lives. You don’t find this isolation with real-world databases. Real databases have their tables linked together in a web of relationships.
Suppose you set out to build a database that can manage the sales of your custom beadwork shop. The first ingredient’s simple enough—a Products table that lists your merchandise—but before long you’ll need to pull together a lot more information. The wares in your Products table are sold in your Orders table. The goods in your Orders table are mailed out and recorded in a Shipments table. The people in your Customers table are billed in your Invoices table. All these tables—Products, Orders, Shipments, Customers, and Invoices—have bits of related information. As a result, if you want to find out the answer to a common question (like, “How much does Jane Malone owe?” or “How many beaded wigs did we sell last week?”), you’ll need to consult several tables.
Based on what you’ve learned so far, you already know enough to nail down the design for a database like this one. But relationships introduce the possibility of inconsistent information. And once a discrepancy creeps in, you’ll never trust your database the same way again.
In this chapter, you’ll learn how to explicitly define the relationships between tables. This process lets you prevent common errors, like data in different tables that doesn’t sync up. It also gives you a powerful tool for browsing through related information in several tables.
One of any database’s key goals is to break information down into distinct, manageable pieces. In a well-designed database, you’ll end up with many tables. Although each table records something different, you’ll often need to travel from one table to another to get all the information you want.
To better understand relationships (of the non-romantic kind, anyway), consider an example. The following section demonstrates two ways to add information to the bobblehead database: one that risks redundant data, and one that avoids the problem by properly using a relationship.
Think back to the Dolls table you created in Chapter 26 to store a list of bobblehead dolls. One of the Dolls table’s pieces of information is the Manufacturer field, which lists the name of the company that created each doll. Although this seems like a simple-enough detail, it turns out that to properly assess the value of a bobblehead, you need to know a fair bit more about the manufacturing process. You may want to know things like where the manufacturing company’s located, how long it’s been in business, and if it’s had to fight off lawsuits from angry customers.
If you’re feeling lazy, you could add all this information to the Dolls table, like so (the grayed-out columns are the new ones):
|
ID |
Character |
Manufacturer |
Manufacturer-Location |
Manufacturer-OpeningYear |
Manufacturer-Lawsuits |
PurchasePrice |
|---|---|---|---|---|---|---|
|
342 |
Yoda |
MagicPlastic |
China |
2003 |
No |
$8.99 |
Your first reaction to this table is probably to worry about the clutter of all these fields. But don’t panic—in the real world, tables must include all the important details, so they often grow quite wide. (That’s rule #3 of data design, from 3. Include All the Details in One Place.) So don’t let the clutter bother you. You can use techniques like column hiding (Hiding Columns) to filter out the fields that don’t interest you.
Although column clutter isn’t a problem, another issue lurks under the surface in this example—redundant data. A well-designed table should list only one type of thing. This version of the Dolls table breaks that rule by combining information about the bobblehead and the bobblehead manufacturer.
This situation seems innocent enough, but if you add a few more rows, things don’t look as pretty:
|
ID |
Character |
Manufacturer |
Manufacturer-Location |
Manufacturer-OpeningYear |
Manufacturer-Lawsuits |
PurchasePrice |
|---|---|---|---|---|---|---|
|
342 |
Yoda |
MagicPlastic |
China |
2003 |
No |
$8.99 |
|
343 |
Dick Cheney |
Rebobblicans |
Taiwan |
2005 |
No |
$28.75 |
|
344 |
Tiger Woods |
MagicPlastic |
China |
2003 |
No |
$2.99 |
Once you have two bobbleheads that were made by the same company (in this case, MagicPlastic), you’ve introduced duplicate data, the curse of all bad databases. (You’ll recognize this as a violation of rule #4 of good database design, from 3. Include All the Details in One Place.) The potential problems are endless:
If MagicPlastic moves its plants from China to South Korea, you’ll need to update a whole batch of bobblehead records. If you were using two tables with related data (as you’ll see next), you’d have just one record to contend with.
It’s all too easy to update the manufacturer information in one bobblehead record but miss it in another. If you make this mistake, you’ll wind up with inconsistent data in your table, which is even worse than duplicate data. Essentially, your manufacturer information will become worthless because you won’t know which record has the correct details, so you won’t be able to trust anything.
If you want to track more manufacturer-related information (like a contact number) in your database, you’ll have to update your Dolls table and edit every single record. Your family may not see you for several few weeks.
If you want to get information about manufacturers (but not dolls), you’re out of luck. For example, you can’t print out a list of all the bobblehead manufacturers in China (at least not easily).
It’s easy to understand the problem. By trying to cram too many details into one spot, this table fuses together information that would best be kept in two separate tables. To fix this design, you need to create two tables that use related data. For example, you could create a Dolls table like this:
|
ID |
Character |
Manufacturer |
PurchasePrice |
|---|---|---|---|
|
342 |
Yoda |
MagicPlastic |
$8.99 |
|
343 |
Dick Cheney |
Rebobblicans |
$28.75 |
|
344 |
Tiger Woods |
MagicPlastic |
$2.99 |
And a separate Manufacturers table with the manufacturer-specific details:
|
ID |
Manufacturer |
Location |
OpeningYear |
Lawsuits |
|---|---|---|---|---|
|
1 |
MagicPlastic |
China |
2003 |
No |
|
2 |
Rebobblicans |
Taiwan |
2005 |
No |
This design gives you the flexibility to work with both types of information (dolls and manufacturers) separately. It also removes the risk of duplication. The savings are small in this simple example, but in a table with hundreds or thousands of bobblehead dolls (and far fewer manufacturers), the difference is dramatic.
Now, if MagicPlastic moves to South Korea, you need to update the Location field for only one record, rather than many instances in an overloaded Dolls table.
You’ll also have an easier time building queries (Chapter 31) that combine the information in neat and useful ways. (For example, you could find out how much you’ve spent on all your MagicPlastic dolls and compare that with the amounts you’ve spent for dolls made by other manufacturers.)
Note
Access includes a tool that attempts to spot duplicate data in a table and help you pull the fields apart into related tables. (To try it out, choose Database Tools → Analyze → Analyze Table.) Although it’s a good idea in theory, this tool really isn’t that useful. You’ll do a much better job of spotting duplicate data and creating well designed tables from the start if you understand the duplicate-data problem yourself.
This bobblehead database shows you an example of a relationship. The telltale sign of a relationship is two tables with matching fields. In this case, the tip-off’s the Manufacturer field, which exists in both the Dolls table and the Manufacturers table.
Note
In this example, the fields that link the two tables have the same name in both tables: Manufacturer. However, you don’t have to do it this way. You can give these fields different names, so long as they have the same data type.
Using these linked fields, you can start with a record in one table and look up related information in the other. Here’s how it works:
Starting at the Dolls table, pick a doll that interests you (let’s say Yoda). You can find out more information about the manufacturer of the Yoda doll by looking up “MagicPlastic” in the Manufacturers table.
Starting at the Manufacturers table, pick a manufacturer (say, Rebobblicans). You can now search for all the products made by that manufacturer by searching for “Rebobblicans” in the Dolls table.
In other words, a relationship gives you the flexibility to ask more questions about your data, and get better answers.
In the previous example, the Dolls and Manufacturers tables are linked through the Manufacturer field, which stores the name of the manufacturing company. This seems like a reasonable design—until you spend a couple of minutes thinking about what might go wrong. And databases experts are known for spending entire weeks contemplating inevitable disasters.
Here are two headaches that just may lie in store:
You might recognize these problems, because they’re similar to the challenges you faced when you tackled primary keys (The Primary Key). As you learned, it’s difficult to find information that’s guaranteed to be unique and unchanging. Rather than risk problems, you’re better off just relying instead on an AutoNumber field, which stores an Access-generated ID number.
Interestingly enough, you use the same solution when linking tables. To refer to a record in another table, you shouldn’t use just any piece of information—instead, you should use the unique ID number that points to the right record. Here’s a redesigned Dolls table that gets it right by changing the Manufacturer field to ManufacturerID:
|
ID |
Character |
ManufacturerID |
PurchasePrice |
|---|---|---|---|
|
342 |
Yoda |
1 |
$8.99 |
|
343 |
Dick Cheney |
2 |
$28.75 |
|
344 |
Tiger Woods |
1 |
$2.99 |
If you take a look back at the Manufacturers table (Redundant Data vs. Related Data), then you can quickly find out that the manufacturer with the ID value 1 is MagicPlastic.
This design’s the universal standard for databases. However, it does have two obvious drawbacks:
The person adding records to the Dolls table probably doesn’t know the ID of each manufacturer.
When you look at the Dolls table, you can’t tell what manufacturer created each doll.
To solve both these problems, use a lookup. Lookups show the corresponding manufacturer information in the Dolls table, and they also let you choose from a list of manufacturers when you add a record or edit the ManufacturerID field. (You saw how to use lookups with value lists on Adding New Values to Your Lookup List. You’ll learn how to use lookups to bring together related tables, like Dolls and Manufacturers, on Using a Relationship.)
No, this isn’t a detour into feel-good Dr. Phil psychology. Database nerds use the labels parent and child to identify the two tables in a relationship, and keep track of which one’s which.
Here’s the analogy. As you no doubt know, in the real world a parent can have any number of children. However, a child has exactly one set of parents. The same rule works for databases. In the bobblehead database, a single manufacturer record can be linked to any number of doll records. However, each doll record refers to a single manufacturer. So according to the database world’s strange sociology, Manufacturers is a parent table and Dolls is a child table. They’re linked by a parent-child relationship.
Tip
Don’t think too hard about the parent-child analogy. It’s not a perfect match with biological reality. For example, in the bobblehead database, you may create a manufacturer that doesn’t link to any dolls (in other words, a parent with no children). You still call that record a parent record, because it’s part of the parent table.
It’s important to realize that you can’t swap the parent and child tables around without changing your relationship. It’s incorrect to suggest that Dolls is the parent table and Manufacturers is the child table. You can see that such a suggestion would break the parent-child analogy: a single doll can’t have more than one manufacturer, and a manufacturer isn’t limited to creating a single doll. In order to prevent problems and all-around fuzzy thinking, you need to know exactly which table’s the parent and which one’s the child.
Tip
If you have trouble identifying which table’s the parent, there’s a simple rule to steer you right. The child table always contains a piece of identifying information from the parent table. In the bobblehead database, the Dolls table contains the ManufacturerID field. On the other hand, the Manufacturer table doesn’t have any doll information.
If you have database-savvy friends, you’ll hear the term parent-child relationship quite a bit. The same relationship is also called a one-to-many relationship (where one is the parent and many represents the children, because a single parent record in one table can link to several child records in the other).
The relationship between Dolls and Manufacturers is implicit, which is a fancy way of saying that you know the relationship exists, but Access doesn’t. Database pros aren’t satisfied with this arrangement. Instead, they almost always define their relationships explicitly. When you create an explicit relationship, you clearly tell Access how two tables are related. Access then stores the information about that relationship in the database file.
You have good reasons to bring your relationships out into the open. Once Access knows about a relationship, it can enforce better error checking. It can also provide handy features for browsing related data and editing linked fields. You’ll see all these techniques in the following sections. But first, you need to learn how to define a relationship.
You can try out the following steps with the Bobblehead.accdb file, which is included with the online examples for this chapter. It contains the Dolls and Manufacturers tables, in their original form (with no relationships defined). The BobbleheadRelationships.accdb database file shows the final product: two tables with the right relationship.
Here’s what you need to do to set up a relationship:
Every relationship links two fields, each in a different table. Your first step is to identify the field you need to use in the parent table.
In a well-designed database, you use the primary-key field (The Primary Key) in the parent table. For example, in the Manufacturers table, you use the ID column, which uniquely identifies each manufacturer.
Open the child table in Design view. (The quickest way is to right-click it in the navigation pane, and then choose Design View.)
In this example, the child table is Dolls.
Create the field you need in the child table, if it’s not there already.
Each child record creates a link by storing a piece of information that points to a record in the parent table. You need to add a new field to store this information, as shown in Figure 30-1.
Figure 30-1. In the Dolls table, you need a field that identifies the manufacturer for that doll. It makes sense to add a new field named ManufacturerID. Set the data type to Number, and the Field Size to Long Integer, so it matches the ID field in the Manufacturers table. After you add this field, you need to fill it with the right information. (Each doll record should have the ID number of the corresponding manufacturer.)
Note
The fields that you link in the parent and child tables must have consistent data types. However, there’s one minor wrinkle. If the parent field uses the AutoNumber data type, then the child field should use the Number data type instead (with a Field Size of Long Integer). Behind the scenes, an AutoNumber and a Long Integer actually store the same numeric information. But the AutoNumber data type tells Access to fill in the field with a new, automatically-generated value whenever you create a record. You obviously don’t want this behavior for the ManufacturerID field in the Dolls table.
Close both tables.
Access prompts you to save your changes. Your tables are now relationshipready.
Choose Database Tools → Show/Hide → Relationships.
Access opens a new tab named Relationships. This tab’s a dedicated window where you can define the relationships between all the tables in your database. In this example, you’ll create a just a single relationship, but you can use the Relationships tab to define many more.
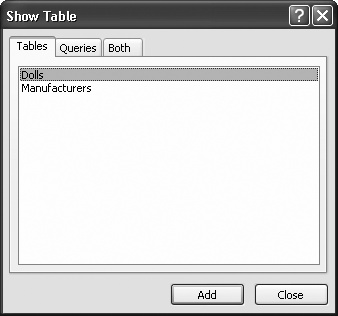
Before Access lets you get to work in the Relationships tab, it pops up a Show Table dialog box asking what tables you want to work with (see Figure 30-2).
Add both the parent table and child table to your work area.
It doesn’t matter which one you choose first. To add a table, select it in the list, and then click Add (or just double-click it).
Access represents each table in the Relationships tab by a small box that lists all the table fields. If relationships are already defined between these tables, they’ll appear as connecting lines.
Click Close.
You can now arrange the tables in the Relationships tab (see Figure 30-3). The Relationships tab shows a database diagram—it’s the canvas where you add relationships by “drawing” them on.
Figure 30-3. You can drag the tables you’ve added to any place in the window. If you have a database that’s thick with relationships, this ability lets you arrange them so that the relationships are clearly visible. To remove a table from the diagram, right-click it, and then choose Hide Table. To add another table, right-click the blank space, and then choose Show Table to pop up the Show Table dialog box.
To define your relationship, find the field you’re using in the parent table. Drag this field to the field you want to link it to in the child table.
In this case, you’re linking the ManufacturerID field in the Dolls table (the child) to the ID field in the Manufacturers table (the parent). So drag ManufacturerID (in the Dolls box) over to ID (in the Manufacturers box).
Tip
You can drag the other way, too (from the child to the parent). Either way, Access creates the same relationship.
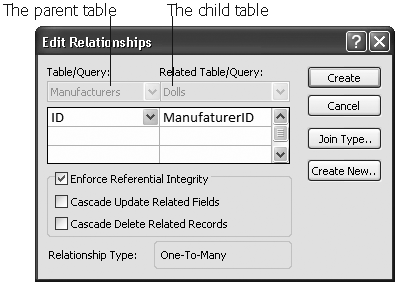
When you release the mouse button, the Edit Relationships dialog box appears (see Figure 30-4).
If you want to prevent potential errors, then put a checkmark in the Enforce Referential Integrity option. (It’s always a good idea.)
This setting turns on enhanced error checking, which prevents people from making a change that violates the rules of a relationship (like creating a doll that points to a nonexistent manufacturer). You’ll learn more about referential integrity and the two settings for cascading changes on Referential Integrity. For now, it’s best to switch on the Enforce Referential Integrity option and leave the others unchecked.
Figure 30-4. Access is clever enough to correctly identify the parent table (shown in the Table/Query box) and the child table (shown in the Related Table/Query box) when you connect two fields. Access identifies the field in the parent table because it has a primary key (The Primary Key) or a unique index (Preventing Duplicate Values with Indexes). If something isn’t quite right in the Edit Relationships dialog box, then you can swap the tables or change the fields you’re using to create the relationship before continuing.
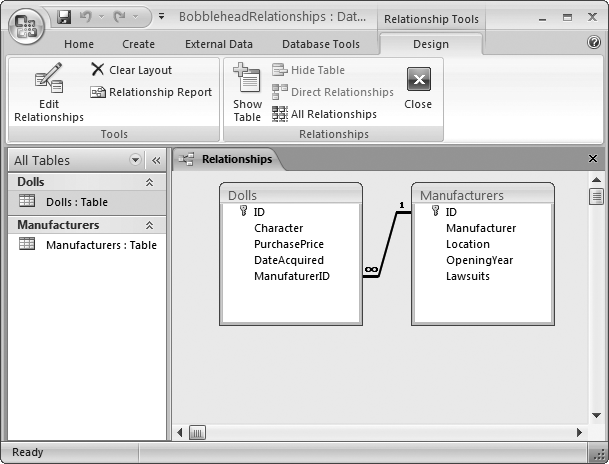
This action creates the relationship that links the two tables. It appears in the diagram as a line (Figure 30-5).
Figure 30-5. Access uses a line to connect related fields in the Relationships tab. The tiny 1 and infinity (∞) symbols let you distinguish between the “one” and the “many” side in this one-to-many relationship. To edit the relationship, double-click the line. To remove it altogether, right-click the line, and then choose Delete.
Tip
If you chose Enforce Referential Integrity (in step 9), Access checks to make sure any existing data in the table follows the relationship rules. If it finds some that doesn’t, then it alerts you about the problem and refuses to continue. At this point, the best strategy’s to create the relationship without referential integrity, correct the invalid data, and then edit the relationship later to turn on referential integrity.
Close the Relationships tab. (You can click the X in the tab’s top-right corner, or choose Relationship Tools | Design → Relationships → Close.)
Access asks whether or not you want to save the Relationships tab’s layout. Access is really asking you whether you want to save the relationship diagram you’ve created. No matter what you choose, the relationship remains in the database, and you can use it in the same way. The only difference is whether you’ll be able to quickly review or edit the relationship in the Relationships tab.
If you choose to keep the relationship diagram, the next time you switch to the Relationships tab (by choosing Database Tools → Show/Hide → Relationships), you see the same arrangement of tables. This feature’s handy.
If you choose not to keep the relationship diagram, it’s up to you to recreate the diagram next time by adding the tables you want to see and arranging them in the window (although you won’t need to redefine the relationships). This process takes a little more work.


Tip
Many database pros choose to save their database diagram, because they want to see all their relationships at once in the Relationships tab, just the way they left them. However, real-world databases often end up with a tangled web of relationships. In this situation, you may choose not to save a complete diagram so you can focus on just a few tables at once.
The next time you want to change or add relationships, you’ll follow the same path to get to the Relationship window (choose Database Tools → Show/Hide → Relationships).
If you choose to save a relationship diagram (in step 11 in the previous section), the tables you added appear automatically, just as you left them. If you want to work with tables that aren’t in any relationships yet, you can add them to the diagram by right-clicking anywhere in the blank area, and then choosing Show Table.
If you choose not to save your relationship diagram, you can use a few shortcuts to put your tables back on display:
Drag your tables right from the navigation pane, and then drop them in the Relationships tab.
Choose Relationship Tools | Design → Relationships → All Relationships to show all the tables that are involved in any relationships you’ve created previously.
Add a table to the diagram, select it, and then choose Relationship Tools | Design → Relationships → Direct Relationships to show the tables that are linked to that table.
As you already know, you can use the Relationships tab to create new relationships. You can also edit the relationships you’ve already created. To do so, rightclick the line that represents the relationship, and then choose Edit Relationship. (This takes some nimble finger-clicking. If you don’t see the Edit Relationships option in the menu, you’ve just missed the line.) To remove a relationship, rightclick the relationship line, and then choose Delete.
Now that you’ve gone to the work of defining your relationship, it’s time to see what benefits you’ve earned. As in the real world, relationships impose certain restrictions. In the database world, these rules are called referential integrity. Taken together, they ensure that related data’s always consistent.
Note
Referential integrity comes into action only if you switched on the Enforce Referential Integrity option ( Defining a Relationship) for your relationship. Without this detail, you’re free to run rampant and enter inconsistent information.
In the bobblehead example, referential integrity requires that every manufacturer you refer to in the Dolls table must exist in the Manufacturer table. In other words, there can never be a bobblehead record that points to a nonexistent manufacturer. That sort of error could throw the hardiest database software out of whack.
To enforce this rule, Access disallows the following three actions:
Adding a bobblehead that points to a nonexistent manufacturer.
Deleting a manufacturer that’s linked to one or more bobblehead records. (Once this record’s removed, you’re left with a bobblehead that points to a nonexistent manufacturer.)
Updating a manufacturer by changing its ID number, so that it no longer matches the manufacturer ID in the linked bobblehead records. (This updating isn’t a problem if you use an AutoNumber field, because you can’t change AutoNumber values once you’ve created the record.)
Note
If you need to add a new doll made by a new manufacturer, you must add the manufacturer record first, and then add the doll record. There’s no problem if you add manufacturer records that don’t have corresponding doll records—after all, it’s perfectly reasonable to list a manufacturer even if you don’t have any of the dolls they’ve made.
Along with these restrictions, Access also won’t let you remove a table if it’s in a relationship. You need to delete the relationship first (using the Relationships window) and then remove the table.
It’s important to realize that there’s one operation you can perform that doesn’t violate referential integrity: creating a bobblehead that doesn’t point to any manufacturer. You do this by leaving the ManufacturerID field blank (which database nerds refer to as a null value). The only reason you’ll leave the ManufacturerID field blank is if the manufacturer record doesn’t exist in your database, or if the information doesn’t apply. Perhaps the bobblehead wasn’t created by any manufacturer but was created by an advanced space-faring alien race and left on this planet for you to discover.
If this blank-value back door makes you nervous, then you can stop it. Just set the Required field property (Preventing Blank Fields) on the ManufacturerID field in the Dolls table. This setting ensures that every bobblehead in your Dolls table has legitimate manufacturer information. This technique’s important when related information isn’t optional. A sales company shouldn’t be able to place an order or create an invoice without linking to the customer who made the order.
The rules of referential integrity stop you cold if you try to delete a parent record (like a manufacturer) that other child records (like dolls) link to. However, there’s another option—and it’s much more drastic. You can choose to blow away all related child records whenever you delete a parent. For example, this would allow you to remove a manufacturer and wipe out all the dolls that were produced by that manufacturer.
Warning
Cascading deletes are risky. It’s all too easy to wipe out way more records than you intend, and if you do there’s no going back. Even worse, the Undo feature can’t help you reverse this change. So proceed with caution.
To turn on this option, you need to switch on the Cascade Delete Related Records setting when you create your relationship (Figure 30-4). You can also modify the relationship later on to add this setting.
Once you’ve switched this option on, you can try it out by deleting a manufacturer, as shown in Figure 30-6.
Access also provides a setting for cascading updates. If you switch on this feature (by going to the Edit Relationships dialog box, and then choosing Cascade Update Related Fields), Access copies any change you make to the linked field in the parent record to all the children.

Figure 30-6. In this example, the Dolls-Manufacturers relationship uses the Cascade Delete Related Records setting. When you delete a manufacturer, Access warns you that you’ll actually end up deleting every linked doll record, for a total of nine records.
With the bobblehead database, a cascading update lets you change the ID of one of your manufacturers. When you change the ID, Access automatically inserts the new value into the ManufacturerID field of every linked record in the Dolls table. Without cascading updates, you can’t change a manufacturer’s ID if there are linked doll records.
Cascading updates are safer than cascading deletes, but you rarely need them. That’s because if you’re following the rules of good database design, you’re linking based on an AutoNumber ID column (AutoNumber). Access doesn’t let you edit an AutoNumber value, and you don’t ever need to. (Remember, an AutoNumber simply identifies a record uniquely, and it doesn’t correspond to anything in the real world.)
On the other hand, cascading updates come in handy if you’re working with a table that hasn’t been designed to use AutoNumber values for links. If the Dolls and Manufacturers table were linked based on the manufacturer name, then you need cascading updates—it makes sure that child records are synchronized whenever a manufacturer name’s changed. Cascading updates are just as useful if you have linked records based on Social Security numbers, part numbers, serial numbers, or other codes that aren’t generated automatically and are subject to change.
Relationships aren’t just useful for catching mistakes. Relationships also make it easier for you to browse through related data. Access 2007: The Missing Manual teaches you how to create search routines that pull together information from related tables. But even without this technique, Access provides some serious relationship mojo in the datasheet.
Here’s how it works. If you’re looking at a parent table in the datasheet, then you can find the related child records for any parent record by clicking the plus box that’s just at the left of the row (Figure 30-7).

Figure 30-7. Curious to find out what dolls you have from MagicPlastic? Just click the plus box (circled).
This drops a subdatasheet into view, which shows just the related records (Figure 30-8). You can use the subdatasheet to edit the doll records here in exactly the same way as you would in the full Dolls datasheet. You can even add new records.
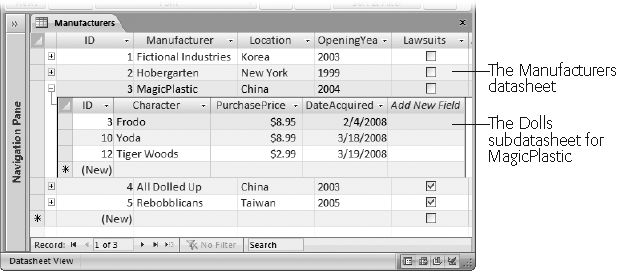
Figure 30-8. The subdatasheet’s really a filtered version of the ordinary Dolls datasheet. It shows only the records that are linked to the manufacturer you chose. The subdatasheet has all the same view settings (like font, colors, column order) as the datasheet for the related table.
Note
You can open as many subdatasheets as you want at the same time. The only limitation is that the records in a subdatasheet don’t show up if you print the datasheet (Printing the Datasheet).
A parent table may be related to more than one child table. In this case, Access gives you a choice of what table you want to use when you click the plus box. Imagine you’ve created a Customers table that’s linked to a child table of customer orders (Orders), and a child table of billing information (Invoices). When you click the plus box, Access doesn’t know which table to choose, so it asks you (see Figure 30-9).
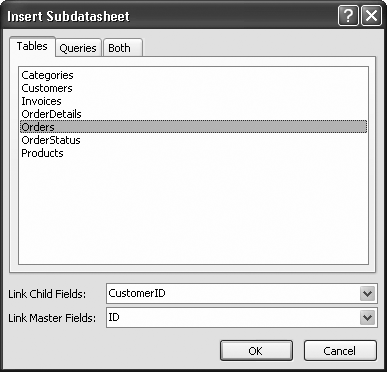
Figure 30-9. When Access doesn’t know which table to use as a subdatasheet, it lets you pick from a list of all your tables. In this case, only two choices make sense. Choose Orders to see the customer’s orders, or Invoices to see the customer’s invoices. When you select the appropriate table in the list, Access automatically fills in the linked fields in the boxes at the bottom of the window. You can then click OK to continue.
Note
You have to choose the subdatasheet you want to use only once. Access remembers your setting and always uses the same subdatasheet from that point on.
As you create more elaborate databases, you’ll find that your tables are linked together in a chain of relationships. One parent table might be linked to a child table, which is itself the parent of another table, and so on. This complexity doesn’t faze Access—it lets you drill down through all the relationships (see Figure 30-10).

So far, you’ve seen how relationships make it easier to review and edit your records. But what about when you add your records in the first place? Relationships are usually based on an unhelpful AutoNumber value. When you create a new doll, you probably won’t know that 3408 stands for Bobelle House O’ Dolls. Access stops you from entering a manufacturer ID that isn’t linked to anyone at all, but it doesn’t help you choose the ID value you want.
Fortunately, Access has a technique to help you out. In the previous chapter, you learned about lookups ( Lookups), a feature that provides you with a list of possible values for a column. When creating a lookup, you can supply a list of fixed values, or you can pull values from another table. You could create a lookup for the ManufacturerID field in the Dolls table that uses a list of ID values drawn from the Manufacturers table. This type of lookup helps a bit—it gives you a list of all the possible values you can use—but it still doesn’t solve the central problem. Namely, the befuddled people using your database won’t have a clue what ID belongs to what manufacturer. You still need a way to show the manufacturer name in the lookup list.
Happily, lookup lists provide just this feature. The trick is to create a lookup that has more than one column. One column holds the information (in this case, the manufacturer name) that you want to display to the person using the database. The other column has the data you want to use when a value’s picked (in this case, the manufacturer ID).
Note
Access is a bit quirky when it comes to lookups. It expects you to add the lookup, and then the relationship. (In fact, when you set up a lookup that uses a table, Access creates a relationship automatically.) So if you’ve been following through with the examples on your own, then you’ll need to delete the relationship between the Dolls and Manufacturers tables (as described on Editing Relationships) before you go any further.
The following steps show how you can create a lookup list that links the Dolls and Manufacturers tables:
Open the child table in Design view.
In this example, it’s the Dolls table.
Select the field that links to the parent table, and, in the Data Type column, choose the Lookup Wizard option.
In this example, the field you want is ManufacturerID.
Choose “I want the lookup column to look up the values in a table or query” and then click Next.
The next step shows a list of all the tables in your database, except the current table.
Choose the parent table, and then click Next.
In this case, you’re after the Manufacturers table. Once you select it and move to the next step, you’ll see a list of all the fields in the table.
Add the field you use for the link and another more descriptive field to the list of Selected Fields (Figure 30-11). Click Next to continue.
In this case, you need to add the ID field and the Manufacturer field.
Tip
In some cases, you might want to use more than one field with descriptive information. For example, you might grab both a FirstName and LastName field from a FamilyRelatives table. But don’t add too much information, or the lookup list will become really wide in order to fit it all in. This looks a bit bizarre.
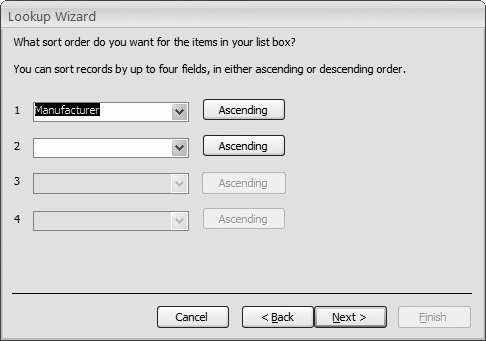
Choose a field to use for sorting the lookup list (Figure 30-12), and then click Next.
In this example, the Manufacturer field’s the best choice to sort the list.
Figure 30-11. The secret to a good lookup is getting two pieces of information: the primary key (in this case, the ID field) and a more descriptive value (in this case, the manufacturer’s name). The ID field’s the piece of information you need to store in the doll record, while the Manufacturer field’s the value you’ll show in the lookup list to make it easier to choose the right manufacturer.
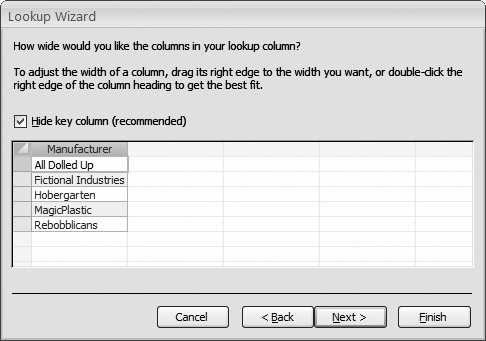
The next step shows a preview of your lookup list (Figure 30-13). Make sure the “Hide key column” option’s selected, and then click Next.
Although the primary-key field has the value that links the two tables together, it doesn’t mean much to the person using the database. The other, descriptive field’s more important.
Choose a name for the lookup column.
Usually, it’s clearest if you keep the name of the field that uses the lookup (in this case, ManufacturerID).
The final step also gives you an option named Allow Multiple Values. If you check this, then the lookup list shows a checkbox next to each item, so that you can pick several at once. (In this example, you can create a doll that has more than one manufacturer.)
Click Finish.
Now, Access creates the lookup for the field and prompts you to save the table. Once you do, Access creates a relationship between the two tables you’ve linked with your lookup column. Here, Access creates a parent-child relationship between Manufacturers and Dolls, just as you did yourself on Defining a Relationship.

Note
The relationships that Access creates don’t enforce referential integrity, because Access doesn’t know if your records can live up to that strict standard. You can have a doll that points to a nonexistent manufacturer. If this possibility seems dangerously lax, you can edit your relationship using the Relationships tab (as described on Editing Relationships). Begin by adding both the Dolls and the Manufacturers table to the relationships diagram. Then, right-click the relationship line in between, and then choose Edit Relationship. Finally, switch on the Enforce Referential Integrity checkbox, and then click OK.
Now, if you switch to the design view of the Dolls table, you can use your lookup when you’re editing or adding records (Figure 30-14).
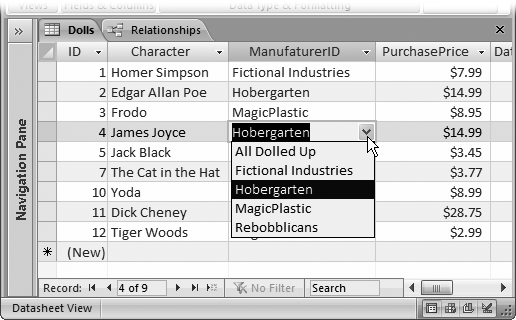
Figure 30-14. Even though the Dolls table stores an ID value in the ManufacturerID field behind the scenes, that’s not how it appears on your datasheet. Instead, you see the related manufacturer name. Even better, if you need to add a new record or change the manufacturer that’s assigned to an existing one, then you can pick the manufacturer from the list by name.