If you want to give a great presentation, then you have to practice. But if you’re like most folks, every time you fire up PowerPoint, clear your throat, and start rehearsing, you find a few places in your slideshow that need tweaking. For example, you may realize that you’ve duplicated information on a couple of slides. Or maybe you discover that you’ve forgotten to cover a critical point, or decide that a small graphic on each slide would reinforce your message. Or, worst of all, you realize that the way you’ve organized your content is all wrong.
In this chapter, you’ll see how to make all these changes and more. You’ll learn to reorder your slides as easily as you shuffle a pack of cards. You can add, delete, move, duplicate, and renumber slides, and even copy slides from other slideshows. You’ll also see how to control the overall look and feel of your presentation by editing its behind-the-scenes slide masters.
When you’re adding text and graphics to an individual slide, as described in Chapter 17, you’re concerned with just one slide at a time—the slide you’re working on. Not so when you want to edit your slideshow as a whole. In that case, you need a way to spread all your slides out in front of you (virtually speaking) so you can see what you’ve got and then decide which slides you want to delete, duplicate, move, and so on.
PowerPoint gives you two handy ways to see most (if not all) of your slides at once: the Slides pane that appears in Normal view (Figure 21-1), and Slide Sorter view (Figure 21-2)
PowerPoint assumes you want to see the Slides pane (Figure 21-1) until you tell it otherwise. The Slides pane is mighty handy: When you right-click individual slides in the Slides pane, you can delete them, duplicate them, move them, and so on, as described in the following pages.
To get rid of the Slides pane, click the X in the upper-right corner. To bring it back again, click the Normal icon or choose View → Normal. If you don’t see a bunch of thumbnails, check to make sure you’ve selected the Slides tab.
For situations where you only need to see three or four slides at a time, the Slides pane is the way to go. But if you need to work with more slides at a time—for example, if you need to move slides 1–5 to the end of a 25-slide presentation—then you need to switch to Slide Sorter view (Figure 21-2).
To switch from one-slide-at-a-time Normal view to Slide Sorter view, either click the Slide Sorter icon or select View → Presentation Views → Slide Sorter.
Tip
Double-clicking a slide in Slide Sorter view pops you back to Normal view with the slide you double-clicked front and center, ready for you to edit.

Figure 21-1. When you click to select a slide in the Slides pane, PowerPoint displays the editable version of the slide in the work area. The number of slides you see in the Slides pane depends on how many slides are in your presentation, and how big you’ve made the Slides pane. Make it skinny, for example, and you’ll see a lot more slides—but then PowerPoint has to make them really tiny to fit them all in. Drag the right edge of Slides pane to resize it.

The best way to begin creating a PowerPoint presentation is to start with an outline, either a hand-sketched one or one created in a word processor (such as Microsoft Word). That way your material is pretty much organized before you begin putting your slides together (Figure 21-3).
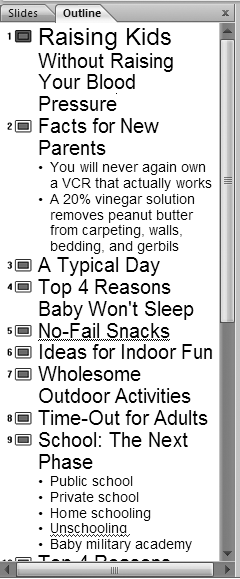
Figure 21-3. When you display your slideshow in Outline view, you see each slide’s title and subtitle text—perfect for double-checking overall content. You can cut or delete slides from Outline view just as easily as you can from the Slides pane or Slide Sorter view.
Nobody gets everything right the first time, though. Even if you follow this wise design practice, you’ll find yourself adding, deleting, and moving the individual slides that make up your slideshow as you rehearse your presentation. After all, you want your slideshow to be tight and well organized so you can concentrate on your message without worrying about repeating yourself, leaping from one unrelated topic to another, or leaving out main points altogether.
You can easily add a blank slide to your slideshow. (You can also bring in a slide from another slideshow, as shown on Inserting Slides from Other Slideshows.) When you create a new blank slide, PowerPoint lets you choose one of several popular layouts. For example, you can create a title slide or a slide containing two columns of text.
Note
Each of the layout options that PowerPoint offers corresponds to a slide master, which serves as a template for creating predesigned slides.
To add a slide to your slideshow:
In the Slides pane, click to select the slide after which you want to add a new slide.
When you want to add a slide at the very beginning of your slideshow, add it after your first slide. Then move it to first position, as described on Moving Slides.
Go to Home → Slides and click the down arrow next to New Slide.
A layout gallery similar to the one in Figure 21-4 appears.
Click to choose one of the canned layouts. (You can always change the layout of the slide later if it’s not exactly what you want.)
PowerPoint creates a new blank slide based on your layout choice and displays the slide in your workspace, ready for you to edit.
Note
PowerPoint gives you two additional, super-quick ways to add a slide. You can either click Home → Slides → New Slide (instead of the down-arrow next to New Slide), or—in either the Normal view’s Slides pane or Slide Sorter view—you can right-click a slide and then, from the context menu that appears, choose New Slide. These methods don’t let you choose a new layout, though; both simply create a basic Title and Content slide. To change to a different layout, right-click the newly added slide and choose Layout.
As you might expect, deleting a slide neatly excises it from your slideshow. After you delete a slide, it’s gone; the only way to get it back is to click Undo, and that only works if you click Undo soon after you delete the slide. (PowerPoint only “undoes” so many actions per work session, as explained on Reversing an Action (Undo).)
If you’re sure you want to delete the slide, then in the Slides pane that appears in Normal view, click to select the slide and then either click Home → Delete, or press the Delete key. Alternatively, in the Slides pane (or in Slide Sorter view), right-click the slide you want to delete and then choose Delete Slide from the shortcut menu that appears.

Figure 21-4. The basic slide layouts PowerPoint lets you choose from look similar to the ones you see here, but the details (like the graphics and the positioning of the title text) depend on the slide masters attached to your presentation. You can learn all about slide masters on Editing Slide and Layout Masters.
Rearranging slides in PowerPoint has the same effect as rearranging transparencies—but because you shuffle them using your mouse, you can’t accidentally drop them all over the floor.
To move one or more slides from one position in your slideshow to another:
In Slide Sorter view, click to select the slide (or slides) you want to move.
To select multiple contiguous slides, click the first slide, then Shift-click the last slide. When you do, PowerPoint automatically highlights all the slides in between. To select multiple noncontiguous slides, Ctrl-click each slide separately.
Drag your selection.
As you move your mouse, PowerPoint displays a line between slides (see Figure 21-5) to let you know where it will place your selection when you let go of your mouse.
When the line appears where you want to put your selection, let go of your mouse.
PowerPoint removes your selection from its original position and inserts it into your slideshow at the point where you dropped it.

If you do much work with PowerPoint, then you’ll probably run into a situation eventually where you want to create two similar slides through duplicating. For example, maybe the last slide in your show reiterates what was on the first slide. Duplicating is also a handy way to experiment with the formatting or content of one slide and keep a good copy in case your editing efforts go haywire. In situations like these, you’ll find it easier to duplicate a slide and then tweak the duplicate than to create two similar slides from scratch.
You can duplicate slides in the Slides pane, Outline view, or Slide Sorter view. To do so, select the slide (or slides) you want to duplicate, and then choose Home → Slides → New Slide → Duplicate Selected Slides. You can also right-click your selection and then select Duplicate Slide from the shortcut menu. PowerPoint duplicates the selected slide (or slides) and places the duplicate immediately after the selection.
Another (slower) way to duplicate slides is to copy and paste them, as described next.
PowerPoint’s cut, copy, and paste commands are an alternative way to move and duplicate slides. There’s nothing new to memorize, since these commands work exactly the same way as the cut, copy, and paste commands in other programs. You may also prefer the precision of clicking-and-picking to dragging slides around using your mouse.
To cut slides:
In Normal, Outline, or Slide Sorter view, select the slide (or slides) you want to cut. Right-click the selection and then choose Cut from the shortcut menu (or click the selection and then press Ctrl+X).
The selection disappears. If you’re in Slide Sorter view, a blinking vertical line appears in the spot where the selection used to be.
To copy slides:
In either Normal or Slide Sorter view, select the slide (or slides) you want to copy. Right-click the selection and then choose Copy from the shortcut menu (or click the selection and then press Ctrl+C).
To paste slides that you’ve cut or copied:
Still in Normal or Slide Sorter view, click between the two slides where you want to paste your cut or copied slides.
A blinking line appears where you click.
Press Ctrl+V or choose Home → Paste.
PowerPoint pastes in the most recently cut or copied slides and renumbers all of the slides in your slideshow.
If you create a lot of PowerPoint slideshows, then you’ll be happy to know there’s an easy way to grab slides from one slideshow and put them into another. Taking slides from other PowerPoint slideshows is useful not just for reusing chunks of slideshows that you’ve put together yourself, but also for borrowing from presentations that other folks have created.
Of course, you can always open both slideshows, hunt around in slideshow #2 for the slides you want to copy, copy them, and then paste them into slideshow #1, exactly as described on Cutting, Copying, and Pasting Slides. But there’s an easier approach—the Reuse Slides command.
To insert a slide from another slideshow:
Open the slideshow into which you want to insert a slide from another slideshow.
In the Slides pane in Normal view, click to select the slide you want the new slide to appear after.
If you skip this step, then PowerPoint assumes you want to add a new slide after the first slide of your main slideshow.
Choose Home → New Slide → Reuse Slides.
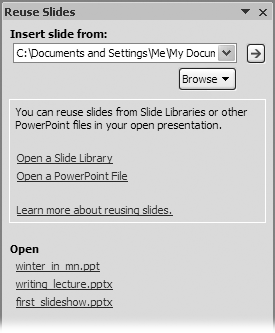
The Reuse Slides pane appears (Figure 21-6). Slideshow files you’ve previously borrowed from appear in a drop-down list.
From the “Insert slide from” drop-down menu, choose the slideshow you want to borrow from.
Alternatively, you can head to the bottom of the Reuse Slides pane, right under where it says Open, and click the name of the recently opened PowerPoint file you want to borrow from.
Tip
You can click Browse → Browse File (or click the “Open a PowerPoint File” link) to look for PowerPoint files on your computer, using an Open dialog box like the one in Figure 17-9.
In the Reuse Slides pane, a Slide Sorter view of the selected slideshow appears (Figure 21-7).
Click the slide you want to add to your slideshow.
PowerPoint adds the slide to your slideshow after the currently selected slide.
Figure 21-7. The preview section of the Reuse Slides pane shows you thumbnails of each slide in the other slideshow. If it’s a huge slideshow, then scroll bars appear in the preview section so you can scroll down and see all of the slides. Each time you mouse over a slide, PowerPoint expands it so you can see it better. Click the expanded version of a slide to add it to your main slideshow.

Slide masters and layout masters determine the initial look of every single slide in your slideshow. For example, if you place one background image, three text placeholders, and a date-and-time footer on a slide master, then every slide in your slideshow will contain the same background image, the same three text placeholders positioned in the same spots, and the same date-and-time footer.
In fact, you’ve been using slide masters without even knowing it. Whenever you choose a theme for your presentation, you’re actually applying a set of slide masters. A theme (Choosing a Theme for Your Presentation) is nothing more than a collection of masters. More specifically, a theme includes a slide master and a handful of layout masters packaged in a special file format (.thmx) so that you can easily apply them to different presentations.
The purpose of slide masters is to help you create an attractive, cohesive-looking slideshow: Make a change once, and it appears on dozens of slides instantly. And because PowerPoint lets you override the slide master by editing individual slides directly, you’re not locked into an all-or-nothing look.
But if you want to tweak a theme or create your own—in other words, if you want to add the same color scheme, formatting, or object (graphic, text, background, and so on) to multiple slides—then you need to learn to how masters work. Fortunately, editing PowerPoint’s masters is just as easy as editing any other slide. The only difference is that you’re not editing an individual slide—you’re setting up a sort of blueprint that you can then apply to any number of slides.
PowerPoint has a few different types of masters, which makes sense because the different presentation elements—slides, notes, handouts—require slightly different kinds of formatting. To understand masters in PowerPoint, all you need to know is what each one does:
Slide master. A slide master is a visual blueprint of how you want to format all the slides in your slideshow. Add a blue background and your company logo to your slide master, for example, and every single slide in your slideshow will have a blue background and that logo. Although most of the time one slide master per slideshow will do you just fine, you can create additional slide masters if you like.
Layout master. A layout master expands on the slide master to let you tell PowerPoint how you want specific types of slides to look. In other words, you can apply different formatting to Title slides, Title and Text slides, Title and Content slides, Comparison slides, and so on. For example, say you have a slide master similar to the one described in the previous paragraph. If you put an italicized header on the Title and Content layout master, then that header (in addition to the blue background and logo) automatically appears on every slide you format using the Title and Content layout. Then you’re free to use, say, a bold header (not italicized) on Title slides, since that’s a different layout.
PowerPoint automatically attaches one slide master and several layout masters to every presentation you create. To edit them, you have to switch into Slide Master view. You use the same steps whether you’re editing a slide master or one of the layout masters:
Create a new presentation (or open an existing one). Select View → Presentation Views → Slide Master.
PowerPoint displays the slide master in your workspace, ready for editing (Figure 21-8). The Master Slide tab appears and, on the left side of the screen where the Slides pane usually sits, you see instead the Thumbnail view of the slide master and the layout masters.
Mouse over the thumbnails on the left side of the screen to see a description of each layout. Then click to choose the slide master or layout you want to edit.
[Name of Theme] Slide Master. All of the changes you make to this granddaddy slide master affect each of the slides in your slideshow. The changes you make to this slide master affect all of the associated layout masters, too.
[Name of Content] Layout. These masters are your layout masters. Edits you make to them affect only those slides that have that particular layout applied to them. Your choices include Title Slide, Title and Content (a title plus some text), Section Header, Two Content (two-column), Comparison (another two-column option, this time with column headings), Title Only, Blank, Content with Caption, and Picture with Caption.
After you make your choice, PowerPoint displays the selected slide master or layout master in the workspace.
Figure 21-8. You can tell you’re looking at a slide master (as opposed to an individual slide) by the Slide Master tab and by the dashed lines you see in the Thumbnail view. These dashed lines remind you that the layout masters all depend on the slide master. In other words, PowerPoint applies any changes you make to the slide master to all of the other layouts in the theme.
Note
When you want to add text to a slide master (because, for example, you want to add the same quote or slogan to each of your slides), you need to insert a new text placeholder. Typing text inside an existing text placeholder doesn’t affect what you see on your slides when you run your slideshow. Instead, it appears only when you’re editing your slides.
Edit the slide master or layout master.
Everything you can add to a regular slide—text, special effects, background colors, and so on—you can add to a slide master or layout master. On the Slide Master tab, you see options for changing the theme, theme-related fonts, effects, colors, and background of your slide master or layout master. You can also click the Home tab or mini-toolbar (to format text) or the Insert tab (to insert text boxes and other objects). Figure 21-9 shows you an example of editing the Title and Text Content layout master.
When you’re finished editing the master, click Close Master View.
PowerPoint scoots you back to the slide editing workspace, where you see that PowerPoint has automatically updated all of the slides that correspond to the slide master or layout master you just changed (Figure 21-10).
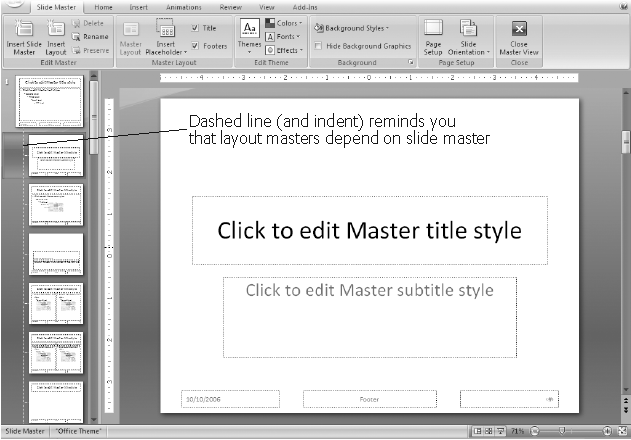

Figure 21-9. The Title and Text Content Master has been edited to change the font of the title and to include a graphic. You can change the formatting of the text placeholders that PowerPoint gives you, but you can’t change the text itself. (Well, you can, but PowerPoint won’t apply the changed text to your slides.) To add text to a slide master or layout master, you need to add your own text box and then type in your text.

Figure 21-10. This slide was created using the Title and Text layout, so it reflects the changes made in the Title and Text Content Master, as shown in Figure 21-9. The title is in a funky font and a graphic strip appears across the top of the slide.
PowerPoint lets you apply multiple slide masters to your slideshow. You don’t want to go crazy and apply a different slide master to every single slide because that would counteract the whole time-saving point of slide masters. Still, in some situations—like when you want to format the sections of a long presentation differently—the ability to apply multiple slide masters comes in handy.
To apply a new slide master to one or more slides:
In the Slide pane, select the slides to which you want to apply a new slide master. Go to Design → Themes and click the down arrow next to the thumbnails.
The Themes gallery appears. Mousing over each theme shows you a live preview, right there on your slide.
In the Themes gallery, right-click the theme you want to apply to your slides and, from the shortcut menu, choose how you want to apply the theme. Your choices are:
Apply to selected slides. Applies the selected theme only to the slides you’ve highlighted in the Slides pane.
Apply to matching slide. Applies the selected theme only to those slides that share a layout with the slides you’ve selected.
Apply to all slides. Applies the selected theme to all of the slides in your slideshow.
PowerPoint reformats your slideshow based on your selection.
Repeat steps 1–2 once for each slide master you want to apply to your slideshow.
You can add any recurring text to the top or bottom of every slide in your slideshow, every handout, and every page of your speaker notes. PowerPoint gives you an efficient way to add recurring information to your presentation: built-in header and footer placeholders. And here’s the best part: Simply by turning on a checkbox, you can choose to hide or show your headers or footers when you go to print your presentation.
PowerPoint lets you add headers to your handouts using the “Header and Footer” dialog box, but you can’t add headers to your slides this way. If you want to add a header to your slides, add it to the slide master, as described on Editing Slide and Layout Masters.
To add footers to your slides using the “Header and Footer” dialog box:
In the Slides pane (Normal view), select the slides to which you want to apply a footer.
You can skip this step if you want all of the slides in your slideshow (or all of your slides except your title slide) to have a footer.
Choose Insert → Text → Header & Footer.
The Header and Footer dialog box shown in Figure 21-11 appears.
On the Slide tab, choose what you want to appear on your slides.
Your options include:
Date and time. Turning on the checkbox next to this option lets you choose the current date and time, which PowerPoint can either update automatically (turn on the “Update automatically” radio box) or not (turn on the radio box next to Fixed). Choosing “Update automatically” also lets you specify the format in which you want the date and time to appear, the language, and the calendar type.
Slide number. Turn on the checkbox next to this option to tell PowerPoint to add automatically generated numbers to your slides.
Footer. Turning on the checkbox next to this option activates a text box into which you can type the text you want to appear at the bottom of your slides.
As you choose options, PowerPoint automatically highlights the corresponding footer placeholder in the Preview section of the “Header and Footer” dialog box (see Figure 21-11).
If you don’t want your date, slide number, or text box footer to appear on your title slide, then turn on the checkbox next to “Don’t show on title slide.”
If you want to apply your date, slide number, and text box footer only to those slides you selected in step 1 above, then click Apply. Otherwise, click Apply All to tell PowerPoint you want the information to appear on every slide in your slideshow (except, possibly, your title slide; see step 4).
The “Header and Footer” dialog box disappears, and PowerPoint applies your footer options to your slides.

Figure 21-11. After you tell PowerPoint to add the date and time, custom footer text, or automatically generated page numbers using the Header and Footer dialog box shown here, you can tweak the appearance of your header or footer content in Slide Master view ( Editing Slide and Layout Masters).
The “Header and Footer” dialog box lets you apply a date-and timestamp, automatically generated page numbers, and the same header and footer text to your notes pages and handout pages.
Choose Home → Insert → Header & Footer, and then click the “Notes and Handouts” tab to select it. Your options are identical to the ones described on Adding Footers to Your Slides with the addition of a Header checkbox, which lets you type in the text you want to appear in the upper-left corner of your notes and handout pages. When you’re done choosing what you want to appear in your header and footer, click Apply to All.
The “Header and Footer” dialog box disappears, and PowerPoint applies your footer options to your notes and handout pages.