In the old days, giving a PowerPoint presentation almost always meant connecting your laptop to a computer projector. You’d stand in front of a live audience and use a remote control to click through each slide while you explained each of your points in detail. You can still give a “stand and deliver” presentation, but today you can also:
Package your presentation for delivery on CD. This option is ideal for interactive, audience-paced presentations like tutorials or continuously running kiosk presentations.
Email the presentation to your audience.
This chapter covers both of these presentation delivery options.
Note
You can also convert your presentation to a Web page, complete with clickable links that viewers can use to navigate your slideshow and even jump to other documents or Web sites. For more on these and other advanced features, see PowerPoint 2007: The Missing Manual.
After you’ve put together your slideshow—created slides, added text and graphics, and so on—you have to give PowerPoint a few instructions on how it should display the slideshow when it’s show time. Say you’re creating a slideshow that you want to run continuously on a kiosk, with no human intervention. You might want to tell to linger a few seconds longer on certain slides than on others. Or imagine that you have two monitors hooked up to your computer: one set into the wall of a conference room, and one on a laptop placed strategically where only you can see it. You can have PowerPoint display the slideshow on the wall monitor, and the speaker notes on the laptop.
Using the Slide Show tab (Figure 23-1), you can set these options and more. The following sections show you how.

Figure 23-1. The Slide Show tab offers a grab-bag of options you can set to tell PowerPoint how you want your slideshow to appear when it runs on a computer.
The first thing to do when you’re setting up your slideshow is to decide which mode you want your slideshow to run in: full-screen, browser, or kiosk. Your choice affects the way folks can interact with your slideshow while it’s running, as well as which other options you can set.
Full-screen mode (Figure 23-2) is the way to go if you’ll be the one giving your presentation. As the name implies, in full-screen mode slideshows take up the entire screen. Depending on the PowerPoint options you’ve set, ghosted controls appear in the lower-left corner of a full-screen slideshow. Other ways you can interact with a full-screen slideshow running include keyboard shortcuts and a right-click menu (Slideshows for Multiple Audiences).
The program assumes you want full-screen mode unless you tell it different. But if you (or a coworker) has set your slideshow to another mode and you want to set it back, here’s how:
Choose Slide Show → Set Up → Set Up Slide Show.
The Set Up Show dialog box (Figure 23-3) appears.
Turn on the radio button next to “Presented by a speaker (full screen).”
When you set up a slideshow to run in browser mode, your slides don’t take over the entire screen; instead, they appear in a self-contained window (see Figure 23-4). A specialized right-click menu appears (Slideshows for Multiple Audiences), offering choices that folks running your presentation might find handy—printing your slides, for example. Designed to be relatively easy for non-PowerPoint folks to figure out how to run, browser mode is an option for slideshows you’re planning to distribute by CD or email.

Figure 23-2. Full-screen mode is the way to go if you plan to run your slideshow yourself, because it gives you the most options for interacting with your slideshow. Pressing Esc ends the presentation.
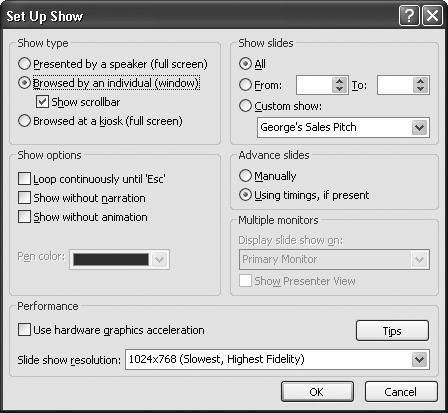
Figure 23-3. The Set Up Show dialog box lets you set useful but relatively seldom-used options that wouldn’t fit on the Slide Show tab.

Figure 23-4. In browser mode, no PowerPoint experience is necessary. To scroll from slide to slide, your audience uses familiar scroll bars. To close the slideshow, they click the familiar X in the upper-right corner of the browser window.
To set up your slideshow to run in browser mode:
Choose Slide Show → Set Up → Set Up Slide Show.
The Set Up Show dialog box appears.
Turn on the radio button next to “Browsed by an individual (window).”
For your audience’s sake, also make sure the Show Scrollbar checkbox, which now becomes available, is turned on.
If you leave this option turned off, your audience won’t see an obvious way to scroll through your slides. They must either know to right-click (which displays a menu of options) or sit there frustrated.
If you’re planning to let your slideshow run unattended, kiosk mode is what you want. In kiosk mode, there are no ghosted controls or right-click menus—which means there’s nothing built-in that your audience can click to start your slideshow, stop it, hop from one slide to the next, or otherwise interact with your slides. After all, since there won’t be a presenter, you don’t want to include presenter controls and risk someone wandering by and fiddling with them.
But what no presenter controls also means is that if you set up your slideshow to run in kiosk mode, you must set automatic timings (Setting Up Automatic Timing) so your slideshow plays automatically all the way through before looping around again.
To set up your slideshow to run in kiosk mode:
Choose Slide Show → Set Up → Set Up Slide Show.
The Set Up Show dialog box appears.
Turn on the radio button next to “Browsed at a kiosk (full screen).”
Typically, you’ll save kiosk-mode slideshows as self-running PowerPoint shows (Creating PowerPoint Shows).
First, make sure your slideshow includes all the slides you want to show—and none that you don’t. To eliminate a slide from a particular slideshow, you don’t have to delete it from the presentation—you can choose to hide it temporarily. That way, you can always take it out of hiding when you want to use it again.
Say you’re giving a presentation to management. One of your slides is quite high-tech—a complicated chart and some head-busting equations. Since this level of detail may confuse your audience, you can hide that slide. If someone in your audience happens to ask a pertinent question during the presentation, you can display the slide manually, as described in the table on Slideshows for Multiple Audiences. The same slide may be appropriate for the engineers you’re giving the same presentation to later in the week, so you can bring it out of hiding for that show.
Note
Because hiding a slide doesn’t delete it, don’t rely on hiding to conceal sensitive or proprietary information. There’s always a chance that you (or someone else running your slideshow) could unhide it accidentally. Instead, either delete the slide or create a custom slideshow (Slideshows for Multiple Audiences).
To hide a slide:
In the Slides pane in Normal view, select the slide (or slides) you want to hide.
If you don’t see thumbnails of your slides on the left side of your screen, choose View → Presentation Views → Normal to restore the Slides pane.
Click Slide Show → Set Up → Hide Slide.
In the Slides pane, the number of your newly hidden slide appears with a line through it (Figure 23-5).
The next time your presentation runs, PowerPoint skips the hidden slide(s).
Pros use teleprompters for a reason: they work. When your brain goes blank and you forget an important point, having an electronic cheat sheet that only you can see can save your presentation (and your reputation as a confident, extemporaneous speaker). PowerPoint offers the next best thing to a teleprompter: It lets you run your slideshow on one monitor, and your speaker notes on another. While your audience is looking at your slides or at you, you can sneak a peek at your notes. And because you’re not fumbling with 3 x 5 cards, no one will be the wiser.
To set up a presenter view, first connect two different monitors to the computer you intend to run your presentation on. (A laptop computer counts as one monitor.) Once the monitors are plugged in, open the presentation you want to set up as a presenter view. Then go to Slide Show → Monitors and turn on the checkbox next to Use Presenter View.
Click the down-arrow next to Show Presentation On (which has now become available), and then, from the list that appears, choose the monitor on which you want your slideshow to appear. Your speaker notes appear on the monitor you’re using to follow these steps.
You’ve got two choices when it comes to clicking through your slides at showtime: you can click through each slide manually, or you can set up an automatic slideshow by telling PowerPoint when to go from one slide to the next. An automatic slideshow is useful if, for example, you’re delivering your presentation on a kiosk, or if you have exactly 40 minutes to give your presentation and need PowerPoint to keep you on track. Also, if you’ve done a presentation many times, you may be able to give your spiel and let PowerPoint change the slides automatically, at just the right moment.
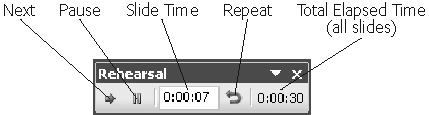
The key to setting up an automatic slideshow is to rehearse your presentation. You run through it just as you would in front of a live audience, while PowerPoint’s virtual stopwatch keeps track of how many seconds you spend on each slide. Then, if you’re satisfied with the pacing, you tell PowerPoint to keep those timings.
Tip
Instead of painstakingly rehearsing your presentation, you can assign each slide, say, a minute and a half (or any amount of time you choose). In the Slides pane, select a slide. Then select Animations → Transition to This Slide, turn on the “Automatically after” checkbox, and type the amount of time you want the currently selected slide to remain onscreen. (Make sure you turn off On Mouse Click.) Repeat for the remaining slides in your slideshow. Alternatively, for each slide you can type the amount of slide time you want in the Rehearsal dialog box (Figure 23-6).
To rehearse your presentation and set timings:
Click Slide Show → Set Up → Rehearse Timings.
PowerPoint begins a full-screen version of your slideshow and displays the Rehearsal toolbar (Figure 23-6).
Step through your presentation as you normally would, speaking aloud and gesturing to a pretend audience.
Hopping around slides in your slideshow affects your rehearsal timings. For example, clicking Repeat to back up to an earlier slide stops the overall slideshow clock, which doesn’t start up again until you return to (or pass) the slide you were on when you clicked Repeat.
Typing the number of a particular slide and then pressing Enter to hop directly to that slide resets the current slide clock even if you’ve already timed that slide; meanwhile, the overall slideshow clock keeps on ticking away.
If the phone rings, the dog barks, your boss steps in, or you’re otherwise interrupted, head to the Rehearsal toolbar and click Pause to stop the clock. Then, after you’ve handled the interruption, click Pause again to resume your rehearsal where you left off.
When you get to the last slide, take as long as you need to wrap up your presentation, and then press Esc.
PowerPoint kicks up the dialog box you see in Figure 23-7.
Choose Yes if you want PowerPoint to flip through the slides at the pace you just rehearsed the next time you run your slideshow. Choose No if you want to flip through your slides manually, or if you’ve discovered during your rehearsal that you need to add or delete slides, rearrange your slideshow, or come up with a lot more banter.
If you chose Yes, PowerPoint displays the Slide Sorter view showing your timings. (If you chose No, PowerPoint simply returns you to Normal view.)
On the Slide Show tab, make sure Use Rehearsed Timings checkbox is turned on.
The next time you start your slideshow, PowerPoint uses your rehearsed timings to click through your slides automatically.

Whether you choose to click through each slide yourself or use automatic timings (Setting Up Automatic Timing) to tell PowerPoint how fast to move through each slide, you usually want to stop the slideshow after the last slide. But for those times when you do want your slideshow to loop continuously (to begin the slideshow over again the instant it finishes), you can do that by clicking Slide Show → Set Up → Set Up Slide Show to open the Set Up Show dialog box. Then, in the Show Options section, turn on the “Loop continuously until ‘Esc’” checkbox. When you take down the show at the end of the day, just press the Esc key to stop the show and regain control of your laptop.
Note
If you set up your slideshow to run in kiosk mode (Kiosk mode), you don’t have to tell PowerPoint to loop continuously—it assumes that’s what you want. In fact, PowerPoint deactivates the “Loop continuously until ‘Esc’” option.
If you give a lot of presentations, you’ve probably found yourself creating one big comprehensive presentation on a particular topic, and then adjusting it for different audiences. For example, say you want to give slightly different variations of the same sales pitch to small-business owners, government acquisitions teams, and purchasing departments in large corporations. Say, too, that you want a ten-minute version of your presentation that skims the highlights for those times when all your potential clients will give you is ten minutes of their time. But you also want thirty-minute and hour-long versions that cover the technical features of your product.
You could reinvent the wheel by copying slides from one slideshow into another, reorganizing them, and saving the newly copied slides as a separate slideshow. But PowerPoint gives you an easier way to accomplish the same result. By creating a custom slideshow, you tell PowerPoint which subset of slides in your comprehensive presentation you want to designate as a new version. You even get to change the order the slides appear. Then you give your new version a meaningful name, like small_business or ten_minute, to remind you what situations to use it for.
Because you don’t actually duplicate slides or files when you create a custom slideshow, you don’t have to worry about carting around multiple PowerPoint files (or keeping them all updated and in synch).
Note
Unfortunately, you can’t mix and match slides from different slideshows in the same custom slideshow. To create a new slideshow from a bunch of different slideshows, you need to copy and paste individual slides ( Cutting, Copying, and Pasting Slides).
The term custom slideshow is a little misleading. When you create a custom slideshow, you’re not actually creating a new PowerPoint file; what you’re creating is a new version of the original slideshow in the form of a named list of slides. The slides themselves stay right where they are, in the original slideshow, which is exactly what makes custom slideshows so useful. Since they’re essentially nothing but lists of slides, no matter how many times the slides themselves change, your custom slideshows always stay automatically up-to-date.
Note
Additional ways to adjust the way your slideshow runs include hiding slides (Hiding Individual Slides) and looping your slideshow continuously (Looping Continuously).
Select Slide Show → Start Slide Show → Custom Slide Show.
If you’ve created custom slideshows in this presentation before, their names appear here, along with the Custom Shows option. (If you haven’t, only the Custom Shows option appears.)
Select Custom Shows.
A Custom Shows dialog box similar to Figure 23-8 pops up.
In the Custom Shows dialog box, click New.
The Define Custom Show dialog box appears (Figure 23-9).
Figure 23-9. PowerPoint lists each slide in your comprehensive slideshow along the left side of the Define Custom Show dialog box, ready for you to pick and choose which slides you want to add to your custom version. PowerPoint designates hidden slides with parentheses as you can see here on Slide 3.
In the “Slide show name” box, type a name for your new custom slideshow.
Pick a short name that reminds you of either the content of the slideshow you’re putting together, or the length (for example, thirty_minute). (In Figure 23-9, the custom slideshow’s name is food_and_fun.) Instead of underlines between words, you can use spaces if you like.
On the left side of the Define Custom Show dialog box, select the slide you want to add. Then click Add.
PowerPoint lists the slide in the “Slides in custom show” box on the right side of the dialog box. Repeat this step for each slide in the comprehensive slideshow that you want to add to your custom show.
If you like, you can change the order of the slides in your custom slideshow: in the “Slides in custom show” list, click the slide you want to reorder. Then press the Up or Down arrow to move the slide up or down in the custom show’s organization (it doesn’t affect their order in the actual presentation).
As you move each slide, PowerPoint renumbers all of the slides in your custom slideshow.
When you’re satisfied with your custom slideshow, click OK.
The Define Custom Show dialog box disappears, and the Custom Shows dialog box reappears with your new custom slideshow listed. You can test your custom slideshow at this point by clicking Show.
Click Close to dismiss the Custom Show dialog box and return to normal editing mode.


Because a custom slideshow is nothing but a list of slides, you can’t edit a custom slideshow’s slide content directly. (To do that, you need to edit the content of the original slideshow’s slides.) But you can add, delete, and reorder the slides that make up your custom slideshow.
To edit a custom slideshow:
Go to Slide Show → Start Slide Show → Custom Slide Show → Custom Shows.
A list of custom shows appears.
Click to select the name of the show you want to edit, and then choose one of the following options:
When you’ve finished editing your custom slideshow, click Close to dismiss the Custom Show dialog box and return to normal editing mode.
The control you have when it comes time to present your slideshow depends on how you’ve chosen to set up your slideshow: as full-screen, browser, or kiosk mode (see Choosing a Slideshow Mode).
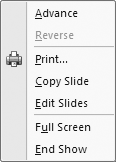
Full-screen mode. Right-clicking your mouse while you’re running a slideshow in full-screen mode kicks up a context menu that lets you choose how to present your slideshow, as you can see in Figure 23-10. But most folks find it quicker (and less distracting to the audience) to use the keyboard shortcuts described in Table 23-1. In addition, when you run a slideshow in full-screen mode, you see the ghosted controls shown back in Figure 23-2, and you can control your presentation with a remove control.
Tip
Even if you’re not normally a keyboard shortcut fan, you may want to familiarize yourself with Table 23-1. That way, if you’re in the middle of giving a presentation and you suddenly notice your slides racing by, for example, you’ll know why (and what to do about it).
Figure 23-10. Anything you can do with keyboard shortcuts, you can do with the context menu shown here. Trouble is, your audience has to sit through the menu selections, which may not do much for their concentration.
Table 23-1. Key Strokes for Navigating Your Slideshow
Press This
Go forward one slide
Enter, Space, Page Down, N, click, right-arrow, down-arrow
Back up one slide
Backspace, Page Up, P, left-arrow, up-arrow
Jump directly to a specific slide, even if it’s hidden (Hiding Individual Slides)
Type the slide number and then press Enter, or right-click the slide and, from the menu that appears, click the title of the slide you want to go to
Scroll back and forth through slides quickly
Roll the wheel on your mouse
Black out the presentation
B or . (period)
White out the presentation
W or , (comma)
End the slideshow
Esc or Ctrl+Break
Hide the cursor (pointer)
= (A to show pointer again)
Start drawing (annotating) electronically on a slide using your mouse or a graphics pen
Ctrl+P, then drag mouse (or stylus) to draw
Stop drawing and turn pen back into arrow pointer
Ctrl+A
Erase all the ink annotations on a slide
E
Pause a slideshow that’s running automatically
S (Press S again or + to restart it)
Browser mode. If you set up your slideshow to run in browser mode and told PowerPoint to show scroll bars (Moving Around Inside a Presentation), you can use the scroll bars in the browser window to scroll from slide to slide. Right-clicking shows a different context menu (shown in Figure 23-11) than the one that appears for full-screen presentations. Finally, only a few keyboard shortcuts work for browser-mode slideshows: Go forward one slide, Back up one slide, and End the slideshow (see Table 23-1).
Kiosk mode. If you set up your slideshow to run in kiosk mode (Kiosk mode), no ghosted controls appear, and no right-click menu appears, either. What’s more, none of the keyboard shortcuts shown in Table 23-1 work. Instead, you need to set up automatic timings (Setting Up Automatic Timing) so that the slideshow runs through your slides automatically so that folks who stop by the kiosk can navigate your slideshow.

A PowerPoint show is a version of your slideshow saved in a special format (.ppsx, .ppsm, or .pps) that folks who don’t have PowerPoint installed on their computers can run. Instead, when you distribute a PowerPoint show—by burning it to CD, for example, by emailing it—all your recipients need to run your show is a copy of the PowerPoint viewer. The PowerPoint viewers is a freely downloadable Microsoft program that lets viewers run and print slideshows, but not edit them.
The difference between a slideshow saved as a PowerPoint show and the same slideshow saved as a PowerPoint presentation file is simply this: opening the show in PowerPoint or in the PowerPoint viewer runs it in slideshow mode; opening the presentation file in PowerPoint runs it in editing mode. Both shows and presentation files can be edited in PowerPoint.
Note
When you package your slideshow for CD, PowerPoint automatically throws in a copy of the free PowerPoint viewer so the recipient of your CD doesn’t have to hunt one down herself. To run a slideshow that’s on a CD, simply insert the disc into a computer’s CD drive. Windows launches PowerPoint (or the PowerPoint viewer), and the show starts playing automatically.
To create a PowerPoint show:
Choose Office button → Save As.
The Save As dialog box appears.
From the “Save as type” drop-down menu, choose “PowerPoint Show(*.ppsx)”.
In the “File name” box, type the filename you want your file to have. In the “Save in” box, type the folder where you want to save your file. When you’re done, click Save.
PowerPoint saves your show using the filename and folder you specified, and the Save As dialog box disappears.
Thanks to PowerPoint 2007’s new, more compact file formats, emailing presentation files is easier on your audience than ever. Emailing a presentation is especially easy if you have Outlook installed on your computer. You never have to leave the comfort of PowerPoint.
Note
If you don’t have Outlook installed on your computer, you need to email your presentation the old-fashioned way. In your email program, create a new email message. Then fill in your recipients’ email addresses, attach your presentation file (for example, myPresentation.pptx), and then send the email.
To email a presentation, make sure you’ve saved your presentation, and then choose Office button → Send → Email. Microsoft Outlook opens a blank email message with your presentation automatically attached. Customize the email message, type your recipients’ email addresses, and click Send to send the message.
File-wise, creating a PowerPoint presentation can get messy fast. You’ve got your presentation file itself, of course, but depending on which elements and effects you’ve added to your slides, your presentation file may depend on additional files containing fonts, audio and clips, images, linked content, and so on. And if you’ve ever tried to make a quick copy of a presentation (for example, on your way out the door to catch a plane) you know how frustratingly hard this theoretically easy task is to pull off in reality.
Fortunately, PowerPoint can automate the process. When you package your presentation for CD, you tell PowerPoint to gather up all of the files you need to run your slideshow (complete with a copy of the PowerPoint viewer, if you like, to make sure they have everything they need to run the slideshow) and stick them in a single folder, which you can then store on your computer or, if you happen to have a CD burner connected to your computer, copy directly to disk.
Note
You can save more than one presentation to a CD (or to a named file). If you do, PowerPoint lets you specify what order you want your presentations to run in (see step 5 on Packaging Presentations for CD).
If you’ve created additional files such as supporting documentation, electronic brochures, or text scripts, you can tell PowerPoint to add them to the package, too. Supporting documentation helps offset the fact that your audience (and not you) will be running the slideshow. For example, if your slideshow is a tutorial, you can include self-tests, answer keys, instructional drawings, a bibliography, or anything else you want students to be able to refer to after they’ve worked through the tutorial.
To package a presentation for CD:
Office button → Publish → Package for CD.
A Package for CD dialog box similar to Figure 23-12 appears.
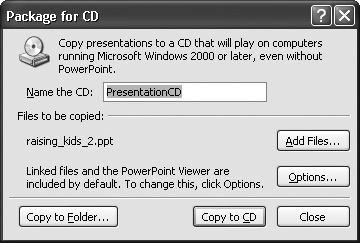
Figure 23-12. The Package for CD option is a bit of a misnomer. Yes, you can use it to gather up all your presentation-related files and burn them to a CD-but you can also use it to organize the files in a single folder, an option you may find useful if you’re hooked up to a network. Clicking Options displays the dialog box in Figure 23-13.
In the Name the CD box, type the name you want to give your CD (or, if you’re not planning to burn a CD, the name you want to give your presentation’s file folder).
Your audience will see this name, so make sure it’s both meaningful and appropriate.
If you have supporting files you’d like to add to your CD (or to your folder), click Add Files. In the “File name” box, type the name of the file you want to add (or browse your computer to find the file). Then click Add.
The Add Files dialog box disappears, and PowerPoint adds the file to the list of things to burn to your CD.
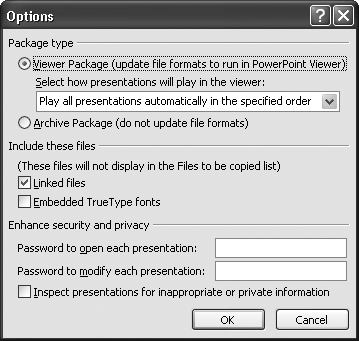
To tell PowerPoint how you want your audience to run your packaged presentation, click Options.
The Options dialog box opens (Figure 23-13).
Turn on the Viewer Package radio button.
This popular option tells PowerPoint to include a copy of the PowerPoint viewer in your package, as well as an executable file that launches the viewer preloaded with your presentation as soon as your audience inserts the CD.
If you choose this option, PowerPoint also lets you click the down arrow next to “Select how presentations will play in the viewer” and choose one of the following: “Play all presentations automatically in the specified order,” “Play only the first presentation automatically,” “Let the user select which presentation to view,” or “Don’t play the CD automatically.”
When you’ve finished setting options, click OK to close the Options dialog box.
In the Package for CD dialog box, choose one of the following:
Copy to CD. Choose this option if you want to copy your presentation files to a CD. Obviously, this option doesn’t work unless you have a CD burner attached to your computer.
Copy to Folder. Choose this option if you want to copy your presentation files to a named folder on your own computer, or to a computer on your network.
PowerPoint pops up a dialog box that lets you type in a name for your folder, as well as where on your computer (or network) you want to store it.
Click Close.
PowerPoint saves your presentation to disk or to your computer.