
IN THIS CHAPTER
Lists serve several different functions in all publications, including Web pages. A bulleted list can itemize a topic's points or catalog the properties of an object. A numbered list is helpful for giving step-by-step instructions. From a page designer's point of view, a list can break up the page and simultaneously draw the viewer's eye to key details.
Lists are an important alternative to the basic textual tools of paragraphs and headings. In this chapter, you study Dreamweaver's tools for designing and working with each of the three basic types of lists available in HTML:
Unordered lists
Ordered lists
Definition lists
The various list types can also be combined to create outlines. Dreamweaver supplies a straightforward method for building these nested lists.
What word processing programs and layout artists refer to as bulleted lists are known in HTML as unordered lists. An unordered list is used when the sequence of the listed items is unimportant, as in a recipe's list of ingredients. Each unordered list item is set off by a leading character, and the remainder of the line is indented. By default, the leading character is the bullet, a small, filled-in circle; however, you can create a custom bullet through Cascading Style Sheets.
You can either create the unordered list from scratch or convert existing text into the bulleted format. To begin an unordered list from scratch, position the cursor where you want to start the list. Then click the Unordered List button, supplied conveniently on the Text Property inspector, or use the Text

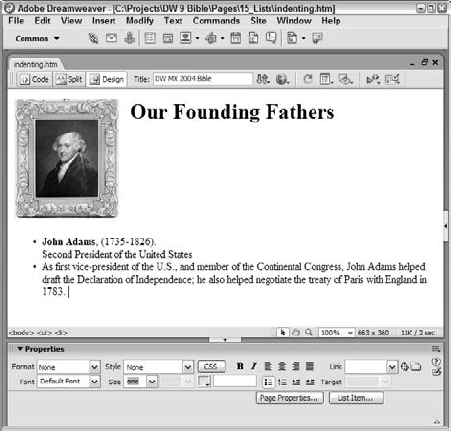
Figure 15-1. An itemized list that doesn't need to be in any specific order is perfect for formatting as an unordered list.
If you are changing existing text into a list, select the paragraphs first and then use the menu command or the Unordered List button on the Property inspector or Insert bar.
Dreamweaver creates one list item for every paragraph. As you can see from Figure 15-1, list items are generally rendered closer together than regular paragraphs. A list, unlike block elements such as paragraphs or headings, is not formatted with additional space above and below each line.
Warning
In Dreamweaver, the word paragraph is used literally to mean any text designated with a paragraph tag. Certainly, you can apply a heading format to an HTML list, but you probably won't like the results: The heading format reinserts that additional space below and above each list item—the ones generally not used by the list format. If you want your list items to appear larger, change the font size through Cascading Style Sheets, the Property inspector, or with Text
After a series of paragraphs is formatted as an unordered list, you can easily add additional bulleted items. The basic editing techniques are the same for all types of lists:
To continue adding items at the end of a list, simply press Enter (Return) to create each new list item. Another bullet is inserted, as long as the preceding item is not empty.
To insert an item within an unordered list, place your cursor at the end of the item above the desired position for the added item and press Enter (Return).
List items can be copied or cut and pasted to a different place on the list. When selecting a list item, use the Tag Selector in the status bar to be sure you select the tags enclosing the list item, not just the list item text. Position your cursor at the start of the list item that will follow the pasted entry and choose Edit

To end a bulleted list, you can press Enter (Return) twice or deselect the Unordered List button on the Text Property inspector.
You may occasionally need to tweak your list code by hand. Two HTML tags are used in creating an unordered list. The first is the outer tag, which defines the type of list; the second is the item delimiter. Unordered lists are designated with the <ul>...</ul> tag pair, and the delimiter is the <li>...</li> pair. The unordered list code in the Code inspector looks like the following:
<ul>
  <li>All subjects were right-handed</li>
  <li>Half the subjects were women</li>
  <li>Subjects ranged in age from 20 to 42 years</li>
</ul>
Tip
If you are working in Code view, you can click the List Item button in the Text category of the Insert bar to insert a <li>...</li> pair. Insert the tags <ul>...</ul> by clicking the Unordered List button on the Insert bar.
If a list item is too long to fit in a single line, the browser indents the text that wraps. By inserting a line break code, you can emulate this behavior even when you're working with lines that aren't long enough to need wrapping. To insert a line break, click the Line Break button in the Characters category of the Insert bar or choose Insert
Note
If you are creating an XHTML document, you must use <br /> instead of <br>. When you press Shift+Enter (Shift+Return), Dreamweaver automatically determines the correct format to use for the break tag based on the DOCTYPE statement, visible at the top of the document in Code view.
Adding Unordered Lists
In this Technique, you practice adding an unordered list to a Web page.
In the Files panel, switch to the Dreamweaver Bible working site previously created.
Go to Techniques15_Lists and open the file
lists_start.htm.Place your cursor below the paragraph following the Relative Realty Benefits heading.
In the Property inspector, click Unordered List. A bullet symbol appears, indicating the first list item.
Enter the following text: Local realtor team.
Press Enter (Return) and enter the next bullet point: Highly qualified personnel.
Press Enter (Return) and enter the next bullet point: A-Z assistance.

You can nest one unordered list inside another to create sublists. Place your cursor after the second bullet point and press Enter (Return).
In the Property inspector, click Text Indent.
You can also create a sublist by pressing Tab. Enter the text for the first item in sublist: #1 Local Firm.
Press Enter (Return) and enter the next bullet point: Top Ten state sales agents.

Save your page.
In the next Dreamweaver Technique, you add ordered (numbered) lists to the page.
Most browsers depict the default bullet as a small filled-in circle. In HTML, you can use any of three Dreamweaver-supported strategies to change the shape of your bullets. Your choices are to:
Add an attribute to the
<ul>or<li>tag to specify one of several other bullet shapes.Simulate an unordered list by using an image of the bullet.
Use Cascading Style Sheets to define a new bullet shape.
In HTML, the <ul> and <li> tags can include a type attribute that defines the shape of the bullet. Although the type attribute doesn't include a wide range of different bullet symbols, you have a few options. Most browsers recognize three bullet styles: bullet (the default), circle, and square. You can apply the style to the entire unordered list or to one list item at a time.
Warning
In the HTML 4.0 specification, the type attribute is deprecated. This means that although still supported by current browsers, the attribute has been replaced by a newer or more desirable method of achieving the same thing. In this case, the type attribute has been replaced by newer Cascading Style Sheet attributes. Because the type attribute is deprecated, it may not be supported at all in future versions of HTML. On a practical level, however, major browsers tend to continue supporting deprecated tags and elements so that older Web pages continue to display correctly. According to the HTML specification, if a browser stops supporting the attribute, the browser should simply ignore the attribute when encountered in a page.
Dreamweaver gives you access to the type attribute in Code view. To change the bullet style for the entire unordered list, follow these steps:
In Code view, right-click (Control+click) the
<ul>tag for your list and choose Edit Tag<ul>from the context menu.In the Tag Editor dialog box that appears, select one of the following from the Type drop-down list:
[Default]—No style is listed, and the browser applies its default, usually a solid circle
Disc—A solid circle
Circle—An open circle
Square—A solid square
Click OK.
The previous steps change the bullet style for all items within the list. You can also change the bullet style for just one item in a list, although it would be unusual to do so. Just follow these steps:
In Code view, right-click (Control+click) the
<li>tag for the list item you want to change and choose Edit Tag<li>from the context menu.In the Tag Editor dialog box that appears, make sure the Unordered List option is selected. This setting ensures that the correct list of options appears in the Type drop-down list.
In the Type drop-down list, select one of the bullet options (described in the preceding steps).
Note
Dreamweaver also enables you to change the type attribute for one list item or for an entire list by using the List Properties dialog box. To access this dialog box, click any single item in your list, and on the Properties inspector, click the List Item button. You can change the shape of the bullet for the entire list by selecting an option in the Style list; you change the bullet for just the selected item using the New Style list. Notice that only the Bullet and Square are available in the List Properties dialog box; the Circle option is not included.
A second method of changing the bullet symbol involves the time-tested solution of substituting a graphic for the bullet. Just as it does with graphical horizontal rules, the Web offers a substantial clip art collection of bullets. Using this method, you don't format your list as an unordered list at all; instead, you format your text in plain paragraphs or tables and then insert a graphic for each bullet. You can, however, have the best of both worlds by using CSS to change the bullet image, as described in the following section.
The newer technique for installing bullet styles uses style sheets. Cascading Style Sheets (CSS) can switch a list or list item's bullet style to the same shapes that the <ul> and <li> type attribute can; but with a style sheet, you can perform one additional task. You can assign the bullet style type to a specific file—in other words, you can customize your bullet image. The minor drawback to using this technique is that the list aspect of style sheets is not supported by early browsers, such as Internet Explorer versions 3.x and earlier and Netscape versions 4.7 or earlier. Safari and other standards-compliant browsers support this feature as well.
Note
If you're totally unfamiliar with CSS, you'll be happy to know that Cascading Style Sheets are covered in depth in Chapter 7.
Here is a brief version of the steps for using a style sheet to assign a new bullet symbol:
Choose Window
In the CSS Styles panel, click the New CSS Rule button.
In the New CSS Rule dialog box, click the Tag radio button to redefine the HTML tag.
From the option list, select the
ultag.Select a Define In option to determine whether the style definition is saved in the current document or in a separate style sheet file. Refer to Chapter 7 for more information about making this decision.
Click OK.
In the CCS Style Definition dialog box that appears, select List in the Category list (see Figure 15-3).
Find your graphics file by clicking the Browse button next to the Bullet Image text box. Click OK when you're finished.

Unlike a bulleted list, in which sequence is not vital, order is important in the ordered (or numbered) list. The major advantage of an ordered list is the automatic generation of list item numbers and automatic renumbering when you're editing. If you've ever had to renumber a legal document because paragraph 14.b became paragraph 2.a, you recognize the timesaving benefits of this feature.
Ordered lists offer a slightly wider variety of built-in styles than unordered lists, but you cannot customize the leading character further. For instance, you cannot surround a character with parentheses or offset it with a dash. Once again, the browser is the final arbiter of how your list is viewed.
Many of the same techniques used with unordered lists work with ordered lists. To start a new numbered list in Dreamweaver, place your cursor where you want the new list to begin. Then, in the Text Property inspector, click the Ordered List button or choose Text
As with unordered lists, you can also convert existing paragraphs into a numbered list. First, select your text; then click the Ordered List button on the Property inspector or choose Text
The default numbering system is Arabic numerals: 1, 2, 3, and so forth (see Figure 15-4). In a following section, you learn how to alter this default to use other numbering formats or to create an alphabetic list.
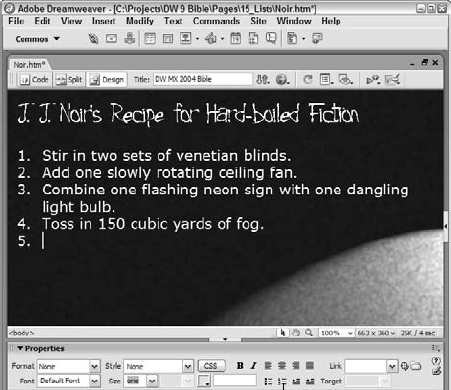
The HTML code for an ordered list is <ol>. Both <ol> and <ul> use the list item tag, <li>, to mark individual entries, and Dreamweaver handles the formatting identically:
<ol>
  <li>Stir in two sets of Venetian blinds.</li>
  <li>Add one slowly rotating ceiling fan.</li>
  <li>Combine one flashing neon sign with one dangling light bulb.</li>
  <li>Toss in 150 cubic yards of fog.</li>
  <li></li>
</ol>
The empty list item pair, <li>...</li>, is displayed on the page as the next number in sequence.
Inserting Ordered Lists
Ordered lists are inserted in a similar fashion to unordered ones, but have the advantage of automatically being renumbered when moved.
In the Files panel, re-open the
lists_start.htmfile.Place your cursor below the paragraph following the Top Three Reasons to Buy Now heading.
In the Property inspector, click Ordered List.
The number 1 appears, indicating the first list item.
Enter the following text: Lower interest rates
Press Enter (Return) and enter the next item: Best investment going
Press Enter (Return) and enter the final item: Owning your home means security
You can re-order a numbered list easily. With your cursor still in the final list item, choose the
<li>tag from the Tag Selector.Drag the selected list item and drop it in front of the first list item.
The items are automatically renumbered.

Save your page.
In the next Dreamweaver Technique, you work with a special kind of list, the definition list.
Modifications to an ordered list are handled in the same manner as those to an unordered list. The results are far more dramatic, however.
To continue adding to the sequence of numbers, position your cursor at the end of what is currently the last item and press Enter (Return). The next number in sequence is generated, and any styles in use (such as font size or name) are carried over.
To insert a new item within the list, put your cursor at the end of the item you want to precede the new item and press Enter (Return). Dreamweaver inserts a new number in sequence and automatically renumbers the following numbers.
To rearrange a numbered list, highlight the entire list item you want to move. Using the drag-and-drop method, release the mouse when your cursor is in front of the item immediately below the new location for the item you are moving. Again, Dreamweaver automatically renumbers the list items in order.
To end an item in a numbered list, press Enter (Return) twice, or press Enter (Return) and deselect the Ordered List button on the Text Property inspector.
You can apply these different numbering styles to your numbered lists:
Arabic Numerals—1, 2, 3, and so forth (this is the default style)
Roman Small—i, ii, iii, and so forth
Roman Large—I, II, III, and so forth
Alphabet Small—a, b, c, and so forth
Alphabet Large—A, B, C, and so forth
You can restyle your entire list all at once, or you can just change a single list item. To change the style of the entire ordered list, follow these steps:
Position your cursor anywhere in an existing list.
If necessary, click the expander arrow on the Text Property inspector to display the additional options. Click the List Item button. The List Properties dialog box opens with Numbered List displayed as the List Type, as shown in Figure 15-5.
Open the drop-down list of Style options and choose any of the numbering types.
Click OK.

Warning
If the List Item button is inactive in your Text Property inspector, make sure that you have only one list item selected. Selecting more than one list item deactivates the List Item button.
As with unordered lists, when you modify the style of one ordered list item, all the other items in the same list adopt that style. To alter the style of a single item, follow these steps:
Select the item you want to change.
In the expanded portion of the Text Property inspector, click the List Item button.
From the List Item section of the List Properties dialog box, open the New Style list of options.
Select one of the numbering options.
Although you can't automatically generate an outline with a different numbering system for each level, you can simulate this kind of outline with nested lists. See "Using Nested Lists" later in this chapter.
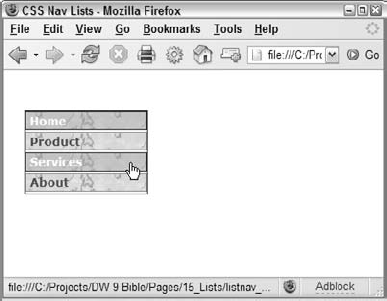
CSS has made many innovations possible in Web design. One of them is styled navigation buttons that look and act like sliced-bitmapped graphics with JavaScript rollover capability. CSS navigation bars, however, take up much less bandwidth, are instantly accessible, and are far easier to modify than bitmapped graphics. Although the same technique discussed in this section could be applied to a series of paragraph tags, the unordered list is a more natural fit. Of course, you don't want the bulleted list to look like a bulleted list, and CSS makes such a transformation possible with ease.
Here's an overview of the process:
Create background graphics for both the standard and mouse-over views.
Put a list of links in a
<div>tag. Each link serves as a separate button.Build the CSS file that combines the background graphics and the links.
Apply the appropriate CSS ID to the
<div>tag—and let CSS do the rest.
In addition to standard rollover behavior, this technique makes it possible to style an individual list item as the current page indicator, as shown in Figure 15-6.
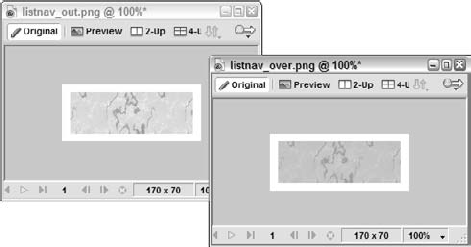
A little bit of prep work is needed before you can begin applying CSS to your list. The first step is to use a graphics program, such as Fireworks 8, to make the button images. Two separate but similar images are needed: one for the initial button look and another for the rollover view.
Here's the process I used to create my graphic images with Fireworks:
In Fireworks, create a new document larger than you expect your button to be. My initial document was 300 × 200. You can, of course, create a document the same size as your button image, but Fireworks' Fit Canvas feature makes trimming the excess canvas area a one-click operation.
Using the Rectangle tool, draw an object slightly larger than the expected width and height of a single button; my image is 150 pixels wide by 50 pixels high. The image is to be used in the background of your navigation element and should be large enough so that it does not tile.
Style your rectangle however you choose. I used an orange solid fill (#FF9900) and applied a Vein texture at 80%. It's a good idea to create your graphics with the dual states in mind. I'll be able to create a darker version of my image for the rollover just by altering the texture percentage.
Choose Fit to Canvas to trim the excess canvas from your background image.
Export in either JPG or GIF format. This serves as the background for my initial button (also referred to as mouse-out), so I've named this image
listnav_out.jpgand stored it in my Dreamweaver site.Alter the graphic to represent the rollover state. I simply lowered the Vein texture setting to 60%, which darkens the image significantly. Figure 15-7 shows a comparison between the two figures.
Export the image with an appropriate name; my second image is called
listnav_over.jpg.
Be sure to save your source file so that you can easily make alterations as needed. With your images created, you're ready to move into Dreamweaver to create the list and encompassing <div> tag.
Next, create the basic HTML and text elements for the CSS navigation bar. Because one of the elements you need is an absolutely positioned <div> tag, you can set up your CSS file and enter the first of the CSS definitions.
Tip
It's not absolutely necessary for you to create the CSS before you insert the tags, but because Dreamweaver renders each new style as it is applied, this approach gives you a better sense of what the CSS styles are doing.
To set up the CSS file with the first of the CSS definitions, follow these steps:
Create a new CSS file by choosing File
Open the HTML or dynamic page to which you want to add the navigation.
From the CSS Styles panel, select Attach Style Sheet; when the dialog opens, import your previously created style sheet. Click OK to close the dialog when you're done.
Now define the first of your CSS, which positions and gives the basic shape to the navigation bar. From the CSS Styles panel, select New CSS Rule.
In the New CSS Rule dialog box, select Advanced and enter the ID for the element to contain the list navigation. I called mine
#listnav. You'll recall that the opening hash mark designates an ID selector in CSS.Click OK to open the CSS Rule Definition dialog and switch to the Position category.
Set these values in the Positioning category, as shown in Figure 15-8:
Type
Absolute
Width
151 pixels
Top
50 pixels
Left
25 pixels
When you're finished, click OK to close the CSS Rule definition dialog. The next step combines two actions into one: inserting a
<div>tag and assigning the CSS style you just created.From the Layout category of the Insert bar, select Insert Div Tag.
In the dialog box, choose the just-defined CSS style from the ID list. When you click OK, your
<div>is added to the page with some placeholder text. Now you're ready to add your list items.Delete the placeholder text in the
<div>and, from the Property inspector, select Unordered List.Enter the text for your button labels, one button per bullet. I've got four list items:
Home
Products
Services
About
Be sure to avoid placing any unnecessary paragraph returns following the list. Only the list items you want to appear as buttons should be in the
<div>tag.Add a link to each list item by selecting the text and entering a filename in the Link field of the Property inspector. Alternatively, you can click the folder icon and choose a file from the Select File dialog.

At this point, you have a plain bullet list of links in an absolutely positioned <div> tag on your page, as shown in Figure 15-9. Now you're ready to start styling!

The definition of the CSS styles is at the heart of this technique. In all, six different styles are needed:
#listnav ul—Defines the font face and size for all the list items, removes the standard bullet, and clears the margin and padding.#listnav li—Ensures a bottom margin is present to separate each list item.#listnav a—Extends the active area of the link to the block-level and adds a background image, width, and border.#listnav a:link, #listnav a:visited—Defines the look of the text when the buttons are in their standard and already-visited states, giving a specific color and removing the underline from the link.#listnav a:hover—Swaps the background image and alters the text color in the rollover state.#sellistnav a:link, #sellistnav a:visited, #sellist a:hover—Sets the look and feel of the selected button, indicating the current page in a navigation bar.
Because I've already laid the foundation with a list of links inside a <div> with a defined CSS ID, the changes are immediately evident in Dreamweaver.
The process is the same for defining each CSS rule. Each rule is named with the Advanced selector type chosen in the New CSS Rule dialog box, which enables the user to enter any type of selector.
To get started with #listnav ul, follow these steps:
From the CSS Styles panel, select New CSS Rule.
In the New CSS Rule dialog box, with Selector Type set to Advanced, enter #listnav ul in the Selector field and click OK to open the CSS Rule Definition dialog.
Set these values in the Type category:
Font
Verdana, Ariel, Helvetica, sans serif
Size
14 pixels
Weight
Bold
Set these values in the Box category:
Margin
0 pixels (for all)
Padding
0 pixels (for all)
Set these values in the Border category:
Style
Solid (for all)
Width
1 pixel (for all)
Color
#990000 (for all)
Set this value in the List category:
Type
None
When you're finished, click OK to close the CSS Rule definition dialog.
You should notice an immediate difference in Dreamweaver. The bulleted list is already starting to look much more button-like (see Figure 15-10).

Figure 15-10. After you define the #listnav ul style, the bullets disappear from the unordered list.
The next style, #listnav li, affects each list item individually. Follow these steps:
From the CSS Styles panel, select New CSS Rule.
In the New CSS Rule dialog box, with Selector Type set to Advanced, enter #listnav li in the Selector field and click OK to open the CSS Rule Definition dialog.
Set this value in the Box category:
Margin-Bottom
2 pixels
The Margin-Bottom value determines the distance between each of the navigation buttons; increase the value to make the buttons farther apart.
When you're finished, click OK to close the CSS Rule definition dialog.
Now, to build up the #listnav a style, follow these steps:
From the CSS Styles panel, select New CSS Rule.
In the New CSS Rule dialog box, with Selector Type set to Advanced, enter #listnav a in the Selector field and click OK to open the CSS Rule Definition dialog.
In the Background category, click Browse and choose the exported image to represent the mouse-out. For my navigation bar, the file is
listnav_out.jpg.Set this value in the Block category:
Display
Block
Set these values in the Box category:
Width
140 pixels
Padding-Top
2 pixels
Padding-Right
2 pixels
Padding-Bottom
2 pixels
Padding-Left
5 pixels
These values determine the width of the block and set the position of the text within it.
Set these values in the Border category:
Style
Solid (for all)
Width
1 pixel (for all)
Color
#CC9900 (for all)
When you're finished, click OK to close the CSS Rule definition dialog.
With the background image in place, the buttons are really beginning to take shape (see Figure 15-11).
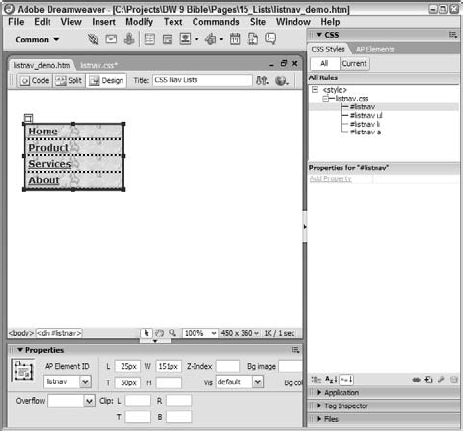
Figure 15-11. Alter the Padding-Left setting to move the text away from the left edge of the background image.
Next, to define two CSS rules—#listnav a:link and #listnav a:visited—at once, follow these steps:
From the CSS Styles panel, select New CSS Rule.
In the New CSS Rule dialog box, with Selector Type set to Advanced, enter #listnav a:link, #listnav a:visited in the Selector field and click OK to open the CSS Rule Definition dialog.
Set these values in the Type category:
Color
#993300
Decoration
none
Setting Decoration to none turns off a link's underline.
When you're finished, click OK to close the CSS Rule definition dialog.
Next, you want to define the #listnav a:hover style. Follow these steps:
From the CSS Styles panel, select New CSS Rule.
In the New CSS Rule dialog box, with Selector Type set to Advanced, enter #listnav a:hover in the Selector field and click OK to open the CSS Rule Definition dialog.
Set this value in the Type category:
Color
#FFFFFF
In the Background category, click Browse and choose the exported image to represent the mouse-out. For my navigation bar, the file is
listnav_over.jpg.Set these values in the Border category:
Style
Solid (for all)
Width
1 pixel (for all)
Color
#990000 (for all)
When you're finished, click OK to close the CSS Rule definition dialog.
The last style won't appear to have any effect until you preview the page in a browser, as shown in Figure 15-12.

The final style is applied to whatever link represents the current page. As such, it's an exact duplicate of the style just created for #listnav a:hover, which makes it a breeze to create. Follow these steps:
In the CSS Styles panel, right-click (Control+click) the
#listnav a:hoverstyle and choose Duplicate from the context menu.In the Duplicate CSS Rule dialog box, enter #sellistnav a:link, #sellistnav a:visited, #sellist a:hover in the Selector field.
When you're finished, click OK to close the dialog.
The style you just created is really the only one that you must apply, and you take care of that last detail in the following section.
Because of the way the CSS is written—and the fact that the containing <div> tag was assigned a CSS class from the beginning—almost all the styles are automatically applied. The only one left is the style that makes the current link appear selected.
To apply the selected link style, follow these steps:
Place your cursor in the list item that represents the current page. For demonstration purposes, I'll use Home.
In the Tag Selector, right-click (Control+click) the
<li>tag for the selected item. From the menu that opens, choose Set ID

That's it—your unordered list is now a fully functioning navigation bar. To modify any of the labels on the buttons, just modify the text directly. To add a new button, create a new list item by adding a paragraph return after any existing list item. Your new list item turns into a button the second you add a link to it.
A definition list is another type of list in HTML. Unlike ordered and unordered lists, definition lists don't use leading characters such as bullets or numbers in the list items. Definition lists are commonly used in glossaries or other types of documents in which you have a list of terms followed by descriptions or explanations.
Browsers generally render a definition list with the definition term flush left and the definition data indented, as shown in Figure 15-14. As you can see, no additional styling is added. You can, however, format either the item or the definition with the Text

Figure 15-14. Definition lists are ideal for glossaries or other situations in which you have a list of terms followed by their definitions.
To begin your definition list in Dreamweaver, follow these steps:
Choose Text
Type the definition term and press Enter (Return) when you are finished. Dreamweaver indents the next line.
Type the definition data and press Enter (Return) when you are finished.
Repeat steps 2 and 3 until you have finished your definition list.
Press Enter (Return) twice to stop entering definition list items.
Tip
If you have an extended definition, you may want to format it in more than one paragraph. Because definition lists are formatted with the terms and their definition data in alternating sequence, you have to use the line break tag, <br> (or <br /> for XHTML documents), to create blank space under the definition if you want to separate it into paragraphs. Press Shift+Enter (Shift+Return) or click the Line Break button on the Insert bar to enter one or two <br> tags to separate paragraphs with one or two blank lines.
When you insert a definition list, Dreamweaver denotes it in code using the <dl>...</dl> tag pair. Definition terms are marked with a <dt> tag, and definition data uses the <dd> tag. A complete definition list looks like the following in HTML:
<dl>
  <dt>Capital</dt>
  <dd>Sum owed by a business to its owners. See Owner's Equity.</dd>
  <dt>Cash</dt>
  <dd>Total of currency, coins, money orders, checks, bank
    drafts, and letters of credit the firm has on hand or in bank
    accounts from which money can be drawn immediately.</dd>
  <dt>Cash Payments Journal</dt>
  <dd>Journal for recording payments made in cash.</dd>
</dl>
Tip
You can vary the structure of a definition list from the standard definition term followed by the definition data format, but you have to code this variation by hand. For instance, if you want a series of consecutive terms with no definition in between, you need to insert the <dt>...</dt> pairs directly in Code view or in the Code inspector. To facilitate the insertion of these tags, you can click the Definition Term and Definition Description buttons in the Text category of the Insert bar to insert the appropriate tags in Code view.
Applying Definition Lists
Although definition lists are not used as frequently as unordered or ordered ones on the Web, they're perfect under specific circumstances.
In the Files panel, re-open the file
lists_start.htmworked on in the previous Dreamweaver Technique.Place your cursor below the paragraph following the Real Estate Terms heading.
Select Text
Unlike the other list types, no special indicator is displayed.
Enter the following text for the definition term: adjustment date
Press Enter (Return) and enter the definition data: The date the interest rate changes on an adjustable-rate mortgage.
Press Enter (Return) again and enter the second term: assessment
Press Enter (Return) again and enter the second definition: The placing of a value on property for the purpose of taxation.
Press Enter (Return) again and enter the final term: assumption
Press Enter (Return) again and enter the final definition: The term applied when a buyer assumes the seller's mortgage.

Save your page.
You can combine, or nest, lists in almost any fashion. For instance, you can mix an ordered and unordered list to create a numbered list with bulleted points. You can have one numbered list inside another numbered list. You can also start with one numbering style such as Roman Large, switch to another style such as Alphabet Small, and return to Roman Large to continue the sequence (like an outline).
Dreamweaver offers an easy route for making nested lists. The Indent button in the Text Property inspector—when used within a list—automatically creates a nested list. The ordered list in Figure 15-15, for example, has a couple of bulleted points (unordered list items) inserted within it. Notice how the new items are indented one level.
Follow these steps to create a nested list in Dreamweaver:
In an existing list, select the text that you want to indent and reformat with a different style.
In the Text Property inspector, click the Indent button. Alternatively, you can choose the Text
Note
Nested unordered lists exhibit a cool feature in most browsers—they automatically change the list style for each level. In many browsers, the outermost level is displayed with a bullet, the second level with a circle, and the third level with a square. This feature provides automatic outlining from an unexpected source! For ordered lists, the style of indented items does not change automatically.
Go to the List Properties dialog box and select another list type or style, as described in preceding sections.

Figure 15-15. Dreamweaver automatically generates the code necessary to build nested lists when you use the Indent button on the Text Property inspector.
Warning
You can unnest your list and reverse the effects of the Indent button by clicking the Outdent button in the Text Property inspector or by choosing Text
To see why one list contained inside another list is considered to be nested, look at the code created by Dreamweaver for the following list type:
<ol>
  <li>Stir in two sets of Venetian blinds.</li>
  <li>Add one slowly rotating ceiling fan.</li>
  <li>Combine one flashing neon sign with one dangling light bulb.
    <ul>
      <li>Use a bare bulb, preferably swinging.</li>
      <li>The neon sign should throw contrasting shadows.</li>
    </ul>
  </li>
  <li>Toss in 150 cubic yards of fog.</li>
</ol>
Notice how the unordered tag pair, <ul>...</ul>, is completely contained between the ordered list items.
Warning
If you don't indent your list items before you change the list format, Dreamweaver breaks the current list into three separate lists: one for the original list above the selected text, another for the selected text itself, and a third list for the items following the selected text. If you don't want this arrangement, use the Tag Selector to select the entire list you want to indent, and then click the Indent button in the Text Property inspector. Dreamweaver nests the list as described previously.
Dreamweaver gives you access to a couple of special-use list types: menu lists and directory lists. When the tags for these lists—<menu> and <dir>, respectively—were included in the HTML 2.0 specification, they were intended to offer several ways to present lists of short items. Unfortunately, browsers tend to render both tags as unordered lists. You can use Cascading Style Sheets to restyle these built-in tags for use in 4.0 and later browsers.
Note
Both the <menu> and <dir> tags are deprecated in HTML 4.0. Because most browsers format these lists like unordered lists, you should typically just use ordered lists instead of either of these list types. Ordered lists are supported in older browsers and will continue to be supported for the foreseeable future.
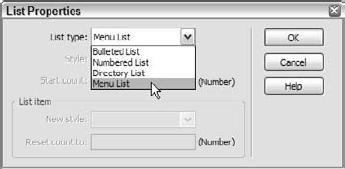
A menu list generally comprises single items with each item on its own individual line. To apply a menu list style, follow these steps:
In an existing list, select one item.
In the expanded Text Property inspector, click the List Item button.
In the List Properties dialog box, open the List Type drop-down list and choose Menu List, as shown in Figure 15-16.
Click OK.
The directory list was originally intended to provide Web designers with an easy way to create multiple-column lists of short items. Unfortunately, the most current browsers present the directory list's items in one long list, rather than in columns.
The directory list format is applied in the same way as the menu list, and here as well, most browsers render the format as an unordered list with bullets. To create a directory list, follow these steps:
In the current list, select one item.
In the expanded Text Property inspector, click the List Item button.
In the List Properties dialog box, from the List Type drop-down list (refer to Figure 15-16) choose Directory List.
Click OK.
Lists are extremely useful to the Web site designer from the perspectives of both content and layout. Dreamweaver offers point-and-click control over the full range of list capabilities. Keep these points about lists in mind:
The primary list types in HTML are unordered, ordered, and definition lists.
Use unordered lists when you want to itemize your text in no particular order. Dreamweaver can apply any of the built-in styles to unordered lists, or you can customize your own list style through Cascading Style Sheets.
An ordered list is a numbered list. Items are automatically numbered when added, and the entire list is renumbered when items are rearranged or deleted. Dreamweaver gives you access to different styles of numbering—including regular Arabic, Roman numerals, and uppercase or lowercase letters.
CSS styles can significantly adjust the look and feel of your lists, both unordered and ordered, even to the point of converting them into a navigation bar.
Definition lists are designed to display glossaries and other documents in which terms are followed by definitions. A definition list is generally rendered without leading characters such as bullets or numbers; instead, the list terms are displayed flush left, and the definitions are indented.
Dreamweaver gives you the power to nest your lists at the touch of a button—the Indent button on the Text Property inspector. Nested lists enable you to show different outline levels and to mix ordered and unordered lists.
Menu and directory lists are also supported by Dreamweaver. These special lists are rendered in a similar fashion, but they can be adapted through style sheets for extensive use.
In the next chapter, you learn how to work with frames and framesets in Dreamweaver.