Image, Depth, and Perspective
So far we’ve concerned ourselves with making scenes smooth and believable. We’ve looked at ways to even out ugly shot transitions and examined what to do when faced with many tracks from which to choose. Unfortunately, these are the very procedures that some editors point to when claiming that dialogue editing is boring and wanting of soul. “Sound effects editing is filled with opportunities for artistic expression, but not so dialogue!” Rubbish.
You have to do your basic scene balancing before you can get to the fun stuff. It’s very difficult to manipulate subtle changes in the focus of a scene if you can’t hear past the room tone explosions at each edit. In the same way, you can’t paint your walls until you fix the falling plaster. Once your scenes run smoothly, however, and there are no serious problems with noises or off-microphone sound, you’re ready to begin adding some life to the dialogue.
In this chapter we’ll begin to turn flat dialogue into something with depth, focus, and story.
Dialogue in the Soundscape
Film dialogue is overwhelmingly mono, usually coming exclusively from the center speaker.1 As shockingly retro as this may seem, there are good reasons for it. Logic tells us that the apparent sound source of a line of dialogue should mimic its visual source. Given the ever growing number of channels on a big-league film print, you’d think we’d take advantage of some of those channels and move the dialogue around the screen. See it on the left; hear it on the left. Same goes for the right. Moving character? No problem, automate a pan from left to center to right and into the audience. Simple? Yes, but set up such a dialogue scene on your workstation and you’ll sense the lunacy of your “logical” plan right away.
Panning
People interact differently with dialogue than with music, sound effects, backgrounds, or Foley. We’re both more critical and more imaginative with dialogue, and when it’s panned, we’re not the least bit forgiving. Rather than enhancing the film experience, panned dialogue (other than an occasional offscreen line or group loop) often takes the viewer out of the scene—the last thing you want. Problems crop up when you place dialogue anywhere but in the center loudspeaker behind the screen.
Here are some of the factors that go into dialogue placement within the sound image:
The bottom line on dialogue imaging is that you can, in fact, do a bit of panning but you must be terribly sober about it. Normally, however, the dialogue comes out of the center speaker and none other.
Depth
Just because film dialogue is mono doesn’t mean it’s flat. In a flat scene, the dialogue sticks to the screen. Everything is given equal weight, so there’s no focus. To “manage” levels, the scene is compressed too much so it presents itself as a wall of sound. There’s no air in the sound, and the scene is fatiguing to watch. In short it lacks depth.
When a scene has depth, there’s a feeling of space around the words. There’s a focus, however subtle, that not only guides the viewer but adds commentary. And even though all of the dialogue is coming from one speaker, there’s a feeling of layers, as though some sounds stay near the screen while others move progressively away from the speakers.
Achieving Depth
First of all, it certainly doesn’t hurt to start with excellent recordings. When the dialogue is well recorded and on-axis without too much ambient noise, you don’t have to overcook the tracks in the premix, so you can hold onto the natural roundness of the voices. The reflections in the room, undamaged by aggressive noise reduction, contribute to a sense of space.
But depth control is mostly about well-planned, well-mixed tracks. When you receive an OMF, the narrative is there but there’s no discipline in the tracks and it’s impossible to find the personality of each region. As you reassemble the shots, rid them of noises, and smooth the transitions, you develop an understanding of how the regions work and how they fit together. You begin to understand them in a way that you couldn’t when they were all jumbled together. Each scene, and in fact each shot, you discover, contains a “moment.” This moment is the focus of the action. Make sure that it isn’t compromised by a footstep, door close, or other natural but ill-placed sound. Give the featured moment a bit of space in which to breathe, thus putting it on stage.
Split off the regions you want to separate from the rest of the scene. You’ll manipulate these separated regions later, in the premix. A tiny bit more volume here, a little less there, wetter, sharper, duller.2 If you want to push a shot further back toward the screen, split it off so that the mixer can change the EQ to darken the sound, reduce the level a bit to make it less prominent, or create a little reverb.3 Even a tiny amount of trickery will create distance between foreground dialogue and a manipulated background element, and the process can be used to imply physical, emotional, or social separation.
Depth and the Mixer
Ultimately, most of the depth in a scene comes from the countless tiny fader moves that the mixer executes while predubbing. “Microdynamic control,” you might say. The finesse of the mixing process pulls one shot from the screen and pushes another back, so plan the tracks so that you and the mixer can take advantage of your editing fantasies. Prepare tracks that seduce the mixer into playing with depth.
If, on the other hand, you don’t dissect your tracks enough to let them talk to you, or if you merely “process” your tracks in a workstation rather than giving them the time they need in a proper dialogue premix, you probably won’t achieve the separation and depth you’re seeking. If you limit and compress as a substitute for manual fader moves, you clog the air within the tracks and the light in the conversation will darken. There’s a reason that dialogue is premixed on a dubbing stage.
I don’t mean that you can’t achieve a decent dialogue premix with a workstation. It can be done, but you need time and a decent interface that encourages you to constantly interact with your tracks. You have to work with a controller whose latency is small enough and whose fader resolution is high enough to allow for instant, fine adjustments. Even with the right tools, however, you’ll probably spend as much money—and a lot more time—doing a competent dialogue premix in a workstation as you’d spend on a budget board mix. Unfortunately, mixing “in the box” is usually associated with low-budget productions, so you’re expected to “box-mix” the tracks in less time, not more, than you’d get for a mix on a mixing stage. Still, by planning your tracks well and knowing what’s important in each shot, you can develop rich, deep scenes that will survive even in-the-box mixes.
Focusing on One Character in a Group
Imagine a choir singing with our protagonist standing on the second riser. The scene begins with a wide shot, and we hear the whole choir singing. As the camera slowly dollies toward our herione, we want to call attention to her voice. We may do this purely for “realism”—to sense more of her voice as we approach, providing another layer to the sound. Or we may want to psychologically focus on her, to reflect on what we learned of her in the last scene or to telegraph something soon to happen. In the mix we might subtly lower the choir’s tracks to lend her an unnatural aura of isolation.
Achieving Focus in Common Situations
Whatever your objectives, you’ll need to create a clean sync track with nothing but the character’s voice that you can mix with the track from the wide shot. Normally, this is done with postsync (ADR), where you prepare the actress’s lines and then rerecord her singing, sync to picture. Rerecording singing is in many ways easier than rerecording spoken dialogue, since most music carries a predictable rhythm. The actress need but learn the “quirks” in her onscreen performance to make a good match. (Chapter 15, ADR, discusses how to spot the shots, prepare the paperwork, and record and edit the lines.)
A similar situation is a dolly shot that moves down a line of football players attempting to sing the national anthem. As we approach an athlete we hear his voice strengthen, hold and fade away as we pass, only to be overtaken by the next one entering the frame. In this case, you’ll record ADR for each of the featured characters, panning (maybe) and fading (certainly) the lines as the camera moves down the line. If, when approaching individual players, you can hear their voices on the original recording, you’ll need to replace the take with a less specific version. Otherwise, you run the risk of hearing someone singing with himself.
Perspective
In a scene with two characters, the sound level of each character often remains the same regardless of who’s on screen, as though we’re sitting somewhere between the two, listening. However, there are questions of perspective that must be asked. Cut to a wide shot and we may or may not change the sound to match the change in picture perspective. On a very close shot, we may or may not accentuate this physical closeness with a bit more volume. Even if we cut to a long shot—a point of view that would in the real world certainly affect our sound perception—we may stick with a close-up sound. Or we may completely muffle the dialogue to reflect the frustration of trying to eavesdrop from across the yard. These are choices about sound perspective.
Simply put, perspective in sound reflects decisions we make concerning our relationship with the screen action as well as the relationships—physical and emotional—between the characters within the scene. In the conversation scene from the last paragraph, we kept the same perspective when cutting from one close-up to the other, and hence kept the same volume, EQ, and reverb for the two characters regardless of who was on screen.
This wasn’t only because they were seated relatively close together but also because they were communicating with each other, carrying on a conversation, so there was some sort of emotional contact. There was no reason to honor the “fact” that during a cutaway to the nonspeaking character there would logically be a sense of sound separation. Respecting reality—pulling back the dialogue a bit as we cut to the listener’s face—would emotionally separate the two. However, when we cut to a wider shot, we must decide what we’re trying to accomplish.
Are we, the viewers, being shut out? If so, a strong perspective cut that reminds us of our outsider status would make a point. If, on the other hand, we keep the scene steady, ignoring the change in picture perspective, we keep the focus on the conversation rather than on the physical world. It’s as though the conversation transcends changes in our viewpoint.
Perspective to Achieve Emotional Separation
I recently edited the dialogue on a film about a mother coming to terms with her adult son’s impending death. The film deals with a mother and son struggling with the pains and mistakes of their past. Much of the film takes place in the son’s bedroom, so there’s not a lot of action. At the beginning of the film, the two characters don’t know how to connect, since they’d never learned how to talk to each other. During these early scenes, Mom aimlessly cleans Son’s room as they talk at each other.
Since there’s no real chemistry between the two at this point in the film, I forced a bit of perspective on all off-camera dialogue. As we watched Mom clean nervously while “listening” to her son’s harpings, the son’s dialogue was very slightly attenuated and made a tiny bit wetter, as though Mom was hearing but not listening. When Mom was talking and we lingered on a cutaway of Son, her voice, too, was made slightly distant.
The film progressed, and after the inevitable row there was some real, though painful, connection between the two. As they battled and reconciled, the perspective difference between them vanished. They weren’t exactly getting along, but they were communicating. The rest of their conversations in the bedroom were mixed at equal volume, keeping the characters connected.
Perspective to Achieve Physical Distance
The most recognizable perspective cuts are about physical rather than emotional or psychological distance. For example, Mom and Dad are arguing in the kitchen. We cut to the other end of the house where we see a frightened child listening, along with us, to the muted shouts of the parents. This is a classic perspective cut that tells us something about the size of the house, the parents’ ability to keep their problems from the child, and about the way the child perceives the argument.
Another example from Hamlet, Act 3: In Scene IV Hamlet and Gertrude are arguing in her chamber; the action might cut from one close-up to another and be sprinkled with medium and wide shots. More than likely we’d keep this conversation rather level, to constrain the energy of their argument and to hold the focus on the fight. But when cutting to a behind-the-curtain scene to see all of this from Polonius’s point of view, it’s his breathing and body motion that comes to the forefront whereas the fight between Hamlet and Gertrude sounds lower and a bit darker.
This perspective split not only accentuates the spatial separation between the two sides of the scene but also calls on a film language convention used to describe eavesdropping. By pushing the main part of the scene (for example, Hamlet and Gertrude’s brutal argument) to the background, we make Polonius the focus of the shot. His fear, his anger, and his humanity are what counts. This sort of perspective cut is a common way to identify the outsider as well as to give some depth to a scene.
Perspective to Achieve Social Isolation
Sometimes there’s no real physical separation, yet you use perspective to separate one member of a group from the rest. Imagine a circle of schoolgirls, giggling and gossiping, largely at the expense of one of them—let’s call her New Girl. All dialogue between the girls in the circle is prepared and mixed in a normal way, so nothing initially seems wrong to an outsider. But the teasing intensifies, and New Girl becomes increasingly frustrated. To make a point, we force perspective on the sounds of the other girls when the camera cuts to New Girl. We begin to experience the badgering from her point of view.
The sounds of the provokers become wetter, lower in level, and maybe a bit darker, all to show the increasing separation between New Girl and the group. When we cut back to the other girls, the sound is normal again, further stressing the frustration of the victim. Not only is she subjected to the other girls’ taunts but, worse, she’s separated from the society she so wants to be a part of. By the end of the scene, we may have lost all sound when we share New Girl’s viewpoint. She gives up and tunes out. Most of the emotional message of the scene is delivered through sound manipulation.
Perspective cuts to emphasize emotional separation need not be delivered with a hammer blow. The ones I used to divide Mom and dying Son aren’t severe—just a 2 dB level drop, a little EQ, and a tiny bit of reverb. Few people will notice, but this subterfuge makes a difference. Other times, when you want to stress distance, separation, or fear, you can apply aggressive perspective.
Remember, leave the equalization, dynamics processing, and reverb for the mix. Plan the subtle storytelling, then organize your tracks so that it’s easy to develop your ideas with the rerecording mixer.
The Telephone Split
If you stand beside someone who’s talking on the phone, you hear only one side of the conversation. Of the person at the other end you hear, at most, occasional squawks and clicks. You won’t be able to follow the exchange. Often this is what happens in a film. If the filmmaker doesn’t want the viewer to know what’s up on the other end of the line or wants a realistic feeling, you’ll get a straight, realistic scene like this.
However, another convention in film language allows us to hear both sides of the conversation, as though we were listening in. This trick, unrealistic as it is, can be useful as an efficient way to kill off exposition and other essential information, and it serves to electronically bring together two characters, all the while keeping them physically separate.
Editing the Telephone Split Like it or not, the telephone split is part of the language of film, so you’d best know how to do it. Here’s how:
• |
Mark each location change cut in the scene. Remember, these marks are based on picture, not sound, edits. |
• |
Split the tracks at the picture cuts. You’ll edit onto four tracks: |
– Character A “live.” We’re with this character, so we hear his voice in a natural way. We hear this track only when seeing character A. |
|
– Character A “phone.” This is the phone voice of character A as heard by character B. We hear this track only when character B is on the screen. |
|
– Character B “live.” We’re with this character, so we hear her voice in a natural way. We hear this track only when seeing character B. |
|
– Character B “phone.” This is the phone voice of character B as heard by character A. We hear this track only when character A is on the screen. |
|
• |
From the moment the phones are picked up, edit two sets of room tone: one for the live voice and another for the disembodied voice coming over the phone. Phone noise doesn’t come and go with speech, like a walkie-talkie. Instead, there’s a constant noise floor coming over the phone. |
• |
Once you edit the tracks, removing all unnecessary noises, fixing articulations, and doing all of the things you normally do with dialogue, soften (lengthen) the perspective cuts a bit. Usually, two to three frames of crossfade will do, but it depends on the effect you’re after as well as the relative noisiness of the tracks. (See Figure 11-1.) |
Using the Right Edit
During a crossfade, two sounds are of course playing at once. Ideally, there’s neither a “bump” from excess energy nor a “hole” from a loss of energy. Most of the time you don’t pay much attention to this. If you set up your preferences correctly (and you’re not sharing the machine with another editor who changes your preferences while you sleep), everything ought to work well. But what if you try a perspective cut and something goes terribly wrong—your edits bump. What happened?
Crossfades
Normally you’re cutting or crossfading between two different sounds. (See Figure 11-2.) Even when you’re crossfading between different parts of the same soundfile the material is usually not from the exact same moment, so you aren’t crossfading across phase-aligned material. One side fades out and the other fades in, and the 3 dB attenuation at the fade’s midpoint is perfect to prevent a rise or drop in level during the transition. (See Figure 11-3.)
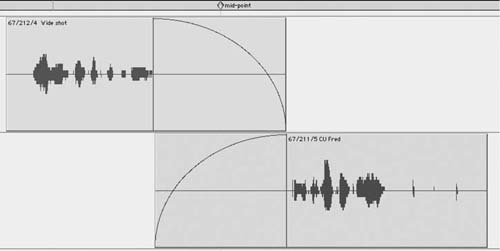
Figure 11-1 Example of a finished phone split. The markers indicate which character is onscreen. Continuous room tone for each character prevents the phone from “keying in and out” like a walkie-talkie and maintains a steady room presence when a character stops speaking. The tracks have been renamed for this demonstration. Only if the film has an extraordinary number of phone conversations do you create dedicated phone tracks.

Figure 11-2 A “normal” crossfade between two shots. Note the symmetrical fades that provide 3 dB of midpoint attenuation.
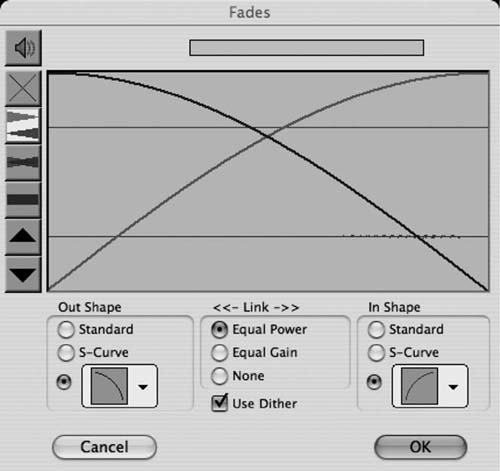
Figure 11-3 The Pro Tools fade control window showing a 3 dB attenuation at crossfade midpoint. This is the fade you’ll use under normal circumstances. Pro Tools calls this “Equal Power” crossfade linking. Most DAWs offer a similar dialogue box.
Crossfades for Perspective Cuts
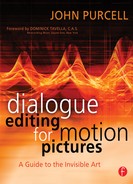
With any type of perspective cut, including a phone split, you have to pay attention to the type of edit linking you use. (See Figure 11-4.) To create a perspective cut, you first begin with one continuous region. You perform an edit, likely at a picture-motivated location, and then split the region on to two tracks.
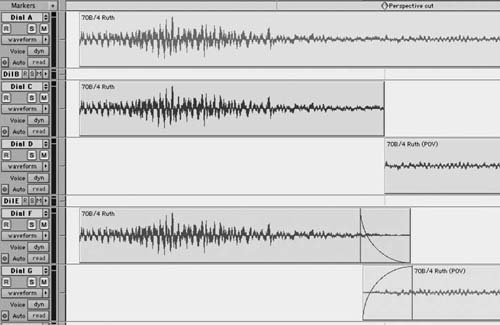
Figure 11-4 The history of a perspective cut. On Dial A is the original region, crossing a perspective cut marker; the cut is seen on Dials C and D. The faded perspective cut is on Dials F and G. Note the very steep fadeout on Dial F. This provides a 6 dB midpoint attenuation, sufficient to compensate for the “bump” normally caused by playing two phase-coherent sounds simultaneously.
Once split onto two tracks, the regions are overlapped and then crossfaded. The amount of overlap depends on the “rules” of the film you’re working on and the transition softness or harshness you’re trying to achieve. Now begins the problem. Use the same −3 dB crossfade that you normally use and you’ll hear a rise during the crossfade.
Because the material being played during the crossfade is precisely the same on both tracks, it plays together twice as loudly as a during a “normal” crossfade. Whereas 3 dB was enough attenuation to quell a rise in our first example (refer to Figure 11-2), during a perspective crossfade we need 6 dB of midpoint attenuation to achieve unity. (See Figure 11.5.)

Figure 11-5 The Pro Tools fade control window showing a 6 dB midfade attenuation, which is what Pro Tools refers to as “Equal Gain” fade linking. It’s used only for perspective edits, where both sides of the crossfade are exactly the same.
Using the wrong amount of attenuation is a very common mistake, and it shamelessly foils attempts at smoothness. Get into the habit of listening to all crossfades. If something sounds strange, don’t start moving the fade right away. First double-check the fade and make sure the fade linking is set correctly.
1 Such generalizations are always dangerous. There are, of course, stereo dialogue films and there are giant gee-whiz films that place dialogue all around the screen because, well, they can. And there are artistic films that play with stereo images for reasons beyond those of traditional narrative.
2 The English language is not “rich” when it comes to describing sound qualities. Often the most efficient way to discuss sound is through metaphor. Hence, descriptions such as “wet” (reverberant), “dry” (little or no reverb), “sharp” (rich in high frequency, when describing nonmusical sounds; high in pitch when describing musical sounds), and “dull” (poor in high-frequency elements; the opposite of “bright”).
3 Under normal circumstances it’s nuts to add reverb to a track while you’re working in a cutting room. When I say “add reverb” I mean organize your tracks in such a way that the mixer can easily add reverb (or EQ or dynamics or delay) to the shot.