No One Works in a Vacuum—How to Know
Where You Fit into the Filmmaking Process
Introduction
Most of the challenges facing dialogue editors are the result of decisions made on the set. Location mixers must make choices about sound, story, sample rates, timecode, and formats. These decisions will irrevocably affect the future of the production tracks and hence your way of working.
You can’t undo incorrect sample rates, weird timecode, or improper timebase references, but if you equip yourself with a knowledge of production workflows, you’ll be better able to respond to the problems that come your way. Since you inherit the fruits of the production, you need to understand how films are shot and how the moviemaking chain of events fits together. This way, you can plan postproduction workflows before the shoot, before it’s too late to do anything but react to problems.
The way we work today is the offspring of generations of tradition, technological advances, economic pressures, and a good deal of chance. Current cinema workflows are more complicated than ever, and with the introduction of high-definition shooting, postproduction, and distribution, things appear to be truly out of control. But remember that with each significant new technology in the film industry has come a brief period of bedlam that quickly settled into a state of equilibrium. And usually the pressure to get things back to normal is so great that innovative, creative means are quickly devised to rein in the technology and make things better than ever.
How We Got Where We Are
Sound recording and motion picture filming grew up at more or less the same time. When Thomas Edison recited “Mary Had a Little Lamb” in 1877 to demonstrate his tinfoil phonograph,1 a bitter war of innovation, patent fights, and downright thievery was raging in Europe and the United States to come up with methods of photographing and projecting moving pictures. Most initial attempts at displaying motion were inspired by Victorian parlor toys like the Phenakistoscope and later the Zoetrope (a spinning slotted cylinder that contained a series of photographs or drawings); a strobe effect gave the impression of motion when the pictures were viewed through the slots. Enjoyable though those gadgets were, they weren’t viable ways to film and project real life.
Auguste and Louis Lumière’s public screening of La sortie des ouvriers de l’usine Lumière in 1895 is generally acclaimed as the “birth of cinema,” but, then, Christopher Columbus is credited with discovering America. Believe what you will. La sortie des ouvriers, about a minute long, was a static shot of workers leaving the Lumière plant. Was this really the first film to be shown? Of course not. As early as 1888, Augustin Le Prince was able to film and project motion pictures. And Edison, who long claimed to be the inventor of cinema, was making movies in 1892.
Since 1892, Birt Acres and Léon Bouly had been independently improving their motion picture systems and their movies. But Bouly couldn’t pay the yearly patent fees for his invention and his license expired, while Acres proved a prodigious inventor and filmmaker but managed to slip into relative obscurity. Meanwhile, Antoine Lumière, father of Auguste and Louis, more or less copied Edison’s Kinetoscope while taking advantage of Bouly’s lapsed patent. The offspring of this effort was the Lumière Cinématographe,2 a camera, projector, and filmprinter all rolled into one. The brothers Lumière shot and commercially distributed numerous short actualités, including l’Arrivée d’un train en gare (Arrival of a Train at a Station) and Déjeuner de bébé (Baby’s Lunch).
In all fairness, the Lumière family had more going for them than just sharp elbows. By 1895, the world was evidently ready to pay money to see factory workers leaving work or a train arriving at a station. Plus, the Cinématographe was startlingly lightweight and portable compared to its behemoth competitors.
It was clear to all that a method of showing sound and picture was of great commercial interest. In the late 1880s, Edison and his associate, W.K.L. Dickson, linked the Edison cylinder phonograph with a larger tube that was slotted much like the Zoetrope. It wasn’t elegant, but it did produce synchronized images and sound.3 Georges Demeny, in 1891, claimed to produce a synchronous sound system, but like so many assertions in this time of riotous invention, this proved unfounded. There were many other attempts to add sound to the ever more popular moving picture, but at least three impediments came between a successful marriage of sound and picture: reliable synchronization, amplification, and the fact that silent pictures were so effective and popular.
Early Attempts at Sound in Movies
Many early sound movies were merely prerecorded playback tracks to which “silent” actors mimed. By the 1920s, when commercial talkies were a real possibility, sound playback was usually from a phonograph synchronized to the film projector via belts, pulleys, and cogs. The most successful interlocked phonograph/projector system was the Vitaphone, made by Western Electric and Bell Laboratories. But this double-system playback failed completely in the event of a film break or a skip in the record. The projectionist had no choice but to return to the beginning of the reel. Eugene Augustin Lauste patented a form of optical film soundtrack in 1910, but it would be another 20 years before optical recording was adopted for film sound.4
Amplification of disk or cylinder recordings posed a hurdle, since early phonographs played their sounds acoustically rather than through amplification—hardly appropriate for large halls. The German Tri-Ergon sound-on-film system, later improved on by American Lee De Forest, enabled a sound reader to convert variations in the optical track into a signal that could be amplified by valve amplifiers newly improved by the Marconi company and others. This was the beginning of a standard for sound reproduction that would last more than 50 years—optical sound printed directly onto the filmprint.
But there was one more hurdle to clear in order to bring sound movies out of the “gee whiz” ghetto and into commercial success. Simply stated, silent pictures worked. By the mid-1920s silent films had established a language and an audience and were rightly considered both entertainment for the masses and an intellectual means of expression. Many filmmakers and film theorists vehemently objected to adding the vulgar novelty of sound to this new but advanced art form. The most famous objection came in the form of the 1928 manifesto “Sound and Image” published by Eisenstein, Pudovkin, and Alexandrov.5 They protested that cinema with sound would become a means of displaying the ordinary and the real, rather than reaching to higher meanings through the newly developed art of montage.
It would be naïve to think, however, that the development of cinema sound was held up because of the rantings of a few Soviet intellectuals. In fact, it was the studios that were most opposed to innovation. They had a good thing going, and it was hard for executives to imagine that it would ever change. Silent films were relatively easy and cheap to produce, and studios had invested heavily in the mechanism that enabled them to crank out and distribute them. Also, the costs of refitting movie theaters with sound playback equipment seemed uncomfortably and unnecessarily high. Plus, silent films weren’t altogether silent or as inexpensive as met the eye. Often projections were accompanied by live sound effect artists, musicians, singers, or actors, and all these people had to be paid. Studios were interested in reducing these costs, and the most attractive place to start was with the musicians. Devising a way to mechanically play a musical score to a silent film would reduce costs by dismissing the cinema orchestra from every performance. And playback tracks never go on strike.
Talkies
In 1926, Warner Brothers released Alan Crosland’s Don Juan, with a huge score preformed by the New York Philharmonic Orchestra. The music was played back—in sync—from a Vitaphone record. Thus, the stage was set for a commercially released feature-length talkie to step into history. Crosland’s The Jazz Singer, which premiered in October 1927, was actually a standard silent movie with a few lines of spoken dialogue, but still it was a huge money maker. It didn’t take long for the studios to see the writing on the wall and begin gearing up for sound production and distribution.
Shooting and recording a Vitaphone film was much like producing a live radio show. There was no postproduction, so every sound in a scene had to be recorded live—sound effects, offscreen dialogue, music, everything. Until rerecording was perfected in the 1930s, editing of any kind was all but impossible. Postsynchronization was first used in 1929 by King Vidor on the film Hallelujah!6 Freeing the shooting process from the draconian restrictions that early sound recording techniques imposed, it restored some of the freedom and lightness of the silent era. By the mid-1930s, it was possible to mix several channels of sound without distortion, and postsynchronization of dialogue and other sounds began to allay the fears of those who predicted that sound cinema would inevitably result in naturalistic films.
Sound was still recorded optically, however, so it was very tedious and time consuming to edit and manipulate recorded tracks. Blimps were invented to quiet noisy cameras, microphones became more directional, and optical soundtracks were improved and standardized. The sound Moviola was made available in 1930, so there was now a standardized, sophisticated way to edit picture and optical sound film. In 1932, a process of printing a common serial number on synchronized picture tracks and soundtracks was developed. “Edge numbering,” or “rubbering,” allowed accurate logging of film elements and reprinting of edited tracks from their original masters. This system of coding film workprint and sound elements has remained more or less unchanged.
In a brief period of time, movie sound got much better. Arc lights lost their deafening hum, so they could be used on sound pictures. Biased recording was introduced, yielding far quieter tracks. Fine-grain film stock resulted in not only better-looking prints but also finer-resolution optical soundtracks, as did UV optical printing. In 1928, the frequency response of motion picture soundtracks was 100 Hz to 4000 Hz. Ten years later it was 30 Hz to 10,000 Hz.7
Despite these improvements in sound recording and mixing technology, film sound editing didn’t substantively change for more than 20 years. Picture and sound editors worked on Moviolas, later adding flatbed film editing tables such as the Steenbeck, KEM, or console Moviolas. Sound was printed onto 35 mm optical sound film for editing and mixing, and released on 35 mm film with mono optical soundtracks.
The Modern Era
In 1958 magnetic recording came of age and everything changed. Stefan Kudelski introduced the Nagra III battery-operated transistorized field tape recorder, which with its “Neo-Pilot” sync system became the de facto standard of the film industry.8 Soon production sound was transferred to 35 mm magnetic film, mag stripe, which could be easily handled, coded, edited, and retransferred as needed. Dialogue and effects editors were now free to manipulate tracks as never before. During the mix, edited dialogue, effects and backgrounds, Foley, and music elements were combined and recorded onto yet more 35 mm magnetic film (fullcoat). (This system continues today on films edited mechanically.) With sound elements on mag, there was no real technical limit to the complexity of the sound design or even the number of tracks, although the cumulative hiss from the mag discouraged playing too many tracks at once. When Dolby noise reduction was introduced in 1975, even this limitation was surmounted.
The system of recording on analogue tape, editing sound and picture on mag stripe, and mixing to fullcoat served the film industry for more than 30 years. It was predictable, stable, and universal, and its hunger for labor kept apprentices and assistants—many of whom would be the next generation of editors—near the action. Then, once again, it all changed. Enter nonlinear picture editors and digital audio workstations.
Now, for far less than the price of a car, you can have unrivaled editing, processing, and management power in a small computer. You can make changes over and over, painlessly creating alternate versions of your work. There’s no getting around the fact that the technology is massively better than it was a generation ago, which means that you’re much more empowered to make your own choices.
Therein lies the problem. Digital audio workstations and the hugely altered workflow they bring about have turned sound editing on its head. What was once a well-understood, widely accepted process has been given a huge dose of democracy, if not anarchy. The way we work has changed in a revolutionary way, not just in a few evolutionary adjustments. Crews are smaller and roles are less defined, and even the basic workflow is no longer basic. The way you work now depends on where you live, plus a thousand other peculiar variables.
Different Formats, Different Processes
What makes for the present confusion is not that modern editing has been digitized but rather that the picture almost always has to be transferred to video, which has a different timebase from that of film. Countless sample rates, pullups, pulldowns, transfer speeds, and timecode types may lead you to believe that digital audio postproduction is a hopeless maze of variables, any of which are poised to trip you up and wreck your health.
Not so. Despite all the options, it all comes down to two variables:
• |
How was it shot? |
• |
How and where will postproduction take place? |
Break down the production into logical categories, like these two fundamental questions, and there will be no doubt as to how to proceed with your postproduction. Master that and the process is no longer cryptic.
Next, we’ll look briefly at several ways of shooting and posting films. These examples are simplified, but ought to give you an idea of where moviemaking workflows are similar and where they differ. Don’t get frustrated by the details. Study the work models that affect you and glimpse at the others. Audio postproduction details are discussed in Chapters 5, 9, and 10. What’s important at this point is that you have a good understanding of the filmmaking process, since what goes on before and after dialogue editing greatly affects your work. All of the illustrations presented here are based on the film model (filmprint and mag sound), so it’s worth your while to read this section even though you’re almost certainly working electronically.
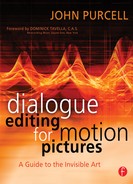
The Film Model Since the advent of magnetic recording in the late 1950s and industry acceptance of magnetic sound film a short time later, the workflow shown in Figure 2.1 has been the model for making movie sound. There are still films produced in this manner or that use big chunks of the model in their production.
The Film Shoot During the shoot, the camera uses synchronous motors to maintain an exact speed of 24 frames per second (fps).9 On the sound side, the mono Nagra recorder (or stereo Nagra with FM pilot or stereo Nagra with timecode) records a 50 Hz or 60 Hz pilot tone onto the tape along with the audio. When it’s time to shoot, you’ll hear “Roll sound!” from the assistant director. The sound always starts first because (1) it takes longer for a Nagra than a camera to get up to speed, and (2) tape is much cheaper than film so no one complains about a little bit of it being wasted. Once the Nagra is locked at the proper speed, indicated by a flag on the front panel, the location mixer will say something to the effect of “Sound speeding.” Next comes the camera.
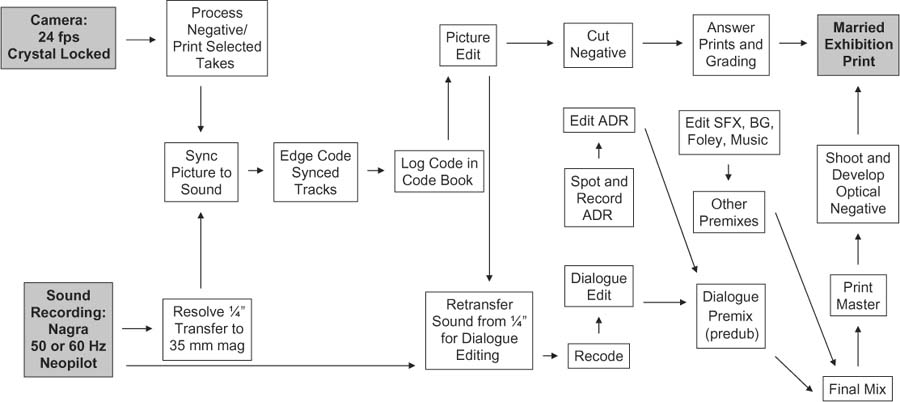
Figure 2-1 Workflow of an analogue project shot on film and edited with the film workprint and magnetic sound film.
When the set, the actors, the background actors, and the photography department are absolutely ready, the assistant director will call, “Roll camera!” In comes the clapper/loader, who has written the appropriate scene and take information on the slate. He stands in a place visible to the camera and audible to the microphone and verbally announces the upcoming shot. When the camera is running and locked, the camera assistant will announce, “Camera speeding.” At this point, the clapper/loader will call “Marker!” to let the world know that the clap is soon to happen. One gentle smack of the clapper, and the deaf film camera and the blind Nagra have what it takes to find their sync in postproduction.
The Film Lab At the end of a shooting day, or at some other sensible interval, the clapper/loader gathers up the negative, labels it, and sends it to the lab for processing. The lab develops all of the negative, but to reduce costs only the takes selected by the director during the shoot are printed for screening and editing (hence the familiar command: “Cut! Print it!”). These selected takes arrive at the picture cutting room in the form of positive 35 mm work-prints, which will soon be organized by scene and slate, or whatever other system the picture editor chooses. But not just yet.
The ¼″ Nagra tapes, or sound rolls, are transferred to 35 mm mag stripe. To ensure that they’re played back at precisely the same speed they were recorded at, a resolver attached to the Nagra compares the pilot tone recorded on the tape with the mains frequency (50 or 60 Hz) and slews the tape to the right speed. For the rest of the postprodcution process, whenever sound and picture must be interlocked, the mains frequency serves as the common clock.
The Picture Cutting Room Back in the picture cutting room, the assistant editor uses the slate information and claps to synchronize picture with sound. Then the lab rolls are broken into a more sensible order, usually by scene, and leaders with start marks are added. Each picture/sound pair of rolls is coded with a unique series number, a several digit edge code stamped at left intervals on the workprint. Once printed, the edge code information is entered into the “Code Book,” a vast database also housing the Keykode and scene/ shot/take data for the entire film—vital for locating alternate shots, reprinting shots, and keeping things in order. Now the director and editor will sequester themselves in the cutting room for weeks or months, finally emerging with a locked picture.
For quite a while now, the picture team has been handling the mag stripe that contains the production sound, coating it with perspiration, dirt, and Reuben sandwich detritus. That’s why it’s common to log the shots used in the final picture edit and retransfer the takes from the original ¼″ tapes to a fresh mag. These pristine tracks will be the raw material of the dialogue edit. The dialogue team splits the tracks into many units and works on Moviolas or flatbed editors to add tone, replace problem words, or remove noises. Their finished product will be many (perhaps 20 or more tracks per reel) 1000-ft rolls of mag stripe.
Sound Effects and ADR Meanwhile, the rest of the sound department has been busy. The ADR supervisor spots where new lines must be recorded and prepares the volumes of paperwork necessary to manage the ADR. These lines are recorded in a studio and then edited by the ADR editor. Sound effects and background editors add texture, excitement, space, and emotion to the film. Foley, the “live” sound effects (for example, footsteps, body motion, cloth rustle, and the sounds of objects like plates, locks, and keys), are recorded and edited. Finally, the music—scored as well as acquired and practical—is edited by the music department. Like the dialogue units, these elements arrive at the mix as 1000-ft rolls of mag.
Negative Cutting While the film’s sound is becoming beautiful, the picture is having its own adventure. Negative cutters use key numbers embedded in the edge of the workprint and negative to conform the original camera negative to the picture edits made by the editor. This glued-together negative is printed to create the first real version of the film, the silent first answer print. The director and director of photography use the first answer print to make decisions about the brightness and color of each shot. This process, called color timing or grading, may require several grading sessions and prints before the film has the desired look.
The Mix The sound elements are finished and there’s a print to project, so the film is ready to mix. Rarely does a mixer string up all of the elements of a film and mix everything at the same time. Instead, the film undergoes a series of premixes (predubs) in which one group of elements is mixed in isolation. Usually the first premix is the dialogue, since production sound serves as the foundation on which all other sounds are built. The timbre, noise level, and attitude of the dialogue premix will determine how subtle, loud, wide, or aggressive the rest of the tracks can play. In the premixes, the editor’s tracks are playing from the 1000-ft rolls of mag stripe and are recorded to 1000-ft loads of multitrack fullcoat, onto which up to six tracks can be recorded.
Premixes are about detail, getting the most out of the dialogue or the effects, background, and so on. Here you focus shots to direct the viewer’s attention or to enhance the emotion of a scene. The premixes are combined in the final mix to create the best flow, to move the narrative forward, and to create the best “ride” for the audience. During final mix, the playback sources are the multitrack premix recordings. The final mixed sounds are recorded onto multitrack fullcoat stems, keeping the final, balanced, beautified dialogue, effects, and music separate on different fullcoats to more easily create different versions of the final film mix, whether for international, television, or airplane distribution. The stems are then combined to make a print master, whose number of channels depends on the distribution format (Dolby Stereo, Dolby Digital, SDDS, DTS). The print master goes to a lab where it’s converted to an optical negative, which is then joined with the color-corrected printing negative to form a release print. Premiere, popcorn, fame, and fortune follow.
Don’t let the whirlwind nature of this description scare you. The details of the audio side of this production methodology will be discussed in much greater detail later.What’s important is to understand the overall workflow of making a movie. Take another look at Figure 2-1 before we move on to how most films are made today, how the new system compares to the mechanical method, and where lie the traps that can get you into trouble.
Making Movies in the Digital Age
Moviemaking today isn’t all that different from when picture meant film and sounds were on mag. But the small differences between then and now can be crippling if ignored. Two steps in the process require great attention. First, the film must be transferred to videotape (which runs at a different speed than film does) while maintaining an absolute reference between a frame of film and its matching video frame to ensure accurate negative matching. Second, you must remember that NTSC video doesn’t run at 60 Hz (30 fps) but rather at 59.94 Hz (29.97 fps). If you keep your wits about you regarding the telecine transfer and pay attention to NTSC sample rates, you’ll find electronic editing pretty straightforward.
We’ll now look at seven electronic work models, with postproduction in PAL, NTSC, and high-definition 24p. Again, remember the most basic questions you should ask when approaching a sound for film job:
• |
How was it shot? |
• |
A Brief Pause to Discuss Negative Cutting in the Modern World
Avid’s Film Composer and Final Cut Pro’s Cinema Tools came into being to allow editors cutting on workstations to create accurate negative cut lists. It’s vital that the negative cutters know that a certain video frame refers exactly to a corresponding frame of negative. This is not a good place for approximations.
Negative cutting was more straightforward in the days of sprockets. You simply put the 35 mm workprint into a sync block, read the key numbers from the print (numbers that were printed directly from the original negative onto the workprint), and found the corresponding piece of negative. Simple. Now we edit on workstations, which offer countless creative advantages over film but make negative matching more complicated. Remember, you can’t directly load film negative into a workstation; you must first transfer the image to videotape or at least create some sort of a videolike stream and load that. This process is called the telecine transfer and it’s done at the lab or at a boutique “dailies facility” working in conjunction with the lab. Since neither PAL nor NTSC video runs at film speed, maintaining a relationship between film frames and video frames is a bit of a black art.
In the NTSC world, the transfer from film (24 fps) to tape (29.97 fps) is accomplished by scanning one frame of negative onto two successive fields of video, then scanning the next frame onto three fields of video, and so on. This cycle, called the 2:3:2 pulldown,10 continues for frames A, B, C, and D; on the fifth frame the cycle starts over.11 As long as the transfer engineer takes care to start this “A-frame” cycle at the right place and then carefully logs all of the appropriate information into a FLEx file, the Avid can keep track of the redundant fields and deliver a reliable negative cut list. During telecine, and for the rest the postproduction process until the picture is again on film, all picture and sound elements are slowed by 0.1 percent, to the NTSC crystal rate of 59.94 Hz. While the project stays in the video/computer world, sound and picture run at 29.97 fps.
Back on the other side of the ocean, PAL folks don’t even try to transfer the 24 fps negative to videotape at its natural speed. Instead, they accelerate it to 25fps and transfer it directly to tape with no interfield shenanigans.12 The upside of this procedure is that there develops a direct relationship of film frames to video frames (25 film frames = 25 video frames), so it’s easy to establish a database that will form the basis of the negative cut list. The downside is that after telecine transfer you’re left with a master videotape, usually a Betacam, with a picture running 4 percent fast, so you can’t sync with your audio—yet. There are no quick video sound dailies in PAL.
Once the negative is transferred to tape, the speeded-up picture is loaded into the picture editing computer. The workstation is then placed in “film mode,” which again slows the film to its native 24 fps, keeping track of which fields the workstation doubled to make the speed change. Now the sound—which never changed speed—is loaded into the workstation and synced with the picture. As in the NTSC model, the picture assistant will create a database that contains scene, take, timecode, sound roll number, and so on. This information will again present itself as a negative cut list for the lab and an edit decision list (EDL) for the sound department. (An EDL is a document that describes every event in a film. It can detail both sound and picture edits, and it’s an important tool for dialogue editors. We will encounter EDLs throughout this book.)
Keep in mind that, whether in PAL or NTSC, the sync of the film is determined by the assistant picture editor, who often works late at night, is occasionally not terrifically experienced, and may not be secure enough to ask questions. When you start a project and get a locked film from the picture department, remember how the syncing was done—by a human, not by God. Always question sync.
Working in an NTSC Environment
Pullups, pulldowns, impossible-to-remember sample rates, noninteger frame rates—these are the intricacies of NTSC. Those used to jumping through these hoops take it all for granted. But to those used to working in PAL, undertaking a project in NTSC is intimidating.
Actually, there’s only one truth you must respect to avoid the pitfalls of NTSC: At any given stage in the process, the picture and sound must have the same reference. Whether you’re at “film speed” (44.1/48 kHz, 30 frame TC, 60 Hz line reference, 24fps film) or “pulled down” for video (44.056/47.952 kHz, 29.97 frame TC, 59.94 Hz line reference, 23.976 fps film speed), keep the picture and the sound at the same reference at any given step and you’ll have no problems. You can pull up and pull down as many times as you want; just do the same to sound and picture at each step and your NTSC blues will vanish.
A Note about Drop-Frame Timecode
Let’s get something straight. “Non-drop-frame timecode” does not mean 30 fps and “drop-frame timecode” does not mean 29.97 fps. The dropness or non-dropness of a timecode flavor has to do with how it counts, not how fast it runs. A drop-frame calendar (say, the Gregorian) includes leap years to keep it in sync with the solar year, while a non-drop-frame calendar (the Islamic, for instance) has no mechanism to keep it in solar sync. Both calendars run at the same rate—a day is a day, an hour is an hour, a minute is a minute. But one has a built-in “hitch” to force it back into sync with the seasons, while the other doesn’t. Christmas always holds a hope of snow, but Ramadan can occur in any season.
SMPTE timecode works much the same way. Both non-drop-frame and drop-frame timecode count 30 frames per second, 60 seconds per minute, and so forth. The difference is that with 29.97 drop-frame timecode an hour of timecode equals an hour of clock time because the counting mechanism has a way of realigning with reality, whereas an hour of 29.97 non-drop-frame timecode is 3 seconds—18 frames longer than a clock hour. Still, despite its seeming inaccuracy, non-drop-frame’s simplicity makes it the standard in film production.
Single-System NTSC Production and Editing
There are no secrets to single-system NTSC production. It’s very straightforward—the sound is recorded onto the videotape along with the picture, and there’s no speed change throughout postproduction. The timecode for the sound and the picture is the same, so it’s the most straightforward of all of the processes. Figure 2-2 shows the NTSC single-system workflow.
After the shoot, the video dailies are loaded into the picture workstation, the picture is usually highly compressed to allow for manageable storage. There’s nothing to sync, plus sound and picture share the same timecode so list management is not complicated.
When picture editing is finished, the editor makes an OMF and sound EDLs for the sound department. The OMF (which will be discussed in Chapter 5) is a postproduction Rosetta stone that enables the dialogue editor to work directly with the tracks from the Avid. The EDL and the original field recordings are used by the sound team to recreate the picture editor’s sound edits—if necessary—by going back to the original recordings. If the sound was initially loaded into the Avid via analogue or if there are other sound problems, the sound assistant will auto-assemble (or PostConform) the film using the EDLs to automatically recreate all of the picture editor’s sound edits with audio from the original tapes.

Figure 2-2 Postproduction workflow: Shoot in single-system NTSC, post in NTSC. For better quality and easier postproduction, backup sound can be recorded separately, using the same timecode as the camera’s. An OMF of the picture editor’s sound files and edits can be used for dialogue, or the sound team can auto-assemble the original production sounds using the master tapes, an EDL from the Avid, and appropriate software.
The dialogue editor also uses the audio EDLs to find alternate sound takes during the editing process. From this point on, electronic postproduction resembles the mechanical film model. It’s true that during the mix, sounds will play from a DAW or hard-disk player, and will likely be recorded to a hard-disk recorder rather than to fullcoat, but those differences are cosmetic rather than structural.
Meanwhile, the picture department redigitizes the necessary images, this time with no compression. The online edit, followed by color correction and titles, yields a high-quality picture, into which the mixed sound is inserted.
Shoot Film (24 fps), Record Sound on Tape, Edit Picture and Sound in NTSC
Once again: At any given stage in the process, the picture and sound must have the same reference, either 60 Hz (film speed) or 59.94 Hz (video speed). Over the course of production and postproduction, the image and sound will speed up and slow down several times between film and video speed (see Figure 2-3), but as long as they work in tandem, there will be no problems. Really.
At the shoot, the sound recorder is running at 44.1 or 48 kHz and the film camera is running at a fixed 24 fps. The DAT (or ¼″ tape) will record 30fps timecode. When the film is transferred to videotape, it undergoes the 2:3:2 pulldown. This doesn’t affect its speed, but since the telecine is referenced to the video clock rate of 59.94 Hz, the picture is slowed by one-tenth of a percent to 23.976 fps. If the original audio field recordings are to be synchronized in the telecine, that DAT player must also be locked to the video reference generator so that it will be running at the same rate as the film.
The video recorder, whether Betacam, U-Matic, or the like, runs at the video reference speed and the timecode on the tape is 29.97 fps, almost always non-drop for film postproduction. Because sound and picture are running at the same speed, the DAT sound can be synced to the picture in the telecine transfer bay, but this would certainly not be my first choice. I’d wait to sync sound and picture in the Avid.
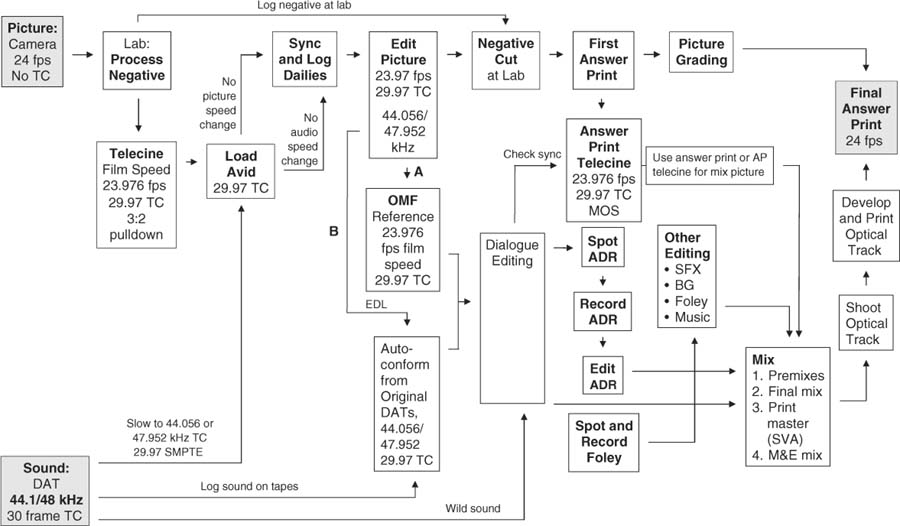
Figure 2-3 Postproduction workflow: Shoot film, record sound on tape, post in NTSC. Note that both camera and DAT recorder run at “film speed” during the shoot, but are slowed by 0.1 percent to “video speed” for the duration of postproduction. The film will again run at its natural speed once sound and picture are married on the release print. After Avid editing, production sound can be imported (a) directly via an OMF or (b) conformed from the original tapes.
The assistant picture editor loads the tapes into the Avid/FCP, along with the DAT sound. The TC DAT player must be referenced to video while loading sound into the picture workstation, thus pulling down the sample rate to 44.056 or 47.952 kHz. For the rest of the process, all video and audio equipment are locked to NTSC video reference. Once sound and picture elements are loaded into the Avid, the assistant synchronizes the shots, again providing information so that the computer knows the offset values between sound and picture. This information is used at the end of the editing process to allow for accurate reconforming of audio elements.
The rest of the process resembles the mechanical film model, even though the equipment is a bit more modern. Throughout the remainder of this double-system workflow, picture and sound remain locked to video reference, 59.94 Hz. Even the mix, where you’re likely watching a projected film image rather than a videotape, will usually occur at 59.94 Hz. If you’re editing at 44.056 or 47.952 kHz and want to add some new synchronous material—music, for example—it must be loaded at video, not film, speed. Otherwise, you’ll have two conflicting timebases within your edit list—a good formula for losing sync.
Only when the negative is cut, the film is printed, and the mix is complete is the film projected at its “natural” speed of 24 fps.
Shoot Film (24 fps) or Tape, Record Sound on Hard-Disk Recorder, Edit in NTSC
It’s now common to record location sound on hard-disk recorders, forgoing tape altogether. Cantar, Deva, and 774 are among the players in this ever more crowded field. Recording on location without tape offers easier backup, far more tracks, and increased versatility. New generation analogue-to-digital converters, combined with much smarter analogue and digital circuitry, offer better sound than DAT recorders. With sample rates of up to 192 kHz and 24-bit resolution, sound detail and dynamics are vastly improved. Also, the location mixer can add metadata notes to the soundfiles and can painlessly provide individual unmixed tracks as well as mixdowns for the picture editor. (See Figure 2-4.) It’s almost too good to be true.
Effective use of this new technology, however, entails a bit more than swapping out the old kit for new. Just as picture and sound cutting room procedures and culture had to retool when sprockets fell to digital workstations, so too must the location mixer and editorial team modify some of their work habits to fully exploit the advantages of hard-disk field recorders.
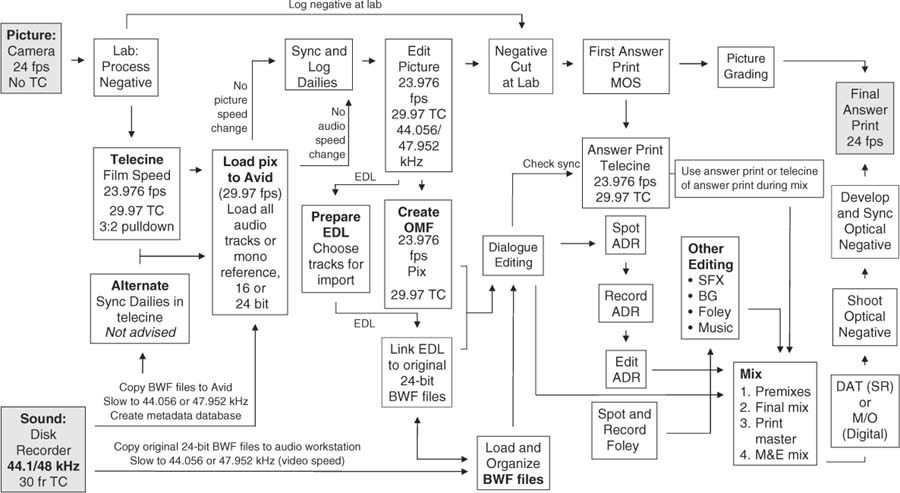
Figure 2-4 Postproduction workflow: Shoot film, record sound on hard-disk recorder, post in NTSC. Original recording soundfiles can be copied directly to the Avid and to the sound department’s drives.
A disk-recorded shoot differs little from film production with a DAT recorder. The recorder rolls, the camera comes up to speed, and a clapper is used to synchronize the two. Some hard-disk recorders allow for offloading to an external hard drive, while others permit only transfer to DVD-RAMs. Some can be programmed to name files as they go, while others require naming take by take. Some location mixers name files based on scene and take or camera setup and take (when they have time), while others simply let the recorder name files by recording order. For these reasons, a bit of planning is in order.
If you’re shooting in a tape format, whether high definition (HD) or standard definition (SD), and recording sound on hard disk, there are several routes you can take to synchronize the video camera and recorder. You can use radio links to transmit the camera’s timecode to the audio recorder, or you can transmit the recorder’s timecode to the camera. Both of these techniques have some serious downsides.13
The most reliable and common way to get a video recorder/camera and a hard-disk recorder to work in tandem is to attach a very stable free-running timecode generator to the camera and record its output to one of the camera’s unused audio channels. At least twice daily, synchronize the camera’s timecode generator with the timecode clock on the hard-disk recorder. This preserves the integrity of the videotape’s longitudinal timecode—making for easier video postproduction—and it can be used on multiple-camera shoots. When the videotapes are digitized and synchronized in the Avid, the audio timecode, which is on an audio channel of the tape, is attached to each video image. Since all tracks of a take have a common timecode, it’s easy to sync each track to the corresponding image.
At the end of each shooting day, the sound recordist drops by the location cutting room and transfers the day’s spoils to an editing drive. As soon as the picture telecine tapes are back from the lab, the picture assistant can start syncing dailies, as there are no longer DATs to digitize into the Avid.
Working in a PAL Environment
The PAL world, with its 25 fps, 50 Hz fixed realities and never a dropped frame, is decidedly less complicated than its North American cousin.14 Of course, filmmaking in an NTSC environment is also a snap once you’ve caught on. Still, it’s very comfortable living in a world in which 25 fps really is 25 fps, not a slightly slow-witted relative.
Single-System PAL
If you’re editing a single-system-originated project, shot on videotape or HD with no extra sound recorder, there’s virtually no difference working in PAL or NTSC aside from the obvious frame rate. Figure 2-5 shows the PAL workflow.
North Americans, remember that you’ll never run into frames 25, 26, 27, 28, or 29 when working in PAL. Source video and source audio will have the same timecode, of course, since this is single system.
If your project was shot at 25 fps on HD or SD video for film blow-up, remember to put your sync pop (beep, plop, etc.) two video frames later than you usually would, since it must be 48 film frames before the first frame of action. So, rather than placing the sync pop for reel 1 at 00:59:58:00, for example, place it at 00:59:58:02. This way, when the video image is scanned to film, there will indeed be 48 frames between the plop and the beginning of the reel.
Shoot Film (24 fps), Record Sound on Tape, Edit Picture and Sound in PAL
This is still the most common production workflow for low-budget films in the PAL world. (See Figure 2-6.) Things will change as shooting on film gives way to electronic cinematography and location mixers choose hard-disk recorders over tape. For now, though, many films are made this way. Unlike its NTSC relative, in which the picture department has it pretty easy (except for policing the telecine transfer for proper A-framing), double-system PAL is very easy on the sound department but requires a bit of thinking by the picture editor. The fundamental problem is that film runs at 24 fps and PAL video runs at 25. Given this reality, there’s no elegant way to maintain proper speed and sync while transferring from film to PAL videotape.
Unlike the highly regular NTSC 2:3:2 pulldown, which is jitterless to normal humans, the PAL 24 → 25 telecine transfer adds one highly visible repeated field every 12 frames. Films transferred to PAL at 24fps display a telltale twice-per-second bump in what should be smooth motion, such as camera pans or slow car bys.
Timecode on the DAT will be 25 fps, since the project will be edited in a PAL/EBU environment. The speed of the sound will never change, whereas the picture will make a brief foray from 24 fps (90 feet/minute) to 25 fps (93 feet, 12 frames/minute) and back. The “picture dumps,” the videotapes made from the Avid for the sound department, must run at 24 fps, but negative cutters usually request a 25 fps tape for their purposes. The first answer print is transferred to video at 24fps, not 25, as picture must stay at its natural speed at this point in the process. As a result, the telecine of the first answer print always displays the telltale bump that comes from repeating a field every 12 frames. The speed is right, but the motion looks goofy.
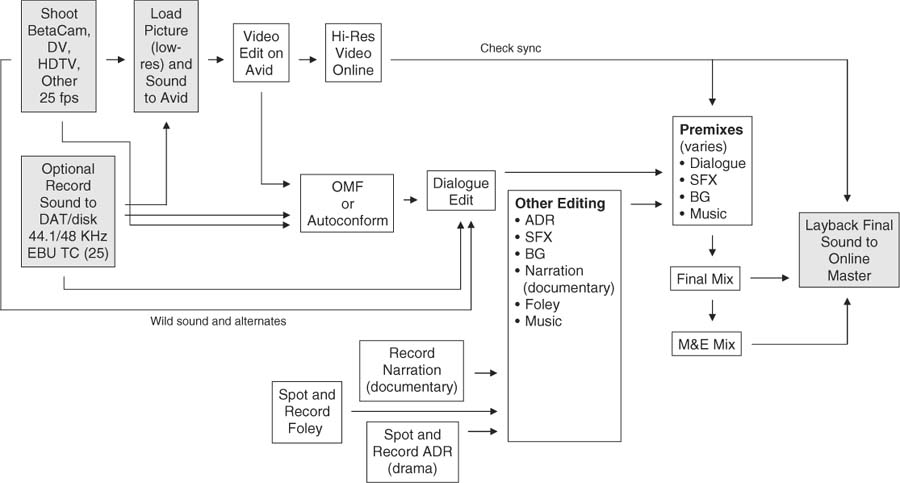
Figure 2-5 Postproduction workflow: Shoot single-system PAL, post in PAL. As with single-system production in NTSC, speed remains constant throughout the process.
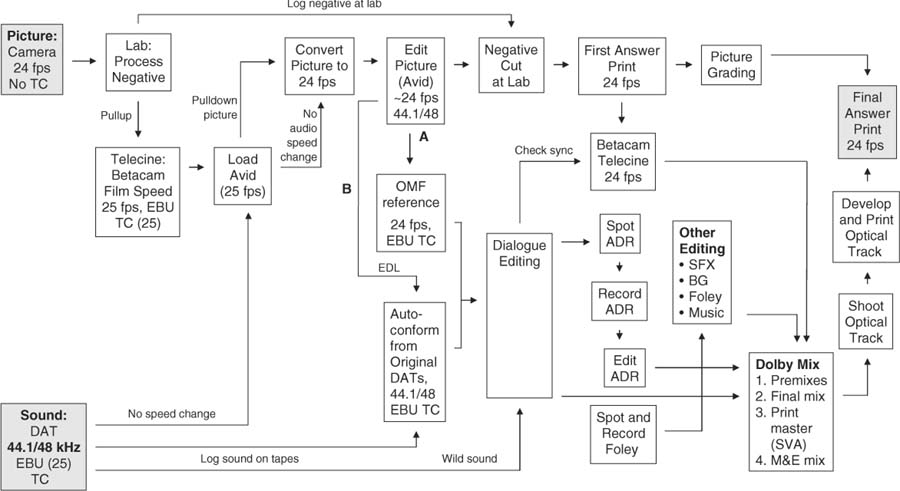
Figure 2-6 Postproduction workflow: Shoot film, record sound on tape, post in PAL. Unlike NTSC film postproduction, here the sound never changes speed throughout the process. As with NTSC projects, edited sound can be imported (a) directly from the Avid, or can be reconformed (b) from the original tapes.
Shoot Film (24 fps), Record Sound on Hard-Disk Recorder, Edit Picture and Sound in PAL
More and more films are being recorded with hard-disk recorders, so you’ll eventually face this work model. (See Figure 2-7.) On the picture side, nothing’s changed from the DAT paradigm. The picture still makes its round-trip speed change, ending up at its original 24 fps. Only on the sound side of the story are things a bit more complicated because the larger word lengths available with hard-disk recordings.
Soundfiles that are 24 bit can be loaded into an advanced Avid such as Adrenaline can be imported directly into a digital audio workstation via OMF. Assuming there are no audio problems, you can use the OMF—no need to return to the original files. If, on the other hand, the picture editor worked on an older or more modest Avid, he used 16-bit sound. After picture editing, the original 24-bit files must be relinked to the Avid OMF so that the sound department can take advantage of the larger original word lengths.
Shooting and Posting at 25 fps (in PAL)
Even though it’s no longer rocket science to shoot 24 fps film and edit in PAL or NTSC, you can still find a number of producers in the PAL world who choose to shoot their feature films at 25 fps. With this method, the film stays at its natural speed throughout the postproduction process and is slowed down to 24 fps only during projections; also:
• |
The picture editor can work on virtually any workstation, so no more hunting for Film Composer or Cinema Tools. |
• |
This technique offers an easy way to avoid flicker when shooting a film involving lots of television screens or data monitors. |
• |
Original sound recordings can be easily synchronized to the telecine dailies, since there’s no speed change in the transfer. |
There are two downsides to shooting at 25 fps. One is not your problem; one is. At 25 fps, film rushes through the camera 4 percent faster than at 24fps, so more is used. You don’t care about this unless you have a piece of the film’s profits. However, there’s a sound issue to consider. Shooting and posting at 25 fps doesn’t cause a problem until the film is finished and its time to screen the print—at 24 fps. Not only will all action be slower than you’re used to seeing (not much you can do about that), but the sound will be heard at a lower pitch. This may not make a discernable difference with dialogue (although everyone will sound a bit sleepy), but you’ll notice the difference with music. Everything will be flat, and those with perfect pitch will howl like dogs when hearing “impossible” chords.
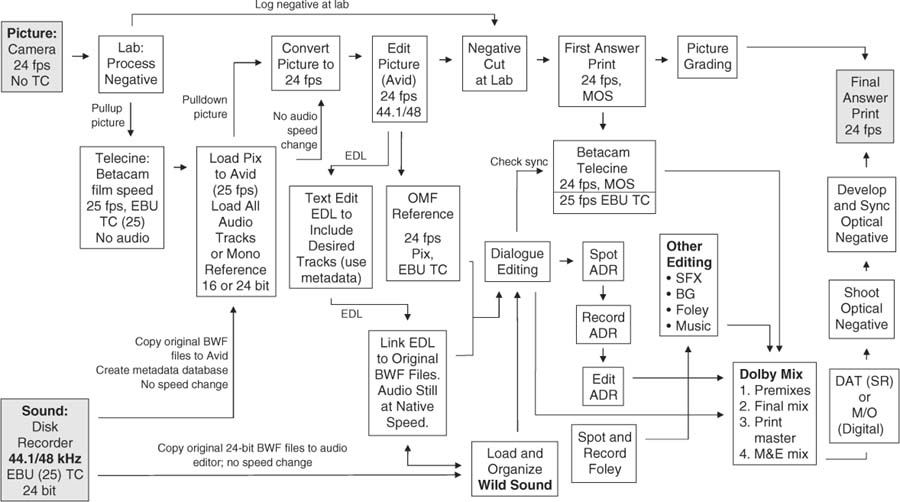
Figure 2-7 Postproduction workflow: Shoot film, record on hard-disk recorder, post in PAL.
The solution? After the mix, during the print mastering process, you can raise the pitch of the entire mix by 4 percent. The 25 fps print will indeed sound sharp, but when played at the world standard 24 fps, the pitch will be correct. Again, however, we have a downside. When pitch-shifting a full mix with dialogue, music, and effects components, you run a decent chance of encountering glitches. Many supervising sound editors forgo the pitch-shift altogether, preferring a certain pitch error to an uncertain artifact problem. A classic no-win situation. If you do choose to pitch-shift, make a copy of the print master prior to pitch correction. This will be your TV audio master, which will of course run at 25 fps. There’s nothing dumber than starting with a 25 fps master, pitching up for the filmprint, and then pitching down for TV.
If your project is intended for 24 fps film release, the head plop for each reel will fall two frames later than you expect it to. If this is a TV-only project, the plop will go at its normal place, two seconds before the beginning of program.
Shooting Film and Recording Sound for PAL TV
It’s possible to shoot film at 24 fps for 25-frame PAL television, but it’s not a director’s first choice. The 4 percent additional film stock cost may not appeal to producers, but the nasty PAL 24 → 25 frame speed adjustment or the even more unseemly and noticeable bumps means that most PAL film-fortelevision productions are shot at 25 fps.
This is good news for the sound department, since it leaves little room for silly mistakes down the production line. You’ll record at 48 kHz with EBU 25 fps timecode, and unlike its feature film cousin, you can sync the sound directly to the Betacam dailies so that everyone can hear the sync rushes. If the picture department chooses to load the Avid with the sound from the Beta telecine masters rather than from the original DATs, you’ll have to do a PostConform (or equivalent) after picture editing, as the sound on the Beta will result in a compromised OMF.
High Definition
High definition (HD) is everywhere. It’s increasingly seen in production as an alternative to film negative, and it appears in postproduction, where high-resolution digital files allow for multigeneration visual effects at a price and quality superior to that of traditional optical effects. HD is rapidly being accepted as a consumer television format. Plus, digital cinema is quickly making inroads in the movie distribution market. Unlike video or film formats, HD isn’t something you can easily label, however. Basically it’s any format that offers higher resolution than SD NTSC or PAL video, and that’s not very difficult to do. But there’s no such thing as “just HD.” Instead, there are scores of formats, frame rates, and resolutions.
Many issues must be taken into account when launching into an HD production. There are just so many variables. Frame rates of 23.976, 24, 29.97, 30, 59.94, and 60fps are allowed by the Advanced Television Standards Committee. And that’s just for NTSC. Add in resolutions and scan technique, and you end up with more than 20 combinations. Table 2-1 lists a few legal HD frame rates for NTSC production.15
Since manufacturers have adopted different standards, similar cameras may reference at different rates. Differences between digital recorders only compound the problems. The higher the number of variables, the greater the amount of organizational work that inevitably falls on assistant editors in all departments of a film project. But before breaking into a panic, remember that the same rule that applies to NTSC production applies to HD: At any given stage in the process, the picture and sound must have the same reference. If, at each stage of production and postproduction, sound and picture maintain the same reference, you can intelligently wade through the morass of HD filmmaking.
Table 2-1 NTSC High-definition Frame Rates
Resolution |
Type of Scanning |
Frame Rates (fps) |
1920 × 1080 |
Progressive |
23.976, 24, 29.97, 30 |
Ironically, the best way to approach HD workflow is to treat it like film.16 If the project was shot on 24p (or 23.98p), create SD work tapes and edit with them as you normally would. For film projects, transfer the negative to HD as though you were working with an SD electronic editing model. In PAL, transfer the negative at 50 Hz (24 fps) to a 24p HD recorder. From this you can make all necessary PAL offline copies. For NTSC, lock the telecine and the 24p recorder to 59.94 Hz (23.976 fps). Standard 29.97 NTSC work copies can be created from this HD master. Just remember to keep the reference the same for sound and picture at all stages in the postproduction process, and you won’t have any problems.
When the finished job is scanned to film for release, sound and picture will both be referenced to 60 Hz and will fall into sync. Many filmmakers shooting HD but expecting to release on film choose to shoot at 24p since it’s easy to create an excellent filmprint from that. TV formats are also relatively compatible with 24p. Well-heeled productions may shoot 23.98p with sound at 29.97 fps and then edit on a workstation capable of storing and displaying HD images (and equipped with a dizzying amount of storage). You can also shoot at 24p/48 kHz as long as (again!) sound and picture are running at the same rate at any given step of the process.17
To survive a production shot on HD, or shot on film and transferred to HD, make a detailed chart of the project’s workflow before shooting begins. Discuss with the director of photography, the supervising sound editor, and the picture editor what each hopes to accomplish and come up with a plan that doesn’t give any player an excuse to change the rules in midstream. Specify frame rates, timecode, and sample rates for each step of the process and make sure that everyone understands and concurs.
Keep the reference rates correct and you’ll get through the job. However, remember that HD is a relatively new format whose “common knowledge” rules haven’t filtered down to low-budget producers just yet. So expect that everything in the field was done wrong, and be prepared for surprises—another reason for knowing as much as possible about all of the filmmaking workflows.
1 Biographies of Thomas Edison aren’t hard to come by, but a rich and simple source of Edison history and archival material is the U.S. Library of Congress web site, which has a section devoted to him. Edison phonograph sound clips and movie excerpts are available, as are countless historical documents (http://memory.loc.gov/ammem/edhtml/edhome.html).
2 Tjitte de Vries. “The Cinématographe Lumière: A Myth?” Photohistorical Magazine of the Photographic Society of The Netherlands (1995,http://www.xs4all.nl/~wichm/myth.html).
3 Mark Ulano. “Moving Pictures That Talk, Part 2: The Movies Are Born a Child of the Phonograph” (http://www.filmsound.org/ulano/index.html).
4 David A. Cook. A History of Narrative Film (New York: Norton, 1981, pp. 241–44).
5 Cook, 1981, pp. 265–66.
6 Cook, 1981, p. 268.
7 Elisabeth Weis and John Belton, eds. Film Sound: Theory and Practice (New York: Columbia University Press, 1985, p. 67).
8 Audio Engineering Society (http://www.aes.org/aeshc/docs/audio.history.timeline.html).
9 Actually, most cameras can run at several fixed speeds, such at 23.98, 24, 25, 29.97, and 30 fps. Many can be adjusted to run at a number of “non-sync” speeds to give the effect of speeding up or slowing down the action. You can’t record sync sound at such “unreal” speeds, however.
10 The 2:3:2 pulldown has many names: 3:2 pulldown, 2:3 pulldown, 2:3:2 pulldown, and so on. It’s all the same thing.
11 A concise explanation of the NTSC 3:2 pulldown can be found in The Film Editing Room Handbook, Third Edition, by Norman Hollyn (Los Angeles: Lone Eagle Press, 1999, pp. 105–14).
12 There is a PAL postproduction method in which film negative is transferred to tape at 24 fps before loading the Avid, to allow for sound dailies. However, the 25 fps technique is more common.
13 For a detailed discussion of incorporating hard-disk recorders into a shoot, see Aaton Audio: Post Chain, v11 (Aaton, s.a, February 2006, www.aaton.com).
14 For a clear, brief overview of working in PAL, see “PAL Basics: Film Sound for the Rest of the World” by Douglas Murray, in The Motion Picture Editors Guild Magazine (vol. 23, no. 2, March/April 2002).
15 Chris Meyer. “Designing for HD: An Essential Checklist” (www.filmmaking.com).
16 For much more detailed information on HD shooting rates and their implications, see High Definition and 24p Cinematography by Paul Wheeler (Oxford: Focal Press, 2003).
17 Visit http://24p.com/reference.htm for an ever-growing series of papers on working in a 24p environment, presented by Michael Phillips and others.