Burn-Ins, File Names, and Backups
There are many quality-of-life matters you can address as you set up your editing realm, some that will make editing easier and others that will protect you from disaster. Developing a sensible file-naming system will make for happier editing—and your colleagues will know which of your sessions to use when you’re not available. A smart backup system will avert the worst of disasters and help you to sleep at night. And intelligently preparing your videotapes will reduce errors and save time.
Some of the processes described in this chapter will be handled by an assistant, if you have any luck at all, but there will be times you need to handle them on your own. Plus, it doesn’t hurt to know what your assistant is up to.
Make a Timecode Burn-In
Whether your picture is on videotape or in a digital video file, try to make a copy of it and insert a timecode burn-in. Using tapes without a burned-in timecode window, relying instead on the VTR’s character inserter, is at times unreliable and inconsistent. If your tape contains only LTC (longitudinal timecode1), or if that’s all your VTR can interpret, timecode is valid only at play speed. Without VITC (vertical interval timecode), neither the VTR’s timecode character inserter nor your workstation’s timecode interpreter can accurately define addresses as you “scrub,” making reliably defining scene changes and perspective cuts impossible. Even with VITC there are pitfalls.
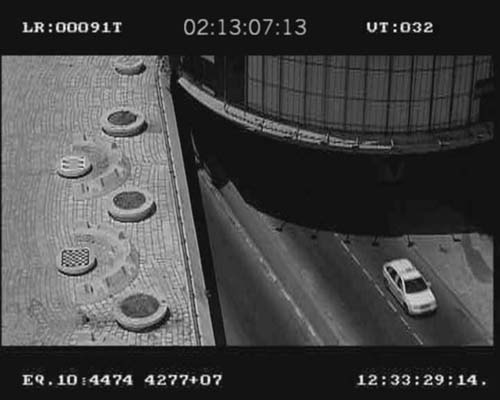
Figure 6-1 Place the timecode burn-in at the top of the frame, taking care not to cover other windows. The other information on the screen is largely for the picture department, but it occasionally comes in handy. In this frame from Jellyfish, by Shira Geffen and Etgar Keret, the original windows are (clockwise from upper left): lab roll, videotape number, dailies timecode, Keykode. (Reproduced by permission of Lama Films.)
When you have a timecode burnt in on the tape (see Figure 6-1), the noise bar2 of the video will wipe over the timecode window and you’ll see the frame change. It’s more like working on film.
Most Avid cutting rooms are incapable of burning the timecode directly onto the video image, so the burn-in becomes a two-step process. First obtain a regular videotape “digital dump” from the Avid or Final Cut Pro. Next send the tape to a video facility for dubbing with a burn-in or, if so equipped, do it yourself. Making a dub with a timecode burn-in isn’t rocket science, but you should pay attention to a few details whether you’re making the copy yourself or writing the instructions for the dubbing facility.
• |
Place the timecode window at the very top of the frame, outside the image if possible. Smaller is better. Try not to cover up any of the other information fields, but since this tape is just for you and not for negative cutting, only the source sound timecode window is truly important. If the timecode window is at the very top of the frame, it will be the first information updated by the noise bar as you scrub the VTR. As small a matter as it may seem, this actually saves considerable time over the course of the film if your picture is on tape.3 |
• |
Be certain that the play and record VTRs, the timecode generator, and the timecode inserter are all locked to the same video reference. |
• |
Confirm that both channels of audio are transferred, not mixed together. Also, the LTC and VITC timecode must be copied with the dub. You’re much better off passing the timecode through a TC generator and “jam-syncing” the code than you are just patching the timecode as though it were an audio signal (it is an audio signal, but a very special one). |
• |
Clearly label the tape with title, date, reel number, and version name or number, along with any technical details. |
When editing to a QuickTime movie or other disk-based video player, I prefer to make a timecode burn-in before digitizing the picture so that I’ll have a permanent “hard-copy” timecode display. Establishing sync with a nonlinear player is much like voodoo, and throughout the editing process the question of gooey sync looms. By physically stamping the timecode onto the video, it’s simple to sync picture to sound and quite easy to confirm sync when you’re in doubt.
Digital Picture Pitfalls
There are many ways that nonlinear video players can lead your sync astray. If, for example, you’re working with Pro Tools on a Mac, onboard QuickTime picture playback without an extra video card will inevitably result in unreliable sync. Forget what the manufacturers tell you. As your session gets heavier, sync becomes more erratic—sometimes spot-on, other times quite loose. To achieve worry-free sync when working to digital picture, use a separate video device as a picture player. This could be a video disk recorder, such as the Pixys video recorder/player from Fairlight4 or the V-Cube from Merging Technologies.5 Or turn last year’s computer into a virtual video player with Virtual VTR.6 You can also achieve excellent results using a separate high-quality video card that provides reference-locked video playback.
Postproduction facilities may jump at the opportunity to trade in an expensive, maintenance-heavy Betacam player for an extra FireWire drive and an inexpensive video interface box. But editors pay the price of this cheapness, always wondering about sync. If you have any influence over the purchasing choices of the facility where you work, encourage the use of proper external video recorder/players. Life’s too short to constantly worry about sync.
Use Smart File Names
The ease with which you can produce and compare endless variations of a cut is one of the greatest blessings—and curses—of digital audio workstations. There are countless reasons for different versions of an edit, and by the end of the project you could easily have created hundreds, each represented by its own session file.
Table 6-1 Fields in a Dialogue Session File Name
Shortname |
Abbreviated film name used by all editors. Probably the name the lab uses on files relating to the film. |
Dial |
Indicator that the session is about dialogue and not SFX, BG, etc. |
R |
Reel number. |
ver |
Picture version the session applies to. Could be the date when the video was modified or the picture version name or number. Could also refer to special attributes of the session (director’s version, screening version, merged-session version, etc.). |
edit |
Dialogue edit in this picture version. Might be a series number (1, 2, 3, …) or date of the edit. |
Of course, each version is a new session. You have to name these files something, so you might as well give them names that illuminate. With all of this in mind, here’s a suggestion for dialogue session file names:
shortname Dial Rx ver x, edit x
which translates into what’s shown in Table 6-1.
Barring other reasons for creating new versions, I’ll do a save as twice daily, once at lunch and once at the end of the day. If my starting file for the day was Jordan Dial R5 ver4 edit 3, my midday save will be Jordan Dial R5 ver4 edit 4, and my end-of-the-day save will be Jordan Dial R5 ver4 edit 5.
If I come in the next morning only to realize that the double cheeseburger at yesterday’s lunch so clouded my judgment as to render the entire afternoon’s work unusable, I can always revert to edit 4, not tell anyone of my disaster, and swear off heavy food for the rest of the gig. If I’m going to try an editorial path I consider likely to fail, I’ll make a new edit (possibly Jordan Dial R5 ver4 edit 5a) that differentiates this experimental version from the “straight” work I’ve done. If edit 5a fails to be brilliant, I can easily revert to edit 5.
Perform a normal save, in which the session file is overwritten, as often as you can remember. You can also use your workstation’s auto-save feature to make overwrite saves of your sessions at regular intervals.
Back up Your Files
Needless to say, you must have a plan for backing up your soundfiles and sessions. Unlike SFX editing, where your bank of soundfiles is constantly growing, dialogue doesn’t generate a lot of new files after the OMF import and/or auto-assembly, so you can do one big backup at the beginning of the project and most of the work is done. Still, you have to back up daily the handful of new files you inevitably generate: the bounces, consolidations, and processed regions. Open your session without them and you’ll face embarrassing holes. Also, any destructive process, such as Pro Tool’s pencil tool, alters your originals. Such modifications aren’t stored with the session, but rather exist as changes in the underlying soundfile, which must be backed up once again or the changes won’t show up in reconstituted projects.
Finally, don’t forget to back up your ADR files. Say you record an ADR session from a remote location via ISDN and then trip on the drive’s power cable, smashing the drive and its contents to pieces. Who’s going to look stupid? Back it up.
By far the easiest way to back up a session’s new soundfiles and keep them up to date is with a backup utility such as Mezzo or Retrospect.7 Whether you back up to a FireWire drive, a DVD, a tape drive, or across a network, backup programs keep track of changes to your drive since the last backup session and incrementally copy only what’s necessary.
Without special software you can still manage your backups with confidence; it’s just a bit more work. After the OMF and autoconform are opened and you’ve created your master sessions (one per reel), copy the entire project to a large FireWire backup drive. On your work drive, label (color code) all of the files that have been copied.
• |
As you edit, pay attention to where you put new soundfiles. Fewer target folders mean fewer places to look for them. |
• |
At the end of each work day, open all of the folders to which you’ve been adding soundfiles. Sort by modification date, and the new, unprotected files will come to the top. These new files won’t carry a color label since they haven’t been copied to the backup drive. Copy them (from every applicable folder) to the backup drive now. Previously copied soundfiles that have undergone destructive changes—such as with Pro Tools’ pencil—will sort near the top of the list because they were recently modified, but they’ll carry a color label from previous backups, making them a bit harder to find. |
• |
Don’t forget to copy your session files. |
• |
Finally, color label the newly copied files to indicate that they’ve been backed up. |
1 Timecode can be placed on a tape in a number of ways. The oldest method involves converting the 80-bit timecode data stream into an analogue signal and recording it onto a dedicated channel (the timecode track). In olden days, before VTRs had dedicated timecode heads, an analogue timecode signal would be recorded onto an audio channel. This caused all sorts of problems, including nasty crosstalk. Called LTC (longitudinal timecode), it worked very well at play speeds but wasn’t accurate at very slow speeds. LTC is worthless when the VTR is stopped. To get around this problem, a timecode was developed that can be read at nonplay speeds. VITC (vertical interval timecode) is placed in the vertical blanking of the video, just above the picture area. If you reduce the picture size or roll the picture down, you can see it in the form of dancing white dots and dashes. Most VTRs read both LTC and VITC and know how to switch between the two as the play speed changes. Finally, there’s BITC (burnt-in timecode), also known as “window dub” or “timecode window.” This is a graphic, human-readable display of the current timecode address inserted into the video. The fact that your videotape has a burn-in is no guarantee that the tape has machine-readable timecode.
2 The noise bar is the “frame line” that wipes over the video as you slowly scrub from one frame to the next. Since there are two fields in a frame, two noise bars must pass over the screen to advance one frame. If your VTR has a timebase corrector or dynamic tracking, you likely won’t see the noise bar.
3 There are arguments, at times passionate, about where to place the timecode burn-in—at the top or at the bottom of the frame. You’ve heard my reasons for the top. There are, however, times when it’s best to place the burn-in at the bottom of the frame. If you use the character inserter in the Betacam or DV player to create your burn-in, rather than using an external timecode inserter, you’re better off placing the burn-in at the bottom. With the timecode window at the top, the built-in inserters may “print” the timecode into the video before updating the time. You end up with BITC that’s one field late.
4 See www.fairlightau.com.
5 See www.merging.com.
6 See www.virtualvtr.com.
7 Mezzo is a product of Grey Matter Response. Retrospect is made by EMC Dantz.