A Quick Look at Picture Editing
More than any other sound editor, the dialogue editor needs to know what happens in the picture department. When we remain ignorant of “that picture stuff,” things go wrong and we don’t know why. If we don’t understand the way picture editors think, we can’t understand the tracks they give us. And without a decent grasp of the picture cutting process and the issues facing picture editors, we don’t know if we’re being snowed or if it really is impossible to give us what we need.
The picture editor and the picture department assistants have huge responsibilities. At one level they must organize, absorb, and edit the vast collection of shots from the filming in order tell a story, develop characters, and create sequences that are more than the sum of their parts. At the same time, they must wrangle a huge database of picture and audio offsets so that negative cutters and sound editors can make sense of their edit room decisions. Keep in mind this unlikely balance between wizard/artist and bean counter/IT administrator when you’re having a tough time relating to your picture editor.
A Picture Editing Primer (NTSC Version)
The following idealized description of film editing won’t make a film editor out of you, but it should give you an idea of the workflow in a modern picture editing room. Pay attention to the organization, methodology, procedures, and issues involved, and you’ll be better equipped to communicate with picture editors and more likely to get what you need from them.
Telecine and Digitization
At the end of a day’s shooting the negative is rushed to the lab for processing. Once dry it’s taken to the telecine bay for transfer to videotape. A telecine works much like a projector shining into a video camera that’s synchronized to the projector’s shutter. A powerful cathode ray tube is the source of light, and the image is scanned rather than merely videotaped. The telecine operator has enormous control over brightness, contrast, and color, but with dailies the transfer is usually one light, a term from film printing meaning that no great care was taken to color-correct each shot, but rather a decent, average setup was used. Depending on the needs of the picture editing department, the videotape format may be Betacam SP, Digital Betacam, DVCAM, U-Matic, or S-VHS.
Increasingly, high-budget productions are forgoing transfer to tape and instead creating high-definition files directly from the telecine. It’s only a matter of time before this process is democratized and all transfers go straight to disk. Tape or file, the process and the bottleneck issues are the same. In certain circumstances, the audio from the shoot—whether originating on DAT, Nagra-D, DA-88, or hard-disk recorder—is transferred to the videotape during the telecine transfer (not recommended). Otherwise, the sound is transferred and synchronized in the picture-cutting room.
Transferring negative to tape without developing a relationship between film frames and video frames is a waste of time. Remember, sooner or later, a negative cutter will have the job of precisely recreating the picture editor’s decisions. Unlike the picture editor working in a virtual world with many levels of undo, the negative cutter works with a pair of scissors, with one chance to get it right. This is no place for approximations. For the telecine videotape to be useful, you must know the relationship between any given videotape frame and the corresponding film frame and original audio timecode. If you don’t, you’ll find yourself in darkness once the picture editing is finished.
Establishing a relationship between the telecine videotape and the original sound recording is no great feat, given that each carries timecode to identify every frame. But what about the original film negative, which holds no timecode? Thankfully, original camera negative film is manufactured with a chunk of data printed twice per foot, outside the sprockets. Machine-readable Keykode1 barcodes contain address information as well as codes for manufacturer, film stock, and lot number. This information replicates the human-readable key number. During telecine transfer, the colorist creates a record of pertinent information from the film negative, the sound recording (if used), and the transfer videotape.
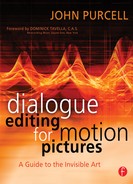
Generically, the colorist’s record is called a Telecine Log, but the two most common varieties are FLEx (Film Log EDL Exchange Protocol) files, developed by da Vinci Systems, and ALE (Avid Log Exchange) files, developed by Digidesign. These make up the database used to track edits throughout the picture editing process. Limited fields of the FLEx files can be recorded to VITC lines on the videotape, thus making foot+frame and pulldown information machine readable. One Telecine Log printout, shown in Figure 3-1, is provided for each videotape.
Back in the cutting room, the assistant picture editor digitizes the videotapes, using the telecine logs to tell the Avid all there is to know about scenes, takes, camera rolls (the name given to each roll of original negative), Keykode, and pulldown. The Avid now also knows how to decode the 4-frame A-frame sequence so that it can unambiguously match a video frame to its film parent. If the original sound was transferred and synchronized in the telecine bay, the assistant picture editor will digitize sound along with picture. Even though the audio timecode will match the video timecode (the two are now on the same tape and in sync, after all), the FLEx or ALE file will enable the Avid to generate an EDL2 that refers to the original DAT or HD timecode or to the metadata-equipped BWF soundfile. Without this, you wouldn’t be able to autoconform the dialogue from the original tapes. If the telecine videotape doesn’t include audio, the assistant picture editor will load the sound into the Avid, sync the claps for each take, and supply the missing audio data for each take (sound roll number, scene and take, etc.). This is shown in Figure 3-2.
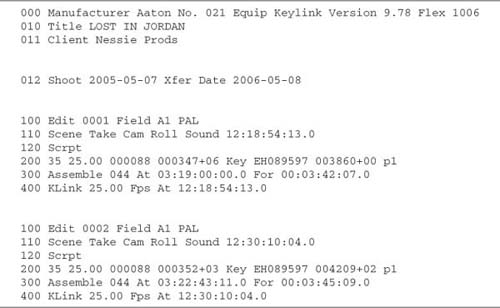
Figure 3-1 Example of a FLEx file made during a telecine transfer session. This information is used to establish a relationship between film negative Keykode and videotape timecode; it will follow the picture through the editing process to facilitate accurate negative cutting.
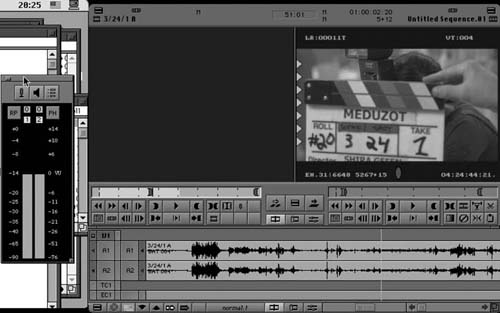
Figure 3-2 Syncing a shot in an Avid. Once the sync relationship is established between sound and picture for each shot, an offset database facilitates creation of video and audio EDLs and a negative cut list. The picture editor can forget about the many timecodes, since the machine will remember this vital information.
More and more films are originating their picture on something other than film negative. As DV and HD photography becomes more common, negative cutting will become less a part of the filmmaking process. For now you need to remember that a great deal of picture editing hygiene centers around painless negative cutting.
Organizing the Material
Before beginning to break up the long (up to an hour) digitized dailies rolls into individual scenes and takes, the assistant will check one more time that the metadata accurately reflects the realities of the videotape. Timecode, camera and sound roll numbers, scene, and take labels must be correct at this point; once editing begins it’s much harder to find and resolve problems.
The assistant editor organizes every scene and take into bins (Avidspeak for folders), as shown in Figure 3-3, arranged however is most comfortable for her. Typically, bins are organized by scene. To make editing easier, you can add text descriptions of each take to the existing metadata.3
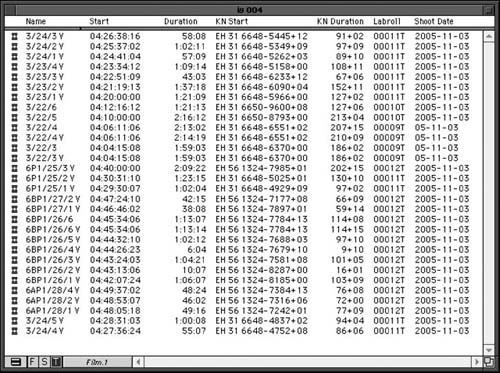
Figure 3-3 Shots in the Avid are organized in bins.
The First Assembly
The picture editor screens and logs the shots. He then selects the shots that best serve each moment of the scene to construct an assembly. This first assembly is often numbingly long, but it allows editor and director to see for the first time how the shots interact.
Nonlinear picture editing workstations like Avid and FCP allow endless versions of scenes, so editors can easily play with the story, saving different interpretations to present to the director. Such flexibility comes at a cost: Unmanaged, this wildly growing collection of versions becomes unwieldy. To combat this disarray, editors and assistants apply standardized naming schemes to the files.4 So, for example, a file including the editor’s first cut of scenes 33 and 34 may be called “033-034 v100.” The second editor’s cut would be “033-034 v101.” The “v101” tells you which screening the version relates to. Typically, “100” denotes the editor’s cuts; “200,” the director’s cuts; and “300,” later studio or public screening edits. Other editors rely on dates to keep track of versions, since the Avid’s bin view is easily sorted by date. The specifics of version codes vary by production, but there must always be a means of knowing what the edit refers to.5
Sound Enters the Picture
As the editor and director work to find the story and eliminate narrative dead ends, doing their best to hide bad acting and feature the good stuff, many versions are created, all of which are logically (hopefully) logged and saved. Often, an editor will add temp music and temp SFX to the Avid cut. Temp music will almost never survive to the final soundtrack, since few small-budget films can afford John Williams or Led Zeppelin. It’s there to provide mood and rhythm and to give a screening audience (as well as the director and editor) a clue as to how the scene will work. When the composer gets involved, he’ll likely be told to use the temp music track as an inspiration, to “make it just like this, but different.”
Don’t be surprised to hear “temporary” sound effects added during the offline. Sometimes you really do need to hear a sound effect to understand the feel of a scene. The endlessly ringing phone, the crying baby in the next room, the downstairs neighbors who won’t give us any peace … these sorts of things must be heard for the scenes to make sense. Moreover, as focus groups become ever more common, directors feel that their unfinished films must sound as “finished” as possible. Right or wrong, filmmakers assume that a public audience (or even an audience of studio executives) can’t appreciate an unfinished work.
As a result, Avid edits are becoming more and more loaded with temp SFX, temp ADR, temp music, and temp Foley. An entire industry has grown from this mess. Significant chunks of a sound budget now go to temporary mixes, and supervising sound editors are often brought onboard during the picture editing process for the sole purpose of preparing and nursing countless temp mixes. The dialogue editor may or may not become involved with the temp mixes, depending on the size of the production.
As the dialogue editor, you take what comes out of the picture editing room and make sense of it. However, if the picture department loads sounds into the Avid without timecode, you have no access to them except through the OMF.6 And if (God forbid) the wild sounds were loaded via analogue at very low or distorted levels, you’re up a creek. Even though the sound department will theoretically replace any Avid-loaded SFX, Foley, dialogue, ADR, or music, you must be able to access what they did in picture, just in case the director falls in love with his cutting room ADR and you’re forced to use it.
The only way to give the sound department some level of control over these wild sounds is to arrange for all nonproduction sounds (i.e., everything that didn’t originate at the shoot) to be first transferred to a timecode format (usually TC DAT or a soundfile with a timestamp) and then digitized into the Avid. These sounds or files can be loaded directly into the Avid session, and as long as the filenames go unchanged you’ll have no trouble relinking to the original files, which are held for safekeeping in the sound department. This rule applies as well to temporary narration the editor may record into the Avid; record instead to TC DAT and then digitize it into the workstation. If it turns out that the director can’t part with the “perfect” sound he recorded in the cutting room (which happens more often than you’d think), you’ll be able auto-conform the material as though it were a production sound.
If budget allows, the assistant picture editor will regularly conform the 35mm workprint to the editor’s Avid edit. This way there will always be a filmprint available for screenings. The temporary soundtrack—whether a rough mix within the Avid or a serious board mix—is transferred to 35mm fullcoat for double-system screening.
Screenings, Recuts, Completion, and Music
The film now undergoes a series of public and private screenings, revisions, and restructurings. At this point, both the composer and the supervising sound editor are onboard. The composer provides musical sketches for the spotted scenes. These are synchronized with the picture, discussed, and fought over. New musical sketches appear, and the process continues until the score is more or less set.
When pictures were cut on film, people thought (and worked) in 1000-ft editorial reels. Before the final mix, these were merged into 2000-ft A/B reels. In the early days of workstations, picture editors continued this convention—cutting a film in 1000- or 2000-ft reels—largely because the weak computers of the era couldn’t handle longer sessions without getting slow or stupid. Today, however, many picture editors prefer to assemble their scenes into one continuous string. This way the entire film or parts thereof can be screened without changing reels. The downside is that once the picture is locked, the picture editor or assistant has to break the film into reels because labs insist on 2000-ft lengths. This is a good time for the supervising sound editor to lend a hand, to ensure that the changeovers occur in sound-friendly places (away from music, high-density dialogue, anticipated complex low-frequency backgrounds, etc.).
Wrap-Up
When the film is locked and broken into reels, a bit of work still remains for the picture people. The negative cutter will need a digital dump, or output tape, along with a special EDL and cut list. If you’re working in PAL on a Film Composer or on Final Cut Pro with Cinema Tools, you have to make a 25 fps cut list, shown in Figure 3-4, and output tape for the negative cutter. For the sound department, the assistant picture editor will make a 24fps output tape and two sets of EDLs (audio only and video only). He’ll also make an OMF (usually OMF-2).
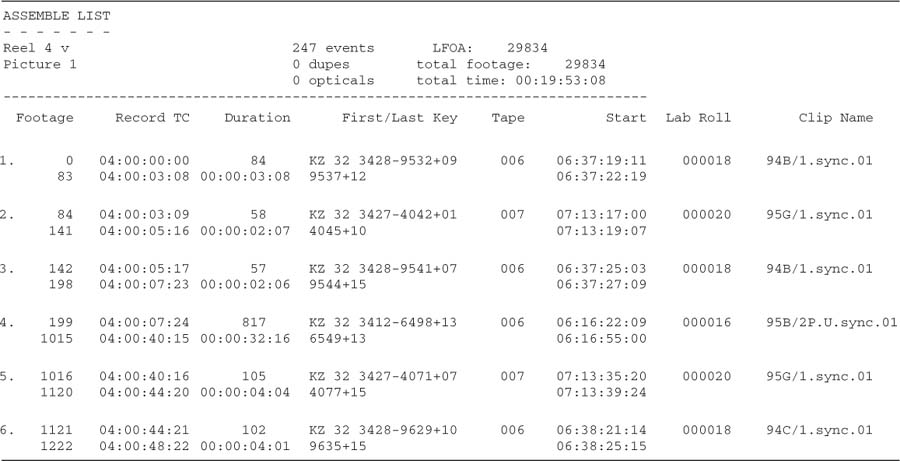
Figure 3-4 Excerpt of a cut list produced by an Avid. Armed with this list and a reference videotape, the negative cutter can assemble the original camera negative to match the film editor’s cuts.
This is when you come by to pick up the original tapes and associated sound reports, lined script, and list of characters. If the original sound recordings, whether on DAT or hard disk, aren’t available to you, ask the assistant to create a series of OMFs from the bins containing all of the original takes. From this you can create sessions and then extract soundfiles. It’s a bit of a hassle to work this way, but if it’s all you can manage, smile and move on.
1 Keykode is a trademark of the Eastman Kodak Company.
2 An EDL (edit decision list) is an event-by-event description of a video-based program, with all picture and sound edits detailed. We’ll discuss the EDL in great detail in Chapter 5.
3 These bins may later save your life. If for some reason you can’t access the original sound rolls, you can create OMFs (Open Media Framework files) from the Avid bins that contain all of the takes. From these OMF files you can create sessions and extract correctly named soundfiles from them. It’s not the easiest procedure, for you or for the picture department. But it’s good to know that this option exists.
4 This is the naming scheme discussed in The Film Editing Room Handbook, Third Edition, by Norman Hollyn (Los Angeles: Lone Eagle Press, pp. 167–68).
5 Learn from this file-coding system. When you save versions of your work, apply a meaningful name that refers to the tape version, the sequence number of your work, and/ or the date of the last edit. More about this in Chapter 6.
6 OMF is a means of transferring media between different machines (for example, between a Final Cut Pro picture editor and a Fairlight audio editor). Much more about this in Chapter 5.