Now, the Actual Editing
At last, it’s time to edit. No more setup to be done, no more preparation work. As you begin, keep the following two main purposes of the dialogue editing process in mind so that you can be efficient and focused.
• |
To serve the film by creating clean, focused tracks, free of anything that gets in the way. This is how you can help move the story along and create minute details that enhance plot, character development, and drama. |
• |
To prepare tracks that can be mixed easily and productively. No matter how creative, clean, or detail-rich your tracks, if the mixer can’t quickly make sense of them, all of your work is in vain. You’ll never have enough time in a dialogue premix to give your tracks the time they deserve, so you have to edit with an eye to the mix, presenting your tracks in such a way that the mixer spends her time creatively, bringing out the best in them rather than trying to figure out your system. |
Respect these two goals—craftsmanship and procedure—and the rest will work out.
Splitting Tracks
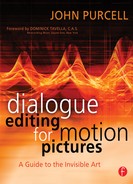
The first real step in editing is to split the tracks within a scene so that each camera angle (shot) has its own track. This will make it easier for you to understand the scene and allow the scene to “talk” to you. It will also make for a sensible mix when the time comes. Give the rererecording mixer a beautifully edited but badly organized scene and your work will be wasted (plus, you’ll hear some well-deserved harsh words). If you’ve done any popular music production, you know that you organize the recording, editing, and mixing of each song by instrument. (See Figure 10-1.) You might have a track for the lead guitar, one for the bass, one for the synth, a few for the drums, and of course one for the singer. In your mix, you’ll want a specific combination of EQ, dynamics, and effects for each instrument and voice throughout the song.
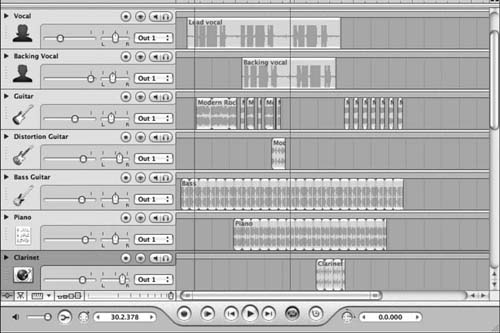
Figure 10-1 Idealized tracking session for a pop song as seen on Apple’s Soundtrack Pro. Each instrument occupies one track on a song. On another song, the track geography may be totally different, depending on the song’s needs.
If the guitar lives on the same track throughout the song, you can easily apply its required processing without interfering with the other instruments and without any undue automation acrobatics. If you record a few bars of guitar on a certain track and then drop in some drums followed by a few lines of vocals, you can imagine how difficult it becomes to control the music. You’ll spend all your time executing exotic processing automation and lose focus on the real issue—telling a story through music.
In many ways you face the same issues in dialogue editing. Within a scene, each camera angle, each perspective, every character behaves like an instrument in a pop song. By properly organizing the scene, you gain the same control you achieve in music mixing. Each shot will have its unique characteristics, and by putting each one on its own track—within that scene—you’re making life much easier for yourself and for the mixer.
Be careful not to take this music analogy too far. The “rules” of a scene—who’s on which track—are true only within the one scene you’re working on. Just because Bill’s close-up is on Dial C in scene 76, he doesn’t have to appear on Dial C throughout the film. Nor do you need to create hundreds of tracks to accommodate all the people/angle combinations you’ll encounter. On a film of average complexity, you should be able to elegantly edit the dialogue using no more than 16 tracks, still providing the order and logic needed to wrangle the tracks within each scene. This is possible only because you recycle the tracks on entering a new scene. Unlike music production, where a track takes on the name of its “inhabitant,” dialogue tracks steadfastly hold onto their names: Dial A, Dial B, and so on.
Fortunately, the key to organizing your session by shot presents itself as soon as you open the session. Unless you’re especially unlucky, the scene, shot, and take information (or the slate and take number if the production used a sequential slate-numbering system) will appear on the region names. (See Figure 10-2.)
An Example of Scene Organization by Shot
Before the shoot, a scene must be broken into shots. At its most basic level, a scene will contain a master shot, close-ups for each speaking character, perhaps a two-shot or a dolly shot, and whatever other angles are needed to move the story along. Let’s imagine a simple two-person interior scene and see how it can be broken into shots. In the drawing room, Fanny and Edmund are engaged in a bit of courtship (the dialogue is transcribed from Jane Austen’s Mansfield Park, first published in 1814).1

Figure 10-2 Use the information in the region names to identify scene, shot, and take.
Edmund
Now I must look at you Fanny, and tell you how I like you; and as well as I can judge by this light, you look very nicely indeed. What have you got on?
Fanny
The new dress that my uncle was so good as to give me on my cousin’s marriage. I hope it is not too fine; but I thought I ought to wear it as soon as I could, and that I might not have such another opportunity all the winter. I hope you do not think me too fine.
Edmund
A woman can never be too fine when she is all in white.
That’s the script. The director will visualize it into shots, and the assistant director will organize a sensible shooting order based on locations, availability of actors, and weird production demands. You’ll end up with a script breakdown like this:
Scene 32, INT day drawing room, Edmund and Fanny
Shots:
32 |
MWS |
Establishment shot, Edmund + Fanny left of frame, large clock on right |
32A |
MCU |
Fanny |
32B |
CU |
Edmund |
32C |
WS |
through window |
When the scene is shot, the script supervisor keeps track of which parts of the scene were successfully filmed from each angle. This lined script will enable the film editor, and later you, to see which text was covered during each shot and take. In the real world, the script report will include coverage details for each take so you can easily know what you have to work with and where your pitfalls lie. It’s rare that all shots, or angles, will cover the entire scene. Usually, a scene is blocked so that certain sections are covered by specific angles. Otherwise, you end up wasting film and shooting time, both of which are expensive.
The lined script in Figure 10-3 is hideously oversimplified, but you see how the picture editor can use the script notes to learn what sort of coverage exists.2 He’ll pick from this treasure trove of shots, selecting the best moments and the greatest performances, and piece together a believable, emotional scene that pulls the viewer through the action and into the next scene.
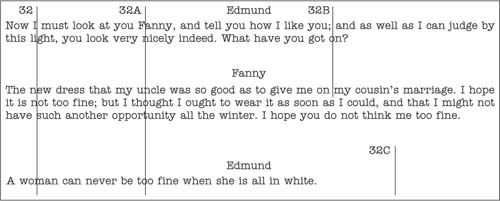
Figure 10-3 Much simplified example of a lined script.
Split by Sound Edits, Not Picture Edits
In the scene shown in Figure 10-3, begin by placing every appearance of shot 32 (the master shot) on Dial A, all 32A regions on Dial B, and so forth. (See Figure 10-4.) Later you might decide to further split the regions, but this is a good start—and it’s very easy. Remember that even though you’re splitting the dialogue regions by shot, you’re not (or you are but very rarely) cutting with the picture. You’re splitting by “microphone angle” and your splits will be based on sound, not picture, edits. If picture editors always cut picture and sound at the same moment, films would be awfully boring, so sound and picture edits are often staggered.
In the scene with Edmund and Fanny, the editor might have cut to Fanny’s close-up (CU) before Edmund completed his first speech. Although we were seeing Fanny’s appreciative face, we would hear the end of Edmund’s track. Still holding onto Fanny’s CU, we would hear her lines, now in sync with her picture. At the end of Fanny’s lines, the picture editor may choose to hang on to her CU for a few moments, even while we hear Edmund’s retort. In all such cases, split the dialogue based on sound edits only.
At this point, you don’t know anything about the tracks, but you can make certain blind assumptions. By organizing the scene by shot, you can better understand its sound issues. Plus, this configuration will make the mix sensible and logical.

Figure 10-4 As you begin to split a scene, the most sensible place to start is by shot. In this example, scene 71, all of the regions from shot (or “slate”) 206 go to Dial A, regions from shot 209 go to Dial B, and so forth. The sequence is a matter of taste, but many editors place the first shot to appear in a scene onto the first track used in that scene.
Additional Splits
At times you’ll want to split your tracks beyond the basic shot-of-origin mode. Perspective cuts, telephone conversations, problematic noises, or places where you want extra focus are just a few of the reasons to do this. If, for example, the picture editor used three different takes of Edmund’s close-up, two of which have the same room tone and another that suffers from a low-frequency rumble, you should split the rumble-infested take onto its own track. After all, it will unquestionably need special processing because of the noise, and it will likely benefit from longer room tone transitions.
Don’t be shy about splitting; tracks are cheap. In general, splitting is better than not splitting, but thoughtless or unnecessary splitting creates more problems than it solves. Talk to your rerecording mixer about how many tracks you can use, and how detailed he wants the splits to be.
Unnecessary Inserts
Just because the picture editor gives you a shot, you don’t have to use it. If, while talking to Fanny, Edmund (32B) takes a thoughtful pause and the picture cuts to Fanny silently nodding her approval, the picture editor will probably cut both picture and sound to Fanny’s shot (32A). When the lecture continues, the editor will cut back to Edmund’s track. What you’re left with is a change of room tone when we cut to Fanny and another when we return to Edmund. (See Figure 10-5.)
Clearly, if Fanny says something or makes an audible sigh or movement, you’ll need her insert to maintain a sense of reality. However, if the sound from her insert offers no useful information, you’ll end up moving back and forth between room tones for no reason. Not only does this make you work harder than necessary, but it subjects the viewer to yet another room tone transition. If the inserted room tone doesn’t help the story, get rid of it and cover the inserted shot with room tone from Edmund’s track. (See Figure 10-6.) The result: A smoother track that’s easier to cut and easier to mix. Everyone wins.
How Many Tracks?
In general, you want enough principal dialogue tracks to be able to cut two consecutive scenes of average complexity without reusing tracks. So if, on average, you use 6 tracks per scene, you’ll want 12 to 14 primary dialogue tracks. Sometimes things get out of control and a long or madly complex scene uses ten or more tracks, so the next scene will necessarily reuse some. Don’t worry.

Figure 10-5 When you cut from 32B to the silent cutaway of Fanny, 32A, you may introduce unnecessary room tone changes and gain nothing in exchange.

Figure 10-6 If there’s absolutely no interesting information in Fanny’s short cutaway, remove it and fill with Edmund’s room tone. Also, if Fanny’s cutaway has useful information but is unacceptably noisy, remove it and fill with tone from 32B. Later, Foley may be added to liven up the gap.
On small films I typically use about 14 main dialogue tracks. By the time I get to the dialogue premix, I’ve added a few ADR tracks, some production effects, and X, Y, and Z tracks, ending up with about 30 altogether. Any mixer can handle 30 tracks, but if I’m working with a mixer or dubbing stage I don’t know, I’ll e-mail a list of my tracks and ask if this arrangement is reasonable.
No matter how many tracks you end up with, be sure to have the same number on each reel, in the same order. Even if you don’t use every track on each reel, go to the mix with every track in its proper place, muted if unused. This way, the tracks will always come up on the correct channels of the mixing desk. Repatching is a nuisance and always leads to mistakes.
Splitting Scenes
Just as you split your tracks within a scene, you can split one scene against the next, making for easier mixing. Most rerecording mixers prefer to “checkerboard” their dialogue premixes (or predubs) onto different premix record tracks so they have greater control over scene transitions or additional processing during the final mix.
If your mixer wants to work this way, try not to recycle tracks on adjacent scenes. Say that one scene uses eight tracks (Dials A → H); try to start the next scene on track 9 (Dial I). The third scene will then begin again on Dial A. (See Figure 10-7.) If you have a very long or complicated scene that won’t allow checkerboarding, just make sure that its first couple of shots start on tracks that weren’t used at the very end of the outgoing scene. (See Chapter 16, Preparing for the Mix, for more on this topic.)
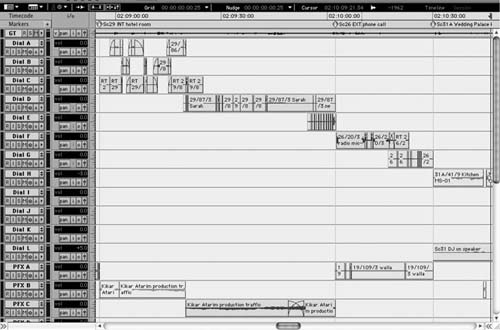
Figure 10-7 Try not to put adjacent scenes on the same tracks. Here scene 29 is on Dials A, B, C, and D, plus PFX B and C. Scene 26 (including its split, which begins during scene 29) is on Dials E, F, and G plus PFX A. The beginnings of scene 31A can be seen on Dials H and L.
Shot Balancing and the Rules of Thumb
Dialogue editing’s most important sleight of hand is taking the elements of a scene, often shot at different times or under dissimilar conditions, and nursing them into a living scene that viewers will truly believe to be real. Matching the voice qualities, the degree of “on-mic” sound, and the level and quality of the room tone and creating narrative-enhancing perspective are what make a scene shine. Shot balancing removes the mechanics of filmmaking, but exploits the language of film to allow the sound of the dialogue to be more than just the carrier of the text.
Remember, films are shot with one camera, not in script order. Between each shot or setup (not each take), the camera relocates, the lights are reset, and all sorts of other things change. This results in a new sound for each angle. Sometimes the difference between shots is hardly noticeable; other times the contrast is shocking, leaving the edited scene all but unlistenable.
Compare cinema’s single-camera approach with video studio production techniques. Soap operas and many TV comedies are shot multicamera (i.e., with multiple cameras), either in front of an audience or designed to give you the impression that an audience exists. Because scenes are shot more or less in real time, there’s little difference in the sound characteristics from one shot to another.
There’s usually no change in set or lighting between shots (since they’re shot multicamera), so there’s little reason for each angle to have a different sound. Besides, these productions are almost always shot on a sound stage, so the overall noise and the differences from one angle to another are under much better control. Finally, the sound source doesn’t change with the picture—the sound is captured from a common studio boom or a battery of radio mics—so there’s no resulting change in room tone or sound color. (See Figure 10-8.)

Figure 10-8 A schematic of multicamera studio recording. Shown are the characters, the boom microphone, and three video cameras. Sound is captured from studio boom microphones or from several wireless microphones. The character of the sound doesn’t change from shot to shot.
Now, back to film production. Imagine an interior restaurant scene (we’ll call it scene 45) in which three people—Bob, Betty, and Blanche—are talking. Betty’s back is to the kitchen, so her room tone includes refrigerator rumble in a large, hard space as well as some shuffling about. Bob’s back is against a soft banquette, so his room tone is comparatively quiet. Behind Blanche is the rest of the restaurant—goodness knows what her shot sounds like, but it’s probably full of air conditioner noise. (These shots have far more similarities than differences, but in this example we’ll exaggerate things for the sake of clarity.)
The scene consists of several shots (see Figure 10-9):
1. |
Wide establishment shot of everyone at the table, scene 45. |
2. |
Medium close-up of each of the three characters: |
| a. Betty CU, scene 45A |
| b. Bob CU, scene 45B |
| c. Blanche CU, scene 45C |
3. |
Medium shot, POV from the kitchen, scene 45D. |
Now piece together an imaginary scene from the shots just given. The picture editor will analyze each one and fashion a scene that exploits the strengths of the footage (and conceals its weaknesses) to best tell a story. Chances are, the resulting sound bumps aren’t the editor’s highest priority. The picture people tell the story; we try to make it work. Besides, “It all sounded pretty good in the Avid!”

Figure 10-9 A schematic of scene 45. Note the different camera setups for each shot. Also note the landmarks in the room and their relationships with the characters and the camera. The geography of the room helps define the room tone for each shot.
Once you open the OMF, the scene is immediately annoying. Cuts between Betty and Bob result in two mismatched kinds of kitchen noise, while moving to Blanche you lose the hum of the kitchen only to hear the din of the restaurant. And neither of the wider shots cuts well against the close-ups. Even if the scene is interesting and dramatically effective, it won’t sound like a movie because of the bumps. How can this happen? How can the picture editor do this to you? Easy.
• |
Picture editors have things on their minds other than the sound of shot transitions, so what to you seems an unforgivable lapse of judgment makes perfect sense to them. They’re right. The story is what counts. Let the sound department deal with the bodies. |
• |
Between the hard drives, the computers, and the lousy speakers, you simply can’t hear in a modern picture editing room. Nothing masks bad cuts like computer and air conditioner noise. |
• |
Picture cutting rooms are rarely equipped with adequate mixers, amplifiers, or loudspeakers. |
Scene 45 is sitting on your desk and, for whatever the reason, it doesn’t work.
Every time there’s a change in sound sources, room tone, voice characteristics, or level, you’re temporarily knocked out of the scene—reminded that this is a movie. Since every ounce of your film-literate brain wants to think of scene 45 as real life, you get back into the scene quickly enough. But the magic is temporarily violated with each cut. Before you can effectively attack the other issues (noises, overlaps, replacements, perspective, etc.), you must make the scene reasonably smooth. Otherwise, the irregularities caused by room tone mismatches will make it all but impossible to listen for the more subtle problems. (See Figure 10-10.)
You soon discover, however, that smoothing scenes is a constant tradeoff between total noise and evenness, and many novice editors err on the side of noise. “Lay down a wall of room tone,” the logic goes, “and you can mask the differences between shots.” Or you can mask the differences between the shots by running a vacuum cleaner in your cutting room while listening to the scene, but that’s hardly a solution. (See Figure 10-11.)
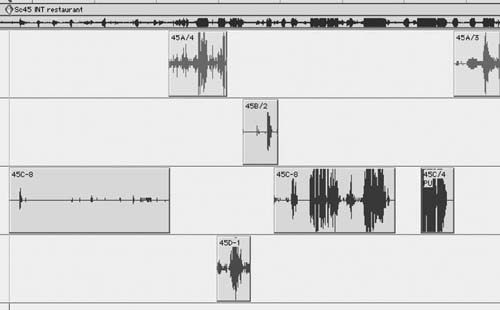
Figure 10-10 Detail from scene 45 after you’ve organized the tracks but before editing. Each shot has different room tone, so the scene is bumpy. Note that Blanche (45A) and the shot from the kitchen (45D) have much heavier room tone than the other shots have.
Although there are (rare) occasions when you want to include a wall-to-wall carpet of room tone in a scene, you shouldn’t count on this as a solution to shot mismatches. But because this ill-conceived practice is so common, it’s worth looking at why you shouldn’t work like this. Look again at Figure 10-11. We’ve done nothing to ease the transitions. True, the bumps are less audible, since the problematic transitions are hiding behind the room tone track. During the dialogue premix, however, you’ll undoubtedly remove some of the ambient noise and the mask will lose its cloaking ability. The cleaner you make the tracks sound, the more this editing technique will betray you.
Aside from being ineffective, this technique makes for noisy tracks. Throughout the scene, at least two tracks of room tone are playing. Twice the room tone, double the noise floor. The original problem wasn’t within the shots but only at the transitions, so why should we add unnecessary noise to the middle of perfectly respectable shots? This brings us to the first fundamental rule of thumb for dialogue editors.

Figure 10-11 Room tone was applied for the entire duration of scene 45 in an attempt to mask shot mismatches. The underlying problem has not been solved, and the scene will now be much noisier.
Rule One: Whenever Possible, Play Only One Source of Room Tone at a Time
Let each shot speak for itself, overlapping room tones only at transitions. It’s true that there must be constant room tone running the length of a scene. After all, it’s the air that a scene breathes. However, in most circumstances the room tone comes from the regions themselves. Only when there’s a hole in the production track do you add a steady track of tone.
In Figure 10-12, each shot crossfades into the next. Here we were lucky because there was sufficient clean room tone within the handles of each shot to allow for easy crossfade creation. There’s no added, steady room tone track; instead, the room tone comes uniquely from the shots that make up the scene so it rarely has more than one source. “But,” you ask, “what about the cross fades? During these transitions two room tones are playing at once.” Yes, but as one shot fades in its partner fades out, so the sum of the two is never more than 100 percent of the average level of the shots. You haven’t broken the rule about avoiding more than one simultaneous tone.

Figure 10-12 Detail of preliminary edit of scene 45. Regions overlap more or less symmetrically and there’s no supplemental room tone track. The room tone for the scene is carried by the shots themselves.
Creating crossfades between regions doesn’t eliminate sound differences between shots. It merely lengthens the transition so that you don’t notice the changes. Human “hearing memory” is surprisingly short, so it doesn’t take much to fool the ear into thinking that a transition is smooth. Just spread the transition over a bit of time and most listeners won’t hear a thing.
Once you construct smoothing crossfades between shots, the scene will almost certainly sound quieter, as though you equalized or otherwise cleaned it. There will likely remain “swells” as you move back and forth between shots. When the room tone characteristics of two adjacent shots are very different, there’ll be peaks and troughs in the overall noise level as well as changes in the sound itself. During the dialogue premix you’ll process these crossfaded shots to further minimize the mismatches. This brings us to the next basic rule of dialogue editing.
Rule Two: Evenness Is a Trade-off between Noise and Smoothness
When two shots don’t match well, you’ll inevitably hear their transitions despite crossfades. By lengthening a crossfade, you’ll smooth the transition and give the impression of evenness. At the same time, this will increase the total noise since there’ll be a longer period during which two room tones are playing. What’s the “right” length? Of course, there’s no answer to that. It’s a choice, so use your judgment. Don’t be afraid to experiment with fade lengths; a tiny change in overlap can make a huge difference in balance, noise, and smoothness of the crossover.
Why Bother? Since you’re going to equalize and noise-reduce the shots during the mix, why go to such editorial trouble to smooth the transitions? Won’t the processing during the dialogue premix mitigate the differences between the shots? Yes … but. Imagine you’re painting a badly damaged window frame. The goal is a smooth, evenly covered surface that you can achieve either by slathering on a couple of thick coats of paint or by carefully scraping and sanding and filling, then applying a primer and sanding again—only then applying several thin coats of finishing paint. Either way the window gets painted. But in the lazy example you lose the details of the carpentry. The surface may be covered but it’s not “articulate.” It may be relatively smooth, but it’s covered with a thick crust of paint that masks the sharp lines, bevels, and joints of the underlying wood. In short, the craftsmanship is lost. Because in the careful example you took the time to fix the holes, mend the transitions, and smooth the surface, you need to apply only as much covering as is absolutely necessary. The paint finish is smooth, yet the personality of the underlying woodwork is maintained.
Such is the case with dialogue editing and mixing. Whereas it’s true that you can smooth almost any shot transition if you throw enough EQ and noise reduction at it, you have to ask yourself, “At what cost?” Scenes not properly prepared prior to the mix require much more processing to achieve an acceptable amount of smoothness. Because of the excessive filtering they may lack life, or sound thin and metallic, or at worst like a cell phone. This leads us to the third rule of thumb.
Rule Three: Design Scenes That Require the Least Amount of Processing
When your transitions are smooth, they’re less objectionable to the ear. Hence, they require less shot matching. Of course, certain shots will need to be “helped along” and the entire scene will need noise reduction, but since your dialogue transitions largely take care of themselves, you don’t need to overcook it. This allows the rerecording mixer to put more energy into making the shots sound nice—robust, full, warm, articulate. The dialogue hasn’t been stripped of its character, so there’s more to play with.
Ironically, the noisier the location of the scene, the bumpier you can leave your dialogue edit. If you’re cutting a scene with lots of traffic noise, rest assured that the sound effects editor can sort out a problematic dialogue transition with a well-placed car-by or other background motion effect. No one will notice one more car-by amid a noisy scene, and the tiny added motion energy will bridge the gap.
On the other hand, no scene is harder to cut than an intimate conversation in a dead quiet bedroom at three in the morning. There’s nothing to hide behind, and if the shots aren’t naturally well matched, it’s a nightmare to cut back and forth. If there’s camera noise on one shot but not on the other, you have very few smoothing resources and you can’t count on the SFX guys to save you. There are few appropriate atmospheric sound effects that can be used to mask the bumps, so you’re on your own.
Transition When There’s No Handle
In our restaurant scene with Bob, Betty, and Blanche, the editing gods indeed smiled on us. We were able to create clean room tone bridges merely by opening each shot’s handles. As we pulled out the handles, we didn’t encounter any footsteps, breaths, or words to ruin the room tone. Finding good “free” room tone like this isn’t unusual, but to find it for a whole scene is unheard of. Count your blessings.
What do you do when the handles don’t provide the room tone you need for transitions, as shown in Figure 10-13? You must create room tone, attach it to the region, and then make your crossfade. The next section deals in depth with room tone—what it is, how to make it, how to manage it. But first let’s look at an example of bridging shot transitions using room tone you’ve found or created. (See Figure 10-14.)
Often when the handle’s room tone is of no use, you’ll find enough elsewhere in the same shot. Since the character of most room tones varies over time, looking nearby has two advantages: It’s easy and it’s likely to match. (See Figure 10-15.)
Remember, the room tone you’re attaching to a shot must come from that shot (but not necessarily from the same take). Doing otherwise defeats the point of splitting tracks and organizing your scenes by shot of origin. If you can’t find appropriate room tone elsewhere in the shot, try copying the region to a work track and fishing through the entire take. This technique is described in the next section.
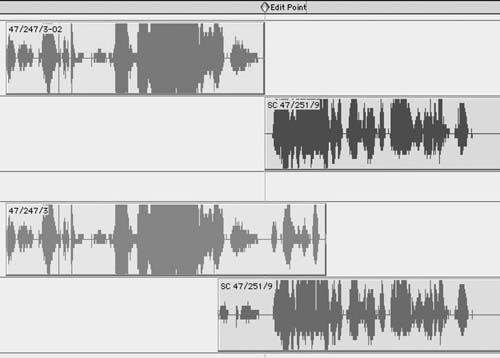
Figure 10-13 Just because you have a handle doesn’t mean it’s useful. Here you see the OMF edit (above) and after opening handles (below). The marker indicates the location of the original cut. Note that there’s no useful room tone in either handle. Always listen for words, breaths, and motion sounds when opening handles for tone bridges.

Figure 10-14 Create room tone “bridges” from nearby sections of the same shot. Here the two regions from Figure 10-12, which had no usable handles of their own, are linked using copies of adjacent room tone from the same shot.
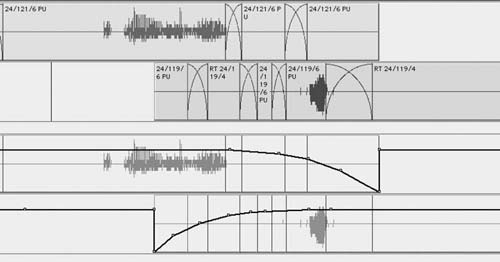
Figure 10-15 Room tone bridges are constructed from small segments of appropriate room tone from the same take as the main regions (above). Note that crossfades are used between the room tone segments. Below is the volume automation showing the crossfade between shots 121 and 119. Many workstations allow you to fade across several faded regions rather than having to resort to level automation.
You’ve now smoothed shot transitions in two ways: the lucky way, where you find usable room tone in the shots’ handles, and the more common method, where you copy or construct a tone transition. Although each set of regions poses unique transition problems that require their own solutions, all shot transition puzzles are solved with some variation of these techniques.
Using Room Tone When Editing Dialogue
Room tone is the single most important tool of dialogue editing. Just as woodwind players are obsessive about their reeds, or fly fishermen have a mystical relationship with their flies, so too are dialogue editors fanatical about room tone. Without it, you can’t edit.
At the same time, the term “room tone” is grossly misunderstood and misapplied. To many, it means “an interior atmosphere.” To some, it’s any atmosphere. Wrong on both counts. Room tone is the “silence” in any location recording, what’s left from a take when you remove the words, the footsteps, and the rustle. It describes the location (interior or exterior) at which a scene was shot, and it helps define the essence of a shot.
Room tone’s lofty position is due both to the trouble it causes and to the way it conveniently rushes to the rescue. Bumps in an edited scene are usually caused not by differences between characters’ voices but rather by differences between their room tone. It’s room tone that sets the shots apart, interfering with the magic of cinema continuity. And it’s room tone that enables you to create a smooth and believable scene. Dialogue editors use room tone in every stage of editing. These are some of the most obvious examples:
• |
To bridge between different shots within a scene, lending the impression that the scene is a continuous action rather than a collection of shots. |
• |
If added judiciously, to ease the transition between quiet close-ups and boomy wide shots. |
• |
To remove noises from dollies, denture smacks, lip flaps, offscreen talking, and so on. |
• |
To replace the environmental sound when dialogue must be rerecorded (ADR). Any missing body action sounds are replaced with Foley. |
• |
To enhance international versions of films (M&E) when original room tone is added to atmospheres so that the international version resembles the original-language version. |
Room Tone versus Backgrounds or Atmospheres
Simply put, room tone belongs to the dialogue department, whereas atmospheres (also called “backgrounds” or “ambiances” depending on where you live) are the domain of the sound effects/background department. Dialogue recordings are mono (perhaps multitrack, but not stereo), and so is room tone. Atmosphere recordings are usually stereo, although some are mono. Good room tone will have all of the characteristics of the shot that it’s fixing. Level, color, pitch, “action”—all of these attributes must match the shot at the moment in the scene when they’re used. Even if the location mixer records a stereo atmosphere of the set, this is not the same as a room tone and its uses are different.
Finding Room Tone
A location recordist will try to record room tone for each scene filmed. This will solve some of your problems, but it’s not necessarily the answer to your prayers. If there are four shots for a given scene, for example, each one will have its own distinct sound. Maybe the lights have moved; perhaps there’s a noisy highway behind a character in one angle but not in others; or the camera may be closer to the actor (and microphone) in one shot than in the others so the camera noise is discernibly louder in that shot. The reasons for mismatched room tone are endless. (See Figure 10-16.) When the location mixer records 30 seconds of room tone for the scene, whose tone is he recording? The shot with the camera? The shot with the highway noise? The shot with more lighting ballast noise? Or perhaps an “average” room tone for the scene?

Figure 10-16 Shooting on location means mismatched room tones. In this convenience store, there are several sources of steady noise, many of which can’t be turned off. Add to that the traffic outside and the noises created by the shoot itself—ballasts and the generator—and you see how it’s hard to depend on a “general” room tone recording intended to cover the whole scene.
To make matters worse, it’s often very difficult for the location mixer to enforce a few seconds of real silence on the set while she records. Her call for “Total silence!” doesn’t mean “Whisper softly into your cell phone” or “Slowly open your lunch.” “Absolute quiet!!” doesn’t mean that the continuity person can complete her notes or that the grip can play with his pliers. Bottom line: You’ll rarely be able to find good room tone within the wild room tone recordings from the set. You have to make it yourself.
Creating Room Tone
A common myth is that you need to locate only a small snippet of decent tone and then you can loop it to cover any duration. Wrong. Unless you’ve created a room tone so sterile that it totally lacks texture, any loop you attempt will be heard as just that: a loop. Reasonably long stretches of room tone can be looped, but even these usually require some tricks to avoid sounding repetitive. (See Figure 10-17.)
Another myth is that you can successfully create loads of room tone in a sampler. It can be done, but the result is rarely natural, alive, or believable. For the most part, if you want good room tone for a shot you must collect bits and pieces of it from within the shot and then piece together a convincing construction. (See Figure 10-18.)

Figure 10-17 A room tone loop fills the hole between two shots. A string of regions that looks like this will sound like a loop. Anything this symmetrical means that the editor didn’t listen while filling the gap.
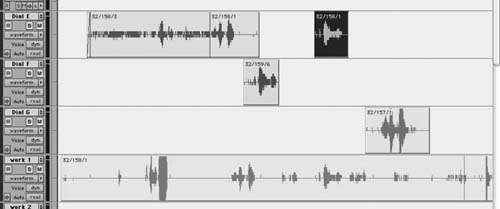
Figure 10-18 More room tone is needed for the highlighted section on Dial E. If a region’s natural handles aren’t useful, copy the region to a work track and completely open the region’s handles. There’ll be many possibilities for finding good room tone.
The new room tone must come from within the same shot as the material it’s supporting. Using another shot’s tone won’t solve your problems. What do you do?
1. |
Make of copy of the region for which you’re trying to create room tone. Paste it onto one of your work tracks. |
2. |
Open the handles of this region all the way to its boundaries. |
3. |
If you’re working on a Pro Tools, enter Shuffle mode. On other DAWs, use a mode that allows you to ripple tracks while editing. (Take note: One of the main reasons you created work tracks was to have a safe place for ripple editing. If you use Shuffle mode on a “real” track, you’ll lose sync on all of the track’s downstream regions.) Remove all dialogue and noises from this region. The region will become increasingly shorter and you’ll be left with room tone only. You can actually remove most of the words and noises without listening to the track; let the graphic display and your gut be your guide. |
4. |
Make a couple of fine passes, each time removing more and more unwanted noises, breaths, and rustle. You should end up with a very smooth chunk of room tone, devoid of recognizable landmarks. The process is much like making a reduced sauce—you cook it for hours and hours until it becomes a small, perfect concentrate. |
5. |
You can automate the process of isolating room tone with Pro Tools’ Strip Silence function. (See Figure 10-19.) This feature, equivalents of which are found on most workstations, asks for a threshold volume and a duration, which it uses to define “analogue black.” If you dial in −35 dB and 500 ms, for example, it will create a new region wherever the peak level doesn’t exceed −35 dB for at least a half a second. Once this criterion is met, it will create a new region. Some people like to work with Strip Silence; I prefer to create room tone manually. |
6. |
When your room tone is smooth and without transient sounds, perform crossfades at each of the edits you created. This will smooth the cuts and prevent clicks (especially important if your room tone carries lots of low-frequency information). (See Figure 10-20.) |
7. |
You’ll want to create a consolidated region from your jumble of crossfaded clips. One complete region is easier to edit, fade, and automate. Plus, you’ll have a properly named room tone region that will appear in your regions list and can be imported into other reels of the film. Before consolidating this string of edits, be certain that you’re happy with the edits and the crossfades, since once consolidated the edits can’t be fixed. Consolidating creates a new soundfile, which you must subsequently name. |
8. |
Name the new file using a sensible, systematic, easily sorted naming scheme—for example, “RT Sc32 Bill WS (quiet version).” This provides all the information you need to find the right room tone without scratching your head. You don’t want to end up with hundreds of room tone soundfiles named “Aud_1-1.” Begin the soundfile name with “RT” and all of your room tones will sort together. Begin with the scene name and it will live among the other regions from the scene. How you name your room tone creations is not important as long as you’re consistent. Later in the scene, or perhaps when you edit the ADR, you’ll need the room tone files you painstakingly created. Make it easy on yourself by giving them consistent, logical names. |
9. |
If you’re working on a Pro Tools, return to the Slip mode. If you are using another workstation, leave the ripple enable mode and return to normal editing. |
10. |
If you’re going to immediately edit with your new room tone (which is usually the case), trim away the beginning and end of the soundfile before copying it to a track adjacent to the one you’re editing, from which you’ll cut and paste as necessary. Trimming the top and tail of the soundfile provides a handle you can use to fade or trim any new edit. (See Figure 10-21.) |

Figure 10-19 Pro Tools’ Strip Silence dialogue box.

Figure 10-20 Even out room tone with crossfades.

Figure 10-21 Consolidate the tone into one manageable region. Trim off the region’s outer edges (seen here beyond the highlighting) before copying to leave “wiggle room” for crossfades and edit point positioning.
Using All Takes to Create Room Tone
If, after you cull the words, noises, and other unwanted irregularities from your expanded take, there’s not enough room tone to work with, you can extract what you need from all of the takes of the shot.
• |
Find all of the alternate takes of the shot in question, including the one used in the film. (See Chapter 12 to learn how to do this.) String the takes together, one after another, onto the work track. |
• |
Follow the procedure described earlier for extracting quality room tone from the takes. When finished, consolidate and name the new room tone file. |
Dealing with Changes in Room Tone Pitch or Volume
Small, recognizable sounds—that tiny click, the miniscule footstep, the quiet lip smack—will betray you when you repeat a section of room tone. Plus, it’s not likely that the click, step, or smack riding along with room tone will happen to fall in an appropriate spot in the scene. Get rid of such signatures.
However, sometimes it’s not enough to remove the telltale noises. Say you’re looping a piece of room tone that rises in pitch over the course of its 5-second life (nondescript background traffic rumble is an example). Merely repeating the cue will result in a “reset” of the pitch at each loop edit. Even though you carefully removed the noises, your loop still sounds like a loop. (See Figure 10-22.)

Figure 10-22 This room tone region tends to get louder with time, so looping it will result in a sudden drop in level followed by a slow rise. The same problem can arise when the level is even throughout the region but there’s a steady change in pitch. Either way, there’ll be a bump at the edit.

Figure 10-23 Assuming there are no sounds with patterns (voices, birds, car horns, etc.) or with a clear attack and decay, you may be able to loop a room tone with a pitch or level pattern by reversing the soundfile.
You can often create a good loop from a pitch-periodic room tone file by copying and reversing the room tone. (See Figure 10-23.)
• |
Make a copy of your clean room tone region. Make sure there are no acoustic sounds such as footsteps, birds, or voices in the clip. |
• |
Use your DAW to create a new, reversed region. |
• |
Trim a small amount from the end of the original file and the beginning of the reversed file. Edit these shortened soundfiles together and crossfade as necessary. |
• |
Consolidate and name the resulting soundfile. |
The room tone will still have a cyclical pattern, but it will be smooth and complete rather than cut off in mid-period. In a pinch, it will work fine as long as you don’t overuse it.
Matching Room Tone and Dialogue
Go to great lengths to avoid applying EQ or other processing to a room tone during editing. If you have to change the room tone to match a shot, there’s probably something wrong with it. Try again to find a better match, since “fake” room tone will come back to haunt you. Remember, it’s unlikely that you can hear as well in your cutting room as on the mixing stage, so bold processing of room tone clips will likely backfire.
If all honest attempts at finding acceptable room tone fail, then all is fair game. Equalize if you must, but listen to your work in a mix room—before the premix—to make sure you haven’t fooled yourself into believing that the edit works. It’s horribly embarrassing to play these tracks in the dialogue premix—tracks you’re so proud of because of the nerdy manipulations you’ve subjected them to—only to hear that they sound nothing like the dialogue you’re trying to match.
Using Room Tone to Remove Noises in Dialogue
Location recordings are filled with small noises that often go unnoticed on first listening. The causes of these short nuisances are limitless, but the most common are static discharge, cable problems, lip smacks and dentures clacks, dolly track, and crew noises. Individually, these tiny sounds don’t amount to much, but collectively they steal focus from the dialogue and leave the impression that the set is much noisier than it really is. Thankfully, these transient noises are easy to remove as long as they occur between words.
Small ticks and pops can usually be replaced with room tone, but first you have to find them. The easiest way is by scrubbing until you pinpoint the click. Then zoom in to the offending noise. Find a tiny piece of adjacent room tone, copy it and paste over the click, and add short crossfades. (See Figures 10-24 and 10-25.) If you’re removing several clicks within a small region, use a different piece of room tone for each replacement so it doesn’t sound like a loop.
Techniques for removing such noises are discussed in more detail in Chapter 12, Damage Repair.

Figure 10-24 Often clicks are very hard to spot visually. The click here, indicated by the marker, can be fixed by replacing it with adjacent material. The selected sound will be pasted over the matching part of the region containing the click. Line up the sine curves to avoid making new clicks.

Figure 10-25 The copied material covers the click, and short crossfades prevent introducing other problems. Note that the line of the waveform follows a more or less predictable path even after the new material is inserted.

Figure 10-26 Room tone copied from a pause in dialogue. Don’t copy the entire available room tone. Omit a bit on either side of the selection so you can easily adjust the edit point and make crossfades.
Copying Less Room Tone Than You Need
When copying room tone from a pause, take less than what’s available. Leave some clean tone in the handle beyond what you select so that when you edit it into your track you’ll have some extra room tone to play with and use for crossfades. (See Figure 10-26.) Remember, if there’s motion or clothing rustle in the area you’re repairing, your “fill” room tone must contain matching action. Don’t go to the trouble of adding clean room tone to a rustle-filled shot when the resulting quiet will be distracting.
Working with More Than One Channel of Dialogue
When mono Nagra was the industry standard, most location recordings came to the dialogue editor on single-channel 35 mm mag stripe. For better or worse, you were at the mercy of the location mixer, whose job it was (and still is) to combine all of the on-set microphones into a single mixed track. Then along came stereo Nagra and later DAT, which enabled location mixers to provide two separate mixes or two solo tracks, depending on the complexity and needs of a shot. There were pioneers like Robert Altman, who was recording on multitrack tape as early as 1975 with Nashville, but two-track location recordings remained the norm until very recently.
As hard-disk recorders become the standard, multitrack field recordings are changing the way everyone works, not just the pioneers. Now when you get an OMF or EDL from the picture department, it’s not at all unusual to be confronted with four, six, or more tracks per take, plus a mono track or split-track mixdown of the solo tracks. Given enough time, you can exercise great control over the tracks, bringing them to the mix well planned and highly focused. But how often do you have the time to sort through so many options?
When you’re facing a scene in which every shot has several channels of original audio, it’s easy to lose your perspective and choke on the abundance of sounds. Do you pick one track or play them all? Do you play two tracks at the same time? The answer, of course, is “it depends.”
Many shots—a close-up of a talking head, a two-shot of seated characters, even a group of people—can be recorded perfectly well onto one channel using a boom, a directional microphone, and a skilled boom operator. Any of these scenes can sound great on one track if the recording team is nimble. Assuming that this single track is well recorded, nothing could be easier for you. Just fix the head and tail of the shot, remove any unwanted noises, and you’re done.
On the other hand, it’s really satisfying to have at your disposal every microphone—radio mic and boom—so that you can choose exactly where you want to focus. You have fewer overlap problems and no worries about the location mixer or boom operator missing his cue. Again, the problem is having the time to sift through the material.
Deciding Which Track to Use
Despite the recent proliferation of hard-disk recorders, most low-budget films are still recorded on two tracks, whether on DAT or another media. Typically, you’ll find a boom on the left channel and a radio microphone or a mix of radio microphones on the right, but this will vary by location mixer, and it will all be written down in the sound reports. (Throughout this section, let’s assume you’re using the OMF. However, the same rules apply when working with tracks generated from an auto-assembly.)
No offense to our friends in the picture department, but the last thing you want is for the picture editor to decide for you which track to use for each shot. As long as you don’t lecture her on montage, she can stay out of your microphone decisions. Early in the picture editing process, ask the editor to use both DAT audio tracks throughout the editing. Failing this, ask the assistant picture editor to include both audio tracks before creating the OMF regardless of the tracks chosen by the editor. This way you’ll have easy access to all DAT tracks.
When you first open the OMF, you probably see two channels for every event. As you learned in Chapter 9, you first have to decide which of these two-track events are dual mono. Even though many shots are still mono (Why should they be otherwise?), you’ll eventually run into multitrack shots. What you do with these extra channels is largely guided by common sense, but it will also depend on the wishes of the film’s rerecording mixer. If you’ve never prepared tracks for the person who’ll be mixing your dialogue, have a little talk. Find out how he likes to receive multimicrophone, multitrack elements. Does he want all decent tracks to be available (and prepared) for the mix, or does he prefer that you make the call? How should you present the main choice? The other channels? Muted? Unmuted? Find out. The rest is up to you.
Deciding which channel to use is extraordinarily situation-specific, so the best I can do for you in a book like this is to set some basic rules, which, once having learned, you can forget and then trust your gut. For example, earlier we learned the first rule of thumb of dialogue editing: Whenever possible, play only one source of room tone at a time. A simple, even crossfade often works well when crosscutting from one boom shot to another. (See Figure 10-27.) It also works with two radio mics in one shot. As long as the shots are reasonably similar, then symmetrical crossfades almost always give you good results.
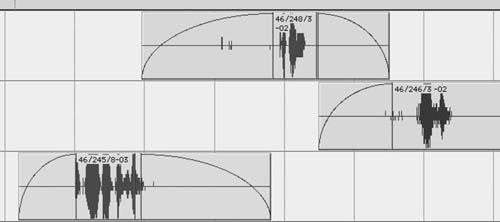
Figure 10-27 Boom shots crossfading against each other. This is the most straightforward and easiest of all shot transitions.
One Shot, Two Mics, Similar Room Tone—No Dialogue Overlaps Imagine a long shot in which two people walk toward the camera. There’s no headroom for a boom, so both actors are wired with radio microphones. (See Figure 10-28.) Each carries her own room tone, but the tones aren’t overwhelmingly different from each other. This doesn’t sound altogether bad, and you may be tempted to do nothing at all, leaving both tracks. However, there are a few pitfalls in leaving both running simultaneously.
• |
You’re unnecessarily playing two tracks, even though only one person is speaking at a time. This doubles the room tone noise. |
• |
Since both tracks are always open, you increase the chances of radio microphone distortion, clothing rustle, and other nasties coming from the nonspeaking character’s mic. |
• |
Whenever one of the characters speaks, you hear her voice twice—once close and on-mic and again through her partner’s microphone, muffled, off-axis, and slightly delayed. The resulting dialogue is less punchy because you now have two wavefronts: one tight and crisp; the other gooey and late. If you remove the off-mic track, you’ll usually get better articulation and a sense of reduced ambient noise. |
Contrary to general opinion, mixing two radio mics separated by a reasonable distance won’t often result in phasing. In fact, you’ll hear phasing only when the two characters are very close—kissing, hugging, or passing near each other. Cutting this shot is actually quite simple. Assuming that there’s a pause between each character’s lines, you can crosscut as though the sounds came from separate shots. (See Figure 10-29.)
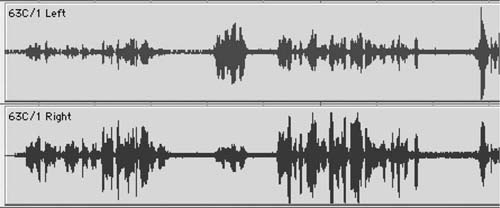
Figure 10-28 A typical pair of radio microphone tracks. The characters are each wearing a wireless, and their room tones are similar. Normally, you won’t want to let both tracks play at the same time, as all sorts of problems may arise.
Never fade during a line of dialogue. Put another way, there should never be any dialogue inside a fade. If there’s no room to crossfade between characters, you can likely cut in places where strong modulation will mask the edit. (See Figure 10-30.)
Removing the off-mic information will make your shot sound crisper and more articulate. If you hear one character’s room tone coming and going with her lines, first extend the room tone bridges. If this doesn’t work, it’s likely that the room tones are too dissimilar, either in volume or in texture, and you’ll have to try a different approach. Read on.

Figure 10-29 When two radio mic tracks carry similar room tone, you can usually crosscut between them. Listen to all of your fades (in solo) to make sure you’re not including any of the “other” side of the conversation in your track.
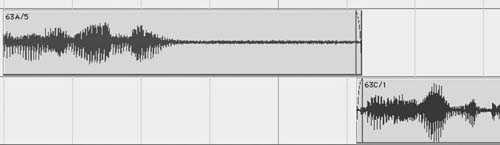
Figure 10-30 If the region you’re fading to (in this case, 63C/1) doesn’t have a usable handle, or if attempted crossfades result in audible changes in room tone, hide the shot transition in the strong initial modulation of 63C/1’s beginning. Often you can mask moderate changes in room tone behind such a heavy attack. Listen carefully to the transition—with plenty of preroll—to make sure you’re not fooling yourself.
One Shot, Two Mics, Similar Room Tone—Dialogue Overlaps In the real world, people often interrupt each other. Sometimes it’s an aggressive or excited attempt to make a point, but more often it’s just part of the rhythm of speech. As if by some mandate from above, movie dialogue is much more serial—one person speaks, the other responds. It certainly makes for easier dialogue editing. When one character does interrupt another in a film, it’s called an overlap. Usually, but not always, it’s a problem.
When a character’s track is corrupted by the sound of her conversation mate’s voice, you’ll likely have to replace the end of the on-mic line as well as the beginning of the incoming line. At least that’s the rule. However, when you’re cutting back and forth between reasonably well-balanced and isolated microphones, overlaps don’t always cause you grief. If there’s very little crosstalk between mics, you can play both tracks for the duration of the overlap and hope for the best. The power of the interruption’s attack will often mask the doubling of tone, so you won’t notice a noise increase. If both sides are clean and on-mic, you can probably get away with playing both tracks for a few words.
Sometimes playing both tracks during a two-microphone overlap doesn’t work. The increase in ambient noise due to room tone doubling may be audible. You may encounter strange coloring of the voices from the interaction of the two mics. Or you may hear a doubling of words if the two characters are far enough apart to create a timing difference but not so far as to keep them off of each other’s tracks. In such cases, you must reconstruct from outtakes both the end of the corrupted line and the beginning of the interruption. (See Figure 10-31.) Chapter 12 discusses techniques for locating the alternate take material needed to salvage these overlaps.
Boom on Track 1, Radios on Track 2—Similar Sound Occasionally a boom and a radio microphone will crosscut surprisingly well despite common sense telling you otherwise. Try using the cross-cutting technique shown in Figure 10-32. Odds are good it will work. If not, continue reading.
One Shot, Two Microphones—Dissimilar Room Tone Sometimes it’s not possible to crossfade back and forth between the two microphones of a shot. At each crossfade you hear a wave of changing room tone energy and the scene loses its footing. Matters are made worse in “cutty” scenes, since the frequent cuts are constantly reminding the ear of tone mismatches. This is a common situation when editing a scene with a boom and one or more radio mics, but two radio mics can also result in the same problem.

Figure 10-31 A typical two-radio microphone overlap. In the highlighted section, the top (left) track interrupts the bottom track. Outside the highlight, only one track is “on-mic” and the other can be eliminated. During the overlap, both characters are talking, which means that their lines are contaminated during the overlap and probably have to replaced.
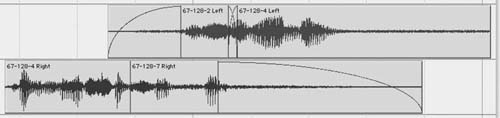
Figure 10-32 Both sides of the overlap have been repaired. A new beginning (67-128-2, left) replaced the damaged attack on the top track, and a clean ending (67-128-7, right) replaced the corrupted end of the bottom track.
Figure 10-33 shows a classic scheme for cutting between strongly mismatched shots. Room tone fills are edited for each angle and kept separate from the shots. This gives great flexibility, but may prove to be too much work. When one shot’s room tone is much louder than the other’s, try first filling the heavier track (usually the boom) with room tone and fading in and out on the quieter track.

Figure 10-33 What’s left of the original pair is on Dial E and Dial G after cutting the scene. The tracks have dissimilar room tone, so a simple back-and-forth edit plan won’t work. Here, all off-mic signal was replaced by the matching room tone and placed on the track beneath. This four-track plan is a bit cumbersome, but it gives the rerecording mixer the most flexibility in balancing smoothness versus noise.
• |
Eliminate all off-mic dialogue on the boom track (i.e., when the dialogue of the other person is heard on the boom channel, replace it with good boom room tone). |
• |
If the radio microphone room tone isn’t too loud, you can either create short tone bridges leading up to the dialogue or cut from silence to radio mic with no tone bridge, assuming that the dialogue attack is loud enough to mask the change in room tone level. Figure 10-34 shows how to construct such a shot. |
• |
Use volume automation to slightly reduce the boom channel’s level while there’s dialogue on the radio microphone channel. Match the timing and curve of the automation with the fades on the radio track. How much can you lower the level of the channel that carries the dominant room tone? Probably not more than 3 dB, but it depends on the two tracks. (See Figure 10-35.) |
You may encounter scenes largely covered by a boom microphone that also include a few inserts from radio mics. (See Figure 10-36.) Often, the radio microphones will carry less room tone than the boom, so the inserts will stand out. An easy way to match these shots without increasing overall noise is to run a track of the boom’s room tone parallel to the room tone segments. The mixer can easily control the amount of room tone with respect to the shot. There are many other applications for this parallel tone technique, such as production effects (PFX) editing and ADR editing.

Figure 10-34 The top track is a boom and the bottom track is a radio microphone with much less room tone. In this case, Paul’s mic can probably fade in and out without continuous tone, since the noise of the boom microphone masks any swells in his room tone.
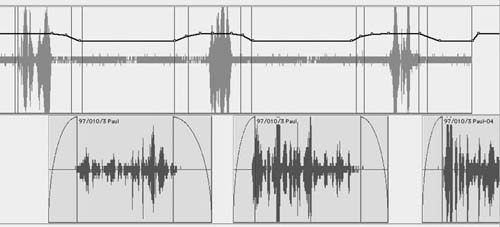
Figure 10-35 Even though Paul’s radio microphone track carries little tone compared to Beatrice’s boom, its room tone will contribute to the overall noise level. Slightly reducing the level of the boom track while the radio mic is playing will help smooth the scene and make it quieter.
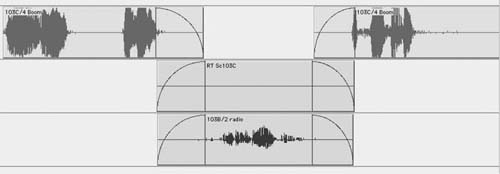
Figure 10-36 Occasional quiet radio microphone inserts can be balanced andcontrolled by providing a parallel track of the boom’s room tone.
One Microphone per Channel—Dissimilar (and Loud) Room Tone In the last example, one channel overpowered the other so you only had to create one track of continuous room tone. The other, quieter track could effectively “hide” behind the noise of the dominant track. Now you’re facing two noisy tracks, each carrying its own room tone. This poses an unsettling choice between smoothness and noise. Certainly, the smoothest option would be to run both tracks all the time so there’s no energy or tone change between the two. But this causes two problems.
First, as in any of the examples shown, the off-mic track, with its slightly outof-sync, muddy sound, will compromise the clarity of the speaking character. Adding this inarticulate muck to an otherwise decent bit of dialogue will weaken attacks and add an unwanted “halo” around the words. Even with a noisy room tone problem, the normal rules of cutting still apply. The other problem is that running two tones all the time makes your edit awfully noisy. No getting around that.
Once you’ve tried other, less draconian solutions, you’re left with the option of creating two fully toned tracks and then minimizing the double room tone noise as best you can with volume automation.
• |
On each track, remove the off-mic dialogue and replace it with appropriate room tone. |
• |
Once you’ve finished the editing, use volume automation to reduce redundant room tone as much as possible. (See Figure 10-37.) When, for example, the character on Dial B is speaking, lower the level of the added room tone on Dial A until you reach a point where you can hear the room tone changes. At that point, back off a bit with the level reduction. |
• |
Before all these automation gymnastics, talk to the rerecording mixer. There’s a chance he won’t want you to automate the tracks in this way but to do just the editing. Usually the mixer appreciates all this work—if it’s done well. Sometimes, your efforts are met in the mix with “Get rid of all this silly automation!” Find out what to do. |

Figure 10-37 Complete tone fill for two noisy, nonmatching tracks (top). Filling offmic sections will clean room tone and help with articulation, but it results in a noisy scene. Volume automation (bottom) reduces noise buildup.
Two Acceptable Tracks—Which to Use?
Rarely in life are you saddled with too many good choices, but this dilemma does occasionally appear in dialogue editing: You encounter a scene recorded with a radio microphone and a boom and, amazingly, both sound pretty good. Which one to use depends on your access to the rerecording mixer. If you can play the scene to the mixer (or, barring that, to the supervising sound editor), you can get an opinion as to which way to go. Some mixers will ask you to fully prepare both tracks so that the choice can be made in the mix. Others will leave the choice to you.
On zero-budget films, I prefer to make the decision myself. If I’m familiar with the way the mixer works, I’ll move the unused track—unedited—to a junk track. If I don’t know the mixer, I’ll prepare the unused track (up to a point) and then move it to junk. I remove the unused source from the active dialogue tracks since I don’t want it brought into play unless we encounter a problem mixing my selection. Of course, I could edit both tracks side by side and mute the unused side of the pair. But this ties up a lot of track real estate and takes too much time, so I avoid it.
Bottom Line: Common Sense and Luck
We’ve looked at several archetypal two-track situations, each with its own specific set of problems. And we saw lots of rules. Yet most editorial messes fall into grey areas, so rarely will stridently following the rules bring the truth. Instead, you have to analyze each problem, try the most appropriate solution, and then wing it. These are the main points to remember:
• |
Two-microphone editing is always a tradeoff between smoothness and total noise level. Keep enough mics open and you can make anything smooth. But at what cost? Crosscut as much as you can without causing unacceptable changes in room tone. |
• |
Talk to the mixer if possible to see if your edited scene can be mixed or if you need to rethink your plan. And remember: Many scenes don’t need to be perfectly void of room tone changes. A skilled sound effects editor, upon hearing your edited guide track, will add a quiet car-by here, a discreet child’s cry there, and no one will notice the occasional foible in the dialogue track. |
• |
Except when both characters are speaking simultaneously or when it’s otherwise impracticable, get rid of all off-mic dialogue. It only muddies up the track. |
• |
When you must run simultaneous room tones because of mismatched levels or color, try to automate the tracks in a way that reduces the total volume of the room tone. |
There’ll be times when you simply must use both channels. If there’s continuous action on both tracks, there’s no way to cut back and forth. In such cases, remove all the unwanted noises you can from each track and present both to the mixer. There’s nothing more you can do.
Multitrack Recordings
It’s more and more common to encounter multitrack dialogue recordings because there are many advantages to having lots of tracks. A clever location mixer will provide a good mix as always, recorded onto one or two tracks, but he can also provide prefader, unmixed microphone tracks. The picture editor, and later you, will still get a production mix that, quite honestly, is acceptable most of the time. After all, the production mixer has studied the script and is on location with the actors and the boom operator, so his mix carries the magic and energy of the shoot.
Still, sometimes you need to get back to the original tracks because something didn’t work out so well. For example:
• |
The production mixer missed a cue, so the beginnings of an actor’s lines are off-mic. You hear the correct microphone fading in too late. |
• |
The boom operator missed the cue, so the speaker is off microphone until the microphone pans into focus. You can try to resurrect the line from a nearby radio microphone. Success is unlikely, but the attempt is noble. |
• |
The location mix is good, but you want to change the focus of the scene. Since you have all of the elements of the shot, it’s easy to reconstruct the shot and alter its balance. |
• |
A nonspeaking character touched her radio microphone. That channel was open at the time, so the mix was corrupted with mic noise. Go back to the solo track and pull what you need, without the noise. |
• |
There’s an overlap problem. You may be able to solve it with other tracks of the same take. In the end you may have to go to alternate takes but this is certainly the easiest place to start. |
Simple two-microphone scenes can benefit from multitrack recording. Say you have an interior wide-shot urban scene with two characters far enough apart to warrant two microphones. The close-ups are covered with one boom. Since we’re in the city, the dialogue recordings are punctuated with bus-bys and car-bys and the occasional siren. If there’s a siren-by over a wide shot, how do you deal with the continuation of this background sound when the picture cuts to a close-up? Place another microphone away from the action, distant enough to avoid picking up the dialogue in the recording but close enough for it to capture the same noises the set mics do. Record this on the third track. When the picture editor cuts away, you’ll find the conclusion of the siren-by on track 3.
Unfortunately, this flexibility isn’t free. More tracks means more editing, and with so many options you can choke on the bounty. Unless you have an unlimited budget (unheard of), try to stick to the location recorder’s mix if it’s good. When you accept a job with multitrack recordings, have a long, hard talk with the supervising sound editor about her expectations regarding time and methodology.
Planning for Multitrack Editing
There are many ways to organize a production/postproduction workflow to suit the needs of the picture and sound post departments as well as the resources of the location mixer.3 Long before shooting begins, the location mixer must meet with the supervising sound editor, the picture editor, and the postproduction manager or producer. (A quick get-together in the hotel bar the night before the shoot doesn’t count.) The result of this meeting will be a flowchart that everyone has agreed on, understands, and signed off on. Done well, a multitrack project recorded on hard disk, picture-edited with a mono mix, and sound-edited with all available tracks will pass without a hitch. Mess up the communications along the way and you’ll have a nightmare on your hands. And you, the dialogue editor, will likely to be the one to bear the brunt.
Once you have all of the tracks—whether by file-matching the original BWF files or by opening an OMF from an appropriately endowed picture workstation—you have innumerable choices before you. However, the actual editing is no different from any other job. And as with all editing, you must make choices first. Even if you have six tracks to choose from, odds are that at any given moment only one character is speaking. Lose the other tracks, but don’t delete what you don’t need. Instead, move it to a junk track, in sync. If you have a hunch that an unused track may be wanted in the mix, prepare it and move it to an easily accessible track. Choose wisely when selecting which track to use, and the rest of the process will go amazingly well.
Making Sense of a Scene
Dialogue editing is the last line of defense against a scene that doesn’t make sense. Granted, there’s not much you can do if the narrative itself is falling apart, but you can prevent the soundtrack from adding to or even creating the folly. For example, when a scene is supposed to be exciting or busy, a picture editor may stack up production sounds, feeling that “more is more.” This works when the sounds in the sonic soup—each and every one—make sense and have specific roles to play. But when sounds are dolloped indiscriminately, whether by a picture editor or a sound editor, the result isn’t excitement. It’s a mess.
Here are some examples of poorly thought out, faux-exciting scenes:
Three ten-year-old girls are playing in a bedroom. They begin to dance and spin. As they become more vivacious, they start to giggle and laugh, and the laughter builds until they’re interrupted by their humorless father. Since the girls are partly hidden by a doorframe in the master long shot, the picture editor layers several takes of the girls’ squealing. No major lip-sync problems, he reasoned, so why not make the scene “beefier” this way? On an initial screening of the film, this trick might go unnoticed. You’ll play along with the intensifying frolicking and likely not realize that rather than just three voices—one for each girl—you’re hearing six or nine or more. The catch: This doesn’t make sense. Even if most viewers can’t initially identify the problem with the scene, they’ll feel the scene is clogged, undisciplined, and without dynamics.
You’re editing the production sound of a car chase. What in the Avid screening seemed like a reasonably exciting collage of revving and squealing and shifting just doesn’t hold up to scrutiny. The engines aren’t consistent, the points of view aren’t well planned, and more often than not a car “speaks” with two or more voices at once. This isn’t believable, and it doesn’t develop. It lacks dynamics and seems to have no sound plot. Of course, in a car chase scene most of the work will fall into the lap of the sound effects editor. Still, you’ll find yourself in situations like this, where the picture editor considered ever escalating noise a substitute for exciting sound editing. Analyze each shot to decide what’s important, then develop a plot to the car chase’s sound. In action scenes, each shot is usually about one thing and one thing only, so press your point on that single detail.
You’re editing a documentary, and the picture editor has created a voiceover from a character’s interview footage. In one case, he placed the attack of a new line under the ringout4 of the previous one to keep a correct rhythm and prevent an unnatural pause in the sentence. The result, however, is a double-voicing. We simultaneously hear two elements of the character’s voice, a vocal technique you’ll find only in Tibetan monasteries. Never allow more than one element of any character’s voice—words, breaths, nonverbal vocalizations—to play together. There are very few ironclad rules in this book, but this is one of them: People can make only one vocal sound at a time.
These messes come in all shapes and sizes, and it’s up to you to sort them out. If you inherit such an unfocused scene from the picture department, don’t start polishing it right off the bat. Solo each shot, one by one, and figure out what the editor had in mind with it. If you can make this sound work, do it. But if the shot is better served by replacing the sound with another take, go through the alternates to find a shot more focused.
Nothing is sacred, and as long as you honor the intentions of the editor and director you’re on safe ground. Remember, they were trying to enhance the scene using the available resources, often for a temp mix or just to figure out where the heart of the scene lies. This sonic collision wasn’t intended to stand the test of time but rather to give direction. It’s up to you to make something permanent.
Start by thinning and simplifying. Analyze each sound, keeping the ones that contribute to the scene and stowing away the ones that are superfluous, confusing, or useless. Make the scene work at its most basic. Get the levels right. Fix the transitions. Make it behave. Then you’ll know the scene better and be in a position to make sense of it. In the case of our giddy little girls, first make the scene work with no frills. Make it accurate and believable and then see how you can toss in a single girl’s voice from time to time to add to the fun. Repeat this with each of the girls, taking care never to allow any of the three to talk “on top” of herself.
Excitement is not about constant yelling or car revving or crying. It’s about well-timed dynamics. Screams and shouts and laughs lack excitement when there’s no point of reference, just as a rock-and-roll concert at a constant “eleven” is boring. What draws us into the girls’ ecstatic laughing isn’t its brute-force volume but the swells and ebbs, the story told by their sounds. Find a way to create a dynamic within their voices and you’re on your way to drawing the viewer’s attention closer to the scene.
You can accentuate a loud sound by “clearing” a quieter space just before the crescendo. An 85 dB slap to the face isn’t terribly impressive when sitting on an 84 dB noise floor, but a naturally created quiet section just before the slap—built through believable swells and holes in the underlying dialogue elements—will make the insult seem much louder. The increased dynamic range will tell your ears as much. The drop in the surrounding noise just prior to the slap gives the viewer the impression that the gods themselves made room for the ensuing whack. Making space for a loud noise is mostly a mix issue, but it’s also your concern because sounds that end naturally are more effective than quiet created with fader moves.
When you finish a complicated layered scene, ask yourself if there really is a narrative thread to the sounds you’ve compiled. Also ask yourself if you have a plan for mixing the scene. If the honest answer is that you don’t have a clue how this scene will be mixed or that you’re “stabbing in the dark,” you owe it to the scene to have another look. However, if you can honestly claim that each sound has a role to play and that you’ll know how to navigate through the sequence come mixing time, you’re on your way to creating a focused, tight, exciting scene.
Suggested Readings
Aaton. Aaton Audio: Post Chain v10, www.aaton.com. (Specific to the Aaton Cantar.)
Argy, Stephanie. “Roll, Cut, Print: A Conversation Between Sound Professionals from the Set, the Edit Room and the Mixing Stage.” The Editors Guild Magazine 1(25), January/February 2004.
Munro, Chris. “Multi-Track Production Recording: Using Digital Disk Recorders to Improve Quality and Simplify Post Production.” The Editors Guild Magazine 1(25), January/February 2004.
Stratmann, Erich, and Benson, Phil. “Metadata & Metaflow.” The Editors Guild Magazine 24(3), May/June 2003.
1 From the edition published by Penguin Classics (London, 1994, p. 224).
2 Rather than identify shots as “scene/shot (letter)/take,” some productions use a “scene/shot (slate)/take” naming system. Slate identifies the shot in the sequence in which the movie is being shot, whereas the scene-based name reflects the script order. Our close-up of Edmund could have been identified as 32/193/4, meaning “scene 32, shot 193, take 4.”
3 There are several good articles about managing the workflow of multitrack film projects. To learn more, see the Suggested Readings at the end of this chapter.
4 In this context, attack refers to the leading edge of a sound—the first modulation of aphrase. When discussing dynamic processors, attack means the speed with which the processor responds to an input signal. Ringout is the acoustic residue (echo, reverb, diffusion) left at the end of a phrase.