Getting Sound from the Picture Department to the Sound Department
Much of your success as a dialogue editor hinges on your relationship with the picture department, particularly the assistant picture editor. Simply put, you need materials from them that aren’t always convenient to come up with. Your understanding, charm, and decency in dealing with the folks in picture can make the difference between an easy start or several days of begging, deal making, or strong-arming—never knowing if it will get you the elements you need to do your job.
It’s not uncommon to encounter some friction with the picture department. Despite your best negotiated attempts to keep changes to a minimum, changes will happen. Your multipage memos about items you must receive in order to get the job done will be mislaid and you’ll be happy to receive half of what you asked for. You’ll discover that the editor forgot to tell you about a new scene yet to be shot, and throughout the gig you’ll be disappointed with “unnecessary” changes or sloppy paperwork. Lighten up; the picture guys have at least as many pressures and problems as you do, and they’re not out to get you. We’re all on the same side.
It’s in your interest to quickly identify and overcome any problems with the picture team. Separate structural frictions from personal ones and remember that the film is what counts. However you go about this, get over it and move on with your job. At the same time, don’t forget the power carried by the picture editor. In most film cultures, she’s the pinnacle of the postproduction tower, so don’t throw your frustrations in that direction.
The Picture Cutting Room
At the start of preproduction, the supervising sound editor will be in contact with the production office. Depending on the type of film and its budget, as well as his relationship with the director, he may become involved at the script level or may simply show up a few times during the shoot to carry the sound department’s flag. During picture editing, the supervising sound editor will become increasingly involved with the picture department. His crew will provide temporary sound effects for the picture edit and prepare tracks for temp mixes for studio screenings and focus groups. By the time the picture is locked, the supervising sound editor and a small sound crew will be very intimate with the mechanics of the film and the dynamics of the picture department.
As the dialogue editor, you probably won’t become officially involved with the film until a few days before picture lock, unless you’re called in to assist with temp mix tracks. But don’t wait until picture editing is completed to establish contact with the picture staff and with the film. Your sanity and success will depend in part on having a good relationship with the picture people.
Often on very low-budget films, the picture editor and assistant leave the film as soon as the picture is locked. This means there’s no one around to answer questions, find paperwork, or help you read those illegible sound reports. The Avid has already been rented to another client, so you can no longer easily look into how a problem scene was put together. If you didn’t get what you need while the picture department was on the payroll, you’re out of luck; or you have to contact an editor who’s already on another job and barely remembers your film.
On a film with a decent budget, the job of moving the film from picture to sound rests on the shoulders of the assistant sound editor, so you may never need to do any of this. However, to be prepared for the job where you have no assistant, read on.
The Dialogue Editor’s Relationship with the Picture Department
Your most valuable contact in the picture editing room is the first (and likely only) assistant editor. This is the person who will (or won’t) save your neck. The picture editor is important, of course, but may not be your most useful contact, since she’ll be focused on other matters during audio postproduction. When you first introduce yourself in the cutting room, be nice to the picture editor because she can help you get your next job and can provide needed insight into the film, but spend your time with the assistant because that’s where all the information is.
Today many small films don’t employ a full-time assistant picture editor, but instead use an assistant as needed to digitize materials at the beginning of the project, to periodically maintain the database, and to “get the project out of the Avid” when the maestro finishes. If there is an assistant picture editor, meet with him to clarify your needed materials and confer on protocol. Watch the (still unfinished) film and note sections where you’re sure to need alternate takes. Although you’ll always need to rifle through the original tapes in search of alternate material, in any cases where the picture assistant can line up alternate takes on the timeline and include them on your OMF, you’ll save immeasurable time and it won’t cost him much in the way of added work. Make sure you agree with the assistant on matters of OMF formats, EDLs, paperwork, and the like.
Run a series of tests with the assistant picture editor to confirm that the OMF you get meets your needs and that the material is complete and in sync. It’s especially important to coordinate tests with the picture cutting room when dealing with unusual production problems or recording systems you’re not familiar with (such as hard-disk field recorders). These tests can fend off problems down the line, and they help to create a relationship between you and the picture assistant, whose value can’t be underestimated.
Finally, a couple of words about cutting room etiquette. Remember that a picture editor(s) is a very important member of the film crew. Treat her accordingly. On a practical front, be aware of a few traps you can encounter while visiting the cutting room. First, there’ll undoubtedly be lines in the film that are noisy, bumpy, off-mic, and so forth, and the picture editor may inquire, “Can you fix this, or do we have to loop it?” Before you answer, take a breath and count to ten. The correct answer is almost always, “I can’t tell you here and now, but give me the track and I’ll do some tests with the supervising sound editor and the mixer.” Seems pretty obvious, but let’s run down the reasons:
• |
You don’t know the answer, since you can’t hear well in a picture cutting room. |
• |
You haven’t had a chance to look for alternate takes or “fakes” such as close-up (CU) sound on wide-shot (WS) pictures. |
• |
You won’t be forgiven if you’re wrong. |
The only reason to rush to an answer, positive or negative, is to look smart and please the editor. It’s not a good way to operate.
The other socially uncomfortable bind you may find yourself in is at the end of the editing room screening when the editor or director turns to you to ask what you think of the film. If you’re bowled over by the screening, your response will be one of natural enthusiasm. But if you’re still scratching your head when the lights come up, you can always hide behind, “I was so involved in listening for dialogue issues that I can’t really give you a fair answer.” Armed with this reply, you don’t waste precious screening time trying to think of something clever to say about the film.
Essentials for Dialogue Editing
Picture editing is finished—well, almost finished—and there’s enormous pressure on you to get moving. The film is inevitably behind schedule, and somehow you’re expected to take up the slack. However, if you start too soon you run the risk of having to make too many unnecessary conformations—adjusting your already manicured scenes to a new picture cut—which wastes your time, wrecks your budget, and shatters your mood far too early in the project. At the same time, no one wants to be a jerk and single-handedly delay the production on principle.
What Is Needed?
So, just what are the rules about what you absolutely must have before starting to edit the dialogue on a film? The following paragraphs will tell you. Keep in mind that they contain some terms not discussed yet. If you’re unfamiliar with an acronym or expression, check the glossary.
Locked Picture You need a locked picture, split into reels. There’s locked and then there’s locked. Assume that even the most organized director/editor team will make a few picture changes after declaring the film locked. Conformations—that list of changes awaiting you on your desk each morning—are just part of the game. On the other hand, beginning to cut the dialogue on a film whose direction is unclear or that must still undergo focus group testing is crazy. You may spend more time making changes than editing. Even so, you don’t have to wait for the entire film to lock. Often, the interior reels stabilize before the first and last reels. After all, the first reel carries the burden of exposition and character introduction, while the final reel resolves the story and sends the viewers on their merry way. So when time is of the essence and everyone is on your back, you may be able to start on a “safe” interior reel.
If the production provides a digital picture, such as a QuickTime movie, make sure to obtain a “hard” copy on videotape. You can use the tape to redigitize the video if needed, and the tape can serve as the arbiter of sync problems.
OMF to Match Final Picture You’ll need a complete OMF of all edited tracks and any bonus audio material you expect to receive from the picture department. Make sure the OMF version (the cut of the film) matches the version of the picture you’ll be working with. Label both the video and OMF with the same version name.
Audio and Video EDLs The audio EDLs will be essential for finding alternate takes. The video EDLs will be useful for confirming changes, for making perspective cuts, and for general housekeeping.
Original Recordings and Associated Sound Reports More and more films are recorded on hard-disk recorders. If such is the case with yours, you’ll receive a hard drive (probably the same drive holding the OMF and EDLs) with all of the original recordings. There may be DVD backups, too. If your film sound was recorded on DAT, you’ll receive a large box of tapes. However the sound was recorded, you must receive the sound reports, the paperwork that describes what’s on each tape (or in each day’s recording folder in the case of hard-disk recording). You’ll use this paperwork to locate alternate takes and wild sound.
List of Shooting Dates for Each Scene If your film was recorded on a hard-disk recorder, the soundfiles are likely stored in folders identified by the shoot date. A table correlating scene numbers with shooting dates will save many headaches.
Lined Script The lined script from the shoot is used for locating material and revealing coverage within each scene. It gets its name from the vertical lines drawn over the text, indicating which takes cover each part of the script.
That’s it for the essentials. You absolutely must have them before starting. Missing any at this point spells trouble down the line, and a production that can’t provide these key elements is going to cause you heartache. Other elements, although not life or death in importance, are nonetheless worth asking for.
Splitting Reels
Back when all films were cut on upright Moviolas or console editors, sync was a physical truth rather than a metaphysical goal, and editors’ work habits were much more standardized. Picture editors and sound editors alike cut on 1000-ft reels. Now most films are picture-edited on one continuous timeline because any decent video workstation will allow for such massive sessions.
However, you can’t mix a continuous soundtrack that runs the length of a film, then send it to the lab and not expect to be laughed (or yelled) at. Films are still printed in reels of no more than 2050 feet, so that sets the limit of how you mix. And since films are mixed in reels, so too are they edited for sound, which means that before you accept a film from the picture department, it must be broken in to reels. This isn’t the dialogue editor’s responsibility, but if your picture editor is inexperienced it’s in the interest of the sound department to police the reel-splitting process. Here are some rules to observe in order to have sound-friendly reel splits:
• |
Avoid splitting within a musical cue or in a place likely to have one later. Even if the mixer and sound supervisor manage to pull off this feat (which isn’t assured), the music cue will be at the mercy of projectionists and their ability to properly splice together the reels. |
• |
Don’t allow any significant sound within the first second of a new reel. This sound will fall within the changeover and could cause trouble. |
• |
It’s usually easier to break a reel between scenes rather than in the middle of a scene, where this transition will be very exposed. If timing demands a reel change within a scene, pick a picture cut with a bit of “air” on either side. Both traditional changeovers (two-projector) and splicing reels into platters can result in eating into the first and last frames. |
Protect yourself by refusing to begin work on a project whose reels aren’t yet split. Such a premature start can come back to haunt you in the form of complicated rearranging of scenes (work often not included in your deal with the producer). Plus, a client who insists on beginning dialogue editing on an unsplit film is a client with other dangerous surprises lurking in the wings. Make them split the reels. Properly. Period.
The OMF and a Brief History of Nonlinear Editing
When picture and sound were edited on film, elements were completely transportable from one cutting room to another, from a Steenbeck in Paris to a Moviola in Los Angeles. Your plan for sound didn’t depend on the technology used by the picture editor or the sound facility. As long as the rules were followed, everything was interchangeable. Yes, there were a lot of rules to know, but they rarely changed.
Like all technological advances, from the cotton gin to the robotic assembly line, digital picture and audio workstations came about partly to reduce labor costs and extract more efficiency from the remaining workers. The initial equipment costs were numbingly high and the trailblazers paid dearly for their new toys. But once the technology was proven and the economies of scale began reducing costs, there was real potential to get more for less. Edit room staff was progressively whittled away until today it’s not uncommon to find a small film with no assistants. On the other hand, it’s now possible to edit with brain-numbing accuracy and produce multiple versions of a scene in a snap. You can work efficiently and quickly, and with more technological horsepower in your lowly workstation than took man to the moon, you can perform miraculous sound processing feats.
CMX-600 and Montage
The first digital audio and video editors were freestanding pieces of hardware with rooms full of processors and storage devices. The CMX-600 that was released in 1971 (yes, 1971) is considered the first nonlinear video editor; it was the result of a partnership between CBS and Memorex that produced this editor years ahead of its time. Video was recorded as an analogue FM signal, while audio was recorded as a pulse amplitude signal and stored in the video’s horizontal blanking.
The six IBM drives held a whopping 30 minutes of half-resolution black-andwhite picture and sound, plus an address language that would later develop into SMPTE timecode. If you wanted to edit onto an audio track, you had to dedicate one precious hard drive to audio. Edit information was stored on 1-inch punch tape, which was loaded into a CMX-200 online editor for assembly.1 By today’s standards the CMX-600 was crude, but the six units manufactured forever changed the way we look at electronic editing.2
In 1984, the Montage Picture Processor was introduced. It was a surreal array of 17 or more Super BetaMax players shuttling, winding, playing, and coughing out commitment-free scene previews. Preparing for an editing project was a huge task, but the actual editing worked pretty well. The same year, Lukasfilm announced EditDroid,3 a laser disk-based random access editor, whose sound cousin was SoundDroid. The technology behind EditDroid and SoundDroid was acquired by Avid in 1993, and many of the key developers of SoundDroid went on to form Sonic Solutions.
Nonlinear Workstations
The late 1980s witnessed the births, and often the deaths, of countless nonlinear sound editing systems for the sound-for-picture market. Overwhelmingly, these tools were hardware-based proprietary systems that often settled into a market niche. Most of the sound workstations were offshoots of music editors, while others were spawned from restoration and mastering, coinciding with the introduction of the compact disc. Some were built from the ground up for audio postproduction. All of these workstations were closed systems, so neither code nor file formats were easily exchanged between different manufacturers’ products. Still, as long as you kept your job with one studio, life really was getting better.
This “Brave New World” fell apart when jobs had to move from one facility to another. Worse, there was no sane way to take a finished picture cut and begin working on the production sound. Typically, a reconform, often done by hand and ear, was the only way to get the picture editor’s cut to the sound department. This cumbersome and time-consuming chore took much of the fun out of random-access production sound editing.
Auto-Assembly and OMF
It wasn’t long before a method was devised to automatically conform the original takes based on the picture editor’s choices, assuming that the original production sound came with timecode. Auto-assembly was invented. Using an EDL for source name and address information and the RS-232 or RS-422 protocol to control the source machine (initially ¼-inch tape with timecode and later DAT), manufacturers offered a way, however clumsy, of moving from picture to sound. But the resulting soundfiles were based on proprietary platforms and weren’t the least bit interchangeable. You still couldn’t mount a picture editor’s drive onto a digital audio workstation and start editing. Nor was it possible to do part of a project on one type of machine and then move to another.
It’s not that no one was paying attention. Standards setting groups—Society of Motion Picture and Television Engineers (SMPTE), Audio Engineering Society (AES), and European Broadcasting Union (EBU)—were looking for ways to normalize the exchange of this rich and diverse picture and sound data. Since such organizations are notorious for moving slowly, it was the industry that made the first meaningful foray into file transfer protocol. In 1992 Avid Technology, not yet in the audio business, introduced its Open Media Framework Interchange (OMFI, commonly shortened to OMF), designed specifically to allow Avid files and EDLs to be opened directly on any number of audio workstations.
For a few years in the early 1990s, OMF was promising to be the Esperanto in which all machines would seamlessly communicate, allowing transparent postproduction. Once it became a standard, like SMPTE timecode or any digital audio format, equipment choices would be based solely on desired features and price rather than on embedded architecture, since it would be painless to move between makes and models. Of course, reality eventually reared its head.
Between manufacturers’ reluctance to expose their proprietary codes to competitors’ eavesdropping and Apple’s unwillingness to release into the public domain the underlying container code, OMF never attained real “standard” status.4 Instead, it continued to be a product of Avid and later Avid/ Digidesign. This accidental ownership did nothing to make other manufacturers either comfortable or cooperative beyond what was needed to make their workstations accept an Avid project. The utopia of open exchange would have to wait, although OMF did become the de facto standard for moving files between workstations.
OMF-1 and OMF-2 Because OMF was complicated and its implementation for each manufacturer required complex code-writing somersaults, Avid did its best to keep the protocol available to developers. However, within a few years, it was clear—given so many changes, bug fixes, improvements, and the culling of initial mistakes—that OMF needed to change, so OMF-2 was released in 1996. OMF-1 and OMF-2 are not compatible formats.
For most audio workstations, it doesn’t matter which OMF format you receive from the picture department, as long as you have the necessary software on your computer to translate that format into your machine’s language. You can’t convert an OMF-2 file using an OMF-1 translator. This is yet another reason to talk with the picture department long before the picture is locked.
AAF and MXF
Building on the successes of OMF, and learning from its failings, two new file exchange tools were created. One was the Advanced Authoring Format (AAF), created by the AAF Association, a consortium founded by Avid and Microsoft. Avid donated the core OMF model, and Microsoft provided a container code to replace the Apple proprietary container that had long haunted OMF. AAF offers more rugged and bug-free file interchange than did either OMF version. Moreover, the software development kits given to manufacturers for implementation have been more extensively tested than were Avid’s OMF development kits, so industry implementation should be easier. AAF stands a good chance of becoming a real, rather than de facto, standard, unlike unlucky OMF.
Media Exchange Format (MXF) is a media wrapper that standardizes the way different media are revealed to applications, thus facilitating file exchange for very different types of material. Working in conjunction, AAF and MXF allow a far more efficient vehicle than OMF for file exchange than did OMF.5
Exporting the OMF from the Avid
When the picture editor (or assistant) creates the OMF from which you’ll create your initial session, she has the choice to keep separate the soundfiles (the “media”) and the session instruction set (in essence, the EDL plus other control and naming information) or to embed all of this into one giant file. You shouldn’t have trouble with either format, but there are a few things to think about.
To Embed or Not to Embed
A single embedded file is less cumbersome to move around, so it behaves better when sent via an FTP site or with Digidelivery.6 There’s but one file to keep up with rather than thousands. The primary downside of an embedded file is that you can’t access the individual soundfiles within it. If you get an embedded OMF of a reel but need only one or two files from the session, you must convert the entire reel to get them. Of course, unless you’re using a very slow computer or are frighteningly low on disk space, opening a new OMF isn’t all that taxing.
Preparing the OMF in the FCP/Avid
Securing an OMF from Final Cut Pro (FCP) or Avid is a pretty run-of-the-mill exercise, but if you’re new to this picture team, run a short test a few days before final delivery. It’s frustrating to receive an OMF file that either doesn’t open or opens incorrectly. For some reason, the sound department often gets the OMF just as the picture people go home for the day, typically on a Friday or right before that three-day holiday that you were planning to use to make up for lost time. A tiny amount of coordination with the editor can help avoid lost time or lost tempers.
Most major sound facilities supply clients with “OMF cookbooks” that walk picture editors through the process of delivering an OMF that will fit with the facility’s equipment and way of working. One example is shown in Figure 5-1. Remember, OMF isn’t a real standard but rather a proprietary translator, so small changes in equipment or methodology can result in huge problems. Find out what your editing facility requires and make a document for the picture people describing what they need to do.
When you open the OMF, make sure that the regions are named as they were in the Avid. Normally region names will include scene/shot/take information and perhaps a note from the director. Expect to see something like this:
32B-4 Bob eats spinach
or at least

Figure 5-1 Example of an OMF “cookbook” for the picture department. Large sound facilities often provide such standardized guidelines.
If you don’t see sensible information as your region names, but rather a serial list number or gibberish, go back to the picture folks and sort out the problem. Without valid scene/shot/take information, your job isn’t just a little harder but worlds more difficult. Don’t start editing until you get the region names right, no matter how high the pressure or how strong the urge to get moving.
The Edit Decision List
As a dialogue editor you can’t get away from edit decision lists (EDLs). When you auto-assemble, recreating the picture editor’s cuts from DAT or other linear sources, you have to understand and be able to manipulate EDLs. The same goes if you’re using file-linking programs such as Titan to access all recorded channels of a track that was edited in the Avid using only a mono mixdown. Even the most basic dialogue editing skills—finding and using alternate takes to lose noises, improve acting, or resurrect wide, off-microphone shots from their watery graves—require that you know your way around an EDL.
Dissecting an EDL
The industry-standard CMX3600 EDL (see Figure 5-2) isn’t the least bit difficult to learn, it’s just humorless and terribly monotonous. Plus, as a means of describing edit information so that one machine can understand another, it couldn’t be more ill-suited: It’s very data frugal, and parts of its information, such as channel mapping, are amusingly cryptic. Fortunately, the CMX3600 won’t be around much longer, as the AAF Association is developing a new format. For now, though, you can’t escape it.
Even though picture editors regularly cut to eight or more audio tracks, the CMX3600 format can describe only four at a time. Films edited with more than that require multiple EDLs, each representing a 4-track group. The EDL in Figure 5-2 reflects tracks 1 through 4 of a 12-track edit on a Final Cut Pro.
An EDL Event Let’s look at one event from an EDL. Learn one line and you’ve got the whole thing.
003 DVD09 AA C 13:38:11:02 13:38:12:23 02:00:24:06 02:00:26:02
* TO CLIP NAME: 24-07 OF 7 ANNOUNCED 6 JORDAN BORDER T131 MERGED
* COMMENT: 08-02-04
The top line describes the source of the audio (it could just as easily be video) and its original timecode, plus its location in the edited film. The comment lines (indicated by asterisks) give the scene and take as well as other notes from the picture department. Table 5-1 provides details on these and other fields in this event.
In Figure 5-2 the title of the project is on the top header line. Beneath the title, you may see FCM (“frame count mode,” meaning the way the EDL counts the number of frames in a second) followed by NON DROP FRAME or DROP FRAME or 24 FPS or 25 FPS. As you would expect, this flag refers to the timecode type for the edited tape or session, that is, the timecode flavor of the edit master, not necessarily that of the source material. Often on PAL EDLs you won’t see an FCM listing, since there are no expected FCM variables in the PAL universe; PAL editing systems default to 25 fps. It’s unlikely that this flag will be incorrect, but anything can happen. If you’re absolutely sure that the FCM indication is wrong, you can correct it when you clean the EDL (to be discussed soon).
Figure 5-2 Excerpt from a CMX3600 edit decision list. The title line indicates the project name and reel number and the audio channels included in this EDL. On NTSC edit decision lists, the type of timecode will also be indicated on the title line.
The two “comment lines” beneath the event line begin with an asterisk. This is a signal to most postconform programs that the line is not an event, but is instead a comment that can be used to name the region in your session.
Table 5-1 Fields in a CMX3600 EDL Event Line
Column |
Field |
Description |
1 |
003 |
Event number. A series number that makes it easier to refer to specific edits. |
2 |
DVD09 |
Source. The originating media—the source roll, in this case a DVD made from a Cantar hard disk. |
3 |
AA |
Record channels. The channels in the session on which the sound was recorded (or edited), not the source channels. |
4 |
C |
Transition type: cut (C), dissolve (D), wipe (W), key (K), etc. |
5 |
13:38:11:02 |
Source start time. Where on the original field recording, the event begin. |
6 |
13:38:12:23 |
Source end time. Where on the original field recording the event ends. |
7 |
02:00:24:06 |
Record start time. Beginning of the event in the edited program. |
8 |
02:00:26:02 |
Record end time. End of the event in the edited program. |
003 DVD09 AA C 13:38:11:02 13:38:12:23 02:00:24:06 02:00:26:02
* TO CLIP NAME: 24-07 OF 7 ANNOUNCED 6 JORDAN BORDER T131 MERGED
* COMMENT: 08-02-04
In this event, the text line
* TO CLIP NAME: 24-07 OF 7 ANNOUNCED 6 JORDAN BORDER T131 MERGED
identifies the scene and take (and notes that the voice slate on the recording was incorrectly identified as take 6 instead of take 7). This is the line you’ll import for the region name. More on that later. The next text line:
* COMMENT: 08-02-04
is included by the picture editor to aid in file matching from the original Cantar BWF files. Cantar, like most hard-disk recorders, includes all of the takes from one shooting day in a folder whose name is the date of the recording. This information won’t be imported into the postconform, since it’s of no interest to you once you’re editing and because you can import only one text line per event.
For the most part, that’s it. There are, however, a few quirks worth looking at. For example, the EDL event below includes a fade from black.
006 BL NONE C 00:00:00:00 00:00:00:00 02:00:26:02 02:00:26:02
006 DVD09 NONE D 004 13:38:30:08 13:38:33:14 02:00:26:02 02:00:29:08
AUD 3 4
* TO CLIP NAME: 24-07 OF 7 ANNOUNCED 6 JORDAN BORDER T131 MERGED
* COMMENT: 08-02-04
Notice that event 006 occupies two lines. The source of the first line is BL, which stands for “black.” Notice too that this part of the event has no duration. Now look at the next line. Rather than the usual C, for cut transition, there’s a D followed by 004. This double-line event represents a 4-frame dissolve (“fade” in audio terms) from black (silence in the case of sound) to the material on DVD09.
The fact that the first line of the event has no duration is a vestige of how dissolves were made in the days of linear videotape editing. If you wanted to dissolve from tape 32 to tape 67, for example, the CMX editor would make an edit precisely at the beginning of the transition. This “zero cut” was the splice point between normal footage and the transition effect. At the end of the dissolve, there would be another splice to return to normal footage. Pro Tools handles fades and dissolves in more or less the same way, although the process is invisible to the operator.
In truth, by the time you get an EDL it should be stripped of dissolves since an auto-assembly program can’t generate fades for your session. Ask the assistant film editor to convert fades to cuts before generating the EDLs. If he can’t, you can easily do it yourself with EDL Manager.
The other common source symbol in an event is AX, or AUXILLARY, which specifies a video switcher or signal generator. You’ll commonly see AX at the head of a reel, signifying PAL or NTSC color bars that coincide with the 1 kHz reference tone. It’s unlikely that you’ll encounter AX pointing to meaningful dialogue information.
There’s something else odd about event 006: the record channel. Rather than A for audio channel 1, A2 for audio channel 2, or AA for both 1 and 2, the word NONE appears.
006 DVD09 NONE D 004 13:38:30:08 13:38:33:14 02:00:26:02 02:00:29:08
AUD 3 4
What’s the point of an audio recording with no record track enabled? But wait, on the line below you see AUD 3 4, which means that event 006 is edited to channels 3 and 4 in the Avid session. Remember, the CMX3600 EDL is a very old means of expressing video edit decisions. Its ancestors were controllers for VTRs with only two channels. In the glory days of linear videotape editing, there were many flavors of EDL, any of which could have made for a better way of expressing multichannel edit data. As is often the case with standards, however, the weakest of possibilities became the norm. AAF and especially the AES31 audio decision list (ADL) will solve all of these problems, as they are designed to handle real-world data transfer issues and are delightfully sample-accurate.
Finding the End of a Shot
Ask a film editor to identify the last frame of a shot and you’ll be shown the last image connected to the shot in question. The sync block counter will read that shot’s ending footage. This is clear, and it reflects the way we relate to physical objects. Consider that the last step in France before entering Belgium is on the French side of the border; the last word on a page in a book is, in fact, the last word before you turn to the next page. So, if the last frame of a shot is 231 feet, 12 frames, the next shot will begin at 231 feet, 13 frames. Seems pretty obvious.
But video, being a constantly evolving, ever scanning illusion, doesn’t work this way. By design and necessity, the last frame of a shot in video isn’t the last frame we see but rather the beginning of the next frame. Look at this EDL excerpt.
003 DVD09 AA D 13:38:11:02 13:38:12:23 02:00:24:06 02:00:26:02
004 DVD09 AA C 13:29:30:08 13:29:33:14 02:00:26:02 02:00:29:08
Here line 003 ends at 2:00:26:02. The next event, 004, begins at 2:00:26:02, and not a frame later, as you would expect from the commonsense film model. (See Figure 5-3.)
Printing the EDL
To conveniently find alternate takes when you edit, you’ll need to print the EDLs. To easily troubleshoot conform problems, you’ll need to print the EDLs. Recycle paper and you won’t feel so bad about the amount of paper you’re using, but to make for a manageable editing experience, you have to print the EDLs.
To make your life easier, put a header on each EDL page. Include the project name, page number, reel number, and the set of tracks represented in the list (audio 1–4, audio 5–8, audio 9–12, video, etc.), as shown in Figure 5-4. These lists all look alike, and when you’re hurriedly searching for an alternate take, it’s useful to know which is which.
Traditional Film Uses Feet and Frames

Figure 5-3 The out point of a shot is measured differently in video than in film. In film, the last frame physically within a shot is considered the out frame; the next shot begins with the next frame. In video, out is considered to be the frame after the end of the shot, and the next in frame will have the same timecode value.
Print with a fixed-width font such as Courier 10. If you have someone do the printing, check the first few pages. It’s not uncommon for an EDL illiterate to improperly wrap the lines, making the lists all but impossible to use.
Cleaning an EDL
If you’re going to auto-assemble7 from tape or link files from original 24-bit BWF files, you’ll almost certainly have to do some preparatory work on the EDL. It’s important that the list is clean, containing no illegal situations in which edits end before they start or where column widths aren’t standardized. You must also confirm that naming conventions are respected and that notations are consistent.
Figure 5-4 Excerpt from a CMX3600 EDL printout. Note the prominent header, which will appear on each page. Since each reel may have three or four EDLs, easy-to-spot identification will save you time when you need to quickly find a shot or investigate problems.
EDL Manager The easiest way to clean an EDL is with a list manager program such as Avid’s EDL Manager, which can be downloaded from the Digidesign web site. With EDL Manager, you can instantly clean the list or convert it between SMPTE or EBU timecode formats or either of Avid’s “PAL-film” formats. Figure 5-5 shows EDL Manager’s Options page.
The Options page is your chance to decide which elements of the Avid session are saved to an EDL and in what format. Beginning in the upper left corner, select CMX_3600 as the EDL format. Many choices are available, but CMX3600 is the standard and the only one that will work without trouble. If, while looking at your EDL printout, you see only two audio channels displayed, chances are you’ve chosen another EDL type. CMX_340, for example, is a 2-track standard. Make sure the list begins at event 1, and choose LTC as the list master Timecode Type.
The DupeList/Preread section concerns tape-based video assembly and doesn’t influence sound post. When using linear videotape for the final assembly (online), you can’t dissolve from a source videotape to itself (since you can be at only one location on a tape at a time), so you have to copy specific sections onto a work tape, or “dupe reel.”

Figure 5-5 Options page of Avid’s EDL Manager.
The Show section determines which information is displayed in the final EDL. Choose between Comments and Clip Names depending on the auto-assembly program you’re using.
Standards refers to the type of timecode serving as the basis of the list, in other words, the record timecode. In the NTSC universe, it’s possible to have an assortment of non-drop-frame and drop-frame source material, but you can have only one record timecode. This should be set to the timecode format of the program automatically. If not, change it to NTSC, PAL video, or one of the two PAL film settings. Check several edits in the EDL against the realities of the Avid session or the videotape to make sure you’ve done nothing stupid with the timecode.
The Switcher setting in the Standards section concerns the protocol with which the editor controller communicates with the video switcher (“vision mixer”). You needn’t bother with this. Do, however, set Audio Channels to 4. The oh-so-exciting option of 16 channels isn’t valid for CMX3600 EDLs.
Record Start Time is set to Sequence and left alone. Don’t mess with this one unless you’re prepared to offset all of your regions once the new sessions are conformed.
Pulldown Start Frame has to do with the correlation between the video color framing sequence and the 4-frame 2:3:2 telecine pulldown sequence. Normally default to Sequence, which uses the parameters embedded in the original list. Good news for PAL editors—this isn’t your problem!
Tapename Truncation controls how overlong tape (source) names are shortened into CMX3600 legal names. The choices are obvious.
Finally, the big moment: Optimization. This determines how events will be modified in the new EDL and therefore how your auto-assembly will interpret transitions like dissolves, wipes, and, most important, audio dissolves. You’re not interested in keeping the picture editor’s transitions—besides, the OMF gives you a perfect reference of what the editor was up to when he made them. Why muddy up the EDL with all these unnecessary dissolve commands? Check all of the options except Include Black Edits, which is unnecessary.
Click Apply and you’ll see the cleaned EDL in the EDL Manager window. Save it into an appropriately named folder, using a hierarchy something like this:
Lost in Jordan (film title)/
EDLs (all EDL files)/
EDLs postcleaning (as opposed to raw EDLs or print-ready EDLs)/
Repeat for each EDL. Remember, there’ll be a lot of EDLs per reel. Each reel could easily have three or four audio EDLs and a video EDL, so on a 6-A/ B-reel film you may have 30 EDLs per “layer” (raw EDLs, postclean, print-ready, etc.). It pays to be obsessively organized.
Optimizing an edit list does more than enforce the changes you’ve chosen. An EDL cleaning program will format the list in a manner acceptable to most auto-assembly utilities. Some picture workstations generate EDLs not completely within SMPTE norms. Using such lists without first cleaning them may result in unpleasant surprises. If you regularly prepare EDLs and you need more flexibility than the free utilities can offer, consider a more serious EDL management tool such as EDLMax.8
Getting Clip Names into Your Regions
It’s important that your session region names reflect the scene/shot/take information from the Avid and, ultimately, from the original recordings. You can in fact cut dialogue without this information in the region names, but you’ll expend so much energy figuring out camera angles and digging about for clues to sources that you’ll be exhausted before you’ve even begun.
Comment or Clip Names As we saw previously, shot information is carried below the main edit line in an EDL, either as a comment or as part of a clip names line. If you don’t have comments in your EDL, send the list back to the picture department and ask for a version that includes scene/shot/take information in the COMMENT field. In most auto-assembly programs you can choose which line to import: comment or clip names. There’ll also be an option to drop certain recurring text that you don’t want in your region names. For example, you don’t want all of your regions looking like
*COMMENT: 21B/4
It’s pretty obvious that you’d prefer to work with just
21B/4
It’s much easier to get good, consistent results if the picture editor provides the shot information on the comment line rather than as a clip name. The reason is that *COMMENT: is always *COMMENT:, whereas CLIP NAME can begin with *FROM CLIP NAME: or *TO CLIP NAME: or a few other variants. If shot information is carried on the comment line, all you need to do is tell your auto-assembly to delete the string COMMENT: {space}{space} and region names will be correctly labeled. If, however, you inherit a list that uses the more troublesome clip name line for passing along shot information, you must delete these long prefixes or you’ll end up with unusable region names.
An easy way to remove these strings is to import each EDL into a word processor such as Microsoft Word. (See Figure 5-6.) Note the assorted strings that precede the scene/shot/take information in the clip name line. One string at a time, perform global replaces to rid the line of the prefix.
So *TO CLIP NAME: 24-07 becomes 24-07. Don’t delete the asterisk (*) at the beginning of the string because many auto-assembly programs use this to distinguish a comment line from an event line. Lose the * and you won’t see your shot information. Repeat the global replace for each of the text string variations preceding the shot information in the CLIP NAME line.
Figure 5-6 Screenshot of Microsoft Word global replace. In this example, all occurrences of *TO CLIP NAME: {space}{space} are replaced with *. Repeat this procedure for each of the strings preceding scene and take information in the EDL. This isn’t necessary if the comment line carries the scene and take information, since most auto-assembly programs can delete one variable from the string and COMMENT never varies.
Saving the EDL
When you finish this round of cleaning, save the EDL with a new name, as a text-only file. Auto-assembly programs can’t read Word (.doc) files, so your hard work will go unrecognized. Just to keep all these EDLs straight (there’s still one more set of files to go!), you might want to add another folder to your existing EDL hierarchy:
Lost in Jordan (film title)/
EDLs (all EDL files)/
EDLs post cleaning (as opposed to raw EDLs or print-ready EDLs)/
EDLs for printing (these have headers and other formatting to
ease reading)/
EDLs for post conform (that’s what we just created)/
The Auto-Assembly
Nothing’s worse than perfecting a bad idea, so once you’ve prepared one EDL for auto-assembly, do a test conform of a few events to see that everything is working properly.
Auto-Assembly Setup
Connect the timecode from the TC DAT, video, or HD player to the synchronizer. Don’t rely on the 9-pin timecode. Pulling the timecode from the RS-422 will likely work, but the results can be inconsistent, and it’s difficult to see the advantages of inconsistent timecode.
Next, connect the RS-422 between the computer (or synchronizer) and the source machine. Alternatively, you can use a TimeLine Lynx as the machine controller, or the computer’s serial port and V-LAN translators. Whichever method of machine control you choose, try manipulating the player via the auto-assembly program’s transport panel to test the connections. Figure 5-7 shows the PostConform transport panel.
Being able to PLAY, FF, REW, and so on, from the transport panel doesn’t guarantee auto-assembly success, but if you can’t at this point manually control the player from the computer, it’s certain that the computer won’t be able to automatically find the needed source sounds.
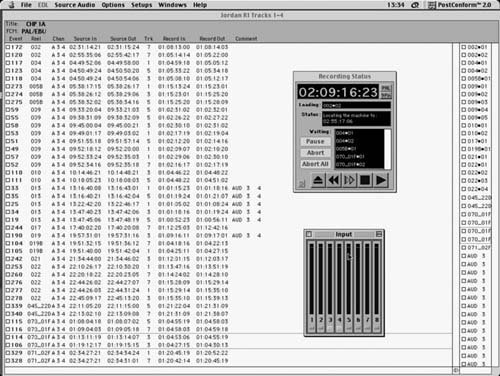
Figure 5-7 Even though it has no OS-X version, PostConform is still a favorite application for autoloading and conforming tape-based field recordings to create Pro Tools sessions.
The player, the audio interface, and the synchronizer must receive the same video reference. Certain audio devices can’t directly accept reference video, so use word clock—derived from the master video source—to synchronize them. A quality TC DAT recorder or a freestanding analogue-to-digital-toanalogue (A/D/A) converter can generally be used to create word clock from video reference.
Don’t get cheap on video reference. Although you can actually do a manageable postconform without taking it seriously, you’re building your dialogue house on sand, which is never a good idea. Working without proper video reference risks sync problems, and a poorly clocked system imposes jitter on the digital audio stream, lessening “crispness” and robbing the dialogue of much needed punch and depth.
Auto-Assembly Step by Step
Some digital audio workstations, such as Pyramix, have built-in auto-assembly and conform utilities. Others, like Pro Tools, use external programs to record and conform original material to match an EDL. In either case, the process, as described in the following paragraphs, remains the same.
Clean the EDL Check for errors, clarify COMMENT fields, and confirm source roll names. Make sure that the information in the COMMENT fields is consistent. Print the EDLs for later reference.
Import EDLs Import your EDL into the auto-assembly program and choose your preferences. Once it’s imported, you’ll see your EDL or something that resembles it. Each line represents one event, for which you can adjust the input audio record channels and the channel mapping. Channel mapping is a matrix that correlates the EDL’s “Track” instruction with the input source channels to create appropriately placed events in the completed session. In general, leave this setting alone. Run a test, and if you don’t like the channel mapping results, start making changes.
When you import an EDL into an auto-assembly program, it will create record blocks, which may include only one event or several depending on your recording preferences and the manner in which the film was edited. Typically you’re asked about handle length, which refers to how much extra material is recorded before and after the edit event, and load spacing, which combines several neighboring source events into one soundfile depending on your preferences.
You’ll also be asked to choose which comment prefixes (such as *COMMENT: or *FROM CLIP NAME:) will signal scene and take names for import as region names.
Load the Sound Normally you choose to let the auto-assembly program automatically load the necessary sounds by controlling the DAT, DA-88, HD player, or whatever tape source holds your original recordings. After all, the joy of using an auto-assembly program is witnessing the player screaming back and forth, with your pristine sounds being recorded automatically while you read Mad magazine. All auto-assembly programs load by source roll, beginning with the lowest. It would be crazy to load in program order because you’d be constantly changing source rolls.
Periodically, you’ll be asked to change tapes. If there’s a timecode problem and the machine can’t properly cue, you’ll have to set the player to “local” and manually cue the tape past the timecode irregularity.
There are times when you don’t want to use the auto-load feature. In such cases, you load the sounds manually and conform later. You may, for example, want to load all of the dailies, then link the files to the EDL for auto-assembly. This will place all of the recorded takes at your disposal, although not in a very well-managed format. (To make all takes available on your workstation, you’re far better off loading the original tapes directly into the DAW, dividing them into takes, and then creating files from these regions.) If your movie was recorded on a hard-disk recorder, you can copy all of the soundfiles onto the workstation drive, later linking the files to an EDL.
Conform the Session Once the auto-assembly program finishes recording the required sounds from the original tapes, you’re ready to conform the sound material to match the EDL. In truth, what you’re doing is linking the EDL events to the recorded soundfiles. If the sounds were autoloaded by the program, these links have been established without your intervention. If, however, you’re conforming previously recorded files or the original field recording files, you must manually link the EDL with the sounds.
If you receive a new (changed) EDL of a reel before you’ve begun to edit, you can once again conform the session with the existing soundfiles. However, since the new EDL wasn’t the basis for the autoloading, it won’t automatically link to the old soundfiles and you have to manually reestablish the link. If you’ve already done considerable editing on a reel, a new session is of little use. You could import the session reflecting the new EDL into your Pro Tools session, but then you have to redo your edits. You’re usually better off performing a conformation of your Pro Tools session to match picture department changes (see Chapter 14). Only if there’s new raw material in the revised picture cut (not just new edits of old material) should you go to the trouble of making a new postconform.
Test before Autoload Before spending all night loading tapes only to discover in the morning that the FCM was set incorrectly or that your audio 3 and 4 edits are mute, run a test. To make certain that the EDL is correctly formatted for the auto-assembly, select about ten contiguous events that include sounds from at least three sound rolls (DATs) and perform a test load and conform.
If, despite a few sync problems, the conform works, you can continue with the rest of the reel. If the conform is missing many regions, investigate naming problems. Events designated as audio 3 and/or 4 that result in empty regions indicate a channel-mapping problem. Some auto-assembly programs expect audio destined for channels 3 and 4 to originate only on inputs 3 and 4. That’s pretty hard to do when your source audio is a DAT! In such cases you must remap the audio for all audio 3 and 4 edits to enter via inputs 1 and 2 on the interface. Usually you do this by individually opening each event within the auto-assembly program and changing the input from 3 and 4 to 1 and 2.
Now you know that the edits are in the right place and that you’re recording the correct channels from the original recordings. However, you don’t know yet if the DAT sound is playing at the right speed. Before (finally!) embarking on an hours-long postconform, find the longest uninterrupted take in the reel and perform an auto-assembly of that region. Play the conformed event against the guide track and check for sync. If the conformed sound drifts against the guide, check the video reference on the player as well as the sample rate on the synchronizer. Once the conformed long take plays back in sync with the guide track, you’re ready to begin the auto-assembly.
Autoconform Files from a Hard-Disk Recorder
It’s possible to use PostConform to auto-assemble projects originating on hard disk, although there are programs better suited for this task. Titan,9 for example, enables you to create Pro Tools sessions from one or more EDLs, combined with the location recorder’s original SDII or BWF files. (See Figure 5-8.) It also facilitates conforming edited Pro Tools sessions based on EDL-formatted Avid change lists.
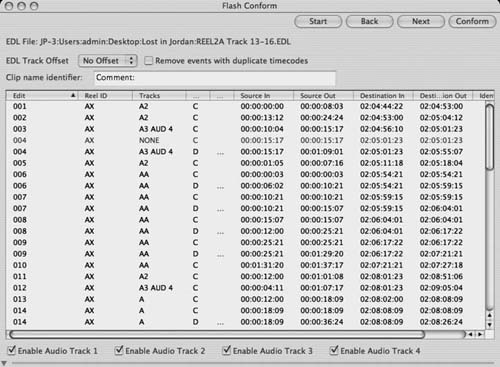
Figure 5-8 Titan’s Flash Conform is a convenient way to conform (file-link) filebased edit lists to create editing sessions for digital audio workstations.
As with other auto-assembly processes, you must choose which comment text string the program will use as a trigger for naming the resulting Pro Tools regions.
Auto-assembly from files is massively easier than it is from tape, since there’s no loading to do. The only caveat is that file-based auto-assembly programs like Titan can be very finicky about EDL formatting, COMMENT field structure, and naming schemes. Some of the time you save by not having to load sounds from tape may be squandered in playing with EDLs. Yet another reason to become skilled at EDL list management.
Merge All Channels
When you’ve conformed all of the EDLs for a reel, you’ll need to merge them into one large session per reel. Open the new sessions one by one and set the start time for each to the correct value for that reel; then save the sessions. Begin this process with the highest track number (e.g., channels 13 through 16) and work down so that the last session for which you set the correct start time is channels 1 through 4. Into this session import the tracks from the other auto-assembly sessions. Finally, import the OMF tracks. You’re now ready to begin setting up for editing.
Metadata Demystified
When you deal with multitrack hard-disk recordings, you inevitably confront metadata. Although devised to streamline workflows and automate repetitive processes, file-based metadata occasionally turns into to a source of intimidation and insecurity. You’ve been dealing with metadata all your life, probably without realizing it, yet the sudden intrusion of the word metadata into normal postproduction conversations leaves even confident editors wondering what they’re not grasping.
Simply put, metadata is data about data. A classic example is a library card catalogue (the metadata), where you’ll find pertinent information about books (the data). Since it’s far easier to search a card catalogue than to wander aimlessly through the stacks, it’s not difficult to see metadata’s value. When you comb the Web with a search engine, you’re querying metadata about billions of web sites—certainly easier than randomly typing URLs.
In audio postproduction there are many day-to-day brushes with metadata. Look through the directory of a sound effects library and you’re dealing with metadata. Pour over the log sheets from a narration recording session and you’re using the stuff. Search for an alternate take of dialogue using an EDL and sound reports and you’re working with two levels of metadata to locate the sounds you want.
The surge in multitrack hard-disk field recordings is the reason that metadata is such a popular topic of water cooler conversations at post facilities. Behind this are three realities: (1) with more channels of information, there’s more to keep up with; (2) most picture editors don’t want to drag around six or more tracks of sound for each shot, so there must be a way for them to cut with a mono production mix and then for the sound department to painlessly access the isolated tracks; (3) there’s always been a lot of metadata in the pipeline, but now it’s largely computerized, which makes it much scarier. (And, of course, there are fewer people on the payroll to sort out the information so there’s more pressure on the survivors.)
Broadcast Wave Format
Making all of this data management possible are rich soundfile formats, such as the increasingly standard Broadcast Wave Format (BWF) files, which carry more than just sound, including timestamps and scene/shot/take and all sorts of other information. BWF, an enhancement of the familiar WAVE (.wav) file, has quickly become an industry favorite. Since the prime reasons for creating it were interchangeability between platforms and ease in managing multichannel recordings, BWF has been widely adopted in audio production and post.
Microsoft WAVE files are made up of components called chunks, that is, blocks of data containing specific types of information with the largest chunk containing the audio data. Each chunk has an identification field and a size indicator so that any number of machines can read the file, address what they can cope with, and disregard the rest. This helps to make this format more universal than those that aren’t compartmentalized because it allows numerous manufacturers to develop applications for similar tasks without having to completely rewrite their source code.
Start with a linear PCM WAVE file (not all WAVE files are linear PCM), add a broadcast extension chunk, and you have a BWF file,10 as shown in Table 5-2. The information in the broadcast extension chunk is standardized enough to be readable on many platforms, yet flexible enough to be useful in film and television production, TV and radio broadcasting, multimedia and games, and other applications.
The Impact of Disk-Recorded Files
Many vintage Avids can’t accept files with word lengths greater than 16 bits, so once the picture is edited there must be a way to replace the edited 16-bit soundfiles with their 24-bit parents. By using a metadata management program such as MetaFlow or Majix,11 you can load 16-bit mixdowns into the Avid and keep track of all of the original 24-bit tracks. At the end of the picture editing, you can use a file-linking program like Titan to conform multitrack, 24-bit files to the decisions made in the 16-bit Avid. Because the metadata houses information about each track of each shot, metadata management programs also serve as databases of alternate takes and additional tracks, often supplanting traditional sound reports.
Table 5-2 Major Components of the BWF Broadcast Extension Chunk
Field |
Contents |
Description |
256 characters worth of shot description, mic types, etc.; not the file name |
Originator |
Sound recordist or project |
Reference |
Unambiguous identifier for locating the file; not the file name |
Origination date |
Date of recording |
Origination time |
Time of recording |
Time references |
Time reference since midnight, in samples |
Version |
BWF format version |
UMID |
Unique Material Identifier—helps track the history of the file |
Coding history |
Coding type (e.g., linear PCM, MPEG, etc.) |
After a day of shooting, the sound recordist provides the assistant film editor with a DVD or hard disk of the field recordings (which can even arrive at the cutting room on a keychain flash disk). Rather than load the recordings as digital audio, the assistant will merely copy the BWF files into the Avid. At the same time, the files are copied to the dialogue editor’s drive. All metadata concerning the takes (scene/shot/take, timecode, number of tracks, etc.) is automatically logged with the files. There’s a huge amount of information available within these metadata files, and once you have it in your system you can do all sorts of things with it. The Excel spreadsheet shown in Figure 5-9 is from a production recorded to BWF files with an Aaton Cantar, transferred to QuickTime via Sebsky Tools,12 and picture-edited with Final Cut Pro.
With the metadata as the starting point, the dialogue editor can set up a database in Excel or FileMaker Pro. Making this database available to everyone on the sound team greatly increases efficiency. And if you add comments, it will point other editors to fruitful soundfiles and keep you—and them—from repeatedly exploring blind alleys. Remember, though, you’re a sound editor, not an IT manager. These lists and databases are here to help you to edit more efficiently. They’re a means rather than an end, so don’t be overly obsessed with spectacular spreadsheets.
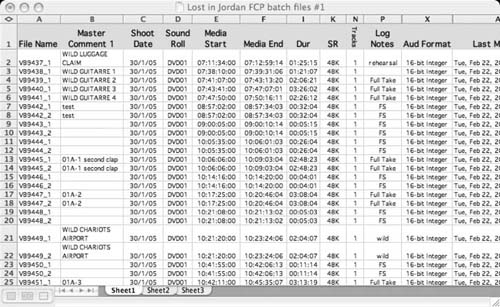
Figure 5-9 Once you’ve imported the metadata from the location mixer’s harddisk recorder, you can set up a very powerful tool for finding, comparing, and commenting on your soundfiles.
Each workstation has its own way of dealing with the vagaries of metadata, 24-bit sound, and multitrack soundfiles. To complicate matters, the brand of hard-disk recorder used in production will influence the route you and the assistant picture editor will take to manage the project. This needn’t be overwhelming; you just have to discover early in the production, long before you start editing, how the film is being shot and recorded. Talk with the assistant picture editor as soon as shooting begins; she’s after all the one who will be syncing the dailies and organizing the paperwork, and who’ll catch the potential pitfalls of the system. At the very least, learn the following:
Armed with this information, approach colleagues who have faced similar jobs and seek their advice. Visit the web site of the manufacturer of the hard-disk recorder used on the film. Go to the Avid or FCP web site. Spend some time in Internet forums to look for pertinent advice.
You’re not the first person to face this hurdle. The key to successfully negotiating the overwhelming set of possibilities is to first gather the information just listed and categorize the problems you’ll face. Once you know what you’re looking for, it’s not hard to find the answers.
• |
As soon as you have access to a sound editing room, arrange a very short test with the assistant picture editor. Ask for a 10-event Avid session that represents the issues you’ll encounter once the picture is locked. |
• |
Ask about mono tracks representing multiple tracks, 16-bit soundfiles linked to 24-bit originals, shooting days whose timecode crossed midnight13—these issues can trip you up when you conform the film. |
• |
Request picture as well as sound so that you can check sync. |
• |
Get an OMF as well as an EDL so that you can easily test the accuracy of the edits as well as the OMF sound quality compared to the original recordings. |
It’s much better to learn of a trap now than to wait until the picture is locked and the weight of the production is on your shoulders. Now you have time to go back to the books to learn what you did wrong and to get the picture department to change some habits.
1 A good history of the CMX-600 can be found in “A Reflection/Eulogy” by Bob Turner (SMPTE/New England Newsletter, January 1998).
2 Technical details on the CMX-600 were graciously provided Jack L. Calaway.
3 For a riveting personal history of electronic picture editing, see In the Blink of an Eye, Second Edition, by Walter Murch (Los Angeles: Silman-James Press, 2001, pp. 75–146).
4 A brief but outstanding history of OMFIis “Workstation File-Format Interchange” by Ron Franklin, in Mix Magazine (vol. 1, October 2002).
5 For a more detailed discussion of AAF and MXF, see “Advanced Authoring Format and Media Exchange Format” by Brooks Harris, in The Editors’ Guild Magazine (vol. 24, no. 3, May/June 2003).
6 Digidelivery is a proprietary file exchange service marketed by Digidesign.
7 By now it should be pretty clear that I’m using the term “auto-assembly” or “autoconform” to generically describe using an EDL and original recordings to recreate the picture editor’s audio cuts. PostConform is a commonly used term, but since it’s a Digidesign trademark, I try to avoid it. Most DAW manufacturers provide such a utility, either within their DAW program or as a freestanding application.
8 EDLMax is a multipurpose EDL management tool made by Brooks Harris Film & Tape, Inc. (http://www.edlmax.com).
9 Titan is a product of Synchro Arts Limited (www.synchroarts.com).
10 A thorough description of the BWF format can be found in “The Broadcast Wave Format—An Introduction” by Richard Chalmers of the EBU Technical Department, in EBU Technical Review (Fall 1997). Also see “BWF—A Format for Audio Data Files in Broadcasting,” EBU Technical Specification (June 2001); and “Broadcast Wave Format (BWF) User Guide,” a publication of the European Broadcasting Union (http://www.ebu.ch/en/technical/publications/userguides/bwf_user_guide.php).
11 MetaFlow was a product of Gallery Software, but is now out of production. Majix is manufactured by Aaton to work exclusively with its Cantar hard-disk recorder.
12 Sebsky Tools was manufactured by Dharma Film but has been discontinued and replaced by Dharma’s other BWF-to-QuickTime product, bfw2qt. Dharma makes other products to aid the transfer of projects from Avid to FCP.
13 Crossing midnight refers to recordings with timestamps that begin before 23:59:59:00 and continue into the next timecode day. A take that “ends before it begins” is disastrous when using linear editing systems but merely an inconvenience when working with file-based recordings.