
CHAPTER 13
Creating and Managing Packages and Programs
IN THIS CHAPTER
![]() Understanding Packages and Programs
Understanding Packages and Programs
![]() Creating a Package from a Definition File
Creating a Package from a Definition File
![]() Configuring Package Properties
Configuring Package Properties
![]() Creating Packages Using the Package and Program Wizard and for UNIX and Linux Systems
Creating Packages Using the Package and Program Wizard and for UNIX and Linux Systems
Applications and deployment types, introduced with System Center 2012 Configuration Manager, are discussed in Chapter 11, “Creating and Managing Applications,” and Chapter 12, “Creating and Using Deployment Types.” This chapter discusses the packages and programs feature that can also be used to deploy applications. Packages and programs have existed since 1994 with Systems Management Server (SMS), the earlier name for Configuration Manager (ConfigMgr). While the functionality of packages and programs has evolved over the years, their core concepts remain the same.
While Microsoft prefers that you use the application model, in several scenarios, using a package makes more sense or is the only option:
![]() Scripts that do not install an application on a computer (such as a script to defragment a disk drive)
Scripts that do not install an application on a computer (such as a script to defragment a disk drive)
![]() One-off scripts that do not need continual monitoring
One-off scripts that do not need continual monitoring
![]() Scripts that run on a recurring schedule and cannot use global evaluation
Scripts that run on a recurring schedule and cannot use global evaluation
![]() Applications that do not have very good detection methods or that require complex detection methods
Applications that do not have very good detection methods or that require complex detection methods
![]() Providing just the files to the operating system (OS) and not necessarily having to provide a program (mainly with task sequences during OS deployment [OSD])
Providing just the files to the operating system (OS) and not necessarily having to provide a program (mainly with task sequences during OS deployment [OSD])
This chapter, along with Chapters 11 and 12, focuses on software deployment. It discusses some key terms associated with software deployment using packages and programs, and it provides further detail on how to create and configure packages and programs. Chapter 14, “Distributing and Deploying Applications and Packages,” discusses how you can deliver a package to a device by creating collections, using distribution points (DPs), and creating deployments.
Understanding Packages and Programs
A software package consists of general information about the software to be deployed, including its name, version, manufacturer, and language, as well as the location of source files for the package (if it has source files). Packages are created manually or from a package definition file such as an MSI, SMS, or PDF file type—discussed in more detail later in this chapter, in the section “Creating Packages Using the Package and Program Wizard and for UNIX and Linux Systems.”
ConfigMgr software packages are not actually repackaged vendor software. While ConfigMgr uses the same source files used to install the software, it uses MSI files to automatically populate many of the questions that require answers to create packages and programs. You can also create software packages without package definition files, as you can deploy executables, batch files, VBScript, JavaScript, and command files, among others. If you can execute it, you can design a package to deploy it!
ConfigMgr uses packages to distribute software and to deploy changes (such as Registry changes) to client configurations.
A package may optionally include programs that provide specifics on how the software runs. A package also contains information about who can access it (security) and where it is distributed (DPs). Programs are commands specifying what should occur on a client when it receives the package. A program can do just about anything; it can install or uninstall software, distribute data, run antivirus software, or update a client configuration.
While programs are not required, a package must contain at least one program if it is to perform any action other than provide a pointer to source files. A definition file provides answers to the majority of the questions required to create a package. An MSI provided as a package definition file includes six default programs for use with software distribution, each allowing the package to run in different ways:
![]() Per-System Attended: This installation causes a program to install and expects user interaction; it runs once for the system on which it is targeted to install.
Per-System Attended: This installation causes a program to install and expects user interaction; it runs once for the system on which it is targeted to install.
![]() Per-System Unattended: This installation causes a program to install that expects to run without user interaction; it runs once for the system on which it is targeted to install.
Per-System Unattended: This installation causes a program to install that expects to run without user interaction; it runs once for the system on which it is targeted to install.
![]() Per-System Uninstall: This installation performs an uninstallation of the program; it runs once for the system that it is targeted to uninstall.
Per-System Uninstall: This installation performs an uninstallation of the program; it runs once for the system that it is targeted to uninstall.
![]() Per-User Attended: This installation causes a program to install and expects user interaction; it runs once for the user for whom it is targeted to install.
Per-User Attended: This installation causes a program to install and expects user interaction; it runs once for the user for whom it is targeted to install.
![]() Per-User Unattended: This installation causes a program to install without user interaction; it runs once for the user for whom it is targeted to install.
Per-User Unattended: This installation causes a program to install without user interaction; it runs once for the user for whom it is targeted to install.
![]() Per-User Uninstall: This installation performs an uninstallation of the program; it runs once for the user for whom it is targeted to uninstall.
Per-User Uninstall: This installation performs an uninstallation of the program; it runs once for the user for whom it is targeted to uninstall.
Each program specifies the command line used to run the program in the method described. As an example, a per-system unattended installation includes a switch to run the program without user intervention.
Because this chapter focuses on ConfigMgr packages, the next sections walk through the steps to create a package and provide examples of the process.
Packages can come in many flavors:
![]() Packages That Use a Definition File: You can create ConfigMgr packages either with a definition file or without. SMS 1.x definition files used an extension of .pdf (package definition file). With SMS 2.0, definition files had either a .pdf or .sms (Systems Management Server) extension. Although these two file types still exist and you can use them with ConfigMgr to create a package, they are relatively uncommon now. Originally, SMS used the .pdf extension; this was later changed to .sms, as the .pdf extension was also used for portable document format files. For information about creating .pdf and .sms definition files, see https://technet.microsoft.com/library/bb632631.aspx.
Packages That Use a Definition File: You can create ConfigMgr packages either with a definition file or without. SMS 1.x definition files used an extension of .pdf (package definition file). With SMS 2.0, definition files had either a .pdf or .sms (Systems Management Server) extension. Although these two file types still exist and you can use them with ConfigMgr to create a package, they are relatively uncommon now. Originally, SMS used the .pdf extension; this was later changed to .sms, as the .pdf extension was also used for portable document format files. For information about creating .pdf and .sms definition files, see https://technet.microsoft.com/library/bb632631.aspx.
The package definition file most commonly used by Configuration Manager is a Windows Installer file. Windows Installer (.msi) files are discussed in the next section, “Creating a Package from a Definition File.”
![]() Packages That You Can Create Without a Definition File: These packages are discussed later in this chapter, in the “Creating a Package Using the New Package Wizard” section.
Packages That You Can Create Without a Definition File: These packages are discussed later in this chapter, in the “Creating a Package Using the New Package Wizard” section.
![]() A Package That Does Not Even Need to Have Source Files as Part of the Package: This is often used when ConfigMgr runs a program already stored on the system.
A Package That Does Not Even Need to Have Source Files as Part of the Package: This is often used when ConfigMgr runs a program already stored on the system.
ConfigMgr uses these different flavors of packages to create Configuration Manager packages. To illustrate how this is accomplished, the next sections step through an example that shows how to deploy a relatively simple package.
Creating a Package from a Definition File
This chapter uses the Windows Installer distributable of 7-Zip (which is also used in Chapters 11 and 12) to walk through the process of creating a package from a definition. In this case, the definition is extracted from the .msi, which contains most of the information needed to create the package and programs.
Creating a 7-Zip Package
Creating a ConfigMgr package for 7-Zip is straightforward and requires the following steps:
1. In the ConfigMgr console, navigate to Software Library -> Overview -> Application Management -> Packages and select Create -> Create Package from Definition from the ribbon bar to open the Create Package from Definition Wizard, shown in Figure 13.1.

FIGURE 13.1 Create Package from Definition Wizard Package Definition page.
2. Click Browse in the wizard and navigate to the .msi. Choose the x86 version for this example. Figure 13.2 shows the imported package definition metadata for 7-Zip version 16.02. Click Next to continue.
The next page offers three different ways to manage source files:
![]() This Package Does Not Contain Any Source Files: This may be useful when ConfigMgr is running a program already stored on the system.
This Package Does Not Contain Any Source Files: This may be useful when ConfigMgr is running a program already stored on the system.
![]() Always Obtain Files from a Source Directory: This is the most commonly used option.
Always Obtain Files from a Source Directory: This is the most commonly used option.

![]() Create a Compressed Version of the Source Files: This may be useful when you need to decrease storage requirements or do not expect the package to change.
Create a Compressed Version of the Source Files: This may be useful when you need to decrease storage requirements or do not expect the package to change.
3. Select the second option for this package—Always obtain files from a source directory. Click Next. If the option you selected specifies that source files are part of the package, the wizard verifies the location of the source files.
4. Specify the package source location by choosing Network path or Local folder. As a best practice, always try to use a network path. Applications (as discussed in Chapter 11) require a Universal Naming Convention (UNC) format of \<servername> <sharename><filename>. A UNC path is required if you convert a package to an application using the Package Conversion Manager (also discussed in Chapter 11). Specify the path to the package source installation folder. As the contents of the selected folder and all subfolders are sent to each targeted DP, try to keep source files organized to reduce any chance of extra files and folders being distributed with a package. Click Next to continue.
NOTE: CONFIGMGR PROCESSES USE LOCAL SYSTEM ACCOUNT
ConfigMgr processes run as the Local System account. Ensure that the computer account of the site server has read permissions to the source files share.
5. Review the Summary page of the wizard, which lists the options chosen to create the package, including the name of the package, how to handle source files, and the location of the source directory (folder). Click Next to create the package. The Progress page appears briefly and automatically changes to the Completion page.
6. Review the status of this page and then click Close. Using the information in the MSI file, the wizard creates a set of installation options for the program, including Per-system attended, Per-system unattended, Per-system uninstall, Per-user attended, Per-user unattended, and Per-user uninstall, as shown in Figure 13.3.

FIGURE 13.3 Programs for the 7-Zip package.
Advantages of Using an MSI File
Using MSI files for package definition greatly simplifies the process of creating a package because the .msi supplies information that otherwise would be specified manually. Review the Summary and Programs pane for the 7-Zip 16.02 package. The Summary tab shows the package ID (which is helpful for troubleshooting) and content status. You haven’t distributed content to any DPs yet, but this summary is helpful when you do.
NOTE: CONTENT AUTOMATICALLY ADDED TO STORE AT CREATION
When you create a new package (manually or with a wizard), files in the content source path are automatically collected and added to the content store on the site that owns the package. You still must send content to the DPs to ensure that content is available for targeted systems.
The Programs tab (refer to Figure 13.3), displays the programs for the selected package. Because you ran the Create Package from Definition Wizard against an MSI file, you can see the six programs automatically created for 7-Zip.
Configuring Package Properties
View the properties of the package and program you created to confirm that all settings are configured as desired. Populate as many fields as possible on the General tab, shown in Figure 13.4. This information can be helpful to a user who needs to choose a software installation from the Software Center or Application Catalog.
Using the Package Properties Data Source Tab
On the Data Source tab, notice the package source location and the current source version. If the contents of the source folder update regularly, consider enabling the Update distribution points on a schedule check box. When a schedule is configured, ConfigMgr re-sends the contents of the package source to the specified DPs. If no changes were detected in the source folder, nothing is re-sent (or refreshed) on the DPs.

FIGURE 13.4 General tab of package properties.
Enable the following options on the Data Source tab, as required:
![]() Persist Content in the Client Cache: Persist content to ensure that the installation source remains in the local cache (%windir%ccmcache). Use this option for software that may need to be rerun regularly but not require content updates. Package source size affects the size of available cache.
Persist Content in the Client Cache: Persist content to ensure that the installation source remains in the local cache (%windir%ccmcache). Use this option for software that may need to be rerun regularly but not require content updates. Package source size affects the size of available cache.
![]() Enable Binary Differential Replication: Use binary differential replication for packages containing large files, such as the installation .wim file for OSD. These algorithms require additional overhead for calculating which bits need to be transferred to DPs for each file in the package source.
Enable Binary Differential Replication: Use binary differential replication for packages containing large files, such as the installation .wim file for OSD. These algorithms require additional overhead for calculating which bits need to be transferred to DPs for each file in the package source.
These options should be used sparingly, as they increase overhead.
Using the Package Properties Data Access Tab
The Data Access tab, shown in Figure 13.5, allows you to configure package share settings. Use this tab to configure how the package is stored on DPs.

FIGURE 13.5 Data Access tab of package properties.
When the Copy the content in this package to a package share on distribution points option is selected, ConfigMgr copies the package contents to the SMSPKGD$ share (where D is the drive letter for the share). You can also specify a custom-named share to use for the package.
NOTE: PACKAGE SHARE CAUSES DUPLICATE CONTENT ON A DP
One of ConfigMgr’s greatest features is its single-instance store for content. When you select the option to copy the content to a package share, ConfigMgr does just that: It copies all required files and places them on the share. All content in package shares is in addition to the content in the content store, which increases the size of your DP. However, the Copy the content in this package to a package share on distribution points check box must be enabled if you plan to configure any deployment to run from a DP.
Using the Package Properties Distribution Settings Tab
The Distribution Settings tab (see Figure 13.6) allows you to specify distribution-specific settings for a package. This tab has the following configurable options:
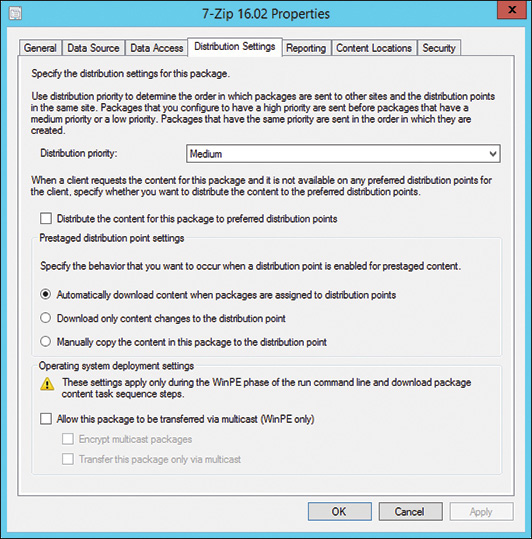
FIGURE 13.6 Distribution Settings tab of package properties.
![]() Distribution Priority: Use this option to control the order in which multiple packages are sent to DPs. You may want to configure more critical packages (antivirus, security patches, and so on) to a high priority so they will be sent to child sites and DPs faster than packages of low priority, such as a portable document format viewer application.
Distribution Priority: Use this option to control the order in which multiple packages are sent to DPs. You may want to configure more critical packages (antivirus, security patches, and so on) to a high priority so they will be sent to child sites and DPs faster than packages of low priority, such as a portable document format viewer application.
![]() Distribute the Content for This Package to Preferred Distribution Points: A client has a “preferred” DP when it is in the boundaries of a defined DP group. If that client requests a package not on the DP, the content is automatically deployed to the preferred DP to fulfill the request for the client. This can useful for content you want to avoid deploying to all DPs, such as a multi user interface (MUI) language package.
Distribute the Content for This Package to Preferred Distribution Points: A client has a “preferred” DP when it is in the boundaries of a defined DP group. If that client requests a package not on the DP, the content is automatically deployed to the preferred DP to fulfill the request for the client. This can useful for content you want to avoid deploying to all DPs, such as a multi user interface (MUI) language package.
![]() Prestaged Distribution Point Settings: Selecting the Enable this distribution point for prestaged content check box on the properties of the DP causes the following settings that affect content distribution to appear on the Distribution Settings tab:
Prestaged Distribution Point Settings: Selecting the Enable this distribution point for prestaged content check box on the properties of the DP causes the following settings that affect content distribution to appear on the Distribution Settings tab:
![]() Automatically Download Content When Packages Are Assigned to Distribution Points: This setting causes the DP to perform normally and not follow prestaged content rules; content will be distributed to any targeted DP.
Automatically Download Content When Packages Are Assigned to Distribution Points: This setting causes the DP to perform normally and not follow prestaged content rules; content will be distributed to any targeted DP.
![]() Download Only Content Changes to the Distribution Point: If you select this option, you must export content and then extract content manually on the DP for initial distribution; subsequent update DP actions send delta updates. Say that you are ready to deploy the next version of Microsoft Office, and the source installation is currently around 1GB. Due to WAN availability, you may choose to manually transfer content to the DP the first time (either over a WAN file copy or by shipping media that contains content to the remote DP). After you prestage the initial payload, update DPs work normally, as expected.
Download Only Content Changes to the Distribution Point: If you select this option, you must export content and then extract content manually on the DP for initial distribution; subsequent update DP actions send delta updates. Say that you are ready to deploy the next version of Microsoft Office, and the source installation is currently around 1GB. Due to WAN availability, you may choose to manually transfer content to the DP the first time (either over a WAN file copy or by shipping media that contains content to the remote DP). After you prestage the initial payload, update DPs work normally, as expected.
![]() Manually Copy the Content in This Package to the Distribution Point: Selecting this option prevents ConfigMgr from copying any content to the DP, requiring you to export content from the ConfigMgr console and then extract it to a new DP.
Manually Copy the Content in This Package to the Distribution Point: Selecting this option prevents ConfigMgr from copying any content to the DP, requiring you to export content from the ConfigMgr console and then extract it to a new DP.
![]() Operating System Deployment Settings: Use this section to enable multicast, require encryption, and/or allow the package to be transferred only via multicast. This section only applies while the system is running Windows Preinstallation Environment (WinPE).
Operating System Deployment Settings: Use this section to enable multicast, require encryption, and/or allow the package to be transferred only via multicast. This section only applies while the system is running Windows Preinstallation Environment (WinPE).
Using the Package Properties Reporting Tab
The Reporting tab displays status Management Information Format (MIF) matching information. Since the Windows Installer package is now imported, the Use these fields for status MIF matching field is enabled, and all text fields are complete.
The default setting for this dialog is Use package properties for status MIF matching. MIF files, which have an extension of .mif, were used in older versions of SMS/ConfigMgr to verify whether software was correctly installed. (For information about MIF files, see https://technet.microsoft.com/library/bb633139.aspx.) Enable the Use these fields for status MIF matching radio button only if you can complete the MIF matching information, such as the MIF filename. Choosing the wrong MIF filename (and other text box configurations in the dialog) may cause ConfigMgr to consume the wrong MIF file and incorrectly report installation status to the site server. If you have software that requires a MIF file to correctly report status, consider moving to the application model, discussed in Chapter 11, so you can include additional detection rules to determine whether software is installed.
Using the Package Properties Content Locations Tab
The Content Locations tab enables you to see the targeted DPs and DP groups, as well as the following:
![]() Validate: Select this option to instruct ConfigMgr to perform a hash check for the desired package on the selected DP. Review SMSDPMon.log on the DP for more information. This option can only be initiated to one DP at a time.
Validate: Select this option to instruct ConfigMgr to perform a hash check for the desired package on the selected DP. Review SMSDPMon.log on the DP for more information. This option can only be initiated to one DP at a time.
![]() Redistribute: Use this option to confirm that all packages are on the targeted DPs when needed.
Redistribute: Use this option to confirm that all packages are on the targeted DPs when needed.
![]() Remove: This option removes content from selected DPs and from all DPs in a selected DP group.
Remove: This option removes content from selected DPs and from all DPs in a selected DP group.
The Security tab displays all users and user groups with rights to a package, as well as their operational rights. Click Cancel to close the dialog (or click OK if you have made changes you want to keep) and proceed to view/change the program properties.
Defining Program Properties
After creating a package, next you configure the program the package will use. Notice in Figure 13.3 that a package has six programs. These programs are automatically created by using the Create Package from Definition Wizard and a Windows Installer file. This example requires a system-based unattended installation. The per-system unattended program deploys the7-Zip installation on a per-system basis and runs without user intervention. If you never plan to use some of the programs, such as per-user unattended, consider deleting them to remove clutter.
To set the program properties, right-click the program named Per-system unattended (located under Software Library -> Overview -> Application Management -> Packages) and then select the 7-Zip package and open the Properties page, as shown in Figure 13.7. Properties for each program include the following tabs:
![]() General
General
![]() Requirements
Requirements
![]() Environment
Environment
![]() Advanced
Advanced
![]() Windows Installer
Windows Installer
![]() OpsMgr Maintenance Mode
OpsMgr Maintenance Mode
These tabs together define how the program will function. The following sections review the content of each, using the 7-Zip package as an example.
Using the Program Properties General Tab
The General tab (shown in Figure 13.7) has a variety of fields automatically populated with information, based on the package definition file used to create the 7-Zip package:
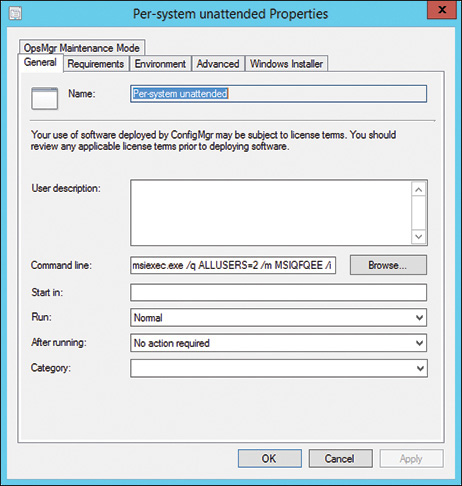
FIGURE 13.7 General tab of the program properties.
![]() Name: The Name field is prepopulated and cannot be changed.
Name: The Name field is prepopulated and cannot be changed.
![]() User Description: This field is a 127-character text field that you use to provide a description of the program.
User Description: This field is a 127-character text field that you use to provide a description of the program.
![]() Command Line: This text field can hold up to 255 characters. It provides the command line that installs the application. For the 7-Zip application, the field uses the following syntax:
Command Line: This text field can hold up to 255 characters. It provides the command line that installs the application. For the 7-Zip application, the field uses the following syntax:
msiexec.exe /q ALLUSERS=2 /m MSIQFQEE /i "7z1602.msi"
![]() Start In: This optional 127-character text field specifies the absolute path to the program you are installing (such as c:install_filesprogram.exe) or the folder relative to the DP you are installing in (such as install_files). This defaults to blank for the 7-Zip installation program.
Start In: This optional 127-character text field specifies the absolute path to the program you are installing (such as c:install_filesprogram.exe) or the folder relative to the DP you are installing in (such as install_files). This defaults to blank for the 7-Zip installation program.
![]() Run: This dropdown specifies whether the program will run normal, minimized, maximized, or hidden:
Run: This dropdown specifies whether the program will run normal, minimized, maximized, or hidden:
![]() Normal: This is the default mode, and it means the program runs based on system and program defaults.
Normal: This is the default mode, and it means the program runs based on system and program defaults.
![]() Minimized: Running minimized shows the program only on the taskbar during installation. The window exists on the taskbar during the installation process; however, it is not the active window maximized on the user’s workstation.
Minimized: Running minimized shows the program only on the taskbar during installation. The window exists on the taskbar during the installation process; however, it is not the active window maximized on the user’s workstation.
![]() Maximized: Use this option when installing programs that require user intervention. It is also good for package testing.
Maximized: Use this option when installing programs that require user intervention. It is also good for package testing.
![]() Hidden: This mode hides the program during installation and is recommended for fully automated program deployments.
Hidden: This mode hides the program during installation and is recommended for fully automated program deployments.
The 7-Zip installation program defaulted to the Normal configuration.
![]() After Running: This dropdown selection determines what occurs after the program completes. The options follow:
After Running: This dropdown selection determines what occurs after the program completes. The options follow:
![]() No Action Required: The 7-Zip installation program defaults to this option, which means no restart or logoff is required for the program.
No Action Required: The 7-Zip installation program defaults to this option, which means no restart or logoff is required for the program.
![]() Configuration Manager Restarts Computer: This option is useful when deploying a program that requires a reboot but the reboot is not initiated as part of the program.
Configuration Manager Restarts Computer: This option is useful when deploying a program that requires a reboot but the reboot is not initiated as part of the program.
![]() Program Controls Restart: Select this option if the program requires a reboot and the program will perform the restart program.
Program Controls Restart: Select this option if the program requires a reboot and the program will perform the restart program.
![]() Configuration Manager Logs User Off: Use this option to log off the user after installation.
Configuration Manager Logs User Off: Use this option to log off the user after installation.
Note that both the ConfigMgr restarts computer and ConfigMgr logs user off options take place forcefully, after a grace period. This means that if either of these options is used, any applications running on the clients will not have the opportunity to save their data or state.
![]() Category: Category is a dropdown selection used to help find specific programs in ConfigMgr when deployed to the Application Catalog. This field defaults to blank, but you can create a new category by typing in the text for the category’s name.
Category: Category is a dropdown selection used to help find specific programs in ConfigMgr when deployed to the Application Catalog. This field defaults to blank, but you can create a new category by typing in the text for the category’s name.
NOTE: USE CARE WHEN ENTERING A NEW CATEGORY
The Category entry is a one-way street. Enter a category and click Apply, and that category cannot be removed (at least not in a supported way). Always check to see if a category already exists, and when entering a new category, double-check your spelling! You can remove the category from a program by selecting the blank option from the dropdown.
Change the program’s configuration on the General tab for the 7-Zip installation, as follows:
![]() User description: Add a comment explaining what the program will do
User description: Add a comment explaining what the program will do
![]() Command line:
Command line: msiexec.exe /q ALLUSERS="" /m MSIQFQEE /i "7z1602.msi" /l %temp%7z1602_install.log
![]() Run: Hidden
Run: Hidden
![]() After running: No action required
After running: No action required
![]() Category: Utility
Category: Utility
The command line will run the installation silently and log to %windir%temp7z1602_install.log if run using the Local System account.
Using the Program Properties Requirements Tab
This section discusses the Requirements tab for the program. Figure 13.8 shows the default configuration for the 7-Zip program created using the package definition file. This tab is where you tell ConfigMgr the requirements for running the program:

FIGURE 13.8 Program Requirements tab.
![]() Estimated Disk Space: Specify the estimated disk space needed to run the program. The setting defaults to 27MB when the package definition file for 7-Zip is used. Although the actual amount of disk space may vary from the amount defined with the package definition file, the default generally provides a good starting point. This setting can be in kilobytes, megabytes, or gigabytes, and it defaults to Unknown for program installations. The setting is for informational purposes only and appears in the properties of the installation in Software Center.
Estimated Disk Space: Specify the estimated disk space needed to run the program. The setting defaults to 27MB when the package definition file for 7-Zip is used. Although the actual amount of disk space may vary from the amount defined with the package definition file, the default generally provides a good starting point. This setting can be in kilobytes, megabytes, or gigabytes, and it defaults to Unknown for program installations. The setting is for informational purposes only and appears in the properties of the installation in Software Center.
![]() Maximum Allowed Run Time (Minutes): Specify the amount of time the program is permitted to run. Enter your worst-case scenario for the time required to install the application. The number should be accurate, as it is used by maintenance windows to determine if the window is large enough to run the installation. With the default setting of Unknown, ConfigMgr monitors the installation for a maximum of 120 minutes; if you have only a 90-minute maintenance window, the program will never run.
Maximum Allowed Run Time (Minutes): Specify the amount of time the program is permitted to run. Enter your worst-case scenario for the time required to install the application. The number should be accurate, as it is used by maintenance windows to determine if the window is large enough to run the installation. With the default setting of Unknown, ConfigMgr monitors the installation for a maximum of 120 minutes; if you have only a 90-minute maintenance window, the program will never run.
The setting defines how long the program is expected to run, which can be quite variable, as it depends on the speed of the system where the program is being installed, program size, and network connectivity between the system and the source files used for the installation. In this example, the setting defaults to Unknown. However, based on previous installations of 7-Zip, the program should complete within 5 minutes. ConfigMgr requires a setting between 15 and 720 minutes (or Unknown), so set this value to 15 minutes. Choose the maximum runtime carefully, as it affects the following:
![]() During program installation, the ConfigMgr client monitors the installation until the maximum time is reached. If the installation has not completed by the maximum allowed time, ConfigMgr sends a status message stating that the maximum runtime has been reached and that ConfigMgr will no longer monitor it. (This frees up ConfigMgr to deploy additional software, if required.)
During program installation, the ConfigMgr client monitors the installation until the maximum time is reached. If the installation has not completed by the maximum allowed time, ConfigMgr sends a status message stating that the maximum runtime has been reached and that ConfigMgr will no longer monitor it. (This frees up ConfigMgr to deploy additional software, if required.)
![]() Before a program runs, ConfigMgr checks to see if there are maintenance windows defined; if so, it verifies that the available window is larger than the Maximum allowed run time setting. If the window is not large enough, the client will wait for an available window for deployment (unless configured to ignore maintenance windows.)
Before a program runs, ConfigMgr checks to see if there are maintenance windows defined; if so, it verifies that the available window is larger than the Maximum allowed run time setting. If the window is not large enough, the client will wait for an available window for deployment (unless configured to ignore maintenance windows.)
![]() The OpsMgr tab uses the Maximum allowed run time setting as the time-out for the maintenance mode duration.
The OpsMgr tab uses the Maximum allowed run time setting as the time-out for the maintenance mode duration.
Two options are available for platforms on which ConfigMgr can run the program:
![]() This Program Can Run on Any Platform: This default configuration works well for programs that are not platform specific.
This Program Can Run on Any Platform: This default configuration works well for programs that are not platform specific.
![]() This Program Can Run Only on Specified Client Platforms: This installation type is for client-specific platforms. For example, the 7-Zip client has two different installation files, based on the client platform (amd64 and i386). In this situation, you would separately package each program type and use this option to allow each program to run only on a specific client platform. It is best to not scope a supported platform down to the service pack level.
This Program Can Run Only on Specified Client Platforms: This installation type is for client-specific platforms. For example, the 7-Zip client has two different installation files, based on the client platform (amd64 and i386). In this situation, you would separately package each program type and use this option to allow each program to run only on a specific client platform. It is best to not scope a supported platform down to the service pack level.
If the program can run on only specified platforms, select those platforms. Try to avoid specifying platforms as narrow as Windows 7 Service Pack (SP) 1 (32-bit), unless you know the software will only run on Windows 7 SP 1 and not on RTM. Try instead to use the All Windows 7 (32-bit) platform. Software generally continues to install and execute successfully when an OS upgrades to a new service pack. If you limit your favorite portable document (PDF) utility installation to an All Windows 7 SP 1 collection and then deploy Service Pack 2 (if it is ever released), you could not install the application on the SP 2 system until you modified the supported platforms defined in Figure 13.8.
![]() Additional Requirements: Additional text in this box is seen by the user in Software Center. No items are evaluated from this setting.
Additional Requirements: Additional text in this box is seen by the user in Software Center. No items are evaluated from this setting.
TIP: HIDING NON-APPLICABLE SOFTWARE WITHOUT CREATING SPECIFIC COLLECTIONS
The Only on specified client platforms (also known as restricted platforms) setting allows you to control which client systems see a deployment, based on OS and architecture. For machine-targeted deployments, restricted platforms are evaluated when the client receives policy and do not run unless the restrictions are met. The deployment also only appears in Software Center if the current OS meets the required platform restriction. User-targeted software (including software that appears in Application Catalog) is evaluated at runtime. If a user initiates the example described on a Windows 10 system from the Application Catalog, he or she is notified that the requirements were not met to install the software on the computer.
For the 7-Zip program, change the properties on the Requirements tab to set the estimated disk space to 5MB and the maximum allowed runtime (in minutes) to 15. Also, specify that this program can only run on the following platforms: All Windows 7 (32-bit), All Windows 8 (32-bit), All Windows 8.1 (32-bit), and All Windows 10 (32-bit). This allows the software to be installed on the described platforms, regardless of service pack.
Using the Program Properties Environment Tab
The Environment tab for this program, shown in Figure 13.9, identifies characteristics about the environment to run the program. Following are options in the Program can run dropdown:
![]() Only When a User Is Logged On: Select this option when the program ConfigMgr is installing needs to have the user logged in to install.
Only When a User Is Logged On: Select this option when the program ConfigMgr is installing needs to have the user logged in to install.
![]() Whether or Not a User Is Logged On: This is the most common option; it runs the program using the Local System account (run with administrative rights).
Whether or Not a User Is Logged On: This is the most common option; it runs the program using the Local System account (run with administrative rights).
![]() Only When No User Is Logged On: Selecting this option means the installation does not occur until the user logs out of the system.
Only When No User Is Logged On: Selecting this option means the installation does not occur until the user logs out of the system.
The conditions under which a program can run directly tie into the Run mode options:
![]() Run with User’s Rights: This option is available only if the option Only when a user is logged on is chosen for when to run the program.
Run with User’s Rights: This option is available only if the option Only when a user is logged on is chosen for when to run the program.
![]() Run with Administrative Rights: This default option is available in any of the three configurations that determine when a program can run. Choosing this option makes a check box available that allows users to interact with the program.
Run with Administrative Rights: This default option is available in any of the three configurations that determine when a program can run. Choosing this option makes a check box available that allows users to interact with the program.
![]() Allow Users to Interact with This Program: Use this option when the user needs to interact with the program. This is excellent for troubleshooting when packages are not installing correctly. When this option is selected, the user interface is visible to the logged-in user, and the user can interact with the program. As an example, choose this option if the program requires the user to make a selection or click a button. If a program runs without this option selected and the program requires user intervention, it waits for the user interaction (which never occurs) and eventually times out when the maximum allowed runtime occurs (defined on the Requirements tab of the program; if undefined, the program times out after 12 hours).
Allow Users to Interact with This Program: Use this option when the user needs to interact with the program. This is excellent for troubleshooting when packages are not installing correctly. When this option is selected, the user interface is visible to the logged-in user, and the user can interact with the program. As an example, choose this option if the program requires the user to make a selection or click a button. If a program runs without this option selected and the program requires user intervention, it waits for the user interaction (which never occurs) and eventually times out when the maximum allowed runtime occurs (defined on the Requirements tab of the program; if undefined, the program times out after 12 hours).
TIP: RUNNING DEPLOYMENTS WITH ADMINISTRATIVE RIGHTS
At first glance, running an advertisement with administrative rights seems like a no-brainer. You can use this approach to install the software regardless of the level of permissions available to the logged-in user. However, this can cause some difficulties when installing a program that writes data to the Registry (in HKEY_CURRENT_USER) or if a package tries to access files the account does not have rights to access.
In this situation, try running with the user’s rights instead. If that does not work, create two different programs—one running under the user’s access and allowing access to the Registry and a second running with administrative rights. Link the programs together with the Run this program first option. This may require repackaging the application to determine the portion of the application that requires administrator rights to install.
Another option involves using the task sequencing engine to deploy packages that need to perform Registry edits or run something in a user context. This can be done by running a command-line task sequence step with a run as statement.

The Drive mode section includes the following configurations:
![]() Runs with UNC Name: This default setting runs the program using the UNC name. A client runs from the UNC path only if the deployment is configured with the Run from Distribution Point option set. By default, content is downloaded from a DP to the client cache and run from there (normally %windir%ccmcache).
Runs with UNC Name: This default setting runs the program using the UNC name. A client runs from the UNC path only if the deployment is configured with the Run from Distribution Point option set. By default, content is downloaded from a DP to the client cache and run from there (normally %windir%ccmcache).
![]() Requires Drive Letter: When this option is selected, the program requires a mapped drive to install but allows ConfigMgr to use any available drive letter.
Requires Drive Letter: When this option is selected, the program requires a mapped drive to install but allows ConfigMgr to use any available drive letter.
![]() Requires Specific Drive Letter (Example: Z): When this option is selected, the program requires a specific drive letter to be mapped for installation. (If you choose this option, an additional box is provided to specify the letter to map.) If the drive letter is not available on the client system, the program will not run.
Requires Specific Drive Letter (Example: Z): When this option is selected, the program requires a specific drive letter to be mapped for installation. (If you choose this option, an additional box is provided to specify the letter to map.) If the drive letter is not available on the client system, the program will not run.
![]() Reconnect to Distribution Point at Logon: This last setting specifies that the client will reconnect to the ConfigMgr DP when logging in to the system. This option is available only if the program runs only when a user is logged on, with the user’s rights, and requires either a drive letter or a specific drive letter (such as the drive letter Z).
Reconnect to Distribution Point at Logon: This last setting specifies that the client will reconnect to the ConfigMgr DP when logging in to the system. This option is available only if the program runs only when a user is logged on, with the user’s rights, and requires either a drive letter or a specific drive letter (such as the drive letter Z).
For 7-Zip, configure the Environment tab as shown in Figure 13.9.
Using the Program Properties Advanced Tab
The Advanced tab for the program, shown in Figure 13.10, allows you to specify a variety of configurations, such as whether other programs run prior to this one, if this program is run once for the computer or for each user, whether program notifications are suppressed, how disabled programs are handled on clients, and how the program integrates with install software task sequences:
![]() Run Another Program First: These are program dependencies; selecting this option causes another program to run before this program runs. The check box is cleared by default. Consider a software package with several separate programs requiring installation before the package can be installed: This program has five levels of dependency, and the original program will not run unless program #2 has run, and program #2 will not run unless program #3 has run, and so on.
Run Another Program First: These are program dependencies; selecting this option causes another program to run before this program runs. The check box is cleared by default. Consider a software package with several separate programs requiring installation before the package can be installed: This program has five levels of dependency, and the original program will not run unless program #2 has run, and program #2 will not run unless program #3 has run, and so on.
If you choose this option, you must also specify a package and a program. The option Allow this program to be installed from the Install Software task sequence without being advertised is relevant when discussing task sequences. These are a list of customizable tasks or steps performed sequentially. A task sequence can be deployed to a device collection (for example, advertising a program to a collection). Task sequences provide a more elegant solution than creating dependencies or complex scripts for many situations, including those where multiple dependencies exist for a single program. Task sequences are discussed in detail in Chapter 22, “Operating System Deployment.”
If you select Run another program first, the Always run this program first option is also available (unchecked by default). If you check this option, the program it is dependent on will run regardless of whether it previously ran on the same system.
An alternative to using the Run another program first option is to create a task sequence and build in the logic to determine which commands should run. You can also leverage applications with defined dependencies, discussed in Chapter 12, for any prerequisite software.
![]() When This Program Is Assigned to a Computer: This dropdown has two choices:
When This Program Is Assigned to a Computer: This dropdown has two choices:
![]() Run Once for the Computer: This is the default setting.
Run Once for the Computer: This is the default setting.
![]() Run Once for Every User Who Logs In: This option causes the program to run for each user who logs in to the computer.
Run Once for Every User Who Logs In: This option causes the program to run for each user who logs in to the computer.

![]() Suppress Program Notifications: Checking this option causes notification area icons, messages, and countdown notifications to not display for the program. This is useful for programs that may be running when someone is using the system, if there is no requirement to notify that the program is running. Override this setting with the client setting Show notifications for new deployments in the Computer Agent section of the console. Review Chapter 9, “Client Management,” for information about customizing client settings.
Suppress Program Notifications: Checking this option causes notification area icons, messages, and countdown notifications to not display for the program. This is useful for programs that may be running when someone is using the system, if there is no requirement to notify that the program is running. Override this setting with the client setting Show notifications for new deployments in the Computer Agent section of the console. Review Chapter 9, “Client Management,” for information about customizing client settings.
![]() Disable This Program on Computers Where It Is Deployed: This determines how ConfigMgr will handle the program. The default is unchecked; if checked, advertisements containing this program are disabled. When checked, this option also removes the program from the list of available programs the user can run, and it will not run on the systems where it is assigned. This can be useful when there is a need to temporarily halt a deployment because the change applies to all advertisements of the program, and the program is disabled when policies are retrieved by the client.
Disable This Program on Computers Where It Is Deployed: This determines how ConfigMgr will handle the program. The default is unchecked; if checked, advertisements containing this program are disabled. When checked, this option also removes the program from the list of available programs the user can run, and it will not run on the systems where it is assigned. This can be useful when there is a need to temporarily halt a deployment because the change applies to all advertisements of the program, and the program is disabled when policies are retrieved by the client.
![]() Allow This Program to Be Installed from the Install Software Task Sequence Without Being Deployed: The final check box on the Advanced tab determines how the Install Software task sequence in OSD handles the program. The option is unchecked by default. Check this option for any programs used within an OSD task sequence that are not currently deployed to a collection.
Allow This Program to Be Installed from the Install Software Task Sequence Without Being Deployed: The final check box on the Advanced tab determines how the Install Software task sequence in OSD handles the program. The option is unchecked by default. Check this option for any programs used within an OSD task sequence that are not currently deployed to a collection.
For the 7-Zip program, accept the default configurations.
Program Properties Windows Installer Tab
The Windows Installer tab provides installation source management. If the program requires repair or reinstallation, the MSI file automatically accesses the package files on the DP to reinstall or repair the program.
The available fields shown in Figure 13.11 are Windows Installer product code and Windows Installer file. You can define these by clicking Import and specifying the MSI file used for the program. Choosing the MSI file populates both fields.

FIGURE 13.11 Program Windows Installer tab.
For the 7-Zip program, click Import and select the Windows Installer file used for the installation (in this case, 7z1602.msi) and click Open. The product code and filename are automatically populated, as shown in Figure 13.11.
An added benefit to this feature is that when a device moves to a different location, ConfigMgr automatically modifies the source path on the local system if the system is in a different boundary group with content available for the software.
Program Properties OpsMgr Maintenance Mode Tab
The final program properties tab determines the Operations Manager maintenance mode configurations for the program. Two options are available, as displayed in Figure 13.12:
![]() Disable Operations Manager Alerts While This Program Runs: Selecting this option places the computer in OpsMgr maintenance mode while the program is running. The duration of the maintenance mode is defined by the Maximum allowed run time (minutes) setting defined on the Requirements tab (refer to Figure 13.8). In previous versions of OpsMgr, the option did not actually perform the steps required to truly disable Operations Manager alerts while the program ran. This option pauses the OpsMgr health service but does not put everything into maintenance mode, which means heartbeat alerts are still generated. This check box is fully functional with System Center 2012 Operations Manager and higher, enabling full maintenance mode on a system.
Disable Operations Manager Alerts While This Program Runs: Selecting this option places the computer in OpsMgr maintenance mode while the program is running. The duration of the maintenance mode is defined by the Maximum allowed run time (minutes) setting defined on the Requirements tab (refer to Figure 13.8). In previous versions of OpsMgr, the option did not actually perform the steps required to truly disable Operations Manager alerts while the program ran. This option pauses the OpsMgr health service but does not put everything into maintenance mode, which means heartbeat alerts are still generated. This check box is fully functional with System Center 2012 Operations Manager and higher, enabling full maintenance mode on a system.
![]() Generate Operations Manager Alert if This Program Fails: Selecting this option creates an event in the application log containing the package name, program name, advertisement ID, advertisement comment, and failure code or MIF failure description. You can configure the application event to create an Operations Manager alert. The authors recommend using this feature for critical software deployments such as service packs.
Generate Operations Manager Alert if This Program Fails: Selecting this option creates an event in the application log containing the package name, program name, advertisement ID, advertisement comment, and failure code or MIF failure description. You can configure the application event to create an Operations Manager alert. The authors recommend using this feature for critical software deployments such as service packs.

FIGURE 13.12 OpsMgr Maintenance Mode tab.
Packaging the 7-Zip application with a package definition file demonstrates many of the configurations used when manually creating a package and program. While using a package definition file (an MSI, PDF, or MIF file) is recommended, what takes place when one is not available? Drawing on the information used to create the 7-Zip package, the next section discusses the process to create a package and program manually, using the Citrix Receiver installation as an example.
Creating Packages Using the Package and Program Wizard and for UNIX and Linux Systems
The following sections discuss how to create a new package using the Create Package and Program Wizard. You can use this wizard to create a package when a definition file is not available. You also could optionally create a program for a computer or for a device running Windows CE. You can also choose not to define a program, making the files in the package directly available for use. An example of using only a package is the unattended.xml file referenced by the Apply Operating System Image step of OSD.
The sections also discuss how to create a package and program for software that can be deployed to UNIX or Linux systems with an installed ConfigMgr agent. Microsoft does not support deploying ConfigMgr applications to UNIX or Linux systems. Use packages and programs for UNIX and Linux systems to install new software deployments, install updates for software already available, patch a UNIX/Linux computer, or run scripts. ConfigMgr supports maintenance windows to control execution of programs on UNIX and Linux systems.
Creating a Package Using the New Package Wizard
The Citrix Receiver software allows a user to connect to a Citrix environment running either a Virtual Desktop Infrastructure (VDI) or Remote Desktop Services (RDS) workload. Citrix Receiver is available at no charge from https://www.citrix.com/products/receiver/. You can use the Create Package and Program Wizard to create a package for the Citrix Receiver. Follow these steps:
1. As when creating a package using a package definition file, navigate in the console to Software Library -> Overview -> Application Management -> Packages and select Create -> Create Package from the ribbon bar.
2. On the Package page, specify a variety of fields to reflect your personal preferences for the package. These fields are visible in the ConfigMgr console as well as the Software Center and Application Catalog. Enable the check box This package contains source files and click Browse to select the source files location. From this dialog, you can select a network (UNC) path or a local folder. Select a network path whenever possible so the source files are accessible at all times. The first page of the wizard should look similar to Figure 13.13. When you are finished with this page, click Next.

3. On the Program Type page, select one of three options:
![]() Standard Program: Specify a standard program used to deploy software to a computer system.
Standard Program: Specify a standard program used to deploy software to a computer system.
![]() Program for Device: Use this option for creating a package to deploy to supported mobile devices running Windows CE.
Program for Device: Use this option for creating a package to deploy to supported mobile devices running Windows CE.
![]() Do Not Create a Program: Use this option with a package to access the source files on a DP. This type of package (with no program) is often used with OSD for running scripts, utilities, and such.
Do Not Create a Program: Use this option with a package to access the source files on a DP. This type of package (with no program) is often used with OSD for running scripts, utilities, and such.
In this case, select Standard Program and click Next.
4. On the Standard Program page, enter the required information (the name and command line) and modify any other required settings, as shown in Figure 13.14. Click Next to continue.
5. On the Requirements page, select whether another program must run first, any platform restrictions, estimated disk space, and maximum allowed runtime, as shown in Figure 13.15. For this example, select All Windows 10 (32-bit) for the specified platforms and click Next.
6. Review the Summary page, and if the information looks correct, click Next, confirm that the wizard completed successfully, and click Close.


FIGURE 13.15 Requirements page of the Create Package and Program Wizard.
Refer to the section “Creating a Package from a Definition File,” earlier in this chapter, for information on how to view and modify properties of the package and program. To create a new program for an existing package, right-click the desired program and select Create Program from the context menu.
The majority of packages required by most organizations have existing package definition files because most major packages now install from MSI files. For packages that do not have package definition files but have setup files, the Citrix Receiver client example illustrates that you can manually create packages by performing some additional steps. You can often install simple applications with a batch file or a script. For more complex applications, work with the vendor to find a supported and documented process to perform an unattended deployment of the application.
TIP: SITE FOR SOFTWARE PACKAGING AND DEPLOYMENT GUIDANCE
A great place for general guidance on software deployment is the App Details site (https://www.appdetails.com/). App Details provides information on how to distribute software, including examples for Adobe Reader, Microsoft Office, and Visual Studio .NET. You now can deploy nearly all software using packages that run the various command-line configurations.
Creating Packages for UNIX and Linux Systems
If a Linux or UNIX system is enrolled with a ConfigMgr agent, you can use ConfigMgr’s packages and programs software distribution capability to deploy applications to those systems. This functionality works with maintenance windows and provides status messages for centralized reporting. Throttling of network bandwidth while downloading the software is also supported and can be configured using Client Settings.
Complete the following steps to define a package and a program for the Dropbox client version 8.4.19:
1. In the ConfigMgr console, navigate to Software Library -> Application Management -> Packages. Select Create Package on the ribbon bar to open the Create Package and Program Wizard.
2. On the Package page of the wizard, supply at a minimum a name for the package (see Figure 13.16). In this case, supply the following information:
![]() Name: Dropbox Client 8.4
Name: Dropbox Client 8.4
![]() Manufacturer: Dropbox
Manufacturer: Dropbox
![]() Language: EN-US
Language: EN-US
![]() Version: 8.4.19
Version: 8.4.19

3. Select This package contains source files and click Browse to open the Set Source Folder dialog box. Confirm that the radio button for the Network Path (UNC name) is selected and provide the UNC path to the folder where the .rpm file is located (in this case, \armadaDSLApplicationsDropboxv8.4.19Deployx86). Click OK to close the Set Source Folder dialog box and click Next to continue.
4. On the Program Type page, select to create a standard program (for a client computer), select to create a program for a device, or select not to create a program. In this case, confirm that Standard Program is selected and click Next.
5. On the Standard Program page, provide the information for this specific program (at a minimum, the name and command line). In addition, provide the following information, as shown in Figure 13.17:
![]() Name: Install Dropbox
Name: Install Dropbox
![]() Command Line: rpm -ivh nautilus-dropbox-2015.10.28-1.fedora.i386.rpm
Command Line: rpm -ivh nautilus-dropbox-2015.10.28-1.fedora.i386.rpm
![]() Startup Folder: <none>
Startup Folder: <none>
![]() Program Can Run: Whether or not a user is logged on
Program Can Run: Whether or not a user is logged on
![]() Run Mode: Run with administrative rights
Run Mode: Run with administrative rights
![]() Allow Users to View and Interact with the Program Installation: <not selected>
Allow Users to View and Interact with the Program Installation: <not selected>
![]() Drive Mode: Runs with UNC name
Drive Mode: Runs with UNC name
Click Next to continue.

FIGURE 13.17 Standard Program page of the Create Package and Program Wizard.
6. On the Requirements page, specify whether you want to run another program first, which is not necessary in this case. You can also specify platform requirements. Select This program can run only on specified platforms and select the x86 versions of RHEL 4, RHEL 5, and RHEL 6 in the list. Also specify the estimated disk space, which is 20MB, and the maximum allowed runtime, which is 15 minutes in this scenario, as shown in Figure 13.18. When finished, click Next.

7. On the Summary page of the wizard, verify the information you entered. If everything looks correct, click Next to continue.
8. On the Completion page, verify that the package and program were created successfully. When successful, click Close to close the wizard.
With the package and program created, you can distribute the files to DPs and deploy the program to a custom collection containing the hosts to which you want to install the Dropbox client.
On the Linux client, you can use the scxcm.log file to troubleshoot package deployment issues. If installation was successful, Dropbox appears under a submenu of Applications.
Summary
This chapter provided examples of creating packages in ConfigMgr both with and without a package definition file. It also discussed programs and packages and available configuration options, as well as tips for avoiding common issues when creating packages. Chapter 14 includes additional details on deploying packages and ConfigMgr applications to users and client systems, and it also discusses the user experience.