
CHAPTER 19
Endpoint Protection
IN THIS CHAPTER
![]() Protection Capabilities of Microsoft’s Antimalware Platform
Protection Capabilities of Microsoft’s Antimalware Platform
![]() Prerequisites for Endpoint Protection
Prerequisites for Endpoint Protection
![]() Deploying and Configuring Endpoint Protection
Deploying and Configuring Endpoint Protection
![]() Monitoring and Reporting in Endpoint Protection
Monitoring and Reporting in Endpoint Protection
This chapter discusses Microsoft’s antimalware platform and enterprise management of that platform using System Center Endpoint Protection (SCEP). The chapter also covers the cloud-based capabilities provided with built-in features of SCEP/Windows Defender, along with the advanced additional features in Windows Defender Advanced Threat Protection (ATP).
The chapter includes an extensive presentation of Microsoft’s protection technologies, including a detailed breakdown of the internal capabilities of SCEP/Defender. The chapter also discusses the protection capabilities of Windows itself. These generic capabilities are included in this chapter because SCEP/Defender does not replace any Windows capabilities.
A concise planning and requirements gathering discussion is provided to help you understand how to select a definition distribution methodology and how to use ConfigMgr to get the most out of SCEP/Defender. The chapter discusses deployment, configuration, monitoring/reporting, and actions/alerts, including information on how to configure the various definition distribution methods along with how to distribute the Endpoint Protection (EP) client. Information is provided regarding how best to leverage the ConfigMgr console to monitor SCEP/Defender.
The chapter concludes by discussing Windows Defender ATP, a cloud service that enhances and extends the protection capabilities of Defender on Windows 10. It is licensed separately from SCEP and ConfigMgr, but the agent can be onboarded by ConfigMgr through client policy.
Protection Capabilities of Microsoft’s Antimalware Platform
SCEP and Windows Defender in Windows 10 provide solid antimalware capabilities that are directly integrated into ConfigMgr’s console and infrastructure. The following sections introduce the antimalware platform and protection technologies included within SCEP and Windows Defender in Windows 10. They explain Microsoft’s technology and design in developing its common antimalware platform, which is shared by Windows Defender and SCEP. This overview of protection technologies can help you better understand SCEP and Windows Defender’s antimalware technologies, enabling their successful deployment, configuration, and operation.
Understanding these antimalware capabilities is important, as they are often delivered as part of a simple toggle in the user interface, and in some cases multiple features are included in a single toggle. Other antimalware solutions often provide these capabilities in a much more verbose fashion.
Key antimalware capabilities built into Windows 10 are also discussed. These capabilities leverage Windows Defender, the default antimalware solution for Windows 10. Microsoft does not intend to replace the security capabilities of Windows with Defender/SCEP. Keep this in mind if you have many legacy systems to manage or maintain.
Using Antimalware as a Service
Consider Microsoft’s antimalware platform as a service. This antimalware solution was intentionally designed to provide simple and direct protection, in contrast with other antimalware solutions that provide advanced capabilities but often require specialists with antimalware knowledge. To achieve this simplicity, Microsoft leverages its monthly engine updates and multiple daily definition updates to introduce new signatures and additional protection technologies, delivered in the engine updates or via platform updates if more substantial changes are required, such as reporting or enterprise controls.
These capabilities are defined based on information gathered by a global network of telemetry, which includes the following:
![]() Email Services: Specifically, Microsoft offers the consumer cloud email service Hotmail/Outlook.com along with Office 365. These services are often the frontline for spreading malware.
Email Services: Specifically, Microsoft offers the consumer cloud email service Hotmail/Outlook.com along with Office 365. These services are often the frontline for spreading malware.
![]() Consumer Microsoft Antivirus (AV) Installations: This telemetry data is from non-commercial users of Microsoft’s antimalware platform. It includes Windows Defender on Windows 10 and Windows 8/8.1, as well as Microsoft Security Essentials on Windows 7 and below.
Consumer Microsoft Antivirus (AV) Installations: This telemetry data is from non-commercial users of Microsoft’s antimalware platform. It includes Windows Defender on Windows 10 and Windows 8/8.1, as well as Microsoft Security Essentials on Windows 7 and below.
![]() Microsoft Malicious Software Removal Tool: This telemetry data is reported back from execution of the Malicious Software Removal Tool (MSRT). New versions of MSRT are released each Patch Tuesday.
Microsoft Malicious Software Removal Tool: This telemetry data is reported back from execution of the Malicious Software Removal Tool (MSRT). New versions of MSRT are released each Patch Tuesday.
![]() Enterprise Microsoft AV Installations: These installations include SCEP, Azure Endpoint Protection, and Windows Defender in Windows 10, which apply only when cloud protection is enabled; see the “Dynamic Signatures Service and Behavior Monitoring” section, later in this chapter.
Enterprise Microsoft AV Installations: These installations include SCEP, Azure Endpoint Protection, and Windows Defender in Windows 10, which apply only when cloud protection is enabled; see the “Dynamic Signatures Service and Behavior Monitoring” section, later in this chapter.
This network of millions of endpoints lets Microsoft respond and prioritize efforts based on real-world evolution and development of malware so it can respond to trends as well as to completed malware. For an example of the type of telemetry to which Microsoft has access, review the Microsoft Security Intelligence Report, published quarterly at https://www.microsoft.com/security/intelligence-report. Microsoft is less focused on investigating malware that might cause a problem and instead focuses on malware that is causing a problem.
This strategy often means that Microsoft’s antimalware platform lags in lab testing due to the use of real-world prevalence-based telemetry. In addition, Microsoft focuses heavily on preventing false positives across its antimalware development life cycle, and it has one of the industry’s lowest false positive rates. Given the number of devices in the world running Microsoft Security Essentials and Windows 10 Windows Defender, Microsoft needs to ensure that its false positives are extremely low.
In addition, Microsoft does not provide controls and settings to define different thresholds based on process “risk,” as defined by an administrator or similar advanced controls. Instead, Microsoft makes these determinations based on its malware research and telemetry. The response is then codified into the definition updates. When a new threat creates a need for a new way to protect systems, Microsoft releases a change into its engine or the platform itself—again, based on the complexity of the change.
The telemetry, dynamic definition distribution, and settings design discussed in this section show that you could consider Microsoft antimalware a Software as a Service (SaaS) solution. Similar to the desktop client or app portion of a SaaS solution, SCEP is regularly updated and limits customization, but the trade-off is easier configuration and quicker releases. As an administrator, your role is to keep each client as current as possible without interrupting your business rather than making low-level configuration changes. As you can see, leveraging the cloud protection and dynamic update capabilities of SCEP and Windows Defender is critical to delivering the best protection Microsoft’s antimalware platform provides.
Understanding Microsoft’s Core Protection Technologies
The following sections discuss the key protection technologies included in SCEP and Windows Defender. As just discussed in the “Using Antimalware as a Service” section, many of these capabilities are not settings or features you can toggle or enable; they are part of enabling real-time protection (RTP) and regular scans and are provided as a reference to understand that a simple switch has many moving parts beneath it.
Antimalware, Generics, and Heuristics
Antimalware is the core RTP and scanning included with any antimalware/antivirus product. In SCEP/Defender, this includes file, process, Registry, and network watchers. SCEP/Defender also includes a cache to ensure that unmodified files are not needlessly rescanned; this is accomplished via low-level integration with the file system.
SCEP/Defender also automatically enables generics and heuristics as part of protection, using emulated behavior and/or decrypted binary characteristics, which helps in detecting malware revisions or new malware variants.
In addition, SCEP/Defender’s dynamic translation capability uses virtualization to cause potential malware to run against safe virtualized resources, allowing SCEP/Defender to observe that behavior before it can affect key system resources. This was built into the product because with polymorphic malware, often the only commonality between two samples of malicious code is their behavior, and the binaries are completely different.
Using Antirootkits
Antirootkit and diagnostic scanning address the growing dangers of rootkits and other complex malware (complex referring to malware that has a deep understanding of its target operating system and how to obfuscate itself from detection). To address the threat posed by rootkits and other complex threats, SCEP/Defender includes kernel support libraries, which allow it to detect initial attempts of obfuscation or already obfuscated code. SCEP/Defender can hook into the Windows boot process to remove malware during the next restart prior to the kernel loading; this process is similar to the process by which kernel binaries are updated. It also provides the ability to perform low-level scans. See the section “Using Windows Defender Offline,” later in this chapter, for more information.
Diagnostic Scanning
SCEP/Defender’s quick scan is often assumed to be inferior to a full scan. The quick scan should be named intelligent scan, though, because its diagnostic scanning capability allows SCEP/Defender to automatically vary the scan intensity. By default, if RTP has been constantly enabled and there has been no malware activity, the quick scan is low intensity, and many low-level/expensive elements are disabled.
If RTP is disabled, if other suspicious activity occurs, or if there are known malware incidents, the scan intensity ramps up accordingly. SCEP/Defender also signals administrators when a full scan is required to fully remediate malware. This is only triggered when SCEP/Defender finds specific malware that requires remediation through a full scan.
Dynamic Signature Service and Behavior Monitoring
SCEP/Defender provides two seemingly unrelated features: Dynamic Signature Service (DSS) and Behavior Monitoring (BM). These two features are intrinsically linked. DSS isn’t directly called out in documentation or the console settings, and it receives mention only at tradeshows and during events. However, the description of Microsoft Active Protection Service (MAPS) in SCEP and the description of cloud protection in Defender include a description of DSS. DSS essentially allows SCEP/Defender to pull down late-breaking malware signatures. These are not general-purpose definition updates designed to run against a system that may not be infected; they are designed to protect a machine that has definite signs of infection. The following explains how DSS and BM work:
![]() DSS: DSS addresses unknown software or previously known good software compromises. An example of this is freeware network configuration utilities that promise to increase network performance by tweaking the Windows TCP/IP configuration. While these utilities are of dubious value, they are not outright malicious; however, they require administrative rights, which makes them prime targets for attackers. In some cases, mirror websites hosting these utilities are attacked, allowing the attacker to post compromised versions of the utilities. The compromised versions are used to provide a Trojan attack, where the utility downloads malware and then configures it to automatically launch with the next run. DSS allows Microsoft to instruct SCEP/Defender to block the compromised utility and thus the channel used to deliver the malware.
DSS: DSS addresses unknown software or previously known good software compromises. An example of this is freeware network configuration utilities that promise to increase network performance by tweaking the Windows TCP/IP configuration. While these utilities are of dubious value, they are not outright malicious; however, they require administrative rights, which makes them prime targets for attackers. In some cases, mirror websites hosting these utilities are attacked, allowing the attacker to post compromised versions of the utilities. The compromised versions are used to provide a Trojan attack, where the utility downloads malware and then configures it to automatically launch with the next run. DSS allows Microsoft to instruct SCEP/Defender to block the compromised utility and thus the channel used to deliver the malware.
![]() BM: BM helps determine when to invoke DSS. RTP within the engine is constantly looking at file, process, Registry, and network activity; it compares this activity against the definitions provided. RTP blocks the compromised utility from writing or launching the malware. In addition to providing active protection, RTP forwards key events to another queue, which BM then analyzes in the background. This occurs because RTP can block processing of the file system and other activities, which dramatically affects system performance. BM determines from where malware has been downloaded to the system; in this example, it is the compromised network utility.
BM: BM helps determine when to invoke DSS. RTP within the engine is constantly looking at file, process, Registry, and network activity; it compares this activity against the definitions provided. RTP blocks the compromised utility from writing or launching the malware. In addition to providing active protection, RTP forwards key events to another queue, which BM then analyzes in the background. This occurs because RTP can block processing of the file system and other activities, which dramatically affects system performance. BM determines from where malware has been downloaded to the system; in this example, it is the compromised network utility.
BM and DSS are intrinsically linked because BM triggers DSS to report the compromised network utility binary to Microsoft’s Windows Defender cloud protection (formerly MAPS). DSS then receives a response from Microsoft, confirming that the network utility is compromised. This response takes the form of a new micro-definition that instructs RTP to prevent the compromised network utility from launching. Windows Defender refers to the combination of MAPS and DSS settings as cloud-based protection. Ensure that MAPS/cloud protection is enabled to be able to receive the high level of protection and the most responsive protection. For more information on cloud-based protection, see https://cloudblogs.microsoft.com/microsoftsecure/2015/01/14/maps-in-the-cloud-how-can-it-help-your-enterprise/.
Understanding Windows Antimalware Capabilities
SCEP/Defender does not replace the security features of Windows itself. Instead, SCEP/Defender leverages the capabilities Windows provides to antimalware vendors to their fullest. This means that SCEP/Defender does not perform as well as other products on older Windows operating systems compared to products that attempt to replicate some of the latest Windows security capabilities and features on those operating systems. It is therefore important to consider the intrinsic Windows capabilities discussed in the next sections when evaluating SCEP/Defender.
Early Launch Antimalware and Measured Boot
Windows 8 and Windows Server 2012 introduced two key capabilities to the Windows security stack: Early Launch Antimalware (ELAM) and Measured Boot. SCEP/Defender takes advantage of both operating system (OS) capabilities to ensure secure transition between device firmware, the OS boot process, and the running OS. The following explains how ELAM and Measured Boot work:
![]() ELAM: ELAM was specifically designed to help address rootkits, which tend to attempt to masquerade as system processes or low-level drivers to avoid detection by antimalware products running inside the OS. Secure Boot enables ELAM, which is implemented as a driver, to kick in during the boot process. The ELAM driver starts before other boot drivers, allowing antimalware products to evaluate those drivers and detect malware in the boot process and remediate it prior to initialization.
ELAM: ELAM was specifically designed to help address rootkits, which tend to attempt to masquerade as system processes or low-level drivers to avoid detection by antimalware products running inside the OS. Secure Boot enables ELAM, which is implemented as a driver, to kick in during the boot process. The ELAM driver starts before other boot drivers, allowing antimalware products to evaluate those drivers and detect malware in the boot process and remediate it prior to initialization.
ELAM also allows SCEP/Defender to remove any malicious changes at the next reboot. This is important as you may find that a restart is required after malware remediation. The reason for this is often to remove rootkit-type infections from the boot process using ELAM.
![]() Measured Boot: Whereas ELAM is about prevention, Measured Boot provides remediation, measuring each boot-critical component, which includes everything from the Unified Extensible Firmware Interface (UEFI) firmware through boot start drivers. The measurement is stored in the device’s Trusted Platform Module (TPM). Storing the boot attestation in the TPM provides a log that is resistant to spoofing and tampering. This log contains a trace of all software that loaded prior to the antimalware software, allowing the antimalware software to determine whether those components are infected with malware or are trustworthy.
Measured Boot: Whereas ELAM is about prevention, Measured Boot provides remediation, measuring each boot-critical component, which includes everything from the Unified Extensible Firmware Interface (UEFI) firmware through boot start drivers. The measurement is stored in the device’s Trusted Platform Module (TPM). Storing the boot attestation in the TPM provides a log that is resistant to spoofing and tampering. This log contains a trace of all software that loaded prior to the antimalware software, allowing the antimalware software to determine whether those components are infected with malware or are trustworthy.
Windows 10 and Windows Server 2016 Antimalware Technologies
Windows 10 and Server 2016 further enhance the native security capabilities that Windows Defender can leverage. The Windows Defender name takes on a broader meaning in the latest versions of Windows and Windows Server, as it now refers to the set of security-related capabilities built in to Windows and not just traditional antimalware. These capabilities include the following:
![]() Application Control (Windows 10 Version 1709 and later) and Device Guard: For more information, reference https://docs.microsoft.com/sccm/protect/deploy-use/use-device-guard-with-configuration-manager.
Application Control (Windows 10 Version 1709 and later) and Device Guard: For more information, reference https://docs.microsoft.com/sccm/protect/deploy-use/use-device-guard-with-configuration-manager.
![]() Application Guard: For additional information, see https://docs.microsoft.com/sccm/protect/deploy-use/create-deploy-application-guard-policy.
Application Guard: For additional information, see https://docs.microsoft.com/sccm/protect/deploy-use/create-deploy-application-guard-policy.
![]() Exploit Guard: For more information, see https://docs.microsoft.com/sccm/protect/deploy-use/create-deploy-exploit-guard-policy.
Exploit Guard: For more information, see https://docs.microsoft.com/sccm/protect/deploy-use/create-deploy-exploit-guard-policy.
ConfigMgr Current Branch version 1710 can configure these security features. This chapter does not focus on these technologies; rather, it focuses on the antimalware capabilities of Windows Defender, given the change in ConfigMgr from managing SCEP on Windows 7 and earlier versions to Windows Defender on Windows 10. For general information on the overall capabilities of Windows Defender outside antimalware and Windows 10 threat protection capabilities, see https://docs.microsoft.com/windows/threat-protection/.
Windows Defender is specifically called out in this section rather than SCEP in Windows 10 and Windows Server 2016 because it is built in and enabled by default rather than being an add-in, as with previous versions of Windows. SCEP on Windows 10 and Windows Server 2016 acts a management and monitoring layer on top of Windows Defender. In contrast, previous versions of SCEP installed a complete standalone instance of the Microsoft Common Antimalware Platform.
A new element of Windows Defender is local context, which provides Defender with the specific context of files to use in subsequent analysis and detection. These contexts include the following:
![]() Entry Point Context: This context is about malware infiltration. It enables Defender to do advanced scanning at higher-risk entry points. For example, Defender uses the Mark of the Web feature (see https://msdn.microsoft.com/library/ms537628.aspx) to determine if a file was obtained from an external system (such as the Internet) and local context to ensure that this information is available during file use, even if the file is used after it was obtained.
Entry Point Context: This context is about malware infiltration. It enables Defender to do advanced scanning at higher-risk entry points. For example, Defender uses the Mark of the Web feature (see https://msdn.microsoft.com/library/ms537628.aspx) to determine if a file was obtained from an external system (such as the Internet) and local context to ensure that this information is available during file use, even if the file is used after it was obtained.
![]() Elevation Change Context: Windows Defender now has synchronous scan hooks into User Account Control (UAC) elevation requests, allowing it to understand when a process is elevated. Defender then applies additional scanning to such processes, as they can impact the running system. This also hooks into Smart UAC. As part of the scan, if Defender determines that a process is malicious, the UAC message is altered to explain that Windows Defender blocked the process from executing.
Elevation Change Context: Windows Defender now has synchronous scan hooks into User Account Control (UAC) elevation requests, allowing it to understand when a process is elevated. Defender then applies additional scanning to such processes, as they can impact the running system. This also hooks into Smart UAC. As part of the scan, if Defender determines that a process is malicious, the UAC message is altered to explain that Windows Defender blocked the process from executing.
![]() Secure Persisted Context: The context elements discussed in the previous two bullets are now stored securely in a persisted store, which allows the live context obtained via real-time protection components to be persisted for later use. Following is an example from Microsoft:
Secure Persisted Context: The context elements discussed in the previous two bullets are now stored securely in a persisted store, which allows the live context obtained via real-time protection components to be persisted for later use. Following is an example from Microsoft:
1. An email with an attachment arrives via Outlook, and the user saves the attachment.
2. Days later, the user attempts to execute the attachment.
3. During execution, the attachment requires administrative rights (via a UAC prompt).
4. Defender is both able to determine the level of scanning that needs to be done because of the persisted context and gets the immediate context regarding the UAC prompt.
The final element is the Antimalware Scan Interface (AMSI). This generic interface is designed to allow applications to integrate with the antimalware product present on a device. AMSI is intended to tackle the problem of script obfuscation by malware writers. As scripts and automation code are non-executable and instead leverage script engines for execution, they are good targets for delivering obfuscated payloads. These obfuscated payloads must be deciphered to their native format prior to execution by the script engine.
AMSI allows script engines including PowerShell and VBScript, along with other applications, the ability to submit deciphered code to the antimalware engine on the system prior to execution. As the code is now deciphered, it becomes easier for signatures to catch the malicious code. For more information and detailed examples of how AMSI works, see https://cloudblogs.microsoft.com/microsoftsecure/2015/06/09/windows-10-to-offer-application-developers-new-malware-defenses/.
Using Windows Defender Offline
The final protection capability is Windows Defender Offline (WDO). WDO, which has been available as a separate download since Forefront Endpoint Protection 2010, is designed to address rootkits and other malware that either obfuscate from or embed themselves within the Windows OS, preventing complete removal. WDO is based on the Windows Preinstallation (WinPE) version of Windows, which is designed to run directly from boot media rather than having to be installed, and commonly used by ConfigMgr’s operating system deployment (OSD) and Windows Setup to install Windows itself.
By leveraging WinPE, WDO can scan and clean files that would normally not be accessible on a running system. It can also perform raw disk scans to identify malware that uses slack space, providing remediation against some of the more complex varieties of malware and rootkits.
NOTE: MALWARE THAT USES SLACK SPACE
Slack space refers to space marked as deleted by a file system. This is a perfectly normal design that improves performance, as file systems should only mark data as deleted without overwriting the deleted data. Once the data is marked as deleted, the underlying physical storage units/sectors can be reused to write new data.
Malware can use this slack space to obfuscate itself from protection software running inside the OS. This is usually done by corrupting the boot process, allowing the malware to launch prior to the OS and make changes to the boot order and gain privileged access to low-level application programming interfaces (APIs). The malware can then repeatedly infect a supposedly clean machine with each restart. An example of malware using this technique is Alureon.
SCEP and Windows Defender both attempt to notify the user and the administrator that malware requiring a WDO scan (or offline) scan has been found. SCEP and Defender always attempt to remove what is accessible in the running OS or during a restart. When this is not possible, their state is changed to indicate that an offline scan is required.
In versions prior to Windows 10 and Windows Server 2016, a user or local on-site PC support technician would have to download a version of WDO and install it on a clean PC, as the installation process would obtain the latest drivers and create boot media. The user or technician would then have to use that boot media to boot the infected PC into WDO and allow a scan to complete. The duration of the scan would depend on the malware and whether raw disk scanning was required. Raw disk scanning allows WDO to ignore disk locations marked as free or unpartitioned and scan them as though they were formatted. With Windows 10, WDO is now built in to the main Defender settings and can be launched directly from the Windows Settings app.
WDO is freely available for Windows 7 and later operating systems at http://windows.microsoft.com/windows/what-is-windows-defender-offline.
Microsoft’s Approach to Antimalware
The previous sections provide an overview of the protection capabilities of Windows Defender in Windows 10 and SCEP. Many of these advanced capabilities are enabled simply by enabling RTP and running regular quick scans. SCEP and Defender are designed to provide antimalware as a service, where Microsoft drives both the most appropriate response to malware through telemetry and dedicated researchers. Keep this in mind when determining whether to deploy SCEP/Defender in your organization.
Prerequisites for Endpoint Protection
There are certain prerequisites to meet before deploying EP. These are a combination of external and ConfigMgr-specific dependencies, as follows:
![]() External dependencies:
External dependencies:
![]() If you choose to deliver updates via Microsoft Update (MU) and/or the Microsoft Malware Protection Center (MMPC), you must ensure that your client computers have Internet access. As the MMPC download can be quite large, sufficient bandwidth should be available.
If you choose to deliver updates via Microsoft Update (MU) and/or the Microsoft Malware Protection Center (MMPC), you must ensure that your client computers have Internet access. As the MMPC download can be quite large, sufficient bandwidth should be available.
NOTE: MMPC NOW WINDOWS DEFENDER SECURITY INTELLIGENCE
Microsoft has renamed MMPC to the Windows Defender Security Intelligence (WDSI). The content remains the same: malware research, SCEP/Defender definition downloads, and a cleanup tool. The WDSI site is at https://www.microsoft.com/wdsi. Depending on your version of ConfigMgr, you may still find references to the MMPC in your console.
![]() Microsoft requires that you license Endpoint Protection to use it in your hierarchy. While it is often bundled alongside ConfigMgr client licenses, this technically is a separate license.
Microsoft requires that you license Endpoint Protection to use it in your hierarchy. While it is often bundled alongside ConfigMgr client licenses, this technically is a separate license.
![]() Ensure that the clients where SCEP is to be deployed are running a Microsoft-supported OS. At the time this book was published, this included Windows 7, Windows Server 2008, and later OSs. SCEP is not supported on any older versions of Windows because SCEP does not replace or replicate Windows-based innovations in older OSs.
Ensure that the clients where SCEP is to be deployed are running a Microsoft-supported OS. At the time this book was published, this included Windows 7, Windows Server 2008, and later OSs. SCEP is not supported on any older versions of Windows because SCEP does not replace or replicate Windows-based innovations in older OSs.
![]() ConfigMgr dependencies:
ConfigMgr dependencies:
![]() The Endpoint Protection site system role must be deployed on your central administration site (CAS) or standalone primary site and prior to configuring any EP policies or client settings.
The Endpoint Protection site system role must be deployed on your central administration site (CAS) or standalone primary site and prior to configuring any EP policies or client settings.
![]() If you intend to leverage ConfigMgr’s infrastructure to deliver definition updates, you must have a software update point (SUP) on your standalone primary site or SUPs deployed in your hierarchy.
If you intend to leverage ConfigMgr’s infrastructure to deliver definition updates, you must have a software update point (SUP) on your standalone primary site or SUPs deployed in your hierarchy.
![]() Ensure that appropriate permissions are granted. EP includes a specific security role in ConfigMgr called Endpoint Protection Manager. You can use this role to delegate permissions to EP functions rather than rely on built-in permissions.
Ensure that appropriate permissions are granted. EP includes a specific security role in ConfigMgr called Endpoint Protection Manager. You can use this role to delegate permissions to EP functions rather than rely on built-in permissions.
Planning and Considerations
The following sections provide an overview of the key planning areas and considerations for deploying EP. They provide a good starting point for an overall design that includes EP or for deploying EP into an existing hierarchy.
The following sections include guidelines on the general requirements for an EP solution. These are not specifically SCEP related, but are high-level items to discuss at the start of a project to deploy an antimalware solution. There is also information regarding the key design decisions prior to starting a SCEP configuration and deployment.
Gathering Requirements for Endpoint Protection
The first step in any EP deployment is gathering requirements. It is important to understand the driver behind the selection of Endpoint Protection versus other antimalware products. Following is a list of key questions to address as part of the requirements-gathering process:
![]() Does Endpoint Protection Replace an Existing Solution? If so, understand how EP implements your existing solution’s protection features and how you will migrate settings to EP.
Does Endpoint Protection Replace an Existing Solution? If so, understand how EP implements your existing solution’s protection features and how you will migrate settings to EP.
![]() What Is the Primary Business Driver for Endpoint Protection? As with most other infrastructure deployments, this often comes down to cost. Understanding the primary business driver helps weigh the cost of design decisions. For example, having to create loads of manual processes to replace existing automation built up over time may negate savings from reduced licensing costs.
What Is the Primary Business Driver for Endpoint Protection? As with most other infrastructure deployments, this often comes down to cost. Understanding the primary business driver helps weigh the cost of design decisions. For example, having to create loads of manual processes to replace existing automation built up over time may negate savings from reduced licensing costs.
![]() Where Are Client Computers Located? Distributing update definitions can cause a significant amount of bandwidth usage.
Where Are Client Computers Located? Distributing update definitions can cause a significant amount of bandwidth usage.
![]() Who Will Require Access to Configure Settings from and View Data for Endpoint Protection? Consider to whom you will need to provide access. Will users need to read monitoring data or create and modify policy? Will the built-in security role meet their requirements?
Who Will Require Access to Configure Settings from and View Data for Endpoint Protection? Consider to whom you will need to provide access. Will users need to read monitoring data or create and modify policy? Will the built-in security role meet their requirements?
![]() Will You Need to Consider Mac OS X and Linux Clients? These clients require separate agents. They also obtain updates directly from the Internet and do not support centralized management.
Will You Need to Consider Mac OS X and Linux Clients? These clients require separate agents. They also obtain updates directly from the Internet and do not support centralized management.
![]() What Are Your Organization Security Policies Regarding Antimalware? Most organizations maintain standards around general configuration of antimalware products (real-time protection enablement, regular on-demand scanning). This may also include guidance on exclusions and any banned exclusion types. Microsoft’s guidance for Windows and Windows Server is found at https://support.microsoft.com/kb/822158. The Microsoft IT Pro community also maintains an index of other Microsoft product recommendations, at http://social.technet.microsoft.com/wiki/contents/articles/953.microsoft-anti-virus-exclusion-list.aspx.
What Are Your Organization Security Policies Regarding Antimalware? Most organizations maintain standards around general configuration of antimalware products (real-time protection enablement, regular on-demand scanning). This may also include guidance on exclusions and any banned exclusion types. Microsoft’s guidance for Windows and Windows Server is found at https://support.microsoft.com/kb/822158. The Microsoft IT Pro community also maintains an index of other Microsoft product recommendations, at http://social.technet.microsoft.com/wiki/contents/articles/953.microsoft-anti-virus-exclusion-list.aspx.
![]() What Are Your Organization’s Antimalware Processes and Procedures? Knowledge and documentation of the IT operational guides and processes helps ensure that you can deploy a solution that fits nicely into existing processes and procedures. This helps minimize any resistance to change, allows you to determine large-scale malware incident response plans, and ensures that your EP implementation matches those plans.
What Are Your Organization’s Antimalware Processes and Procedures? Knowledge and documentation of the IT operational guides and processes helps ensure that you can deploy a solution that fits nicely into existing processes and procedures. This helps minimize any resistance to change, allows you to determine large-scale malware incident response plans, and ensures that your EP implementation matches those plans.
Determining Definition Update Sources
There are multiple options for delivering EP definitions, covered more fully in the “Delivery of Definition Updates” section, later in this chapter. Following are several key design considerations:
![]() Leveraging ConfigMgr as an update source allows you to utilize its infrastructure for software updates and content distribution.
Leveraging ConfigMgr as an update source allows you to utilize its infrastructure for software updates and content distribution.
![]() Microsoft releases updates three times a day (exact timings are not published). At a minimum, plan to synchronize your SUP at least once a day and at most every eight hours.
Microsoft releases updates three times a day (exact timings are not published). At a minimum, plan to synchronize your SUP at least once a day and at most every eight hours.
![]() The Windows Server Update Services (WSUS) and file server (or UNC) definition sources require you to provision additional servers or server storage. The UNC method requires developing scripts to update the file share hosting the updates.
The Windows Server Update Services (WSUS) and file server (or UNC) definition sources require you to provision additional servers or server storage. The UNC method requires developing scripts to update the file share hosting the updates.
![]() Always enable the MMPC update source if there is client Internet connectivity. This method is used only after 14 days of definition update failures. It is designed to address malware that attempts to disable the Windows Update Agent (WUA) on clients. Disabling the WUA, especially on Internet-connected laptops, is not recommended.
Always enable the MMPC update source if there is client Internet connectivity. This method is used only after 14 days of definition update failures. It is designed to address malware that attempts to disable the Windows Update Agent (WUA) on clients. Disabling the WUA, especially on Internet-connected laptops, is not recommended.
Leveraging ConfigMgr’s Capabilities
One important capability available to Endpoint Protection infrastructures is ConfigMgr itself. ConfigMgr is a highly capable PC management solution. Because all EP data flows through ConfigMgr, you can use its management capabilities to drastically enhance antimalware capabilities. Following are several examples of how to leverage EP with ConfigMgr capabilities:
![]() Build a collection that finds all clients in a Full scan required state and target them with a more aggressive scan policy that requires a daily full scan during lunch hours.
Build a collection that finds all clients in a Full scan required state and target them with a more aggressive scan policy that requires a daily full scan during lunch hours.
![]() Build a collection that targets a simple package and program that restarts the client computer (perhaps an existing restart wrapper from software distribution). The collection can include clients in the Restart required antimalware state.
Build a collection that targets a simple package and program that restarts the client computer (perhaps an existing restart wrapper from software distribution). The collection can include clients in the Restart required antimalware state.
Using System Center Endpoint Protection with Windows 10
Windows Defender in Windows 10 and Windows Defender in Windows Server 2016 are based on the same common antimalware platform as SCEP. Windows Defender is also the default antimalware shipped and enabled by default on both operating systems. It is also serviced by updates to Windows 10 and Windows Server 2016.
For these reasons, SCEP does not supplant Windows Defender on these systems. Instead, it provides enterprise management and monitoring capabilities on top of Windows Defender. The underlying client user interface remains unchanged and continues to refer to Windows Defender. This is important, as it may require any end-user guidance to address both SCEP and Windows Defender when multiple Windows versions are in use.
Figure 19.1 shows the Windows Defender user interface on a SCEP-managed PC.

FIGURE 19.1 Windows Defender on Windows 10.
Deployment Best Practices
Certain best practices can help ensure a successful EP deployment. The authors provide the following best practices to help you avoid common pitfalls with SCEP/Defender. Like any other best practices, they should be compared to the business requirements and technical constraints of your environment. Following are general best practices for deploying SCEP:
![]() Test Uninstallation of Third-Party Antivirus Solutions: SCEP can uninstall certain third-party antivirus solutions as part of installation. However, this is version and product specific. Uninstallation may require restarts, disabling password protection features, or removing other agents (for example, management agents). These actions may require use of application management in ConfigMgr or a task sequence (TS), depending on the complexity of the third-party solution.
Test Uninstallation of Third-Party Antivirus Solutions: SCEP can uninstall certain third-party antivirus solutions as part of installation. However, this is version and product specific. Uninstallation may require restarts, disabling password protection features, or removing other agents (for example, management agents). These actions may require use of application management in ConfigMgr or a task sequence (TS), depending on the complexity of the third-party solution.
![]() Always Have Multiple Update Methods: Multiple redundant definition update deployment methods are critical to a successful deployment. This may be as simple as ensuring that multiple SUPs and distribution points (DPs) are available for clients. It may also include allowing fallback to Microsoft Update for Internet-connected systems. It could also include creating and using a UNC location for updates. ConfigMgr Current Branch version 1706 includes enhanced fallback capabilities for SUPs both within and between boundary groups. This includes a more aggressive failover if the first backup SUP cannot be contacted within a boundary group. You can also now configure the failover time-out from one boundary group to another neighboring boundary group.
Always Have Multiple Update Methods: Multiple redundant definition update deployment methods are critical to a successful deployment. This may be as simple as ensuring that multiple SUPs and distribution points (DPs) are available for clients. It may also include allowing fallback to Microsoft Update for Internet-connected systems. It could also include creating and using a UNC location for updates. ConfigMgr Current Branch version 1706 includes enhanced fallback capabilities for SUPs both within and between boundary groups. This includes a more aggressive failover if the first backup SUP cannot be contacted within a boundary group. You can also now configure the failover time-out from one boundary group to another neighboring boundary group.
![]() Do Not Disable the MMPC Update Source: This location is designed as a fallback update source to use when the client has not been able to update definitions for 14 days. It is designed to address scenarios where malware or other issues impact the WU agent (Windows Update) or its service (wuauserv) on a SCEP/Defender client or server.
Do Not Disable the MMPC Update Source: This location is designed as a fallback update source to use when the client has not been able to update definitions for 14 days. It is designed to address scenarios where malware or other issues impact the WU agent (Windows Update) or its service (wuauserv) on a SCEP/Defender client or server.
Deploying and Configuring Endpoint Protection
The next sections focus on deploying and configuring SCEP. They cover server-side activities along with configuring policies and deploying SCEP agents using various methods. They do not include monitoring, alerts, reporting, or other areas of SCEP. Those topics are discussed in the sections “Enabling Alerts for a Collection” and “Monitoring and Reporting in Endpoint Protection,” later in this chapter.
Deploying and configuring SCEP from a server point of view is relatively simple, requiring a single site system to be deployed. Policy and client distribution is also straightforward when you plan ahead and document each team’s requirements. The update definition process is the most complex of these processes.
Installing the Endpoint Protection Point Role
Deploying SCEP throughout your hierarchy or site requires deploying the Endpoint Protection Point (EPP) site system role. The role should be deployed to a site system server, either the CAS or your primary site. The EPP needs to be installed on only a single site system, and it can be installed on only one site system.
Deploying the site system role requires the following:
![]() Accepting the end user licensing agreement (EULA) for SCEP
Accepting the end user licensing agreement (EULA) for SCEP
![]() Selecting the default MAPS (formerly SpyNet) configuration for all antimalware policies (which can be overridden on a policy-by-policy basis)
Selecting the default MAPS (formerly SpyNet) configuration for all antimalware policies (which can be overridden on a policy-by-policy basis)
![]() Installing the SCEP agent on the site system server hosting the role
Installing the SCEP agent on the site system server hosting the role
NOTE: THE SCEP AGENT ON THE ENDPOINT PROTECTION POINT
Deploying the EPP on a site system server causes the SCEP agent to be deployed to that server as part of the process of installing the site system role. The agent is installed to allow the EPP components to access the definition update metadata and store it in the site database, allowing easier reporting and monitoring. The agent is not configured to perform real-time protection or scheduled scans.
In environments where SCEP is not deployed to servers, this instance of the SCEP client can coexist with other antimalware solutions. When SCEP is deployed to servers, this instance of the SCEP client may have its protection technologies enabled.
The installation process on a hierarchy and a standalone primary site is the same (barring the selection of servers/sites available). The following steps can be used to deploy the EPP (in this case, on the CAS):
1. In the ConfigMgr console, navigate to Administration -> Site Configuration -> Servers and Site System Roles.
2. Right-click the server where you want to install the EPP role and select Add Site System Roles to launch the Add Site System Roles Wizard, shown in Figure 19.2.

FIGURE 19.2 The Add Site System Roles Wizard.
3. Continue through the wizard. At the System Role Selection page, select the Endpoint Protection Point. If the SUP role is not already installed and configured, you are warned that you should configure it prior to enabling the EPP. If you continue, you must adjust the default antimalware policy to not receive updates from ConfigMgr.
4. On the Endpoint Protection page, displayed in Figure 19.3, accept the EULA and click Next. SCEP has a separate license from ConfigMgr, although the two are often bundled together. If you need clarification regarding your organization’s licensing, speak to your Microsoft reseller or representative.

FIGURE 19.3 Endpoint Protection page of the Add Site System Roles Wizard.
5. On the Microsoft Active Protection Service page, shown in Figure 19.4, select the appropriate MAPS level for your organization. Prior to selecting an option, review the “Dynamic Signatures Service and Behavior Monitoring” section, earlier in this chapter. Choosing to disable MAPS may reduce the security protection provided by SCEP. This page of the wizard alters the default settings for all antimalware policies created in the hierarchy or standalone site.

By using MAPS, SCEP can send information to Microsoft to enable dynamic delivery of micro-signatures in response to BM-gathered data. The basic membership option causes SCEP to attempt to obfuscate from known locations. Advanced membership causes additional data to be sent to Microsoft for more comprehensive responses to malicious behavior.
On Windows 10/Windows Server 2016, there is no difference between basic and advanced settings, and MAPS is represented in the UI by the Cloud-based Protection setting, shown in Figure 19.5.
6. Continue through the rest of the Add Site System Roles Wizard.

When the wizard completes, ConfigMgr installs the EPP role. To modify the default behavior of the MAPS membership settings, navigate to Administration -> Overview -> Site Configuration -> Server and Site Systems. Double-click the Endpoint Protection Point role and then access the MAPS tabs to make changes.
Confirm installation of the EPP role by reviewing the EPSetup.log file in the site server’s log files folder. The log should end with the line “Installation was successful.”
Delivery of Definition Updates
Keeping SCEP/Defender current with definition updates is a critical element for a successful deployment. As discussed earlier in this chapter, in the “Protection Capabilities of Microsoft’s Antimalware Platform” section, you should view SCEP/Defender as a service. The key component powering this “service” is definition updates, which provide standard antimalware detection rules, engine updates, and improvements to the core protection capabilities in response to malware advancements.
Much like a cloud-based service’s code, SCEP/Defender’s definition updates are updated regularly. Microsoft publishes SCEP/Defender updates three times a day to accommodate its worldwide customer base and meet the rapidly evolving threats of the online world. This frequency can change, based on evolving malware conditions reported through telemetry and research.
SCEP/Defender provides multiple methods for updating definition updates. ConfigMgr’s software updates feature is typically used to deliver updates to SCEP/Defender, as discussed later in this chapter, in the “ConfigMgr Software Update Management Source” section. You can also leverage WSUS, Microsoft Update, or UNC file share sources, although they are less commonly used. For completeness and because you can use these options as backup definition update methods, the other methods are covered in the sections after the “ConfigMgr Software Update Management Source” section of this chapter. Review the various options to determine which source or set of sources would work best for your environment.
Definition Updates Architecture
SCEP/Defender definition updates are composed of multiple components. The definition updates are composed of antimalware virus definition modules (VDMs) and the malware protection engine, which contains the core protection technologies and capabilities of SCEP/Defender. The VDMs contain the rules and metadata required to detect and remediate malware infections.
The VDMs are four separate files, as follows:
![]() MpAvBase.vdm: This is the largest VDM; it contains antivirus metadata and rules. It is generally updated monthly by Microsoft as part of the baselining process (see the “Definition Rebase Process” section of this chapter). This VDM provides the starting point for that month’s subsequent delta updates. It enables any new SCEP/Defender clients to get set up or clients who haven’t received definitions for a month or more to get running again.
MpAvBase.vdm: This is the largest VDM; it contains antivirus metadata and rules. It is generally updated monthly by Microsoft as part of the baselining process (see the “Definition Rebase Process” section of this chapter). This VDM provides the starting point for that month’s subsequent delta updates. It enables any new SCEP/Defender clients to get set up or clients who haven’t received definitions for a month or more to get running again.
![]() MpAvDlta.vdm: This file is the antivirus delta VDM. It is updated with each definition update release multiple times a day. It contains all changes since the last base (MpAvBase.vdm) was created, and enables any client with that month’s base to get up to date with that release’s definitions. This file becomes progressively larger with each release, until the monthly baselining process occurs, discussed in the following section, “Definition Rebase Process.”
MpAvDlta.vdm: This file is the antivirus delta VDM. It is updated with each definition update release multiple times a day. It contains all changes since the last base (MpAvBase.vdm) was created, and enables any client with that month’s base to get up to date with that release’s definitions. This file becomes progressively larger with each release, until the monthly baselining process occurs, discussed in the following section, “Definition Rebase Process.”
![]() MpAsBase.vdm: This file contains the antispyware base rule set for the month. It contains base spyware software metadata and rules, along with other potentially unwanted software information. Like the antivirus base VDM (MpAvBase.vdm), it is designed to get new clients set up and to get clients out of date by a month or more updated to that month’s baseline.
MpAsBase.vdm: This file contains the antispyware base rule set for the month. It contains base spyware software metadata and rules, along with other potentially unwanted software information. Like the antivirus base VDM (MpAvBase.vdm), it is designed to get new clients set up and to get clients out of date by a month or more updated to that month’s baseline.
![]() MpAsDlta.vdm: This file is the antispyware delta VDM. Like the antivirus delta VDM (MpAvDlta.vdm), this delta VDM updates the month’s antispyware baseline to that definition update’s release of the antispyware rule set and metadata.
MpAsDlta.vdm: This file is the antispyware delta VDM. Like the antivirus delta VDM (MpAvDlta.vdm), this delta VDM updates the month’s antispyware baseline to that definition update’s release of the antispyware rule set and metadata.
The final file included in a definition update release is the Microsoft malware protection engine, MpEngine.dll. The engine uses the VDMs described in these bullets to scan and protect against malware, including viruses and spyware. The engine is generally updated once a month, along with the baseline. The engine often gains new protection capabilities in response to advancements and innovations made by malware authors.
Definition Rebase Process
Throughout the month, the delta VDMs (MpAvDlta.vdm and MpAsDlta.vdm) grow larger with each definition update release, which increases the size of the definition updates. The increase in size occurs as new malware is discovered and rules to combat it are added. The rebase process occurs monthly. At that time, delta definitions released throughout that month are reviewed, and any opportunity for deduplication is taken and added to the base VDMs. While this slightly increases the size of the baseline VDM files, the delta VDMs are significantly reduced in size.
Over the next month, the delta VDM files slowly grow until the next rebaseline. In terms of file size, Microsoft publishes guidance in KB article 977939 (https://support.microsoft.com/kb/977939) as follows:
![]() New Agent Installation: Approximately 40–70MB
New Agent Installation: Approximately 40–70MB
![]() Agent with Previous Month’s Definitions: 1–15MB
Agent with Previous Month’s Definitions: 1–15MB
![]() Agent with Recent Definitions: 50KB–15MB
Agent with Recent Definitions: 50KB–15MB
These values will vary based on malware activity and when in the rebase cycle they are viewed. For example, at the time this book was published, the following file sizes were obtained from the 64-bit version of the definition updates toward the end of month’s rebase cycle, downloaded from https://www.microsoft.com/wdsi/definitions:
![]() MpEngine.dll: 14MB
MpEngine.dll: 14MB
![]() MpAvBase.vdm: 58MB
MpAvBase.vdm: 58MB
![]() MpAvDlta.vdm: 28MB
MpAvDlta.vdm: 28MB
![]() MpAsBase.vdm: 36MB
MpAsBase.vdm: 36MB
![]() MpAsDlta.vdm: 4MB
MpAsDlta.vdm: 4MB
You can repeat this process by decompressing mpam-fe.exe using 7-zip (http://www.7-zip.org/) or another decompression utility. The files are directly viewable and are not further encoded.
ConfigMgr Software Update Management Source
The method of definition updates described in this section leverages the software updates feature and package distribution infrastructure of ConfigMgr to deliver definition updates. The process relies on having an automatic deployment rule (ADR) configured. For more information on software updates and ADRs, see Chapter 15, “Managing Software Updates.” The first step in configuring this update method is configuring ConfigMgr to synchronize the definition update updates into the site database, using these steps:
1. In the ConfigMgr console, navigate to Administration -> Site Configuration -> Sites.
2. Select the CAS or your standalone primary site. Click Configure Site Components in the ribbon bar and select Software Update Point.
3. On the Classifications tab of the Software Update Point Component Properties window, check the Definition Updates update classification check box, highlighted in Figure 19.6.

FIGURE 19.6 Definition Updates update classification selection.
4. On the Products tab, select the following based on the client OS where SCEP/Defender will run, as displayed in Figure 19.7:
![]() For Windows 8.1/Windows Server 2012 R2 and earlier, check the Forefront Endpoint Protection 2010 product check box.
For Windows 8.1/Windows Server 2012 R2 and earlier, check the Forefront Endpoint Protection 2010 product check box.
![]() For Windows 10/Windows Server 2016, check the Windows Defender product check box.
For Windows 10/Windows Server 2016, check the Windows Defender product check box.

5. Click OK to close the dialog box and commit your changes.
6. Wait for ConfigMgr to complete the next scheduled SUP synchronization. It may be necessary to change the SUP synchronization schedule to daily to ensure that definition update metadata is synchronized in a timely manner.
Once synchronization of the definition updates completes successfully and you confirm that definition updates are visible in the ConfigMgr console as software updates, create an ADR. Using an ADR allows you to save time and prevents you from having to manually approve and distribute the updates. Following are several recommendations to consider prior to creating the ADR:
![]() Place definition updates for SCEP/Defender in their own software update package. This keeps the size of the package smaller than it would be if it included other software updates, allowing for faster replication to targeted DPs.
Place definition updates for SCEP/Defender in their own software update package. This keeps the size of the package smaller than it would be if it included other software updates, allowing for faster replication to targeted DPs.
![]() Select the Only error messages detail level for deployment state reporting. This helps reduce the number of state messages sent as part of definition update deployment, reducing the processor load on the site servers.
Select the Only error messages detail level for deployment state reporting. This helps reduce the number of state messages sent as part of definition update deployment, reducing the processor load on the site servers.
![]() Set the ADR to run with scheduled SUP synchronizations; this helps reduce the lag time between the synchronization process and definition update ADR execution.
Set the ADR to run with scheduled SUP synchronizations; this helps reduce the lag time between the synchronization process and definition update ADR execution.
Follow these steps to configure the ADR to push definition updates to SCEP/Defender agents:
1. In the ConfigMgr console, navigate to Software Library -> Software Updates -> Automatic Deployment Rules.
2. Select Create Automatic Deployment Rule.
3. Enter the following information on the General page of the wizard:
![]() Name: Any descriptive name for the ADR
Name: Any descriptive name for the ADR
![]() Collection: The device collection where you want to deploy the definition updates
Collection: The device collection where you want to deploy the definition updates
4. Click Add to an existing software update group and select the software update group where you want to group the definition updates. If one does not exist, create one.
5. Check the Enable the deployment after this rule is run check box.
6. Review the configuration, as shown in Figure 19.8, and then click Next.

FIGURE 19.8 General page of the Create ADR Wizard.
7. On the Deployment Settings page, set the Detail level list and select Only error messages.
8. In the Property filters list, set the following (Figure 19.9 shows the end result of filter configuration):
![]() Check the Product check box to enable the filter and then set the filter to one or both of the following:
Check the Product check box to enable the filter and then set the filter to one or both of the following:
![]() Forefront Endpoint Protection 2010 for Windows 8.1 and earlier
Forefront Endpoint Protection 2010 for Windows 8.1 and earlier
![]() Windows Defender for Windows 10 and later
Windows Defender for Windows 10 and later
![]() Check the Superseded check box to enable the filter and then select No.
Check the Superseded check box to enable the filter and then select No.
![]() Check the Update Classification check box to enable the filter and then select Definition Updates.
Check the Update Classification check box to enable the filter and then select Definition Updates.

FIGURE 19.9 Deployment page of the ADR wizard.
9. In the Evaluation Schedule page, select Run the rule after any software update point synchronization, as shown in Figure 19.10. Click Next.

FIGURE 19.10 Evaluation Schedule page of ADR wizard.
10. On the Deployment Schedule page, shown in Figure 19.11, set the following configurations:
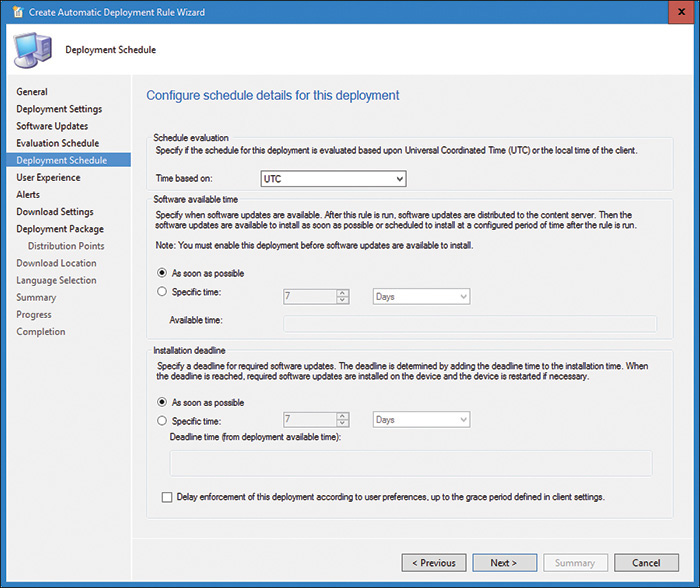
FIGURE 19.11 Deployment Schedule page of ADR wizard.
![]() Time Based On: Select UTC, as installation is automatically randomized within a two-hour window.
Time Based On: Select UTC, as installation is automatically randomized within a two-hour window.
![]() Software Available Time: Specify the available time that allows for the definition update content to replicate to the DPs in your hierarchy. If the hierarchy has DPs that take a very long time to receive content, consider deploying definitions to those locations via a separate ADR.
Software Available Time: Specify the available time that allows for the definition update content to replicate to the DPs in your hierarchy. If the hierarchy has DPs that take a very long time to receive content, consider deploying definitions to those locations via a separate ADR.
![]() Installation Deadline: Select As soon as possible.
Installation Deadline: Select As soon as possible.
Click Next.
11. On the User Experience page, set the users notification list to Hide in Software Center and all notifications and click Next.
12. At the Alerts page, click Next because there is no need to generate alerts as the SCEP/Defender clients will send up state messages based on their definition update status independently as part of SCEP/Defender monitoring.
13. On the Download Settings page, select the required software updates download behavior for the clients, based on the network topology where they are located, and then click Next.
14. On the Deployment Package page, select an existing deployment package used only to store definition updates or create a new deployment package to store only definition updates. Click Next.
15. On the Distribution Points page, select one or more DPs that will host the definition updates for the clients targeted by this ADR. Click Next.
16. On the Download Location page, select Download software updates from the Internet and then click Next.
17. On the Language Selection page, select the languages required for your organization and then click Next.
18. Close the wizard to finish creating the ADR.
Confirm that the ADR was created successfully. The authors recommend testing the ADR by running it manually once to validate that it is working as expected. Ensure that when you test, you use a test collection rather than the production device collection.
Microsoft Malware Protection Center Source
The MMPC is Microsoft’s central location for publishing antimalware information and resources. It also hosts Microsoft’s threat encyclopedia (https://www.microsoft.com/security/portal/threat/Threats.aspx), which contains information on all the malware that SCEP/Defender protects against.
The MMPC also hosts definition updates that are available for direct download (https://www.microsoft.com/security/portal/definitions/adl.aspx). These cover not just SCEP/Defender but all Microsoft antimalware products. The definition updates contain complete definitions and thus are quite large. At the time this book was published, the 64-bit definitions were between 111MB to 124MB. Sizes vary constantly, based on when the updates are in the rebase cycle (see the “Definition Updates Architecture” section, earlier in this chapter) and malware activity.
The MMPC update method is used only if the SCEP/Defender client cannot obtain definitions for at least 14 days. This helps protect against scenarios where malware may have disabled WU components or convinced the user to do so. This is an automated process with no configuration or setup required; the SCEP/Defender client simply downloads the definitions directly from the MMPC. However, because it is automated and unmanaged, there is no protection against wide area network link usage. As this method is used as a last resort, it should be enabled wherever possible.
WSUS and Microsoft Update Sources
Using the WSUS and Microsoft Update definition update method causes the SCEP/Defender client to directly request definition updates from the WUA service. This method circumvents ConfigMgr’s software update management feature and DPs, instead causing the client to directly request the update from the SUP. It is useful in the following scenarios:
![]() As a backup definition update method (although it is dependent on the same SUPs used by software update management)
As a backup definition update method (although it is dependent on the same SUPs used by software update management)
![]() For use in environments that do not use ConfigMgr for software update management
For use in environments that do not use ConfigMgr for software update management
![]() For scenarios where the ConfigMgr client is not deployed, such as server management where the System Center Operations Manager agent is used alongside WSUS for update management
For scenarios where the ConfigMgr client is not deployed, such as server management where the System Center Operations Manager agent is used alongside WSUS for update management
There are no steps to configure this process for Microsoft Update. The SCEP/Defender client calls out to WUA and requests a scan directly against MU. (WUA can communicate with WSUS and MU simultaneously.) However, configuring this process for WSUS requires that you perform specific configuration steps:
![]() If using a WSUS server that is a SUP, follow the steps in the “ConfigMgr Software Update Management Source” section, earlier in this chapter—specifically those that configure software update synchronization to include the products and classifications for definition updates.
If using a WSUS server that is a SUP, follow the steps in the “ConfigMgr Software Update Management Source” section, earlier in this chapter—specifically those that configure software update synchronization to include the products and classifications for definition updates.
![]() If using a standalone WSUS server, follow the steps in this section to configure the products and classifications for definition updates.
If using a standalone WSUS server, follow the steps in this section to configure the products and classifications for definition updates.
![]() Regardless of whether you are using a standalone or SUP-enabled WSUS server, you must configure WSUS approval rules in the WSUS console to enable WSUS to supply the definition updates when requested by WUA clients.
Regardless of whether you are using a standalone or SUP-enabled WSUS server, you must configure WSUS approval rules in the WSUS console to enable WSUS to supply the definition updates when requested by WUA clients.
To enable the required products and classifications for definition updates to be synchronized into the WSUS database, perform the following steps:
1. In the WSUS administration console, select Options -> Products and Classifications.
2. Select the following products accordingly:
![]() For SCEP running on Windows 8.1 and earlier, select Forefront Endpoint Protection 2010.
For SCEP running on Windows 8.1 and earlier, select Forefront Endpoint Protection 2010.
![]() For Windows Defender running on Windows 10 and later, select Windows Defender.
For Windows Defender running on Windows 10 and later, select Windows Defender.
3. On the Classifications tab, select the Definition Updates and Updates check boxes.
Follow these steps to create an automatic approval rule in WSUS, which automatically deploys the latest definitions to clients:
1. In the WSUS administration console, select Options -> Automatic Approvals.
2. On the Update Rules tab, select New Rule.
3. Select the following check boxes, as shown in Figure 19.12:
![]() For the When an update is in a specific classification setting, select Definition Updates.
For the When an update is in a specific classification setting, select Definition Updates.
![]() For the When an update is in a specific product setting, select Forefront Endpoint Protection 2010 and Windows Defender.
For the When an update is in a specific product setting, select Forefront Endpoint Protection 2010 and Windows Defender.

FIGURE 19.12 WSUS Automatic Approval Rule for Definition Updates.
4. Enter a descriptive name in the Step 3: Specify a name text box and click OK.
CAUTION: MAINTAINING THE WSUS DATABASE
Definition updates are regularly updated and generate a large amount of metadata in the WSUS database. This makes maintaining the WSUS database critical to the long-term health and availability of the WSUS server. Microsoft provides guidance on how to ensure the performance of WSUS servers in KB articles 938947 (https://support.microsoft.com/kb/938947) and 2517455 (https://support.microsoft.com/kb/2517455).
File Shares (UNC) Source
The final definition update method available is the network share or UNC path update option. This option is the most complex to implement, as it requires using scripts to populate the share and a method of distributing the content to multiple locations. Microsoft does not provide any official guidance on how to automate this process. However, this is the only method with no dependencies on the WSUS/SUP infrastructure or Internet downloads. The ConfigMgr community has produced multiple guides and sample scripts for configuring this method, listed here for reference:
![]() https://blog.thesysadmins.co.uk/sccm-2012-scep-unc-definition-updates-automation-powershell.html
https://blog.thesysadmins.co.uk/sccm-2012-scep-unc-definition-updates-automation-powershell.html
Working with Antimalware Policies
After selecting one or more methods of definition update distribution, your next step is determining that policy configuration. Policies in SCEP/Defender define the configuration of the protection agent installed on the device. They are distributed as a client policy, like ConfigMgr client settings, and are deployed to collections in a similar fashion. As with ConfigMgr client settings, there is a default policy available to any client without requiring deployment of that policy to specific collections. You can modify the default policy as required to define an organization-wide baseline.
This section covers the various antimalware settings contained in an antimalware policy object in the console. Key settings are provided, along with descriptions and recommendations. For brevity and simplicity, the following are major settings for endpoint protection (those settings not covered are documented at https:// docs.microsoft.com/sccm/protect/deploy-use/endpoint-antimalware-policies):
![]() Scan Type: There are two types of scans in SCEP/Defender:
Scan Type: There are two types of scans in SCEP/Defender:
![]() Full Scan: A full scan is a traditional antivirus scan. It covers files, folders, running processes, memory, and the Registry, scanning the system completely with each execution, without any optimizations. A full scan consumes significant resources and time.
Full Scan: A full scan is a traditional antivirus scan. It covers files, folders, running processes, memory, and the Registry, scanning the system completely with each execution, without any optimizations. A full scan consumes significant resources and time.
![]() Quick Scan: A quick scan dynamically alters the depth of the scan based on the machine’s state, skipping steps not required on healthy systems but becoming increasingly aggressive on unhealthy or suspect systems.
Quick Scan: A quick scan dynamically alters the depth of the scan based on the machine’s state, skipping steps not required on healthy systems but becoming increasingly aggressive on unhealthy or suspect systems.
If a quick scan or real-time protection determines that malware is detected and requires a full scan for removal, an in-console alert is generated. You should leverage quick scans wherever possible. In most cases, a quick scan has a light enough touch to run daily without impacting the user experience. SCEP/Defender can also be configured to run a daily quick scan and a weekly full scan, if required.
![]() Scan Settings: In addition to setting the type of scan, you can control the configuration of the scan itself. The following settings are available:
Scan Settings: In addition to setting the type of scan, you can control the configuration of the scan itself. The following settings are available:
![]() Check for the Latest Definition Updates Before Running a Scan: Selecting this setting causes SCEP/Defender to trigger a definition update prior to executing a scan. This only applies if the WSUS, MU, or network share/UNC definition update sources are configured, as those methods cause the SCEP/Defender client to reach out directly to the source. The Configuration Manager definition update source causes SCEP/Defender to rely on ConfigMgr to push definitions to it; this setting does not apply if only Configuration Manager is set as a definition update source.
Check for the Latest Definition Updates Before Running a Scan: Selecting this setting causes SCEP/Defender to trigger a definition update prior to executing a scan. This only applies if the WSUS, MU, or network share/UNC definition update sources are configured, as those methods cause the SCEP/Defender client to reach out directly to the source. The Configuration Manager definition update source causes SCEP/Defender to rely on ConfigMgr to push definitions to it; this setting does not apply if only Configuration Manager is set as a definition update source.
![]() Start a Scheduled Scan Only When the Computer Is Idle: This setting causes a scan to trigger only when the computer is determined to be idle. The idle detection method varies by OS version. For information on the exact idle detection method for your OS, see https://msdn.microsoft.com/library/windows/desktop/aa383561(v=vs.85).aspx. Enable this setting only if using full scans, as a quick scan has low enough impact not be noticed in most cases.
Start a Scheduled Scan Only When the Computer Is Idle: This setting causes a scan to trigger only when the computer is determined to be idle. The idle detection method varies by OS version. For information on the exact idle detection method for your OS, see https://msdn.microsoft.com/library/windows/desktop/aa383561(v=vs.85).aspx. Enable this setting only if using full scans, as a quick scan has low enough impact not be noticed in most cases.
![]() Force a Scan of the Selected Scan Type if Client Computer Is Offline During Two or More Scheduled Scans: This setting is self-explanatory. In general, you should enable this setting to ensure that multiple scans are not missed due to the machine being consistently offline during the scheduled times.
Force a Scan of the Selected Scan Type if Client Computer Is Offline During Two or More Scheduled Scans: This setting is self-explanatory. In general, you should enable this setting to ensure that multiple scans are not missed due to the machine being consistently offline during the scheduled times.
![]() Scan Network Files: This setting causes scans to remotely scan network locations from the client during a scheduled scan. This may be desired, but it is often more efficient to run a scan on the server itself.
Scan Network Files: This setting causes scans to remotely scan network locations from the client during a scheduled scan. This may be desired, but it is often more efficient to run a scan on the server itself.
![]() Scan Mapped Network Drives When Running a Full Scan: Exercise caution when selecting this setting, as it causes any client machine with a mapped network drive to scan the file server hosting that network drive, which may cause repeated redundant scanning of the same files and increased resource usage on the server and network. For increased granularity, this setting does allow for the Scan network files setting to be enabled while this setting is disabled.
Scan Mapped Network Drives When Running a Full Scan: Exercise caution when selecting this setting, as it causes any client machine with a mapped network drive to scan the file server hosting that network drive, which may cause repeated redundant scanning of the same files and increased resource usage on the server and network. For increased granularity, this setting does allow for the Scan network files setting to be enabled while this setting is disabled.
![]() Scan Archived Files: This setting causes a scheduled scan to extract compressed files and scan their contents. It should be noted that SCEP/Defender scans more than traditional compressed files (.zip, .rar, .cab); it also includes container formats such as ISO files. The list of container formats is varied through engine and definition updates.
Scan Archived Files: This setting causes a scheduled scan to extract compressed files and scan their contents. It should be noted that SCEP/Defender scans more than traditional compressed files (.zip, .rar, .cab); it also includes container formats such as ISO files. The list of container formats is varied through engine and definition updates.
![]() Real-Time Protection: Multiple settings are included in real-time protection, as follows:
Real-Time Protection: Multiple settings are included in real-time protection, as follows:
![]() Monitor File and Program Activity on Your Computer: This setting controls the core RTP capabilities. While it is possible to enable other components of real-time protection, in most environments, this setting should be enabled.
Monitor File and Program Activity on Your Computer: This setting controls the core RTP capabilities. While it is possible to enable other components of real-time protection, in most environments, this setting should be enabled.
![]() Enable Behavior Monitoring: In most organizations, this setting should be enabled to improve protection performance. However, if cloud protection/MAPS is disabled, enabling Behavior Monitoring provides little value. See the section “Dynamic Signatures Service and Behavior Monitoring,” earlier in this chapter, for information on how cloud protection/MAPS and Behavior Monitoring work together.
Enable Behavior Monitoring: In most organizations, this setting should be enabled to improve protection performance. However, if cloud protection/MAPS is disabled, enabling Behavior Monitoring provides little value. See the section “Dynamic Signatures Service and Behavior Monitoring,” earlier in this chapter, for information on how cloud protection/MAPS and Behavior Monitoring work together.
![]() Enable Protection Against Network-Based Exploits: This setting augments BM and causes network traffic to act as an additional sensor for behavior monitoring. It does so by duplicating network traffic and performing asynchronous scanning. This method of scanning reduces the impact of a scan. For more information about this feature, see the blog post at https://cloudblogs.microsoft.com/enterprisemobility/2013/06/24/enhancements-to-behavior-monitoring-and-network-inspection-system-in-the-microsoft-anti-malware-platform/.
Enable Protection Against Network-Based Exploits: This setting augments BM and causes network traffic to act as an additional sensor for behavior monitoring. It does so by duplicating network traffic and performing asynchronous scanning. This method of scanning reduces the impact of a scan. For more information about this feature, see the blog post at https://cloudblogs.microsoft.com/enterprisemobility/2013/06/24/enhancements-to-behavior-monitoring-and-network-inspection-system-in-the-microsoft-anti-malware-platform/.
![]() Enable Protection Against Potentially Unwanted Applications at Download and Prior to Installation: This setting protects the system against potentially unwanted applications (PUAs). PUAs are not malware or malicious software but software that may detrimentally impact the user experience. This impact may involve a lack of choice/control, inability to remove/uninstall, performance impact, advertising, and privacy concerns. For more information on how Microsoft classifies PUAs and malicious software, see https://www.microsoft.com/wdsi/antimalware-support/malware-and-unwanted-software-evaluation-criteria.
Enable Protection Against Potentially Unwanted Applications at Download and Prior to Installation: This setting protects the system against potentially unwanted applications (PUAs). PUAs are not malware or malicious software but software that may detrimentally impact the user experience. This impact may involve a lack of choice/control, inability to remove/uninstall, performance impact, advertising, and privacy concerns. For more information on how Microsoft classifies PUAs and malicious software, see https://www.microsoft.com/wdsi/antimalware-support/malware-and-unwanted-software-evaluation-criteria.
![]() Exclusion Settings: These settings support standard file and folder exclusions, process exclusions, and file type exclusions. When using process or file and folder exclusions, ensure that file system permissions to modify or replace the process binaries or file/folders are restricted to trusted persons. As of ConfigMgr Current Branch version 1602, excluding files and folders can also be specified for Windows device names (for example, DeviceHarddiskVolume2) and environmental variable paths (for example, %ExchangeInstallPath%).
Exclusion Settings: These settings support standard file and folder exclusions, process exclusions, and file type exclusions. When using process or file and folder exclusions, ensure that file system permissions to modify or replace the process binaries or file/folders are restricted to trusted persons. As of ConfigMgr Current Branch version 1602, excluding files and folders can also be specified for Windows device names (for example, DeviceHarddiskVolume2) and environmental variable paths (for example, %ExchangeInstallPath%).
![]() MAPS/Cloud Protection Service: As discussed in the “Dynamic Signatures Service and Behavior Monitoring” section, earlier in this chapter, enabling MAPS/cloud protection service is critical for allowing SCEP/Defender to react quickly to evolving malware incidents using cloud-based telemetry. Relying purely on scheduled definition pull reduces the overall protection for your devices. For these reasons, the authors recommend that you enable this setting.
MAPS/Cloud Protection Service: As discussed in the “Dynamic Signatures Service and Behavior Monitoring” section, earlier in this chapter, enabling MAPS/cloud protection service is critical for allowing SCEP/Defender to react quickly to evolving malware incidents using cloud-based telemetry. Relying purely on scheduled definition pull reduces the overall protection for your devices. For these reasons, the authors recommend that you enable this setting.
NOTE: WINDOWS FIREWALL POLICIES
In addition to configuring SCEP/Defender, you can configure Windows Firewall policies via ConfigMgr. Capabilities with Windows Firewall policies are limited to simply enabling or disabling the firewall for each profile. In most cases, leveraging group policy provides more granular control and includes additional features. Find information on how to deploy Windows Firewall configurations and settings using group policy at https://docs.microsoft.com/windows/security/identity-protection/windows-firewall/windows-firewall-with-advanced-security.
Installing the Endpoint Protection Client
Once you have created antimalware policies, the next step in deploying SCEP/Defender is installing the client. ConfigMgr provides multiple methods to deploy the SCEP/Defender client. Usually deployment with ConfigMgr is simplest. The other methods accommodate more advanced scenarios.
Installing Endpoint Protection Using ConfigMgr Client Settings
To deploy SCEP using ConfigMgr client settings, the authors recommend creating a custom client device setting and deploying that to clients in a device collection. The same process is used for Windows Defender, except with Windows 10/Windows Server 2016, where the core antimalware components continue to be Windows Defender. On Windows 10/Windows Server 2016 and later, a thin management layer is installed to allow ConfigMgr to manage Windows Defender. For either scenario, perform the following steps:
1. Navigate to Administration -> Client Settings.
2. From the ribbon bar, select Create -> Create Custom Client Settings.
3. In the Create Custom Client Device Settings dialog, provide a name for the custom settings and then select Endpoint Protection.
4. Select the Endpoint Protection client settings, as required. Following are key settings for any SCEP/Defender deployment (see Figure 19.13):
![]() Manage Endpoint Protection Client on Client Computers: This setting causes SCEP/Defender installations to be managed by ConfigMgr and is required to install the client. It can also be used to manage clients installed through other methods.
Manage Endpoint Protection Client on Client Computers: This setting causes SCEP/Defender installations to be managed by ConfigMgr and is required to install the client. It can also be used to manage clients installed through other methods.
![]() Install Endpoint Protection Client on Client Computers: This setting causes ConfigMgr to deploy SCEP to ConfigMgr computers. On systems running Windows 10 and later, this installs a management layer between Windows Defender and the ConfigMgr client. This setting has no effect on computers where the client is already installed. Disabling or setting this to false/no does not uninstall SCEP.
Install Endpoint Protection Client on Client Computers: This setting causes ConfigMgr to deploy SCEP to ConfigMgr computers. On systems running Windows 10 and later, this installs a management layer between Windows Defender and the ConfigMgr client. This setting has no effect on computers where the client is already installed. Disabling or setting this to false/no does not uninstall SCEP.
![]() Disable Alternate Sources (Such as Windows Update, Microsoft Windows Server Update Services or UNC Shares) for the Initial Definition Update on Client Computer: This setting is important where multiple definition sources are defined in the default or a custom antimalware policy, as it helps prevent those sources from being used. Instead, the SCEP client relies on ConfigMgr to deploy definition updates after its installation, helping reduce network bandwidth consumption by leveraging the ConfigMgr infrastructure. This setting does not apply to Windows Defender, as the client is running by default in Windows 10/Windows Server 2016 and later.
Disable Alternate Sources (Such as Windows Update, Microsoft Windows Server Update Services or UNC Shares) for the Initial Definition Update on Client Computer: This setting is important where multiple definition sources are defined in the default or a custom antimalware policy, as it helps prevent those sources from being used. Instead, the SCEP client relies on ConfigMgr to deploy definition updates after its installation, helping reduce network bandwidth consumption by leveraging the ConfigMgr infrastructure. This setting does not apply to Windows Defender, as the client is running by default in Windows 10/Windows Server 2016 and later.

Installing Endpoint Protection Using Application Management or the Command Line
Sometimes a complex uninstallation routine is required for an existing antimalware product prior to installation of SCEP. In such cases, you can deliver the uninstallation routines either by an application or task sequence (depending on the uninstall routine’s complexities and requirements). You can also use the command-line method to deploy SCEP outside ConfigMgr, such as where server software distribution is managed via a different product.
This method relies on executing scepinstall.exe from an application, a TS, or the command line. The scepinstall.exe file is located in the Client folder on the ConfigMgr media. A complete list of command-line switches is available at https://docs.microsoft.com/sccm/protect/deploy-use/endpoint-protection-configure-client#to-install-the-endpoint-protection-client-from-a-command-prompt.
Installing Endpoint Protection in an Image
To include SCEP in an image, the SCEP agent must be prepared for imaging. Follow these steps on the reference computer to prepare the SCEP agent:
1. Obtain psexec.exe from https://live.sysinternals.com/.
2. From an elevated command prompt, use psexec.exe to launch regedit as a local system:
Psexec.exe -s -i regedit.exe
3. From the Registry Editor, delete the following keys and then immediately shut down the computer:
HKEY_LOCAL_MACHINESOFTWAREMicrosoftMicrosoft AntimalwareInstallTime
HKEY_LOCAL_MACHINESOFTWAREMicrosoftMicrosoft AntimalwareScanLastScanRun
HKEY_LOCAL_MACHINESOFTWAREMicrosoftMicrosoft AntimalwareScanLastScanType
HKEY_LOCAL_MACHINESOFTWAREMicrosoftMicrosoft AntimalwareScanLastQuickScanID
HKEY_LOCAL_MACHINESOFTWAREMicrosoftMicrosoft AntimalwareScanLastFullScanID
HKEY_LOCAL_MACHINESOFTWAREMicrosoftRemovalToolsMRTGUID
4. Shut down the reference computer (if you have not already) and capture the reference computer for imaging.
Endpoint Protection for Linux and Mac
Endpoint Protection is available for both Linux and Mac. Documentation and installation media are available at the Microsoft Volume Licensing Service Center as a separate download and are restricted to Microsoft Volume Licensing.
Monitoring and Reporting in Endpoint Protection
ConfigMgr provides multiple methods for monitoring SCEP/Defender. This section explains how to monitor SCEP/Defender operations. It also explains how to provide reports on SCEP/Defender to audiences other than ConfigMgr/SCEP IT administrators. Monitoring involves both in-console monitoring from the SCEP dashboard and drilldown into ConfigMgr device collections to view the device state. Operationally, ConfigMgr also provides alerts for complex malware incidents; the “Endpoint Protection Actions and Alerts” section, later in this chapter, provides information on alerts.
SCEP/Defender delivers a set of reports that leverage the same reporting capabilities as the rest of ConfigMgr. While there are only four reports, far fewer than with other ConfigMgr features, they are designed for drilldown inside and between the reports rather than being isolated individual reports. For this reason, it is often useful to grant access to the specific reports rather than email copies of them.
As with all other ConfigMgr data, you can extract SCEP/Defender data for use in other systems. This may include security information and event management (SIEM) solutions to provide a data feed into a security operations center (SOC). It also enables integration with service management solutions to automatically trigger tickets for malware response by security administrators or local desktop support technicians.
Operational Status of Endpoint Protection Clients
To see the primary operational views for Endpoint Protection, navigate to Monitoring -> Security and then expand Endpoint Protection Status to view the individual items:
![]() System Center Endpoint Protection Status: This is the primary view and is generally used for most daily in-console monitoring.
System Center Endpoint Protection Status: This is the primary view and is generally used for most daily in-console monitoring.
![]() Malware Detected: This simpler view provides a list of all malware by collection and a count of infected machines. This view is typically used for secondary analysis after a malware incident has been identified.
Malware Detected: This simpler view provides a list of all malware by collection and a count of infected machines. This view is typically used for secondary analysis after a malware incident has been identified.
By default, the All Desktop and Server Clients collection appears in the Status view. Perform the following steps to add more collections to this view:
1. Open the properties of the collection you want to include in the dashboard.
2. Click the Alerts tab in the Properties dialog box.
3. Check the View this collection in the Endpoint Protection dashboard check box and click OK.
The dashboard views do not pull live data for scalability and performance reasons. They are based on summarized data, refreshed every 20 minutes by default. You can increase or decrease the frequency by going to the Endpoint Protection Status view (the node directly above the two dashboard views), clicking Schedule Summarization, and configuring an appropriate summarization interval. Take care when setting a more frequent summarization, as doing so increases the load on your ConfigMgr site infrastructure (primarily the site database).
The various elements of the Status view are designed to provide actionable information to a ConfigMgr administrator or security professional. The remainder of this section explains the expected actions for each element of the view. They are grouped into two areas: Security State (see Figure 19.14) and Operational State (see Figure 19.15).
The Security State group is composed of two elements. This section of the view is designed to provide information about security-related incidents where either SCEP/Defender has detected malware, SCEP/Defender requires additional steps to remediate malware, or SCEP/Defender itself is not running/installed. The following are the various elements in this group:
![]() Endpoint Protection Client Status: This element is designed to provide a view of all clients where SCEP/Defender is not installed, is inactive, is pending installation, or cannot be installed. Active clients at risk count is the sum of all clients in these states. The core action here is to investigate the installation failures and disablements of SCEP/Defender on those clients, as those clients will not report any antimalware status to the other elements in the view.
Endpoint Protection Client Status: This element is designed to provide a view of all clients where SCEP/Defender is not installed, is inactive, is pending installation, or cannot be installed. Active clients at risk count is the sum of all clients in these states. The core action here is to investigate the installation failures and disablements of SCEP/Defender on those clients, as those clients will not report any antimalware status to the other elements in the view.

![]() Malware Remediation Status: This element provides a view of the malware remediation status. It begins by providing a total number of computers that are in one or more malware remediation statuses. If a computer is in multiple statuses, it is counted only once. Remediation statuses are as follows:
Malware Remediation Status: This element provides a view of the malware remediation status. It begins by providing a total number of computers that are in one or more malware remediation statuses. If a computer is in multiple statuses, it is counted only once. Remediation statuses are as follows:
![]() Remediation Failed: SCEP/Defender was unable to remove the malware in question. The administrator should investigate the failure and re-attempt remediation via SCEP/Defender or take manual remediation steps. The most common reason for this is malware found on read-only removal storage (CD/DVD or write-protected USB/SD card memory devices).
Remediation Failed: SCEP/Defender was unable to remove the malware in question. The administrator should investigate the failure and re-attempt remediation via SCEP/Defender or take manual remediation steps. The most common reason for this is malware found on read-only removal storage (CD/DVD or write-protected USB/SD card memory devices).
![]() Full Scan Required: SCEP/Defender determined that the client is infected by malware that requires a full scan to completely remove it rather than relying on the detections from real-time protection. This is triggered in response to Microsoft’s analysis of the malware and is stored in the definition updates. The administrator should trigger a full scan either via the ConfigMgr console (including automation), manually on the client itself, via software distribution, or by waiting for a full scan scheduled in an antimalware policy to trigger.
Full Scan Required: SCEP/Defender determined that the client is infected by malware that requires a full scan to completely remove it rather than relying on the detections from real-time protection. This is triggered in response to Microsoft’s analysis of the malware and is stored in the definition updates. The administrator should trigger a full scan either via the ConfigMgr console (including automation), manually on the client itself, via software distribution, or by waiting for a full scan scheduled in an antimalware policy to trigger.
![]() Restart Required: Clients in this state are impacted by malware that cannot be removed without a restart. This is usually due to rootkit or similar complex manipulation of the OS. The administrator should restart the machine via software distribution (for example, a simple shutdown.exe execution) or manually by restarting the computer.
Restart Required: Clients in this state are impacted by malware that cannot be removed without a restart. This is usually due to rootkit or similar complex manipulation of the OS. The administrator should restart the machine via software distribution (for example, a simple shutdown.exe execution) or manually by restarting the computer.
![]() Offline Scan Required: Clients in this state require a comprehensive scan outside the running OS. This requires running Windows Defender Offline (regardless of whether the client has SCEP or Windows Defender installed). For more information, see the “Using Windows Defender Offline” section, earlier in this chapter. The administrator should manually run Windows Defender Offline for clients running SCEP or run Windows Defender Offline from the Settings app for clients running Windows 10 and later. For information on automating this and other actions, see the “Scripting Endpoint Protection Actions” section in this chapter.
Offline Scan Required: Clients in this state require a comprehensive scan outside the running OS. This requires running Windows Defender Offline (regardless of whether the client has SCEP or Windows Defender installed). For more information, see the “Using Windows Defender Offline” section, earlier in this chapter. The administrator should manually run Windows Defender Offline for clients running SCEP or run Windows Defender Offline from the Settings app for clients running Windows 10 and later. For information on automating this and other actions, see the “Scripting Endpoint Protection Actions” section in this chapter.
![]() Client Settings Modified by Malware: Clients in this state have had one or more settings modified by malware. In cases where there is a clear way to determine the previous state, SCEP/Defender restores the setting. An example would be malware that disables a component of Windows that is always running. However, it is not always possible to determine what the setting should be. For example, it could be a setting that is not configured by default but may have been enabled before the malware disabled it. The administrator should review the information provided on the malware in the MMPC Threat Encyclopedia and take the required steps. This requires understanding what the intended configuration of the setting should be.
Client Settings Modified by Malware: Clients in this state have had one or more settings modified by malware. In cases where there is a clear way to determine the previous state, SCEP/Defender restores the setting. An example would be malware that disables a component of Windows that is always running. However, it is not always possible to determine what the setting should be. For example, it could be a setting that is not configured by default but may have been enabled before the malware disabled it. The administrator should review the information provided on the malware in the MMPC Threat Encyclopedia and take the required steps. This requires understanding what the intended configuration of the setting should be.
![]() Malware Remediated in the Last 24 Hours: Largely informational in nature, this state allows the administrator to know how many malware incidents have been remediated and understand the environment and number of infections occurring. There is no specific action expected of the SCEP administrator.
Malware Remediated in the Last 24 Hours: Largely informational in nature, this state allows the administrator to know how many malware incidents have been remediated and understand the environment and number of infections occurring. There is no specific action expected of the SCEP administrator.
The Operational state, shown in Figure 19.15, is focused on maintenance and operation of SCEP/Defender clients in the selected collection. The objective of this section of the dashboard is to ensure that SCEP/Defender is running as efficiently as possible. It is also composed of two distinct elements:
![]() Operational Status of Clients: This element contains SCEP-specific issues related to the SCEP/Defender client itself rather than malware events. It is broken down into specific states that relate to the health of the SCEP/Defender client infrastructure.
Operational Status of Clients: This element contains SCEP-specific issues related to the SCEP/Defender client itself rather than malware events. It is broken down into specific states that relate to the health of the SCEP/Defender client infrastructure.
![]() Definition Status on Computers: This element contains information about the state of definition updates in the collection in question. A large group of out-of-date clients may indicate a problem with the definition update source.
Definition Status on Computers: This element contains information about the state of definition updates in the collection in question. A large group of out-of-date clients may indicate a problem with the definition update source.

Reports Available for Endpoint Protection
In addition to in-console monitoring available in the ConfigMgr console, SCEP provides a set of reports. These reports operate on the same data sources from the in-console monitoring. The reports provide the ability to create subscriptions to have SQL Server Reporting Services (SSRS) email the reports to a set of recipients on a regular basis. For more information on ConfigMgr reporting, see Chapter 21, “Configuration Manager Reporting.”
The reports also provide historical information, like the hardware inventory reports. However, the SCEP historical data defaults to 365 days, as opposed to 90 days for hardware inventory. You can reduce this value by modifying the Delete Aged Endpoint Protection Health Status History Data maintenance tasks on the primary sites that manage SCEP/Defender clients. For more information on site maintenance, see Chapter 24, “Backup, Recovery, and Maintenance.”
The following are the reports and the recommended usage of each one:
![]() Antimalware Overall Status and History: This is the primary report. Generally, it should be the first report shared outside the antimalware/security administration team. It provides similar data to the in-console data by surfacing both security (malware and protection states) and operational (definition updates and SCEP deployment) information. It also provides a historical view of the same data, which the in-console monitoring does not provide. It is run on a per-collection basis and requires start and end dates for historical data.
Antimalware Overall Status and History: This is the primary report. Generally, it should be the first report shared outside the antimalware/security administration team. It provides similar data to the in-console data by surfacing both security (malware and protection states) and operational (definition updates and SCEP deployment) information. It also provides a historical view of the same data, which the in-console monitoring does not provide. It is run on a per-collection basis and requires start and end dates for historical data.
![]() Antimalware Activity Report: This report provides high-level counts of malware remediation activities on a per-collection basis. Each count links to the Infected Computers report, with a different value for Infection Status based on the column selected in the Antimalware Activity report.
Antimalware Activity Report: This report provides high-level counts of malware remediation activities on a per-collection basis. Each count links to the Infected Computers report, with a different value for Infection Status based on the column selected in the Antimalware Activity report.
![]() Infected Computers: This report provides details on computers that have suffered malware infection. It lists each infected computer. It allows filtering by Threat Name (name of malware), Cleaning Action (Cleaned/Quarantined/Removed/Allowed/User Specified/No Action/Blocked), Infection Status (outcome of remediation attempt), and User Name.
Infected Computers: This report provides details on computers that have suffered malware infection. It lists each infected computer. It allows filtering by Threat Name (name of malware), Cleaning Action (Cleaned/Quarantined/Removed/Allowed/User Specified/No Action/Blocked), Infection Status (outcome of remediation attempt), and User Name.
![]() Top Users by Threats: This report provides a user-based view per collection of users with the most malware incidents. It lists the users whose behavior and actions appear to result in more malware incidents. It may be that a malware dropper is downloading or dropping other malware on the system, and the incidents are not due to any action of the user running the dropper. This report is useful for end-user outreach and education to help alter behavior and make systems safer. It can also be used for remedial actions such as revoking administrative rights from users that repeatedly install malware.
Top Users by Threats: This report provides a user-based view per collection of users with the most malware incidents. It lists the users whose behavior and actions appear to result in more malware incidents. It may be that a malware dropper is downloading or dropping other malware on the system, and the incidents are not due to any action of the user running the dropper. This report is useful for end-user outreach and education to help alter behavior and make systems safer. It can also be used for remedial actions such as revoking administrative rights from users that repeatedly install malware.
![]() User Threat List: This report provides a list of all malware incidents filtered on a specific user. It acts as a useful drilldown from the Top Users by Threats report.
User Threat List: This report provides a list of all malware incidents filtered on a specific user. It acts as a useful drilldown from the Top Users by Threats report.
![]() Computer Malware Details: This report provides a list of all malware incidents, filtered on a specific user. It acts as a useful drilldown from the Infected Computers report.
Computer Malware Details: This report provides a list of all malware incidents, filtered on a specific user. It acts as a useful drilldown from the Infected Computers report.
Integrating Report Data with Other Systems
As with all other ConfigMgr site database information, you can use SQL Server views to extract EP data. These views use the ConfigMgr 2012 schema; the ConfigMgr 2012 R2 documentation on Endpoint Protection views, located at https://technet.microsoft.com/library/dn581986.aspx, is still valid. An example of how to use SCEP/Defender data from the ConfigMgr database is available with the Power BI dashboards at https://cloudblogs.microsoft.com/enterprisemobility/2016/04/01/exploring-your-system-center-configuration-manager-and-microsoft-intune-hybrid-data-on-power-bi-dashboard/.
Following are the top views to leverage when extracting data for use with other systems:
![]() v_OverallThreatActivity: This view contains the same data as the in-console dashboard’s Security State groups Malware remediation status element. This is essentially data on malware activity and remediation of that malware for the selected collection. Only collections that appear in the dashboard and have the View this collection in the Endpoint Protection dashboard check box checked in their collection properties appear in this view. There is also a history table,
v_OverallThreatActivity: This view contains the same data as the in-console dashboard’s Security State groups Malware remediation status element. This is essentially data on malware activity and remediation of that malware for the selected collection. Only collections that appear in the dashboard and have the View this collection in the Endpoint Protection dashboard check box checked in their collection properties appear in this view. There is also a history table, v_OverallThreatActivityHistory, to access one year of historical information (by default).
![]() v_EndpointProtectionHealthStatus: This view contains the same data as the in-console dashboard across the Endpoint Protection client status, Operational status of clients, and Definition status on computers elements. As with
v_EndpointProtectionHealthStatus: This view contains the same data as the in-console dashboard across the Endpoint Protection client status, Operational status of clients, and Definition status on computers elements. As with v_OverallThreatActivity, only Endpoint Protection collections appear in this view. There is also a history view, v_EndpointProtectionHealthStatusHistory.
![]() Client-Specific Views: Several client-specific views surface information on a per-client basis rather than summarized data. In general, you should use the client views to return per-client data. Avoid aggregating this data on the fly, as built-in summarization processes for SCEP/Defender data feed the
Client-Specific Views: Several client-specific views surface information on a per-client basis rather than summarized data. In general, you should use the client views to return per-client data. Avoid aggregating this data on the fly, as built-in summarization processes for SCEP/Defender data feed the v_OverallThreatActivity and v_EndpointProtectionHealthStatus views and their respective history views. These are the client-specific views:
![]()
v_GS_AntimalwareHealthStatus
![]()
v_GS_AntimalwareInfectionStatus
![]()
v_GS_Threats
![]()
v_EndpointProtectionStatus
NOTE: ENDPOINT PROTECTION V_GS VIEWS
ConfigMgr sends all Endpoint Protection data from SCEP/Defender clients as state messages. Traditionally, v_GS views store current hardware inventory data. (v_HS views store hardware inventory history data.)
Endpoint Protection data stored in these views is not sent via hardware inventory. As part of processing the state message, an additional step populates the tables backing these views. This enables some backward compatibility scenarios for Forefront Endpoint Protection (FEP) and ConfigMgr 2007 reporting and data access scenarios. To verify that this data is not processed by hardware inventory, track the state messages processed by statsys.log and review the associated SQL operations performed during the processing of SCEP/Defender state messages. This also explains why there are no historical tables/views and why this data does not appear in the Hardware Inventory setting under Client Settings.
Endpoint Protection Actions and Alerts
A key activity for a SCEP/Defender administrator is responding to malware activities and incidents. Individual malicious activities often occur across multiple devices throughout an organization. The authors refer to such an activity as a malware incident (adopting the ITIL [Information Technology Information Library] definition of multiple individual events combining to an incident). ConfigMgr’s Alerts feature notifies SCEP/Defender administrators of these incidents. The alerts enable administrators to respond to those incidents. This is especially important for environments without a SIEM solution or other advanced security operational processes.
In most cases, SCEP/Defender automatically handles remediation of malware activities. In some cases, remediation requires that an administrator intervene either because the remediation is disruptive to an end user (for example, an offline scan) or requires additional information (for example, restoration of corrupted settings). Most actions can be triggered from within the console; however, some require either user interaction or automation/scripting.
The next sections explain the available alerts and configuration, available actions, and how to use those actions. They also provide a brief overview of automating alerts and actions. The automation topics are meant to provide guidance on what interfaces and classes/views/cmdlets to use rather than in-depth or prescriptive guidance on building scripts or software development kit (SDK) solutions.
Overview of Endpoint Protection Alerts
ConfigMgr provides four SCEP/Defender-specific alerts. Each alert is configured on one or more collections, and any configurable settings are per collection. This allows you to use ConfigMgr’s dynamic rules to create alert targeting based on AD data, installed software, hardware, operating system, ConfigMgr compliance settings, or anything stored in the Registry or Windows Management Instrumentation (WMI). This is a key capability of merging antimalware management with PC management.
The following are the SCEP/Defender alert types:
![]() Malware Detected: This is the simplest type of alert for SCEP/Defender. It is triggered whenever malware is found on a computer. The Malware detection threshold controls the specific conditions in which an alert is triggered. High, medium, and low refer to the frequency or volume of alerts. Use this threshold to target alerts based on the criticality of the computers in a collection. For example, a server that processes credit card payments is a high risk to the business if compromised; being high risk means it may need high thresholds set. This is based on the following logic:
Malware Detected: This is the simplest type of alert for SCEP/Defender. It is triggered whenever malware is found on a computer. The Malware detection threshold controls the specific conditions in which an alert is triggered. High, medium, and low refer to the frequency or volume of alerts. Use this threshold to target alerts based on the criticality of the computers in a collection. For example, a server that processes credit card payments is a high risk to the business if compromised; being high risk means it may need high thresholds set. This is based on the following logic:
![]() High – All Detection: This alert level causes any detection of malware to trigger an alert. Use this level for systems where any malware detection should trigger an alert, regardless of SCEP/Defender action or response.
High – All Detection: This alert level causes any detection of malware to trigger an alert. Use this level for systems where any malware detection should trigger an alert, regardless of SCEP/Defender action or response.
![]() Medium – Detected, Pending Action: This alert level triggers an alert when malware removal requires manual action. It is useful for invoking help desk processes for desktops. It is also useful on most servers.
Medium – Detected, Pending Action: This alert level triggers an alert when malware removal requires manual action. It is useful for invoking help desk processes for desktops. It is also useful on most servers.
![]() Low – Detected, Still Active: This alert level triggers an alert only when malware removal failed and malware is still active. This generally warrants immediate follow-up, except with malware stored on read-only media.
Low – Detected, Still Active: This alert level triggers an alert only when malware removal failed and malware is still active. This generally warrants immediate follow-up, except with malware stored on read-only media.
NOTE: MALWARE DETECTED ALERT ON READ-ONLY MEDIA (CDS, DVDS, AND SO ON)
You may find that SCEP/Defender reports malware remediation failures for malware that the MMPC Threat Encyclopedia says SCEP/Defender can remove. This is most commonly caused by read-only media, typically optical media (CD, DVD, or Blu-ray discs), but may also include portal flash memory with write protection. When SCEP/Defender or any other program attempts to write to read-only media, Windows returns an access denied error (error code 5). SCEP/Defender has no specific way of knowing why its system-level permissions failed to access the file. In practice, SCEP/Defender is blocking the malware but cannot remove the malware from storage attached to the computer, and hence it reports the failure.
Keep this scenario in mind when building processes around SCEP alert handling and choosing where to enable these alerts.
![]() Malware Outbreak: This alert level allows you to define a custom threshold on when to trigger the alert; the threshold is defined using a percentage of ConfigMgr clients in a collection where malware was detected. The percentage includes computers that do not yet have the SCEP client installed. This is useful in triggering malware/security incident response processes.
Malware Outbreak: This alert level allows you to define a custom threshold on when to trigger the alert; the threshold is defined using a percentage of ConfigMgr clients in a collection where malware was detected. The percentage includes computers that do not yet have the SCEP client installed. This is useful in triggering malware/security incident response processes.
![]() Repeated Malware Detection: This alert is triggered when the same malware is detected between 2 and 32 times in an interval (1 to 168 hours) across all computers in a collection. This alert is useful for finding malware infections caused by repeated user actions or other actions. Detections may be on the same computer or different computers in the collection; this in contrast to the malware outbreak alert, which tells you that multiple computers are infected.
Repeated Malware Detection: This alert is triggered when the same malware is detected between 2 and 32 times in an interval (1 to 168 hours) across all computers in a collection. This alert is useful for finding malware infections caused by repeated user actions or other actions. Detections may be on the same computer or different computers in the collection; this in contrast to the malware outbreak alert, which tells you that multiple computers are infected.
![]() Multiple Malware Detection: This alert is triggered when between 2 and 32 different malwares are found on computers within an interval (1 to 168 hours). This differs from the repeated malware detection level in that different malware is found. This provides a similar ability to detect suspicious actions on computers that may be causing multiple infections.
Multiple Malware Detection: This alert is triggered when between 2 and 32 different malwares are found on computers within an interval (1 to 168 hours). This differs from the repeated malware detection level in that different malware is found. This provides a similar ability to detect suspicious actions on computers that may be causing multiple infections.
Note: Automating Endpoint Protection Alerts
It is possible to programmatically access SCEP alerts. Doing so is useful when you want to extract alerts into other systems, such as ticketing systems to trigger local IT technicians to visit users or IT process automation workflow tools.
There are various methods to extract alerts, including using PowerShell, T-SQL, or WMI:
![]() PowerShell:
PowerShell: Get-CMAlert allows you to get a ConfigMgr alert to use within PowerShell directly. You can also leverage PowerShell’s ability to call .NET or VBScript interfaces as a means to move alerts into other systems. You can also use the Suspend-CMAlert and Disable-CMAlert cmdlets to suppress or close an alert in the console for roundtrip automation workflows. For more information on Get-CMAlert, see the ConfigMgr cmdlet documentation at https://docs.microsoft.com/powershell/sccm/configurationmanager/vlatest/get-cmalert.
![]() T-SQL: If you need to extract information directly from the ConfigMgr database using T-SQL, two key views are
T-SQL: If you need to extract information directly from the ConfigMgr database using T-SQL, two key views are v_Alert and vex_Alert. The v_Alert view contains all alerts generated across the hierarchy and the state of each. This includes multiple timestamp values to aid in filtering results (SkipUntil, CreationTime, LastChangeTime, and AlertStateChangeTime). You can only use the T-SQL views to pull data from ConfigMgr, not to write or change alert data. Microsoft does not support writing directly to the ConfigMgr database.
![]() WMI: The ConfigMgr provider provides the
WMI: The ConfigMgr provider provides the SMS_Alert and SMS_EPAlert WMI classes, enabling you to both export alert information and alter alert states. SMS_Alert returns all ConfigMgr alerts, while SMS_EPAlert filters only to SCEP-related alerts. The Close method of SMS_EPAlert can be used to close alerts. For more information, see https://docs.microsoft.com/sccm/develop/reference/core/servers/manage/sms_epalert-server-wmi-class.
Enabling Alerts for a Collection
After determining which alerts to configure, the next step is to enable them on a collection of computers you want to monitor for malware activity or incidents. You will want to leverage the dynamic nature of collections to get the maximum value out of SCEP/Defender. This could include monitoring critical servers by type based on the Windows services they run rather than using a static list or server naming standard. It can also include building a collection based on compliance settings. Compliance settings–based collections would allow you to determine, for example, if the membership of the local administrators group deviates from the organizational standards for local admin rights. Computers with deviations (authorized or unauthorized) may require closer monitoring, as malware is more likely to be running with administrative rights on these computers.
Perform the following steps to enable a collection for SCEP/Defender alerts:
1. In the console, navigate to Assets and Compliance -> Device Collections.
2. Select the collection where you want to configure an alert; open its properties by right-clicking the collection and selecting Properties.
3. If the View this collection in the Endpoint Protection dashboard check box is unchecked, check it to ensure you can review the collection in the SCEP section of the Monitoring workspace.
4. Click Alerts and then click Add.
5. Select the type of alerts you want to configure, input the desired configuration, and provide an alert name and severity, as shown in Figure 19.16.

On-Demand Actions Related to Endpoint Protection
In addition to alerting on malware activity, it is often necessary to act on monitoring information. ConfigMgr provides SCEP/Defender administrators with multiple built-in capabilities to trigger actions against systems. The on-demand actions allow an administrator to respond quickly to situations remotely. There are two types of targets for actions: specific clients and detected malware.
Client actions cause clients to download new definitions, run scans, download policy, and/or evaluate software updates. These actions are delivered using either standard client policy (by default, once an hour) or client notifications (immediately). You can also use the download policy client notification action to cause standard client policy to be processed sooner. Client actions are triggered by right-clicking a client from a device collection and selecting either Client Notification or Endpoint Protection from the menu.
The following are the client actions related to SCEP/Defender:
![]() Download Definition: Delivered using standard ConfigMgr client policy. This causes the client to trigger the SCEP/Defender built-in update methods (that is, not the Configuration Manager definition update source). It is equivalent to using the SCEP/Defender user interface to trigger a definition update.
Download Definition: Delivered using standard ConfigMgr client policy. This causes the client to trigger the SCEP/Defender built-in update methods (that is, not the Configuration Manager definition update source). It is equivalent to using the SCEP/Defender user interface to trigger a definition update.
![]() Full Scan/Quick Scan: Delivered using standard ConfigMgr client policy. This causes the client to trigger a quick or full scan within SCEP/Defender.
Full Scan/Quick Scan: Delivered using standard ConfigMgr client policy. This causes the client to trigger a quick or full scan within SCEP/Defender.
![]() Evaluate Software Update Deployments: Delivered using client notification (immediate push of policy to clients). This action is useful in environments where software update management is used to deliver SCEP/Defender definition updates and can be used in place of the Download Definitions action.
Evaluate Software Update Deployments: Delivered using client notification (immediate push of policy to clients). This action is useful in environments where software update management is used to deliver SCEP/Defender definition updates and can be used in place of the Download Definitions action.
![]() Switch to Next Software Update Point: Delivered using client notification. This action is useful when definition source is set to ConfigMgr software update deployments or WSUS (when the WSUS server is also used as a SUP). It can be used to rapidly switch clients between SUPs to ensure that the definition updates can be delivered to clients.
Switch to Next Software Update Point: Delivered using client notification. This action is useful when definition source is set to ConfigMgr software update deployments or WSUS (when the WSUS server is also used as a SUP). It can be used to rapidly switch clients between SUPs to ensure that the definition updates can be delivered to clients.
![]() Download Computer Policy: Delivered using client notification. You can use this to force immediate delivery of all SCEP policies and actions (Download Definition, Full Scan, or Quick Scan). This can be useful when an urgent change of policy is required—for example, in response to a malware outbreak or when a false positive is encountered.
Download Computer Policy: Delivered using client notification. You can use this to force immediate delivery of all SCEP policies and actions (Download Definition, Full Scan, or Quick Scan). This can be useful when an urgent change of policy is required—for example, in response to a malware outbreak or when a false positive is encountered.
Detected malware actions allow you to override detections (for example, to mitigate false positives), restore quarantined files, or exclude files/paths from scanning. This is accomplished by creating client policy and delivery to the client via the normal computer policy polling cycle (by default, hourly). The actions can be accessed as follows:
1. In the ConfigMgr console, navigate to Monitoring-> Security and select Endpoint Protection Status.
2. Click the Malware Detected node.
3. Select one of the available actions to respond to the malware.
Following are the potential actions you can take on malware:
![]() Allow This Threat: This action creates an antimalware policy that allows the selected malware to run. The created policy is deployed to the All Systems collection. This action allows you to respond to false positives or allow potentially unwanted programs (PUPs). Use the Download Computer Policy client notification action to cause impacted clients to immediately process this policy.
Allow This Threat: This action creates an antimalware policy that allows the selected malware to run. The created policy is deployed to the All Systems collection. This action allows you to respond to false positives or allow potentially unwanted programs (PUPs). Use the Download Computer Policy client notification action to cause impacted clients to immediately process this policy.
![]() Restore Files Quarantined by This Threat: This action allows you to restore quarantined files associated with this malware. Like the previous action, it allows you to respond to false positives or PUPs. The action allows you to only restore the files or restore the files and add an exclusion for the files. If you choose not to exclude the files, they are quarantined when next scanned by SCEP/Defender.
Restore Files Quarantined by This Threat: This action allows you to restore quarantined files associated with this malware. Like the previous action, it allows you to respond to false positives or PUPs. The action allows you to only restore the files or restore the files and add an exclusion for the files. If you choose not to exclude the files, they are quarantined when next scanned by SCEP/Defender.
![]() Exclude Selected Files or Paths from Scan: This action creates a policy that excludes the selected paths from malware scanning. This also excludes the path for all SCEP/Defender real-time and schedule scan activities. If responding to a false positive, using the Allow this threat action may be more appropriate.
Exclude Selected Files or Paths from Scan: This action creates a policy that excludes the selected paths from malware scanning. This also excludes the path for all SCEP/Defender real-time and schedule scan activities. If responding to a false positive, using the Allow this threat action may be more appropriate.
CAUTION: REPORTING FALSE POSITIVES AND FALSE NEGATIVES
If you run into a false positive or a false negative in SCEP/Defender, report it to Microsoft via your organization’s Microsoft support channel to enable Microsoft to issue a revised definition. Microsoft may also be able to provide prerelease definitions prior to a public release or other workarounds. If you don’t have a commercial support channel with Microsoft, you can submit malware samples directly via the Windows Defender Security Intelligence site at https://www.microsoft.com/wdsi/filesubmission.
Scripting Endpoint Protection Actions
Your organization may require that you automate SCEP actions—either due to limited administrative resources to monitor and trigger these actions or to expedite response to malware. Automated activities can include triggering a full scan, restarting the client, triggering policy polling, and offline scans. These activities rely on building a list of clients that require one or more of those activities to be executed on them.
To build a collection, create a query-based rule to identify the client in the respective states. The attribute class required is Endpoint Protection Status, which includes attributes that represent the various states where additional action is required: AmFullscanRequired, AmRestartRequired, and AmOfflineScanRequired. Each attribute is a Boolean value. Create one collection per attribute and set the query to look for devices where the attributes are true.
After creating these collections, use the Get-CMDevice PowerShell cmdlet to obtain a list of the clients. You can use the following methods to trigger each action against the collection in question:
![]() Full Scan Required: Use the
Full Scan Required: Use the Invoke-CMEndpointProtectionScan cmdlet to invoke a full scan. Run this cmdlet using the -DeviceCollectionId parameter. Specify the collection ID for the collection of devices where the AmFullscanRequired property is true. This queues up an instruction for the next time the client polls for policy. If you need to trigger this more quickly, you can use Invoke-CMClientNotification with the -DeviceCollectionId parameter to issue a client notification.
![]() Restart Required: This requires building the collection and deploying a program to restart the client system. You can reuse existing restart scripts, if available. If one isn’t available, create a ConfigMgr program object that runs
Restart Required: This requires building the collection and deploying a program to restart the client system. You can reuse existing restart scripts, if available. If one isn’t available, create a ConfigMgr program object that runs cmd /c (which opens and closes the command prompt instantly). Set this program to have ConfigMgr restart the computer.
![]() Offline Scan Required: This is the most complex of the three actions. It requires leveraging a script for Windows 10 (1607/Anniversary Update and later). The script can be deployed as a package/program in ConfigMgr. For information on this scripting interface, see https://docs.microsoft.com/windows/security/threat-protection/windows-defender-antivirus/windows-defender-offline. To execute an offline scan on SCEP clients and Windows 10 devices prior to Windows 10 1607/Anniversary Update, see the ConfigMgr product team blog post at https://cloudblogs.microsoft.com/enterprisemobility/2012/04/12/launching-a-windows-defender-offline-scan-with-configuration-manager-2012-osd/.
Offline Scan Required: This is the most complex of the three actions. It requires leveraging a script for Windows 10 (1607/Anniversary Update and later). The script can be deployed as a package/program in ConfigMgr. For information on this scripting interface, see https://docs.microsoft.com/windows/security/threat-protection/windows-defender-antivirus/windows-defender-offline. To execute an offline scan on SCEP clients and Windows 10 devices prior to Windows 10 1607/Anniversary Update, see the ConfigMgr product team blog post at https://cloudblogs.microsoft.com/enterprisemobility/2012/04/12/launching-a-windows-defender-offline-scan-with-configuration-manager-2012-osd/.
Using these scripting methods to automate EP action can significantly improve the security of your environment. As with any other automation and scripting, be sure to fully test prior to deploying in production.
Windows Defender Advanced Threat Protection
Windows Defender ATP is a cloud-based security service provided by Microsoft. It enables Windows 10 to send endpoint behavioral telemetry from Windows Defender and other Windows security components to an organization’s unique and isolated cloud tenant. Endpoint behavior sensors include process, Registry, file, and network communication patterns. These are some of the sample behavior monitoring capabilities discussed in the “Protection Capabilities of Microsoft’s Antimalware Platform” section, earlier in this chapter. Each endpoint is onboarded to Windows Defender ATP, and its telemetry is delivered securely to the organization’s online tenant for processing. This telemetry is then combined with cloud-based security analytics and threat intelligence:
![]() Cloud-Based Security Analytics: Cloud-based security analytics are driven through a combination of big data and machine-learning tools, fed unique information from the Windows and Microsoft ecosystems. This data includes telemetry from the Microsoft Malicious Software Removal Tool, Windows Defender telemetry (both enterprise and consumer data), Office 365 behavioral data, and consumer cloud systems such as Bing and SmartScreen.
Cloud-Based Security Analytics: Cloud-based security analytics are driven through a combination of big data and machine-learning tools, fed unique information from the Windows and Microsoft ecosystems. This data includes telemetry from the Microsoft Malicious Software Removal Tool, Windows Defender telemetry (both enterprise and consumer data), Office 365 behavioral data, and consumer cloud systems such as Bing and SmartScreen.
![]() Threat Intelligence: Threat intelligence is generated by Microsoft in cooperation with antimalware partners. It is used to develop analysis models that enable identification of malware along with attacker techniques and procedures. This threat intelligence modeling is then used as the lens to interpret and analyze endpoint telemetry and cloud security analytics. The result is provided to organizations via the Windows Defender ATP online portal.
Threat Intelligence: Threat intelligence is generated by Microsoft in cooperation with antimalware partners. It is used to develop analysis models that enable identification of malware along with attacker techniques and procedures. This threat intelligence modeling is then used as the lens to interpret and analyze endpoint telemetry and cloud security analytics. The result is provided to organizations via the Windows Defender ATP online portal.
ConfigMgr allows you to easily onboard Windows 10 managed clients onto Windows Defender ATP. This significantly eases rollout and configuration of the endpoint behavioral sensors and ensures that their telemetry is delivered to the Windows Defender ATP tenant. Windows Defender ATP can also be used with non-Microsoft endpoint protection technologies by running Windows Defender in passive mode. For more information, see the “Prerequisites for Windows Defender ATP” section, later in this chapter.
Windows Defender ATP Capabilities
Windows Defender ATP has various features available to use with data gathered and processed within an organization’s tenant, including the following:
![]() Post-Breach Detection: Enables you to find both known and unknown attackers in an actionable alert. This enables a last line of defense and mitigation capability.
Post-Breach Detection: Enables you to find both known and unknown attackers in an actionable alert. This enables a last line of defense and mitigation capability.
![]() Timeline for Forensic Investigation: Enables you to scope a breach or suspicious behaviors to any onboarded machine via a time line. This can be pivoted across file, URLs, and network connections.
Timeline for Forensic Investigation: Enables you to scope a breach or suspicious behaviors to any onboarded machine via a time line. This can be pivoted across file, URLs, and network connections.
![]() Deep Analysis of Files and URLs: Allows you to request further analysis by Microsoft of files or URLs. Files can be manually submitted in the portal or automatically collected by Windows Defender.
Deep Analysis of Files and URLs: Allows you to request further analysis by Microsoft of files or URLs. Files can be manually submitted in the portal or automatically collected by Windows Defender.
Prerequisites for Windows Defender ATP
The first step in using Windows Defender ATP is to subscribe to the service. For information on how to subscribe, see https://docs.microsoft.com/windows/security/threat-protection/windows-defender-atp/windows-defender-advanced-threat-protection. This site also provides information about how to sign up for a free trial of Windows Defender ATP.
In addition to subscribing to the service, the following prerequisites must be met:
![]() Windows Editions: Computers must be running Windows 10 Enterprise, Windows 10 Education, Windows 7 SP1, Windows 8.1, Windows Server 2016 or Windows Server 2012 R2. (Windows Defender ATP also supports non-Windows clients through 3rd party integration.) ATP is not supported on Windows 10 Mobile.
Windows Editions: Computers must be running Windows 10 Enterprise, Windows 10 Education, Windows 7 SP1, Windows 8.1, Windows Server 2016 or Windows Server 2012 R2. (Windows Defender ATP also supports non-Windows clients through 3rd party integration.) ATP is not supported on Windows 10 Mobile.
![]() Connectivity: Each computer will send approximately 5MB per day to the Windows Defender ATP service. Telemetry components need network access to submit information to the service. For information on connectivity requirements, see https://docs.microsoft.com/windows/security/threat-protection/windows-defender-atp/configure-proxy-internet-windows-defender-advanced-threat-protection.
Connectivity: Each computer will send approximately 5MB per day to the Windows Defender ATP service. Telemetry components need network access to submit information to the service. For information on connectivity requirements, see https://docs.microsoft.com/windows/security/threat-protection/windows-defender-atp/configure-proxy-internet-windows-defender-advanced-threat-protection.
![]() Windows Telemetry Service: The Connected User Experiences and Telemetry (diagtrack) service must be running on monitored enrollments and set to start automatically.
Windows Telemetry Service: The Connected User Experiences and Telemetry (diagtrack) service must be running on monitored enrollments and set to start automatically.
![]() Windows Defender Signatures: The Windows Defender ATP agent relies on Windows Defender to perform file scans and return data from those scans. Signatures must be up to date even if Windows Defender is not used in your organization. Windows Defender runs in passive mode in this scenario.
Windows Defender Signatures: The Windows Defender ATP agent relies on Windows Defender to perform file scans and return data from those scans. Signatures must be up to date even if Windows Defender is not used in your organization. Windows Defender runs in passive mode in this scenario.
![]() Windows Defender ELAM Driver: The Windows Defender ELAM driver must be enabled. If Windows Defender is your antimalware solution, this driver is enabled by default. If you are running a non-Microsoft antimalware solution, the ELAM driver must be enabled to successfully onboard Windows Defender ATP. For more information on ELAM, see the “Early Launch Antimalware and Measured Boot” section, earlier in this chapter. For information on how to enable the Windows Defender ELAM driver when Windows Defender is not the antimalware solution of choice, see https://docs.microsoft.com/windows/security/threat-protection/windows-defender-atp/troubleshoot-onboarding-windows-defender-advanced-threat-protection#ensure-that-windows-defender-antivirus-is-not-disabled-by-a-policy.
Windows Defender ELAM Driver: The Windows Defender ELAM driver must be enabled. If Windows Defender is your antimalware solution, this driver is enabled by default. If you are running a non-Microsoft antimalware solution, the ELAM driver must be enabled to successfully onboard Windows Defender ATP. For more information on ELAM, see the “Early Launch Antimalware and Measured Boot” section, earlier in this chapter. For information on how to enable the Windows Defender ELAM driver when Windows Defender is not the antimalware solution of choice, see https://docs.microsoft.com/windows/security/threat-protection/windows-defender-atp/troubleshoot-onboarding-windows-defender-advanced-threat-protection#ensure-that-windows-defender-antivirus-is-not-disabled-by-a-policy.
Configuring Windows Defender ATP Using ConfigMgr
To configure Windows Defender ATP, you must first obtain an onboarding configuration file from the Windows Defender ATP portal. This file enables Windows Defender ATP to access the organization’s tenant and securely submit telemetry data. Take care to ensure that the onboarding configuration file is kept securely, as it contains sensitive information. Perform the following steps to obtain the onboarding configuration file:
1. Log on to the Windows Defender ATP portal at https://securitycenter.windows.com/.
2. Click Endpoint Management.
3. Select the link System Center Configuration Manager (current branch) and then click download package.
4. Decompress the .zip file and place it in a secure location.
When the file is ready, you can use ConfigMgr to distribute it and onboard clients. This process is simple and involves supplying the onboarding file as part of the policy wizard. The policy can then be deployed and monitored like any other ConfigMgr policy. To create the Windows Defender ATP onboarding policy, follow these steps:
1. In the ConfigMgr console, navigate to Assets and Compliance -> Endpoint Protection -> Windows Defender ATP Policies. Right-click and select Create Windows Defender ATP Policy.
2. Enter a name and a description and then select Onboarding. Click Next.
3. Click Browse and navigate to the onboarding configuration file you downloaded from the Windows Defender ATP portal. Click Next.
4. Determine whether you want file samples collected for analysis from managed devices. This can expedite the response to an attack by eliminating the need to gather sample files from impacted machines and submitting them manually to the Windows Defender ATP portal.
5. Complete the wizard and deploy the newly created policy to a collection of clients. You can choose to phase the rollout prior to a mass rollout.
Summary
This chapter provided an in-depth look at the protection technologies and capabilities of SCEP/Defender and Windows. It also provided a guide to designing SCEP deployment, along with configuration and monitoring of that deployment. The chapter covered more advanced topics around programmatic access to EP data across alerts and reporting data, providing a look into how to integrate EP into security event management solutions.
The chapter explained how to leverage ConfigMgr’s device management capabilities to significantly enhance and automate SCEP/Defender antimalware protection. This combination of PC management and antimalware adds tremendous value and is achieved by using simple ConfigMgr automation to drive antimalware responses.
The chapter also discussed the cloud-backed features of SCEP/Defender and the cloud-based nature of Windows Defender Advanced Threat Protection. The purpose is to give you an understanding of the benefits that come from opting into the cloud-based system and provide you with the ability to weigh the costs of sending telemetry to Microsoft against the gains from opting in.