
CHAPTER 20
Configuration Manager Queries
IN THIS CHAPTER
![]() Using the ConfigMgr Query Builder
Using the ConfigMgr Query Builder
![]() Understanding Criterion Types, Operators, and Values
Understanding Criterion Types, Operators, and Values
Queries were mentioned briefly in Chapter 3, “Looking Inside Configuration Manager,” as a means for retrieving information from the ConfigMgr database. You can use the information retrieved in a variety of ways—from something as simple as creating an ad hoc list of clients with a specific operating system (OS) to areas as complex as listing devices missing a certain type of software. However, queries are not just about hardware and software information. You can use queries to easily access information regarding component status and activity audits.
While ConfigMgr comes with a handful of predefined queries, the goal of this chapter is to help you become comfortable writing your own—first by using the ConfigMgr query builder and then, with enough practice, by hand. This chapter provides information on objects, classes, and attributes, as well as descriptions of criterion types, operators, and joins to provide insight for you to build your own queries.
Queries can be the basis of any well-constructed collection, helping to narrow the target of a deployment to the right set of devices. While application intelligence reduces the necessity for intricate collections to deploy software in ConfigMgr, you still must generate a target list of devices for other purposes—such as applying power management, maintenance windows, and endpoint protection settings.
NOTE: USING QUERIES TO CREATE COLLECTIONS
Queries are useful for testing desired criteria for a collection. Simply build the query and review your results; when you create a collection, select the query as a basis for your query-based collection rule. Consider this a one-time copy of the query to the collection; modifying a query or a collection rule initially created from a collection does not update or affect the collection.
Introducing the Queries Node
As introduced in Chapter 8, “Using the Configuration Manager Console,” you manage and run queries by using the Queries node of the Monitoring workspace, shown in Figure 20.1.

FIGURE 20.1 The Queries node of the Monitoring workspace.
When you select a query in the List pane, the ribbon bar displays the following set of options, also shown in Figure 20.1:
![]() Create Query: Creates a new query.
Create Query: Creates a new query.
![]() Export Queries: Exports queries to other ConfigMgr environments.
Export Queries: Exports queries to other ConfigMgr environments.
![]() Import Objects: Imports queries.
Import Objects: Imports queries.
![]() Run: Executes the selected query.
Run: Executes the selected query.
![]() Install Client: Initiates the Install Client Wizard, targeting the objects of the selected query.
Install Client: Initiates the Install Client Wizard, targeting the objects of the selected query.
![]() Refresh: Refreshes the selected query.
Refresh: Refreshes the selected query.
![]() Delete: Deletes the selected query.
Delete: Deletes the selected query.
![]() Move: Moves the selected query to a different folder.
Move: Moves the selected query to a different folder.
![]() Set Security Scopes: Associates the selected query to one or more security scopes.
Set Security Scopes: Associates the selected query to one or more security scopes.
![]() Properties: Displays the properties of the selected query.
Properties: Displays the properties of the selected query.
Organizing the Query List Pane
When you select the Queries node, the List pane displays the icon, name, resource class, and query ID of each query. You can add or remove columns to customize this pane to fit your environment. For example, if your environment utilizes comments heavily, you may want to include the Comments column in your list. Following are the available columns:
![]() Icon: Specifies the icon assigned to the query.
Icon: Specifies the icon assigned to the query.
![]() Name: Specifies the name assigned to the query.
Name: Specifies the name assigned to the query.
![]() Resource Class: Indicates the type of object returned in the result set.
Resource Class: Indicates the type of object returned in the result set.
![]() Query ID: Shows the unique ID assigned by the system to the query. Default queries begin with SMS, while custom queries begin with the site code.
Query ID: Shows the unique ID assigned by the system to the query. Default queries begin with SMS, while custom queries begin with the site code.
![]() Comments: Provides a comment about the query, often to help identity the query.
Comments: Provides a comment about the query, often to help identity the query.
![]() Expression: Specifies the Windows Management Instrumentation (WMI) Query Language (WQL) statement inside the query.
Expression: Specifies the Windows Management Instrumentation (WMI) Query Language (WQL) statement inside the query.
![]() Limit to Collection ID: Specifies to retrieve only values that match the query and exist in the specified collection if you specified a collection ID in the Collection Limiting section.
Limit to Collection ID: Specifies to retrieve only values that match the query and exist in the specified collection if you specified a collection ID in the Collection Limiting section.
To select additional columns, right-click a column header (see Figure 20.2), and select a column.

FIGURE 20.2 Choosing columns in the Queries node.
If you find that adding and removing columns adds excessive white space between column values, you can resize the columns to overlap data or fit them in. To resize columns, choose the separator bar between the column headers and drag it to the left or right. To resize a column to fit the contents automatically, right-click the column header and choose Size Column to Fit. Optionally, resize all columns to fit by right-clicking and choosing Size All Columns to Fit.
While viewing all columns of interest is useful, it may be difficult to sort through the number of queries in the List pane. Clicking any column header sorts the List pane results in the order of the arrow: up for ascending or down for descending. Sorting is also accessible via the menu by right-clicking the column header area.
You can also sift through queries by grouping them by type. You can group queries by any column if the column has been selected for display. To group by a column, right-click in the column header area, choose Group By, and select the column. Figure 20.3 shows how the List pane looks when grouping by the Resource class. Grouping queries together lets you collapse and expand groups.

FIGURE 20.3 The List pane when grouping by the Resource class.
TIP: USING GROUPING
Grouping is not just for managing queries; you can use it to manage the set of results returned from a query, using any of the available columns referenced in the query.
Query objects also benefit from the organizational use of folders and search capabilities inherent in the ConfigMgr console. Well-organized queries in structured folders not only make searching faster, they provide fellow administrators with a structure to look for items even if they do not know exactly what they are looking for! Take time to plan your folders to suit the way your organization uses queries in ConfigMgr.
Viewing Queries and Query Results
To view a query, you must first run it. The easiest way to run a query is to double-click the query you are interested in. Alternatively, you can either select the query and click Run in the toolbar or right-click it and choose Run.
If running a query results in many returned objects, you can use the search bar to narrow the results. This makes finding information extremely fast, as it does not require sorting the results or scrolling up and down to find a particular object.
Once you have a result set from your query, you can perform the following actions, also shown in Figure 20.4, against any of the objects in the set (provided that the resource class is a system resource):
![]() Install Client: Launches the Install Client Wizard.
Install Client: Launches the Install Client Wizard.
![]() Client Settings -> Resultant Client Settings: Helps you easily see the resultant set of client settings for a specific device.
Client Settings -> Resultant Client Settings: Helps you easily see the resultant set of client settings for a specific device.
![]() Start -> Resource Explorer: Displays all hardware and software inventory information for the selected device.
Start -> Resource Explorer: Displays all hardware and software inventory information for the selected device.
![]() Start -> Remote Control: Initiates remote control process, enabling you to view and control users’ desktops.
Start -> Remote Control: Initiates remote control process, enabling you to view and control users’ desktops.
![]() Start -> Remote Assistance: Initiates remote assistance, the built-in remote feature for Windows.
Start -> Remote Assistance: Initiates remote assistance, the built-in remote feature for Windows.
![]() Start -> Remote Desktop Client: Initiates the standard remote desktop client, allowing you to remotely log in to a server.
Start -> Remote Desktop Client: Initiates the standard remote desktop client, allowing you to remotely log in to a server.
![]() Refresh: Refreshes the current query results.
Refresh: Refreshes the current query results.

FIGURE 20.4 Available actions for system resource objects.
Creating Queries
ConfigMgr comes with a handful of queries out of the box that illustrate a very small subset of the rich amount of data available. Consider them a starting point; take time to review these queries to understand the available query properties.
Using the query builder is a safe way to retrieve data from ConfigMgr. Since class joins are built automatically behind the scenes, there is less concern that an improper query will be resource intensive (although this is not entirely mitigated). The next sections provide insights into WQL, the available object types to query, use of the query builder, and available operators.
Building Queries Using the WMI Query Language
ConfigMgr query expressions are written in WQL. Using WQL lets you gather information from the site database by accessing information through the WMI provider. If you are familiar with Structured Query Language (SQL) queries, the format of WQL queries should look familiar, as WQL is a subset of SQL.
WQL is a Microsoft implementation of the CIM Query Language (CQL). CQL is a query language designed for the Common Information Model (CIM), which is a standard created by the Distributed Management Task Force (DMTF). (That is quite a few acronyms!)
Following is an example of a WQL query that lists devices with more than 1,024MB of RAM:
select * from  SMS_R_System inner join SMS_G_System_X86_PC_MEMORY on
SMS_G_System_X86_PC_MEMORY.ResourceID = SMS_R_System.ResourceId where
SMS_G_System_X86_PC_MEMORY.TotalPhysicalMemory >= 1048576
NOTE: MORE ABOUT WMI QUERY LANGUAGE
If you are familiar with SQL, you may notice that this query looks very similar to a SQL query. However, rather than querying tables, WQL queries classes and returns instances instead of rows. Another distinction is that WQL is strictly a retrieval language. WQL cannot create, delete, or modify classes or instances.
Understanding Query Objects, Classes, and Attributes
Before building your own queries, you should understand some of the terminology behind the technology. As discussed in the following sections, a query always consists of the following:
![]() An object type
An object type
![]() One or more attribute classes
One or more attribute classes
![]() One or more attributes
One or more attributes
Object Types
An object type is a set of attributes representing a ConfigMgr database object. Such objects include applications, deployments, devices, and so on. Table 20.1 lists commonly used object types and their descriptions.
TABLE 20.1 Commonly Used Object Types
Object Type |
Description |
IP Network |
A single attribute class containing data related to subnet addresses. |
Package |
A single attribute class that contains data in a ConfigMgr package, such as description, language, manufacturer, priority, programs, version, and so on. |
A single attribute class containing data relevant to programs, such as command line, description, space requirements, runtime, and so on. |
|
Security Roles |
A single attribute class containing information specifically for security roles, such as role name, created by, and users in the role. |
Security Scopes |
A single attribute class that contains data specifically related to security scopes, such as scope name, creator, and category ID. |
Site |
A single attribute class holding data related to site information, such as site code, server name, version, state, and so on. |
Software Metering Rule |
A single attribute class containing data specific to software metering rules, such as filename, file version, date modified, and so on. |
System Resource |
The only multi-attribute class object type containing data from ConfigMgr devices, such as hardware, software, and discovery. This is the object type most often used when writing ConfigMgr queries. |
Unknown Computer |
A single attribute class containing unknown computer data, such as CPU type, agent site, name, description, and so on. |
User Group Resource |
A single attribute class containing discovery data related to user groups, such as domain, organizational unit, SID, group name, and so on. |
User Resource |
A single attribute class that contains the discovery data related to users, such as name, SID, mail, user account control, and so on. |
Attribute Classes
An attribute class is a container object that groups related attributes together. Use the example in the “Building Queries Using the WMI Query Language” section to examine the Memory attribute class, which contains attributes such as AvailableVirtualMembory, TotalPageFileSpace, TotalVirtualMemory, TotalPhysicalMemory, and so on. As all these attributes are logically related to memory, they are grouped into the Memory attribute class.
Most attribute classes exist as part of the System Resource object type. Information in these attributes is provided by hardware inventory. If the available information is inadequate, you can extend the hardware inventory, which enables you to add even more attribute classes to the System Resource object type. Extending hardware inventory is discussed in online-only Appendix E, “Extending Hardware Inventory,” which you can download from the book’s companion website, at http://www.informit.com/title/9780672337901, on the Downloads tab.
Attributes
An attribute is a property in an attribute class that is used for displaying or filtering data. For example, the TotalPhysicalMemory attribute of the Memory attribute class contains the total amount of RAM available, expressed in kilobytes. Figure 20.5 illustrates the relationship of an object type to an attribute class and an attribute class to an attribute.

FIGURE 20.5 The relationship of an object type to an attribute class and an attribute class to an attribute.
The next query removes the WHERE clause and modifies the first line to display the Name and the TotalPhysicalMemory attribute as part of the result set:
select SMS_R_System.Name, SMS_G_System_X86_PC_MEMORY.TotalPhysicalMemory
from SMS_R_System inner join SMS_G_System_X86_PC_MEMORY on
SMS_G_System_X86_PC_MEMORY.ResourceID = SMS_R_System.ResourceId
This query returns all devices and their total physical memory. To return only a certain set of results, use attributes as a part of the criteria set to filter data based on an expression. The example in the “Building Queries Using the WMI Query Language” section uses the TotalPhysicalMemory attribute to specify that the query should bring back only information from devices with over 1024MB of RAM. The query is next modified to add criteria specifying the memory requirements:
select SMS_R_System.Name, SMS_G_System_X86_PC_MEMORY.TotalPhysicalMemory
from SMS_R_System inner join SMS_G_System_X86_PC_MEMORY on
SMS_G_System_X86_PC_MEMORY.ResourceID = SMS_R_System.ResourceId where
SMS_G_System_X86_PC_MEMORY.TotalPhysicalMemory >= 1048576
Using the ConfigMgr Query Builder
This section shows how to create the query used in the previous section. The ConfigMgr query builder has two modes of operation:
![]() Design View: The design view is where you are likely to spend most of your time as it simplifies the query building process.
Design View: The design view is where you are likely to spend most of your time as it simplifies the query building process.
![]() Language View: The language view provides enhanced query writing capability, discussed in the “Writing Advanced Queries” section, later in this chapter.
Language View: The language view provides enhanced query writing capability, discussed in the “Writing Advanced Queries” section, later in this chapter.
The easiest way to create a new query is with the Create Query Wizard. Perform the following steps to launch the wizard and create the query:
1. Click the Queries node and choose the Create Query action to launch the wizard.
2. On the first page, the General Query Settings page, fill in the name of the query. For this example, use the name Systems with Minimum 4GB RAM. Following are some other fields on this page:
![]() Comment: This field is optional, but as a best practice you should use it to help identify the query and indicate its purpose. Fill in the comment with Systems with Minimum 4GB (4194304KB) RAM.
Comment: This field is optional, but as a best practice you should use it to help identify the query and indicate its purpose. Fill in the comment with Systems with Minimum 4GB (4194304KB) RAM.
![]() Import Query Statement: Use this field to browse through existing queries and use one as a starting point for building a query. As this query is built from scratch, do not use this feature at this time.
Import Query Statement: Use this field to browse through existing queries and use one as a starting point for building a query. As this query is built from scratch, do not use this feature at this time.
![]() Collection Limiting: This feature limits results to objects that exist as members of a specified collection. You can specify the collection in the dialog as part of the query properties or have it prompt for a collection each time the query executes. Do not use collection limiting at this time.
Collection Limiting: This feature limits results to objects that exist as members of a specified collection. You can specify the collection in the dialog as part of the query properties or have it prompt for a collection each time the query executes. Do not use collection limiting at this time.
3. Create a new query statement by clicking Edit Query Statement. The Create Query Wizard now displays the Query Statement Properties dialog box.
To display device names and their associated total physical memory, add the attributes to the Results section. Click New to display the Result Properties dialog box. Click Select to bring up the Select Attribute dialog box and add the following paired values:
![]() Attribute Class: System Resource
Attribute Class: System Resource
Attribute: Name
![]() Attribute Class: Memory
Attribute Class: Memory
Attribute: Total Physical Memory (KB)
When completed, the General tab of the Query Statement Properties dialog box should look as shown in Figure 20.6.
4. Now that you have defined the attributes you want to see in your query results, the next step is to specify criteria to display systems that match the requirements. In the Query Statement Properties dialog box, choose the Criteria tab. Click New to display the Criterion Properties dialog box.
Leave the default criterion type (discussed later in this chapter, in the “Understanding Criterion Types, Operators, and Values” section) as Simple value. Click Select to display the Select Attribute dialog box and add the Memory class and the Total Physical Memory (KB) attribute.
Click OK to return to the Criterion Properties dialog box and set Operator to is greater than or equal to. Specify 4194304KB (4GB, expressed in kilobytes) as the value, as shown in Figure 20.7.
TIP: FILLING IN VALUES
If you are unsure of the types of values to use in the Value box, click the Value button. The Values dialog box returns a list of values that you can use.
Click OK to close the Criterion Properties dialog box. Notice that the Criteria tab is now filled with the criterion properties you just created, as shown in Figure 20.8. Click OK to close the Query Statement Properties dialog box and return to the General Query Settings page.

FIGURE 20.6 Attributes added to the General tab.


FIGURE 20.8 Memory expression in the Criteria tab.
5. Click Next to move to the Summary page, which displays the query properties for review, as shown in Figure 20.9. Click Next again to move through the Progress page and bring up the Completion page, which provides details. Click Close to complete the wizard.

TIP: USING TOOLS TO CREATE WMI QUERIES
There are times when creating WMI queries through the wizard or by hand can be quite cumbersome. Several no-cost tools are available to help ease the process. Following is a list of some popular ones:
![]() WMI Code Creator: https://www.microsoft.com/download/details.aspx?displaylang=en&id=8572
WMI Code Creator: https://www.microsoft.com/download/details.aspx?displaylang=en&id=8572
![]() WMI Code Generator: http://www.robvanderwoude.com/wmigen.php
WMI Code Generator: http://www.robvanderwoude.com/wmigen.php
![]() Scriptomatic: https://docs.microsoft.com/previous-versions/windows/it-pro/windows-powershell-1.0/ff730935(v=technet.10)
Scriptomatic: https://docs.microsoft.com/previous-versions/windows/it-pro/windows-powershell-1.0/ff730935(v=technet.10)
Understanding Criterion Types, Operators, and Values
In the “Using the ConfigMgr Query Builder” section, you learned a little about types, operators, and values that are essential components of building criteria to filter data. To illustrate this, the query discussed in that section follows:
select SMS_R_System.Name, SMS_G_System_X86_PC_MEMORY.TotalPhysicalMemory
from SMS_R_System inner join SMS_G_System_X86_PC_MEMORY on
SMS_G_System_X86_PC_MEMORY.ResourceID = SMS_R_System.ResourceId where
SMS_G_System_X86_PC_MEMORY.TotalPhysicalMemory >= 1048576
The criteria of the query follow after the word where. This is known as a WHERE clause, and it is made up of a property, an operator, and a value, closely matching the focus of this section. The query uses the following as the property, operator, and value:
![]() Property:
Property: SMS_G_System_X86_PC_MEMORY.TotalPhysicalMemory
![]() Operator:
Operator: >= (greater than or equal to)
![]() Value:
Value: 1048576
A WHERE clause limits the scope of data returned. The WHERE clause illustrated in this section returns devices with greater than 1024MB of physical RAM. The next sections examine these elements in more detail.
Filtering Queries with Criterion Types
Six different criterion types are used in ConfigMgr queries, all serving the purpose of narrowing the amount of data returned by a query. While all criterion types are used to limit data, each has a different function:
![]() Null Value: This criterion type compares an attribute to null. One such use of this criterion type would be to search for devices where the Active Directory (AD) Domain Name value is unknown.
Null Value: This criterion type compares an attribute to null. One such use of this criterion type would be to search for devices where the Active Directory (AD) Domain Name value is unknown.
To search for devices where the value is missing, the criteria can be set to is NULL. Inversely, the criteria can also search for where the value is present (or is not NULL).
![]() Simple Value: This criterion type compares an attribute to a constant value. This is the most basic and yet widely used type of criterion. This is the type used in the memory query example in the previous section.
Simple Value: This criterion type compares an attribute to a constant value. This is the most basic and yet widely used type of criterion. This is the type used in the memory query example in the previous section.
![]() Prompted Value: This criterion type prompts for the value to compare against at runtime. As an example, using the memory query, instead of specifying 1048576, the criterion type can be left as <prompted value>, providing the administrative user executing the query the ability to populate the value to something else. If 2048MB were more desirable, the administrative user would enter the value 2097152 at runtime.
Prompted Value: This criterion type prompts for the value to compare against at runtime. As an example, using the memory query, instead of specifying 1048576, the criterion type can be left as <prompted value>, providing the administrative user executing the query the ability to populate the value to something else. If 2048MB were more desirable, the administrative user would enter the value 2097152 at runtime.
NOTE: PROMPTED VALUES NOT SUPPORTED IN COLLECTIONS
Though the prompted value type exists in queries, you cannot use it in collections. Collections do not provide an interactive interface to prompt a user at runtime. All other criterion types are usable for query-based collections.
![]() Attribute Reference: To compare two values from the ConfigMgr database, use the attribute reference criterion type. One example of such a use is to locate systems where the current processor clock speed is less than the maximum processor clock speed.
Attribute Reference: To compare two values from the ConfigMgr database, use the attribute reference criterion type. One example of such a use is to locate systems where the current processor clock speed is less than the maximum processor clock speed.
![]() Subselect Value: When the queried attribute is multi-valued and the operator to use is a type of NOT (not like, not equal to, and so on), you must use a subselect value criterion type. Otherwise, a condition to match something such as all devices where Microsoft Visio 2016 is not installed would not work correctly, as every computer would have at least one entry in the Add/Remove Programs class that did not match the criteria. A query such as that would return every device, installed or not.
Subselect Value: When the queried attribute is multi-valued and the operator to use is a type of NOT (not like, not equal to, and so on), you must use a subselect value criterion type. Otherwise, a condition to match something such as all devices where Microsoft Visio 2016 is not installed would not work correctly, as every computer would have at least one entry in the Add/Remove Programs class that did not match the criteria. A query such as that would return every device, installed or not.
If you are unfamiliar with subselect queries, it can be a challenge to write one for the first time. Check the “Examples of Advanced Queries” section, later in this chapter, for a sample query.
CAUTION: BE CAREFUL WHEN RUNNING SUBSELECT QUERIES
Using subselect queries is not necessarily a bad thing. However, they are expensive to run. Because a subselect query is effectively running two queries—one to return all matching objects and another to return subselect objects—if there is a high count for the number of objects, it can take a while for the query to complete. Of course, this is subjective, based on the performance of your server hardware.
![]() List of Values: This criterion type compares the value to a list of constant values. A useful example is when searching for devices that match a certain chassis type. To find devices that match a desktop profile, you could use the values 3, 4, 6, and 7 as a starting point. Figure 20.10 shows the properties of the list of values criterion type when constructing such a query. Note that while you can add multiple values, you are restricted to using one operator type.
List of Values: This criterion type compares the value to a list of constant values. A useful example is when searching for devices that match a certain chassis type. To find devices that match a desktop profile, you could use the values 3, 4, 6, and 7 as a starting point. Figure 20.10 shows the properties of the list of values criterion type when constructing such a query. Note that while you can add multiple values, you are restricted to using one operator type.

FIGURE 20.10 Using a list of values to select certain chassis types.
TIP: INFORMATION ON CHASSIS TYPES
For more information on chassis types, research the Win32_SystemEnclosure class. You can find other useful information in this class, such as serial number, manufacturer, model, and so on. The MSDN article at http://msdn.microsoft.com/library/aa394474.aspx provides additional information.
Using Relational and Logical Operators
Some operators indicate how to assess a value, while others are used to join expressions together. A relational operator indicates how to compare a value against a certain type of data. A logical operator, on the other hand, indicates how to join multiple expressions together. These are discussed in the following sections.
Relational Operators
Depending on the criterion and data type, you will find that certain operators may not be available. Because operators in ConfigMgr are relational in nature, the available operators depend on the data type of the specified attribute. For example, whenever a date value is used, such as Workstation Status - Last Hardware Scan, additional operators become available that are specifically designed to query dates and parts of dates.
Following are the three types of relational operators:
![]() Date and Time Operators: This type of operator requires a value that matches the specified date/time operator. The operators match those found for the other criterion types (with the exception of NULL), prepended with one of the following: day, day of week, day of year, hour, millisecond, minute, month, quarter, second, week of year, or year.
Date and Time Operators: This type of operator requires a value that matches the specified date/time operator. The operators match those found for the other criterion types (with the exception of NULL), prepended with one of the following: day, day of week, day of year, hour, millisecond, minute, month, quarter, second, week of year, or year.
![]() Numerical Operators: This type of operator requires a numerical value; otherwise, the query fails. The numerical operator consists of the following: is equal to, is greater than, is greater than or equal to, is less than, is less than or equal to, and is not equal to.
Numerical Operators: This type of operator requires a numerical value; otherwise, the query fails. The numerical operator consists of the following: is equal to, is greater than, is greater than or equal to, is less than, is less than or equal to, and is not equal to.
![]() String Relational Operators: This type of operator requires a string to evaluate against the operator. Operators such as
String Relational Operators: This type of operator requires a string to evaluate against the operator. Operators such as LIKE are available with strings.
Table 20.2 lists available operators for each criterion type when using the string data type.
TABLE 20.2 Operators for Each Criterion Type for Strings
Criterion Type(s) |
Operators |
NULL value |
is NULL is not NULL |
Simple value, prompted value, attribute reference |
is equal to is greater than is greater than or equal to is less than |
|
is like is not equal to is not like lowercase is equal to lowercase is greater than lowercase is greater than or equal to lowercase is less than lowercase is less than or equal to lowercase is like lowercase is not equal to lowercase is not like uppercase is equal to uppercase is greater than uppercase is greater than or equal to uppercase is less than uppercase is less than or equal to uppercase is like uppercase is not equal to uppercase is not like |
Subselect value, list of values |
is in is not in lowercase is in lowercase is not in uppercase is in uppercase is not in |
Logical Operators
Sometimes a query with a single expression will have insufficient criteria to return the correct set of data. For example, say that the criterion is more than simply looking for devices with greater than 1024MB of RAM, and you are also interested in devices that have more than 800MB of free disk space. You can join the expressions together by using the logical AND operator to cause both expressions to evaluate.
ConfigMgr has three types of logical operators to manage multiple expressions:
![]() AND: Finds all objects that match both expressions joined by AND. This is illustrated with the RAM and free space example in the “Building Queries Using the WMI Query Language” section of this chapter.
AND: Finds all objects that match both expressions joined by AND. This is illustrated with the RAM and free space example in the “Building Queries Using the WMI Query Language” section of this chapter.
![]() OR: Finds all objects that match either expression joined by OR. An example of an OR expression is to search for ConfigMgr client versions that match 5.00.7561.0000 OR 4.00.6487.2157.
OR: Finds all objects that match either expression joined by OR. An example of an OR expression is to search for ConfigMgr client versions that match 5.00.7561.0000 OR 4.00.6487.2157.
![]() NOT: Finds all objects that do not match the expression the NOT operator is applied to. For example, using NOT on an expression looking for ConfigMgr client version 5.00.7561.0000 would return any object with a different version of the client installed.
NOT: Finds all objects that do not match the expression the NOT operator is applied to. For example, using NOT on an expression looking for ConfigMgr client version 5.00.7561.0000 would return any object with a different version of the client installed.
Operator Precedence Order
When you were in math class, your teacher may have talked about something called order of operations. This is a rule that defines which procedures go first. ConfigMgr query evaluations also follow this process. When writing queries that use logical operators, it is important for you to understand the order of operations that is followed to accurately predict the outcome of the query. (And you thought you would never need to know what you learned in school!)
Here is the order in which expressions are evaluated:
1. Any expressions inside parentheses
2. Any expressions using NOT
3. Any expressions using AND
4. Any expressions using OR
To change the order of operations, use parentheses to force a certain expression to evaluate first. For example, if you have multiple AND statements, placing one of the AND statements inside parentheses will cause it to evaluate first. Parentheses are also useful for breaking up complex expressions so that they are easier to understand.
Specifying or Selecting Values
You can specify a value by entering it into the Value field. Clicking Values queries ConfigMgr for data from the specified attribute. The console will display a list of possible values, which is helpful for viewing a sampling of the content of data. If a value that is useful for the query appears, you can select it to automatically insert it into the Value field. If the values returned are larger than 2,000 entries, the list of values is truncated. Keep in mind that there is no specifiable sort order for the list of values.
The Value field also accepts wildcards to help shape the query correctly. Wildcards work with operators that use the LIKE clause. Any other operators assume that the wildcard is a literal character. Table 20.3 details available wildcards and their functions.
TABLE 20.3 Available Wildcards and Their Functions
Wildcard |
Function |
Example(s) |
_ (underscore) |
Matches any single character (can be used more than once) |
_eek matches geek, meek, peek, seek, week __eek matches Greek, cheek, sleek _ea_ matches beak, leaf, seal se__ matches seal, seek |
% (percent) |
Matches any zero or more characters |
%eek matches Greek, geek, peek, sleek, eek g%eek matches geek, Greek |
[x] (bracketed character) |
Matches any specified literal character once |
[%]eek matches %eek [?]eek matches ?eek [_]eek matches _eek [gps]eek matches geek, peek, seek [gm]eek matches geek, meek [w]eek matches week |
[x-x] (bracketed range) |
Matches a range of specified characters once |
[g-s]eek matches geek, meek, peek, seek |
[^x] (bracketed range with a caret) |
Matches any single character not in the bracket once |
[^m]eek matches geek, peek, seek, week |
You can mix and match wildcards together to create more definitive filters in order to match widely and narrowly at the same time. For example, say that you want to find the names Apollo, Ares, Artemis, Athena, Erebos, and Hermes. The following are wildcards you can use to find them:
![]() Apollo and Athena: A%[ao]
Apollo and Athena: A%[ao]
![]() Erebos and Hermes: [EH]%s
Erebos and Hermes: [EH]%s
![]() Ares, Artemis, and Erebos: _r%s
Ares, Artemis, and Erebos: _r%s
Writing Advanced Queries
Until this point, the only type of query illustrated in this chapter has been a simple value query to look for computers with more than 1024MB of RAM. However, the complexity in writing queries for ConfigMgr can grow to be quite challenging. Not only does ConfigMgr support a number of different criterion types, it supports some hidden functions that are not readily exposed in the console.
Using the query builder is a much simpler process than writing WQL queries by hand. However, the query builder is limited in the options it displays in Design view. ConfigMgr supports the use of Extended WQL for query writing, which supports SELECT clauses such as COUNT, DISTINCT, ORDER BY, DATEPART, and so on. Some of these options, such as DISTINCT and ORDER BY, are exposed, as shown in Figure 20.11. Other equally useful syntax must be manually entered—specifically the date and time functions.
Writing queries with certain criterion types, such as a subselect value query, is considered advanced because the process of writing such queries is not particularly straightforward. This type of query is extremely helpful when querying multi-valued attributes such as Add/Remove Programs.
The next section considers several of the restrictions of the Extended WQL implementation as used in ConfigMgr to help understand what is available when writing advanced queries.
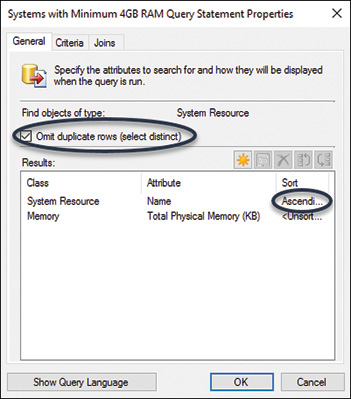
FIGURE 20.11 SELECT DISTINCT and ORDER BY exposed in the query builder.
Limitations of Extended WQL in ConfigMgr
Extended WQL has certain limitations in Configuration Manager (either inherently or because of the SMS provider) to be aware of when writing queries. The following list explains these limitations:
![]() The results of
The results of COUNT do not display properly and are therefore not useful for querying through the ConfigMgr console.
![]()
COUNT and DISTINCT cannot be used together in a WQL query.
![]() While supported,
While supported, UPPER and LOWER are not helpful because WQL is entirely case-insensitive.
![]() The SMS provider does not support querying against system properties. These properties are easily identifiable as they all begin with a double underscore—for example,
The SMS provider does not support querying against system properties. These properties are easily identifiable as they all begin with a double underscore—for example, __CLASS, __NAMESPACE, __PATH, and so on.
![]() If the query is using the collection limiting option, the
If the query is using the collection limiting option, the ORDER BY clause will not work.
![]() You cannot use date and time functions in the query following the
You cannot use date and time functions in the query following the SELECT clause. However, they can be used as a part of the WHERE clause, as shown in the next section.
Utilizing the Date and Time Functions in WQL Queries
In many situations, applying a date filter to a query is quite useful. For example, when creating queries, it is often helpful to know that the information retrieved is the most current information available. An example is pulling changes to hardware inventory that occurred sometime in the past week. ConfigMgr queries support the use of the following functions:
![]() Dateadd(): Returns a specified date value with a specified interval added to it. The following is an example:
Dateadd(): Returns a specified date value with a specified interval added to it. The following is an example:
DateAdd ( datepart, number, date )
![]() Datepart: This parameter specifies the portion of the date to add the number to.
Datepart: This parameter specifies the portion of the date to add the number to.
![]() Number: This integer value is added to the specified datepart.
Number: This integer value is added to the specified datepart.
![]() Date: This is the initial date value to which to add the integer. For example, the following query looks for 30 days ago from July 20, 2017
Date: This is the initial date value to which to add the integer. For example, the following query looks for 30 days ago from July 20, 2017
DateAdd(DD,-30,"7/20/2017")
![]() Datediff(): Returns the difference between two date values in the increment of the datepart specified. The following is an example:
Datediff(): Returns the difference between two date values in the increment of the datepart specified. The following is an example:
DateDiff ( datepart, startdate, enddate )
![]() Datepart: This parameter specifies the portion of the date to calculate the difference against.
Datepart: This parameter specifies the portion of the date to calculate the difference against.
![]() Startdate: This is the starting date to use in the calculation. Startdate is subtracted from enddate.
Startdate: This is the starting date to use in the calculation. Startdate is subtracted from enddate.
![]() Enddate: This is the ending date to use in the calculation. The following example looks for the difference between July 20, 2017, and today, in days:
Enddate: This is the ending date to use in the calculation. The following example looks for the difference between July 20, 2017, and today, in days:
DateDiff(DD,"7/20/2017",Getdate())
![]() Getdate(): Returns the current date value of the system executing the command. Following is an example that looks for 30 days ago from today:
Getdate(): Returns the current date value of the system executing the command. Following is an example that looks for 30 days ago from today:
DateAdd(DD,-30,GetDate())
Table 20.4 illustrates the components of Datepart and their relative abbreviations.
TABLE 20.4 Components of DatePart
Datepart |
Abbreviations |
Year |
year, yy |
Month |
month, mm |
Day |
day, dd |
Hour |
hour, hh |
Minute |
minute, mi |
Second |
second, ss |
TIP: SAMPLE DATE AND TIME QUERY
For an example of a query that uses the date and time functions, refer to the query in the “Querying for Devices with a Hardware Scan in the Past 15 Days” section, later in this chapter.
The next section explores some different advanced queries. Understanding them can assist in broadening your query writing ability.
Examples of Advanced Queries
It is true that WMI queries are limited in functionality compared to SQL queries. However, combining all the query elements discussed in this chapter enables you to produce queries of certain complexity. These queries often cannot be displayed in the ConfigMgr console because the graphical user interface (GUI) simply lacks the capability to show all the components.
The next sections provide examples of advanced queries, which you should find useful as a basis for constructing your own queries. You can use them as-is to tease out data for quick reporting, or you can apply a complex filter to isolate clients for targeting.
Querying for Devices with a Hardware Scan in the Past 15 Days
The following query retrieves any device that has reported a hardware scan within the past 15 days:
select SMS_R_System.Name, SMS_G_System_WORKSTATION_STATUS.LastHardwareScan
from  SMS_R_System
inner join SMS_G_System_WORKSTATION_STATUS on
SMS_G_System_WORKSTATION_STATUS.ResourceId = SMS_R_System.ResourceId
where DateDiff(dd,SMS_G_System_WORKSTATION_STATUS.LastHardwareScan,GetDate()) <= 15
Look closely at the WHERE clause. The DateDiff function is used to calculate the difference between the last hardware scan date and the current date. If the calculated difference is less than or equal to 15 days, the device is included in the results.
This example uses DateDiff, but you can accomplish the same result with DateAdd. DateAdd can manipulate the current date (GetDate) into a date 15 days ago. By comparing the hardware scan date against the DateAdd manipulated date, you can bring back only devices that match the criterion, as illustrated here:
select SMS_R_System.Name, SMS_G_System_WORKSTATION_STATUS.LastHardwareScan
from SMS_R_System inner join SMS_G_System_WORKSTATION_STATUS on
SMS_G_System_WORKSTATION_STATUS.ResourceId = SMS_R_System.ResourceId
where SMS_G_System_WORKSTATION_STATUS.LastHardwareScan > DateAdd(DD,- 15,GetDate())
Querying for Devices Newly Discovered in the Past Day
To locate recently discovered devices, query against the record creation date. Calculating the creation date against the current date will produce devices that are recently discovered. In this case, the value supplied, 1 (following the DateDiff function), looks for creation dates as recently as a day ago:
select SMS_R_System.Name, SMS_R_System.CreationDate from  SMS_R_System where
DateDiff(dd,SMS_R_System.CreationDate,GetDate()) <= 1
Querying for Devices Without Microsoft Silverlight Installed
With this query, using the subselect criterion type, you can draw out devices that do not have Microsoft Outlook installed:
select SMS_R_System.ResourceId, SMS_R_System.ResourceType, SMS_R_System.Name,
SMS_R_System.SMSUniqueIdentifier, SMS_R_System.ResourceDomainORWorkgroup,
SMS_R_System.Client from  SMS_R_System where SMS_R_System.ResourceId not in
(select distinct SMS_R_System.ResourceId from  SMS_R_System inner join
SMS_G_System_ADD_REMOVE_PROGRAMS on SMS_G_System_ADD_REMOVE_PROGRAMS.ResourceID =
SMS_R_System.ResourceId where SMS_G_System_ADD_REMOVE_PROGRAMS.DisplayName =
"Microsoft Outlook") and SMS_R_System.Client = 1
When writing a subselect query, a query is embedded inside another query.
The query in the WHERE clause creates a list of computers that match the criterion of having Microsoft Silverlight installed (see Figure 20.12). The outer query uses an IS NOT IN operator to list any computers that are not in the initial query. Finally, this query uses another criterion to qualify that the query should be limited to information where the resource is a ConfigMgr client.

Querying for Computers and Logical Disks with a Prompted Value
This query displays the logical disk(s) of a specified computer:
select SMS_R_System.Name, SMS_G_System_LOGICAL_DISK.DeviceID,
SMS_G_System_LOGICAL_DISK.FileSystem, SMS_G_System_LOGICAL_DISK.Description,
SMS_G_System_LOGICAL_DISK.Size from  SMS_R_System inner join
SMS_G_System_LOGICAL_DISK on SMS_G_System_LOGICAL_DISK.ResourceID =
SMS_R_System.ResourceId where SMS_G_System_LOGICAL_DISK.Description =
"Local Fixed Disk" and SMS_R_System.Name like ##PRM:SMS_R_System.Name##
Because it uses a prompted value, the query prompts the user to provide a computer name at execution. Because the LIKE operator is in use for the prompted value, you can use a wildcard to mask part of the computer name and potentially return more than one computer.
Querying for Devices Not in a Specified Collection
This query is designed to show devices that are not in a collection that you specify:
select sms_r_system.resourceid, sms_r_system.name
from sms_r_system
where resourceid not in
    (
    select sys.resourceid
    from SMS_CM_RES_COLL_PR10000A AS coll, sms_r_system as sys
    where sys.resourceid = coll.resourceid
    )
The collection is referred to by the collection ID. In this example, the collection ID is PR10000A. When using this query, simply change the collection ID to one in your environment.
Much like the earlier example with Microsoft Outlook (see the section “Querying for Devices Without Microsoft Outlook Installed”), this is a subselect query. However, this query statement uses a class that, while it is not exposed in the query builder’s design mode, can be pasted or typed into the query language window.
For additional information about this query, see http://marcusoh.blogspot.com/2007/08/sms-selecting-objects-not-in-collection.html.
Converting WQL to SQL
By now, you are probably writing queries you find useful enough that you want to move them into a SQL Server Reporting Services (SSRS) report to leverage all the formatting, sharing, and scheduling capabilities! Chapter 21, “Configuration Manager Reporting,” discusses SSRS in depth.
Let’s examine the query used earlier in this chapter, in the section “Querying for Devices with a Hardware Scan in the Past 15 Days.” To quickly convert this query to SQL, look at the ConfigMgr logs. Open smsprov.log and execute the query you want to convert. Look for a line that begins with Execute WQL. This entry displays the actual WQL query issued:
Execute WQL  =
select SMS_R_System.Name, SMS_G_System_WORKSTATION_STATUS.LastHardwareScan
from  SMS_R_System inner join SMS_G_System_WORKSTATION_STATUS on
SMS_G_System_WORKSTATION_STATUS.ResourceId = SMS_R_System.ResourceId
where DateDiff(dd,SMS_G_System_WORKSTATION_STATUS.LastHardwareScan,GetDate())

<= 15
The query in the log matches the referenced query! The next line in the log that begins with Execute SQL contains the SQL query:
Execute SQL =
select  all SMS_R_System.Name0,___System_WORKSTATION_STATUS0.LastHWScan
from vSMS_R_System AS SMS_R_System INNER JOIN WorkstationStatus_DATA AS
___System_WORKSTATION_STATUS0 ON ___
System_WORKSTATION_STATUS0.MachineID = SMS_R_System.ItemKey
where DATEDIFF (day,___System_WORKSTATION_STATUS0.LastHWScan,GETDATE ()) <= 15
CAUTION: MICROSOFT DOES NOT SUPPORT QUERYING CONFIGMGR TABLES
Though extracting the SQL query from smsprov.log is a very useful trick, using ConfigMgr tables in a SQL query is not considered a best practice. Microsoft may alter the database schema between versions to add functionality or improve performance. For this reason, Microsoft does not publish a database schema, as it would imply that the schema is static. Wherever possible, use the provided ConfigMgr database views.
Understanding Relationships, Operations, and Joins
Until now, there has been no discussion of relationships. It has not been a necessary conversation, as the ConfigMgr query builder manages this dynamically as you create a query. Earlier in this chapter, in the section “Using the ConfigMgr Query Builder,” you used the General and Criteria tabs to build a query for finding devices with greater than 1024MB of RAM. Figure 20.13 shows that the query builder also has a Joins tab. The lower pane in Figure 20.13 shows the content of the Joins tab.

FIGURE 20.13 The Joins tab.
In most scenarios, Resource ID is used as the attribute for joining classes together. Notice that in Figure 20.13, both the join and base attributes are set to Resource ID. This is because Resource ID, a unique value that represents a ConfigMgr client resource, is in nearly every class.
The diagram in Figure 20.14 helps illustrate how two classes such as System Resource and Workstation Memory are joined together. Figure 20.15 is a graphic display of the join for System Resource and Memory (on Resource ID), providing combined results from both tables.
As discussed earlier in this chapter, in the “Writing Advanced Queries” section, ConfigMgr uses Extended WQL. Through Extended WQL support, ConfigMgr can provide two kinds of join operations: inner and outer. An inner join is limited to a single type of the same name—inner. Inner join types are the most common type of join used in WQL. (This is also the case with SQL.)


FIGURE 20.15 Diagram of joins.
Outer joins, on the other hand, include full, left outer, and right outer. Queries are often optimized based on the join type selected. Depending on the join, this may mean the difference between pulling some select records and pulling every record in the joined classes. Here is how data is brought together based on the join used:
![]() Inner: All joins created in the ConfigMgr Query Builder automatically use the inner join when the join type is not specified. The inner join will only provide matching results.
Inner: All joins created in the ConfigMgr Query Builder automatically use the inner join when the join type is not specified. The inner join will only provide matching results.
![]() Full: In contrast to the inner join, the full join type displays all the results for the base and the join attribute.
Full: In contrast to the inner join, the full join type displays all the results for the base and the join attribute.
![]() Left: When using a left join type, all the results from the base attribute are displayed. In addition, the matching results from the join attribute are displayed.
Left: When using a left join type, all the results from the base attribute are displayed. In addition, the matching results from the join attribute are displayed.
![]() Right: The right outer join type is exactly the opposite of the left outer join type. The matching results from the base attribute are displayed, along with all the results from the join attribute.
Right: The right outer join type is exactly the opposite of the left outer join type. The matching results from the base attribute are displayed, along with all the results from the join attribute.
When might you deviate from the default? Say that you want to retrieve a list of all your devices as well as the name and version number of internally developed software. The developer who wrote that software did not always populate the version number correctly. Such a query with the default inner join type would bring back only records where the device name, the software name, and the software version exist. Because you need to see the devices where the software is installed but the version value is potentially empty, you switch the join type to a left join to include all records.
To demonstrate, consider this simple query that retrieves system enclosure information:
select SMS_R_System.Name, SMS_G_System_SYSTEM_ENCLOSURE.ChassisTypes
from  SMS_R_System inner join SMS_G_System_SYSTEM_ENCLOSURE on
SMS_G_System_SYSTEM_ENCLOSURE.ResourceID = SMS_R_System.ResourceId
If you use the default join, only devices with a chassis type will be displayed. By switching the join type to left, all devices are displayed, with a blank value for chassis type. The next query, where the inner join has been replaced with a left join, shows the join type modified to left:
select SMS_R_System.Name, SMS_G_System_SYSTEM_ENCLOSURE.ChassisTypes
from SMS_R_System left join SMS_G_System_SYSTEM_ENCLOSURE on
SMS_G_System_SYSTEM_ENCLOSURE.ResourceID = SMS_R_System.ResourceId
Querying Discovery Data
Three different types of discovery data are available for use in a query: system resource, user resource, and user group resource. As some discovery data is captured through ConfigMgr discovery methods, this information is available even before the device has a ConfigMgr client installed.
Each of these classes provides information discovered through the ConfigMgr discovery methods:
![]()
System Resource: Use this class to draw out ConfigMgr information about the device, such as the assigned, installed, or resident site; the client version; and so on. Other information, such as the system name, IP address, subnets, and security identifier (SID), is also available. Finally, you can also query AD information about the device, such as the system organizational unit (OU) name, the system container name, and the system group name, and so on.
![]()
User Resource: Use this class to obtain information about user accounts from attributes such as the full username, mail, unique user name, user account control (disabled, enabled, and so on), and such. In addition, AD information about the user account, such as the distinguished name, user OU name, and user container name, is available.
![]()
User Group Resource: This class contains attributes related to AD user group properties, such as the domain, organizational unit, unique user group name, group name, and so on.
With information available regarding AD accounts, you can use discovery data to build collections to support your ConfigMgr deployment. Collections can be created to group AD computer accounts together to install the ConfigMgr agent.
Querying Inventory Data
The System Resource class, discussed earlier in this chapter, in the “Understanding Query Objects, Classes, and Attributes” section, contains discovered attributes about an object. However, this class contains more than just discovered data.
All queries requiring data from hardware or software inventory need to utilize the System Resource class. In fact, most of the queries covered in this chapter use the System Resource class, which shows how prevalent this class is! Table 20.5 illustrates some popular hardware and software inventory classes.
TABLE 20.5 Useful Hardware and Software Inventory Classes
Class |
Description |
|
Based on |
|
Based on |
Based on |
|
|
Refer to |
|
Refer to |
|
Based on |
|
Based on |
|
Refer to |
|
Refer to |
|
Refer to |
|
Based on |
|
Based on |
|
Based on |
|
Contains file information collected from |
|
Contains information from file headers from |
|
Based on |
|
Based on |
|
Refer to this class to query the last hardware inventory scan date. |
This is just a small list of the rich amount of inventory data that ConfigMgr provides. Over time, as your environment changes, inventoried classes also change. ConfigMgr is flexible enough to evolve with these changes. Refer to Chapter 9, “Client Management,” for information on modifying hardware inventory classes.
If you find that a device does not contain the expected inventory class, the device may not be healthy. In such circumstances, the device may be incapable of running the inventory scan or sending the inventory to the site server, and the expected information may never reach the site server.
Using Query Results
Queries are excellent resources for administrators. They provide a means to view data in an ad hoc manner from ConfigMgr. Such sources of data include discovery, inventory, advertisement, and site status information. Queries can also be the basis of collections that dynamically update. You could also export queries to text files for use in other ways. The next sections discuss these topics.
Exporting Query Results to a Text File
Earlier versions of ConfigMgr included the ability to export query results to a text file. This option was available as a part of the MMC (Microsoft Management Console) functionality, but Microsoft did not port it to Configuration Manager 2012 and newer versions. However, copy and paste can be used as a viable replacement for this functionality. Even though there is no option in the ribbon bar or the right-click context menu, highlighting results and using Ctrl+C will store the results in memory. You can then paste these results into any text editor.
Importing and Exporting Queries between Sites
Unlike some previous versions, ConfigMgr Current Branch no longer requires movement of queries between sites to share them, as the queries are globally available in a hierarchy. However, this function remains available, as it is still useful to export queries to share them with other hierarchies or in community groups with other administrators.
To export a query object, perform the following steps:
1. Select the Queries node and click Export Queries in the ribbon bar.
2. In the Export Objects Wizard, click Next.
3. Select the queries you wish to export, as displayed in Figure 20.16, and click Next.
4. Enter a valid path and filename for the export and ensure that it ends with a .mof extension. Click Next.
5. Confirm the settings and click Next. Click Close to exit the wizard.

When these steps are complete, you can copy or move the file to a suitable location for importing into a different hierarchy. Before looking at the import steps, let’s examine the file content of a sample export, which is based on the query built earlier in this chapter, in the “Querying for Devices with a Hardware Scan in the Past 15 Days” section. The content of the file follows:
// *********************************************************************************
//
//    Created by SMS Export object wizard
//
//    Tuesday, August 09, 2016 created
//
//    File Name: C:QueriesHardwareScan.MOF
//
// Comments :
//
//
// *********************************************************************************
// ***** Class : SMS_Query *****
[SecurityVerbs(-1)]
instance of SMS_Query
{
    Comments = "";
    Expression = "select SMS_R_System.Name,
SMS_G_System_WORKSTATION_STATUS.LastHardwareScan from  SMS_R_System inner join
SMS_G_System_WORKSTATION_STATUS on SMS_G_System_WORKSTATION_STATUS.ResourceId =
SMS_R_System.ResourceId where
DateDiff(dd,SMS_G_System_WORKSTATION_STATUS.LastHardwareScan,GetDate()) <= 15";
    LimitToCollectionID = "";
    LocalizedCategoryInstanceNames = {};
    Name = "Recent Hardware Scan (15 days)";
    QueryID = "";
    ResultAliasNames = {"SMS_R_System", "SMS_G_System_WORKSTATION_STATUS"};
    ResultColumnsNames = {"SMS_R_System.Name",
 "SMS_G_System_WORKSTATION_STATUS.LastHardwareScan"};
    TargetClassName = "SMS_R_System";
};
// ***** End *****
The query remains intact in the expression line.
Importing queries is just as easy as exporting queries. For example, perform the following steps to import a query object:
1. Right-click the Queries node and choose Import Objects. The Import Objects Wizard launches.
2. In the wizard, click Next.
3. Supply the path and name of the file to import. Click Next.
4. Review the name (or names) of the object(s) to import. Click Next and review the comments. Click Next when complete.
5. Confirm the settings on the summary screen and click Next. Click Close to exit the wizard.
CAUTION: DUPLICATE NAMED QUERIES ARE OVERWRITTEN
Review your existing objects carefully to ensure that the query to import does not use an existing name. Any existing objects with duplicate names are overwritten.
Creating a Collection Based on Query Results
Before creating a collection that uses a query rule, examine the results in a query. This provides an opportunity to view attributes, as a collection only shows a default set of attributes. The authors recommend creating a query first, verifying that the results are as you expect, and then using the query as the basis of your collection.
When you import a query into a collection, the additional attributes specified in your query are ignored and replaced with a default set. This also occurs if you paste the WQL from a query to the collection rule directly. Looking at the previous memory query, first examined earlier in this chapter, in the “Building Queries Using the WMI Query Language” section, note the attributes requested in the Select statement below:
select SMS_R_System.Name, SMS_G_System_X86_PC_MEMORY.TotalPhysicalMemory
from SMS_R_System inner join SMS_G_System_X86_PC_MEMORY on
SMS_G_System_X86_PC_MEMORY.ResourceID = SMS_R_System.ResourceId
The following shows how the query is modified after it is imported or pasted into a collection:
select SMS_R_SYSTEM.ResourceID, SMS_R_SYSTEM.ResourceType, SMS_R_SYSTEM.Name,
SMS_R_SYSTEM.SMSUniqueIdentifier, SMS_R_SYSTEM.ResourceDomainORWorkgroup,
SMS_R_SYSTEM.Client from SMS_R_System inner join SMS_G_System_X86_PC_MEMORY on
SMS_G_System_X86_PC_MEMORY.ResourceID = SMS_R_System.ResourceId
Notice that while SMS_R_SYSTEM.Name still exists, the attribute for memory, SMS_G_System_X86_PC_MEMORY.TotalPhysicalMemory has been replaced with other values.
Using Status Message Queries for In-Depth Analysis
Status message queries provide deeper insight into component-level activity and audit messages. Details such as user activity (changes to the hierarchy, sites, or client settings), deployed program messages, collection modifications, deployment, remote control, and even query activity are tracked and reported in status messages. You can find status message queries under Monitoring -> System Status.
ConfigMgr comes stocked with more than 60 different status messages. If one of the standard status messages does not contain the information you are seeking, you can create a custom status message. There currently is no documentation that provides a translation between the status message IDs and their meanings. It is best to build your queries from the existing queries as much as possible, since the criteria may list the necessary message ID values. For example, Figure 20.17 shows the query criteria for the query titled Deployments Created, Modified, or Deleted.

Viewing Status Messages
Executing status message queries is a straightforward process; the only caveat is that they often prompt for information with a dialog you may not be familiar with. Most times, status message queries filter by a date range so that the amount of information returned is not overwhelming and does not take a long time to execute.
For example, examine the following default status message query, titled Remote Control Activity Initiated by a Specific User:
select stat.*, ins.*, att1.*, att1.AttributeTime from SMS_StatusMessage as stat left
join SMS_StatMsgInsStrings as ins on stat.RecordID = ins.RecordID left join
SMS_StatMsgAttributes as att1 on stat.RecordID = att1.RecordID inner join
SMS_StatMsgAttributes as att2 on stat.RecordID = att2.RecordID where
stat.MessageType = 768 and stat.MessageID >= 30069 and stat.MessageID <= 30087 and
att2.AttributeID = 403 and att2.AttributeValue = "ODYSSEY\MOh" and
att2.AttributeTime >= '2018/01/08 01:47:23.000' order by att1.AttributeTime desc
This query requests two pieces of information: property value and time. When using a query to look for a property value, the value can be manually entered or selected from a dropdown list. If you are not familiar with the data or the format, it is often easier to use the dropdown. Once the dialog is loaded, the dropdown list is filled with values.
NOTE: MANUALLY ENTER THE VALUE IF KNOWN
The disadvantage to using dropdown lists is time. As the option suggests, the option Load Existing will query the ConfigMgr database to retrieve a list of values.
You can enter time values by using the Specify date and time option, which provides a calendar view as well as a time frame. If the specific date and time are unknown, use the Select date and time option, which provides some generic values to use as a date, such as 1 hour ago, 12 hours ago, 2 weeks ago, 1 year ago, and so on. View the query information after executing the query to confirm what was entered if you use the values as expressed in Figure 20.18, including a date and time value of 1 hour ago.

FIGURE 20.18 Using date and time in a status message query.
Creating Status Message Queries
In the list of status message queries, there is a query titled Clients That Received a Specific Deployed Program and another titled Clients That Rejected a Specific Deployed Program. To view both statuses in the same list, you must create a custom status message query (or sift through hundreds of records in the All Status Message query). To create a new status message query, perform the following steps:
1. Launch the Create Status Message Query Wizard. Give the query a name such as Clients That Received and Rejected a Specific Deployed Program.
2. To make it easier to create the new query, click Import Query Statement and select the query titled Clients That Received a Specific Deployed Program. Click OK.
3. Click Edit Query Statement. Note that the contents of the selected query are imported.
4. Switch to the Criteria tab and highlight the line labeled [Status message as stat].Message ID is equal to 10002. Double-click the line or select the properties icon to bring up the Criterion Properties dialog.
5. As shown in Figure 20.19, change Criterion Type to List of values and Operator to is in and add the following to the Value to match section: 10002, 10018, and 10019.
6. Click OK to commit the changes and close all the dialog windows.
7. After returning to the Create Status Message Query Wizard, click Next to view the summary. Click Next again to create the query. Finally, click Close to end the wizard.
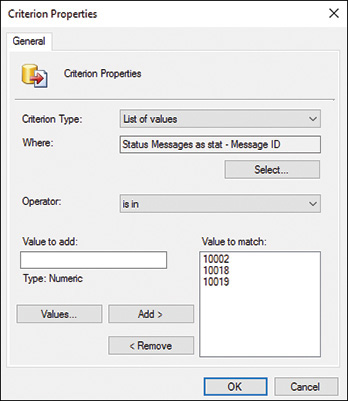
FIGURE 20.19 List of values criteria to display selected status message IDs.
TIP: LEARNING ABOUT CRITERION PROPERTIES
For a refresher on criterion properties, review the “Using the ConfigMgr Query Builder” section, earlier in this chapter.
Most status message queries are named descriptively enough to identify their purpose. However, it is helpful to point out some of the more useful queries. Table 20.6 lists some useful queries and helps you understand the various sources of data from which these queries can draw information.
TABLE 20.6 Useful Status Message Queries
Status Message Query |
Description |
All Audit Status Messages for a Specific User |
Shows the activity of a specific user. |
Client Configuration Requests (CCRs) Processed Unsuccessfully |
Allows for tracking of failures related to processing client configuration requests (CCR). |
Displays audit messages related to collection modification, displaying collections that have been modified or deleted and by whom. |
|
Deployments Created, Modified, or Deleted |
Displays audit messages related to creation, modification, and deletion of deployments. |
Remote Control Activity Initiated by a Specific User |
Shows the activity of any remote control sessions started by a specified user. |
Server Component Configuration Changes |
Tracks changes made to any of the myriad ConfigMgr server components. |
Server Components Experiencing Fatal Errors |
Shows fatal errors displayed by any Configuration Manager server component. |
Summary
Queries are an excellent means of gathering data, testing results for collections, and understanding the requirements of creating reports. This chapter discussed using the ConfigMgr query builder to construct queries. It showed how to use advanced functions to create complex queries when the query builder does not suffice. This chapter covered the fundamentals of classes and operators to equip you to build your own queries. In addition, the chapter showed how to convert WQL to SQL, as well as examples of advanced queries, and it discussed creating status message queries.